Much of boat building and repair involves problem solving, and when dealing with small one-of-a-kind boats, solutions must be creative. For several years, I have been using epoxy and scrap fiberglass to make panels for backing plates. The advantages are numerous: they are inexpensive, robust, can be made of any size and thickness, and do not corrode. Any cloth, mat, roving, or a mat/roving combination like 1708 (17 ounces per yard of strands stitched at a 45° angle, and 8 ounces of chopped-strand mat backing) will work; the choice depends on the project and availability of material. Carbon-fiber and carbon-Kevlar cloths can also be used and make for attractive finished products.
Follow the steps below to make a small flat epoxy/fiberglass plate, as a practice piece. This will allow you to find the curing rate for the epoxy mix you are using. Epoxy cure rates are dependent on the resin/hardener combination, as well as the ambient temperature. The epoxy curing also generates its own heat: epoxy spread out in a sheet will stay cooler and cure more slowly than epoxy in a cup, which can get very hot and cure quickly. This is referred to as working time vs pot life. The epoxy I used has a pot life of 20 minutes, a working time of 100 minutes, and a cure-to-solid of 10–12 hours (leather hardness would be around 4 hours). It’s good practice to stick to one manufacturer for both resin and hardener, and to refer to their data sheet for relevant information.
Making a flat fiberglass-and-epoxy plate
Step 1
Determine the size and shape of the plate you are creating and find a flat work surface large enough to accommodate it and the materials and tools you’ll need. If the plate needs to fit a gentle curve of the hull or deck, lay it up flat. Then, while the panel is leather hard and still flexible, you can press it into the curve until it has fully cured.
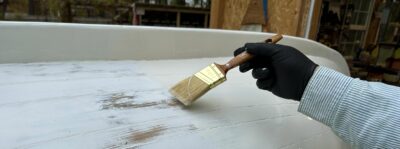
 Photographs by the author
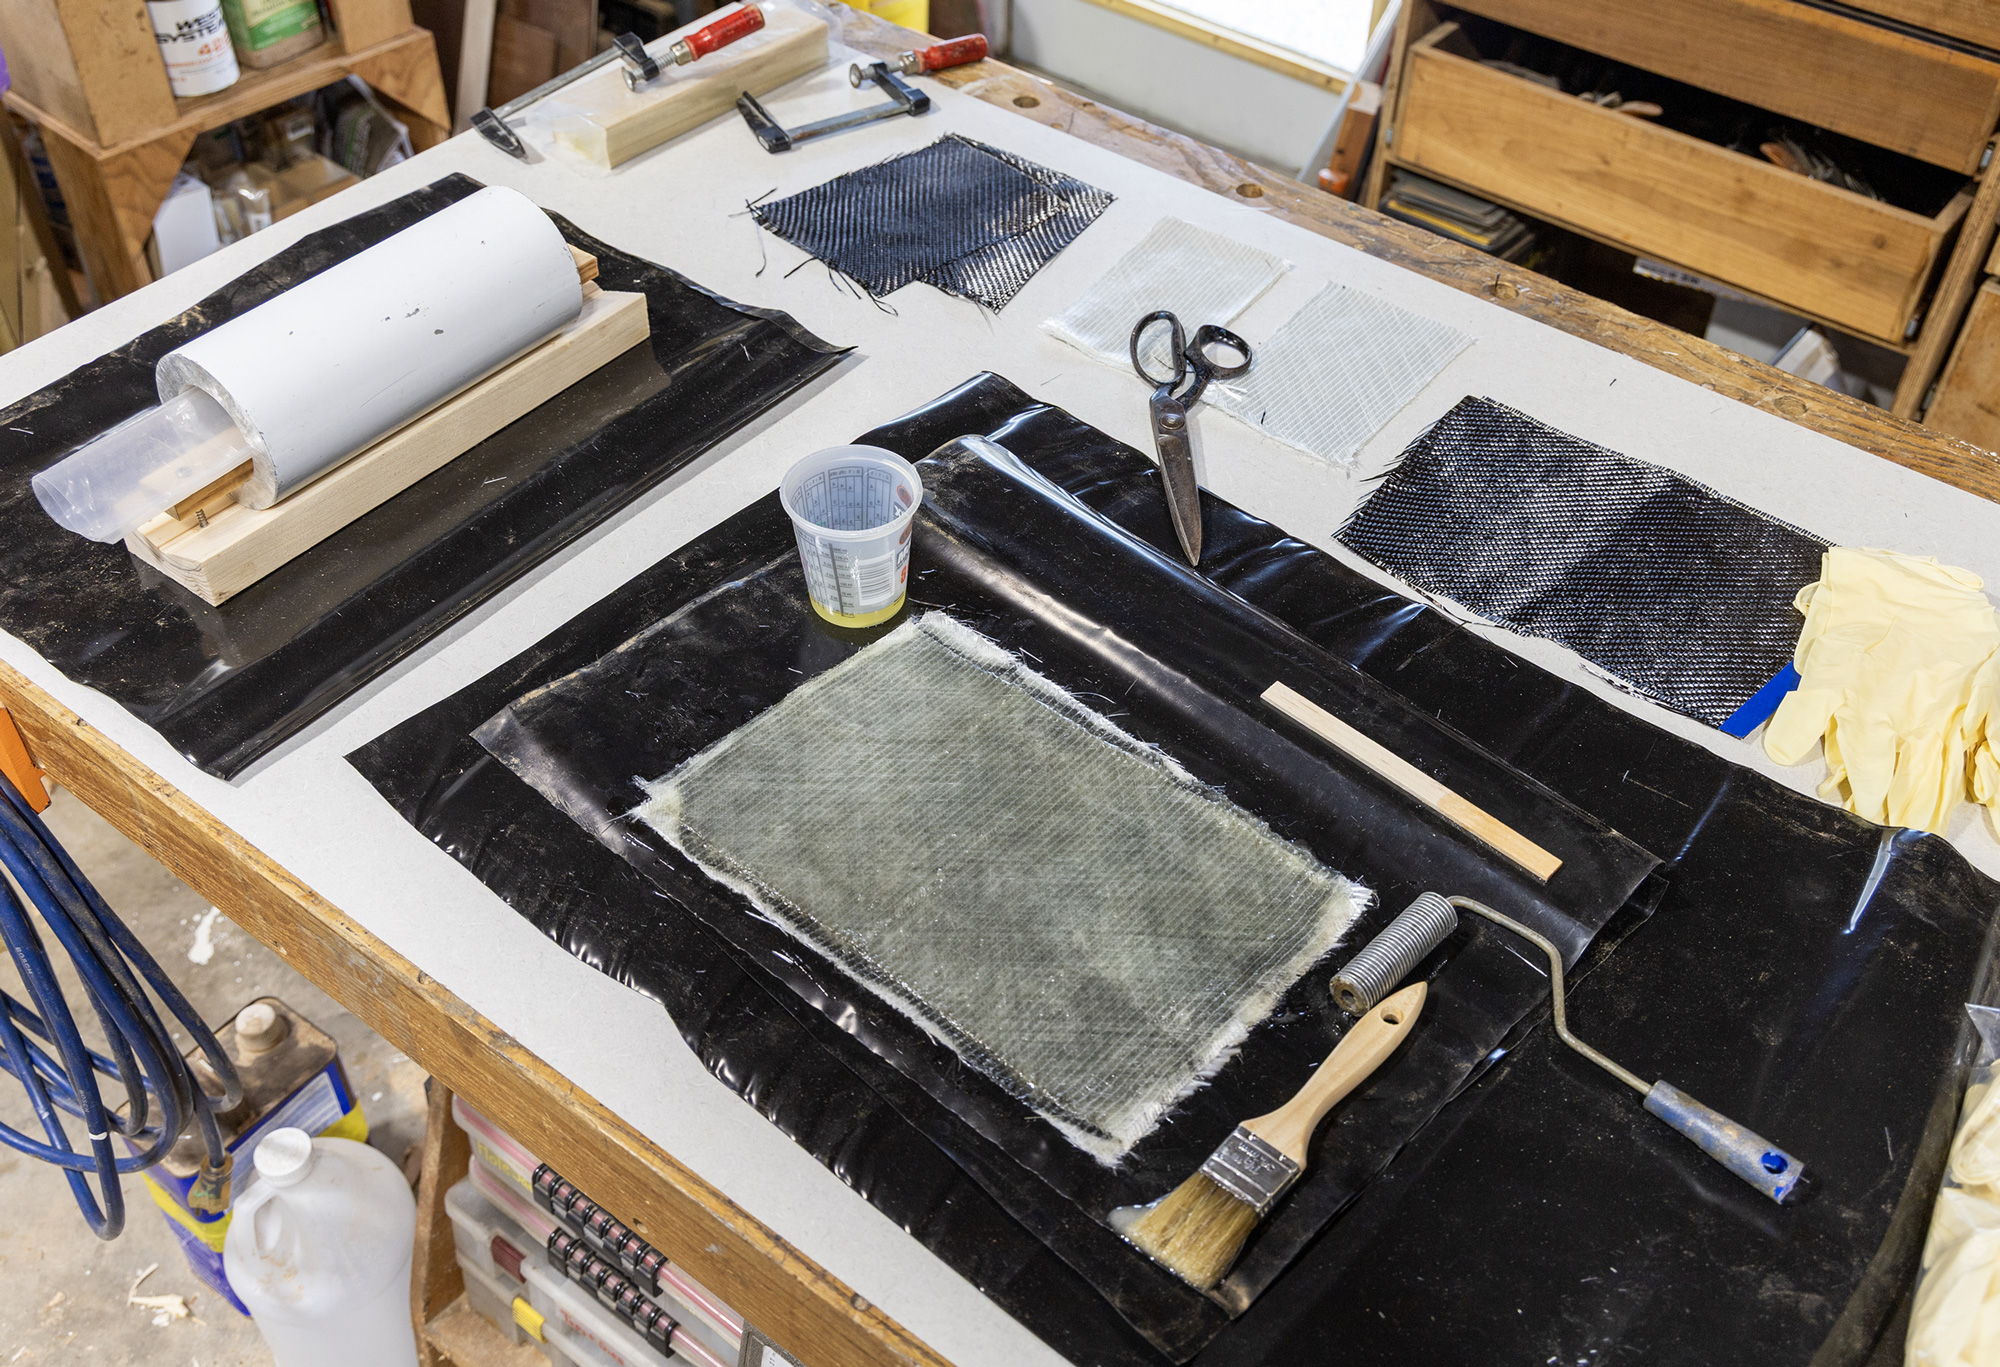
Having an organized workspace is key, as is gathering everything you need ahead of time. Here, precut pieces of carbon fiber and fiberglass are being laid on top of each other and saturated with epoxy. As this can be a messy job, I made sure I had several pairs of disposable gloves on hand. To ensure consistent and even spread of the epoxy, I used a disposable paintbrush and ’glass roller. In this layup I’m using both ’glass and cabon fiber—the latter as a top layer for improved appearance.
Step 2
Prepare and clean your work area and gather all your supplies. You will need several pairs of gloves, acetone or alcohol for a solvent, disposable brushes, a low-viscosity non-blushing epoxy resin and its hardener, mixing containers, fiberglass cloth, and scissors. Your work surface should be covered with a protective sheet to which the epoxy will not bond. For a flat panel you can work on a section of Formica that has been waxed or covered with a piece of polyethylene plastic, such as a trash bag or construction plastic sheet. The sheet should be large enough to cover your whole work surface (not just the immediate area where you will be working). The advantage of using a plastic sheet is the easy cleanup, but it does result in more plastic waste.
Step 3
Cut your fabric to size, cutting as many layers as you need to create the desired thickness for your particular plate.
Lay down one layer and saturate it with epoxy, then work all the air out with your disposable brush, or a ’glass roller. Lay a second layer atop the first and saturate it with epoxy. Repeat until all the layers are laid and saturated. Use the roller to remove any excess epoxy and get a consistent thickness. If you don’t have a roller, cover the assembled panel with another piece of plastic and use a squeegee to work out the excess epoxy. Leave the layup to cure and then peel it away from the protective sheet.
Step 4
Cut the finished layup to shape and drill for fastenings. Trimming is most easily done before the epoxy is fully cured and the panel is leather hard. At that stage you can use a standard utility knife to trim the edges and cut the panel to a desired shape. If you wait till the layup is fully cured, you will need a more aggressive tool. I use an oscillating saw with a carbide blade.
When your panel is trimmed and shaped, you will have a tough, inexpensive pad to use as a backing plate for your boat’s hardware. It will spread the load over a larger area, and prevent crushing of the wood fibers beneath.
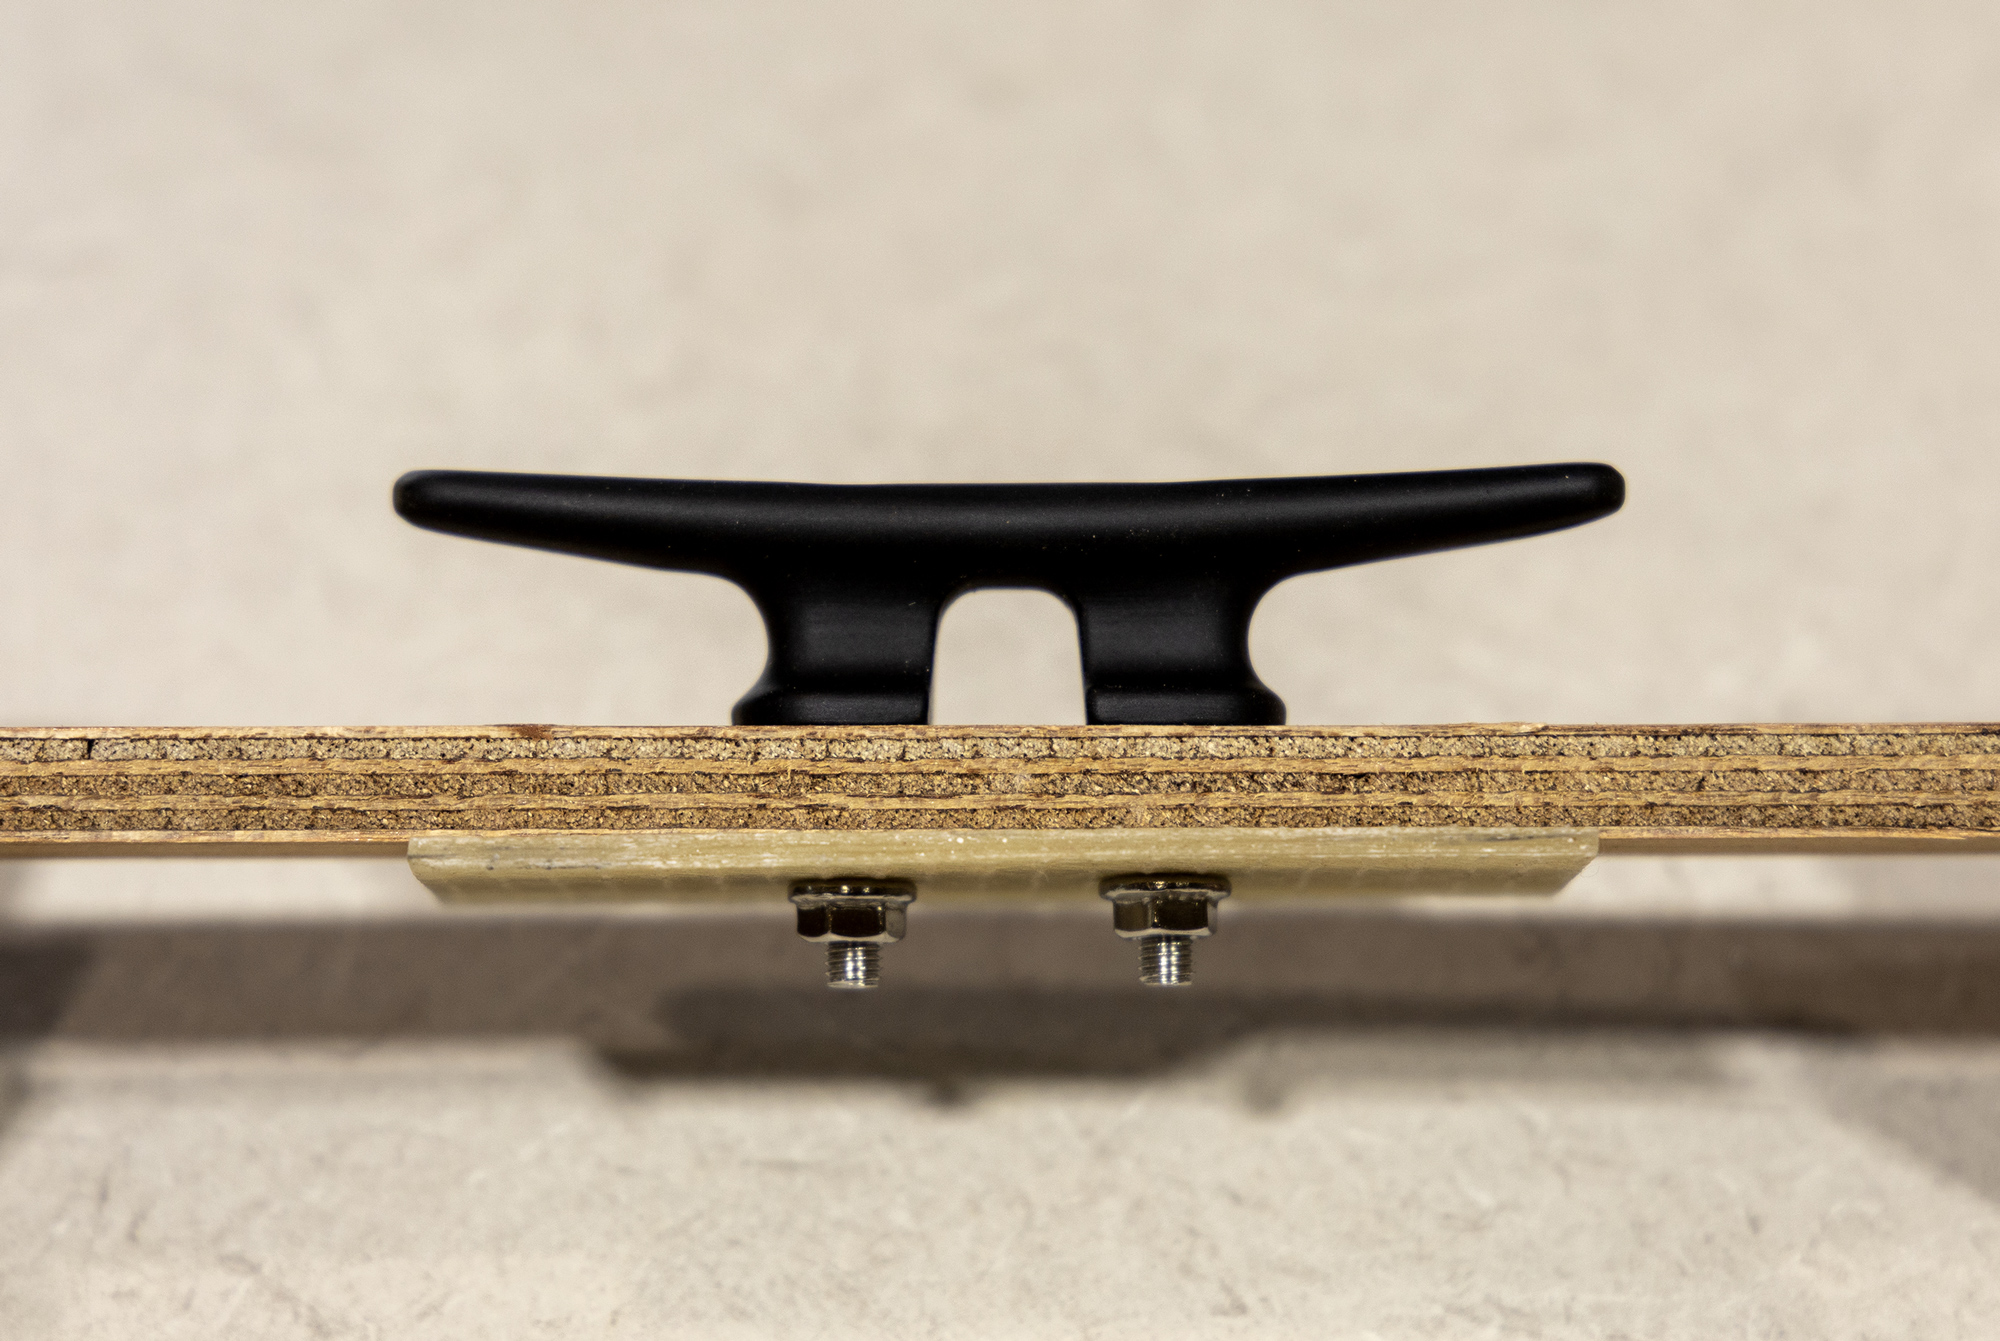
A laminated fiberglass-and-epoxy backing plate spreads the load of a cleat and protects the wood fibers from being crushed by the fastening nuts and washers. When the fitting will be out of sight, I’m less concerned about its appearance and so don’t add the carbon-fiber layer.
Making more complex custom hardware
The variety of hardware items that can be made from epoxy-saturated cloth is far-ranging and certainly not limited to backing plates.
When re-rigging my 12′ 6″ catboat, for example, I used some leftover cloth to make a saddle for the gaff-to-mast connection.
Firstly, I made a form for the saddle that would fit against the mast. I was lucky to have a section of aluminum pipe that was the correct size; otherwise I would have shaped a wooden block to the correct diameter and about 1′ long.
Next, I measured the thickness of the gaff where it would be connected to the arms—to be incorporated on the aft side of the saddle—and made a wooden spacer of the same thickness. I covered the saddle form and the spacer with separate sheets of plastic, dry-fitted them together with clamps to make sure they would sit well, and then laid the spacer aside.
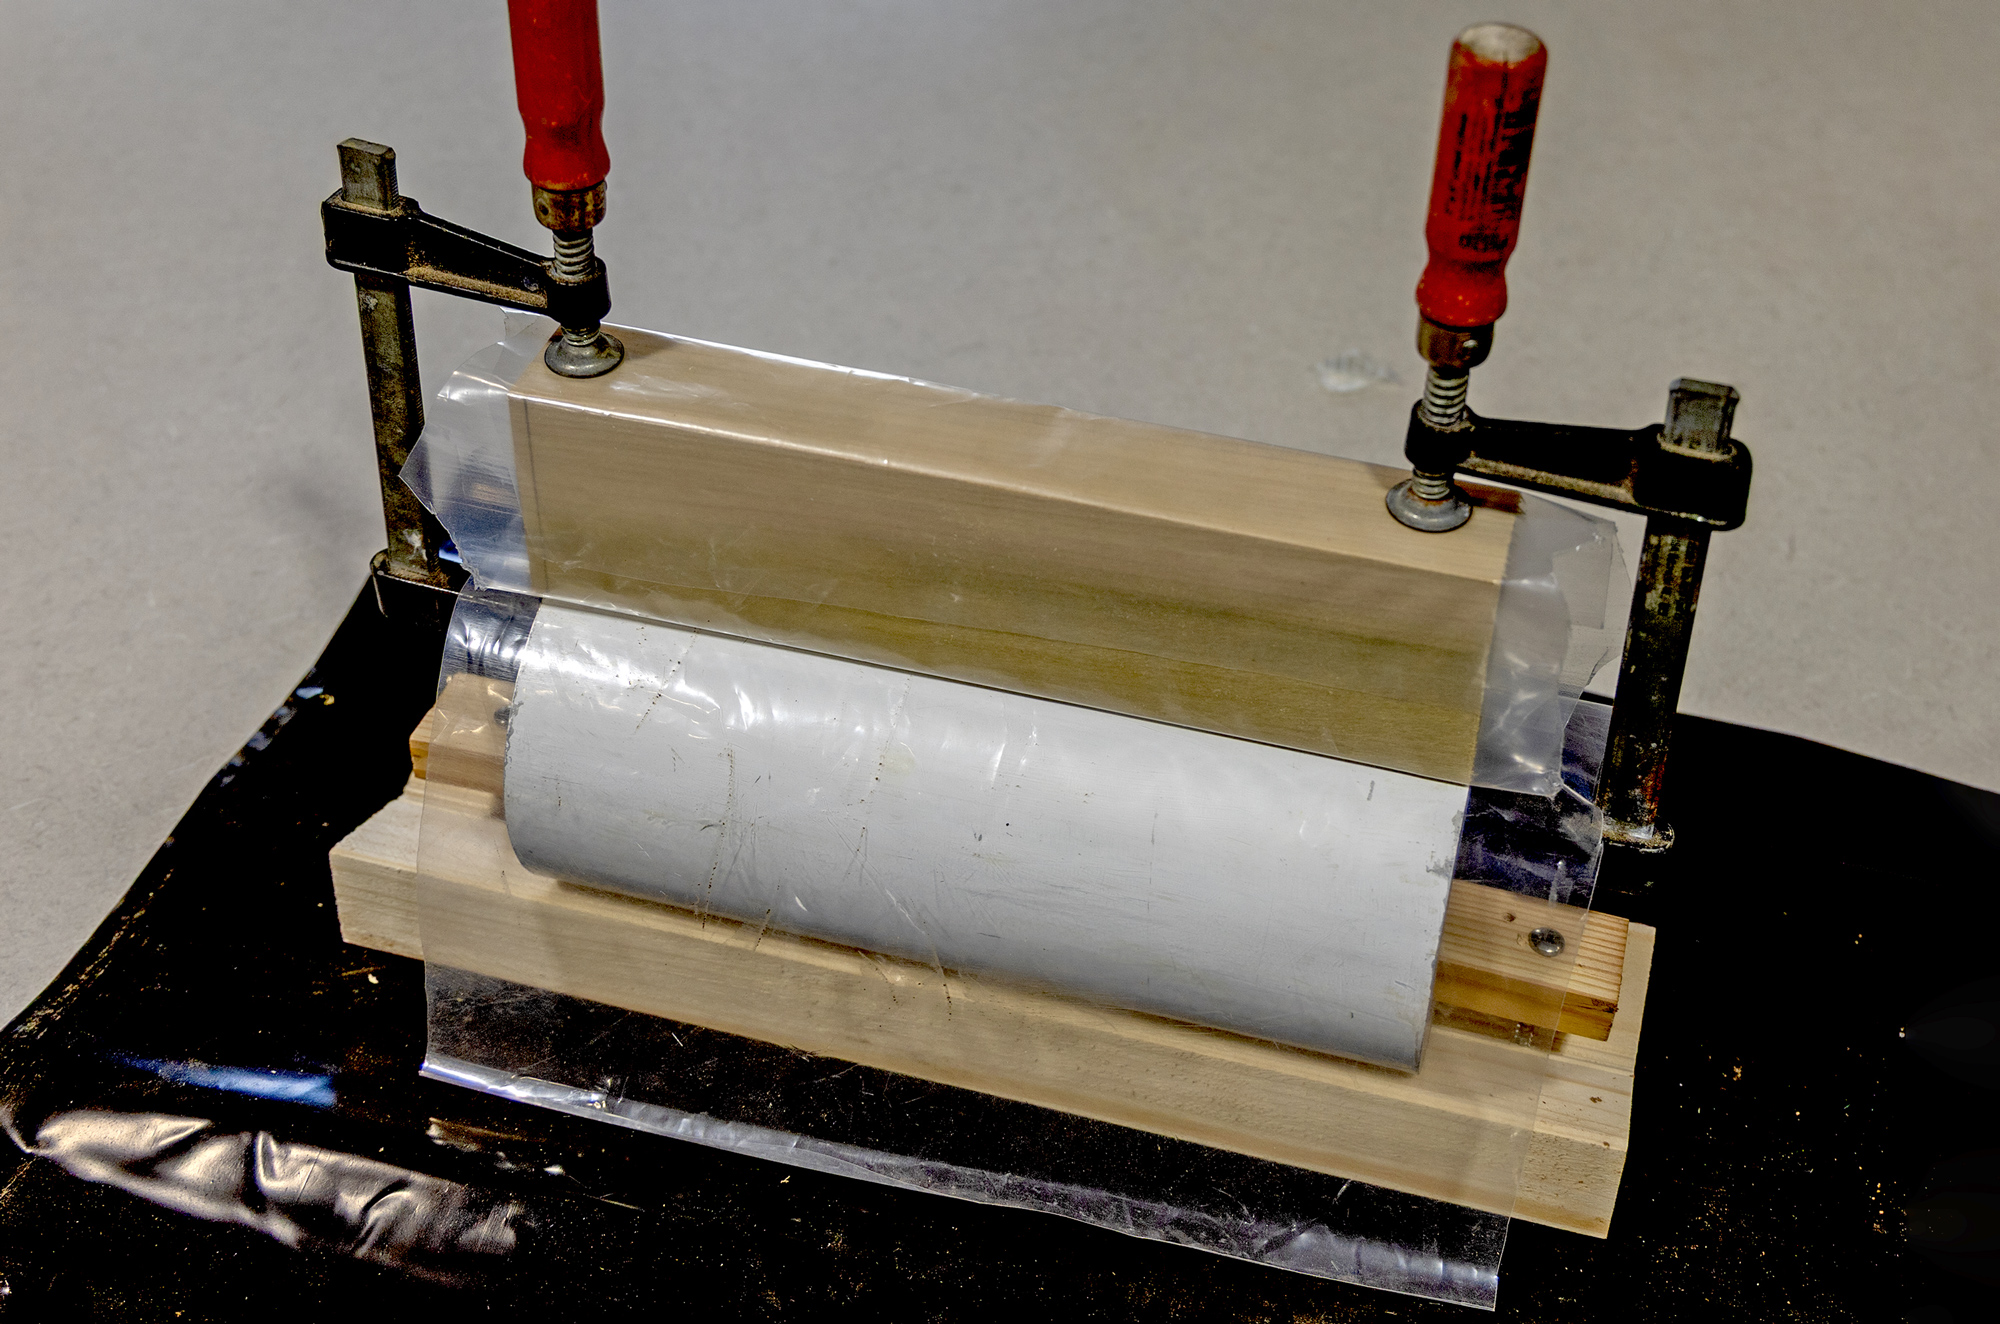
For my gaff-saddle form, I was lucky to have some aluminum pipe that matched the diameter of the mast; for the saddle arms’ spacer I used a block of wood cut to the correct thickness. I separately wrapped the wood and the pipe in plastic to create barriers for the epoxy, and clamped the two forms together to check for placement and stability before proceeding.
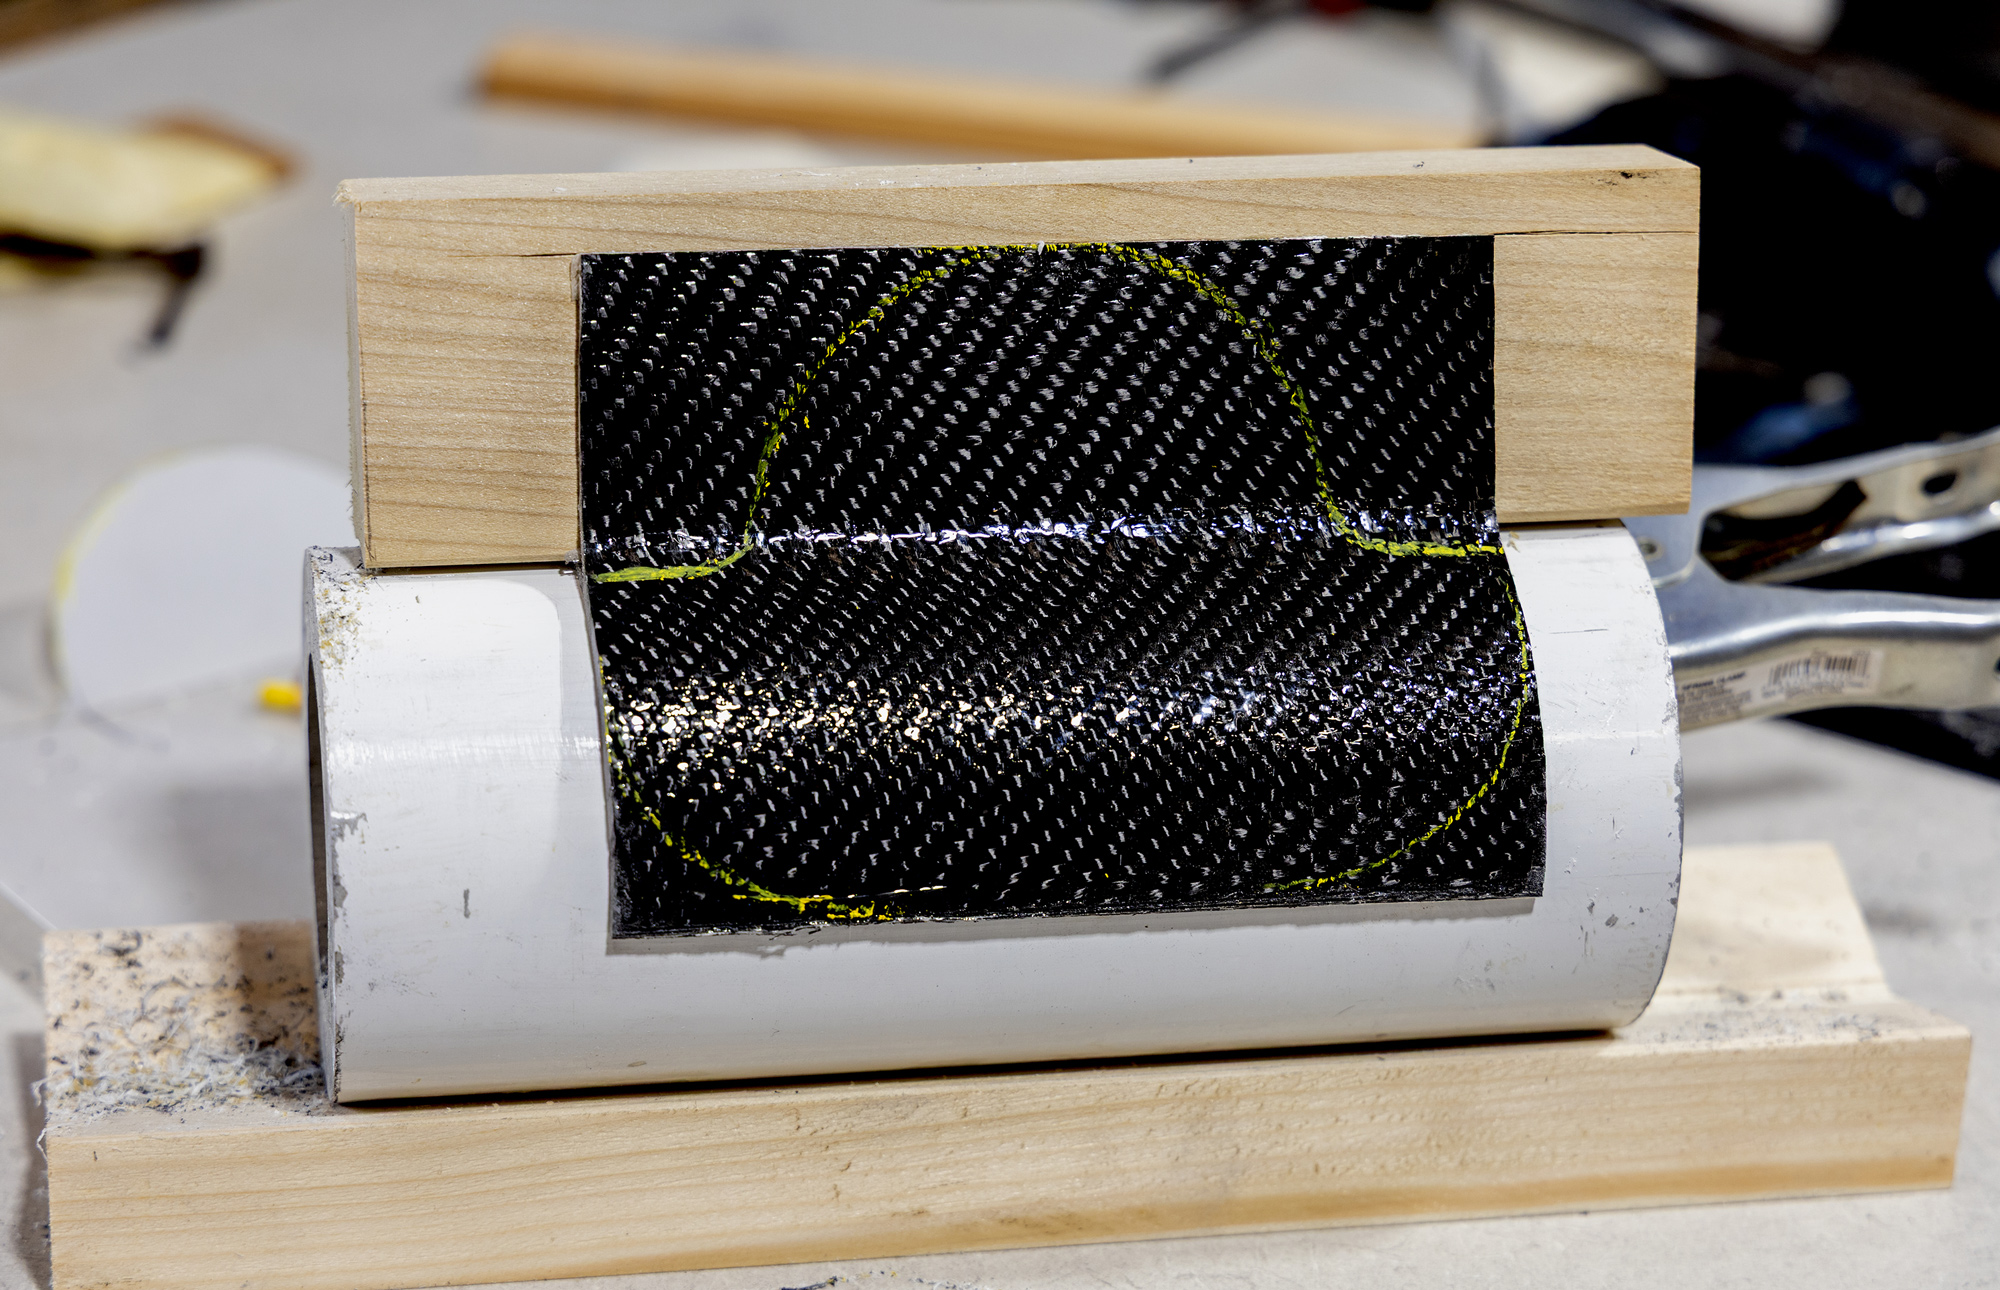
I then cut two pieces of 1708 biaxial fiberglass cloth and a top layer of carbon-fiber cloth—for aesthetic reasons—and laid up the saddle as described above for the backing plate.
While the saddle is still curing, I shaped it over the form and then turned my attention to creating the arms that would fit on either side of the gaff. I clamped the spacer in place on top of the saddle and laid down three layers of 1708 with a layer of carbon on top to create the arms. Don’t be afraid to change your gloves at each step… this is a messy process and you want to avoid getting epoxy on either yourself or your tools.

After laying up the gaff saddle, while the epoxy was still wet, I brought the spacer back to the form and applied additional layers to extend the saddle up either side of the spacer to form the arms. The carbon and ’glass patches are all cut oversize, and the edges will be trimmed at the next stage.
After everything had cured to a leather hardness, I trimmed the edges while the lamination was still on the form—I used a utility knife with a new blade to trim the exposed needles of the carbon-fiber cloth. I also marked out the finished shape of the gaff saddle, but to maintain the curved shape as accurately as possible, I left the lamination on the form to fully cool and cure.

When the epoxy was partially cured, I could trim the ’glass and carbon-fiber edges. Using a block of high-density polyethylene held firm beneath the knife, I was able to guide the blade along a straight and level line.
Once fully cured, I removed the saddle and arms from the form and cut it to its final shape using the oscillating saw with carbide blade. It is important to wait until the piece is fully cured, if not, when you cut or drill into it your finish will be gummy leading to ragged holes and edges. After cutting the shape, I removed any rough edges and faired the curve with sandpaper and carbide-grit files.
Once I had neatly trimmed the edges of the laminate, I marked up the outline of the finished product, but left it on the form to fully cure.
With the saddle complete, I shaped the sides of the gaff where it would sit between the arms and epoxied carbon-fiber cloth to each side. These pads will protect the wood from abrasion when in use. Having assembled the gaff saddle, I finished rigging the boat and went sailing.

After removing the fully cured saddle from the forms, I drilled holes for the gaff pivot bolt and the parrel-bead bungee; I had previously made the carbon-fiber composite pads to go on either side of the gaff to protect the wood of the spar from being chafed by the saddle.
It should be noted that I did nothing to protect the assembled piece from UV damage, as I only day-sail and the gaff saddle is not exposed to the weather for extended periods. If you make fittings that will be unprotected for extended periods, it would be best to cover them with paint or a clear-coat finish for longevity.
My gaff saddle and backing plates are but two examples of hardware I have created using this technique. There have been others and there will be more, for this is a simple, cost-effective, and ultimately efficient way to fit out a small boat with custom hardware.![]()
Michael Jones has had a lifelong obsession with boats and spent 45 years in boatyards repairing and rebuilding a wide range of vessels. He is a past president of the Traditional Small Craft Association.
You can share your tips and tricks of the trade with other Small Boats readers by sending us an email.
For more “how-to” articles for fabricating custom items, see…
Floorboards for Small Boats, keeping gear dry with easy-to-make slatted boards, by Bill Thomas
Pivoting Daggerboard, combining the best elements of a centerboard and a daggerboard, by Detlef Arthur Dücker
How to Build a Brass-Frame Wind Vane, a home-made wind vane for small sailboats, by Sebastian Schröder


Great idea! When it comes to squeezing out excess epoxy from fiberglass cloth, it is key to not squeeze all of the epoxy out, there is a not-too-little, not-too-much “Goldilocks” amount. This avoids having a dry spot in the cloth, just as you want to avoid dry joints when fastening wooden boat bits.
If a new piece is to be permanently epoxied to wood, it is very important to prep the wood with as many coats of epoxy as needed, because some wood will suck the epoxy in like a sponge, leaving a dry joint.
Our last tip is that we use thickened epoxy, like THIXOFlex or Flexpoxy, it takes a little longer to work the epoxy into the cloth, but we are very confident that all nooks and crannies get filled.
Fair winds!