In the late 1950s, my dad built a boat. I wasn’t around yet, but he constructed a plywood runabout from a Sears & Roebuck kit, and through my childhood the old black-and-white photos he took as a record of that project made me long to build a boat of my own. In college I procured plans for a 9′ plywood sailing dinghy with the idea of building it in the basement of my dad’s house. It never happened, but the dream never died. Then, a few years ago, I read somewhere that “if you never start, you’ll never finish.” I began scouring the internet for a suitable build and settled on Heidi, a flat-bottomed, lapstrake skiff described in Richard Kolin’s book, Traditional Boat Building Made Easy: Building Heidi, a 12 foot skiff for oar and sail.
The reasons for my choice were many. I wanted a boat that was easy to build but was traditionally constructed out of solid wood rather than plywood. It had to fit up the stairs from my basement, where it would be constructed. I believed a flat bottom would facilitate moving around the cockpit while fishing and would also lend more initial stability. I liked the lapstrake design, and the sweeping curve of the sheer. Finally, many people praised the boat, the book, and the building technique. But was Heidi too small? I was unsure. Then, in a WoodenBoat Forum post, “Kermit” described stretching Heidi from the 12′ original to a 14′ version he had seen in Richard Kolin’s shop. That was it… I was hooked. I would build a 14′ Heidi.
 Photographs by the author
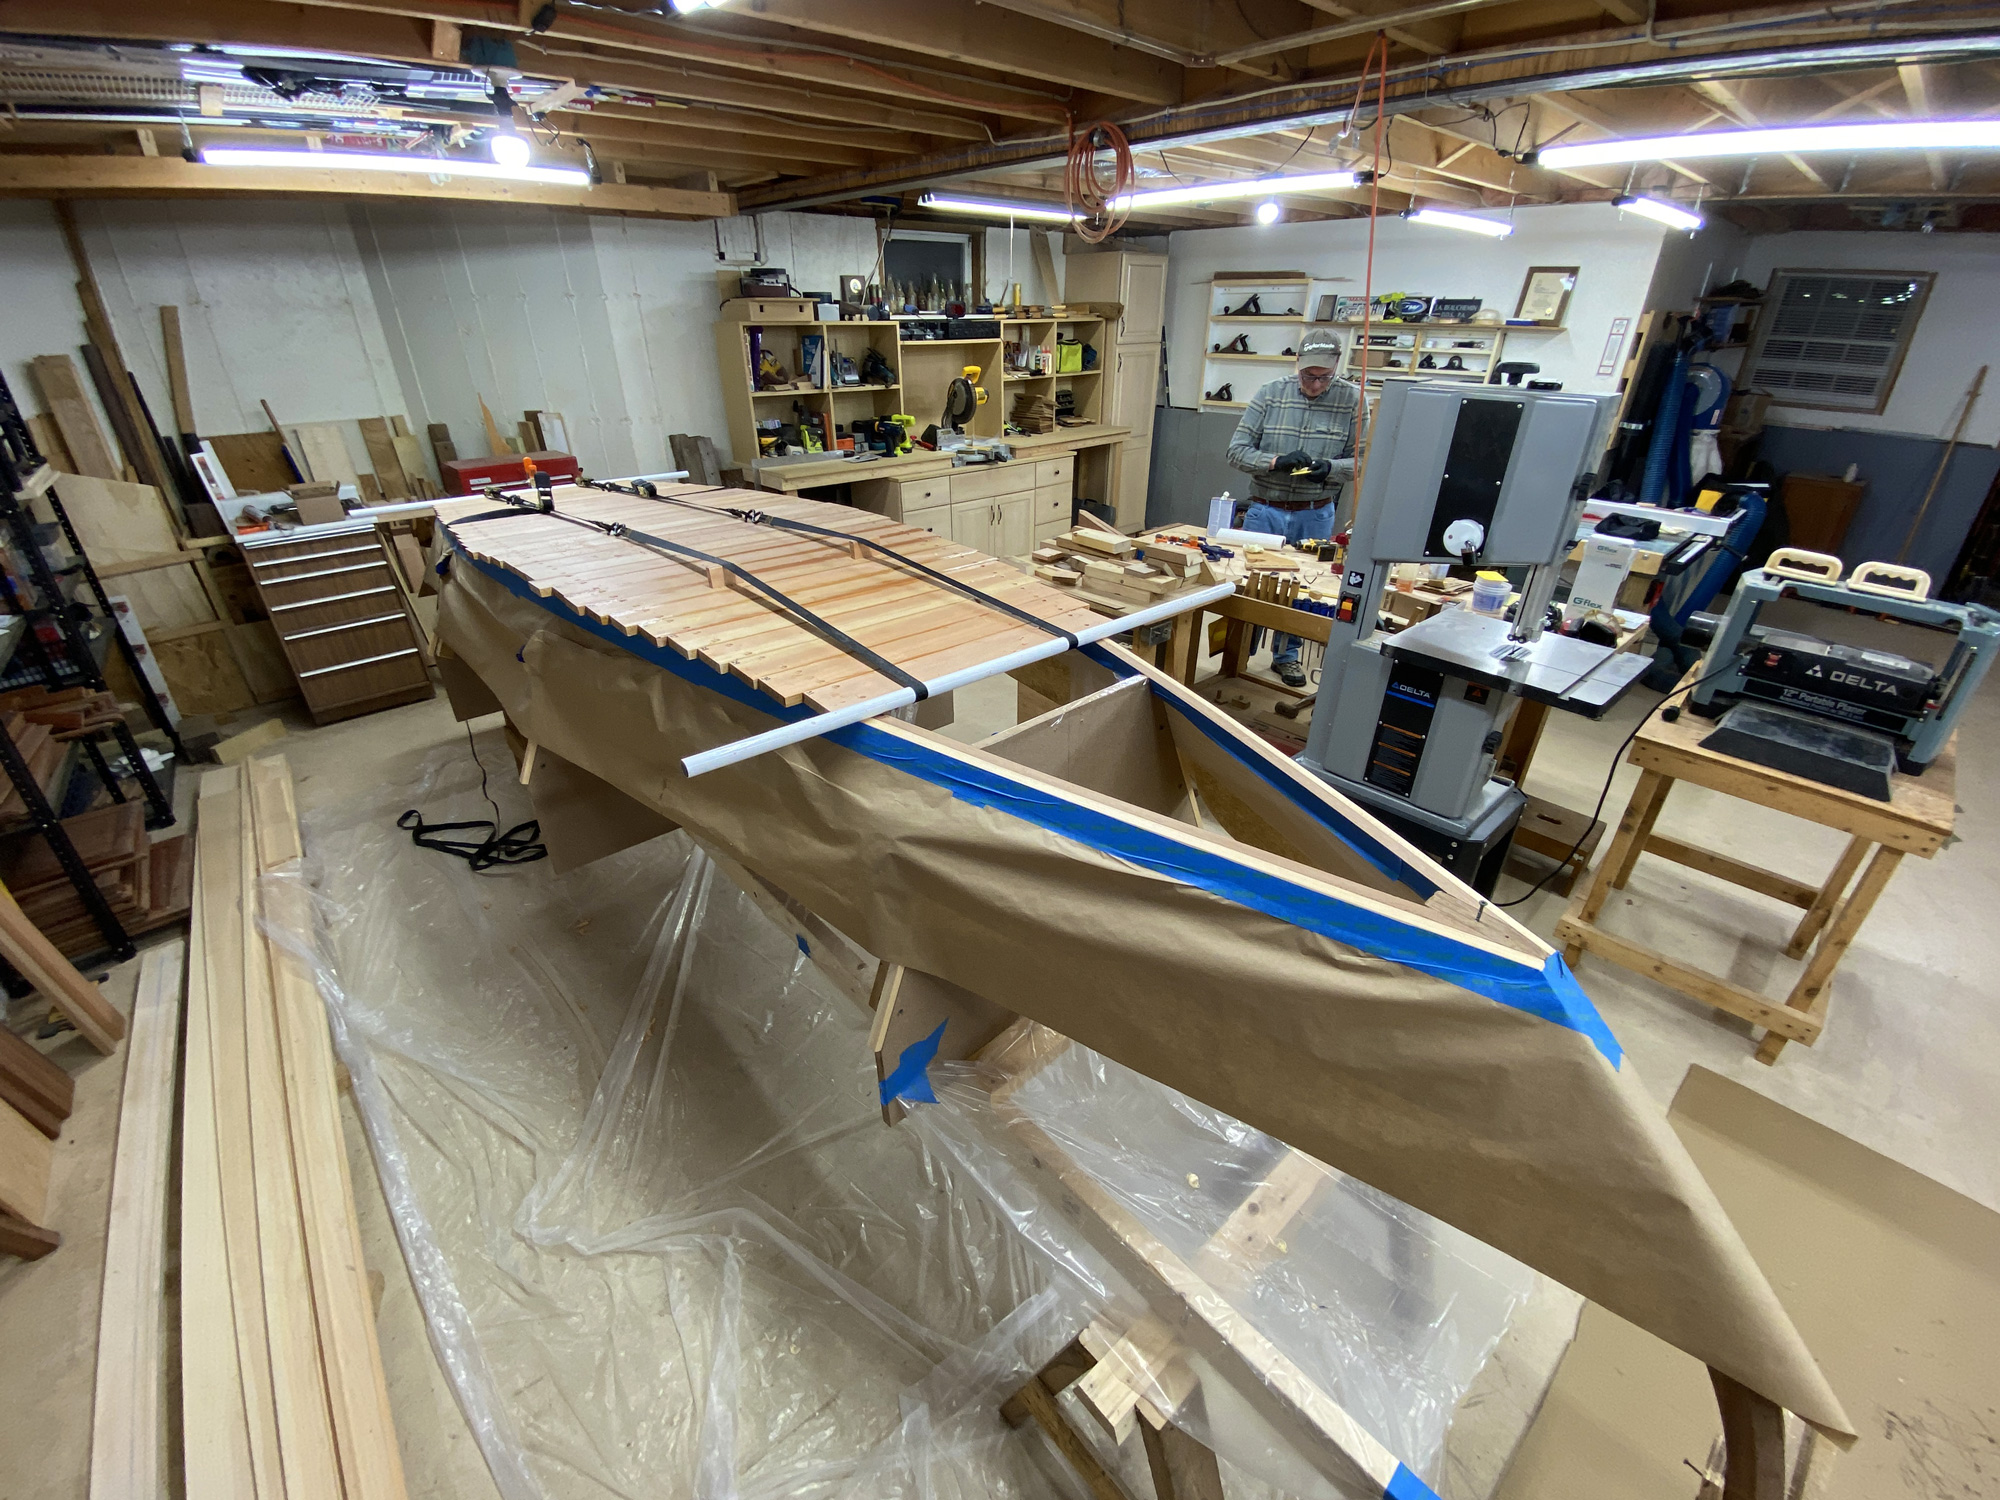
Richard Kolin offers two alternatives for the bottom of Heidi—plywood panels or cross planking. The typical recommendation for boats that will not be kept in the water for long periods is to use plywood, but I wanted my skiff to be closer to traditional, so elected to use glued-edge cross planking. To apply constant pressure while the glue cured, I used tensioned cargo straps.
Building the Heidi skiff
Kolin’s book is very well laid out, beginning with information on necessary skills and tools, cost, space, procuring materials, and other important considerations for the amateur—perhaps first-time—boatbuilder. Chapter Two focuses on tools, materials, and sharpening, and provides detailed lists of all that is needed, from wood—cedar, white pine, or spruce for the planking, bottom, and seats; mahogany or oak for the keel, transom, stem, frames, and chines—to fastenings to glue to fittings. For my build, I chose northern white pine for the planking and Douglas fir, sold as household decking, for the cross-planked bottom. Mahogany would serve for the transom, stem, and chines, and I cut the sawn frames from white oak.
As I moved through the project I followed the book closely. Chapter Three carefully lays out how to build the strongback and set up the three molds (shown in measured drawings) for building the boat upside down. The instructions are particularly detailed for the assembly of the transom and stem, and I had little trouble understanding and carrying out the necessary steps. Of course, since I would be building a 14′ boat I did need to adjust the position of the station molds to accommodate the extra length. There are four spaces between the three molds, transom, and stem, so adding 6″ between each extends the overall length by the required 2′.
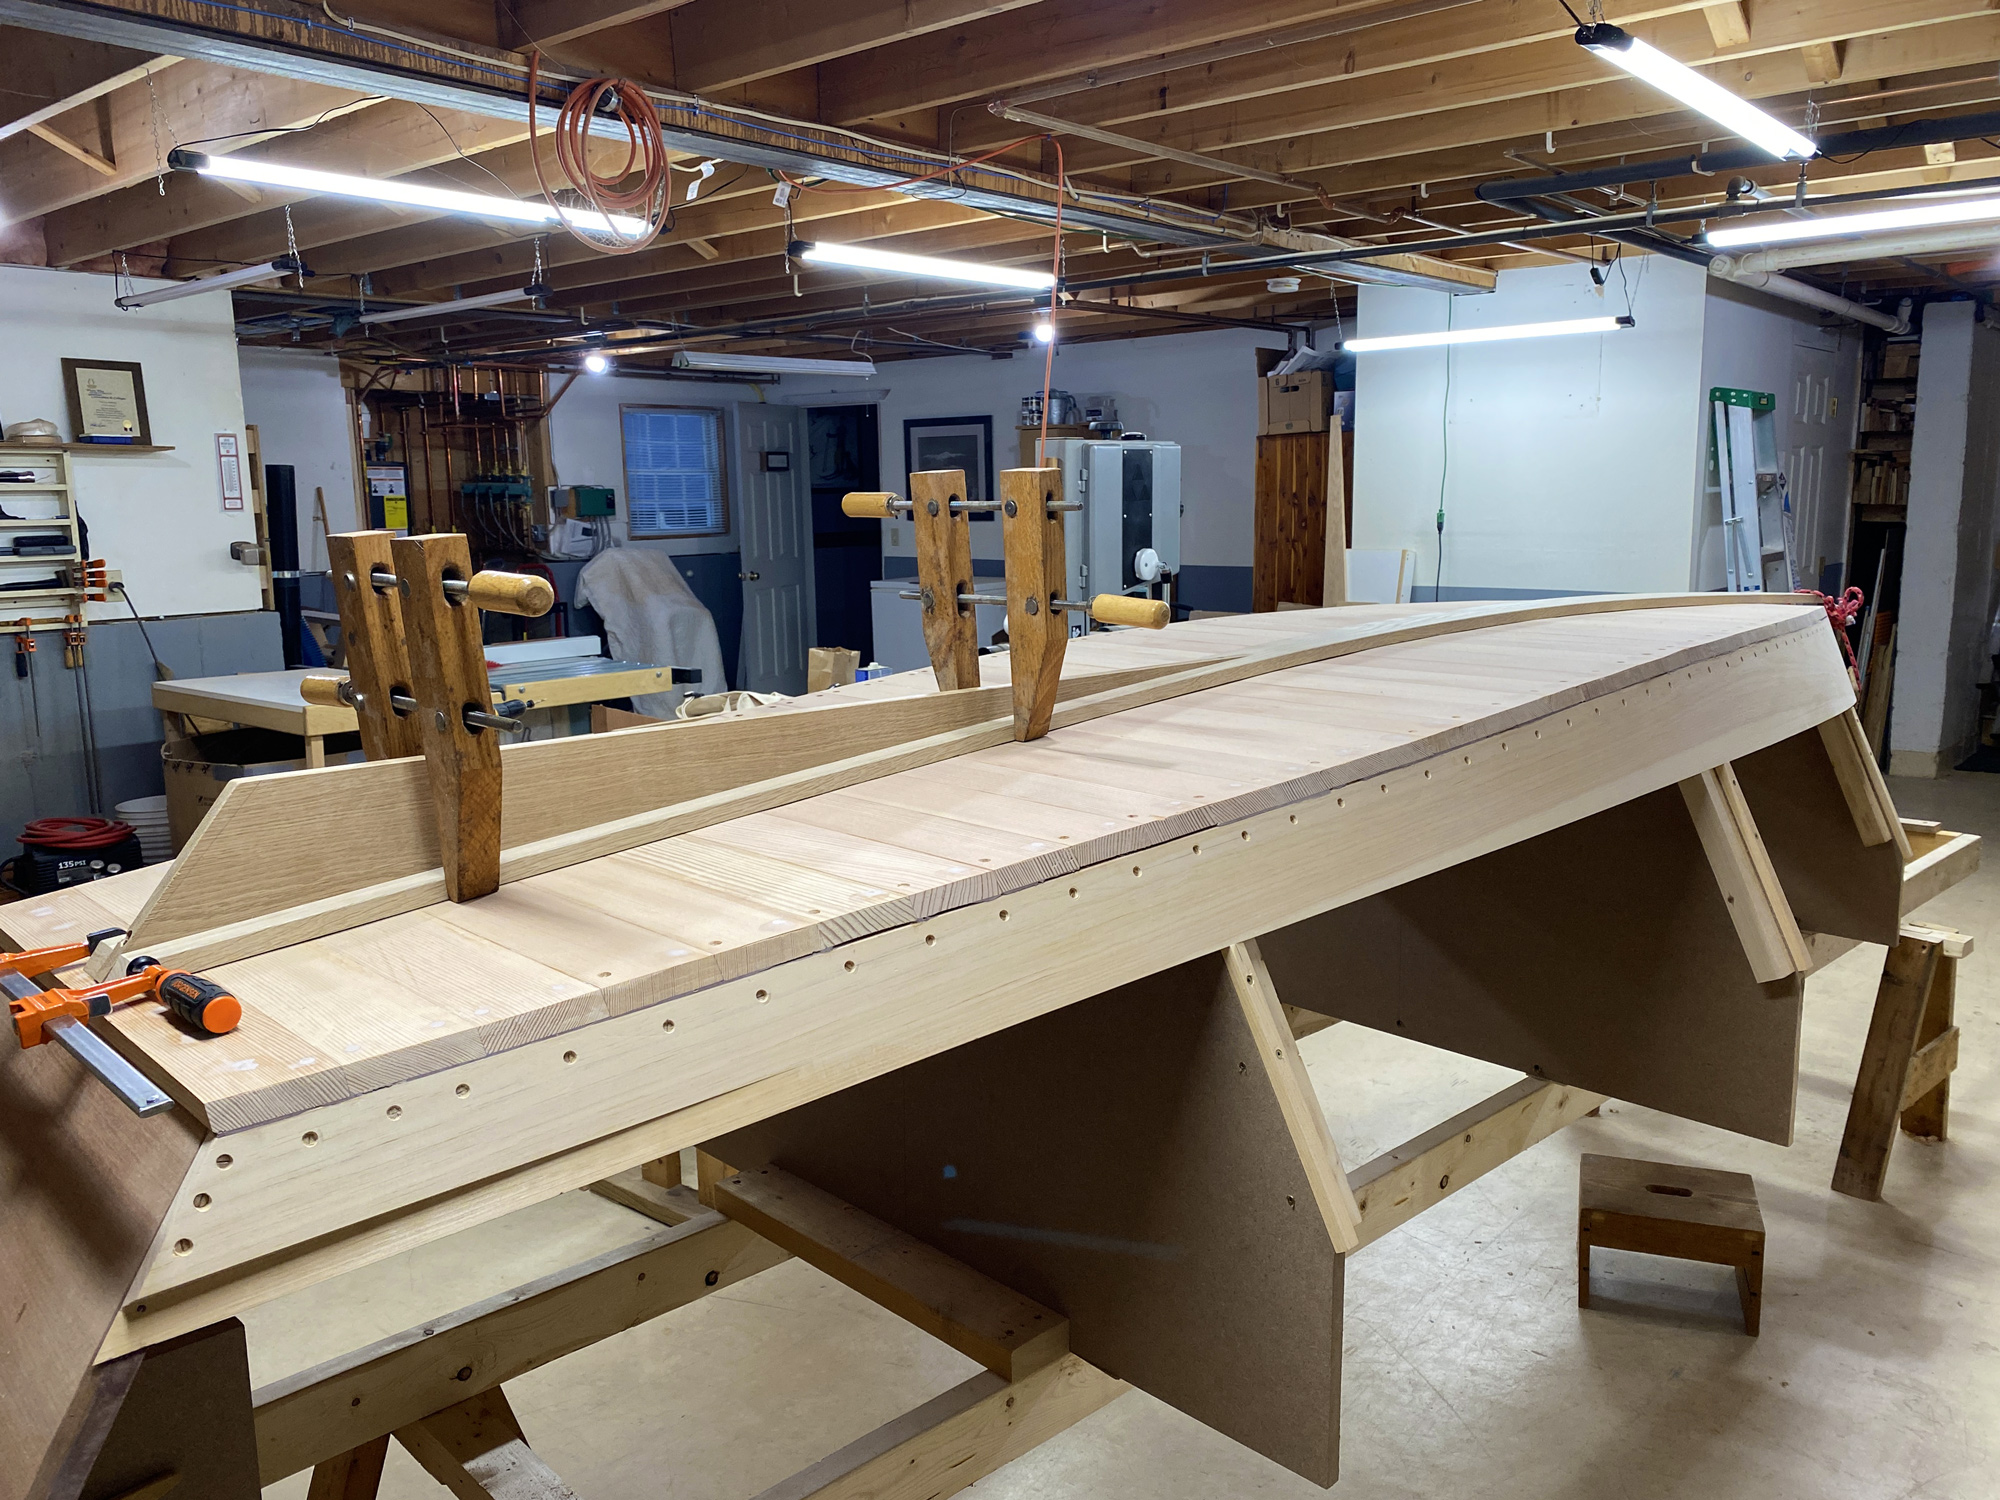
After completing the bottom planking, I installed the keel and skeg. The ample skeg helps the boat to track well under oar. After this, I would fit the two upper planks on each side and then turn the hull over to complete the interior.
Having set up the strongback, molds, and frames, I moved on to fitting the garboards, chines, and bottom boards. The book suggests fitting the garboard before the chines. Instead, I chose to fit the garboard planks only after the chines were installed. That way I could use the chines to scribe a line along the planks, and then cut and plane to that line with finishing touches done after installation.
After the chines, I resumed following the book’s instructions. Kolin specifies that the garboards are straight on their upper edges. After they’re installed around the molds, the flare of the hull’s sides will curve the garboards’ top edges when seen in profile. And, since the sides of the boat are straight, the planks do not require beveling. Instead, spacers are placed under each of the two remaining planks, one spacer for plank two and two for plank three. This makes plank fitting and installation quite simple—ideal for a first-time builder.
With no frames crossing the bottom, the skiff has plenty of unobstructed open space so that, when sailing, the crew can sit comfortably on the floor; the flare of the hull’s sides provides the perfect angle for a sloped backrest.
In Chapter Five, Kolin describes two methods for planking the bottom. The first is to use traditional cross planking with ring nails to fasten the boards to the chines—this, he says, “is suitable for those who will be leaving their boat in the water or will otherwise be able to keep the planking from drying out.” The other method, suitable if the boat is to be trailered or cartopped, is to use a plywood bottom with epoxy and fiberglass tape along the edges. After researching both methods, I decided on a third: using West System’s G-Flex epoxy, I glued the bottom boards together and bedded them at the chines in polysulfide BoatLife caulk. Then, to fasten the boards to the mahogany chines, I used bronze screws instead of bronze ring nails. I really wanted a traditional appearance for my trailered boat, and after speaking to a few people and reading the article “Glued-Edge Carvel Planking” by Matthew Murphy in one of WoodenBoat’s Mastering Skills supplements, I decided this would be an appropriate way to build the bottom. One of the attractions of the method is the simplicity of repairs should a plank split: simply rout or saw a kerf, cut a spline, and epoxy it in. I did paint the bottom inside and out with a two-part epoxy primer, followed by topside paint on the inside and a hard ablative antifouling paint on the bottom. In hindsight, because the boat is trailered, I could have used topside paint for the bottom as well. The finished boat has now been used for two seasons, going in the water for a few hours at a time, and being stored under a boat cover on a trailer; there are no signs of leaking or splitting in any of the bottom planks.
Once the chines, bottom boards, keel, skeg, and garboards were in place, it was time to lay the remaining strakes. Because I had changed the overall length of the boat, this was quite tricky as the dimensions Kolin gives in the book had to be altered. The widths of the planks remained the same at each station, but the positions of those dimensions along the length of the planks were different. I think if I had built to the 12′ length, Kolin’s dimensions and instructions would have made this part of the process as easy as the rest of the boat. I got there in the end, though, and the remainder of the build came together nicely.
 Karen Hall
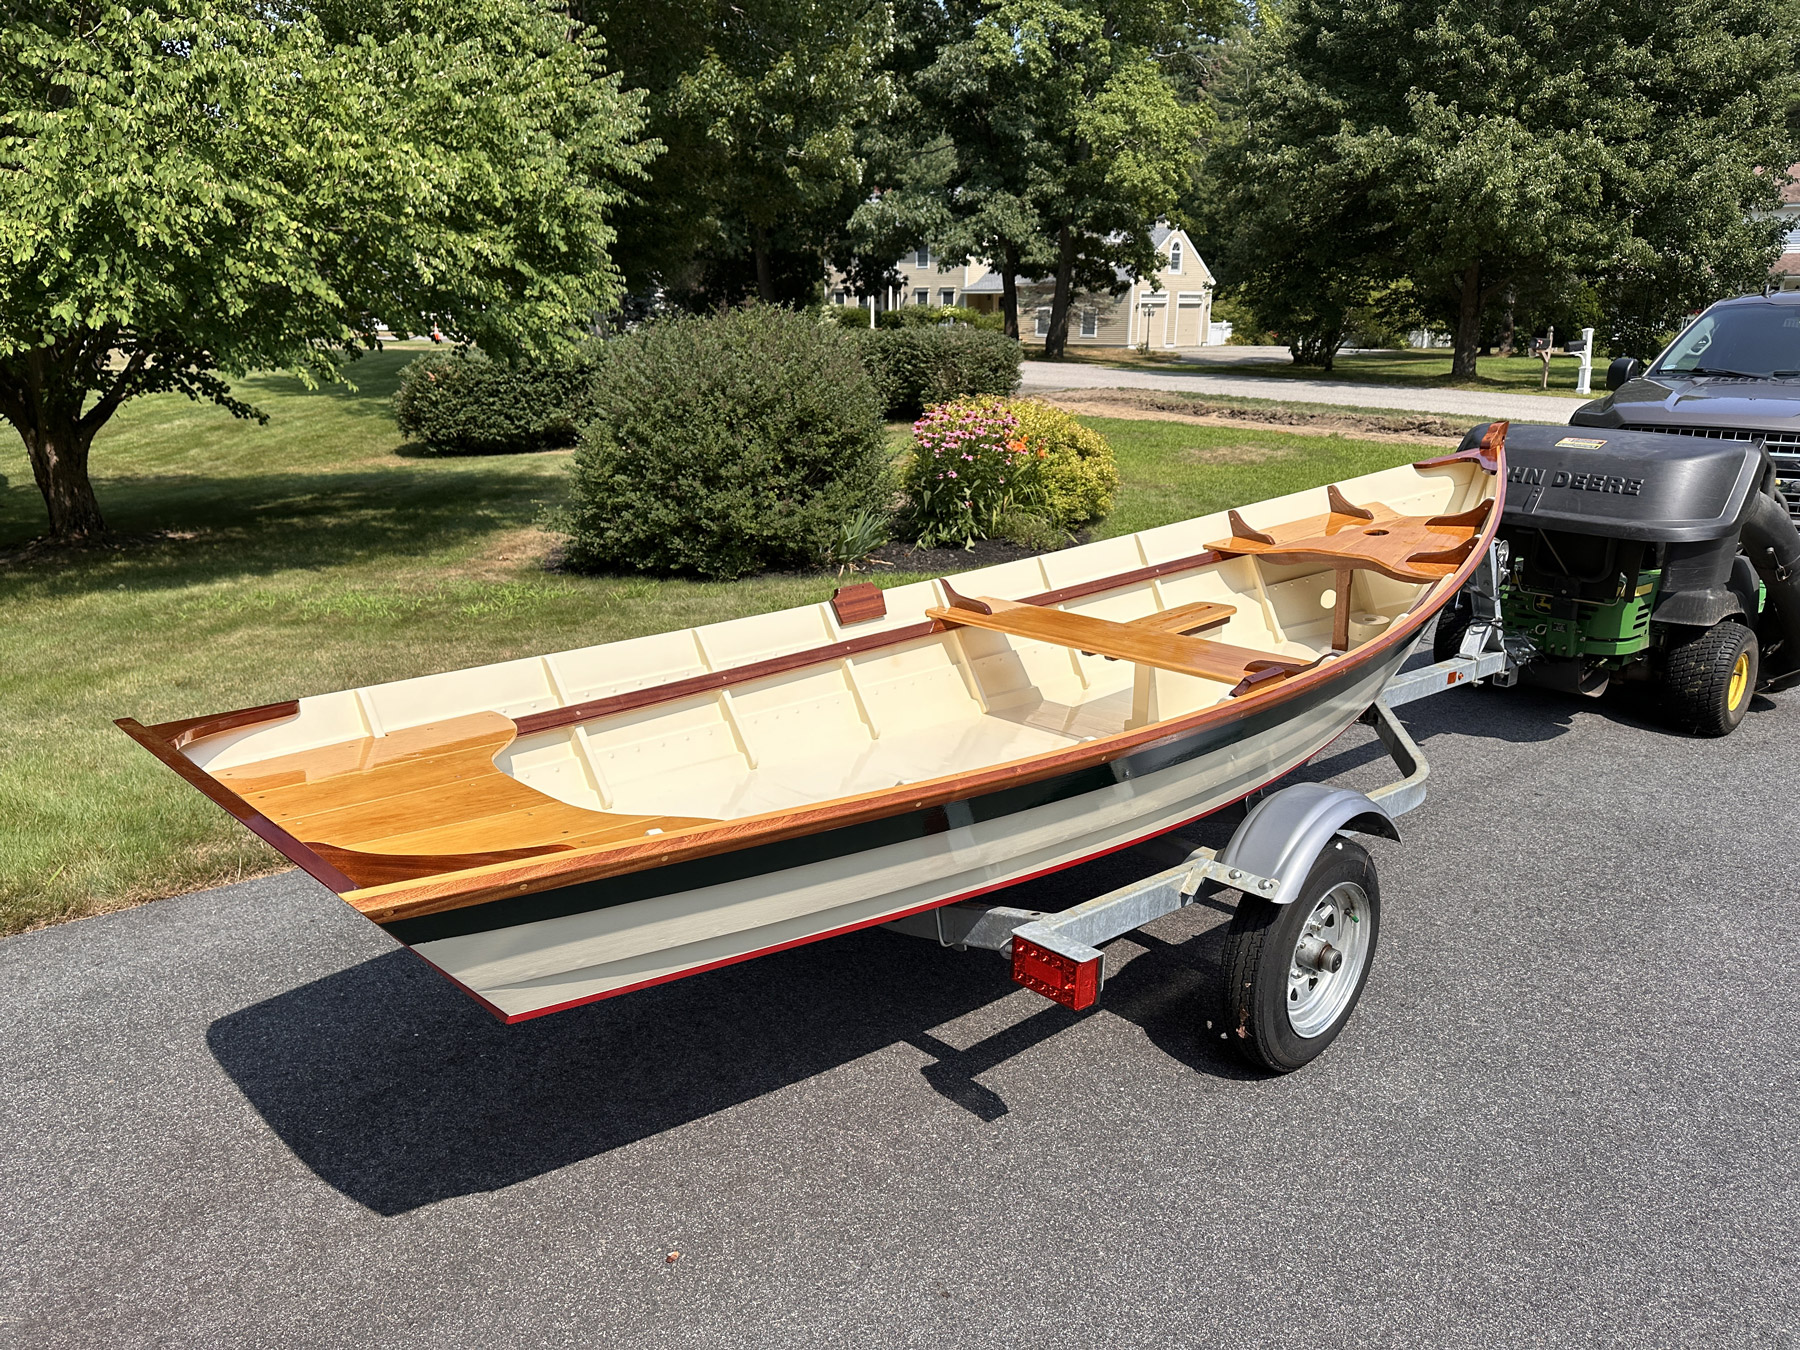
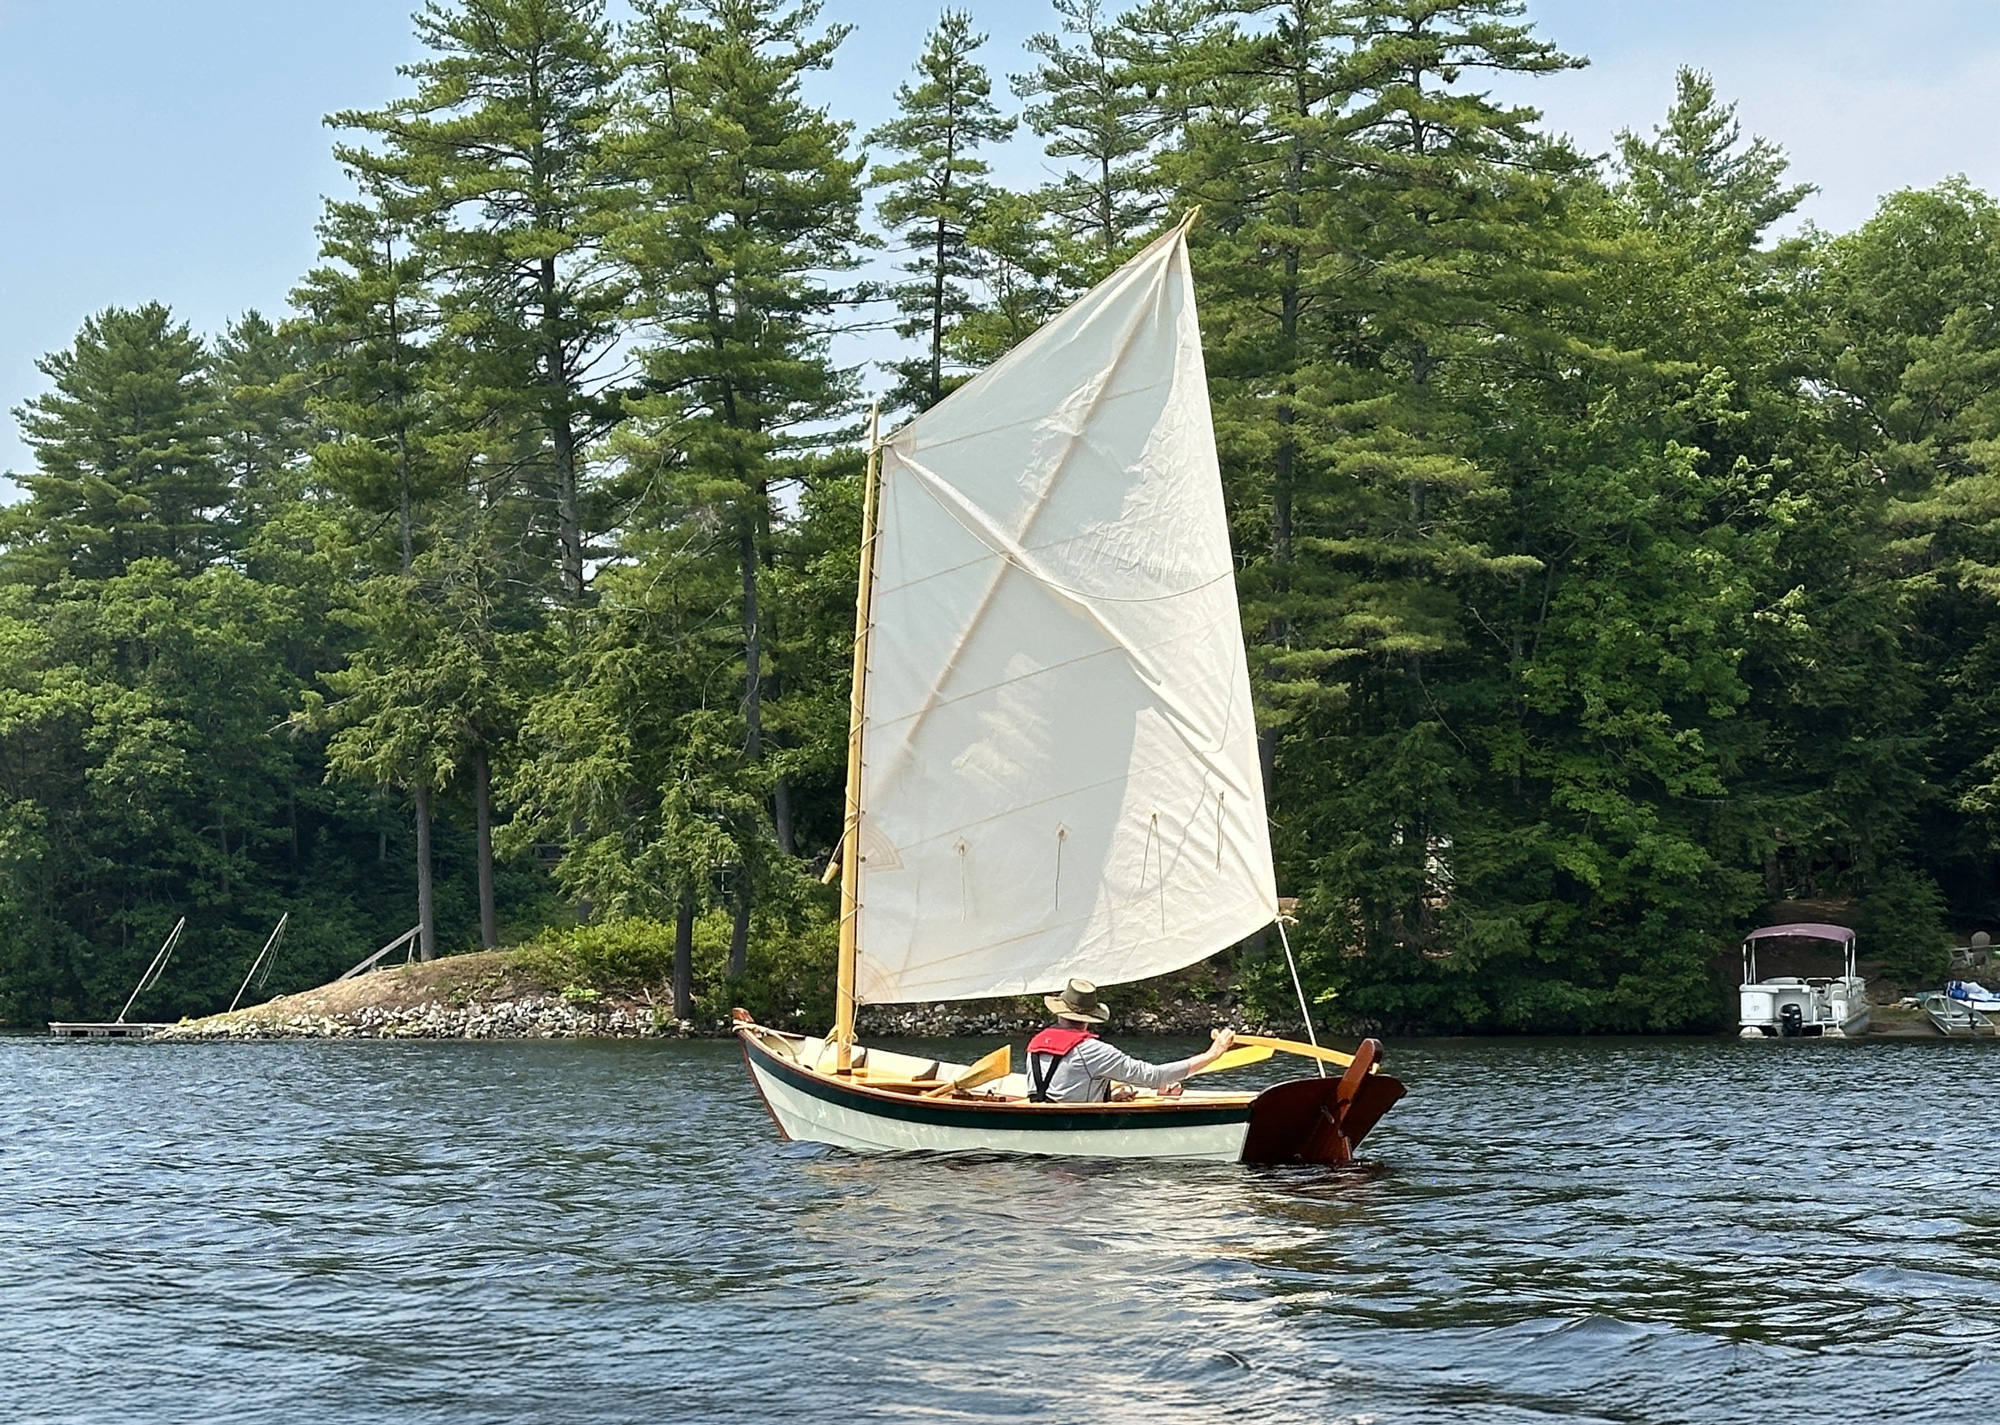
Despite the low freeboard, Heidi can comfortably accommodate three adults when under oar. When sailing there’s room for one or two.
I fitted the interior almost exactly as described in the book and opted for a spritsail rig, which necessitated the construction of spars, a daggerboard (and trunk), and rudder and tiller. Again, as my boat was longer than the original, I commissioned Sailrite to design a new sail adapted from the book’s sail plan, which I built on a heavy-duty Singer sewing machine. I added reef points and a brailing line. I received excellent advice from Ben Fuller, both through his writings and during an in-person conversation at the 2025 WoodenBoat Show, and was happy with how the sail and rig worked out—I will be adding a traveler and mainsheet block to replace the designed port and starboard cleats that I’ve used hitherto. This will improve the sail’s sheeting angle and allow me to move my weight farther forward.
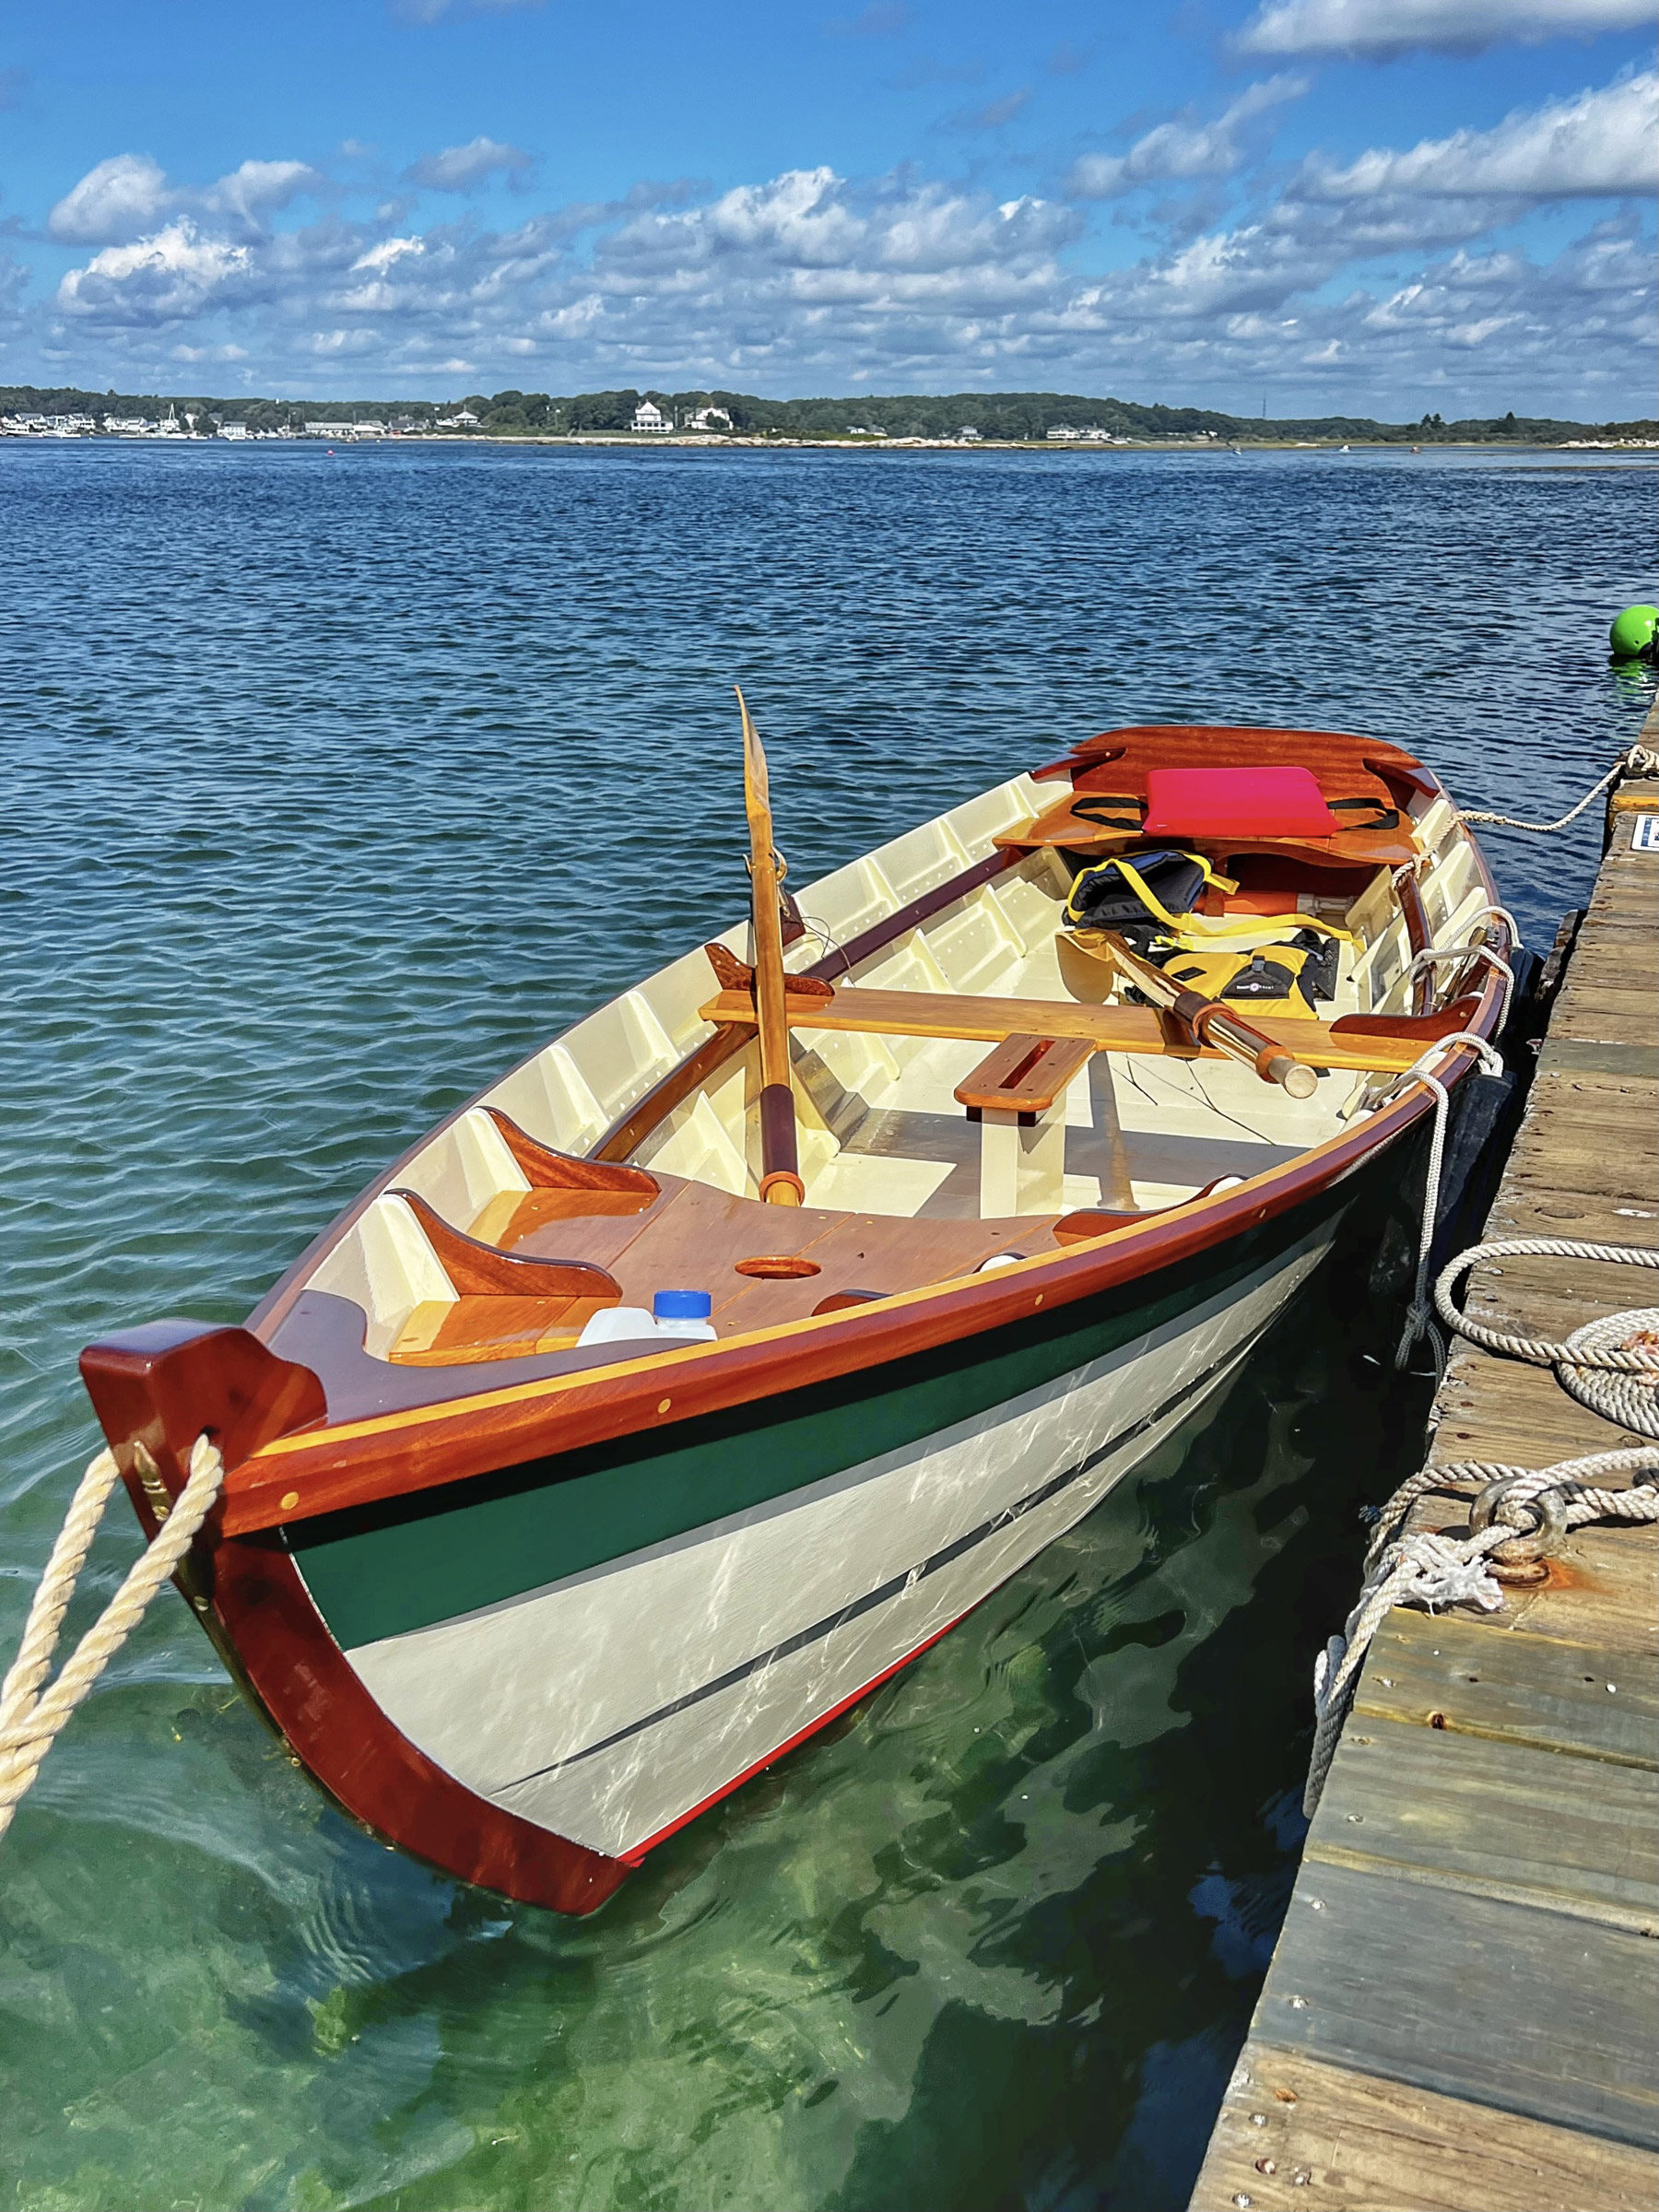
Heidi in the water
I launched my Heidi before the sailing rig was completed. I hadn’t rowed a boat for perhaps 40 years, and even then the few I rowed were prams or very small skiffs. The skiff was neither sluggish nor tender, and for a rusty oarsman, the initial stability was comforting. In spite of the sizable skeg, which does help with tracking, the skiff is quite nimble and easy to maneuver under oars. The boat can carry three adults and still row well despite the minimal freeboard when so laden—although with such a load I wouldn’t want to row several miles nor be caught in a squall with chop. However, when solo or joined by one passenger, the boat is a pleasure to row. It has only one rowing station, as per the design of the 12′ version.
For a novice sailor, Heidi is an uncomplicated and forgiving boat. The simplicity of the sprit rig makes it easy to set sail, and the brailing line allows me to gather the sail quickly when beaching, anchoring, or docking.
I am a novice sailor and so, when it comes to the 14′ Heidi’s performance, I have limited experience on which to base any comparison. However, I can confidently espouse the ease with which the boat sails and the benefits of the sprit rig. I have mostly sailed my Heidi in light winds under 10 knots, and in such conditions have found the skiff’s windward performance good. With one or two people aboard it doesn’t heel much, and the initial stability is a comfort if moving around to fish or adjust the rig. Fore-and-aft trim is important, however, and I have found that if there is too much weight forward it does get a little tippy. Only once have I had to deal with waves—the wake of a motorboat passing close and fast—and I was pleasantly surprised by how comfortably Heidi rode the waves broadside. I have been delighted with the simplicity of the rig but highly recommend the inclusion of a brailing line—it has been indispensable when quickly gathering up the sail to beach, dock, anchor, or simply take down the rig. I do have a halyard but will likely only need it when putting in a reef.
Thanks to Richard Kolin’s book, building Heidi was very enjoyable, and the boat came together well. I love the skiff’s lines, the way it floats, rows, and sails. It always elicits admiration and praise at the dock and out on the water. And even though I was first attracted to the 12’ version, I’m happy with the extra space provided by the 14-footer. I would encourage anyone who, like me, has been thinking of building a boat for a while, to buy Richard Kolin’s book and build a Heidi… you’ll never finish if you don’t start!![]()
Jay Beauchemin is a retired dentist and dental educator from Saco, Maine. He greatly appreciated the help from his friend Mike on this build, as well as his wife’s patience. He exhibited his 14′ Heidi at the 2025 WoodenBoat Show.
Heidi Particulars
LOA: 12′/14′
Beam: 4′
Draft: 4″
Weight: 150/200 lbs (approximate) with sailing rig
Sail area: 58/72 sq ft

The book, Traditional Boat Building Made Easy: Building Heidi, a 12 foot skiff for oar and sail by Richard Kolin featuring the 12′ Heidi, is available from The WoodenBoat Store.
Is there a boat you’d like to know more about? Have you built one that you think other Small Boats readers would enjoy? Please email us your suggestions.
For more sail-and-oar boats you can build at home…
Guppy 9, an all-around dinghy for a first-time builder, reviewed by Cameron Handyside.
Gartside’s Spitfire, a 10′ pram for sail and oar, reviewed by Ioanna Moutousidi and Giannis Bormpantonakis.
The Scout 10, the “smallest camp-cruising sailboat” from Duckworks, reviewed by Christopher Cunningham.


Nice skiff. To be able to row with a passenger with my similar size good little skiff I made a removable seat that goes forward and added a set of oarlock pads. Someone showed me how to rig a removable stretcher to make rowing much more pleasant, just a board resting on chines bearing on frames.
Thank you for your input, Ben. I was thinking of fabricating such a seat between the stern seat and center thwart so I could be more forward without having to sit on the floor or skinny side rails. Your idea might come first if I can convince my wife to join me more.
Jay, that was the first boat I ever built with my daughters when they were 5 years old. Now there 30. I still look at the molds and strongback over my head in the rafters of my barn. Every year I think about getting them down to build another. Stretching it a foot or two sounds really interesting.
I love to hear that! I was drawn to her by her sheer and other lines and I love her size with the extra two feet.
Curious how many hours it took you to build Heidi ?