I grew up paddling cedar-strip canoes in northern Ontario and, as an avid woodworker for 30 years, I had always dreamed of building one. However, it wasn’t until I was 50 years old that I built a 17′ tripping canoe followed by two 15′ wilderness canoes.
In June 2024, I decided to take on a more challenging project: the elegant Liz Pulling Boat designed by Ken Bassett and detailed in Susan Van Leuven’s amazing book, Woodstrip Rowing Craft: How to Build, Step by Step. I thought it would be perfect for early-morning workouts on the water as well as enjoying being afloat with my family and friends. It was designed to be built lapstrake, but Newfound Woodworks in Bristol, New Hampshire, has adapted the design for strip-plank construction. I bought the standard set of detailed plans, which contained 19 pages of full-sized drawings and was accompanied by a 48-page instructional manual illustrated with multiple photographs. Throughout the project, whenever I emailed Newfound Woodworks with specific questions, they were always helpful.
 Ty Bailey
I built the Liz with strip planking and no staples, using cargo straps to apply the required pressure while the epoxy cured in the seams. Unlike in canoes where the strips leave an awkward football-shaped hole to be filled in the bottom of the hull, in the Liz there is a keel plank to which the ends of the strips are glued before being easily planed flush.
Building the Liz
After I purchased all the wood, I set up the molds on the strongback in my workshop. Then I built the transom by laminating 1 1⁄4″ × 8″ pieces of cherry joined with #0 biscuits; the keel plank was fashioned from a 16′ length of 1″-thick Douglas fir, and the stem from two pieces of solid white ash, joined with a scarf joint. All three of these structural members required a rolling bevel, which was new to me, but the plans and book provided comprehensive and clear instructions. For the planking, I bought 10 pieces of 1″ × 8″ rough-cut, clear, white cedar boards, which I milled to 5⁄16″ × 3⁄4″ strips before planing them with a thickness planer to exactly 1⁄4″ thickness before routing the bead and cove profiles.
I spent some time bookmatching the strips and then planked about eight strips per day using the staple-less method. Aside from getting tennis elbow from the repetitive use of the spring clamps, the planking was quite straightforward and began with the sheer strip. Unlike the canoes of my previous experience, the beveled keel plank in the Liz makes planking toward the bottom of the hull easier as the end of each strip is glued to the keel and then easily planed flush with it, thus eliminating the problematic football shape that must be filled in the bottom of a keel-less canoe hull.
 Ty Bailey
With the hull planked up, it was turned over and I faired the inside. Then began the fitout. The cherry inwales were installed first, then the foredeck, then the cherry outwales. The very light-colored sheer planks contrast nicely with the darker-toned gunwales.
I was pleased that I had spent the extra time carefully planing the strips before building the hull, as it made fairing surprisingly easy using a block plane and spokeshave followed by a random-orbit sander with 80-grit, and then 120-grit on a longboard as well as a flexible sanding pad for the curved surfaces. For the sheathing, I used System Three Silvertip epoxy with slow hardener. Its long working time allowed me to really work it into the 6-oz fiberglass when applying the saturation coat, and gave me 72 hours in which to apply additional coats without having to sand between them. Once the epoxy had cured, I was able to sand the hull, again using a random-orbit sander with 120-grit discs.
Once I had finished fairing the hull, I built the 16′-long wear shoe by scarfing two lengths of 1⁄2″ × 6″ white oak. The wear shoe is attached to the bottom of the keel to protect it when beaching. I fastened it with #6 × 1″ wood screws in countersunk holes which I filled with wooden plugs set in epoxy; once the epoxy was cured, I sanded the plugs flush with the surface. I then sealed the join along the edges between shoe and keel with a generous application of thickened epoxy to create a watertight filleted edge.
Three months after starting (having worked about 15 hours per week), I flipped the hull. I fashioned the gunwales—created with inwales and outwales built separately—of 1″ × 1″ cherry scarfed to provide the required length. The inwales have scupper holes cut every 6″. I produced these by clamping both inwales together and drilling holes along the centerline with a 7⁄8″ Forstner bit, then cutting out the wood between the drill holes with a jigsaw, and finally hand-sanding the inside faces of the scuppers with 80-grit paper taped to a wooden block as well as a 1⁄2″-diameter dowel for the curves. Once shaped, the inwales were glued to the hull with thickened epoxy and fastened with #4 × 1″ wood screws from the outside. When I planked the hull, I had chosen a very pale strip for the sheerplank strips so that it would contrast with the deeper tone of the cherry gunwales.
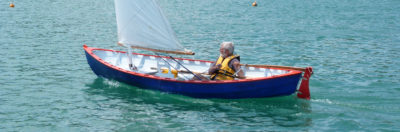
 Lisa Bailey
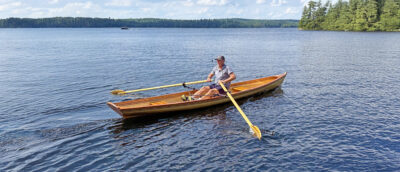
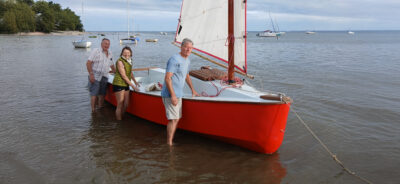
For a novice sculler, the stability of the Liz is forgiving while the light weight and waterline length provide easy acceleration and satisfying speed.
With the inwales in place, I crafted the small foredeck—just 18″ in length—using cherry with two ash accent strips. This was through-fastened to the inwale with #8 × 1 1⁄2″ screws, and then I completed the gunwales by fitting the outwales, again using thickened epoxy. For extra strength, I added three #8 x 2″ screws through the completed gunwales and into the deck. The screws were set in countersunk pre-drilled holes that I subsequently filled with cherry bungs.
Although my Liz would have a sliding-seat rowing rig, I fitted two fixed thwarts made of 7⁄8″-thick solid cherry with contrasting ash strips. The plans show a single seat in the stern, somewhat larger than my boat’s aft thwart, but I decided on two thwarts to add additional stiffness to the hull. The thwarts can be used by passengers when the sliding seat is being used. I have found that having a passenger in the stern seat is ideal as it does not affect the trim but when there is a passenger in the bow, the trim is less good as the bow drops somewhat. With their ends shaped to the contour of the hull interior, the seats are screw-fastened to risers epoxied to the hull. Each thwart has a central support standing on the keel plank. After that, all that remained was to build the two stands for the sliding-seat rowing unit.
As I completed work on the boat, I also built a pair of 9′ 6″ hollow-shaft sculls using plans from Angus Rowboats.
 Ty Bailey
I included an extra thwart forward of the rowing station to give the hull extra strength and stiffness. The plans call for no forward thwart but do include a generously sized seat in the stern.
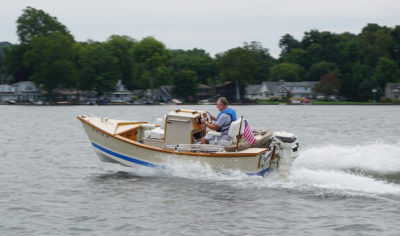
I began varnishing the boat’s interior in early April, making sure to keep the shop’s electric heater going all night so the temperatures would be warm enough for the varnish to cure. Once the finish was complete, I installed the Piantedosi rowing unit. At first glance, installing the stands and attaching the rowing unit to them seemed daunting, but once again Van Leuven’s book was thorough and walked me through the process step-by-step. I was unable to source the gunwale clamps specified in the book to secure the unit’s wings to the gunwales; instead, I used bronze side-mounted oarlocks with 1⁄2″ carriage bolts anodized with a black finish and lock washers.
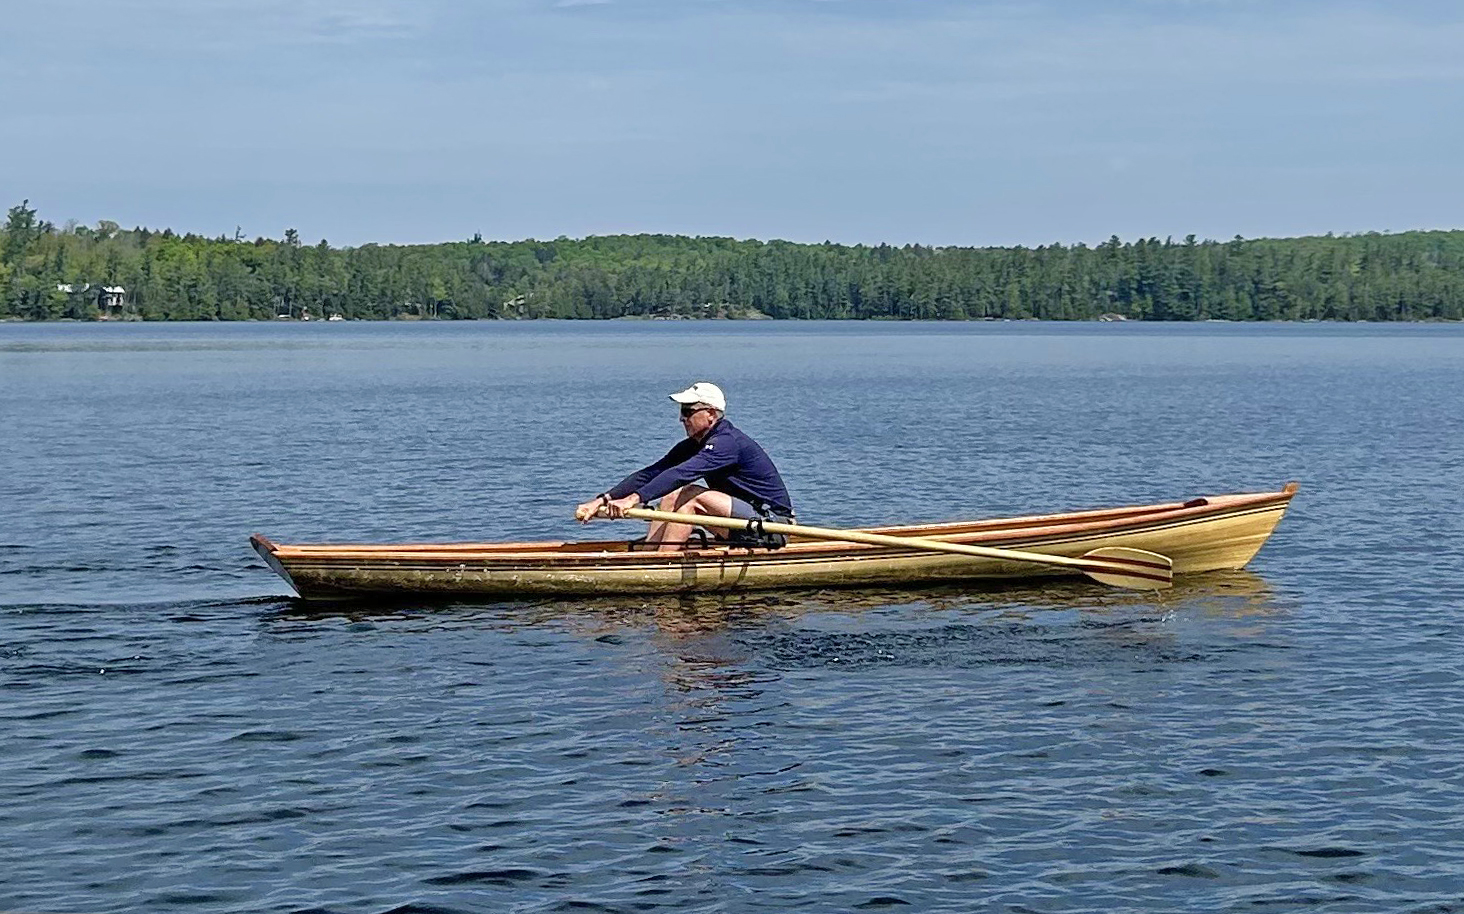
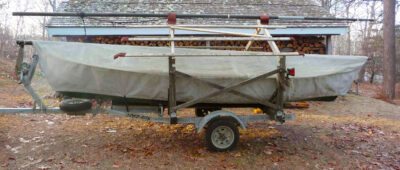
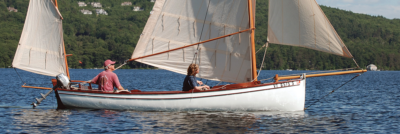
The Liz on the water
The build took 300 hours, and once I had launched the boat, I was pleased to find that, when getting in and out, it feels very stable. This is also true underway in open water even with waves exceeding 18″ and winds of about 15 knots. It glides through the water gracefully with no hint of porpoising as my weight shifts fore and aft on the sliding seat. The Liz is often referred to as elegant, and this can be applied equally to its appearance and its performance in a variety of conditions.
 Lisa Bailey
The Liz is satisfying to build, fun to row, and pleasing to look at—a good choice for the amateur builder and new rower alike.
When I launched the boat, I was new to rowing, but as I have learned proper sculling technique and have been able to get into a rhythm, I have been impressed by the speed at which Liz moves through the water (I average about 100 yards per minute). On a few occasions, the wind has picked up, but the boat has handled it well, cutting through the chop and maintaining its course. Recently, a passing pontoon boat created a 2′ wake on my beam but the Liz neither rocked crazily nor took on any water.
For an amateur boatbuilder looking for a fun yet challenging project, I would recommend the Liz; and for a novice rower, seeking an elegant and forgiving boat in which to enter the world of sliding seats and sculling, the Liz Pulling Boat is a great choice.![]()
Ty Bailey is a recently retired high school guidance counselor who lives in Bobcaygeon, Ontario, Canada. He enjoys a variety of forms of woodworking such as timber-frame construction, log-cabin building, cabinetmaking, carving, and most recently has developed a love for boat building. When not in his woodshop, Ty can be found enjoying a variety of outdoor sports such as cycling, skiing, golf, tennis, and of course, rowing.
Liz Pulling Boat Particulars
LOA: 18′ 3″
LWL: 16′ 6″
Beam: 3′ 1″
Draft: 4″
Weight: approx. 110 lbs

Full plans (price $160) and a kit (price $3,870) for the strip-planked Liz Pulling Boat are available from Newfound Woodworks.
Is there a boat you’d like to know more about? Have you built one that you think other Small Boats readers would enjoy? Please email us your suggestions.


Great job by Ty, but if I had a choice, I think that I’d prefer the lapstrake original
Thank you Ty Bailey for your article about building the Liz pulling boat. In 2019 as my first wood working project, having to buy my first hand plane, saws and other tools, with the plans, materials and fabulous guidance and coaching from Newfound Woodworks and advice from Ken Bassett, my version of Liz, I call Whisper. Whisper is a 22 ft, sliding seat double with articulating out riggers to enable me to fold them in when tying up and covering alongside a dock. It’s a terrific sculling trainer too. I’m glad to have read your article today as I consider another wherry construction project.
In answer to the comment of Ian Stewart, I believe when building a boat, you need to consider form over function. I have strip-built two examples of Ken Bassett’s pulling boat Liz.
Knowing that I would be self-launching these boats, weight was an important consideration. WoodenBoat magazine lists the weight of the lapstrake version at 125lbs, too much for me to pick up off the ground and carry myself. After leaving off all of the unnecessary components such as fake scuppers, unneeded knees, wear keels, and the outer stem, I was able to bring the weight of the strip-planked boat alone down to 70lbs. At this weight I can pick the boat up off the ground, and by balancing it on my shoulder, carry it down to the dock. I then bolt in the wooden rowing wing, that weighs 28lbs on it’s own, and away I go. Since 2017 when I launched my original Liz, we have rowed over 2,000 miles together.