Coming In From the Cold
This article was originally published on WoodenBoat Mastering Skills website
It’s a luxury to work on a boat in the controlled environment of a shed. But sufficient indoor space for a moderate-sized boat is a rare commodity in most locales, and it can be downright expensive to rent for a long-term project.
For temporary needs, construction of a permanent shed is not practical. Conversely, for perennial storage, a temporary shelter may not be economical in the long run. To address this range of needs, here are three buildings that have caught our eye over the years. Each one fits a specific niche: The half-lobster-pot shed was designed as an add-on to an existing shop, although it will also stand on its own; the bow-frame shed is a free-standing temporary shelter; and the boat barn is a no-nonsense, permanent shed.
The descriptions of these buildings are meant more as inspiration than as step wise construction details, as size of project, site of building, duration of storage, and a host of other factors will dictate much customization. We hope these examples provide good ideas for your own shed.
 Kathy Bray
This shed was designed as a temporary add-on to an existing building. However, it has also been used as a free-standing structure with some modification.
A Double-Sawn-Frame Lobster-Pot Boathouse
by Greg Rössel
I developed this shelter in a moment of exigency one January for the accommodation of a large mahogany speedboat that had been delivered to me for repairs to damage suffered in a major storm. I had space beside my shop for the boat, but it was unsheltered. What to do?
Casting about for an idea, my eyes lit upon a sepia photo on the wall of an old office. On the ways were a series of tugboats with their stout double-sawn frames securely set up with ribbands wrapped about them, serenely awaiting their planking. But, of course! For a boat shelter, I could build what amounted to half-double-sawn frames on the shop floor, production fashion. The frames could be built from scrap lumber, and fastened together with drywall screws and glue. These identical arches then could be erected like flying buttresses over the boat.
The frames are relatively light and easily assembled. After the arches are set into place, they need only to be joined together with wooden strapping and sheathed in plastic. And when the boat project is finished, the strapping can be quickly removed and the arches stacked—knocked down like a deck of cards to await the next project. How many frames will a building require?Consider them like roof rafters—the bigger the building and/or the greater the expected snow load, the more you will need.
To build the frames, begin by calculating the height and width of the structure. In my case, the height was the distance from the ground to just below the eaves of the shop roof. The width at the base was what was needed to allow for working space around the boat. With the building’s dimensions established, clear a space on the shop floor to draw the curve. Start by drawing a baseline and erecting a perpendicular, much as if you were setting up to draw a body plan on the lofting floor. After driving nails at the ends to work against, spring a flexible batten out into a curving arch similar to the midsection of a boat. How does it look? Is there enough slope near the top to shed snow and rain, yet still allow headroom to work on deck? Tweak it until it looks right (sketch in your boat, if it helps), then draw the curve. That will be the outside of the curve. Next, draw the inside face of your arch (6″ to 8″ of depth works well).
The frames, or arches, are composed of two layers of 1″-thick wood, cut with the proper curve and fitted to shape. The joints between the individual pieces should fit tightly, at near right angles to the curve, and be staggered (i.e., those on the top layer should fall roughly halfway between those of the bottom layer). When laying out your joints, check that the full depth of the frame can be gotten out of your lumber. (The joints may need to be closer in the “turn of the bilge” region.)
When it looks right, the drawn shapes can be transferred to the wood. You can do this by the process described in WoodenBoat No. 137 (“Setting Up a Building Jig”), or you can lay nails at 12″ intervals along the curve, and press the board onto these, thus transferring the points of the curve.
Cut out the first pieces on the bandsaw, and continue this process until you have made and labeled all the pieces for the bottom layer of the frame. Then repeat the steps for the pieces of the top layer of the frame. This time, the joints should fall roughly halfway between the joints of the bottom half. Now it’s time for mass production. Using the original master pieces as templates, trace and cut duplicate futtocks for as many frames as needed, until you’ve got a whole stack of pieces prepared for assembly. Fasten a series of keeper blocks along the curve drawn on the floor. These blocks will help keep things lined up during assembly.
Plug all the pieces for the bottom layer of frame No. 1 into place. They should fit snugly between the keeper blocks. For extra security, spread yellow carpenter’s glue atop the first tier. Then plug in the pieces for the top layer. Drive plenty of drywall screws through the top layer into the bottom one. The completed frame can then be lifted out of the keepers, and a new one started.
With all the frames built, determine the location of the fore-and-aft strapping, or ribbands, that will tie the whole business together. Align the whole stack of arches so they are dead square, one atop the other. Placement of strapping is basically by eyeball, but the idea is to have it fall at regular intervals along the curve of the frame. The more ribbands, the stronger the building. You should have more near the top where the greater snow load will be, less on the sides. Use a scrap piece of ribband to mark the locations along the outer corner of the top arch, then transfer these marks onto the rest of the stack of frames using a square. The ribbands should be flush with the outside edge of the curve; the easiest way to accomplish this is to bend ribband-sized strips snugly between the ribbands. If the curve is severe, cut kerfs in the backs of these strips to ease the bend.
When using the frames against an existing structure as I did, sockets made of plywood—or steel rafter brackets from the lumberyard—are needed to support the tops of the arches. And a sill board is needed, too. It must be as long as the building and blocked level to support the bottoms of the frames.
It’s best to begin construction with the center frame. Hoist it up, plug it into the socket on the building. Then swing the frame out until it is perpendicular with the building, screw-fasten the lower end to the sill board, and temporarily brace it plumb with diagonals. This arch will be the keystone of the operation, as the remaining frames will be braced from it, with ribbands added as needed to aid alignment. When all the frames are set up plumb and perpendicular, fasten them with screws. Fasten a few diagonal braces internally to stiffen the structure and prevent wracking. The ends can be customized by adding doors, access ports for lumber, or whatever. Don′t forget the ribbands.
What about using the trusses in a free-standing structure? It can be done. Vertical legs must be added to replace the strength afforded by the adjoining building. And hefty gussets and diagonal bracing are important here to resist downward pressure of snow load; also, plenty of cross bracing on the back wall is required. As with any free-standing plastic building, thought should be given to placement. It should only be used in sheltered locations, and be well anchored, either to the ground or the boat.
Several products work well for sheathing, and these are described on page 75. I prefer the plastic specifically designed for greenhouses. It is rugged, difficult to tear, and quite resistant to UV breakdown from the sun. It is also extremely flexible at low temperatures, and it seems plenty slippery to let snow slide off.
How does this building work as a shop? Quite nicely. Plenty of room for workbench and storage racks on the vertical wall, lots of space to work on deck, and enough solar heating and sunlight in February to make you feel like you’re in the Bahamas even if you’re in Maine.
Greg Rössel, a boatbuilder and WoodenBoat School teacher, is a frequent contributor to WoodenBoat.
 Kathy Bray
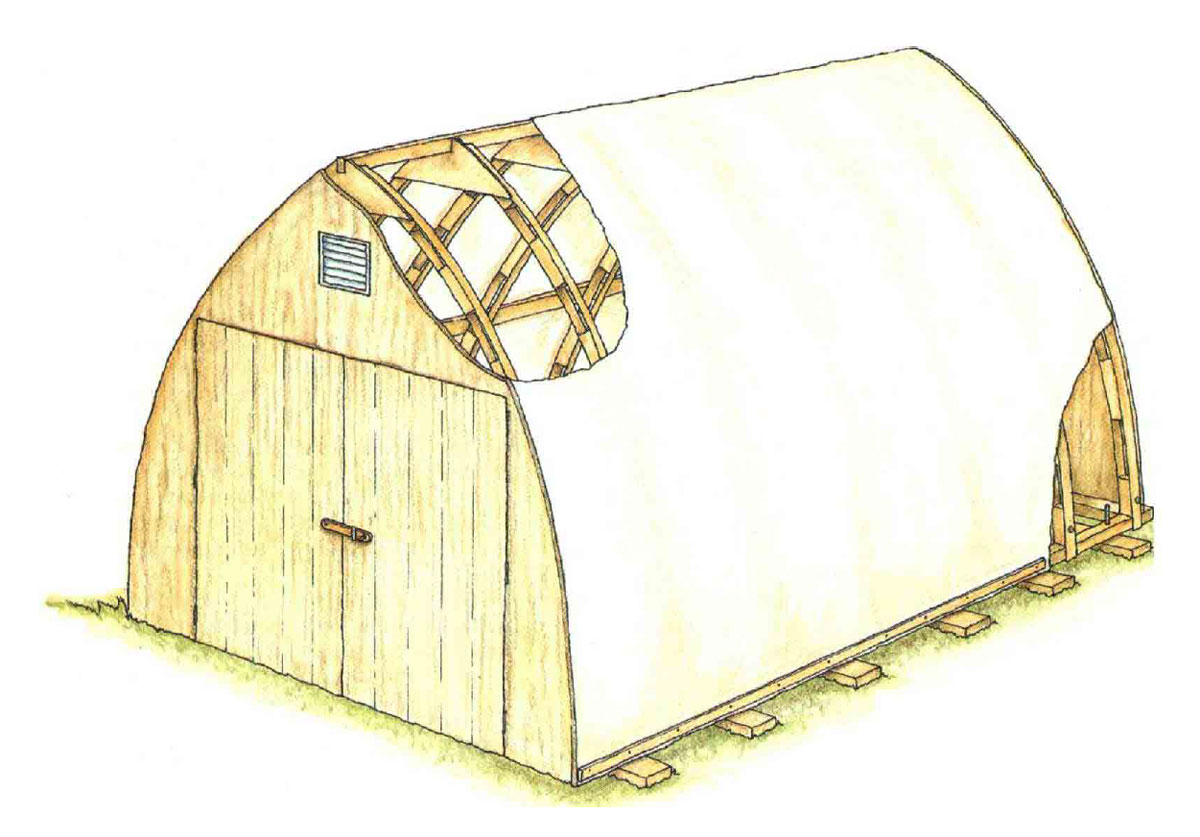
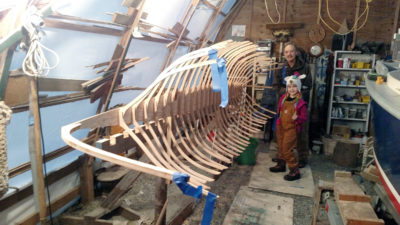
A well-built bow-roof shed, with a good foundation, end walls, and covering, will last for many years.
The Bow-Roofed Shed
by Matthew P. Murphy
The origin of the bow-roofed shed is somewhat apocryphal; the concept has appeared in various pieces of boatbuilding literature for a number of years—including this magazine, back in issue No. 48. But the idea of this building is so elegant—and cost-effective—that an article on boat sheds would be incomplete without it.
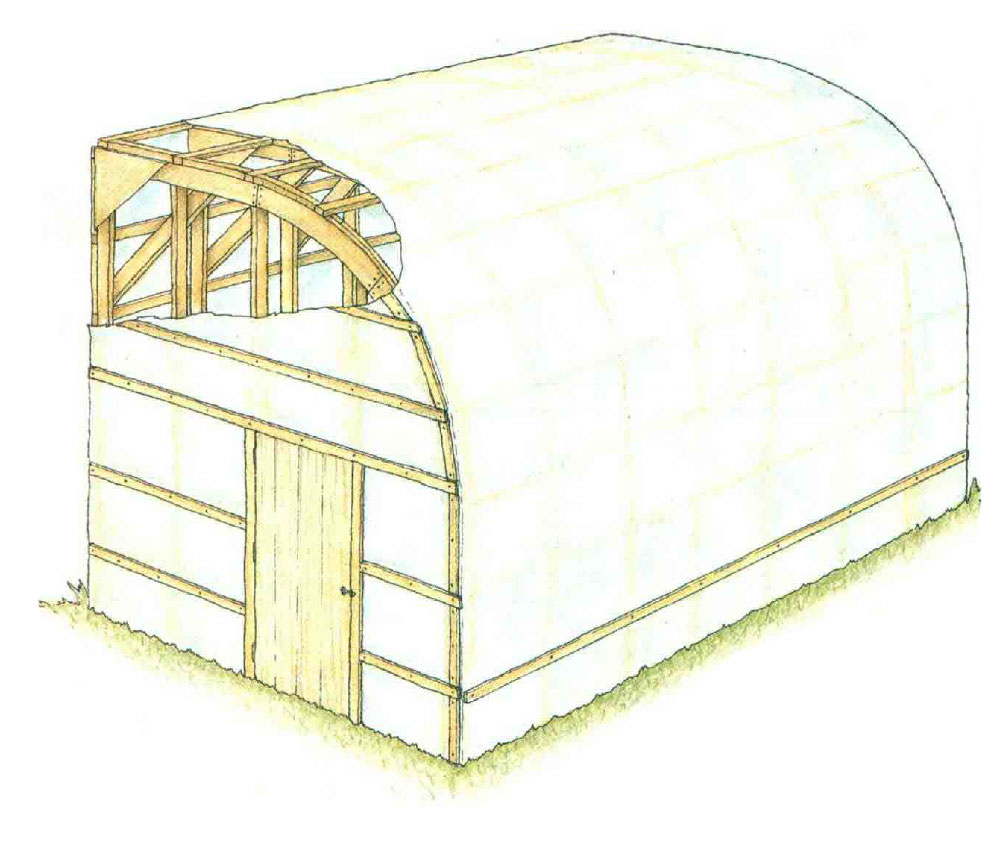
The idea is simple: Trussed bows are preformed by bending furring strips (1 x 3″ strapping) around a series of 2 x 3″ spacer blocks that are temporarily fixed to the shop floor; the resulting bow experiences very little springback. Paired bows are then set up on level sills to form an arch, a ridgepole is fastened, the structure is braced longitudinally and diagonally, and covered. But there are many variations—some of which can turn this big ol’ tent into a semi-permanent shed.
For example, many inexpensive bow-frame sheds use simple stakes to support the sills; longer-lasting structures are built on kneewalls of wood or concrete. Solid end-walls, collar ties, and a partial sheathing of plywood will also solidify things.
To house a short-term boatbuilding or repair project, boatbuilder David Stimson has designed a 14 x 32′ bow-roofed shed, expandable to 20 x 60′ overall. He sells plans for this, as well as a 25-page instruction manual (information below). I used Stimson’s instruction as a departure point when I built my own shed, but I wanted a few modifications.
The original Stimson plans suggested assembling the bows with drywall screws as fasteners. This is fine for a temporary building—and inexpensive. But, within a year, several of the spacer blocks in my bows had cracked across the grain as a result of this construction. Dave now suggests through-fastening all of the spacer blocks.
To allow for quick disassembly, I used plywood gussets to join my “half bows,” and notched these to receive a ridgepole. I thought I was being original until I learned in reading The Gougeon Brothers on Boat Construction that I’d been beat by 15 years. However unoriginal, the concept works well, and has the added benefit of fulfilling the role of collar ties, as well.
Simple collar ties, however, are also a good option. A few years ago, Brooklin Boat Yard erected a bow-frame shed to house a 60′ P-class sloop. At 20′ high, this building was probably the maximum height for this type of construction, considering available lengths of lumberyard strapping. This shed would break apart into two 18 x 30′ units. Despite generous diagonal strapping, the finished building was a bit limber in a blow. Collar ties stiffened the structure considerably, although they also lowered the controlling height of the shed.
Here at WoodenBoat, our Friendship sloop, BELFORD GRAY, spends its winters in one of these buildings—probably the best example I’ve seen. The kneewalls, about 3′ high, are staked into the grassy substrate with generous lengths of rebar. The building is covered in white heat-shrink plastic, except for the first 4′ of the sides. These are sheathed in plywood, which adds great rigidity to the structure, as do the plywood endwalls, complete with hinged barn doors. These features also add a degree of permanence, which may or may not be desirable.
Heat-shrink plastic is marvelous stuff for a shed cover; well applied, it can be downright elegant. But there are other options, and David Stimson has laid down a few estimates of longevity: clear polyethylene, six months; reinforced poly tarp, one year; greenhouse plastic, three to six years; and canvas, five to ten years. But I’d stick with heat-shrink plastic; it looks great, shrinks very tight (the thunder of a loose-fitting cover can be unnerving and distracting), and lasts…well, the shed here at WoodenBoat is going on three years, and there are no signs of failure.
Since plastic has virtually no thermal mass, heating one of these buildings can be inconsistent. I haven’t tried this yet, but I think a sheathing of plastic on the inside of the building would create a good dead air space, making the building more energy-efficient.
A plastic-wrapped structure is essentially a sealed bubble, and condensation is a major issue; the shed must be ventilated. BELFORD GRAY’s home uses store-bought vents mounted in the endwalls.
My materials cost to build a bow-roofed shed was about$1 per sq ft in 1993, which is a substantial savings over many manufactured systems—which run from $4 to $15 per sq ft. My total labor time, with two people working, was about 20-25 hours.
Plans for a bow-roof shed are available from Stimson Marine, RR I Box 524, River Rd., Boothbay, MT 04537; 207-633-7252.
 Kathy Bray
This boat barn is a no-nonsense permanent building with good access and ventilation.
A Boat Barn for All Seasons
by Ken Textor
Creating my own building for the storage, maintenance, and construction of wooden boats was quite different from other homes and barns I’ve built. The criteria for my “boat barn” had to take into consideration some special needs of wooden boat ownership: a space with adequate light and ventilation that wouldn’t create excessive drying; a handy and easily used working space with year-round access; and long-term thrift.
Oddly enough, thrift was one of the prime considerations for building my 22 x 38′ boat barn. Before the barn, I always relied on fitted canvas covers to preserve my three wooden boats through Maine’s long winters. As the cover for my 30′ sailboat began to wear out, I priced a replacement. Around $2,500 was the average quote. Looking 20 years into the future, I could easily see $10,000 being spent on several new covers for each of the boats. From my experience in residential construction, I knew I could build the shell of a building for less than that. Moreover, such a building would add permanent value to our property. Thus was born the idea of a boat barn.
Special boat-oriented design considerations were the driving forces behind the construction plan details. From the experience of other wooden boat owners who store their vessels indoors, I knew a concrete foundation was ill-advised. Concrete floor and sills will draw moisture out of the air, making the boat’s seams open up more than they would during open storage, one owner told me. Moreover, keeping a concrete floor clean is an impossible chore. And working on a concrete floor is hard on your feet, knees, and back.
So I opted for a gravel floor with a crushed stone surface. The gravel stays slightly moist year ’round, which helps keep drying of the boat to a minimum. There’s also just enough “give” in the crushed stone to keep chronic feet, knee, and back problems from developing. And, the gravel resists frost-heaving much better than the exposed ground Mother Nature usually provides. And the crushed stone on top of the gravel also prevents gobs of sand, sawdust, etc., from attaching to your shoes and being tracked around the shop or into the car and home. Most sawdust just falls between the stones.
For a foundation, I sunk creosoted posts 6′ into the ground. This is not only cheaper than concrete posts, it actually will increase the longevity of the structure. That’s because after you fasten 6 x 10″ hemlock sill beams between the posts, the wooden poles eliminate moisture problems. Concrete posts tend to “sweat” in the summer, forming a perpetually soggy spot where the beams and posts join. Wooden posts don’t sweat and, in my experience, they don’t wear out any more quickly than concrete.
Although 6 x 10″ sill beams may sound a bit excessive, my engineering tables called for at least that size because of other special boat barn considerations. First, I knew I had to build a structure without any center supports. Tractor-trailer boat haulers have enough problems maneuvering in relatively small spaces without adding more structures they must avoid. So posts were out. Additionally, I knew the barn’s loft floor would have to be at least 14′ above the stone-and-gravel floor, again to accommodate a large trailered boat. Thus all the weight of the barn had to be supported by the sills under the outer walls. With the creosoted posts set 8′ apart, the 6 x 10″ sills were a little better than adequate.
The cavernous open interior space also created other problems, not the least of which were large wind-loading surfaces, plus a long and potentially expensive clearspan for the loft floor. I solved these problems by using a solution from my days of building post-and-beam structures: the diagonal brace. Although I had ruled out a post-and-beam structure as too expensive, the diagonals normally used in such a building became extremely valuable. Sticking with 2 x 6″ spruce studs for the walls, I used cut-in 1 x 6″ diagonal oak braces at all the exterior corners, both uppers and lowers. Likewise, the 2 x 10″ spruceloft joists were locked in place with more interior 2 x 6″ spruce diagonal bracing. This added more strength to the entire building and has prevented any wracking from strong coastal winds. The diagonals also reduced the unsupported clearspan from 22′ to 14′ and made the loft floor available for all kinds of gear stowage and (someday!) a heated, dust-free paint and varnish room.
Having once worked in busy farm barns, I knew my boat barn’s design would have to include serious ventilation. A haymow in July is the last stop before Hades itself, and all that hull-drying heat can usually be felt throughout an ordinary barn. But in my boat barn, I specified the use of shiplap boards for the walls and a large cupola in the middle of the roof. This has worked extremely well. Even on the hottest summer days, the barn’s upper floor is no hotter than the air outside. The hotter it gets outside, the more the cupola literally sucks the air out of the building. Moreover, that open gravel floor constantly cools and moistens air that seeps in through the shiplap boards. Thus, the barn actually stays cooler than the air outside, sometimes by as much as 10°.
Without the worry of excessive drying, I didn’t hesitate to put lots of large, multipaned windows in my boat barn—ones I had salvaged from a local school. I was specifically looking for such multipane, thermally inefficient windows for two reasons. First, lots of small panes mean the occasional breakage common in heavily used woodworking areas is cheaper and quicker to fix. Additionally, thermally inefficient glass will tend to keep interior temperatures down.
With these school windows, there was the added bonus of the glass being extra thick, which keeps breakage to a minimum. The windows also allow some solar heating in the winter when I close the cupola and the morning sun shines bright and early.
Finally, in designing a building, 1 knew it would be impossible to foresee everything, particularly when jockeying boats around to best advantage. So I specified large access doors on three of the four walls. The biggest are the two hinged doors on the north side, which have a combined opening of 12′ wide and 13′ high. A 10 x 10′ sliding door on the east side has allowed me to remove the small boats when late winter frost heaves still block the north side opening. And a smaller hinged door (4 x 8′) on the south side allows me to put items like saw horses, sheets of plywood, and staging planks temporarily outside while I rearrange the work area inside.
Total construction time for this boat barn was 10 weeks. I built it alone, working about 60 hours a week on it. The total materials cost was $8,700 in 1994, including the hired bulldozer operator who spread the gravel and stone, and the post-hole digger who was a local power company subcontractor. The cupola was added after the first winter. It was built on the ground, disassembled, and then reassembled on the roof. A 4 x 4′ trapdoor positioned in the loft floor above the cockpit of our sailboat makes annual gear removal very easy. Access to the barn is gained through our potting shed, which is attached to another barn, which is attached to the house. Thus I no longer have to work on boats while exposed to the wind and weather.
Ken Textor, a writer and woodworker from Arrowsic, Maine, wrote about refastening in WoodenBoat No. 135.
A Final Note
Be sure to check local building codes and regulations before beginning any of these projects.
Small boat winterization guide
There are some important steps you need to complete before you move your boat into its winter storage. Follow our complete boat winterization guide for more ways to protect your craft from the elements and more. ![]()


The University of Illinois Small Farm Buildings had a wonderful pamphlet offering a Rigid Arch Design that could be sized up or down (almost infinitely). Glued gussets at the peak and both eaves means there are no ties at the eaves, which is wonderful for boat building. The gussets take all the stress. Built to their design it makes a terrific boat building barn. I have a copy of the pamphlet. I built a 20’w x 40’L and 19’H (at the peak) in 1980, it’s still going strong.