While a GPS chart plotter is our primary source of navigation information, printed charts and chart books still have a place on our boats. The challenge, particularly on outboard skiffs, is keeping the charts in place. Lay a chart or chart book down, and it may blow away. Try holding it for a look while underway, and it will bend and flap in the breeze.
 Photographs by the author
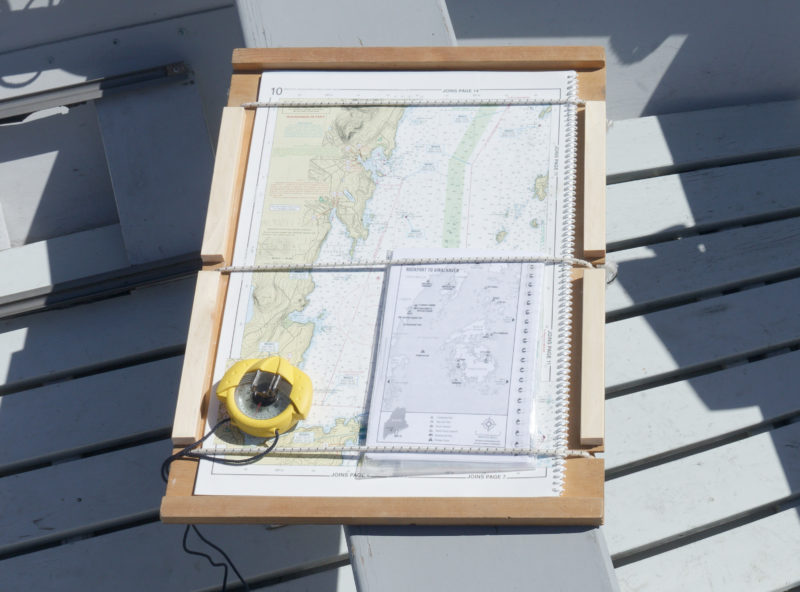
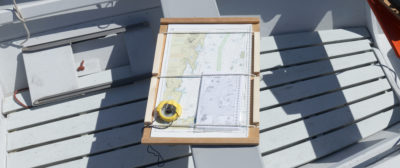
The toggles have been pulled across a waterproof chart book and tucked under the holder, with the shock cords nestled in slots on the right side. A campsite guide protected by a plastic bag also fits under the cords. The compass is not attached to the holder.
I designed and built a couple of portable chart holders three years ago. They’re simple—a piece of plywood with shock cords to hold the chart in place and strips around the perimeter to provide a little lee for the edges of the chart. Ben Fuller has seen and used our holders, and this winter decided to build a couple. He modified the design, and we’ll see how his work this summer.
Plywood 3⁄16″ to 1⁄4″ (4mm to 6mm) thick works well for the panel. I used marine plywood, but any plywood with exterior glue and a smooth surface should be satisfactory. A bit of weight is desirable to help keep the unit from being blown about, but 3⁄8″ thick might be a bit heavy. Plywood also has the advantage that it floats. While we haven’t dropped a holder overboard yet, it is certainly a possibility, and it’s reassuring to know we’ll be able to recover the errant charts.
The wood strips around the edges can be rectangular or quarter oval in section (or a fancier profile, if desired). Rectangular strips are simple to rip from a board if a tablesaw is available. Wood molding strips from a good lumberyard are an alternative. The rectangular strips on the original holders are 1⁄2″ high. Ben used 11⁄16″ quarter-round molding, which I will use when I build additional holders. The original holders initially had strips only along the top and bottom. We found that strips on the sides are also needed to shelter the edges of the chart when the holder is turned sideways to the wind. It isn’t necessary for the strips to be continuous around the sides. Ben established that installing the strips in sections around the hole notches is more efficient than installing the strips and then drilling the holes and cutting the notches.
The shock cords at the top and bottom should be within a couple of inches of the edges of the chart to keep the chart corners from lifting in the wind, but not so close that the chart can slip out. The strips along the holder should extend close to the corners for the same reason.
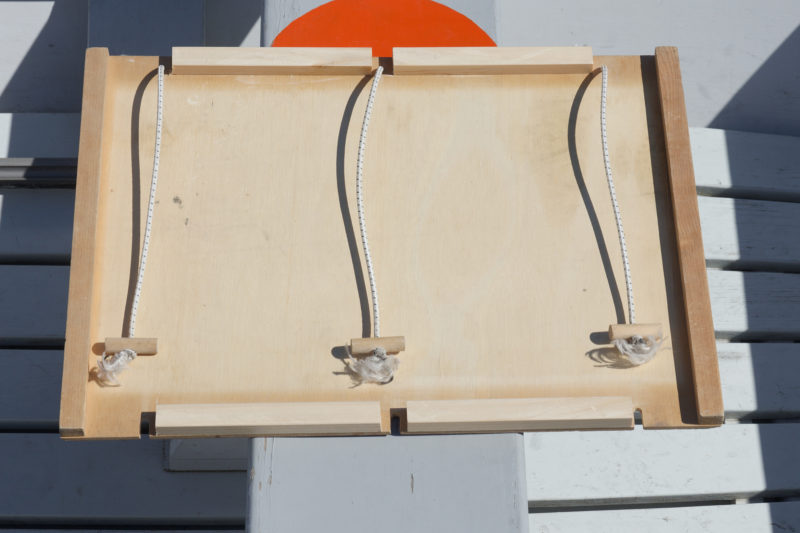
The author’s chart holders have three separate shock cords with toggles. The borders keep the wind from lifting the edges of the chart.
The shock cords are held in place by holes on one side and notches on the other side. The originals have three shock cords with a wood dowel toggle on the free end. The ends through the holes have simple overhand knots which keep the shock cord from pulling through. Each cord slips into a notch and is held in place by the toggle. To fasten the shock cords in place, stretch them so that the toggle will fit around the edge of the panel with the cord in the notch. Releasing the cords just requires pulling the toggles around the edge of the panel. Be sure to hold onto the toggles so they don’t whip around and hit someone.
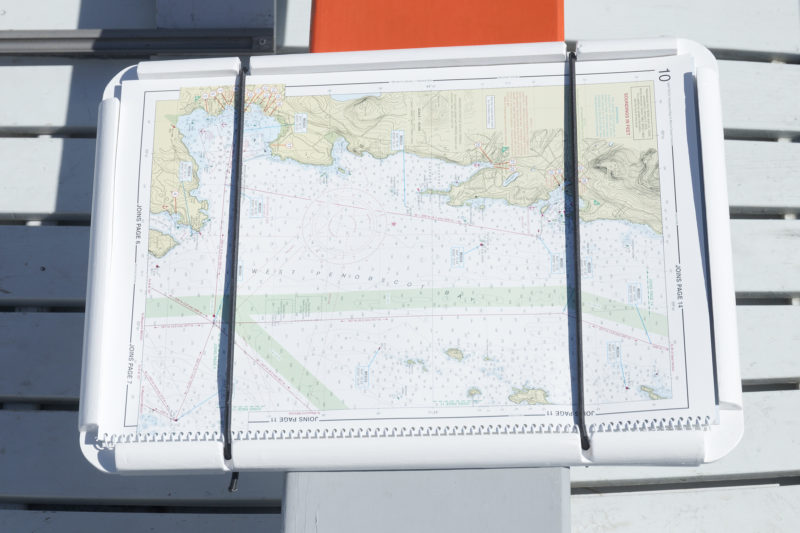
Ben Fuller’s chart holder has a perimeter of quarter round with the corners open to drain rain and spray.
Ben’s holders have a single length of shock cord with the ends of the cord through holes on one side of the panel. The shock cord goes through a wood strip with holes drilled in the ends. The strip takes the place of individual toggles.

A single length of shock cord has its ends knotted under the left side of the holder. The middle of the cord is passed through holes in the ends of a length of quarter round that serves as a single toggle for both slots in the side of the holder. Short lengths of quarter round on the bottom of the holder, each set directly under the short lengths visible here, engage the toggle as well as trap the thwart to keep the holder from sliding off.
I use 3⁄16″ shock cord, and it is strong enough; 1⁄8″ should also work well, particularly if three cords are used. A 1⁄4” shock cord would probably be satisfactory, but I wouldn’t use a larger diameter.
The holes for the fixed ends of the shock cords are the same diameter as the shock cord, and the notches are wider. With the 3⁄16″ -diameter shock cord we used 1⁄4″ -wide notches, though wider also works. To create a notch, start by drilling a hole with a diameter the desired width of the notch, then saw from the edge to the hole.
The shock cord only needs to be snug enough to hold the chart in place when stretched over it. Any tighter makes it more difficult to secure the cord in place and to push it out of the way when the buoy you are looking for is under the shock cord. The original holders span 13 1⁄2″ from the holes to the notches, and the shock cords are stretched about 2 1⁄2″ inches when in place.
Use a water-resistant glue to fasten the strips to the plywood. No need for epoxy or other high-strength glue; Titebond III is satisfactory. If you also use nails or staples to hold fasten the strips with or without glue, make sure they are galvanized or stainless.
The space between the strips needs to be large enough for the chart or chart book to fit; if it is much larger than that, the edges of the chart may be blown by the wind.
We carry two chart books and holders when underway in an outboard skiff. One stays by the helm while the other is used by a passenger/navigator—we’ve found it’s nice to be able to hand passengers a chart to look at. The holders are also useful when a portable flat surface is needed, such as a place to write notes. Ben has painted his holders white so he can write directly on them. His holders also have molding strips on both sides of the back so they can be placed over a thwart without risk of sliding off.

The chart holder can be built to accommodate a chart case if the charts are not printed on waterproof paper.
My original chart holders were put to use immediately after construction three years ago and never received any coats of finish. They do stay inside when not in use, and so far, they’ve held up with only some darkening of the wood from sun exposure.![]()
David Cockey’s interest in traditional boats and boatbuilding began while he was a teenager in Maryland. His influences include Howard Chapelle’s books and John Gardner’s columns in National Fisherman. Several years ago, following a career in automotive research and engineering, David and his wife moved to Maine. His current activities focus around boat design and documenting historic boats, and his boating includes monitoring Maine Island Trail Association islands in Penobscot Bay.
You can share your tips and tricks of the trade with other Small Boats Magazine readers by sending us an email.



Nice!
Good design, I like the Ben’s wood-strip holder. I’ll construct similar holder – one additional thing will be some kind of box or something to hold pencil and a triangle and divider etc.
I’m going to add a flat waterproof plastic envelope to mine velcroed under the chart. I use the Small Craft Nav Aid, which means that all I really need is it and a pencil.
Those are great looking holders. I think the single large toggle could be omitted if the notches were slightly J shaped so that the loop of shock cord could not be released unintentionally. Toggles on the end of shock cords always make me a little bit nervous!
When I was young, we seldom strayed far from our regular cruising grounds in Mahone Bay, Nova Scotia. My father had glued a chart to a piece of 1/4” ply, and coated over it with matte varnish. We could write directly on the chart with a pencil, and erase our marks after we were done. That chart board lasted for many years, although it did yellow with time.
can you flip the board over and include a pic? I don’t fully understand how the end under the board is secured.