I’ve always set up my boats so that I can insert oarlocks and place oars with one hand. It’s a useful technique that comes in handy on multiple occasions: beach launching, when I can’t preset oars and locks but need to push off hard and get going; changing rowing positions while underway in order to trim the boat for shifts in wind and waves; switching between sailing and rowing, when I need to ship or remove oars and locks while handling other gear; and, when coming alongside another boat or dock, it helps to be able to quickly ship one oar and its lock while using the other oar to scull the boat in sideways.
Many conventional horn oarlocks have a lanyard or little chain with a toggle leading from an eye on the bottom of the lock through the socket. Such connections are useful for tying the oarlock to the boat, but for me they render one-handed operation impossible—I need one hand to insert the oarlock and another to pull-through the lanyard or chain, either of which can get bunched up inside the socket. However, tying your locks to the boat is undoubtedly a good thing, so a lanyard that doesn’t feed through the socket is called for.
 Photographs by the author
.
Tying a Lanyard Around the Oarlock Stem
Some locks have a flange beneath the horns, which provides a bearing on the socket. Between the flange and the horns is a groove. A lanyard can be tied with a constrictor knot or clove hitch, or spliced into place so that it lays snugly in the groove. Splicing is a little tricky as the splice must be tight enough to keep the eye in the groove, but it is a neat solution—long-lasting and it won’t unravel.
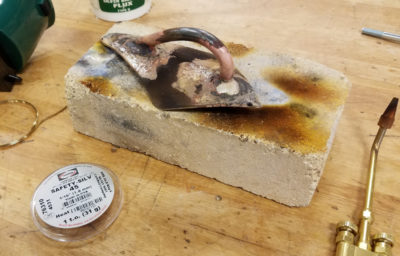
Drilling a Hole for an Oarlock Lanyard
Some oarlocks, such as patent swivel and antique locks, have a lanyard eye on one of the horns. Both Duckworks and Shaw & Tenney sell horn oarlocks with eyes.
But if you don’t want to invest in new oarlocks you can make eyes in your existing locks. In a conventional open-horn lock, there is enough material in the web below the horns to drill a 1⁄8″ hole. Doing this with a drill press works best if you block up the horns so that the lock is exactly horizontal. Use a center punch to make a dimple to guide the drill bit, clamp everything tight, and drill. If you don’t have a drill press and are working with a hand-held drill, use a bit of wood to support the lock when punching a good dimple, then put the horns of the lock into a vise so that it is vertical and upside down.

Make sure the bit is sharp, use a slow speed, and take care to keep the drill perpendicular to the oarlock. Buff the sharp edge at each end with a small fine file.
Modifying Round Oarlocks
Round oarlocks are available online and in most marine-supply stores. Being permanently attached to the oars, they are ideal for inexperienced rowers, liveries, or dinghies used as tenders, but they do slide around when not in use and can damage nice finishes. Nevertheless, they can be useful for rough-water rowing, but I find I need two hands to set the oarlock into the socket: one lifting the oar, the other inserting the lock.
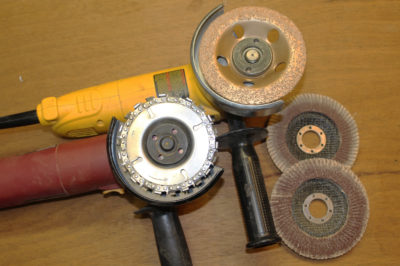
You can transform round locks into horn oarlocks that provide the benefit of open horns (letting you change oars and set up with one hand) together with the oar retention associated with round oarlocks which is useful when sea conditions are rough. To modify the round oarlock, you must cut it, which does take some courage. Measure the oar’s diameter 1′ or so up from the shoulders of the blade. Mark that measurement on the top of the round oarlock, and cut through, using a hacksaw or metal-cutting bandsaw. File the edges of the cut surfaces until rounded over and smooth.

You now have a horn lock but with a narrow opening; the oarlock can’t come off the oar unless it is slid down toward the blade, but the lock and the oar can be separated. Also, the tighter curve of the modified oarlock holds it against the leather better than would a traditional horn oarlock. Round oarlocks don’t have a web in which to drill for a lanyard, but you can splice or hitch a lanyard into the groove just beneath the cradle.
Modifying a Gaco Oarlock
When Christopher Cunningham reviewed the Gaco oarlocks, I was impressed and wrote to John Murray, the developer, to ask if he’d ever tried them without the gate. He hadn’t but sent me a pair of seconds to test. It was easy to cut off the gate, and the polymer horns, ungated, seemed strong and sturdy. I tried them in my relatively heavy dory and could easily one-hand each lock into place then drop in the oars. I could switch between oars—I often carry a pair of oars 6″ shorter than my principal pair, to use when rowing upwind into whitecapping waves—and, while I’ve not spent hours push-rowing with them, which would strain the unsupported side of the lock, I have pulled hard and spun the dory around often, and there are no signs of flexing or failure in the locks. The advantage of the Gacos over a traditional horned oarlock is that they are quieter and less wearing on oar leathers.

Making Oarlock Lanyards
For oarlock lanyards, use a lightweight small-diameter line: 1⁄8″ three-strand cotton line is readily available at hardware stores, or look for three-strand tarred nylon seine twine (#60 is a good size) often sold as fishnet twine. Both can be spliced in place.

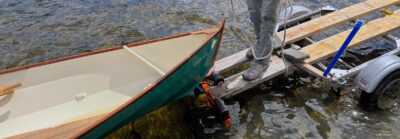
When creating the lanyards, think about how you will use them in the boat, which will determine how long they need to be. You may have only one rowing position and a convenient stringer immediately below it. Or you may have two rowing positions and only one set of oarlocks, in which case you will want to make the lanyard long enough to reach either position without being untied. Lanyards can be tied to a fixed point, but if you want to easily move and unfasten them, make an eyesplice in the bitter end of the lanyard large enough for the lock to pass through. The loop can then be fed through a fastening point and over the lock to hold it in place. Boats built with a smooth interior may not have a riser or stringer on which to fasten a lanyard, but a hole drilled near the edge of a thwart is a neat way to create a belay point.

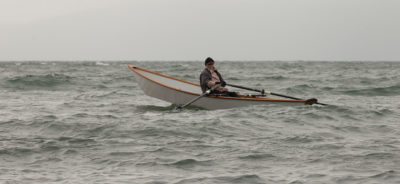
The author’s North Shore Dory with modified Gaco oarlocks
Whichever oarlock and arrangement you choose for your boat, getting your oars and oarlocks set up for one-handed operation will be pleasing every time you leave the dock. Having untied the boat, you can step aboard and then, holding on to the dock with one hand, set up the outboard lock and insert the oar. Now, with your dock hand, you can push off and set up the other lock and oar—no fuss, no drama, just control.![]()
Ben Fuller, curator emeritus of the Penobscot Marine Museum in Searsport, Maine, has been messing about in small boats for a very long time. He is owned by a dozen or more boats: kayaks, canoes, a skiff, a ducker, and a sail-and-oar boat.
Read “North Shore Dory,” Ben’s profile of the early 1900s dory design, here.
You can share your tips and tricks of the trade with other Small Boats readers by sending us an email.


On our rowboats we tie a small weight on the end of a short lanyard coming off the usual hole at the bottom of the oarlock (eg a couple of large washers). This weight will pull the lanyard through the socket and allow one-handed placement of oarlock in socket. The weight is large enough to not pass through socket, thus also effectively tying the oarlock to the socket and the boat.
This is an interesting article, thank you for it Ben! I have also struggled with a chain and toggle on horned oarlocks and still didn’t have peace of mind because a link pulled apart at least once (could have been some unreasonable force on it; I don’t remember). I like your idea for modification of the round locks and might try it. But I don’t much mind damage to my oars (they are made from 2x lumber and 1/4″ plywood so far) and like keeping everything together. So I now use a system inspired by a suggestion in R.D Culler’s book “Boats, Oars, and Rowing”. I use round locks (not cut) with a leather but no button. Instead a narrow line runs from the inner edge of the leather to the top of the blade, secured with rolling hitches. That lets me pull the oars in but prevents them from ever sliding out too far. I’ll add some pictures. (You can see I am not a very serious amateur boatbuilder, with this eye-balled cheap oar design and the different colors from trying to use up old paint.)
Thanks Ben, interesting to see different priorities. My oars are in captive oval locks, which are themselves captive in the useable length of rope-wrap “leathers”. I do not have to worry about them becoming separated. After once losing an oar overboard at a critical time, due to snagging on weed, each oar has a lanyard with a snap. The snap clips onto lines run the length of the cockpit (for clipping things on). The boat has 3 sets of sockets plus extended standing sockets, and I can grab an oar loom with its lock one handed to move between them. When not in use and for transport, mounted big rubber pole clips hold the oars with the captive locks away from where they can do any damage.
I’ve seen the weight and lanyard system, and it works. I’ve never done it as I pull my oarlocks out of the boat when trailering to keep them from dinging up things as I haven’t made roadworthy carriers. And I generally just have one set of locks aboard rowing solo. But it does work well.
One thing a friend showed me is the use of locks in trailering. For many boats you will find that there will be a set of oarlock sockets just aft of your after tie down. If you insert oarlocks there and run the tie down through them it helps with fore and aft positioning and aids in dealing with chafe.
Variants on the lanyard and round lock system apparently were common in the livery era where the lanyards kept the oars on their leathers, kept the oars aboard, and kept the locks with the oars. Sometimes the lanyard was tied or spliced tightly around the loom down near the blade.