 Photos and video by the author
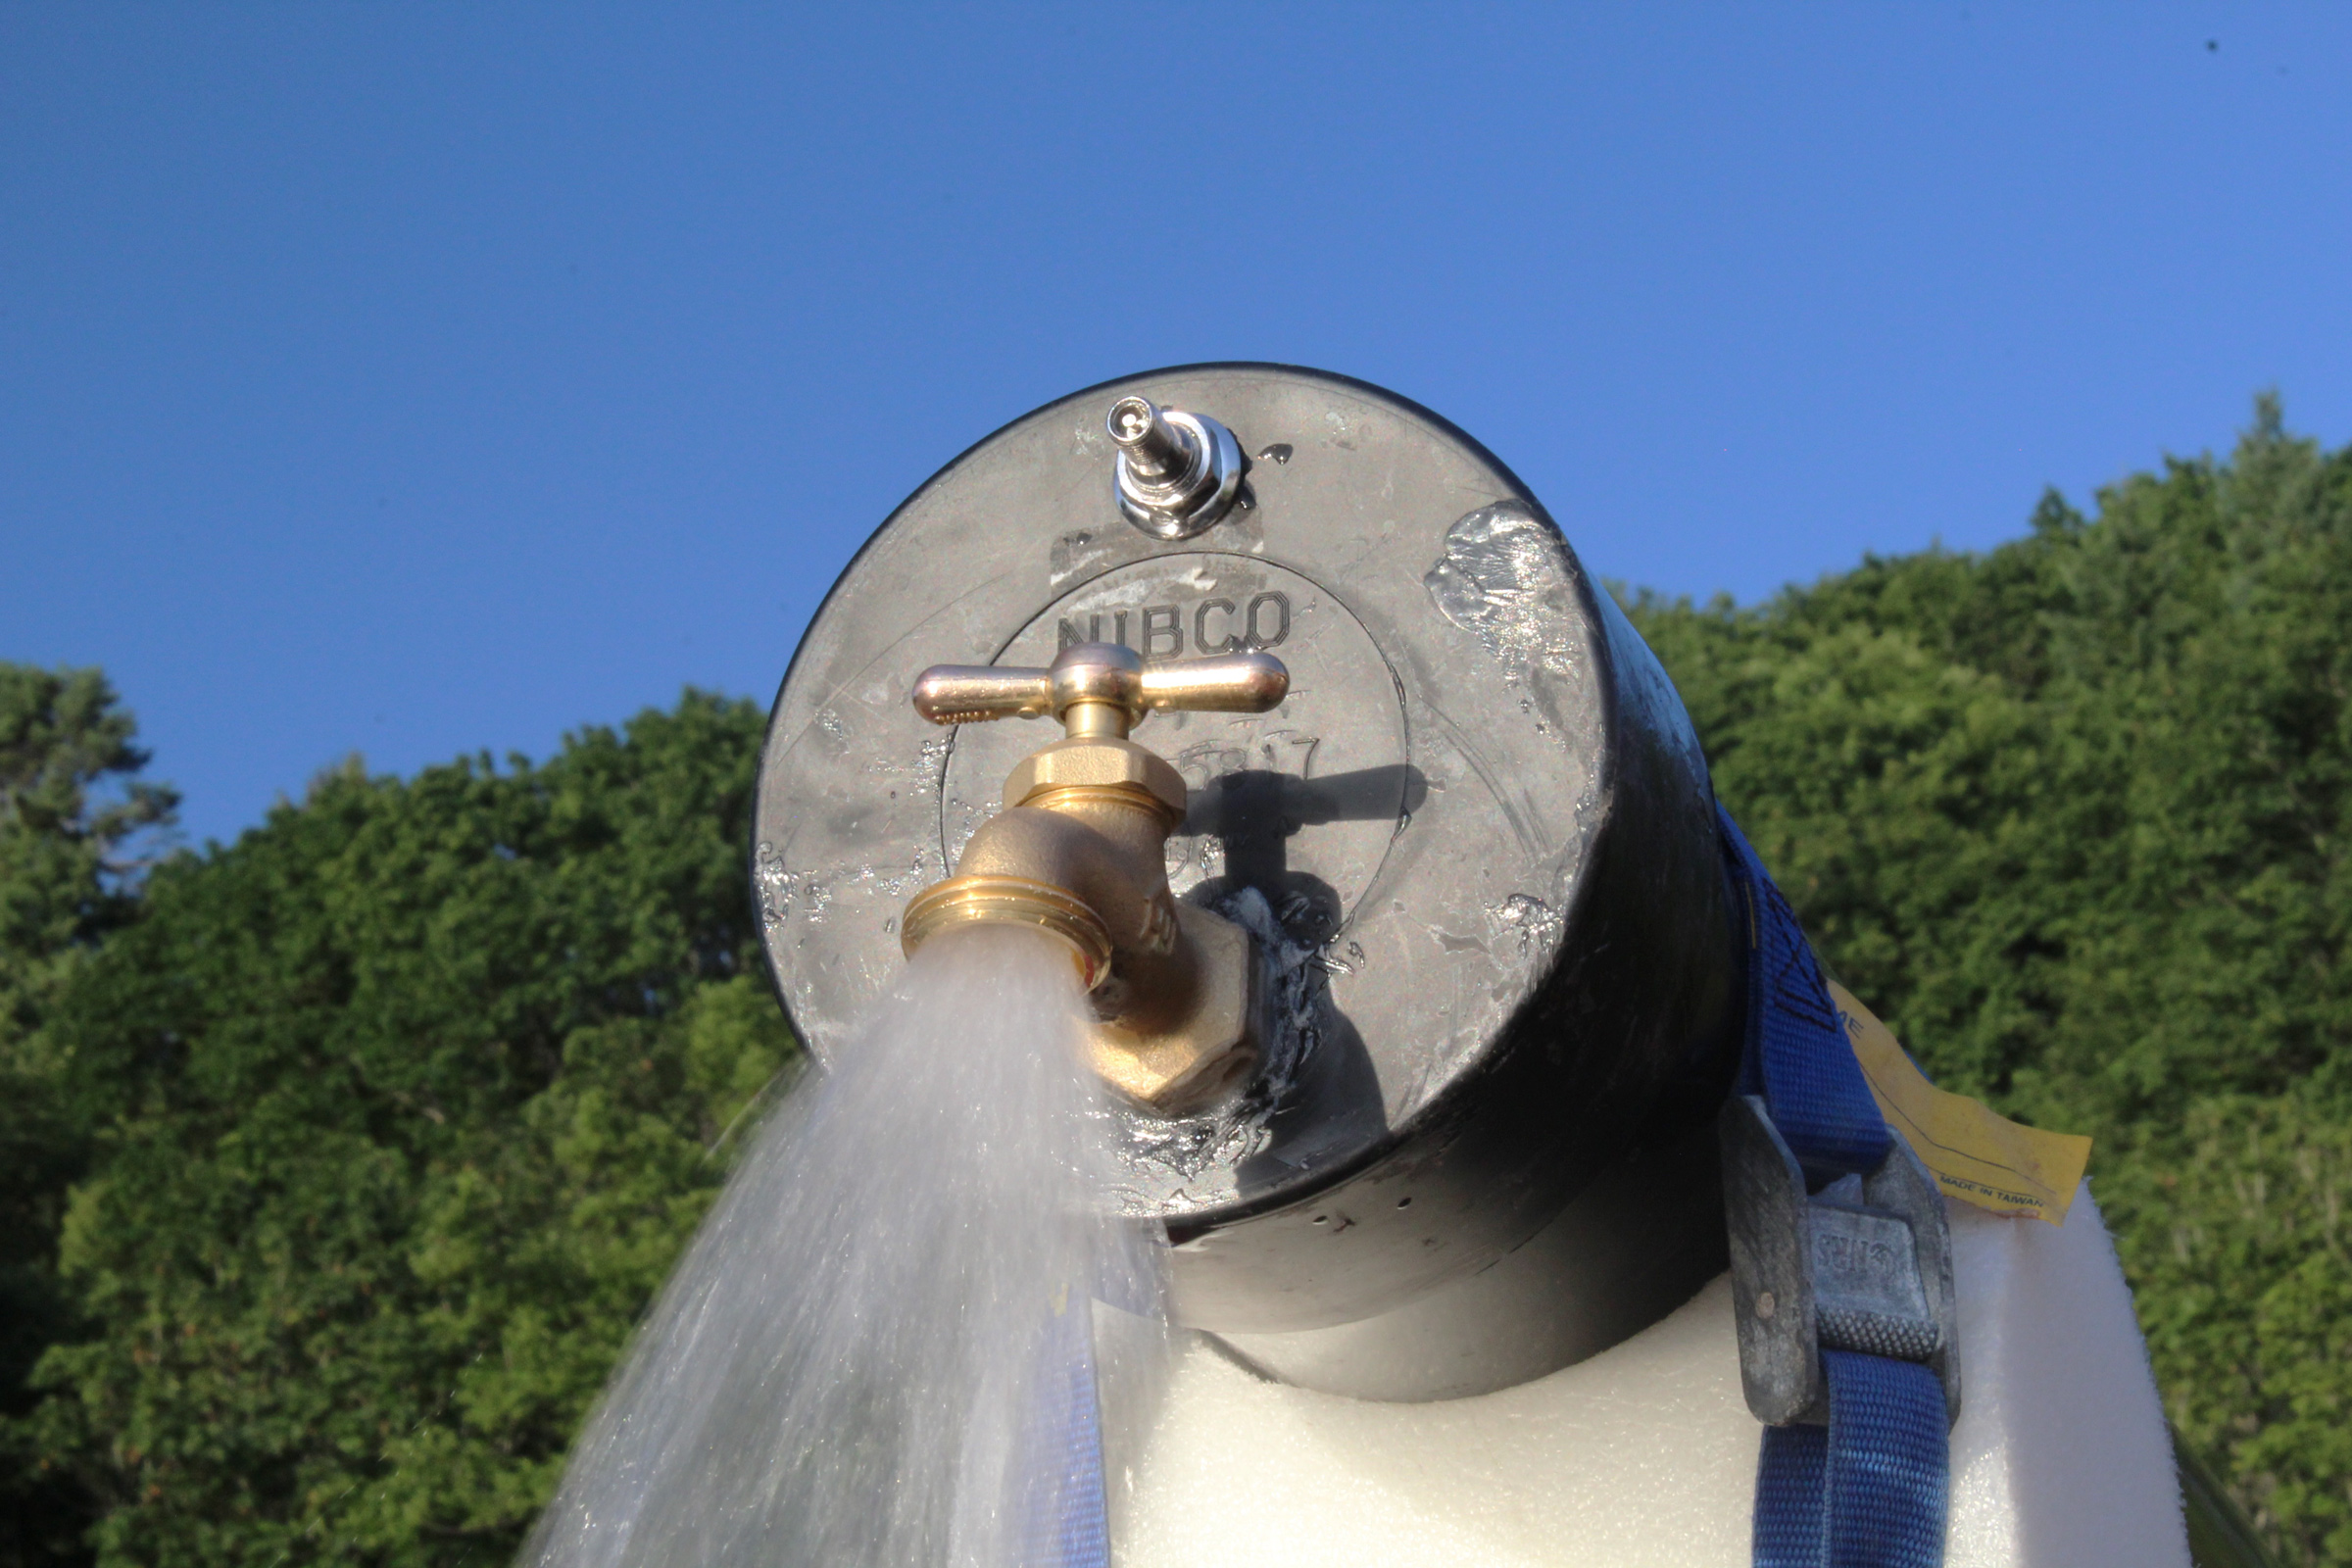
With the pressure in the tank at 40 to 50 psi, the water flows as powerfully as it does from my outside faucets at home.
There are just a couple of launch ramps in my part of Puget Sound that are equipped with hoses to give boats, trailers, and sandy or muddy boots a fresh-water rinse before I hit the road to get back home. So, to keep from making a mess of the car or having salt water to eat away at my trailer, I made a pressurized water tank for my car’s roof rack.
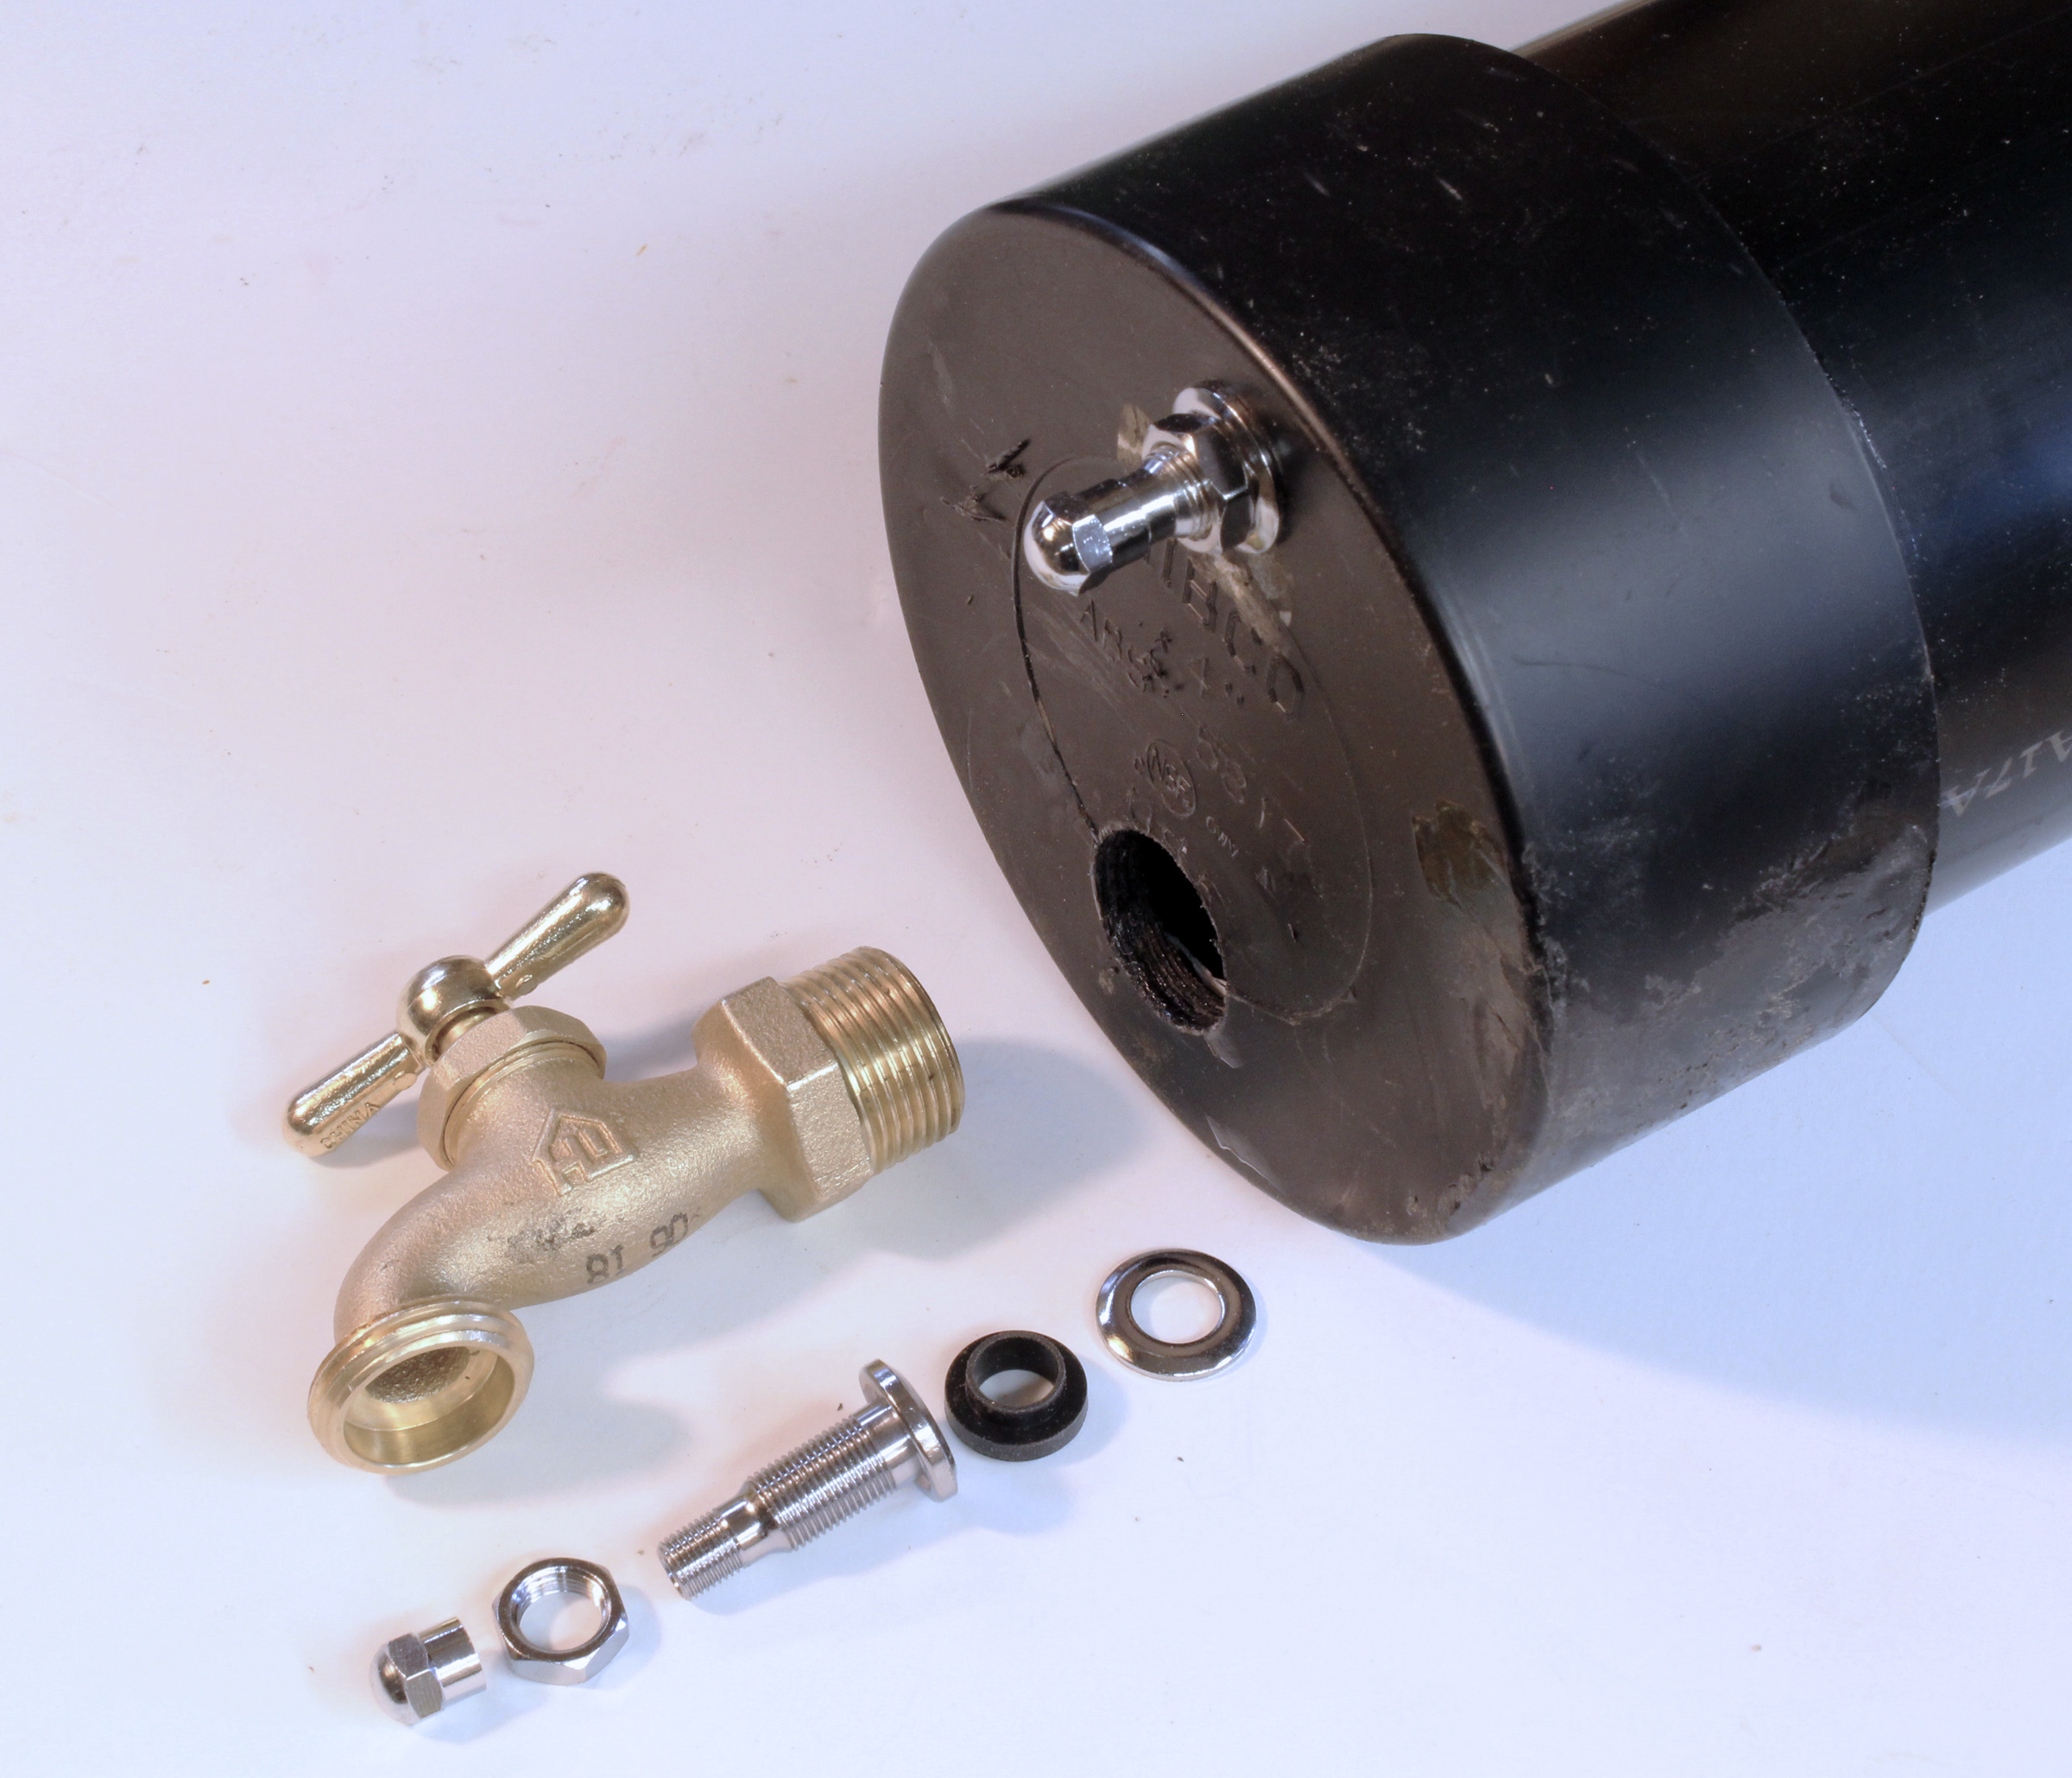
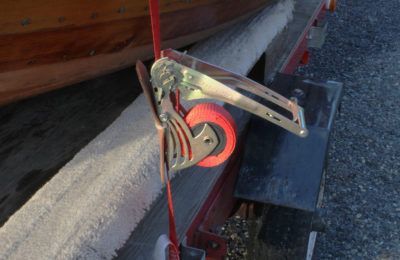
The back end of the tank has a cap that is drilled for a hose bib and a Shrader inflation valve.
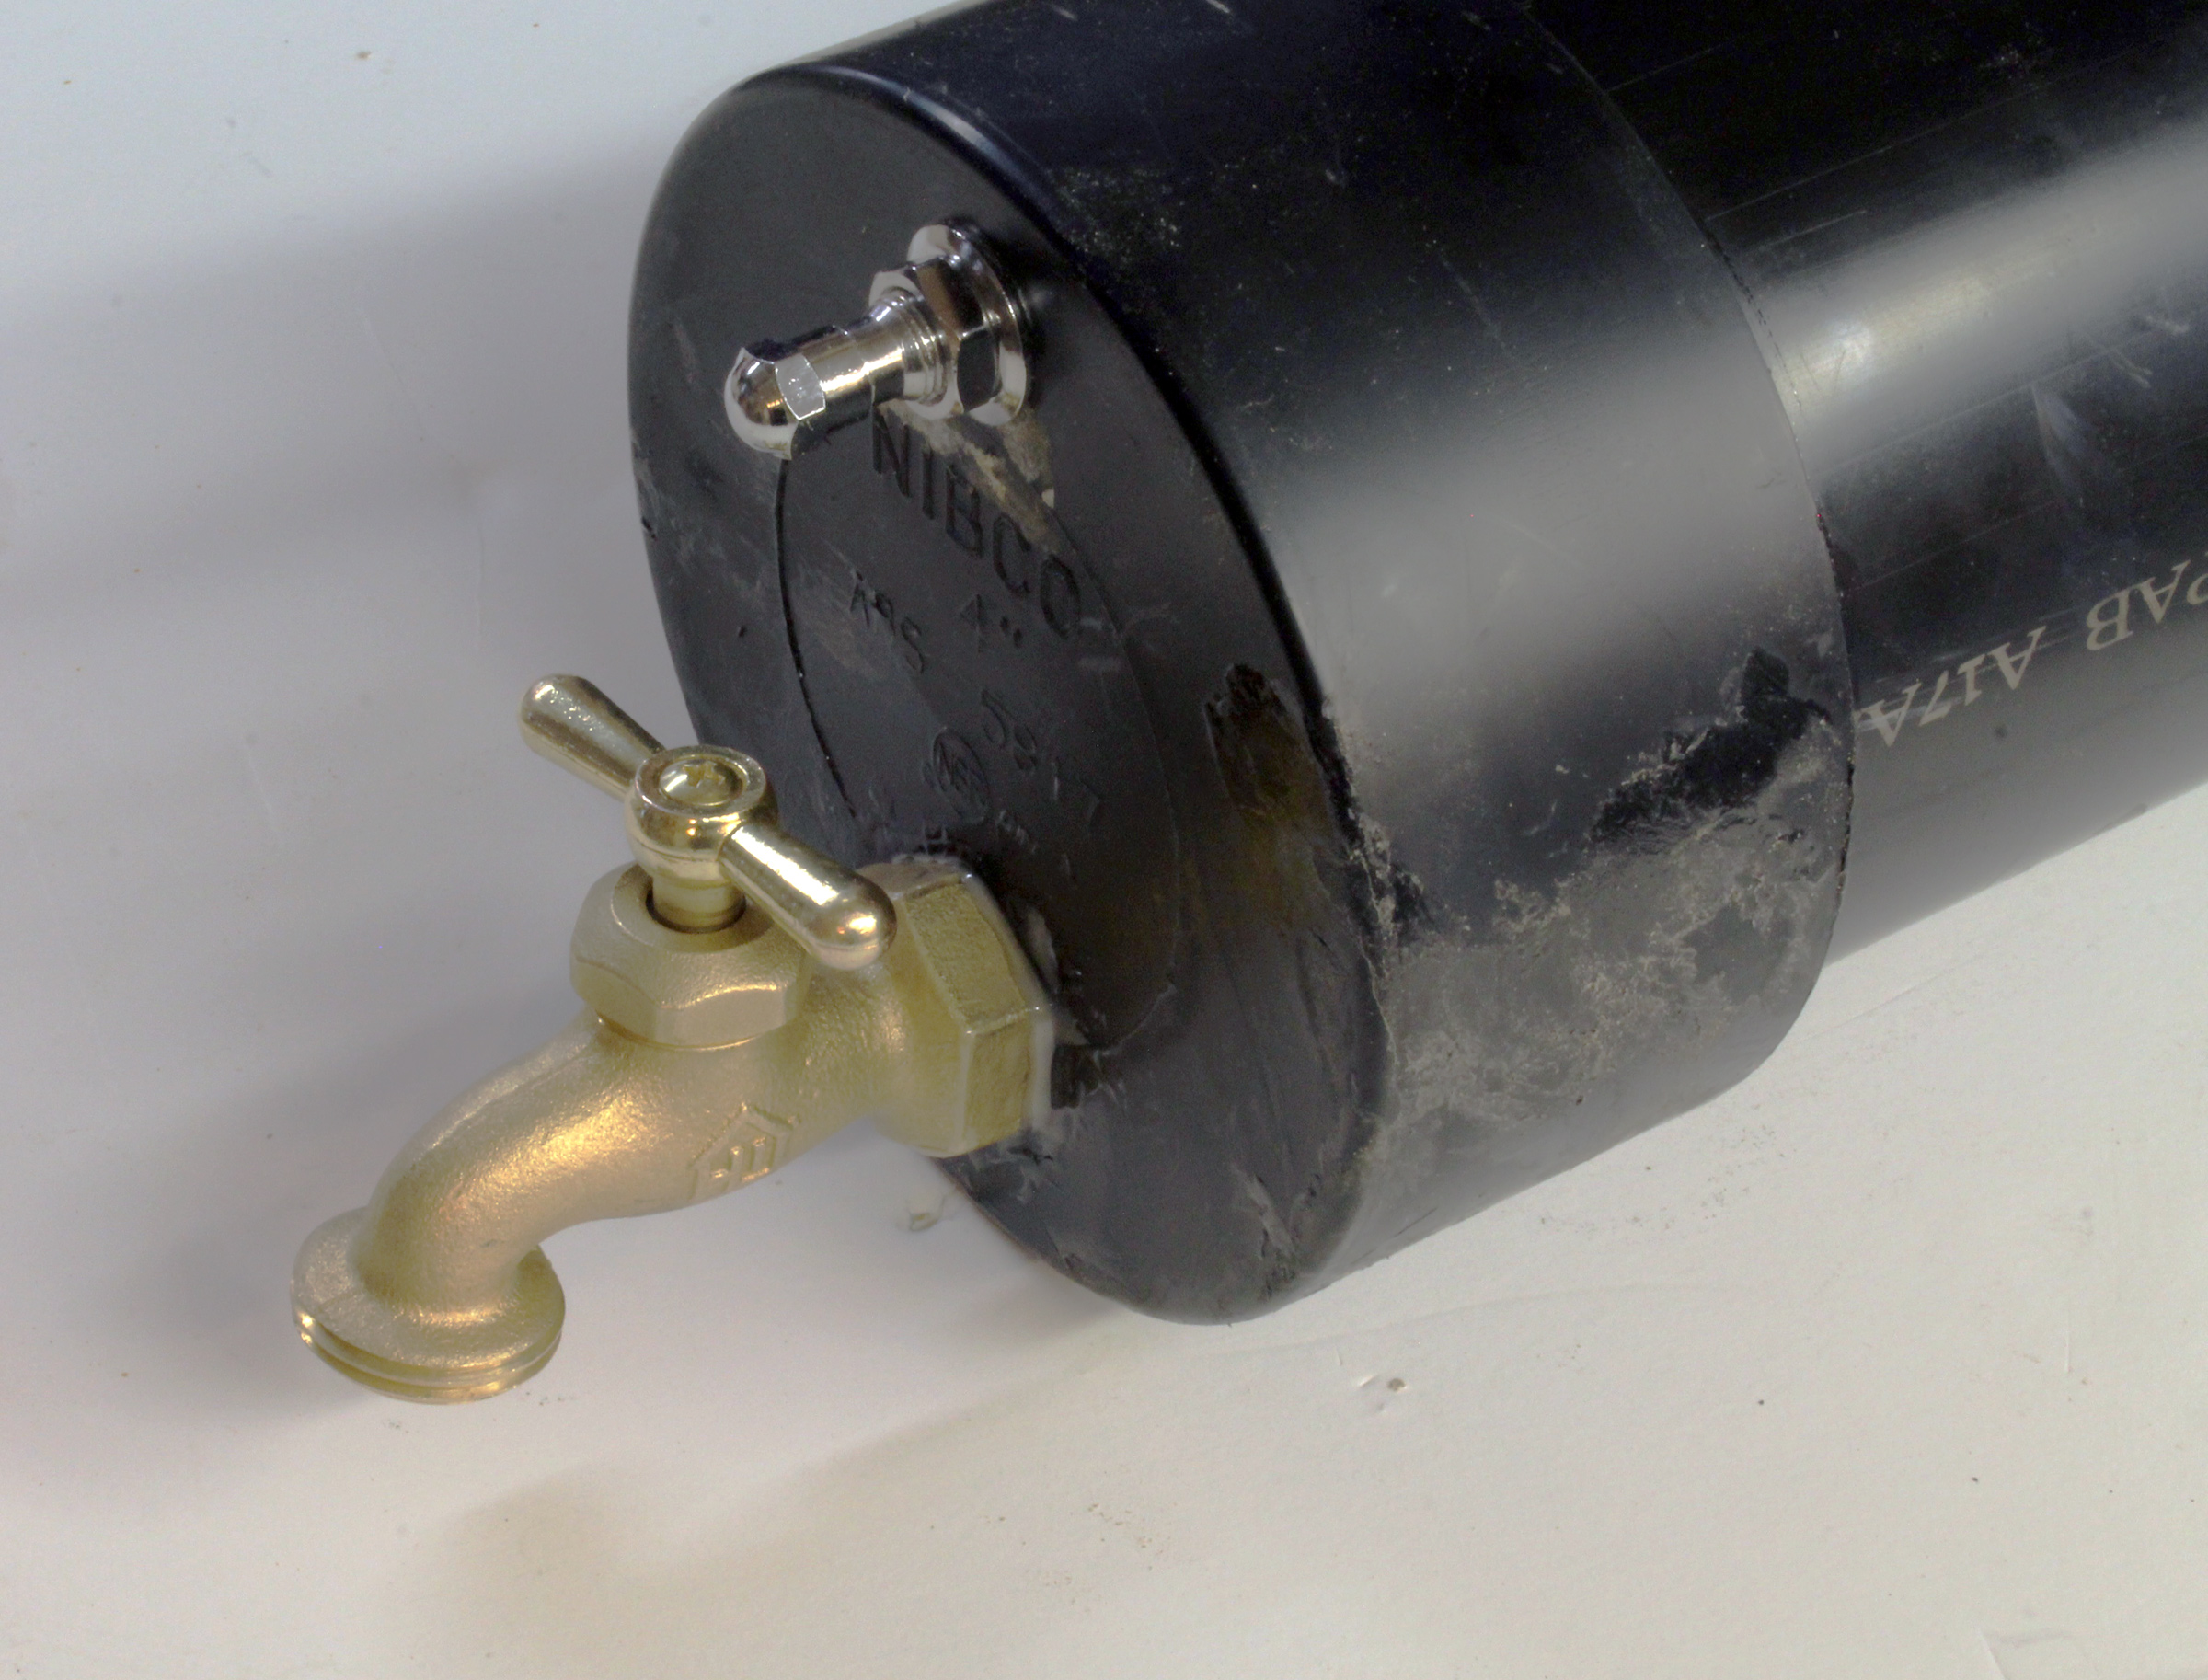
The Shrader valve’s interior flange and gasket keeps it airtight. The bib relies on its threads and a two-part urethane ABS-compatible adhesive to seal it to the pipe cap.
The parts are all commonly available at home-improvement and auto-parts stores. The core of my tank is a 6-1/2′ length of 4″ ABS drain pipe, cut to match the length of my Chevy Blazer roof. On the forward end of the pipe is a 4″ x 3″ closet elbow. It serves as an opening to fill the tank and has a 3” cleanout adapter and plug to close the tank. There are other fittings that can do the job as long as they create a fill opening above the pipe and can be sealed airtight. The back end of the tank has a glued-on cap.
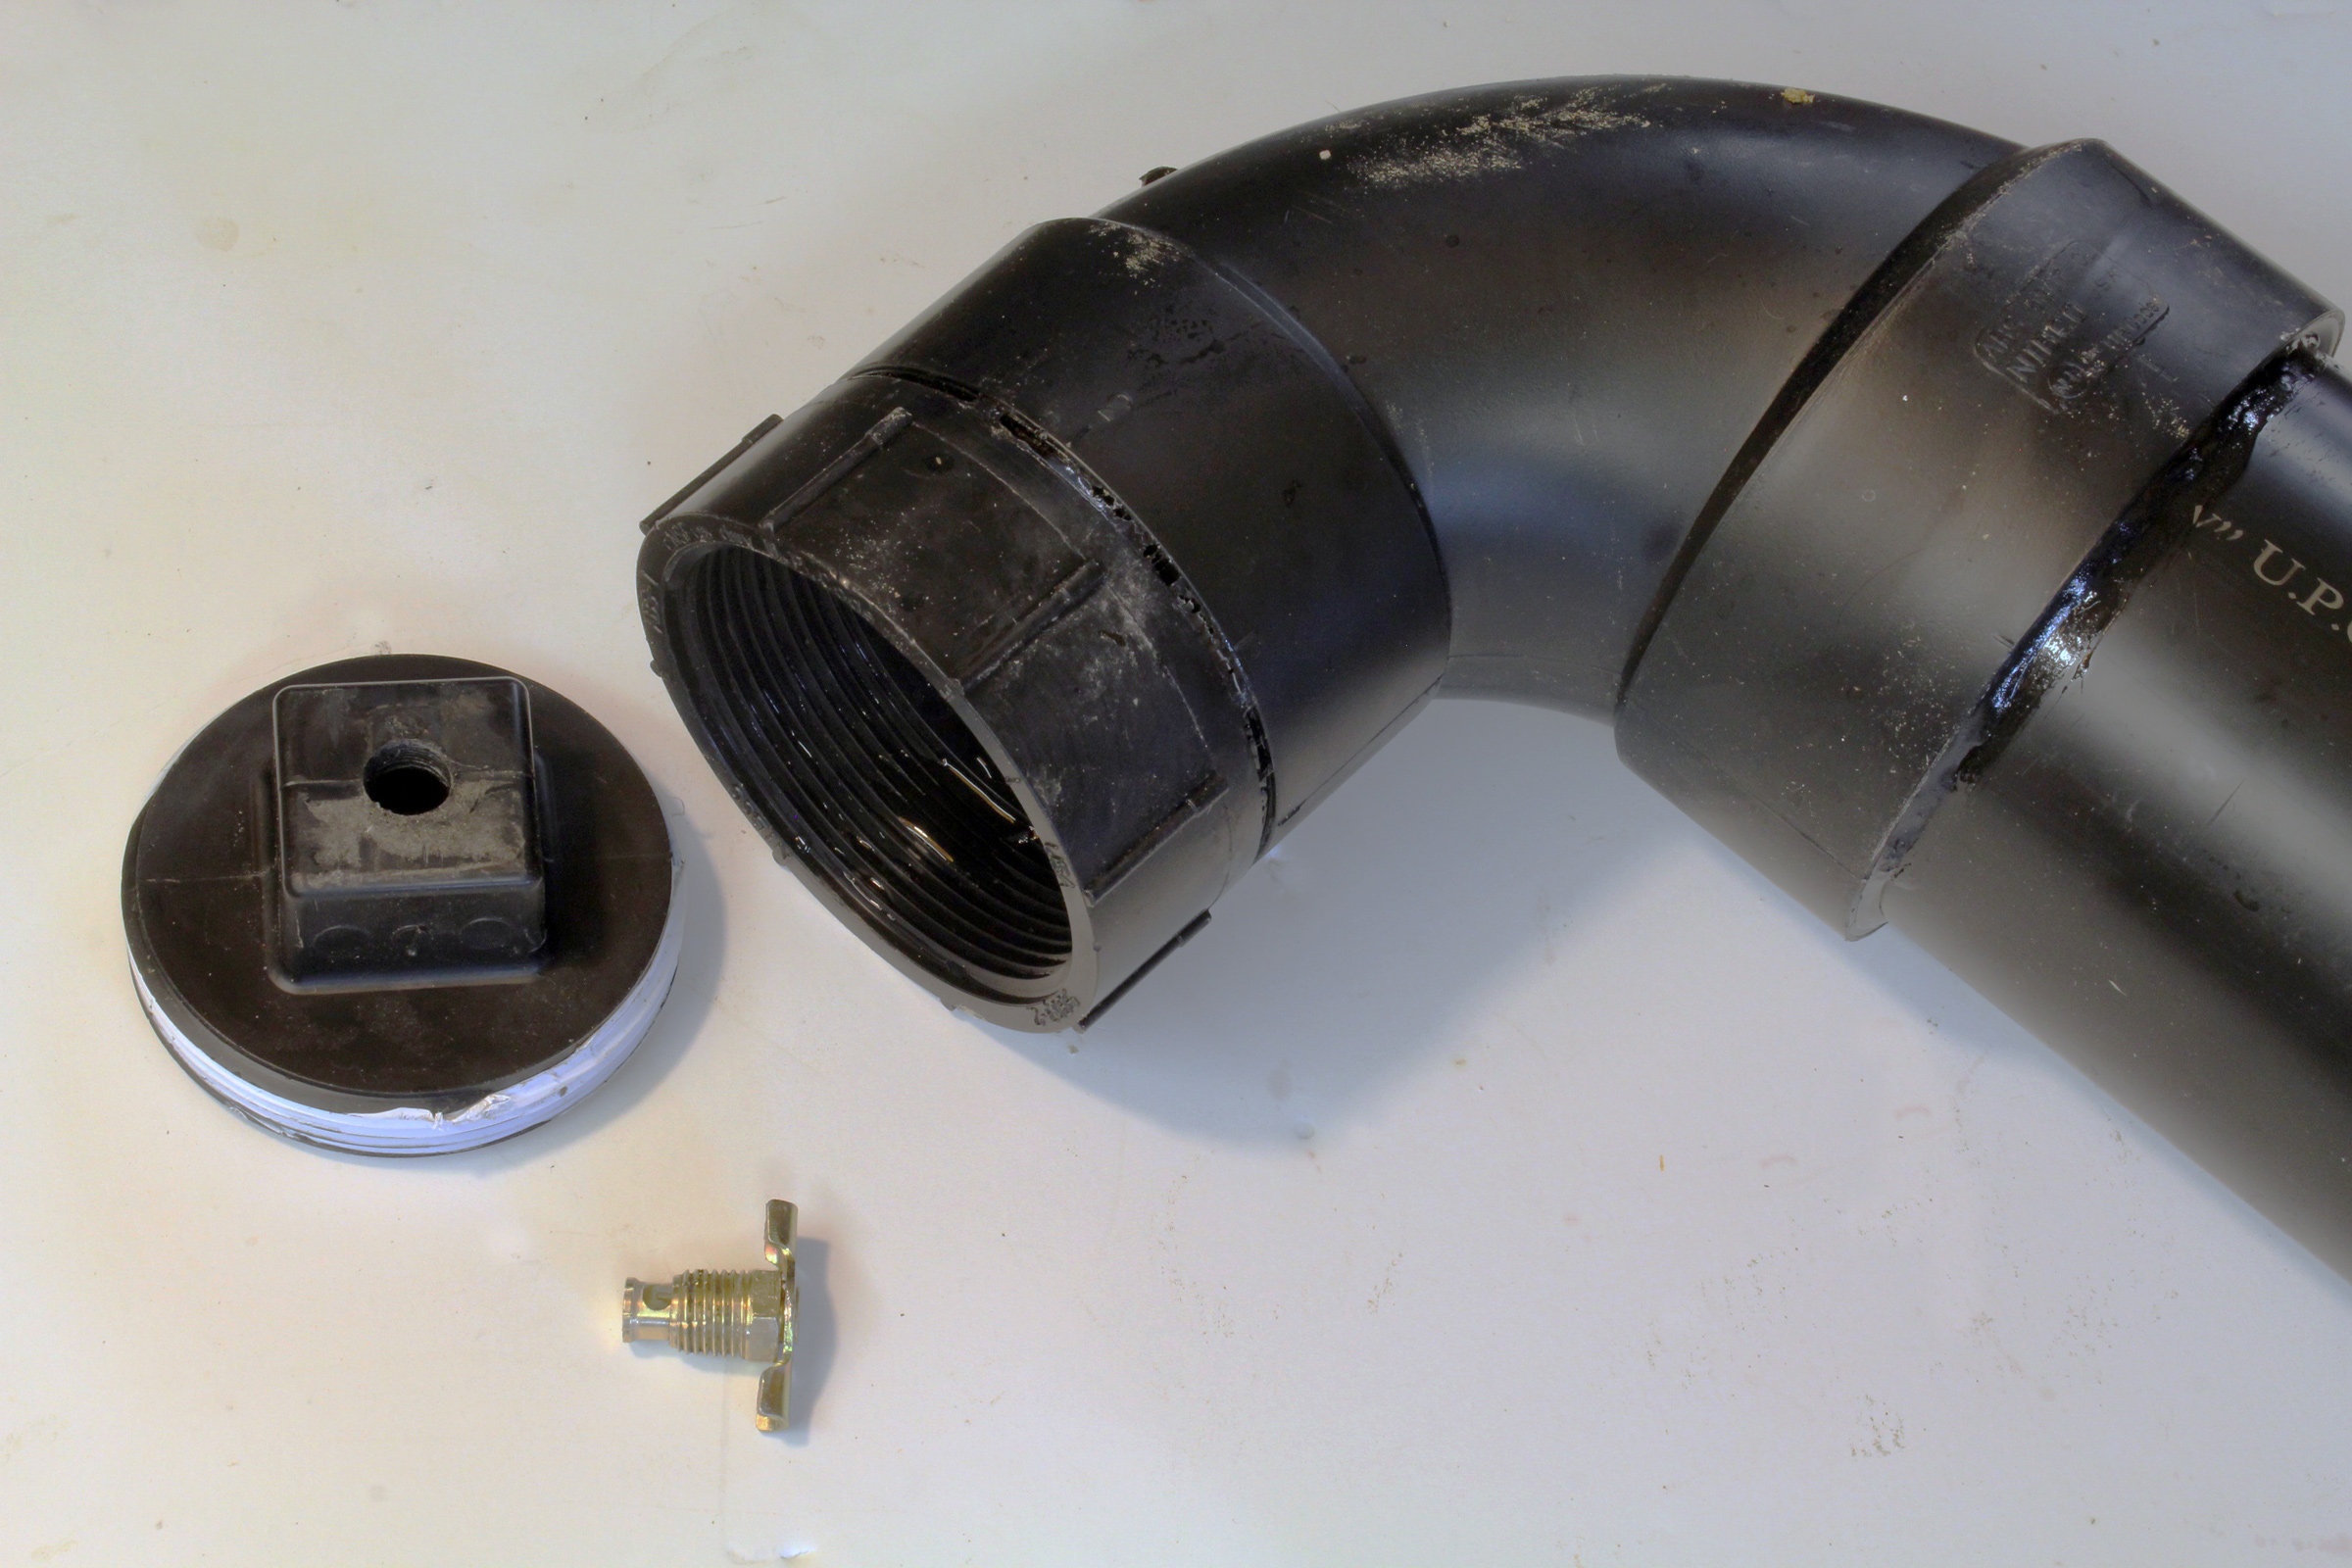
The forward end of the tank has an elbow that reduces the diameter from a 4″ pipe to a 3″ clean-out. The clean-out threads are made air-tight with PTFE tape. The tape stays in place nicely, but may need to be replaced periodically. The brass drain cock is a fitting for a car radiator; here it’s an air vent.
The threaded plug on the filler gets a radiator drain cock that’s used as an air vent, and the cap gets a metal Schrader valve stem, which is easier to install than the rubber stems you see on most car wheels. The cap also gets a hose bib/faucet. I drilled the holes for the bib and the drain cock undersize and filled the openings until the fittings’ threads could cut into the ABS plastic. I backed them out, applied JB-Weld Plastic Bonder (a two-part urethane adhesive that works with ABS and metal), and screwed the fittings in tight. The inside end of the drain cock needed to be cleaned of the adhesive before it set.
After filing off any burrs left by cutting the 4” pipe, I did a dry fit of the pieces and used bits of masking tape to assure I would pushed the fittings completely together during gluing and oriented with the drain cock and bib opposite each other. Gluing the ABS fittings to the pipe is quite simple. Apply a thick coat of ABS cement to the end of the pipe on the outside and a lighter coat on the inside of the fitting. Press the two pieces together with a quarter turn and hold them tight for about a minute while the glue sets.
The cleanout and its plug aren’t meant to make an airtight seal under pressure, but a few wraps of PTFE thread tape will remedy that.
I had intended to put nuts on the threads of the drain cock and the bib to hold them in against the pressure in the same way the valve stem’s flange does, but those fittings both have tapered threads, common among plumbing parts, and there were no matching nuts. After I glued them in place with the Plastic Bonder, I did a pressure test and at 100 psi everything held; the cleanout plug just hissed a little. When doing a pressure test, it’s best to fill the tank and leave only a couple of cubic inches of air space. The tank will quickly come up to pressure and if something fails, the small volume of air in the pipe will equalize quickly, exerting a minimum of force. An empty tank that’s been pressurized with air has much more energy to release.
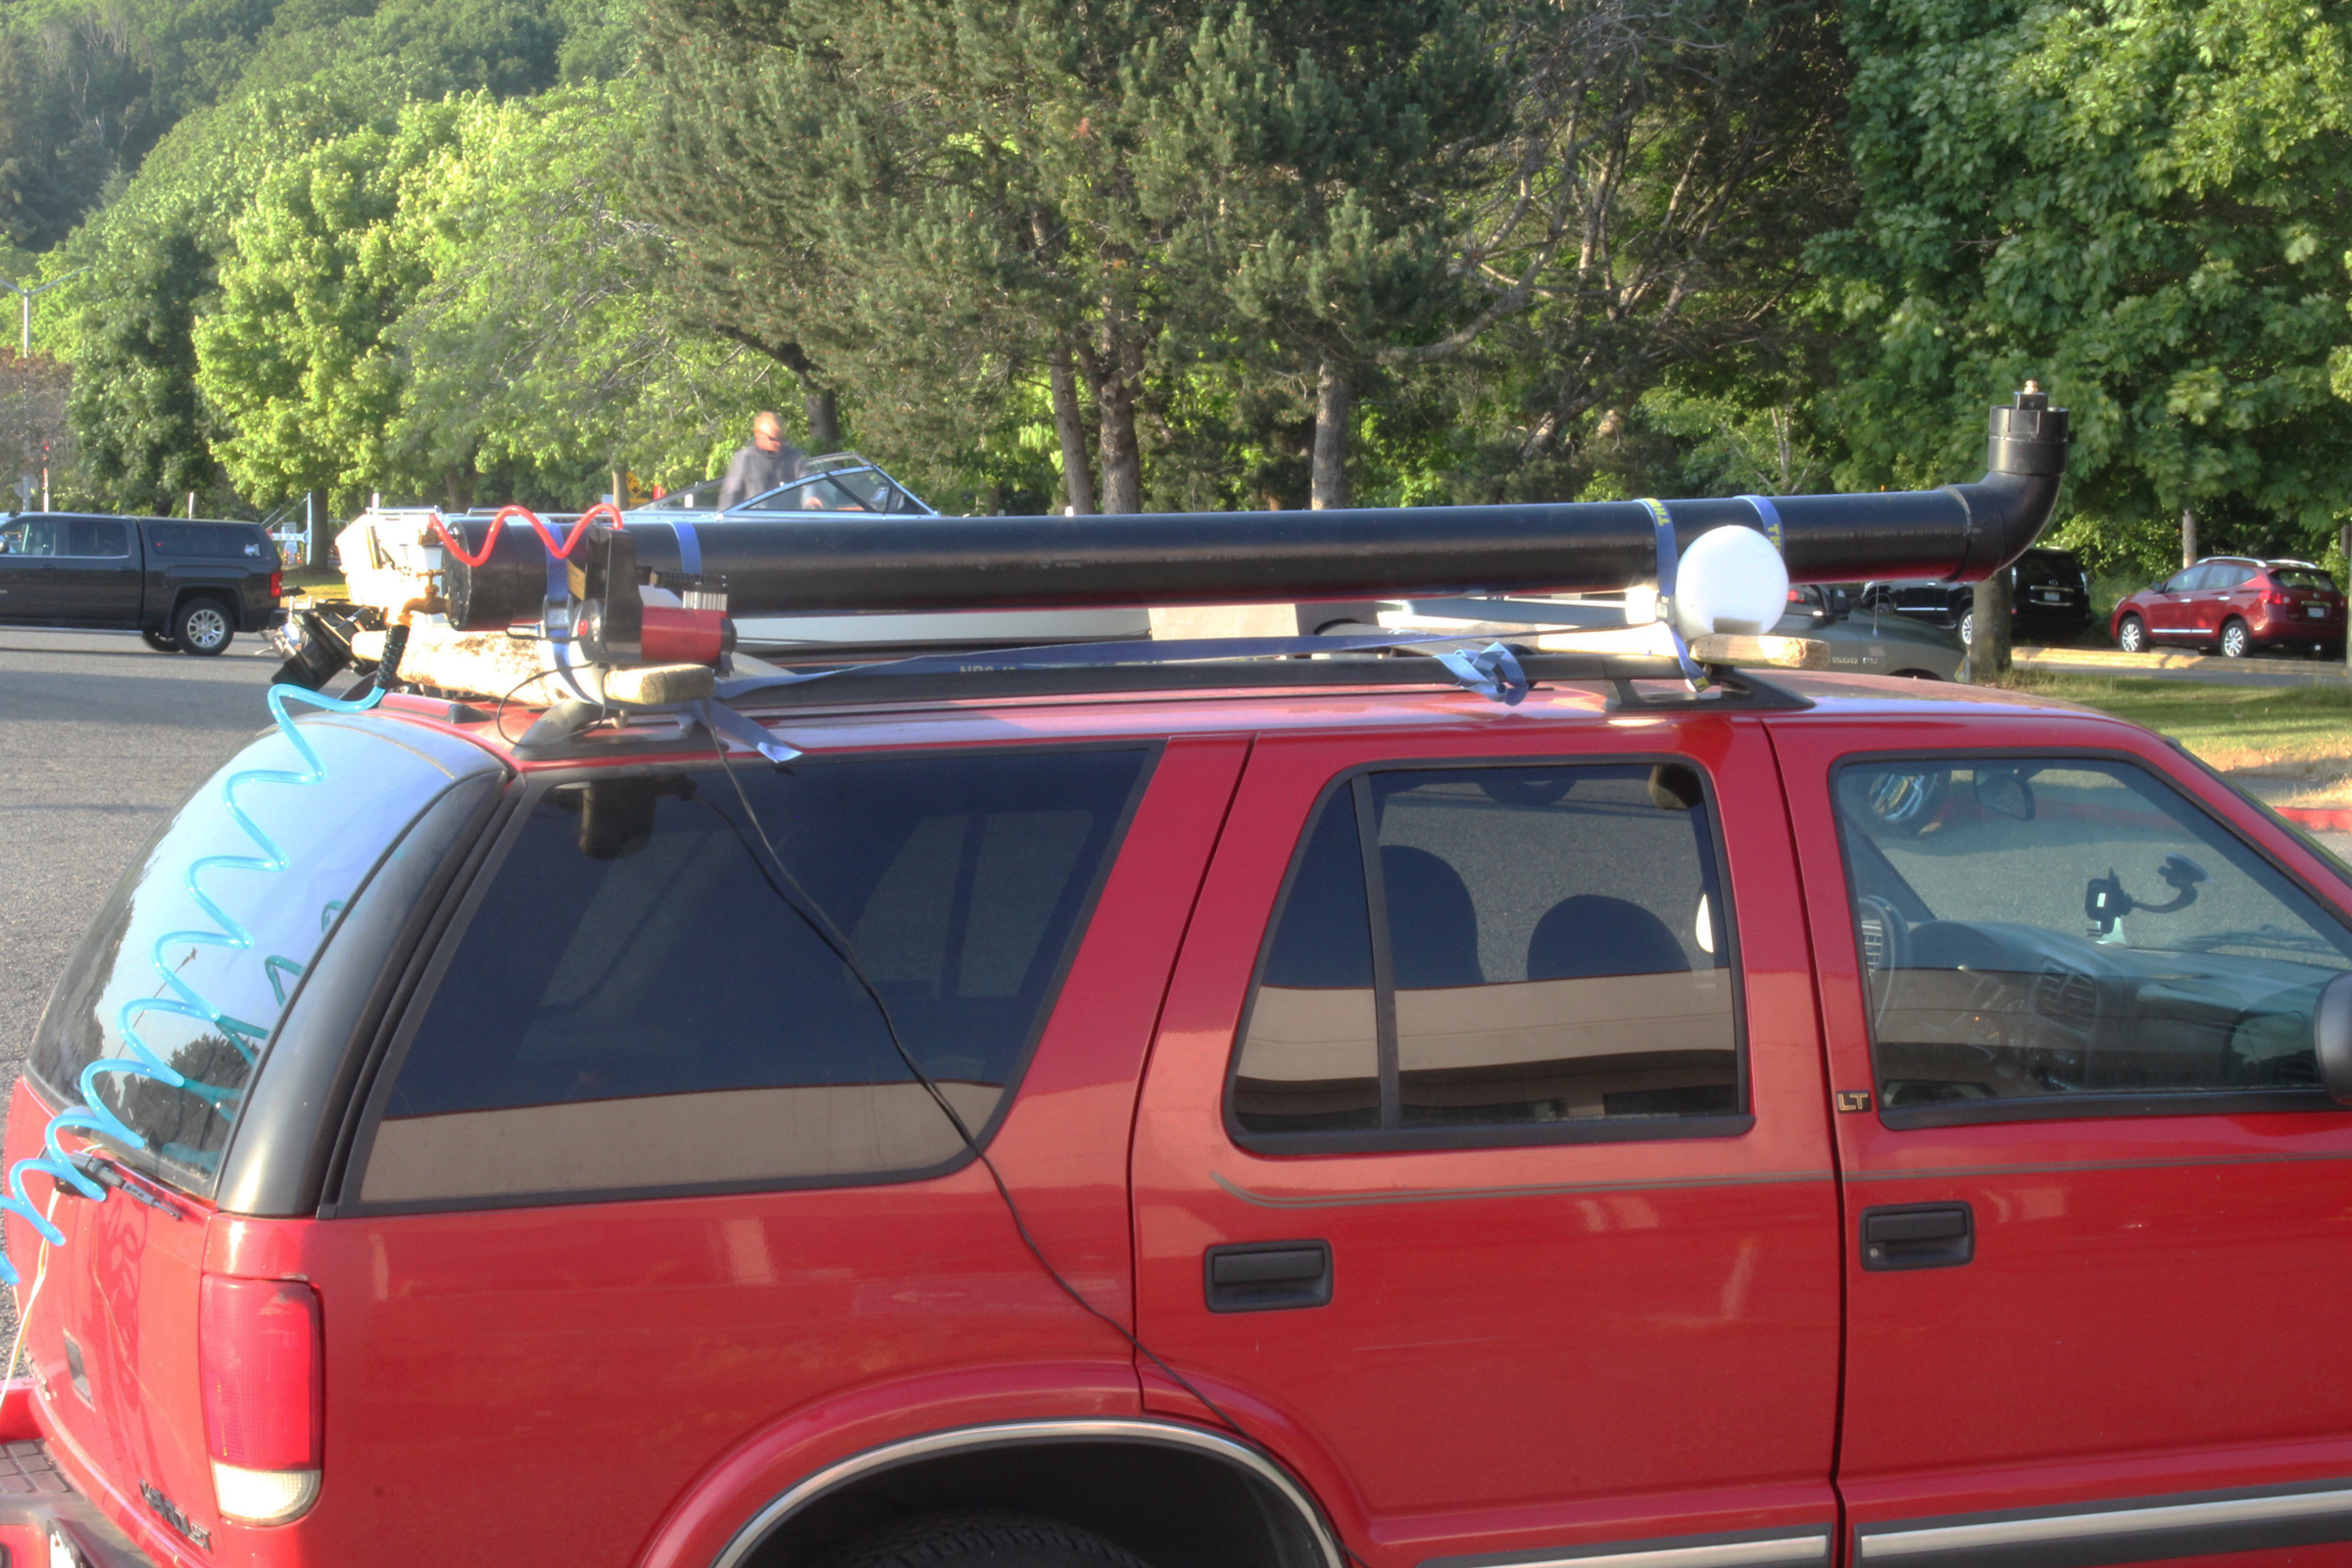
I made the tank as long as the top of my car roof, maximizing the volume of water I could carry without the ends interfering with the rear hatch or hanging over the windshield.
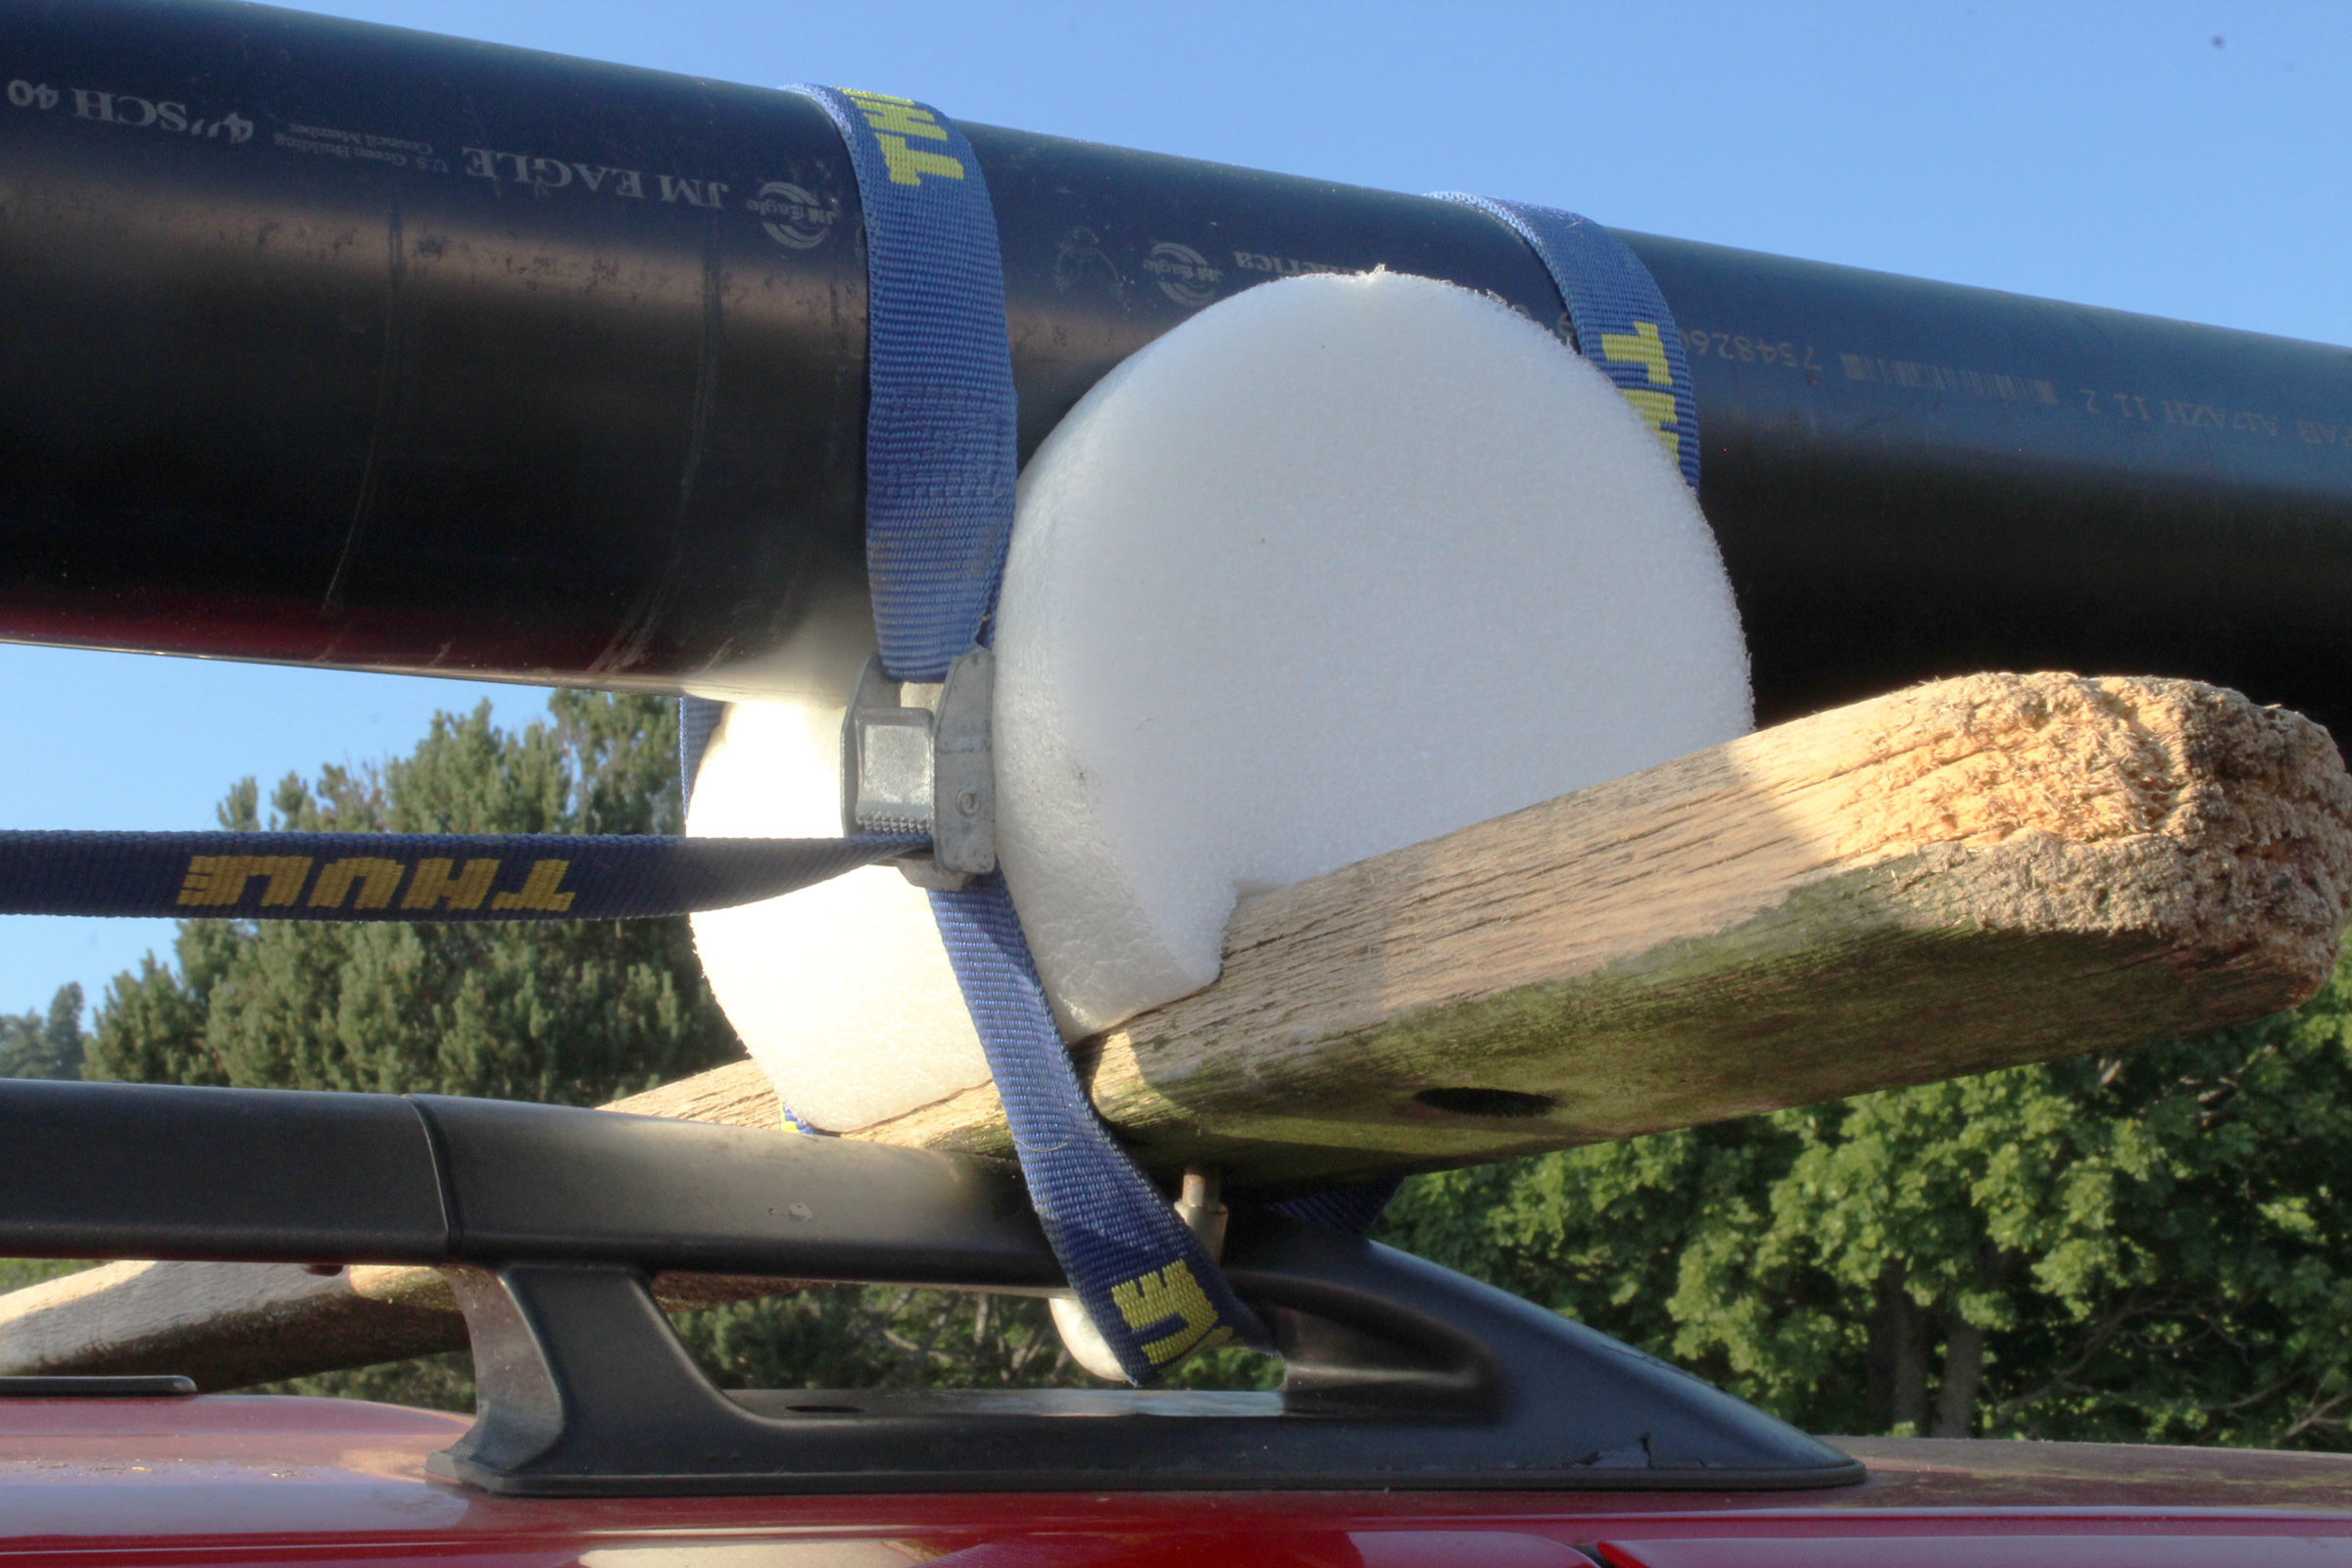
Closed-cell foam, cut from a exercise/stretching roller, cradles the tank and straddles the roof rack.
My system holds about 5 gallons of water, and I’ll fill it completely before heading to the launch site. On a sunny day, the black pipe will absorb heat and warm the water. While I’m boating, I open the drain cock just as a precaution against pressure building up.
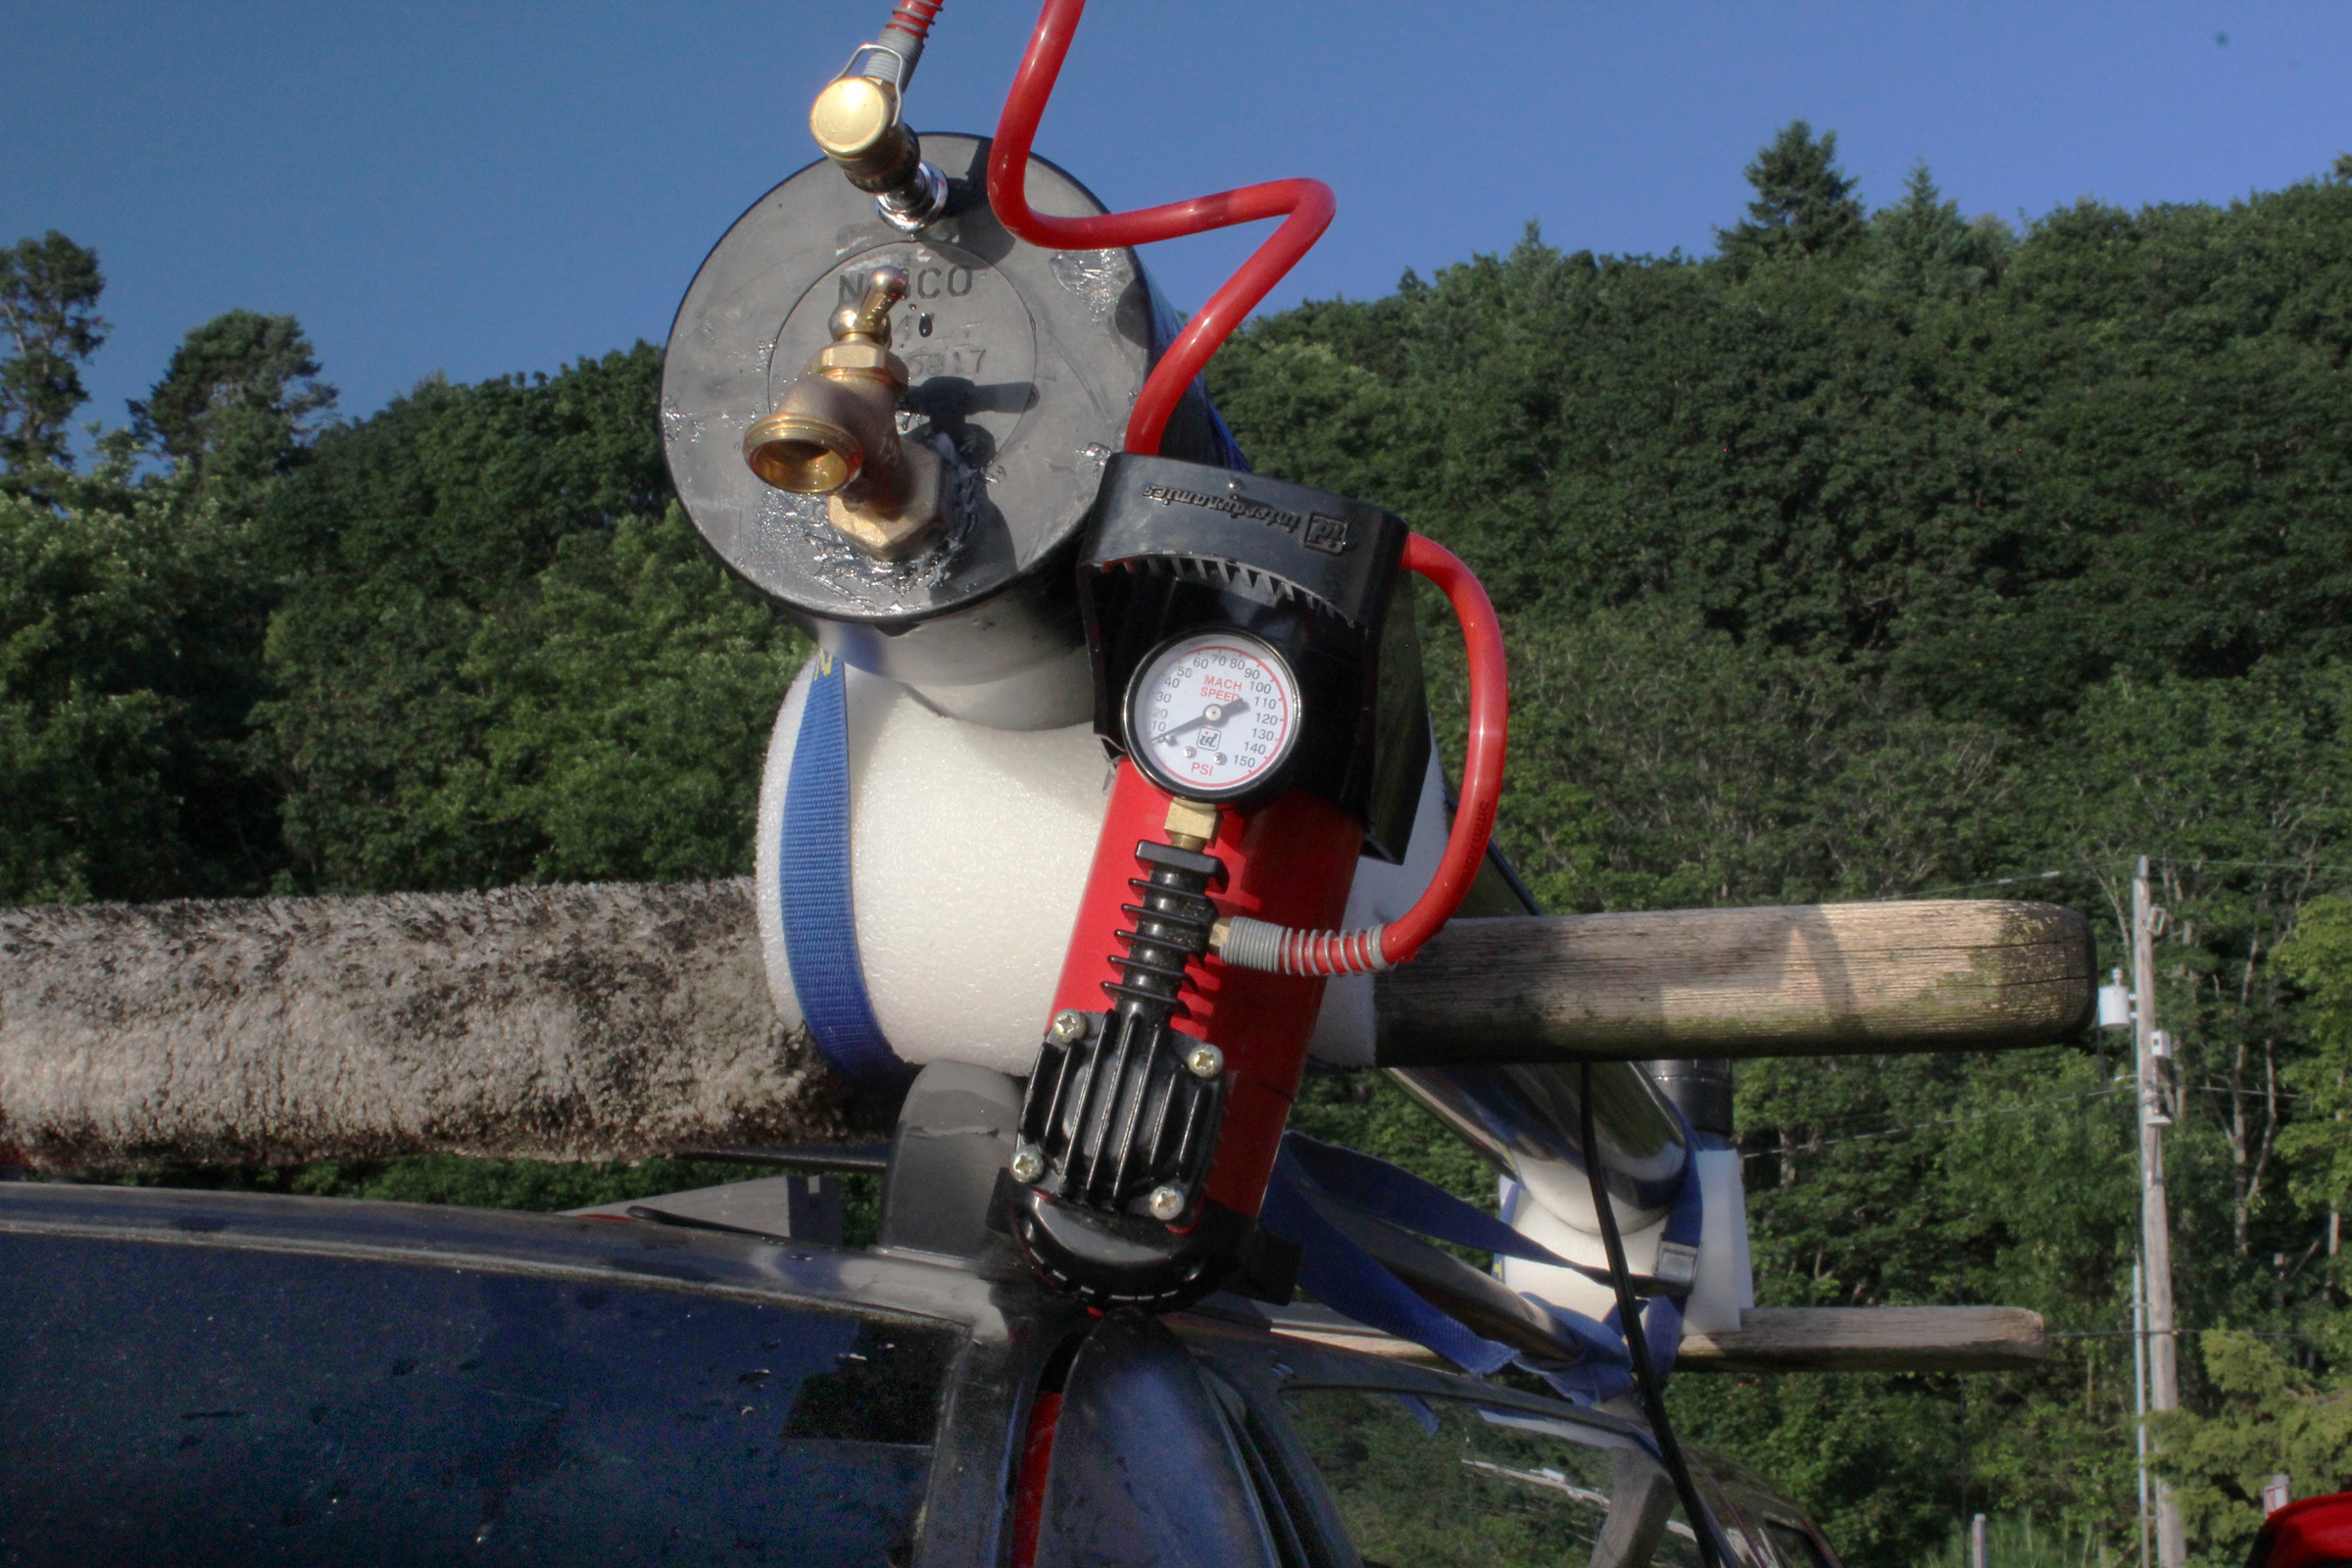
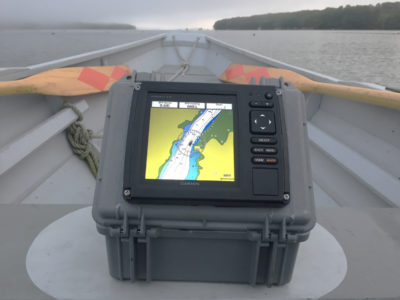
To pressurize the tank, I use the 12-volt tire pump that I always carry in the car for keeping the tires filled with air.

You can use any standard hose nozzle. This brass Little Big Shot Super Nozzle is compact and shoots water quite far. I added the yellow inline valve to cut the flow quickly and keep the nozzle setting I need. The self-coiling 15′ hose is easy to stow.
After I’ve hauled the boat out of the water, I fit a shower nozzle to the faucet so I can rinse salt and sand off myself. With the drain cock open and the tank unpressurized, the full 5 gallons provide 10 minutes of shower time. A short 2-minute shower will drain a gallon and prepare the tank for pressurizing.
Before pumping air into the tank, creating some air space in it, about 20 percent, will provide enough air volume for pressurizing the tank and using the hose. With the faucet and drain cock closed, I connect a little 12-volt electric air pump to the valve. It’s the same pump I keep in the car to inflate the tires. (I’ve used a manual pump too, but because its hose is short, the tank has to be on the ground.) Bringing the pressure up to 40 or 50 psi is sufficient to propel the remaining 4 gallons of water out of the tank. The nozzle I have on the hose will shoot 30′ and, when wide open, empty the tank in 1-1/2 minutes. I can always carry extra fresh water in the car if I need to reload the tank.
The parts for the tank (not including the hose and nozzle) cost about $75 and required only a couple of hours of shop time. It’s a worthwhile investment in salt-free skin, a cleaner car, and a longer-lasting trailer.![]()
Christopher Cunningham is the editor of Small Boats Magazine.
You can share your tips and tricks of the trade with other Small Boats Magazine readers by sending us an email.


Intriguing! I can see having one of these aboard our motorboat’s cabin top to replace the (limited) SunShower I’ve been using.
On an older boat I had, used a 2-gallon garden sprayer, retrofitted with a thumb-switch shower head. If sun wasn’t enough, l would boil up a little water to take the edge off.
How does having that much water so high above your vehicle’s normal center of gravity affect its handling?
There’s no discernible effect on the car’s handling. The empty tank weighs 10 lbs; 5 gallons of water brings that up to a bit over 50 lbs. The lapstrake canoe I often carry on the racks weighs about 80 lbs and it’s not a problem. The heaviest loads I’ve put on the roof racks are drywall for working on my house. A half dozen 1/2″ sheets come to over 300 lbs and that’s not a problem on the 10-minute drive home. With any heavy roof-top load I avoid sudden stops and turns to avoid having the load shift, but I have no concerns carrying the water tank.
Brilliant application of the KISS* principle
*Keep It Simple Stupid