I got my first impression of Hilary Russell’s Solo Carry double-paddle canoe only after I had finished building one for my daughter-in-law. It felt like a maple leaf that had fallen in autumn upon a New Hampshire lake—light, beautiful, and perfectly in place.
As part of a wedding gift to my son and his petite bride, I was looking for a boat design that would be light, manageable, and eye-catching. A canoe seemed to be the best option, so I looked for skin-on-frame designs. The Solo Carry came up in a web search, and Russell’s engaging descriptions and photographs of his designs and thoughts on building and using the boats intrigued me. I was hooked by his assurance that “If you want to customize your boat, you can, easily!” He offers 12 variations for the design, with instructions for modifying the shape of the canoe by changing the spacing between forms, adding a form, or moving the forms at the end or adding to the length of the gunwales.
 Mike Doran
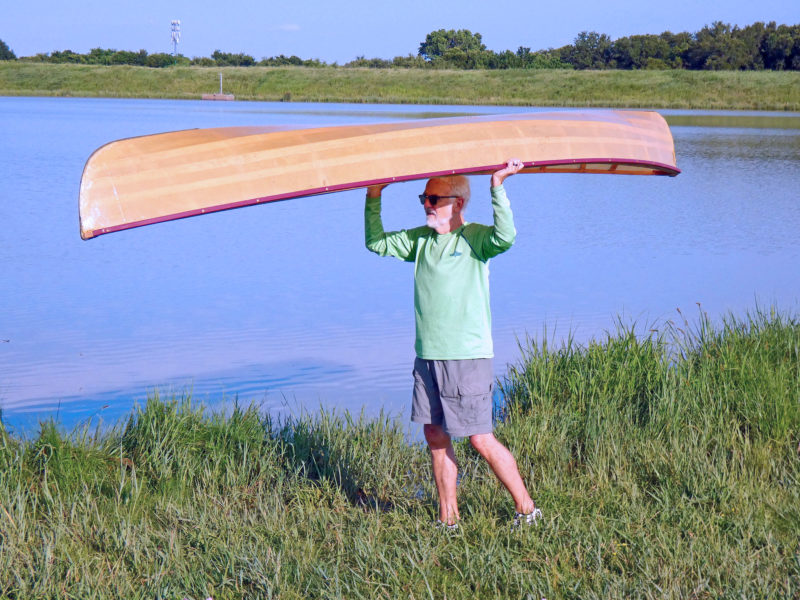
The author’s 13′ 6″ version of Solo Carry weighs just 25 lbs and is easy to portage.
Resources for building one of Russell’s Solo Carry canoes include a two-part how-to article, “Solo Carry: Build a skin-on-frame with substance,” in WoodenBoat 205 and 206; Russell’s 150-page book, Building Skin-on-Frame Double Paddle Canoes; plans drawn by Eric Schade, or a kit that includes ribs, sinew, stembands, and a skin; and classes taught by Russell at the Berkshire Boat Building School.
I bought the book, plans, and a set of milled northern white cedar ribs, and stembands from Russell’s online store. The book’s spiral binding and heavyweight paper make it shop-friendly, and its 113 photographs clearly show just what is to be done. With Russell’s helpful instructions, each process was simple with just enough challenge to instill pride of accomplishment. The book is more than a technical manual; throughout it he offers valuable life lessons and philosophical observations.
I had made a few skin-on-frame kayaks and even a plywood decked canoe, but would not consider myself a master builder by any means; I have basic tools and lots of clamps. The construction manual recommends three sizes of spring clamps—32 clamps in all; more clamps would not go unused. You would do well to read the complete manual before starting your boat, especially if this is your first build. Building the steamer for bending ribs and the strongback for holding the forms are both good practice for getting into the project. Enjoy all the processes; don’t hurry and don’t worry. Fairly soon the elegant canoe shape will begin to emerge.
 Irene Klaver
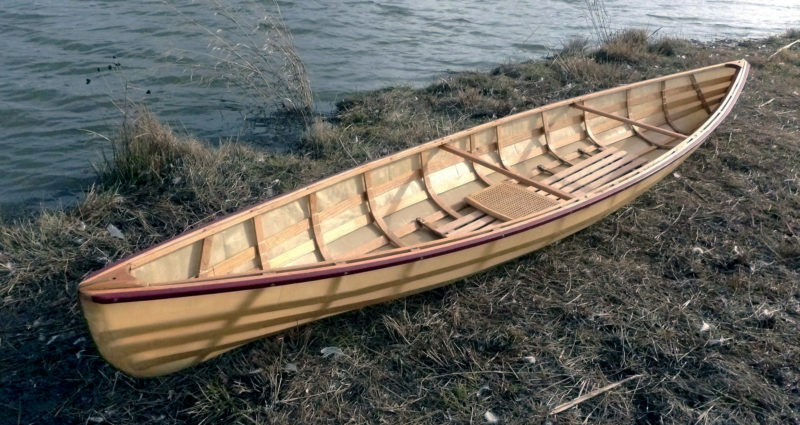
The canoe has two thwarts. The longest one, close to amidships, serves as a backrest and the shorter one in the bow provides bracing for the feet. The caned seat is an option available from Russell Boats.
The build begins with assembling four 1 x 4s to make the box-beam strongback that will support five forms made of 1/4″ plywood. Even with the canoe framework in place on the form the whole rig was light enough to carry, so I often worked outdoors and enjoyed the good weather; when it rained, I could easily move into the carport.
With the full-sized patterns, it was easy to cut the plywood for the forms, stems, and breasthooks accurately. The canoe is built upside down, and you begin by putting the stems and keelson in place. The stringers are next and I used western red cedar for them; Russell suggests spruce, yellow cedar, red cedar, or even clear pine, though he notes that the latter is not as strong as the other woods. Stringers are shaped by the forms, then ribs are bent into place inside the stringers; the steamed northern white cedar ribs took to their shape beautifully, with only two failures. If you have not done steam-bending, Russell provides guidance for making and using simple steamboxes.
Connecting the ribs to stringers involves more than 300 lashings of nylon artificial sinew, but the task was indeed, as the instructions stated, “decidedly sane and relaxing.” Stretching the nylon skin over the frame and applying UV-resistant, water-based polyurethane coating were straightforward operations. I worked on the canoe intermittently over the course of a few months; the actual work time was about a week or so.
 Mike Doran
The choice of a double-bladed paddle is left up to the builder. Small unfeathered beavertail types, like the paddle here, were popular in the 19th century. Wider feathered blades are a more contemporary style.
The finished canoe, weighing just 25 lbs, is easy to cartop solo and easy to carry to the water. For the first trial, I used a foam pad as a seat; it was comfortable enough, but soon after I ordered a cane seat from Russell. The wooden frame with the woven cane fits the classic look of the canoe better than the foam and is very comfortable. If I expect muddy embarking and disembarking, I use a 2′ x 6’ camp pad on the bottom without the cane seat. It is comfortable and protects the lashings from grit.
You’ll paddle sitting on a foam or camp pad or a cane seat in the bottom of the canoe on the 1/4″ floorboards. Keeping the paddler’s weight low contributes to the stability of the boat.
My first trial on the water was on a small pond with only a bit of a breeze and no significant chop. The construction manual gives photo-illustrated lessons on how best to get in and out of the boat while it floats in a few inches of water. It is important to remember that skin-on-frame canoes should not be pulled up onto shore for entering or exiting. Make sure there are no rocks or sharp objects under the boat when getting aboard. That said, the nylon skin is tough and has resisted my collisions with submerged branches and rocks—a frequent occurrence, since much of the water in my part of Texas is often so silted as to obscure almost everything beneath the surface. The flexibility of the lashed stringers and ribs distribute and dissipate the energy of impacts, and the brass stembands protect the skin where it is most susceptible to abrasion.
 Mike Doran
The Solo Carry not only tracks well in flat water but also holds a course well when the wind is blowing.
With the paddler seated, the canoe is quite stable. In a 10-mph wind, it takes no effort to maintain balance with the wind and waves/chop abeam. The canoe tracks well and holds its course even in an adverse wind or current. Its response to paddle strokes is quick and positive. The canoe is so light and responsive that leaned turns seem easy and natural, and the good stability inspires confidence.
On a day with an 8- to 10-mph breeze, I used the GPS on my iPhone to make a few readings. Whether into the wind, with the wind, or somewhere in between, easy conversation-level paddling always achieved a speed of 3 to 3.2 mph; cruising-level paddling was 4.2 mph with the wind and 3.8 mph against it; racing-level paddling was just sustainable at 5 mph, with a little bump to 5.1 mph when the wind was in my favor.
After I built the 13.5′ canoe, I built (with permission from Hilary to build a second canoe from the same set of plans) an 11.5′ version with leftover materials. This is the standard length presumed in the instructions and the plans. For any of the variations of length and shape, the width and thickness of materials remains the same, while the plans indicate required changes in lengths and positions.
 Mike Doran
Sitting low in the hull, kayak style, gives the canoe its stability.
This canoe’s 21-lb weight and ease of transporting mean that it can be used for a sunset paddle at a nearby pond on a moment’s notice; its weight and resilient construction also mean that it can be used on a paddling and hiking adventure.
I think that anyone who wants to build a small boat would enjoy the experience of a skin-on-frame canoe, especially as guided by Hilary Russell. The beginner would be intrigued, then rewarded with a lovely canoe whose every part would be known on a fundamental level, while the seasoned builder would find the simplicity of the type and the scale delightfully engaging.
Each time I have taken the canoe out, people comment on its beauty, even though I could hardly claim my level of craftsmanship is on a par with Hilary’s. When the canoe is not in use, you may be tempted to hang it in your living room as a lovely piece of sculpture.![]()
Brian O’Connor grew up in New Hampshire near beautiful lakes and rivers. Twenty-two years ago, he moved to north Texas as a professor of information science. There are no natural lakes in the area. To stay connected to his earlier days he built a kit kayak and discovered that the muddy Trinity River, some large reservoirs, and a nearby urban flood pond have their own delights. At 74 he has now built 10 boats and looks forward to the challenges and rewards of building and sharing more.
Solo Carry Particulars
[table]
LOA/11′6″ (or stretched to 13′6″)
Beam/28″
Depth/10.5″
Weight/21 lbs (25 lbs)
[/table]
Plans for the Solo Carry canoe are available from Russell Boats/Berkshire Boat Building School for $45. Building Skin-on-Frame Double Paddle Canoes is available as a perfect-bound ($27) or spiral-bound ($29) book.
Is there a boat you’d like to know more about? Have you built one that you think other Small Boats Magazine readers would enjoy? Please email us!




Thanks for the great article! I got the kit for just this exact 13’6″-er from Hilary about 5 years ago at the Mystic Seaport Wooden Boat Show and never did start it. Too many other boat projects in the shop (still), but it’s going to happen soon. Again, thanks, as this gets my whistle wet once again for those light-weight boat dreams.
Dean
Thank you for the write up. I’ve come close to being certain that a skin-on-frame boat will be my first boat building effort. I do worry a bit about a stick or log tearing a hole in the side and am not impressed with videos I’ve seen on Youtube showing how tough skin-on-frame is by striking it with a hammer or some other such thing. Those are not the same forces as loading up the canoe with 190 pounds of me, as well as 40 pounds of gear and while moving slowly having the weight be stopped via a sharp object.
Still I’m a big fan of this building technique. Not only is it relatively affordable but also simple enough for the beginner builder. I wonder if it is possible to double up the skin for more puncture resistance? Much like you, little of the water I plan to use a boat like this has any clarity. But to have a small canoe which weighs between 30 and 50 pounds or so seems perfect for small ponds and the marshes I’d like to explore near the coast of North Carolina. I’ll be checking out those plans very soon.
I would look at reinforcing the hull with a single layer of fiberglass, say woven roving, if it doesn’t add too much weight.
I put a hole in a skin-on-frame rowboat, briskly rowing and hitting submerged rebar – I heard it slide along the skin until a frame, then pop through. Slow leak, easily bailed until I got back to the boat launch. The skin was 8 oz polyester with maybe 4 coats ZAR water-based polyurethane. When I got home, tried to pry open the hole into a tear but couldn’t. Contact cement on the inside, a patch of the same material about an inch bigger all around – effective but looked awful from the outside so cut a square 3×3 inch square, pulled out about a 1/2 inch of threads to fray all 4 edges (think carpet fringe) and ‘glued’ it in place with a little of the ZAR’s, then 2 coats over it. Nary a leak, ever – or another puncture in all the other SOF boats I’ve made: 4 canoes, 2 with willow ribs, 2 kayaks, and the rowboat. BUT, now I always carry a foot or so of Gorilla tape; it would have kept the bailing to a minimum until a permanent repair. Also, lots of occasional scraping from time over rocks, branches, beaverdams and the like without a leak – only that one time.
Rich Brown