I grew up spending my summers in Falmouth, Massachusetts, on Cape Cod. My family has a Joel White–designed Bridges Point 24 sloop; my dad loves to sail and passed his passion down to me. I have been taking sailing lessons since I was eight and I’m now working my fifth summer as a sailing instructor. So, when it came to doing a required “capstone” project for my senior year of high school, sailing was at the forefront of my thinking. I spent months trying to create a project weaving my love for the water with the school assignment. Most students do research and write up a report or try to learn a new skill for their project, but I wanted to do something big.
When I talked to my dad about building a boat, he got super-excited and immediately went to a bookshelf, pulling out Eric Dow’s How to Build the Shellback Dinghy. From that point on, I was determined to build a boat and have it on the water by the end of my senior year.
All photos by Delaney Brown
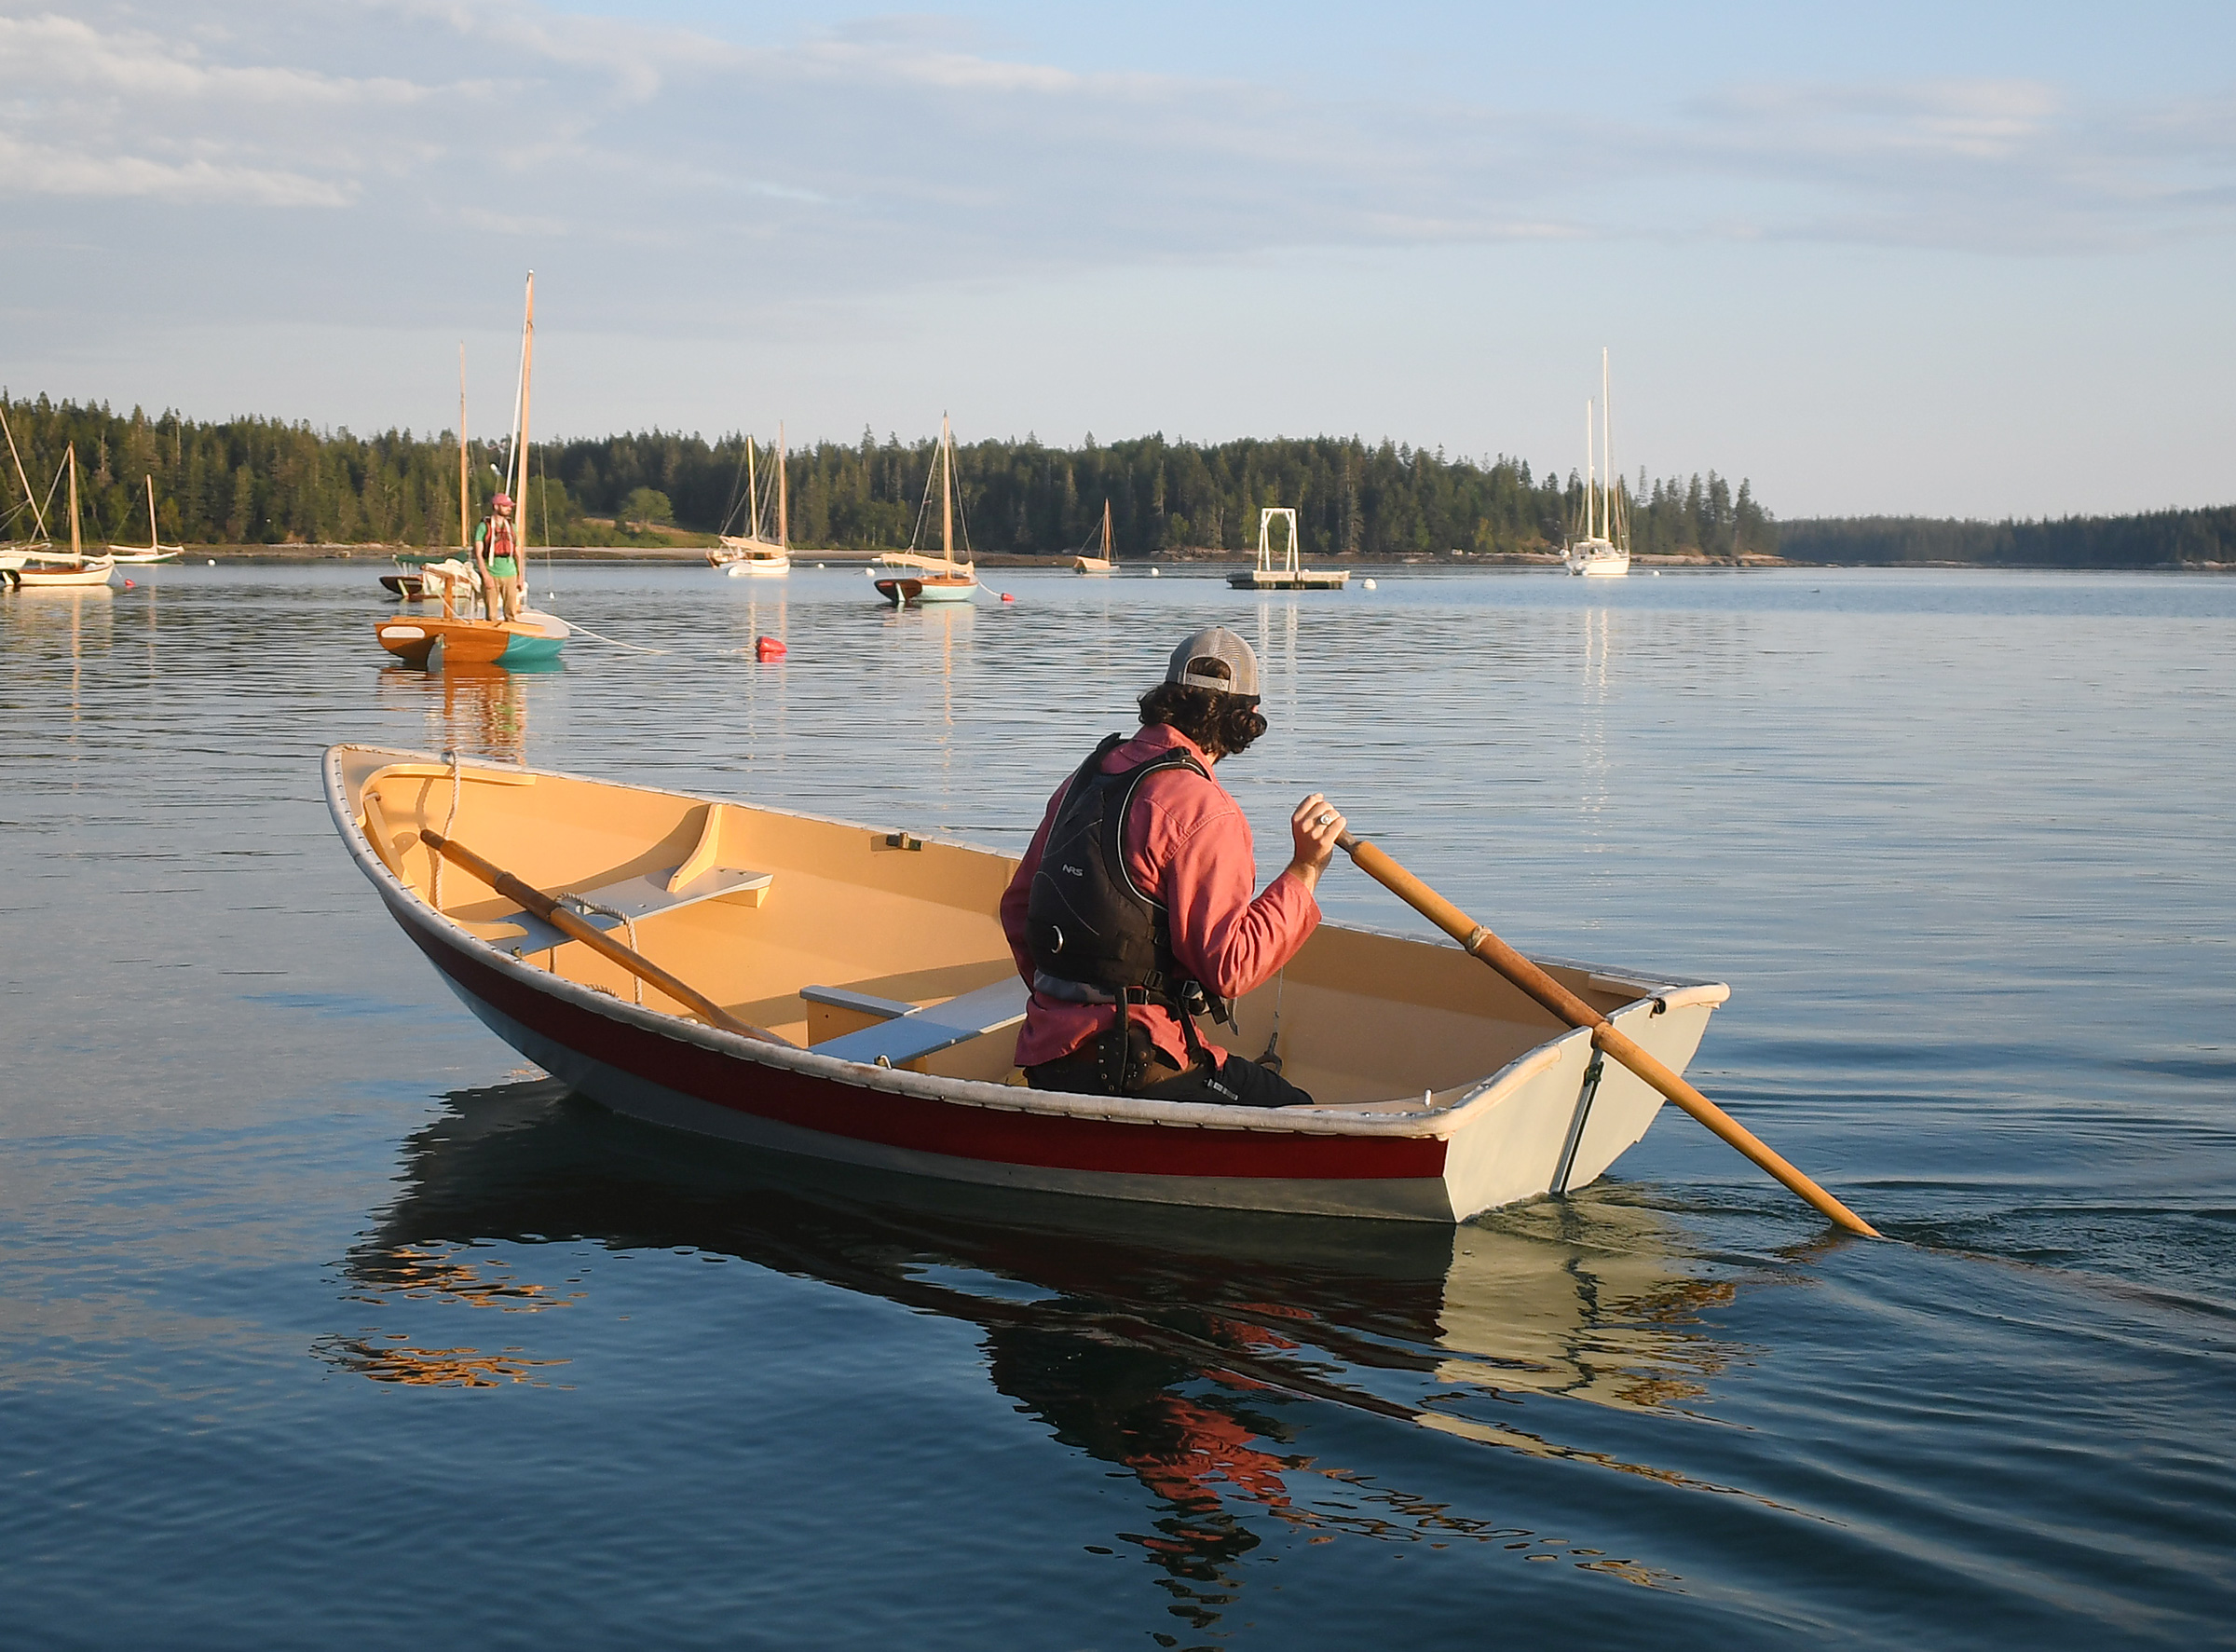
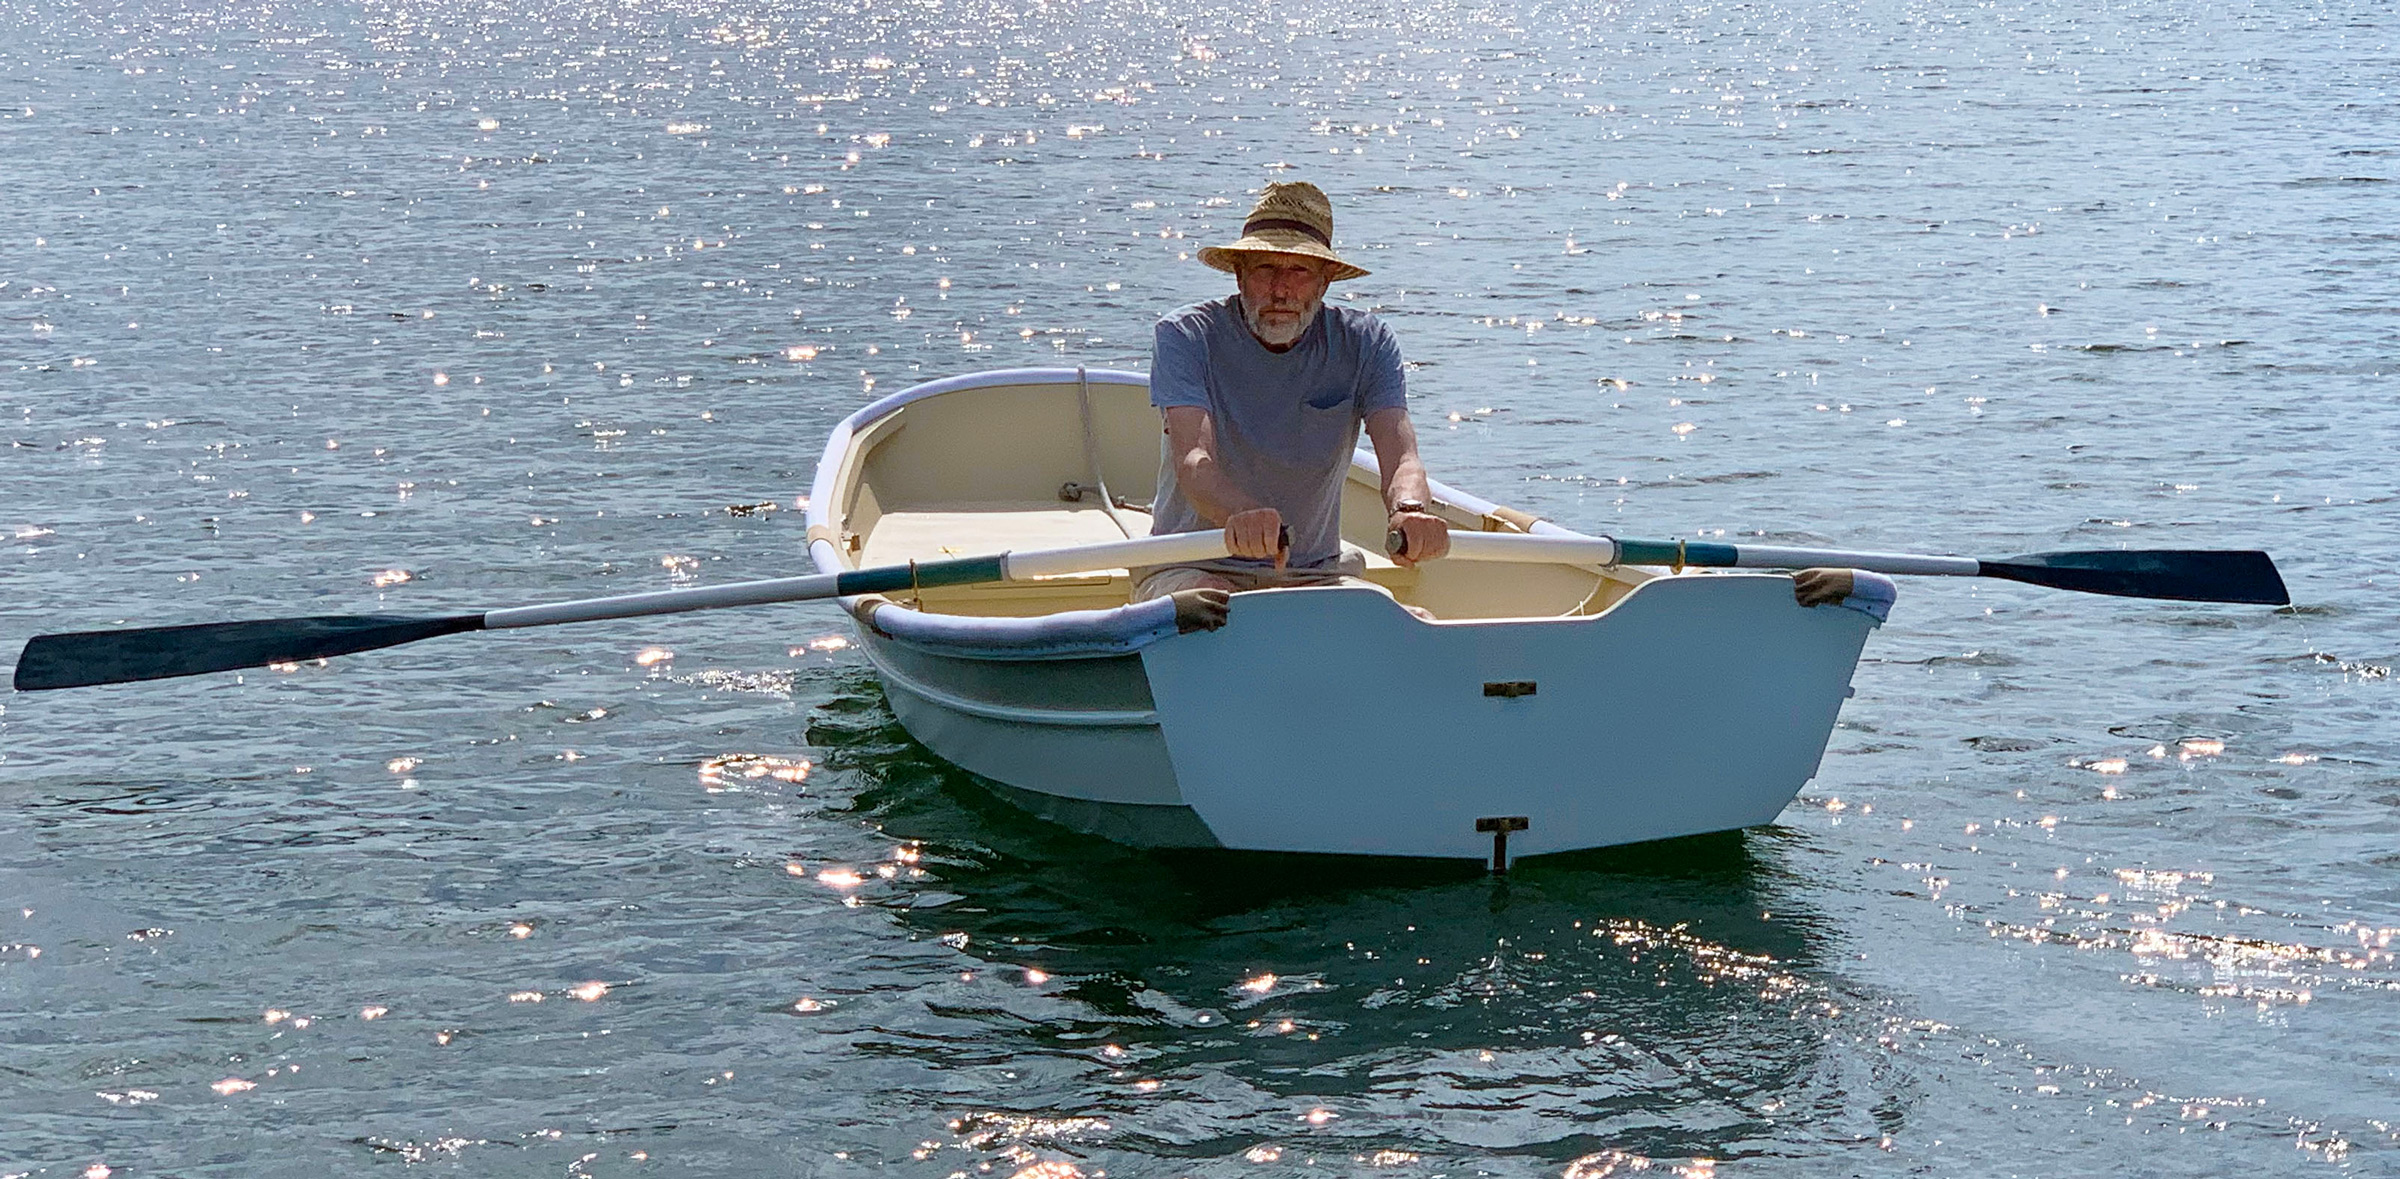
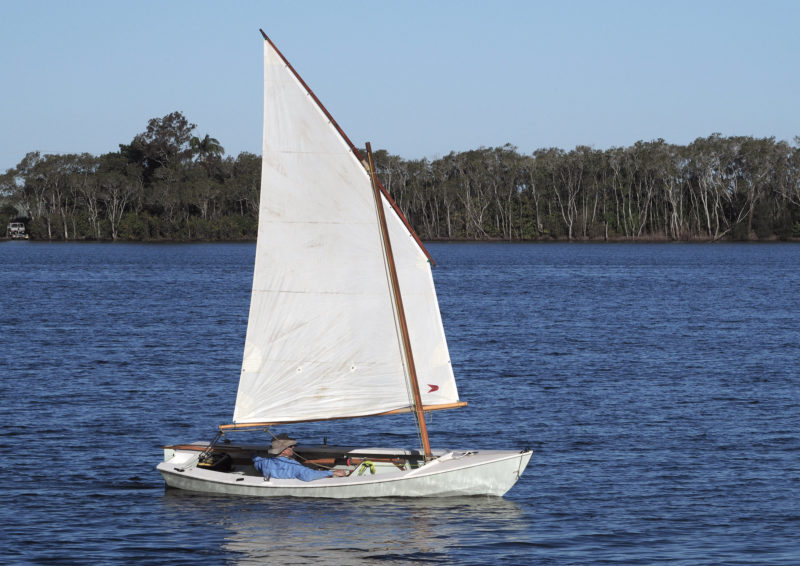
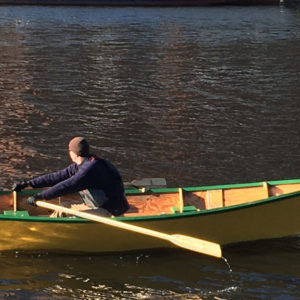
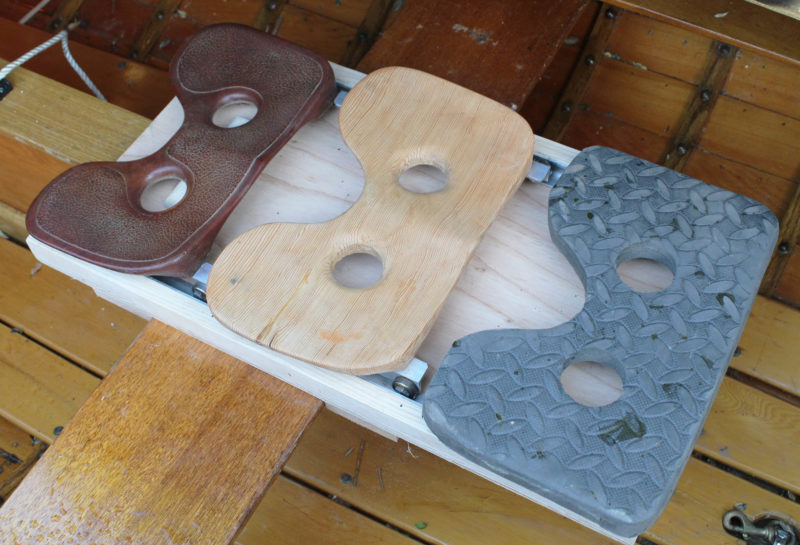
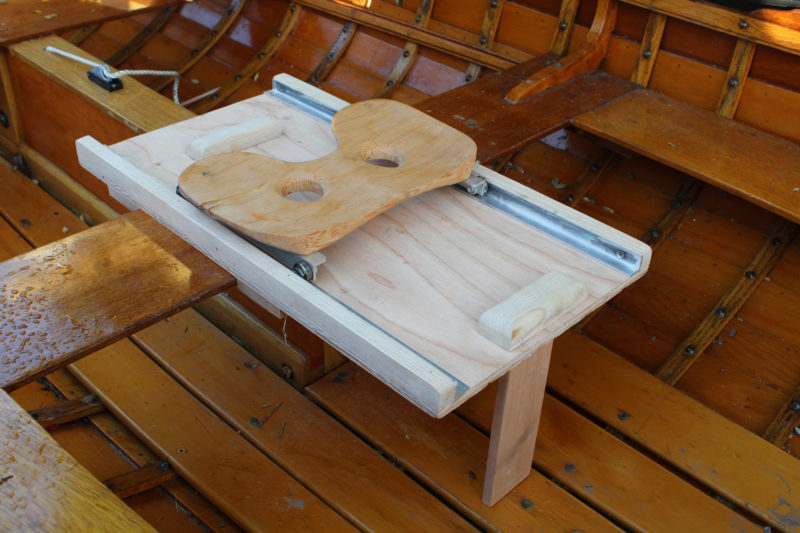
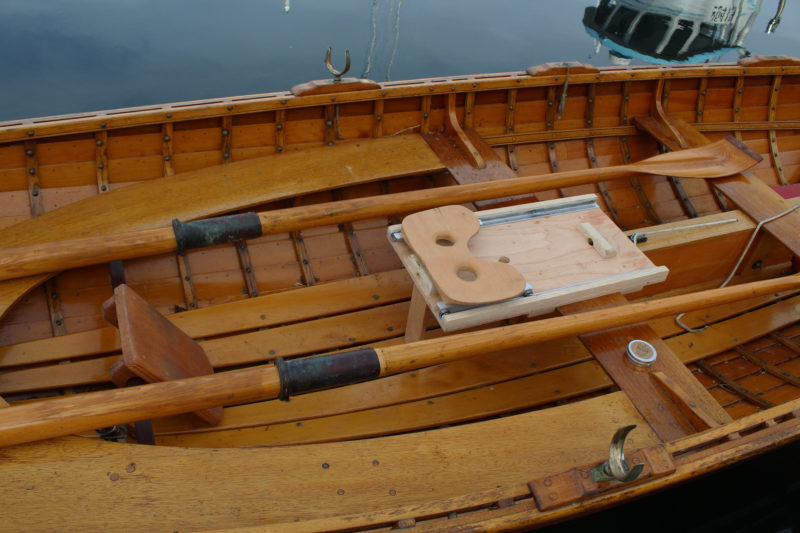
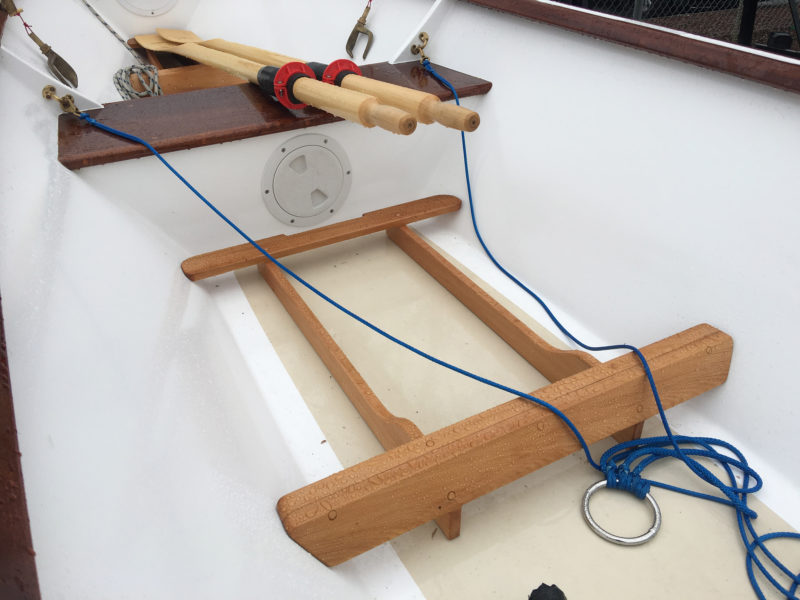
The Shellback is well behaved under oars. Neither the plans nor the book Building the Shellback Dinghy indicate a brace for the rower’s feet at the ’midship rowing station, but the addition of one would allow for a more powerful pull.
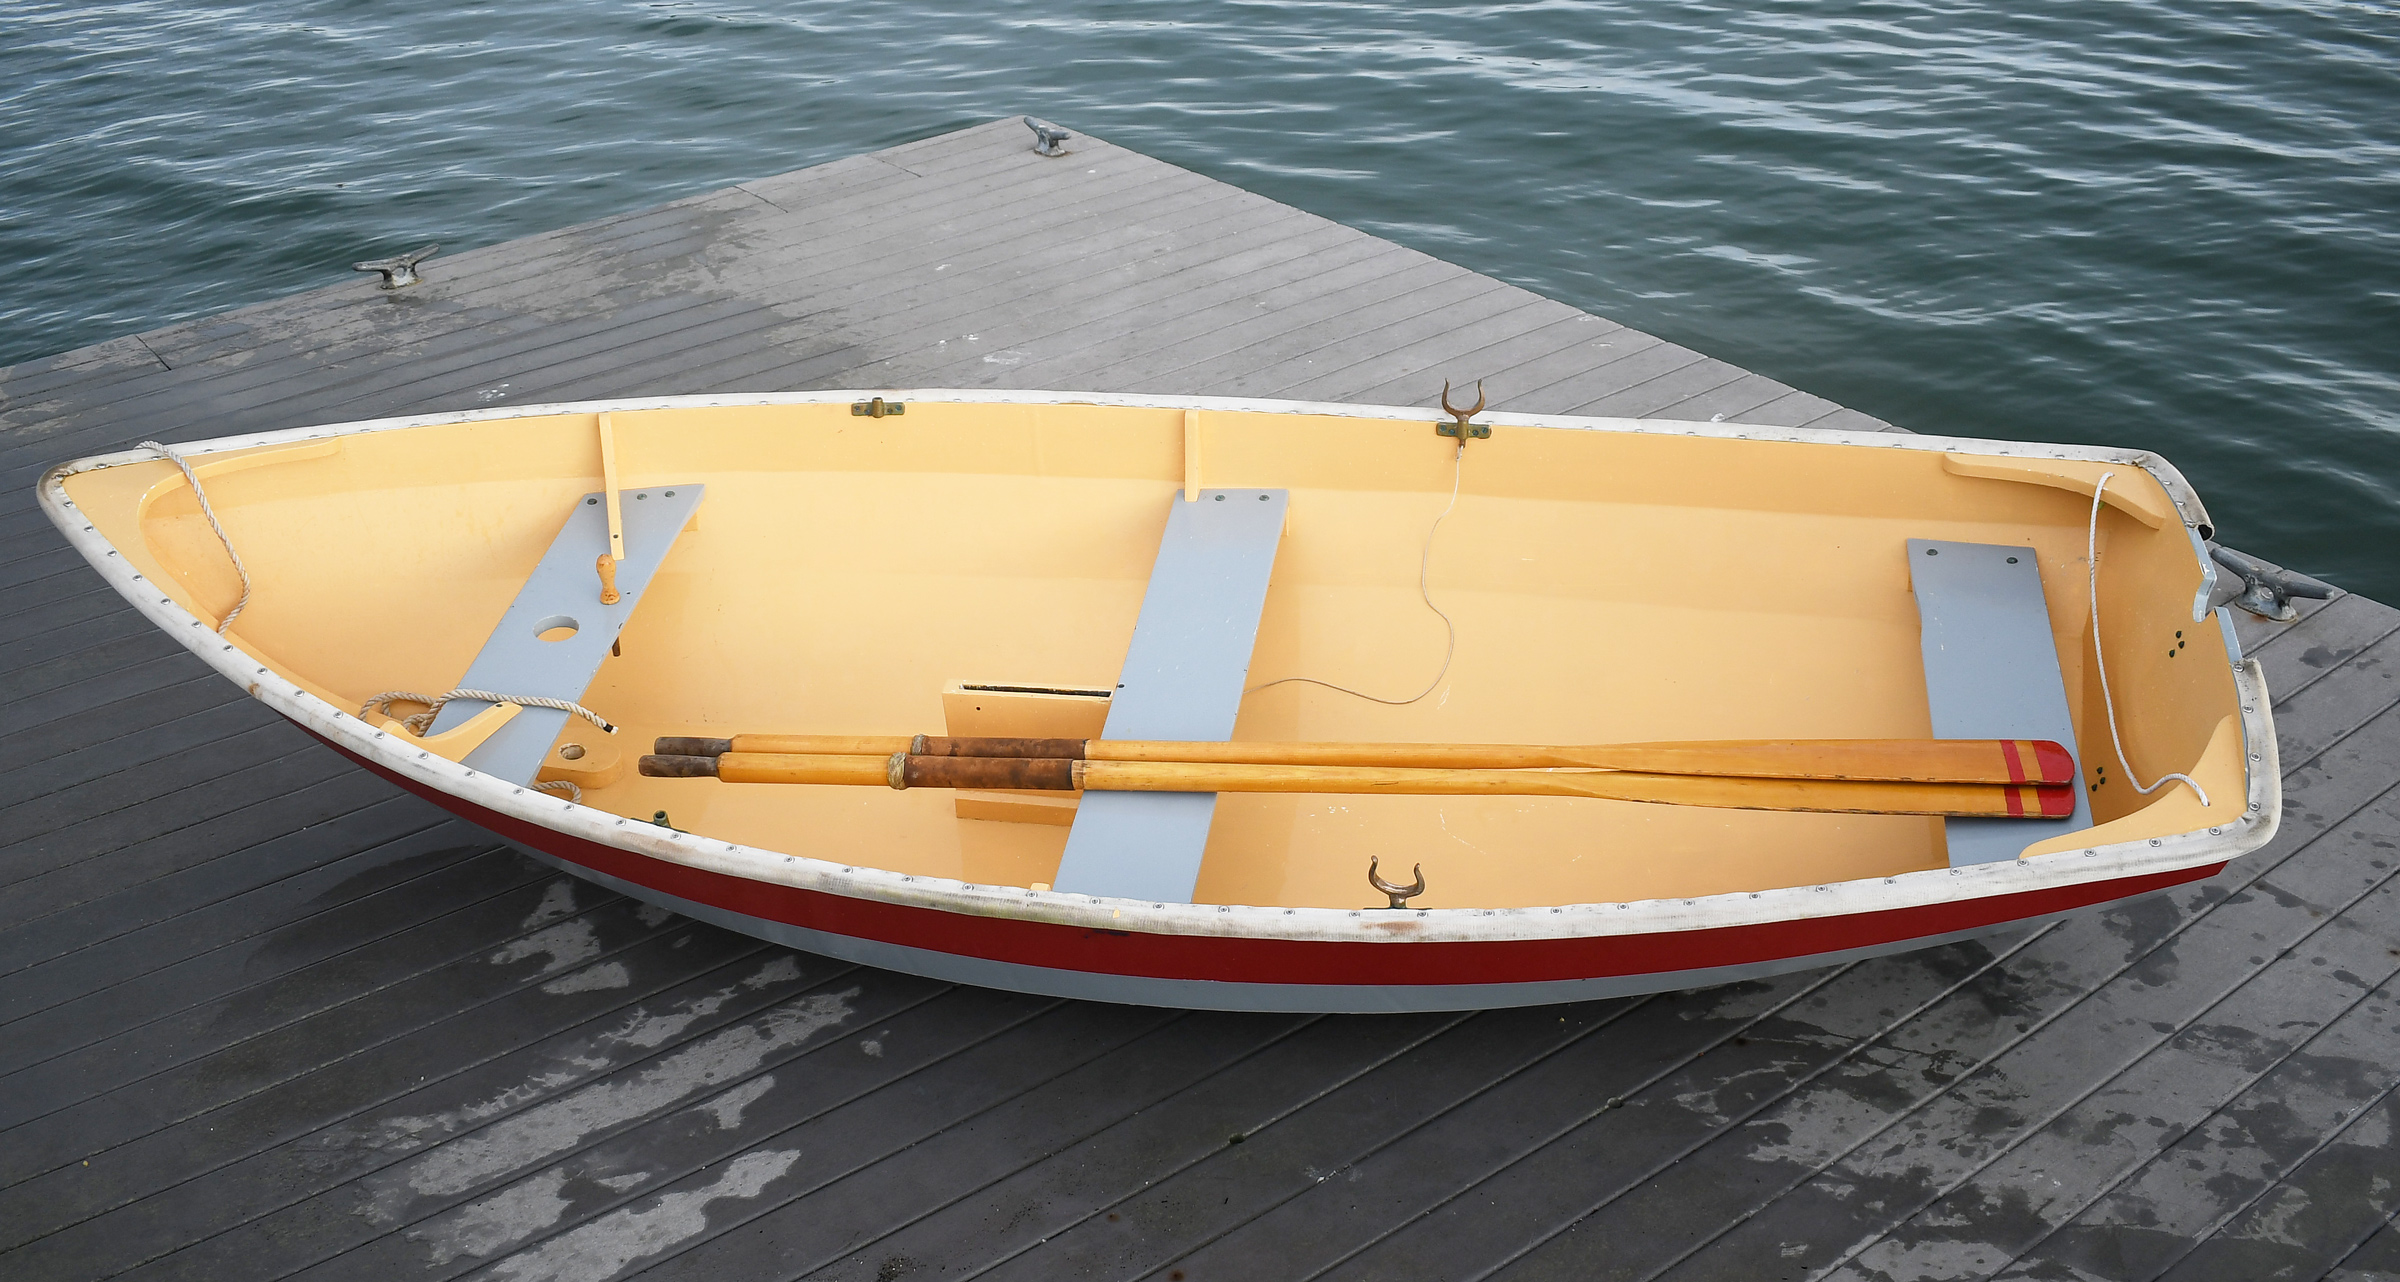
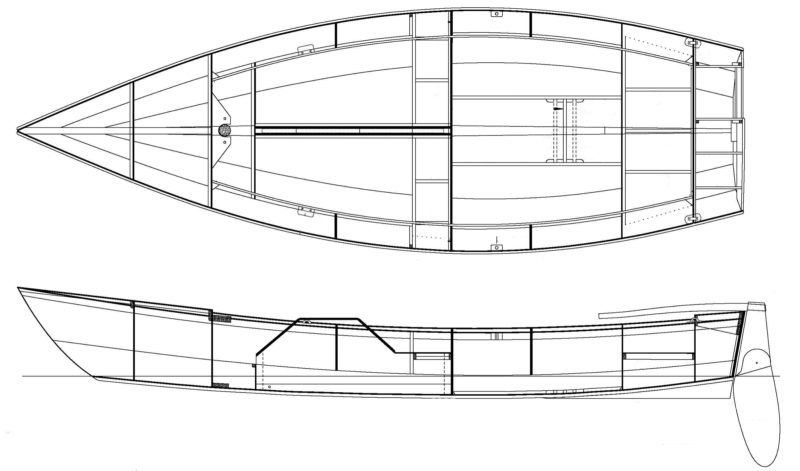
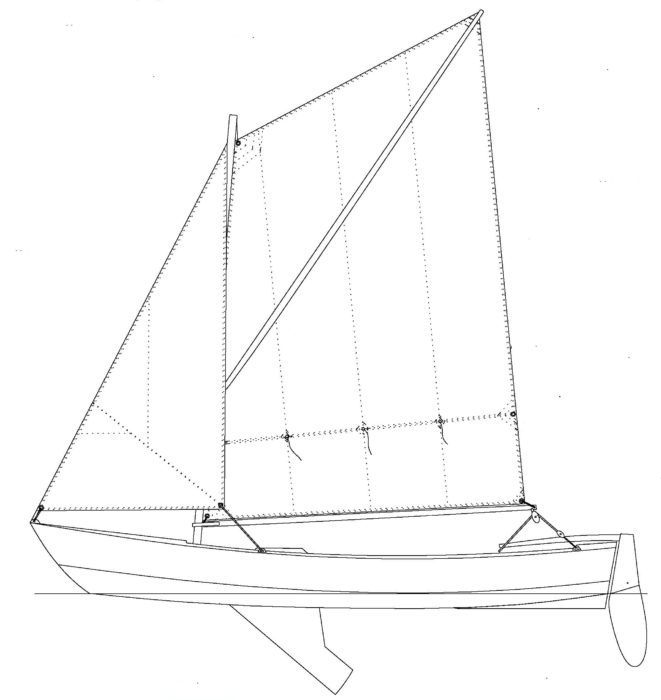
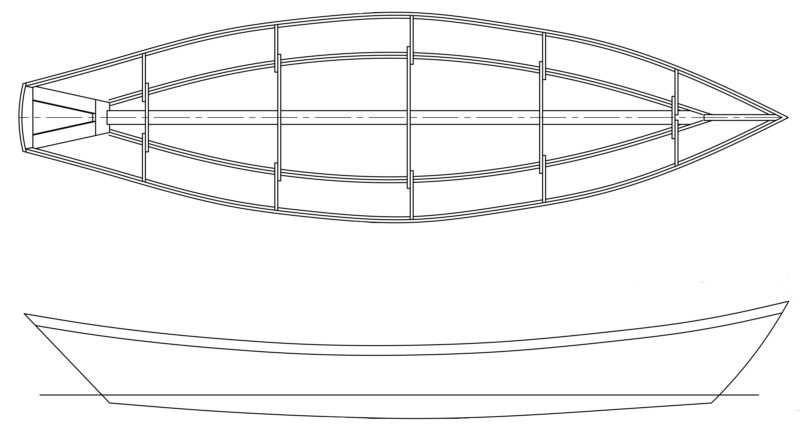
The Shellback is a 11′2″ sailing and rowing dinghy designed by Joel White. The kit I purchased from The WoodenBoat Store came with six sheets of plans, the lumber and precut plywood required to build the boat, all the hardware it would need, the ’midship frame, and the strongback. The plans include lines and offsets and full-sized templates for the three molds, laminated ’midship frame, inner stem, and transom. For a builder working from plans, measured drawings are provided for the 1/4″ plywood planks and the 1/2″ plywood bottom; lofting and spiling aren’t required. Going into this project I had very little woodworking experience and no boatbuilding experience, but I was lucky to have the guidance in Dow’s book as well as the advice of several people in town who had built Shellbacks.
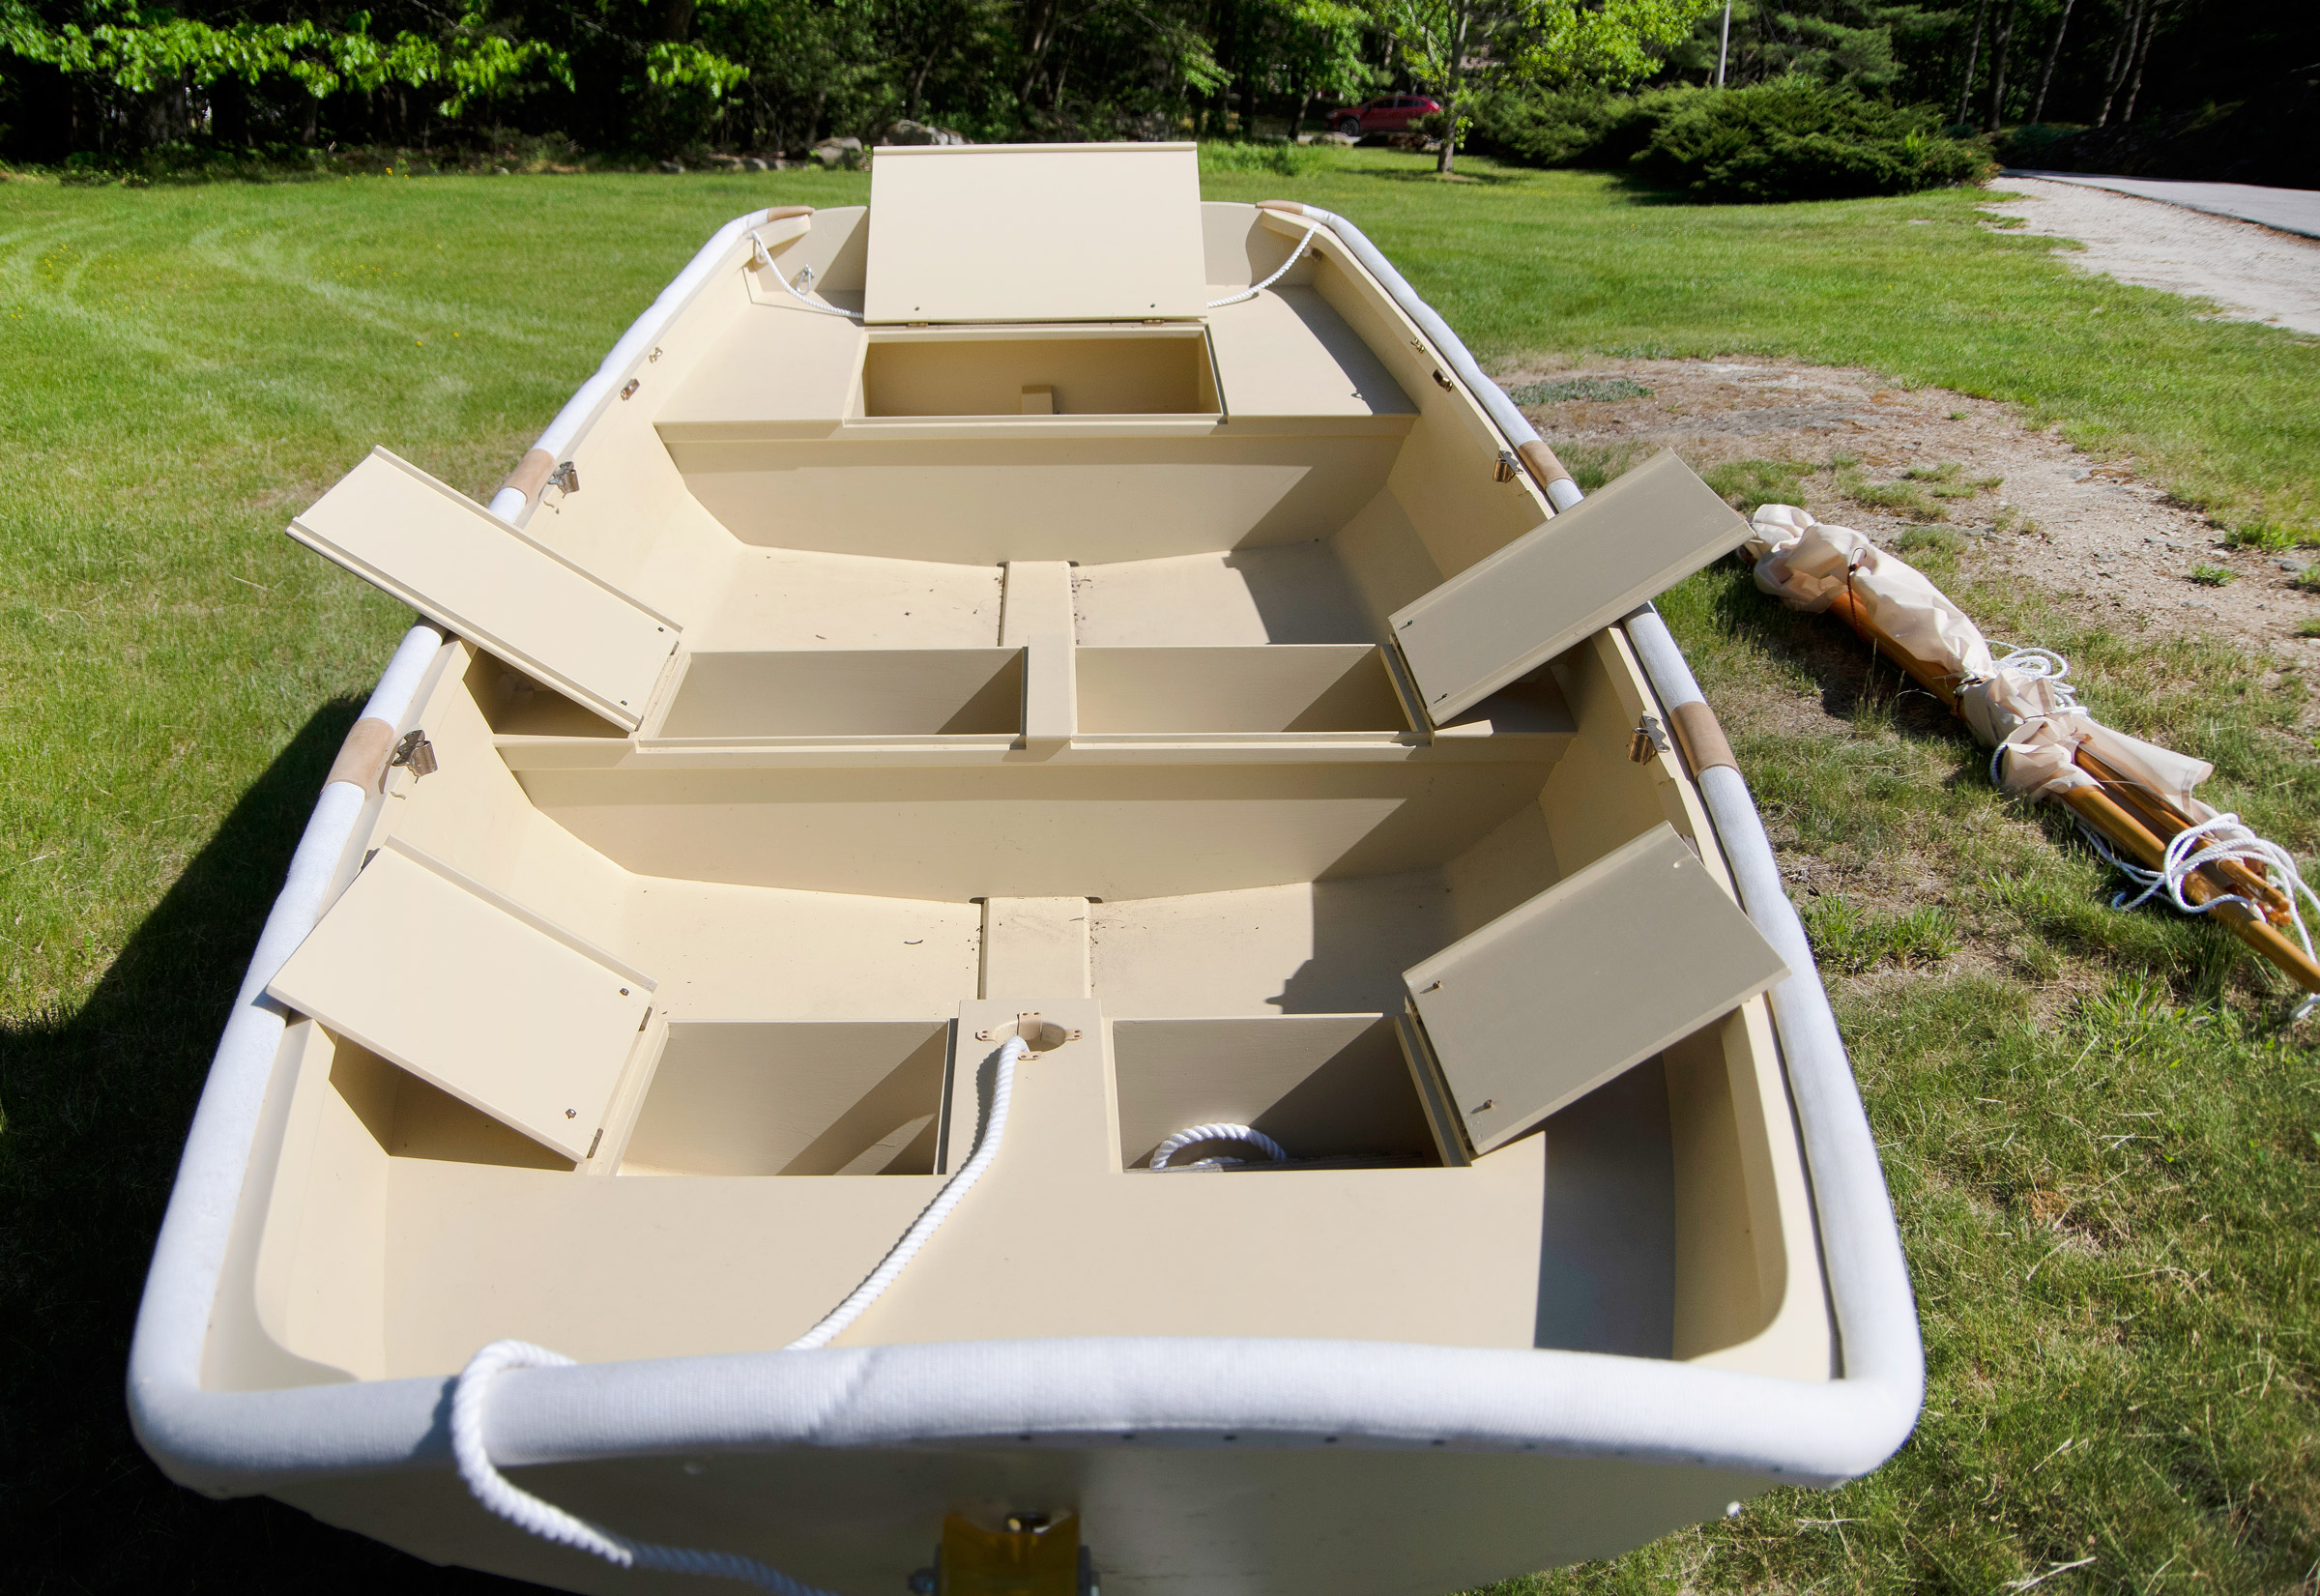
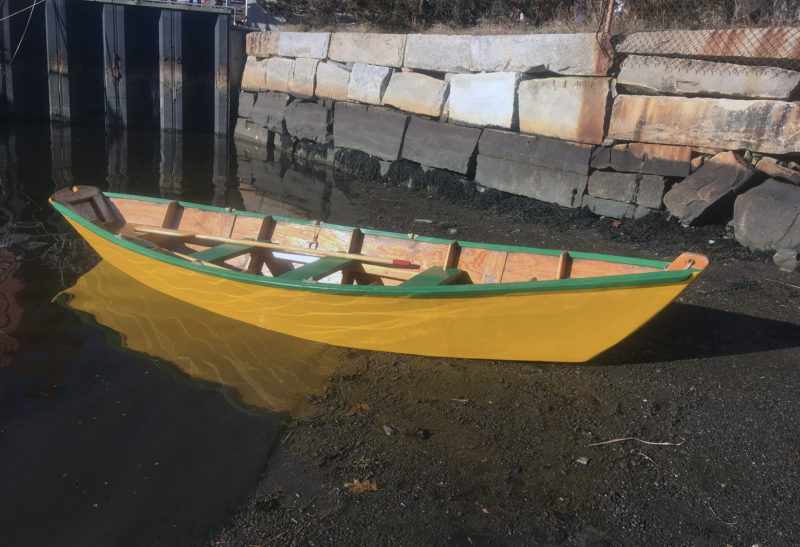
The bottom is obstructed only by the mast step, the daggerboard trunk, and a single laminated frame, leaving the rest of the area clear for the boat’s occupants.
Included in the kit for the sailing Shellback are the blanks for the daggerboard, rudder, and spars. The wooden CNC-cut strongback was easy to assemble and fit together precisely; I made some wooden sawhorses to set it on. Building from the kit went quite smoothly though some steps, while beveling the planks took me a lot of time. Dow’s book was an invaluable resource when I needed additional information on some of the more complex elements of the construction, like cutting the gains at the ends of the planks with a rabbet plane. The actual shaping of the rudder and daggerboard plus making a spar gauge and shaping of the spars are left up to the builder.
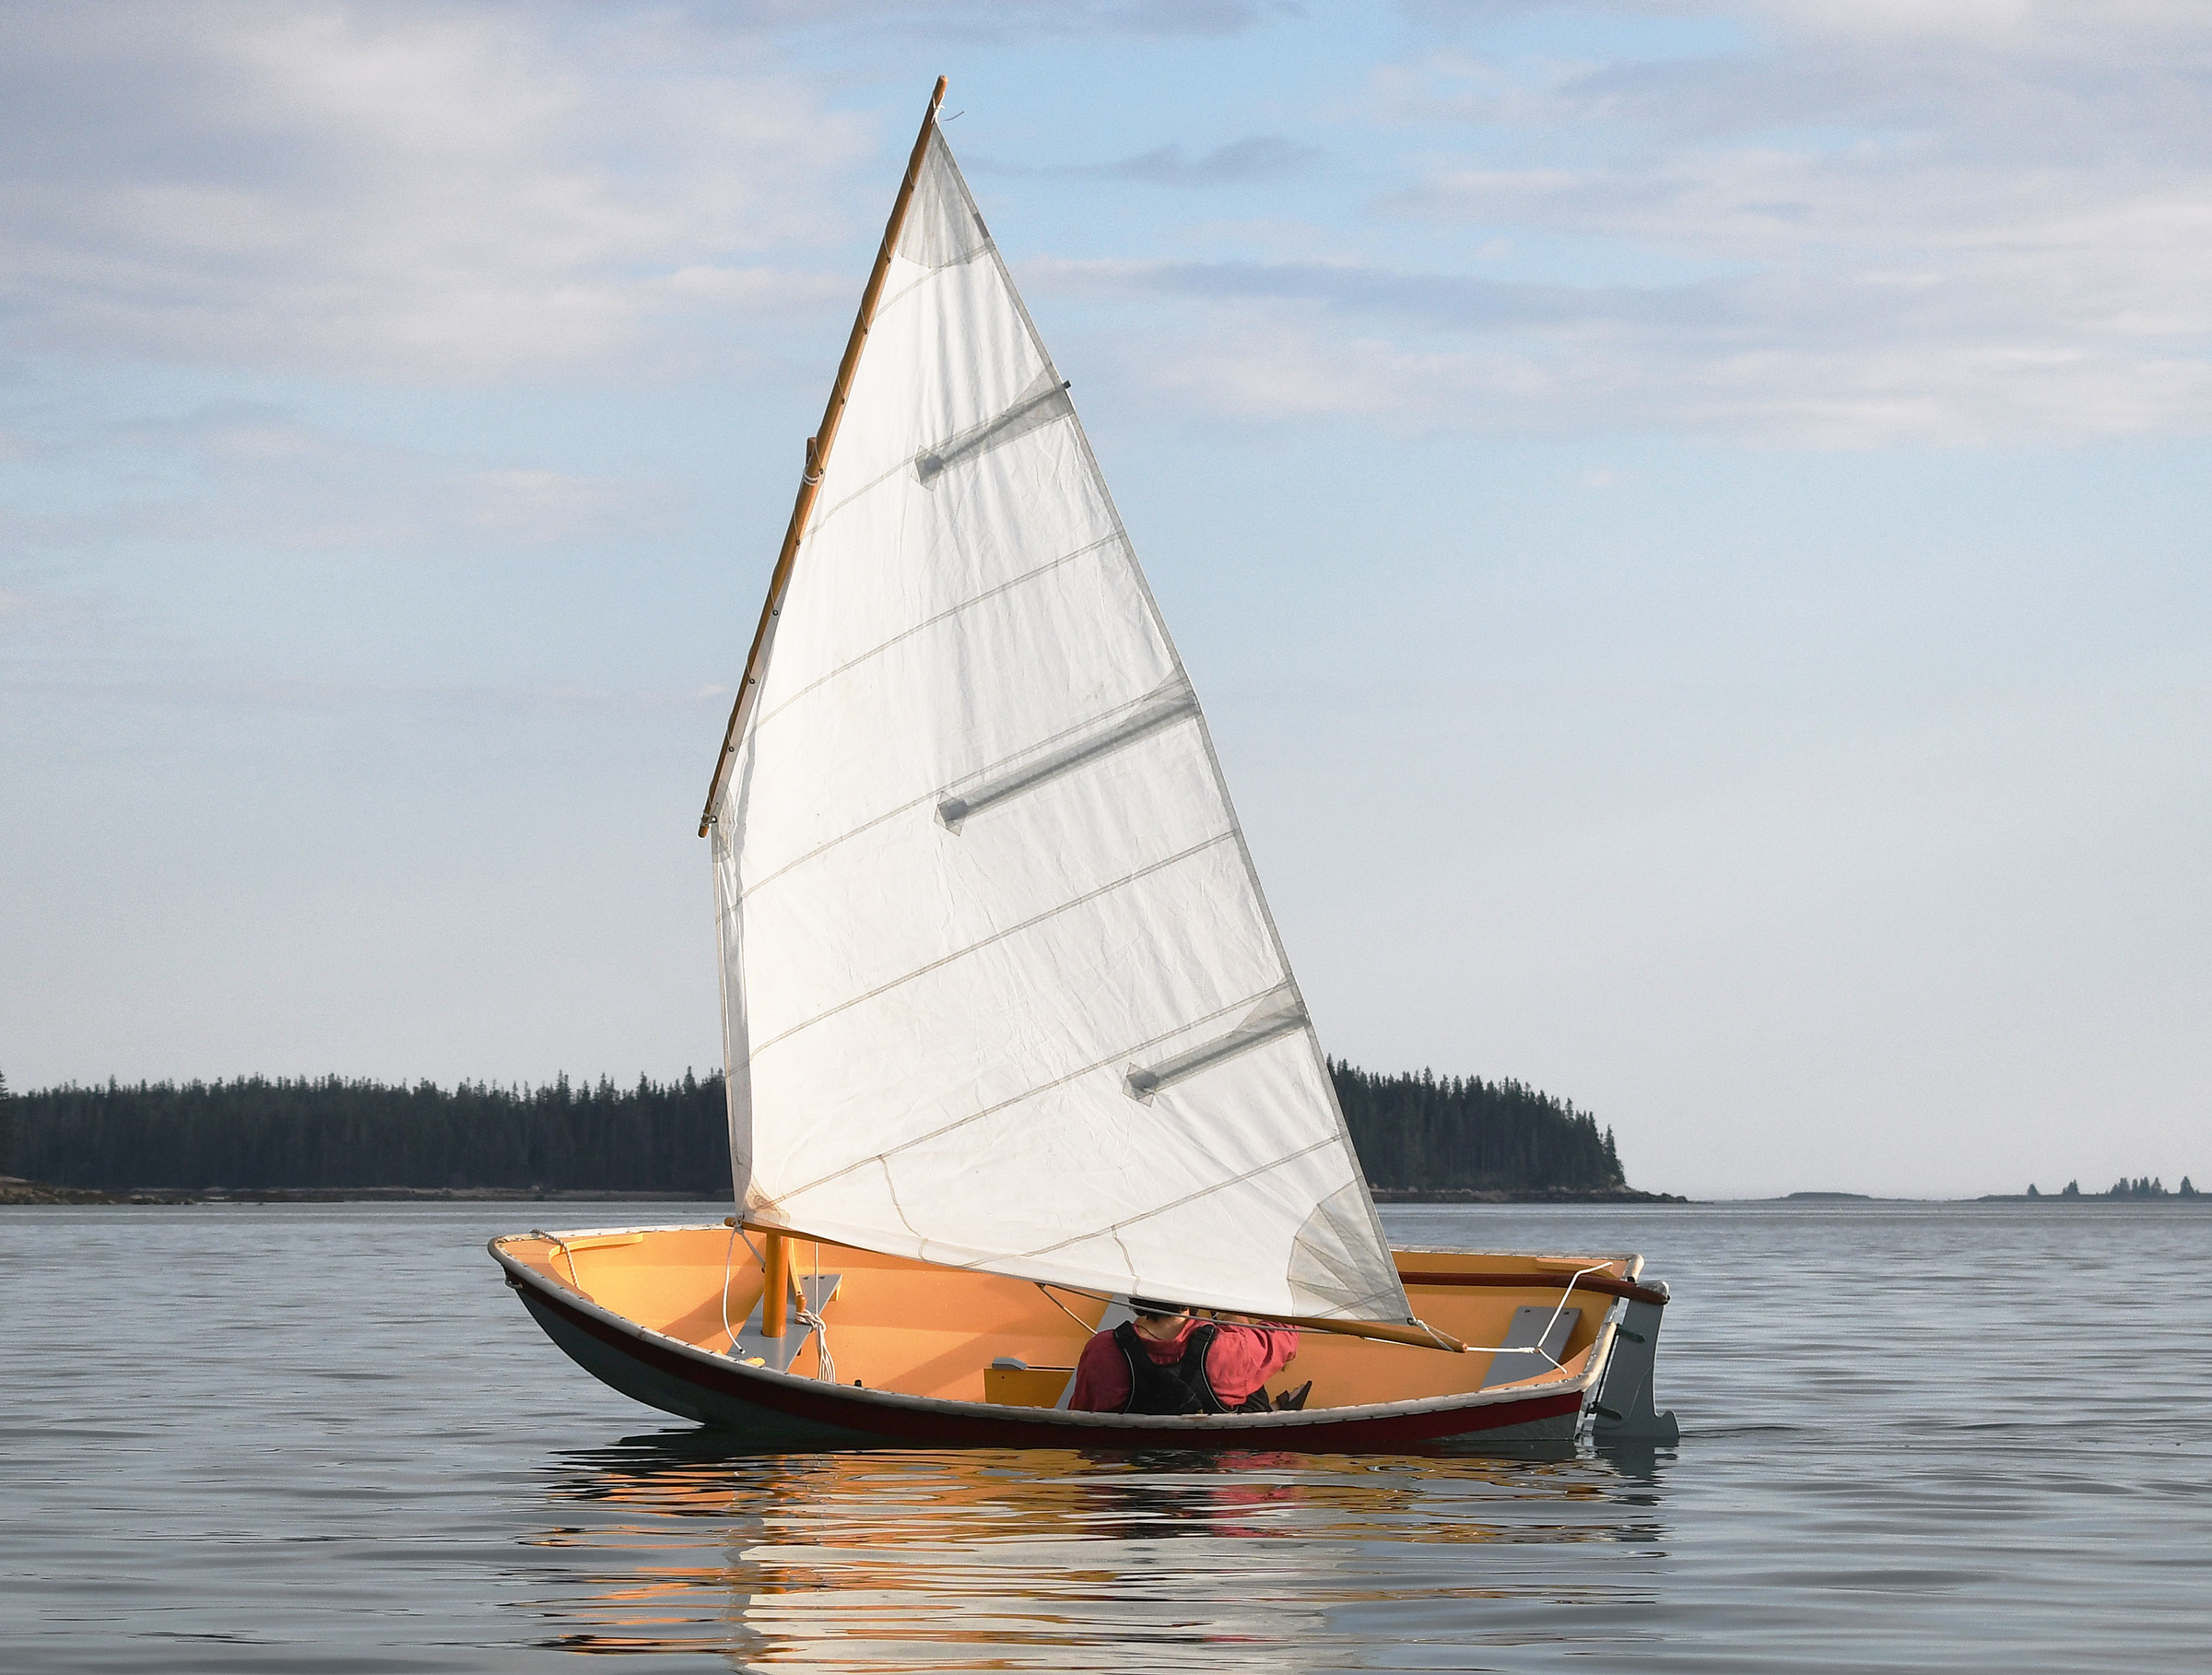
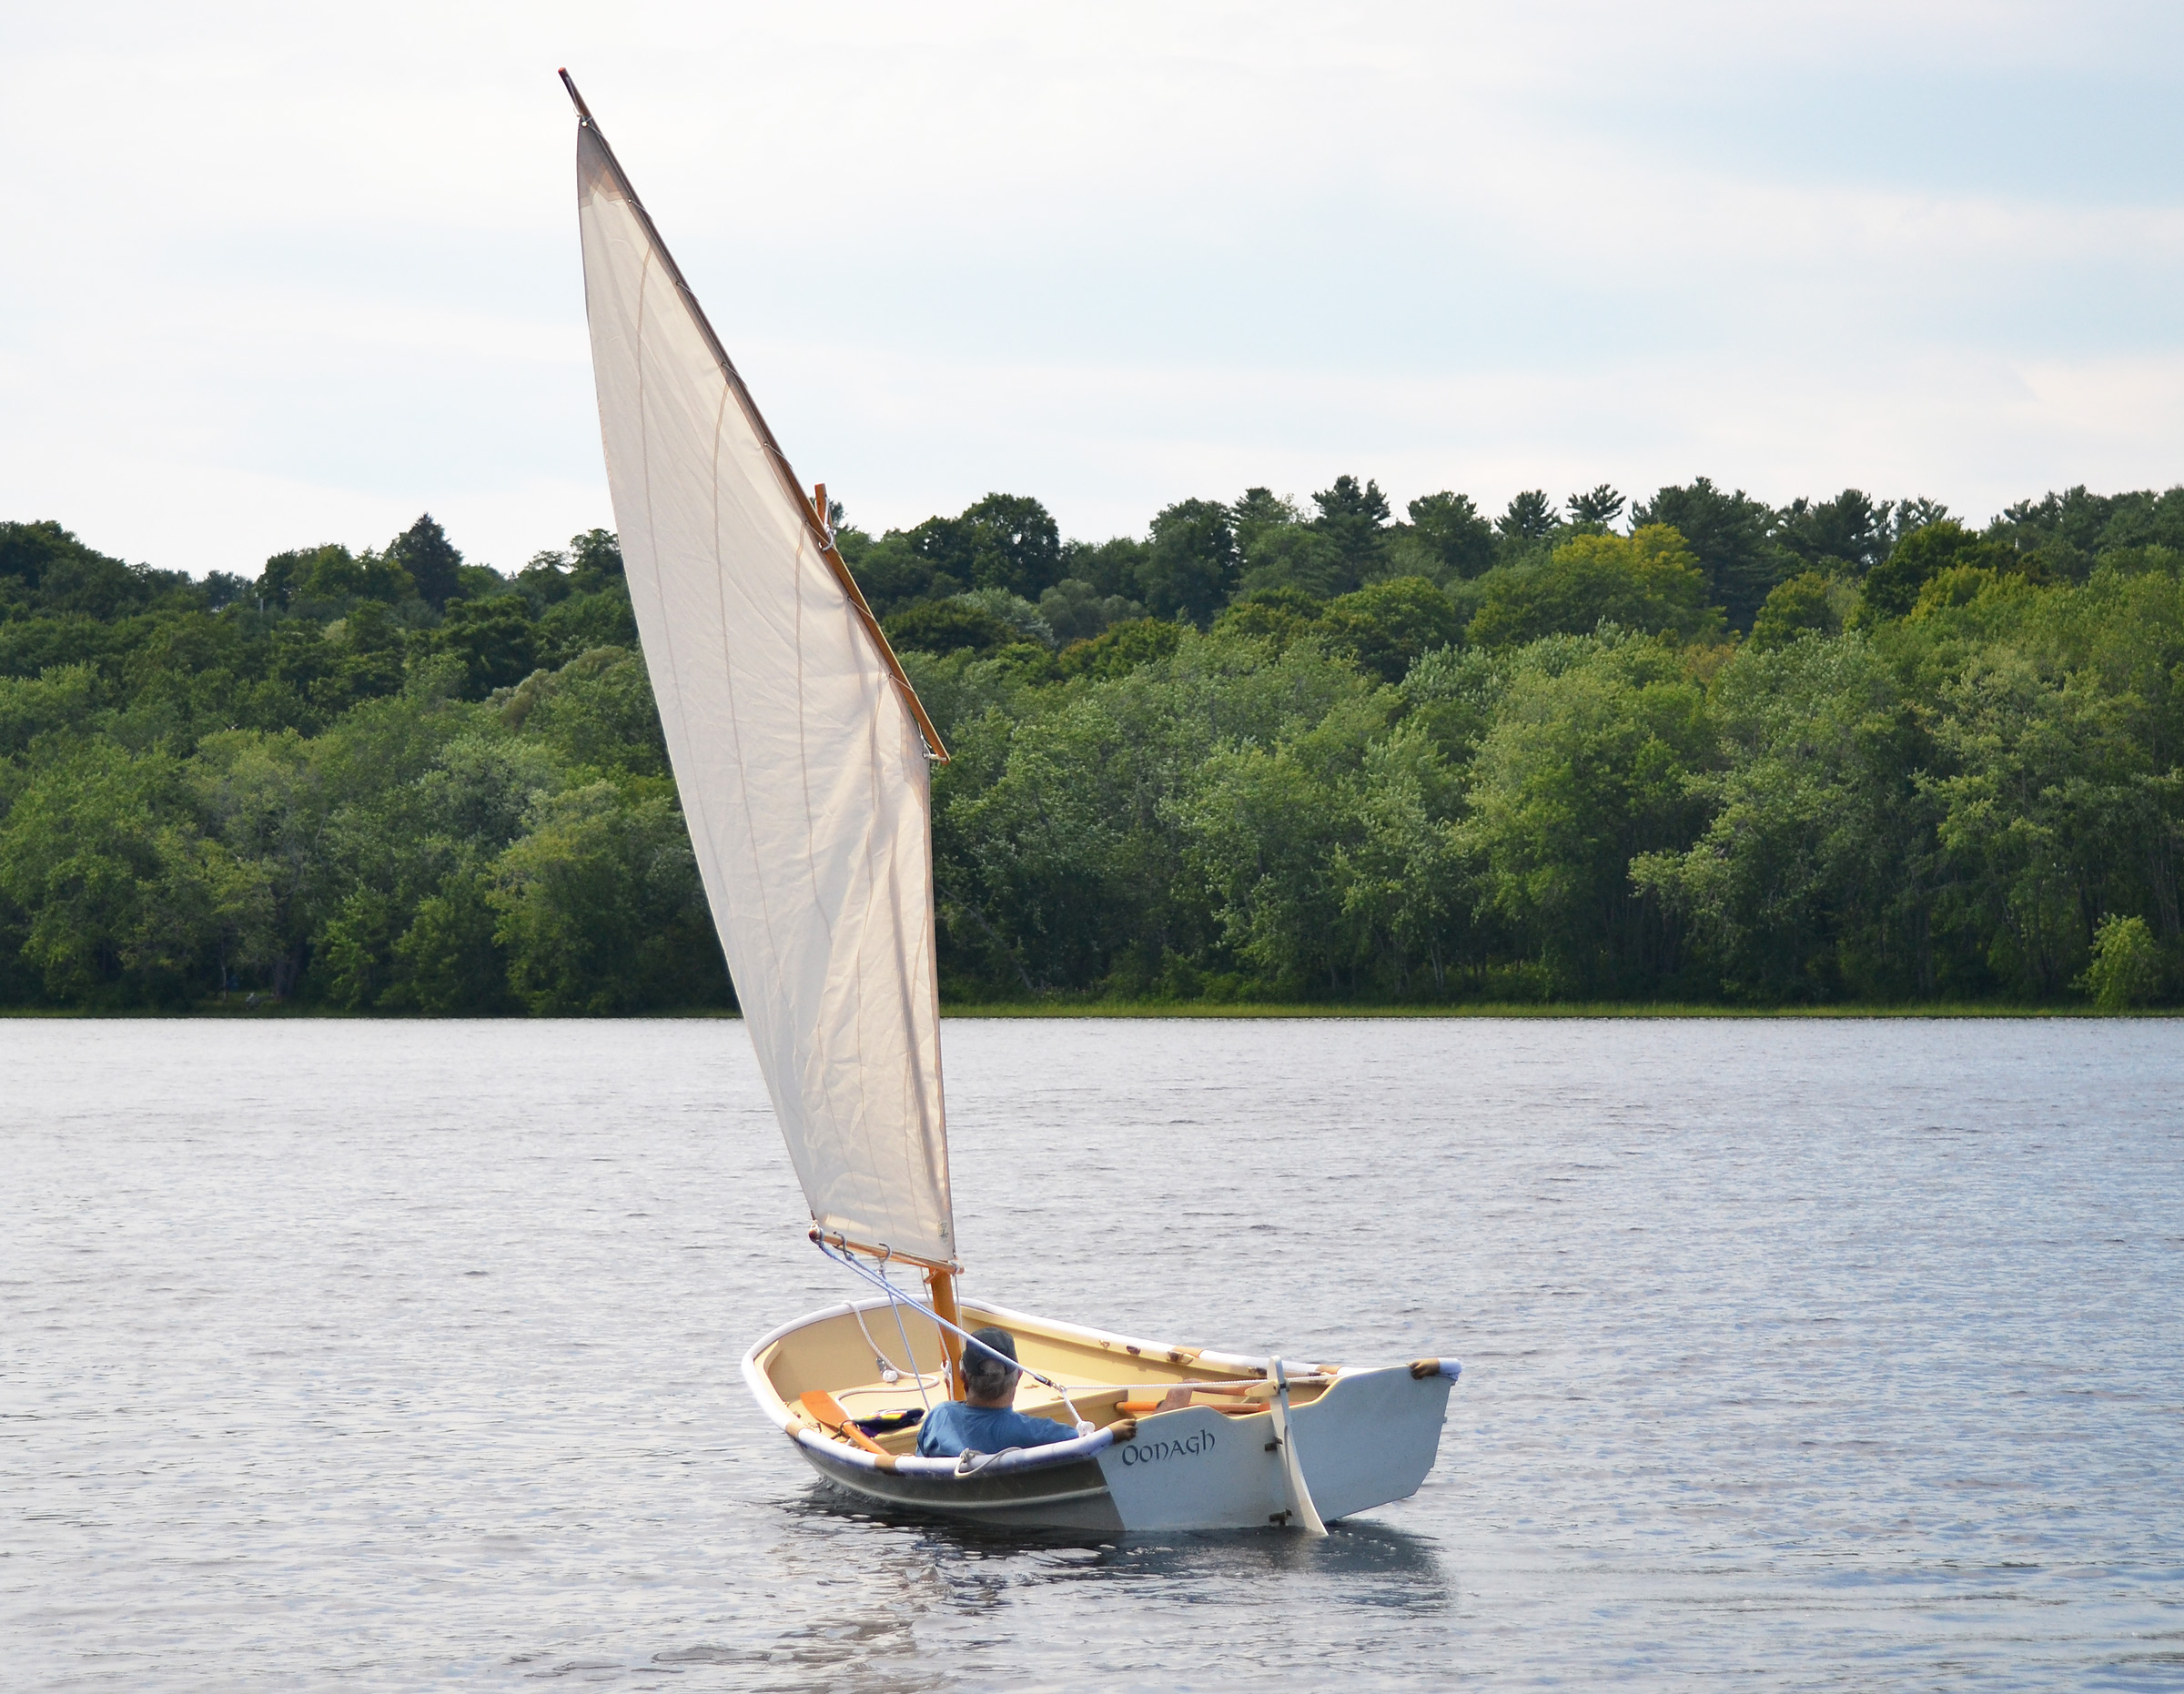
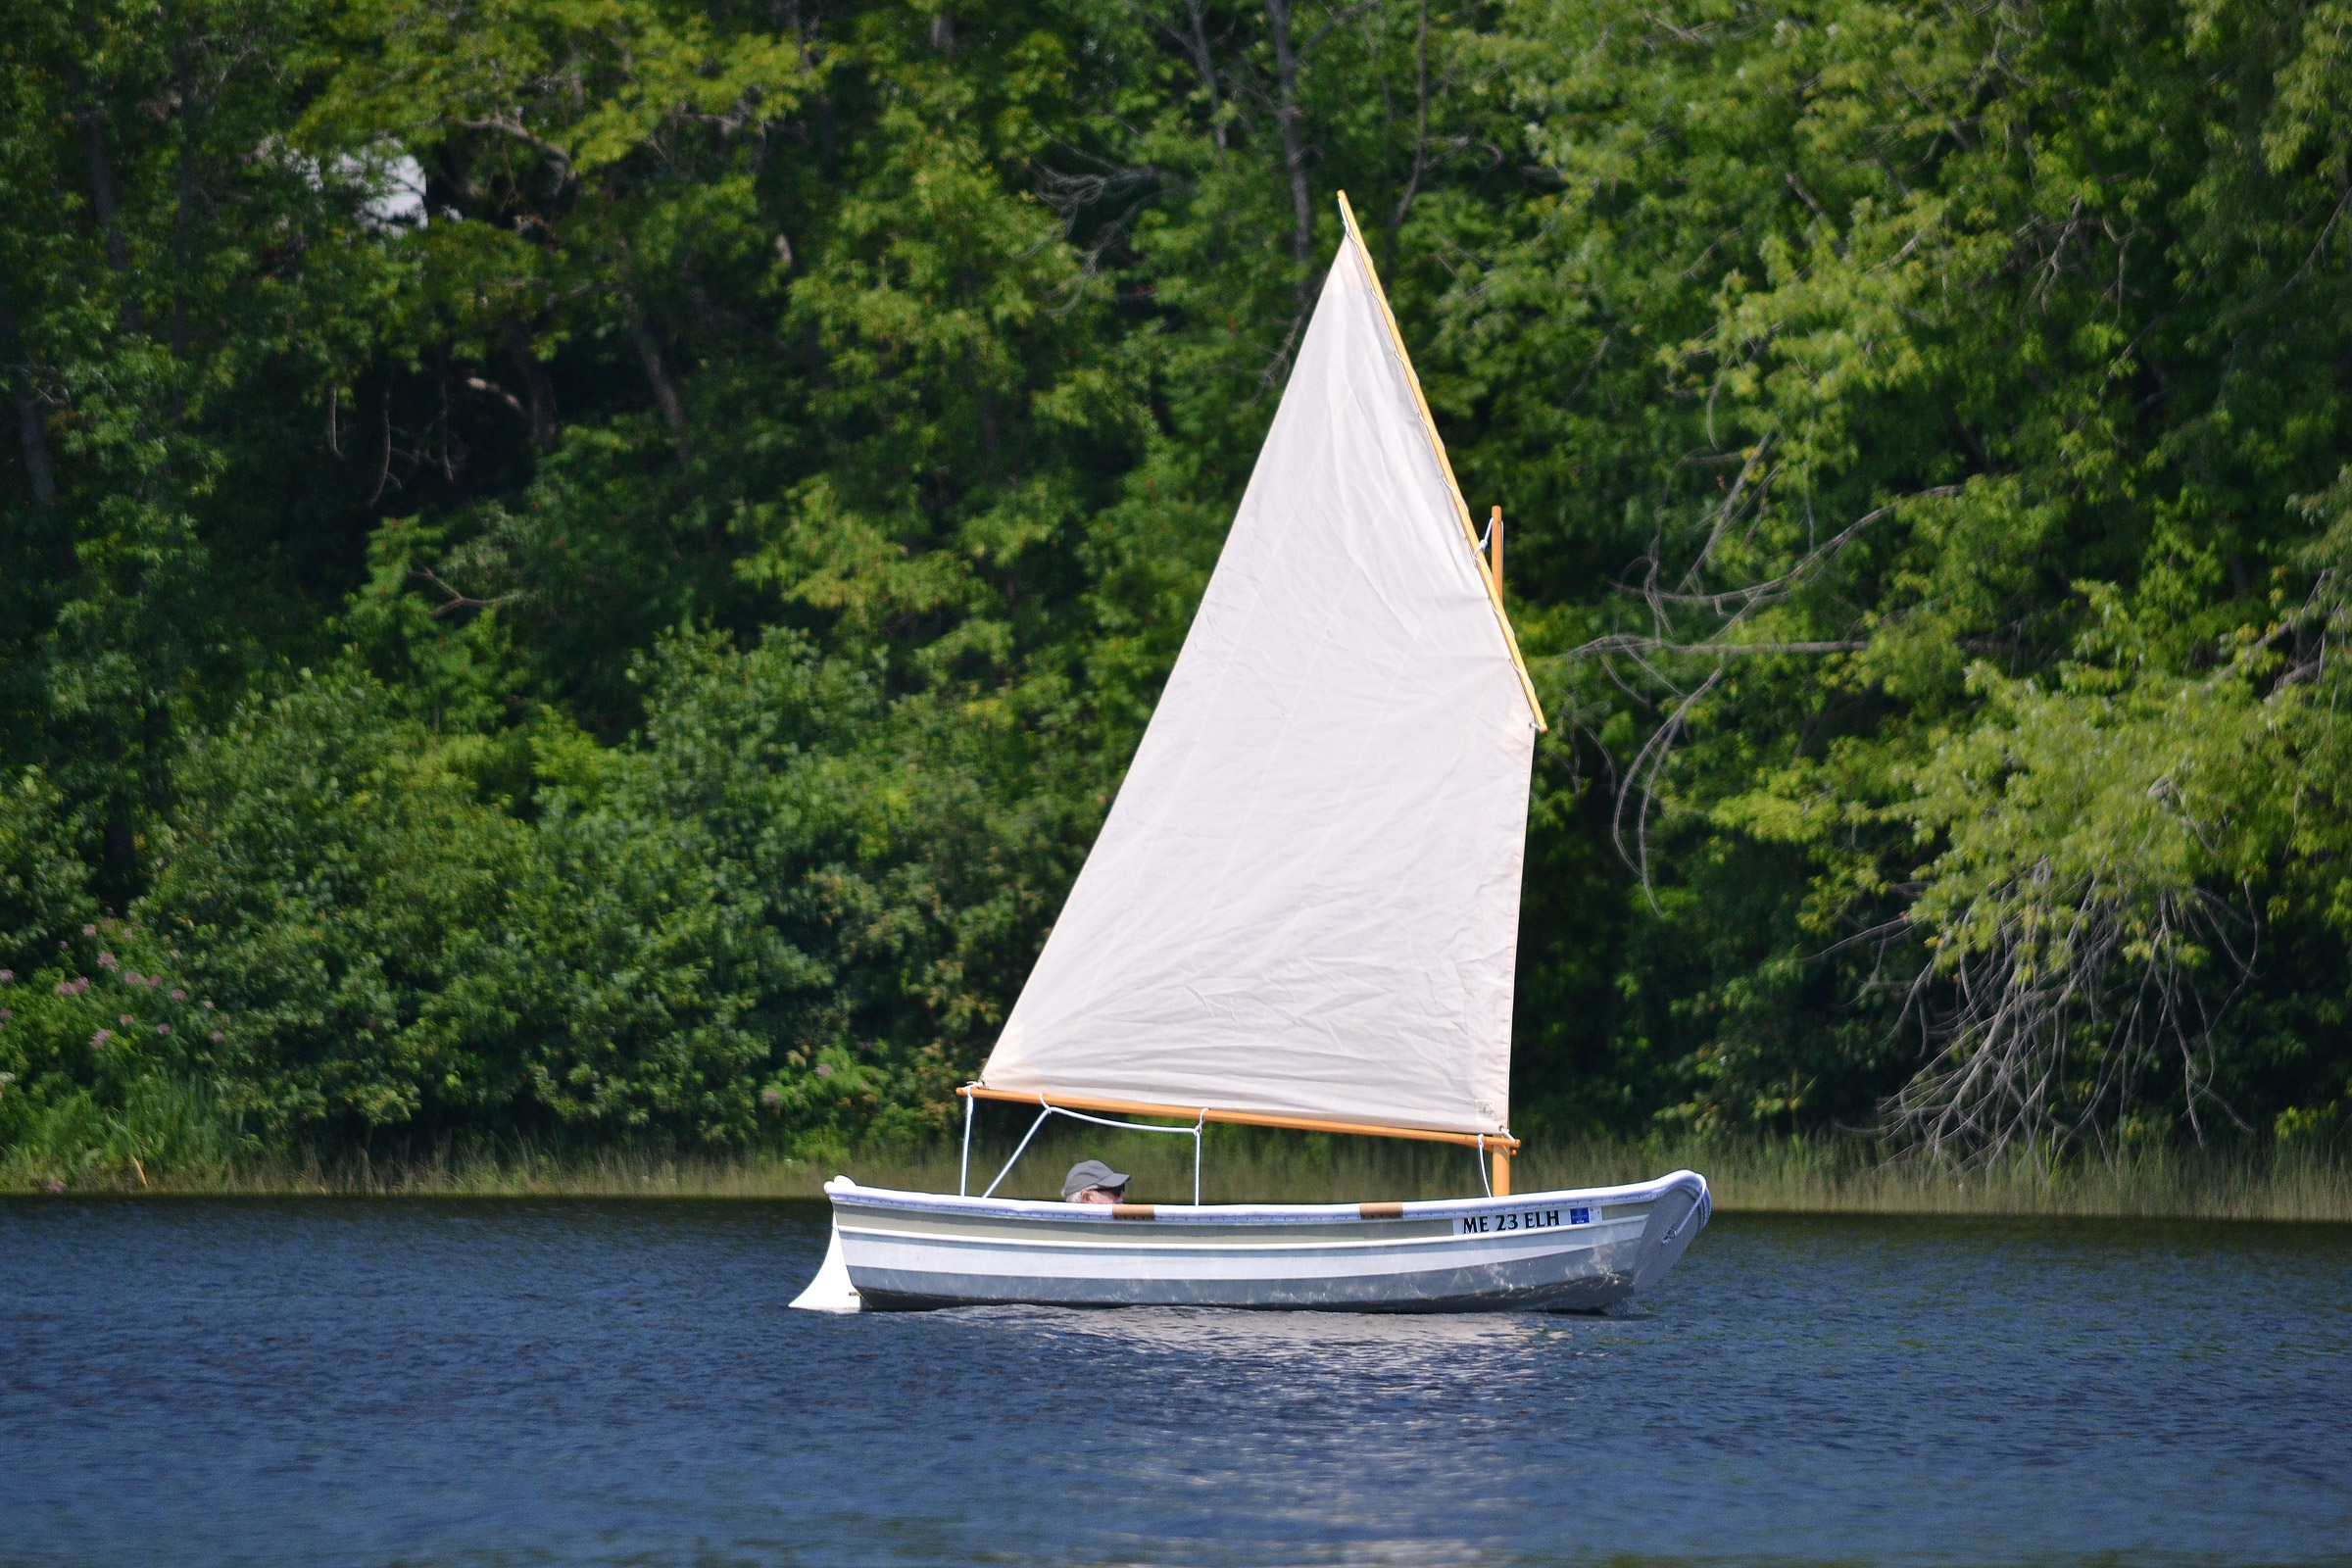
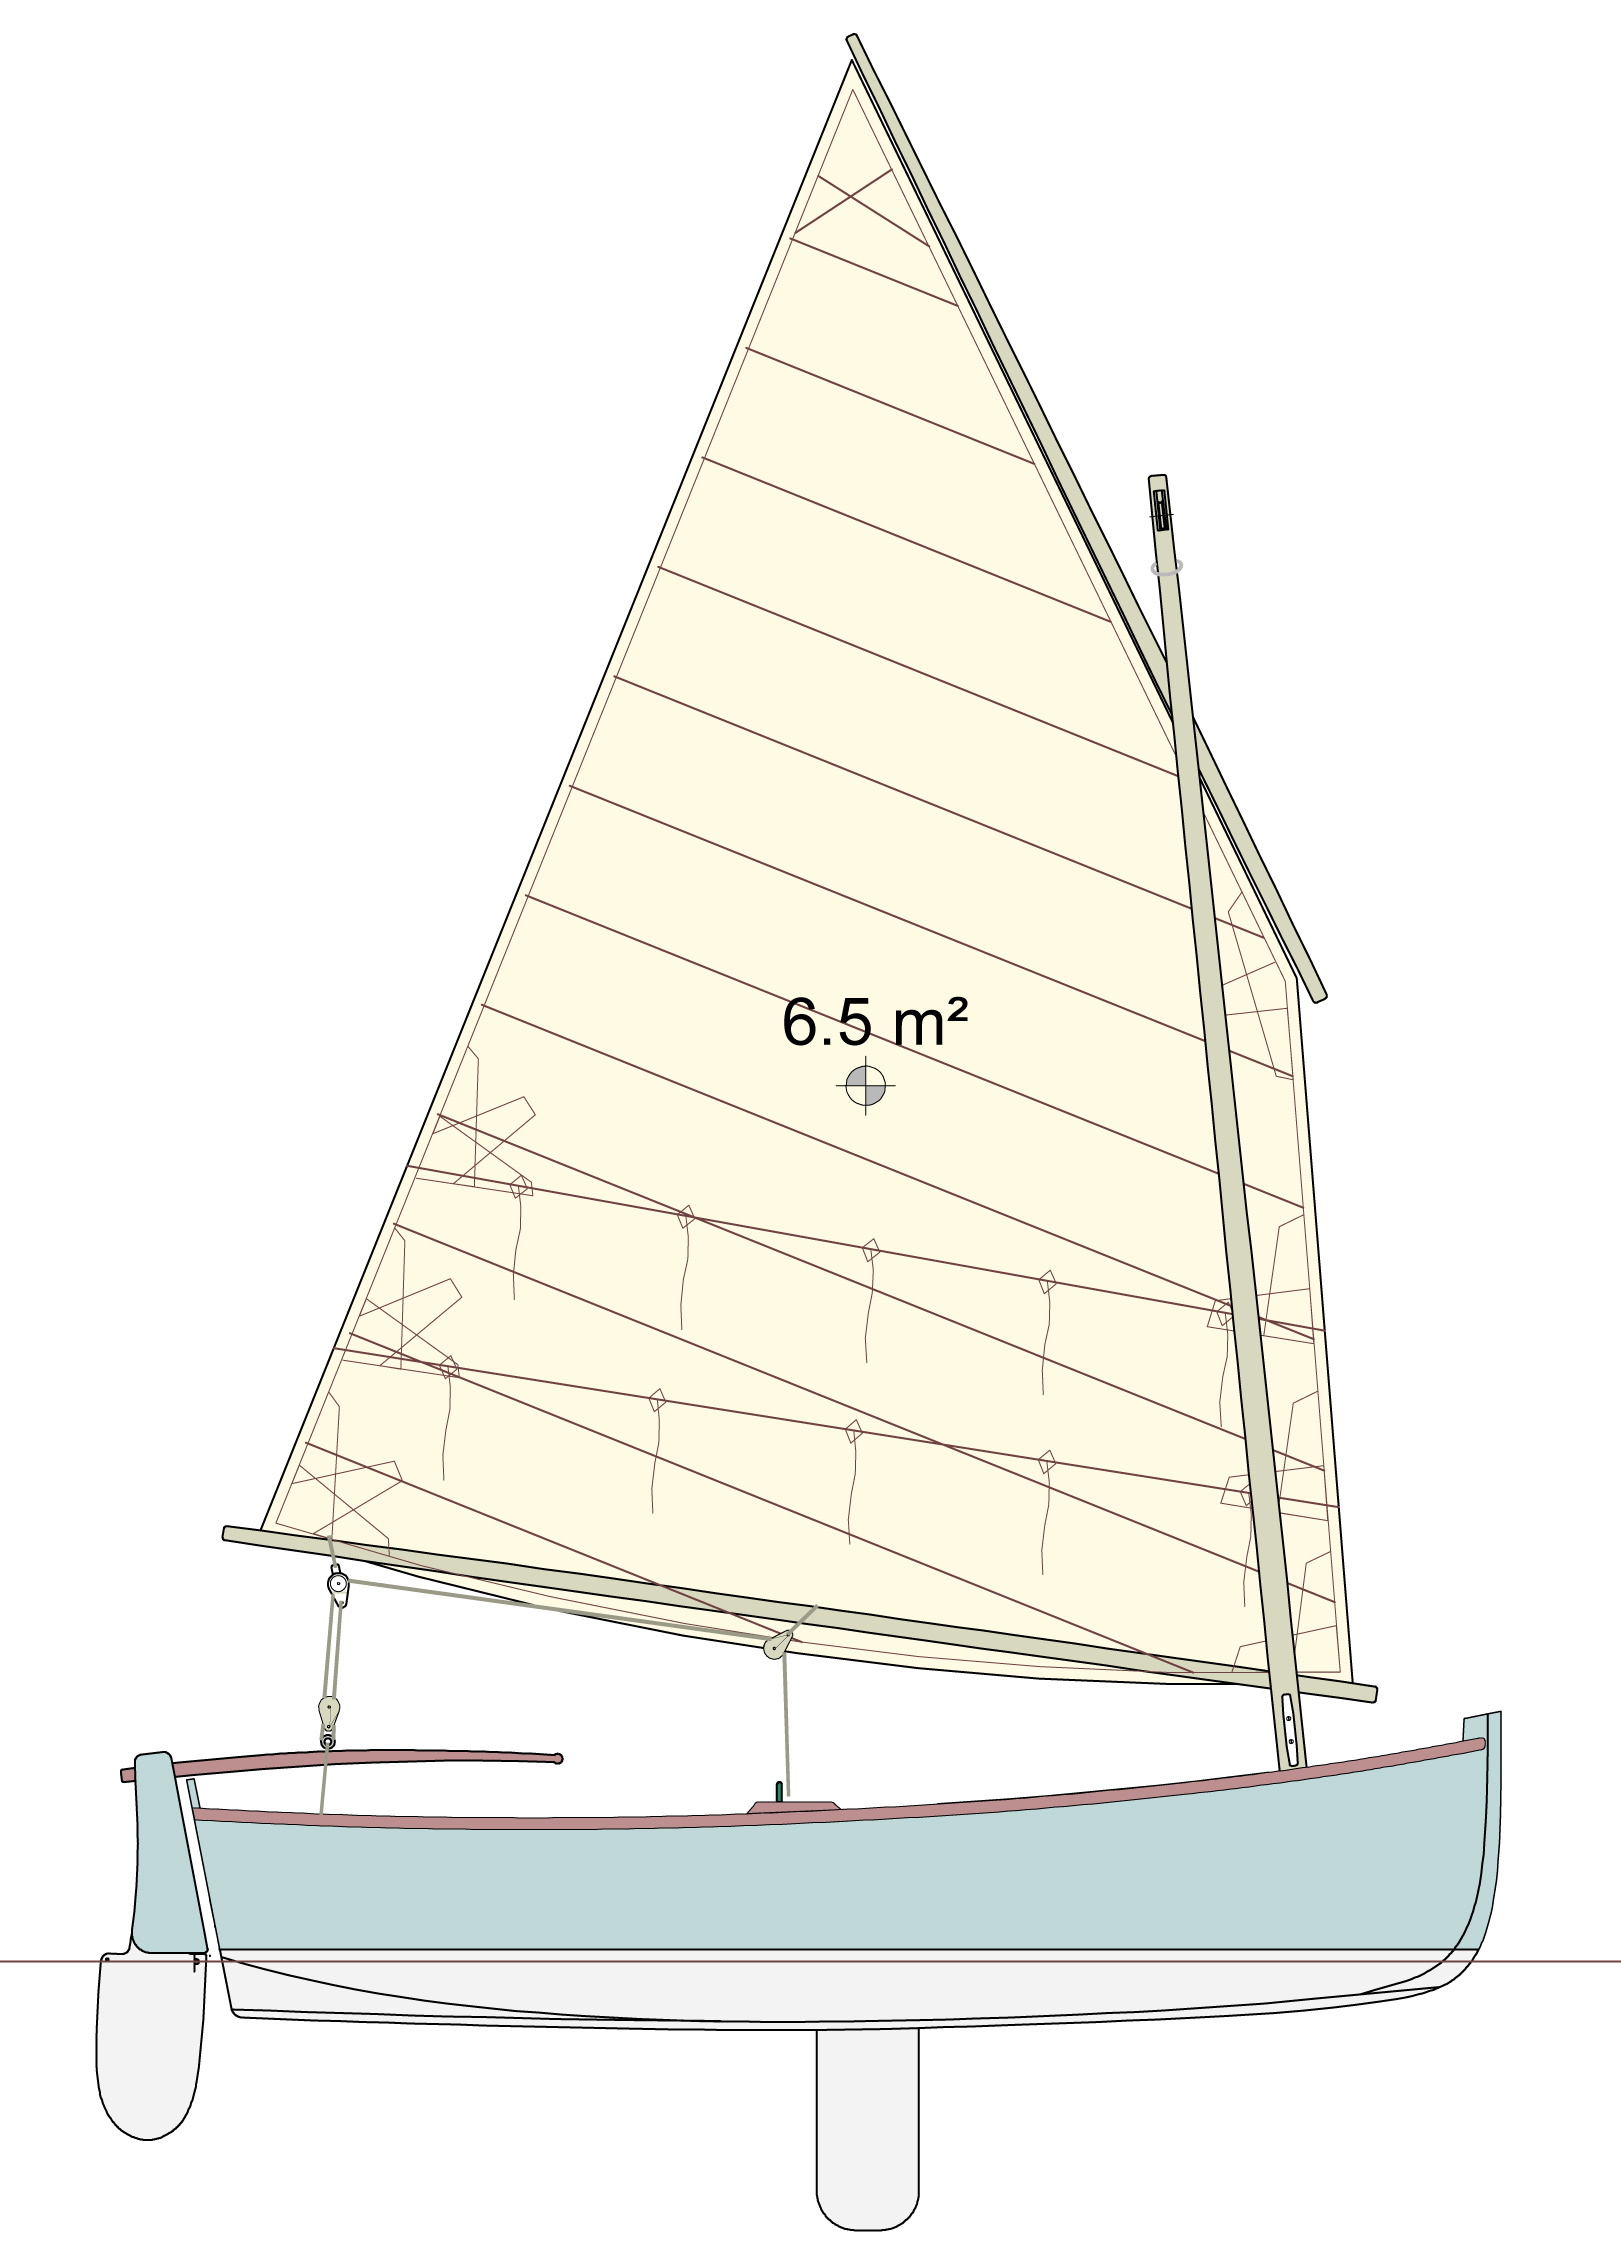
The plans call for a straight leech on the 56-sq-ft lugsail. The battens on this Shellback’s sail allow for some roach in the leech and a little more sail area.
I built the dinghy in my family’s two-car garage. Dow’s book includes a list of tools needed for the job—all are common hand tools plus an electric drill. There is a list of “optional tools that will make the job go more quickly.” While the bandsaw and power planer would indeed speed the work, I preferred using hand tools for tasks such as shaping the spars because they are much more forgiving and gave me more control.
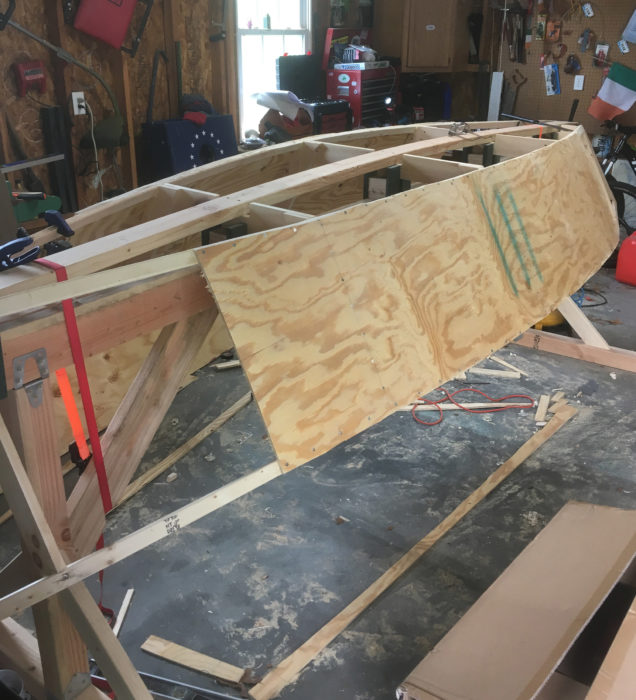
The precut sections of the bottom and planks need to have scarfs cut before being joined with epoxy. Set on the strongback and temporarily held with drywall screws, the edges of the bottom get beveled to meet the garboard, then epoxied, using drywall screws at the laps; the middle planks and sheer planks follow in the same manner. I followed the plans carefully when lining up the planks. The molds came with indexing points on them to help with the process.
When the hull was finished, I coated it with epoxy. I knew that I would be launching this boat from the beach, so I ’glassed the bottom to protect it from all the wear of beaching. These steps are not indicated in the plans or the kit, but I wanted the added layers of protection.
The kit comes with long strips of wood for the outwales, inwales, and blocking for the inwales. Assembling the gunwale parts was just one step where it was extremely helpful to have the book How to Build the Shellback Dinghy, as its illustrations, tips, and tricks made the process a lot easier. The outwales go on first to give the hull some rigidity. This step was easier with two people and about 15 clamps to hold each outwale to the hull. They bend easily enough and do not need to be steamed. Silicon-bronze screws and epoxy hold everything in place.
The thwarts were surprisingly hard to get right and the step I had the most trouble with. I used a compass and a bevel to try and get them to sit flush with the hull. I went through about three sets of seats before I had made ones that fit right. I recommend cutting and fitting some scrap wood to get a flush result before using the wood that comes in the kit. The rest of the inside of the hull is fairly easy to assemble. The daggerboard and rudder foils need to be shaped a little bit, and the daggerboard trunk is simple to build by paying close attention to the plans. Make sure to measure a lot when lining everything up. Dry-fit everything where it should go before permanently attaching anything.
I started the Shellback the summer after my junior year, worked most weekends, school breaks, and many evenings, and finished at the end of my senior year. The build process can be wonderful even for a novice woodworker like me. It’s not a simple process, but it is extremely rewarding.
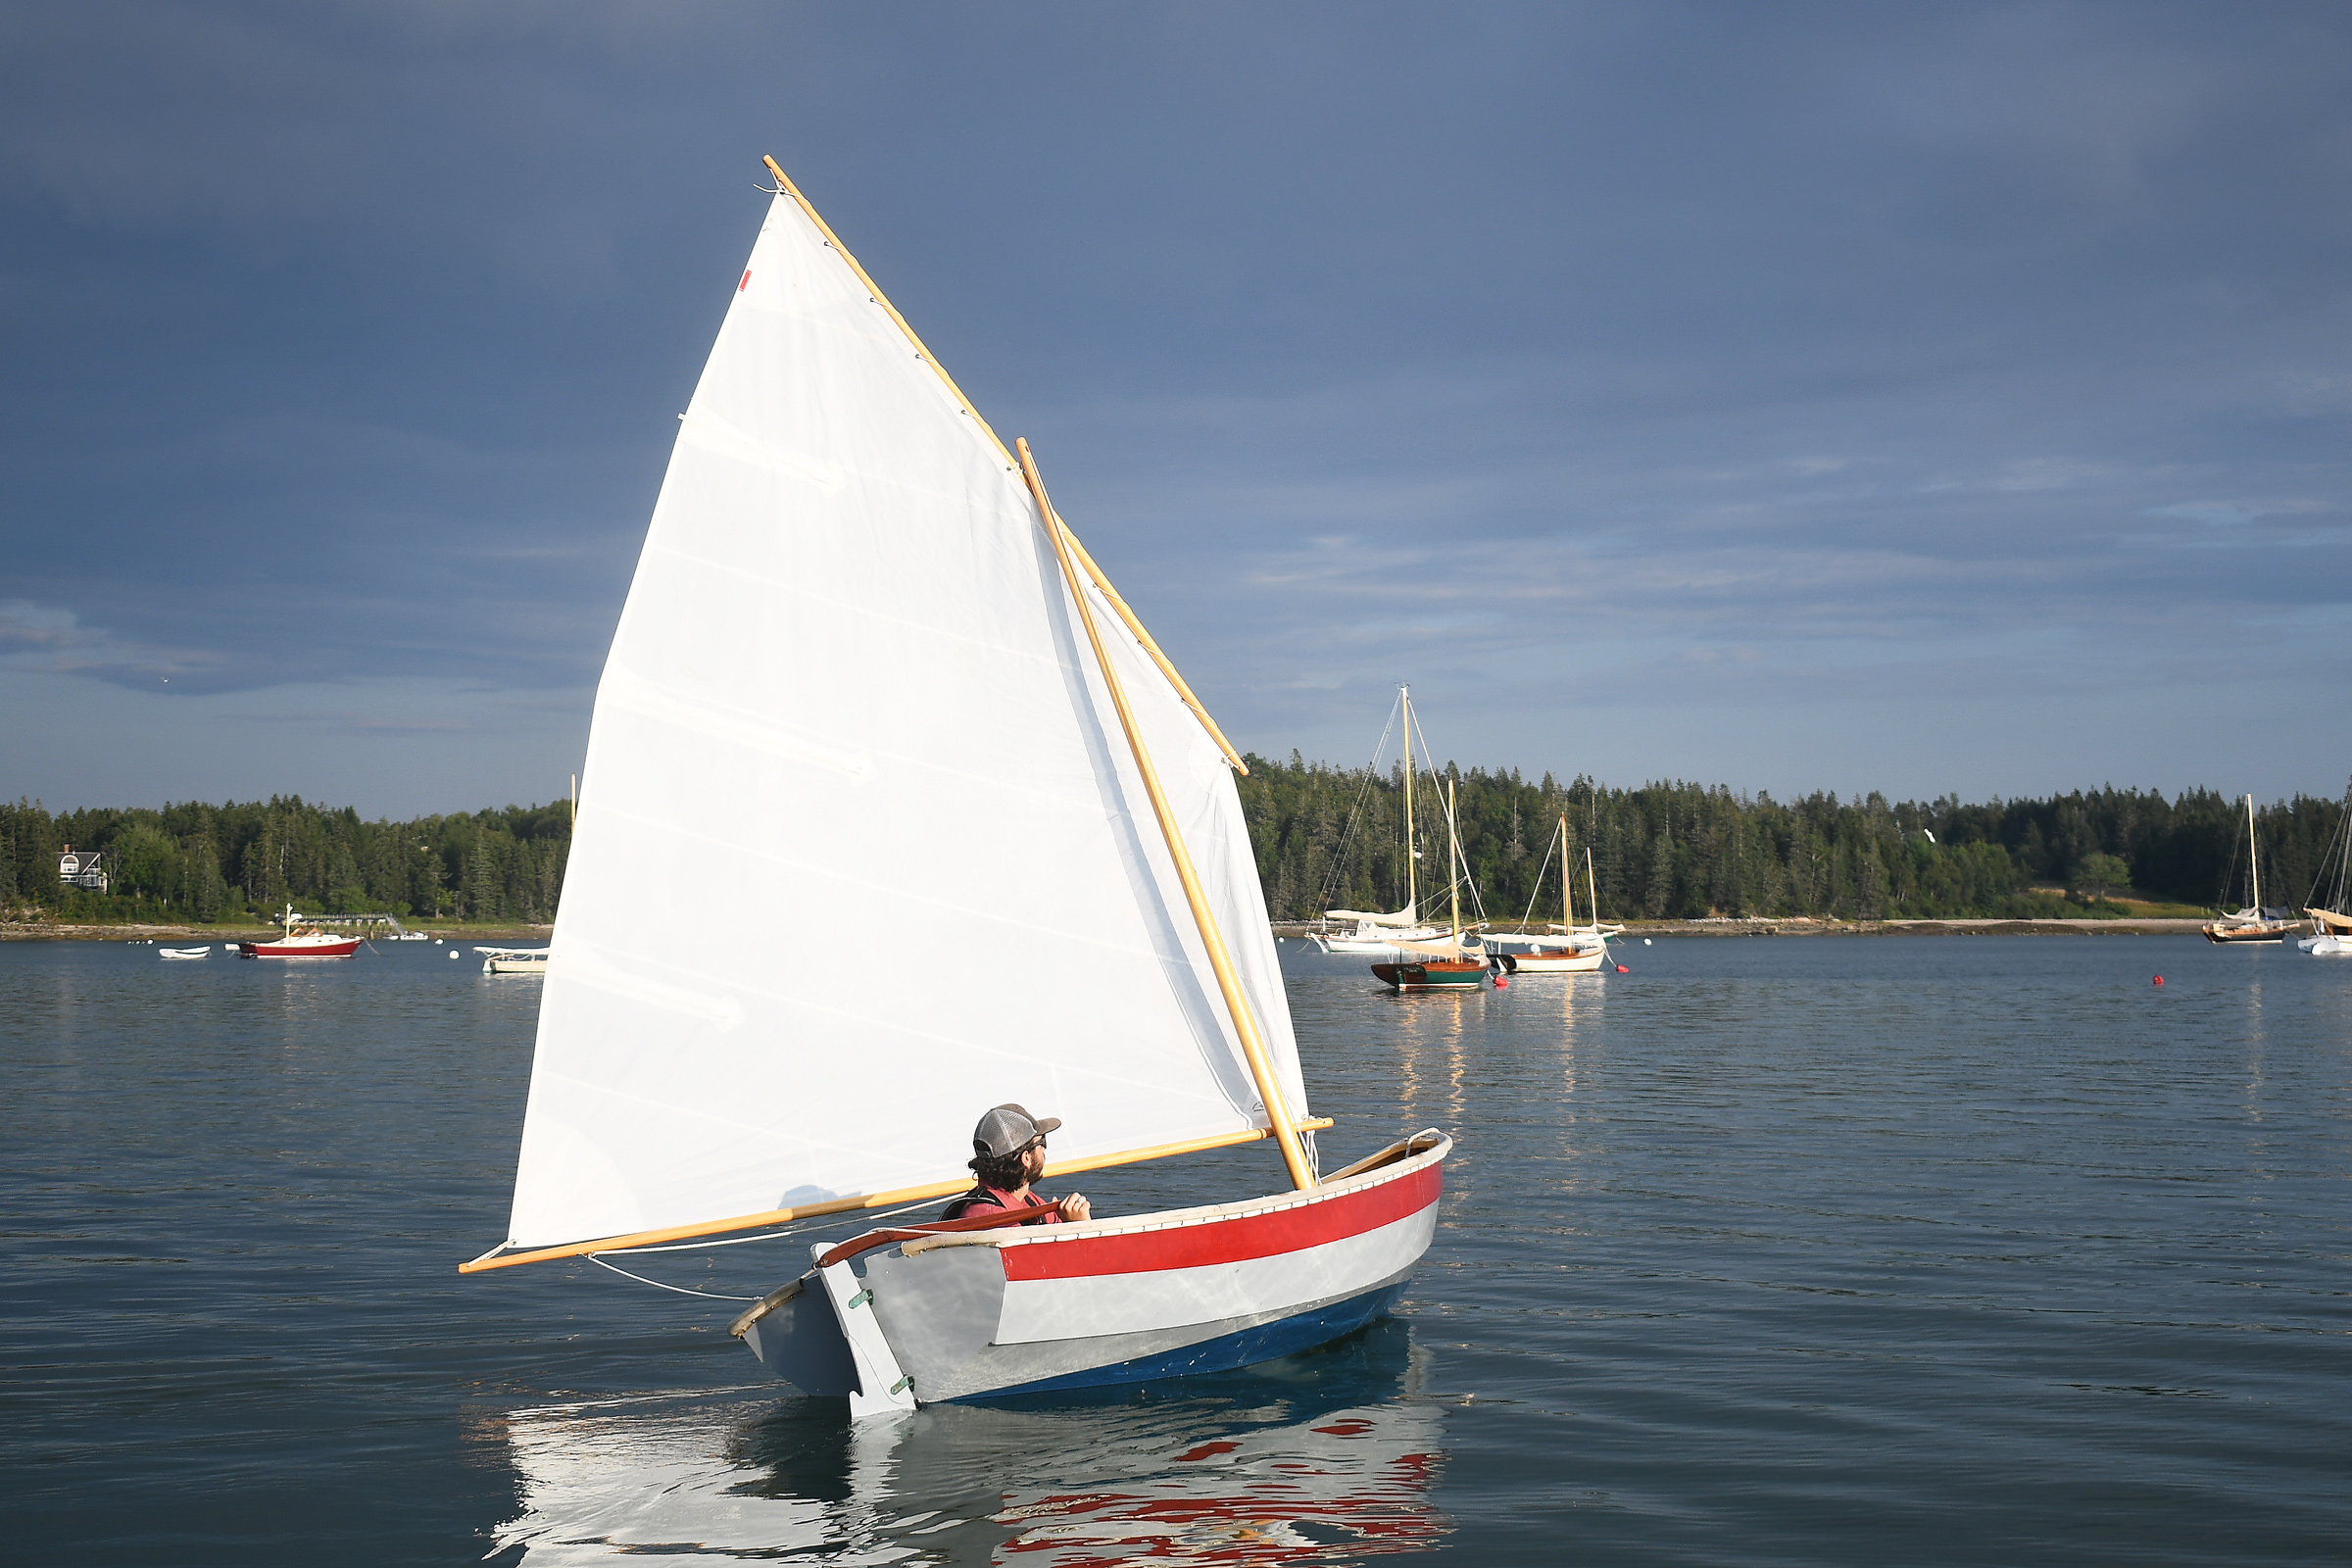
One of the best features of the Shellback is how straightforward it is to transport and launch. My family has a full-sized pickup truck with a 6′ bed, so I don’t need a trailer. Since the dinghy weighs only around 100 lbs, two people can lift it into the truck bed before it is secured with straps for the drive down to the beach. The rig can be easily set up on the beach. I launch from a small beach where the wind is usually blowing straight onshore, so I row out into open water before raising the sail. If the wind were to come from a better angle, I would sail off the beach.
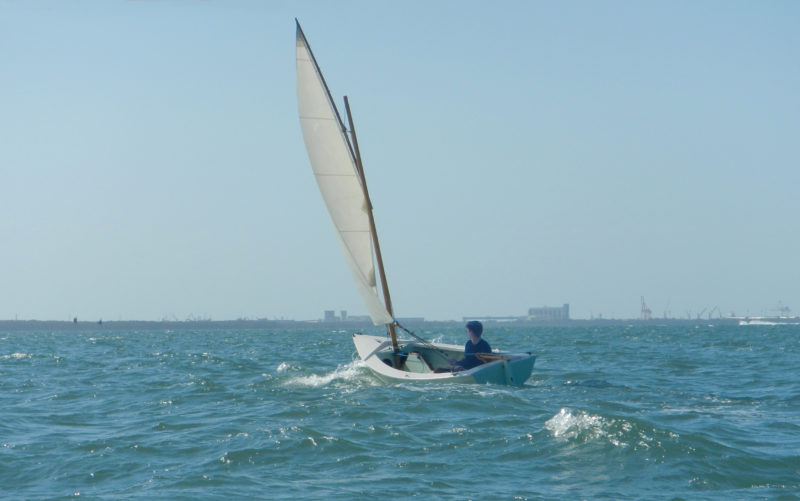
The Shellback is a joy to sail. I can settle down quite nicely just aft of the middle thwart with my feet braced against the leeward side. Sitting on the bottom of the boat, I have good visibility all around, even under the boom. Because the Shellback is so light, it takes almost no wind to get it moving. I feel like I’m gliding along the top of the water, and when the boat really gets going, I hear the sounds of the water rushing past the bottom of the hull—fantastic! The dinghy tracks very well and is responsive to any tiller movement. Sailing is best in about 12 to 15 knots of wind, although the boat can handle more than 15 and still feel under control. The sail has reefpoints, and shortening sail is as simple as re-tying the downhaul and outhaul to set up your reef. The Shellback is also surprisingly stable—you get a nice little heel, but because the boat is so light it’s easy to counterbalance without the need to hike out, especially when you have two people sailing.
Kneeling on the bottom provides good mobility for sailing.
The hull has reassuring stability so the sailor can confidently shift to leeward to heel the boat and let gravity give the sail a useful shape in light air
That lightness and speed do come with a slight cost—the boat does not carry a lot of momentum. That’s wonderful when you’re going back to a dock or beach because it’s easier to come to a stop, but it loses a lot of speed when tacking. The boat gains that speed back super-fast, but it’s something to take note of. I am 5′6″ so I find ducking under her boom when tacking or jibing quite easy. For me, even though the Shellback slows down on a tack, the light weight is worth it for the easy launching and super-fast acceleration.
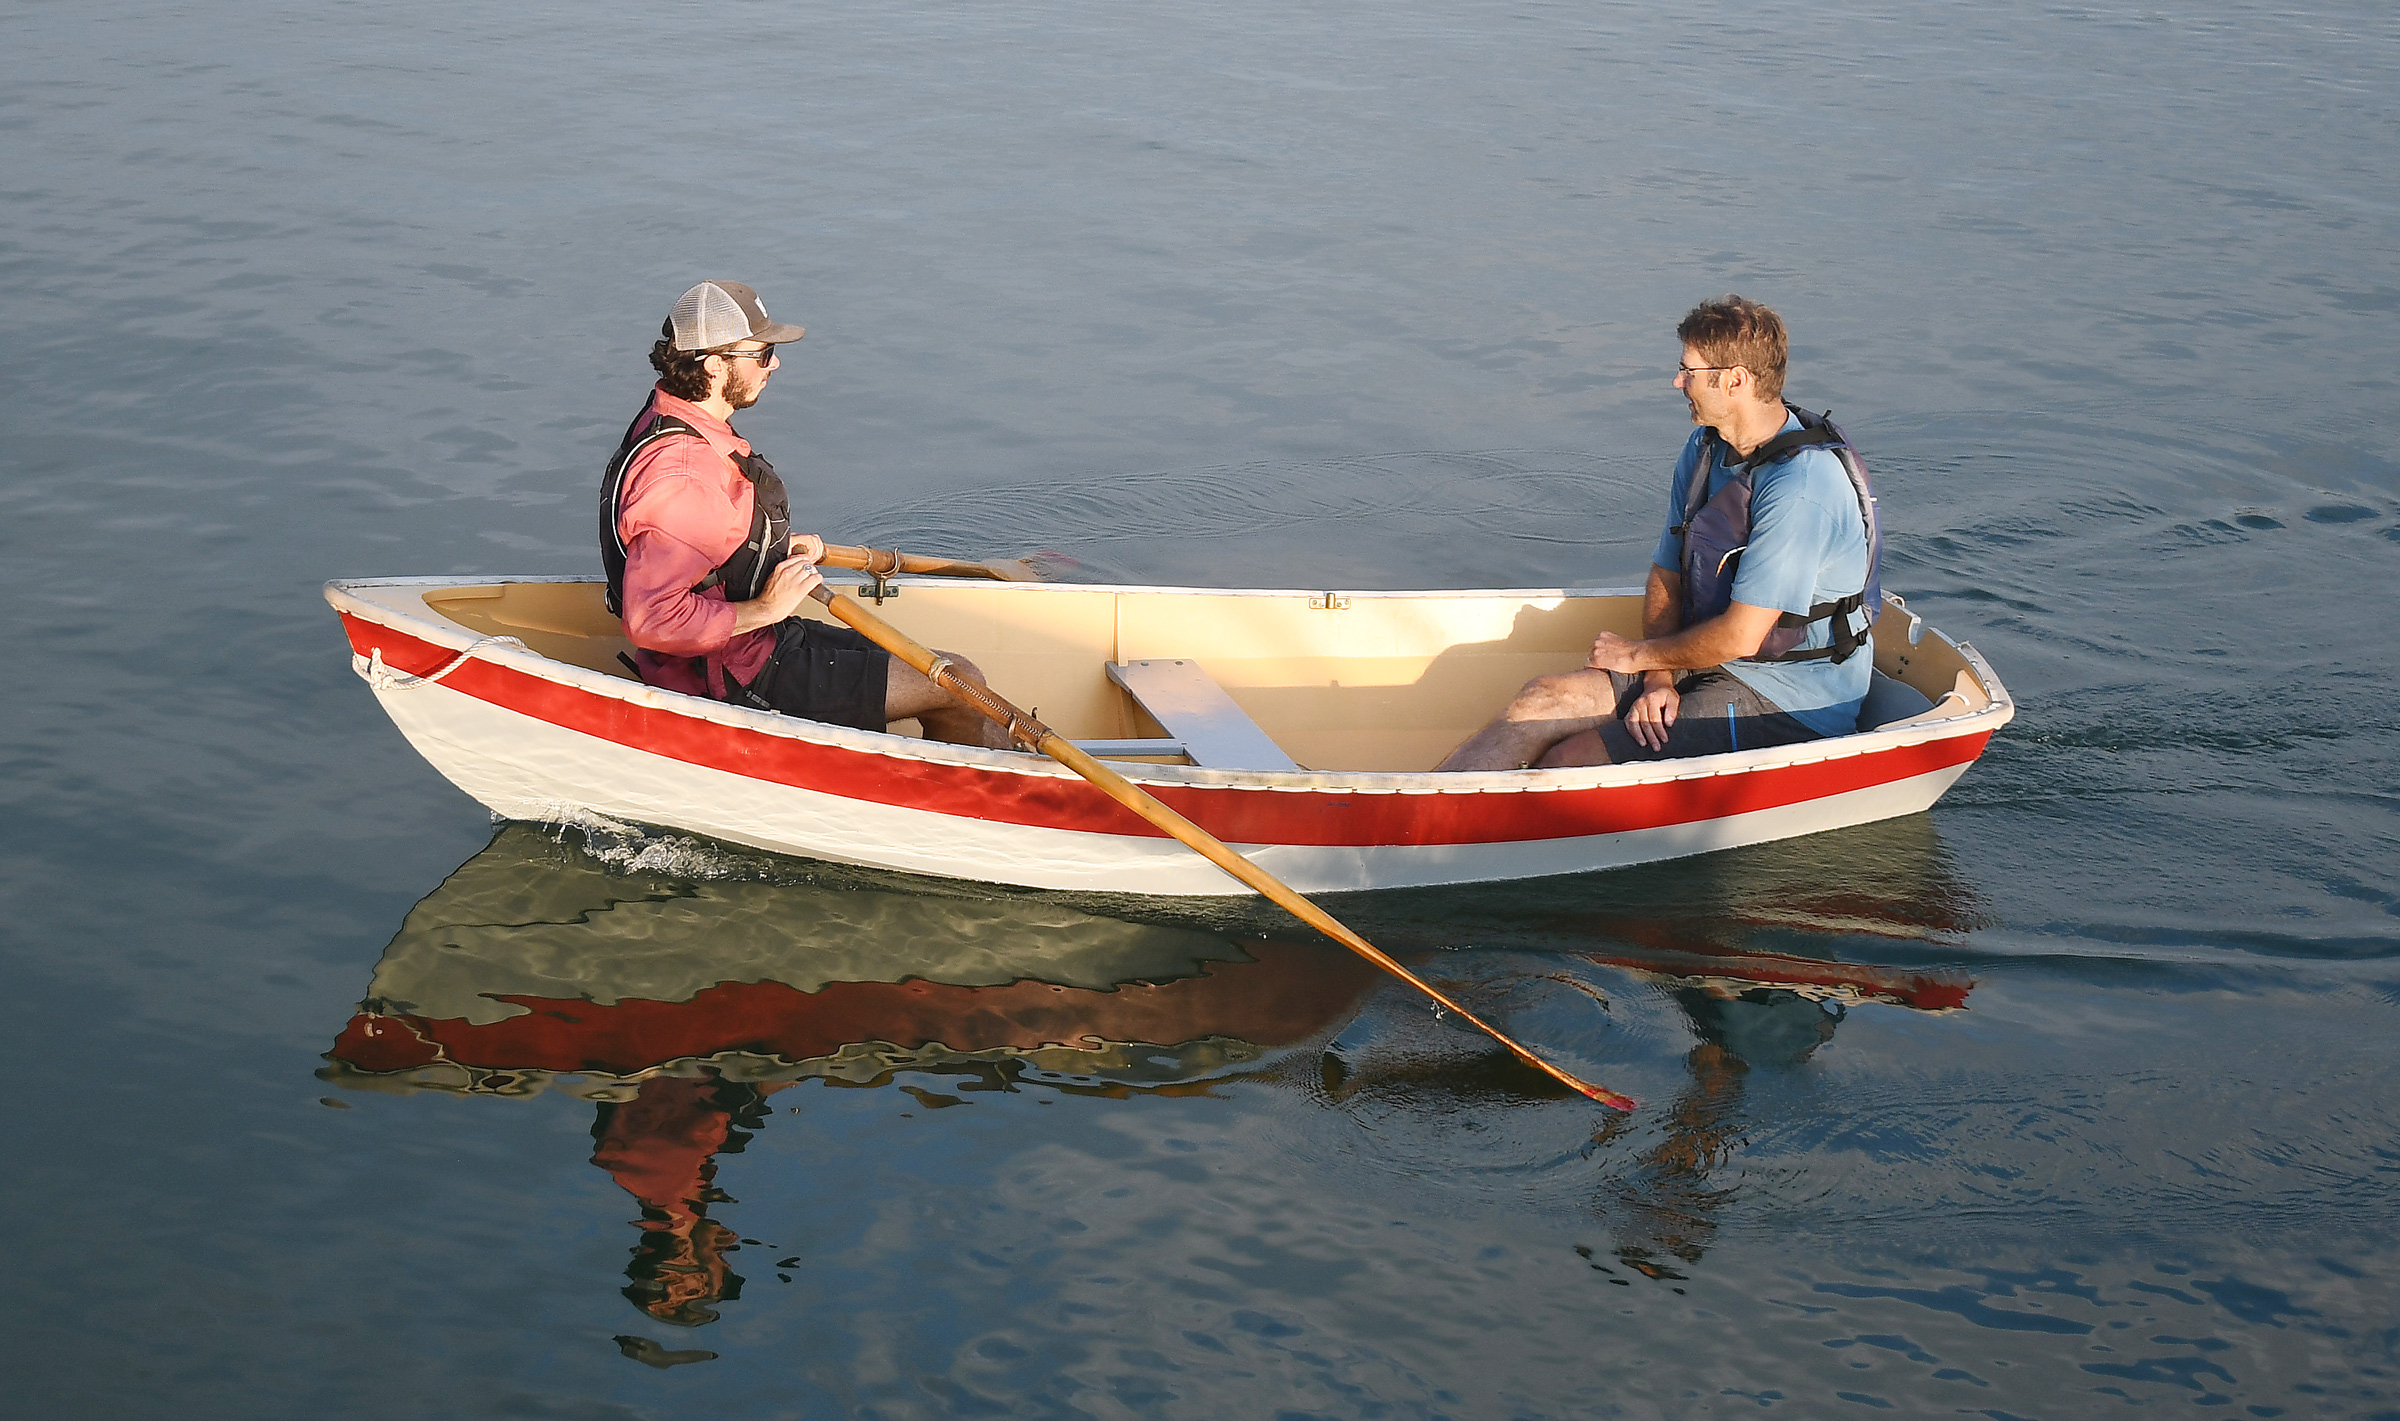
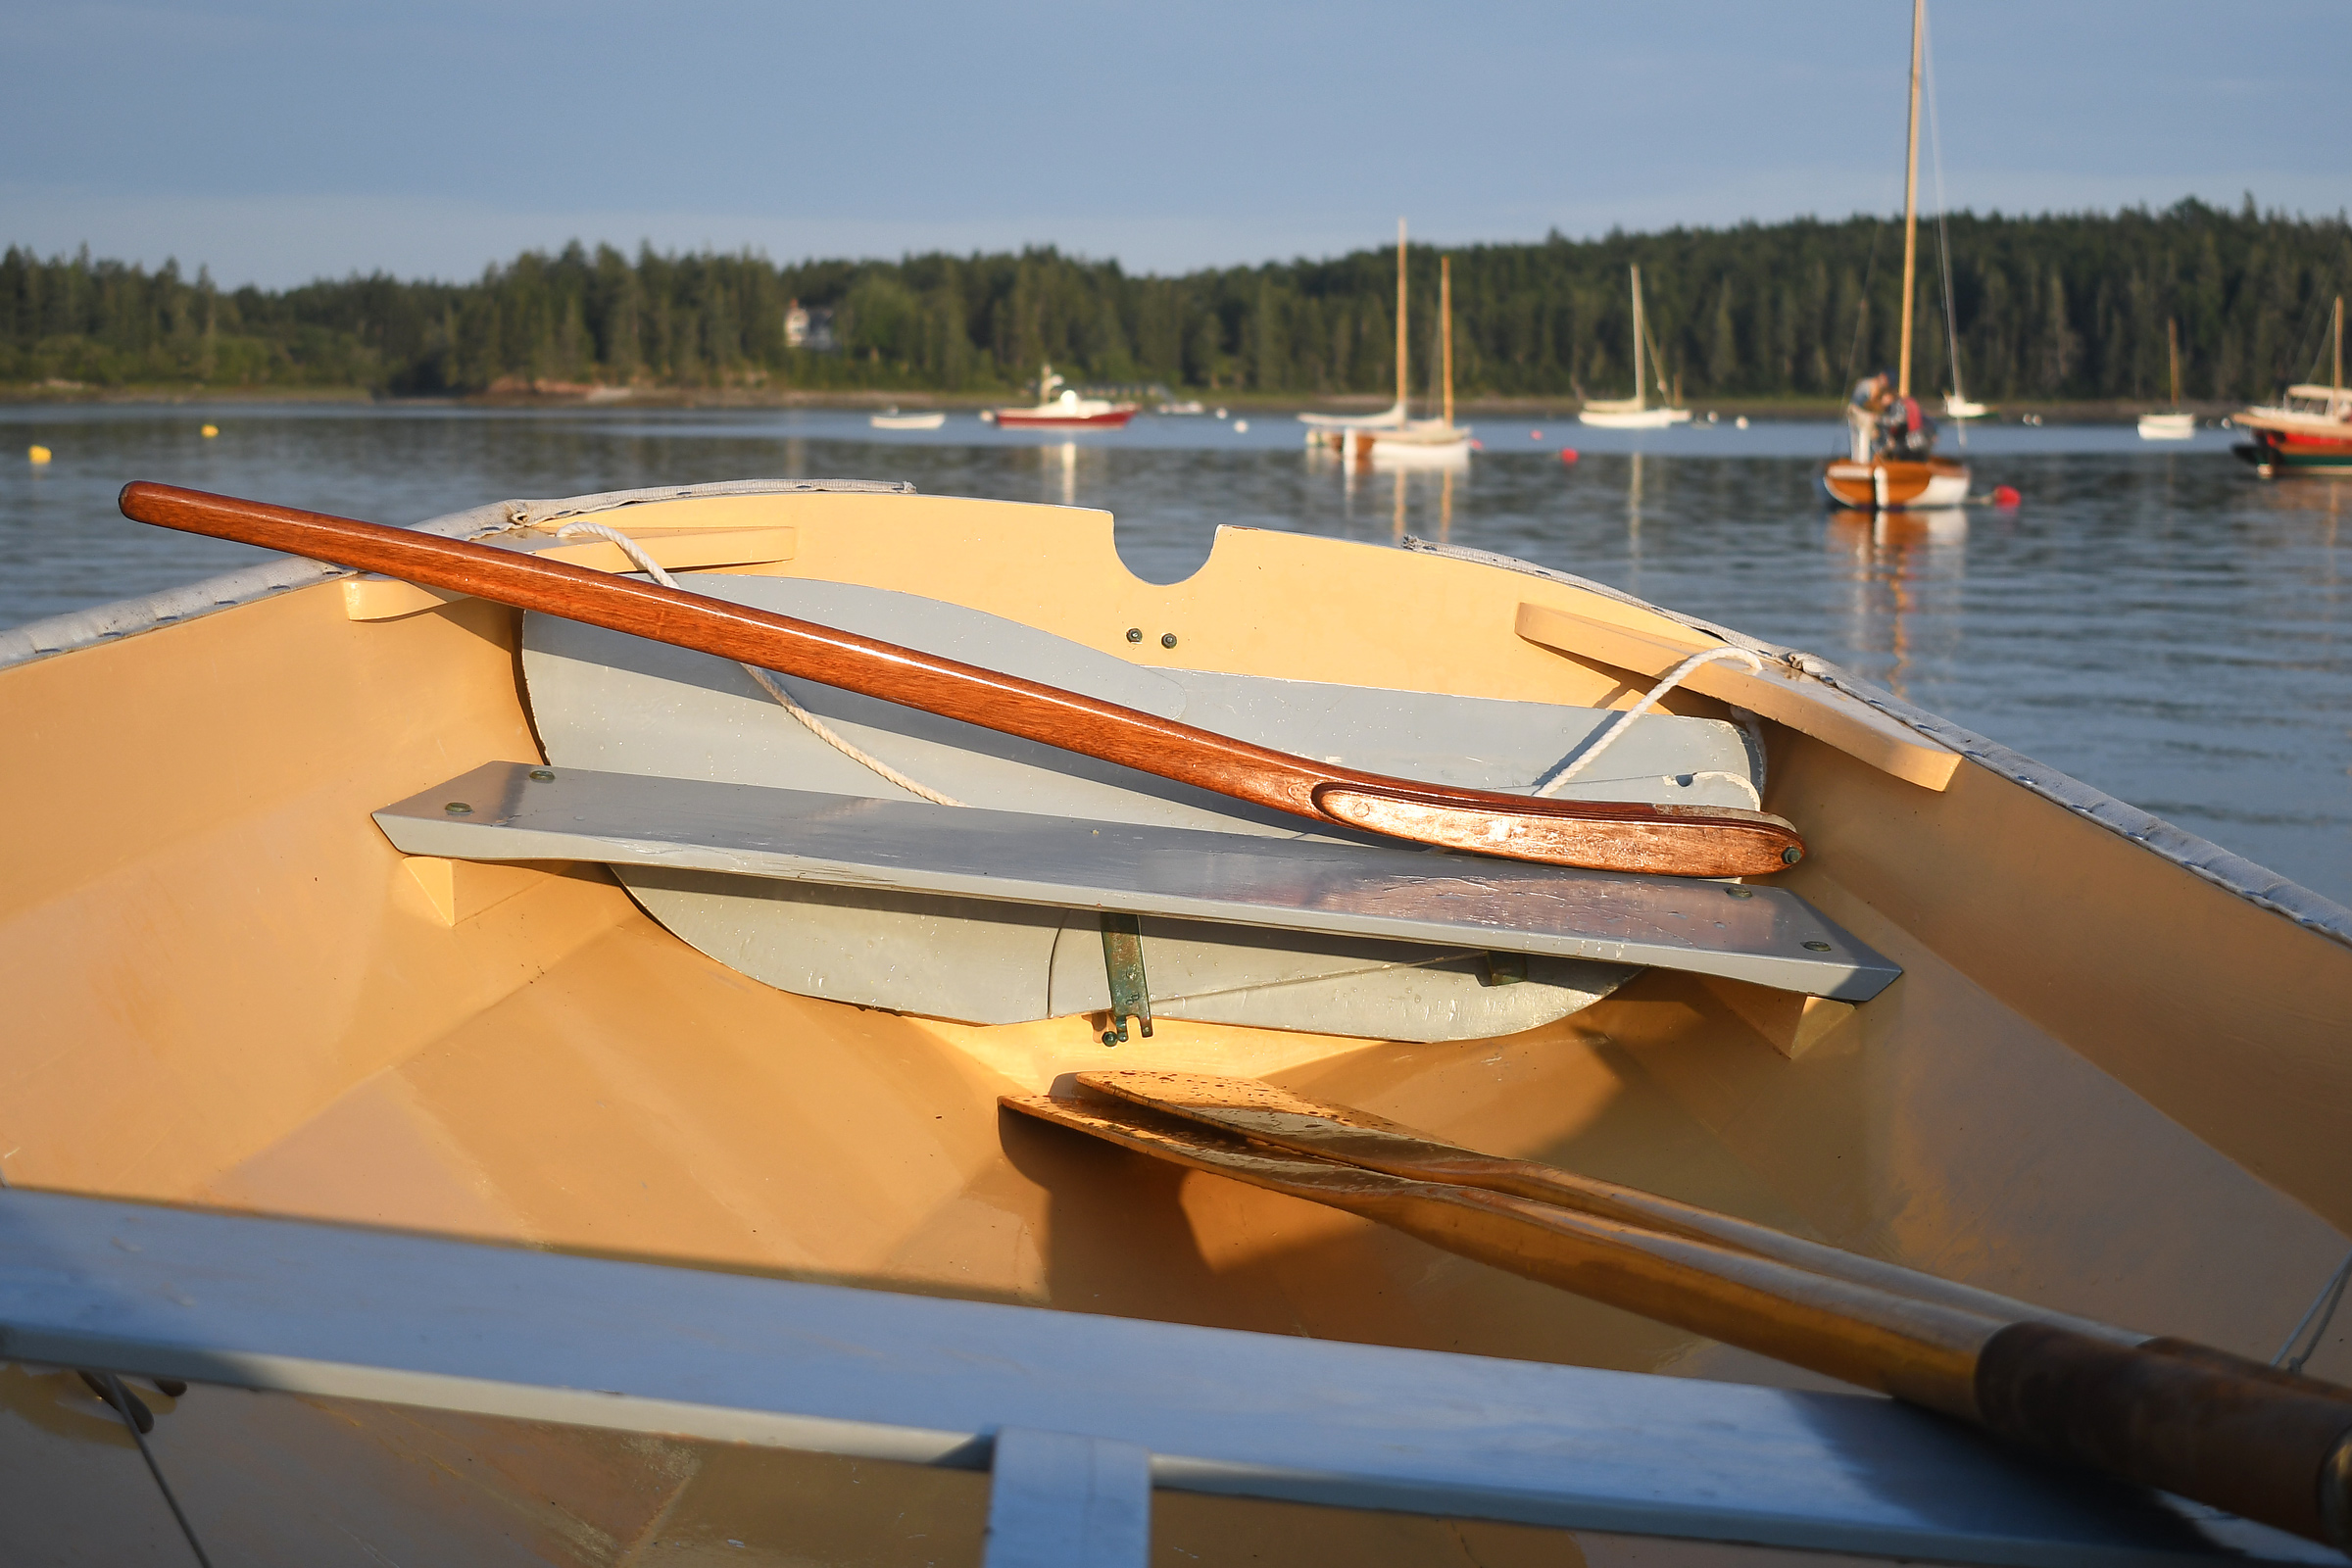
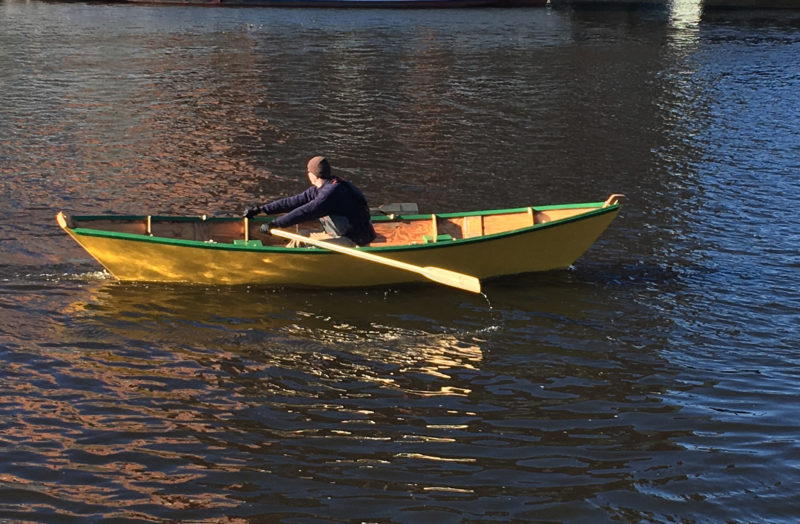
The Shellback rows like a dream. It carries its way in a straight line and moves gracefully through the water. It can easily be rowed solo or with a passenger. Although the plans detail a sculling notch in the transom, I decided not to make one.
The Shellback sits in near proper trim even with a light rower in the bow and a bigger passenger sitting in the stern.
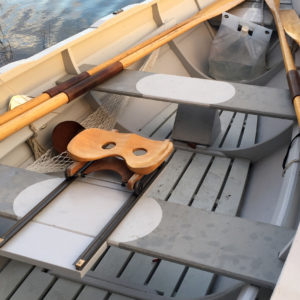
The rudder and daggerboard are designed to stow out of the way when the boat is being rowed. They sit side-by-side in the space created for them between the aft thwart and the transom.
The sculling notch in this Shellback’s transom comes in handy for tootling in confined waterways.
The Shellback is a wonderful design and a fantastic boat for a first-time builder. The plans are not overly complicated, and the kit comes with everything needed. For sailing, you need to be agile to maneuver around in a smaller boat, especially when sitting on the bottom. The Shellback dinghy is easy to build and transport, satisfying to row, and safe and lovely to sail—a fine example of a small sailing dinghy.
Ben Laster is a first-year student at Worcester Polytechnic Institute studying Robotics. He is an avid boatbuilder, sailing instructor, and fisherman on Cape Cod, Massachusetts.
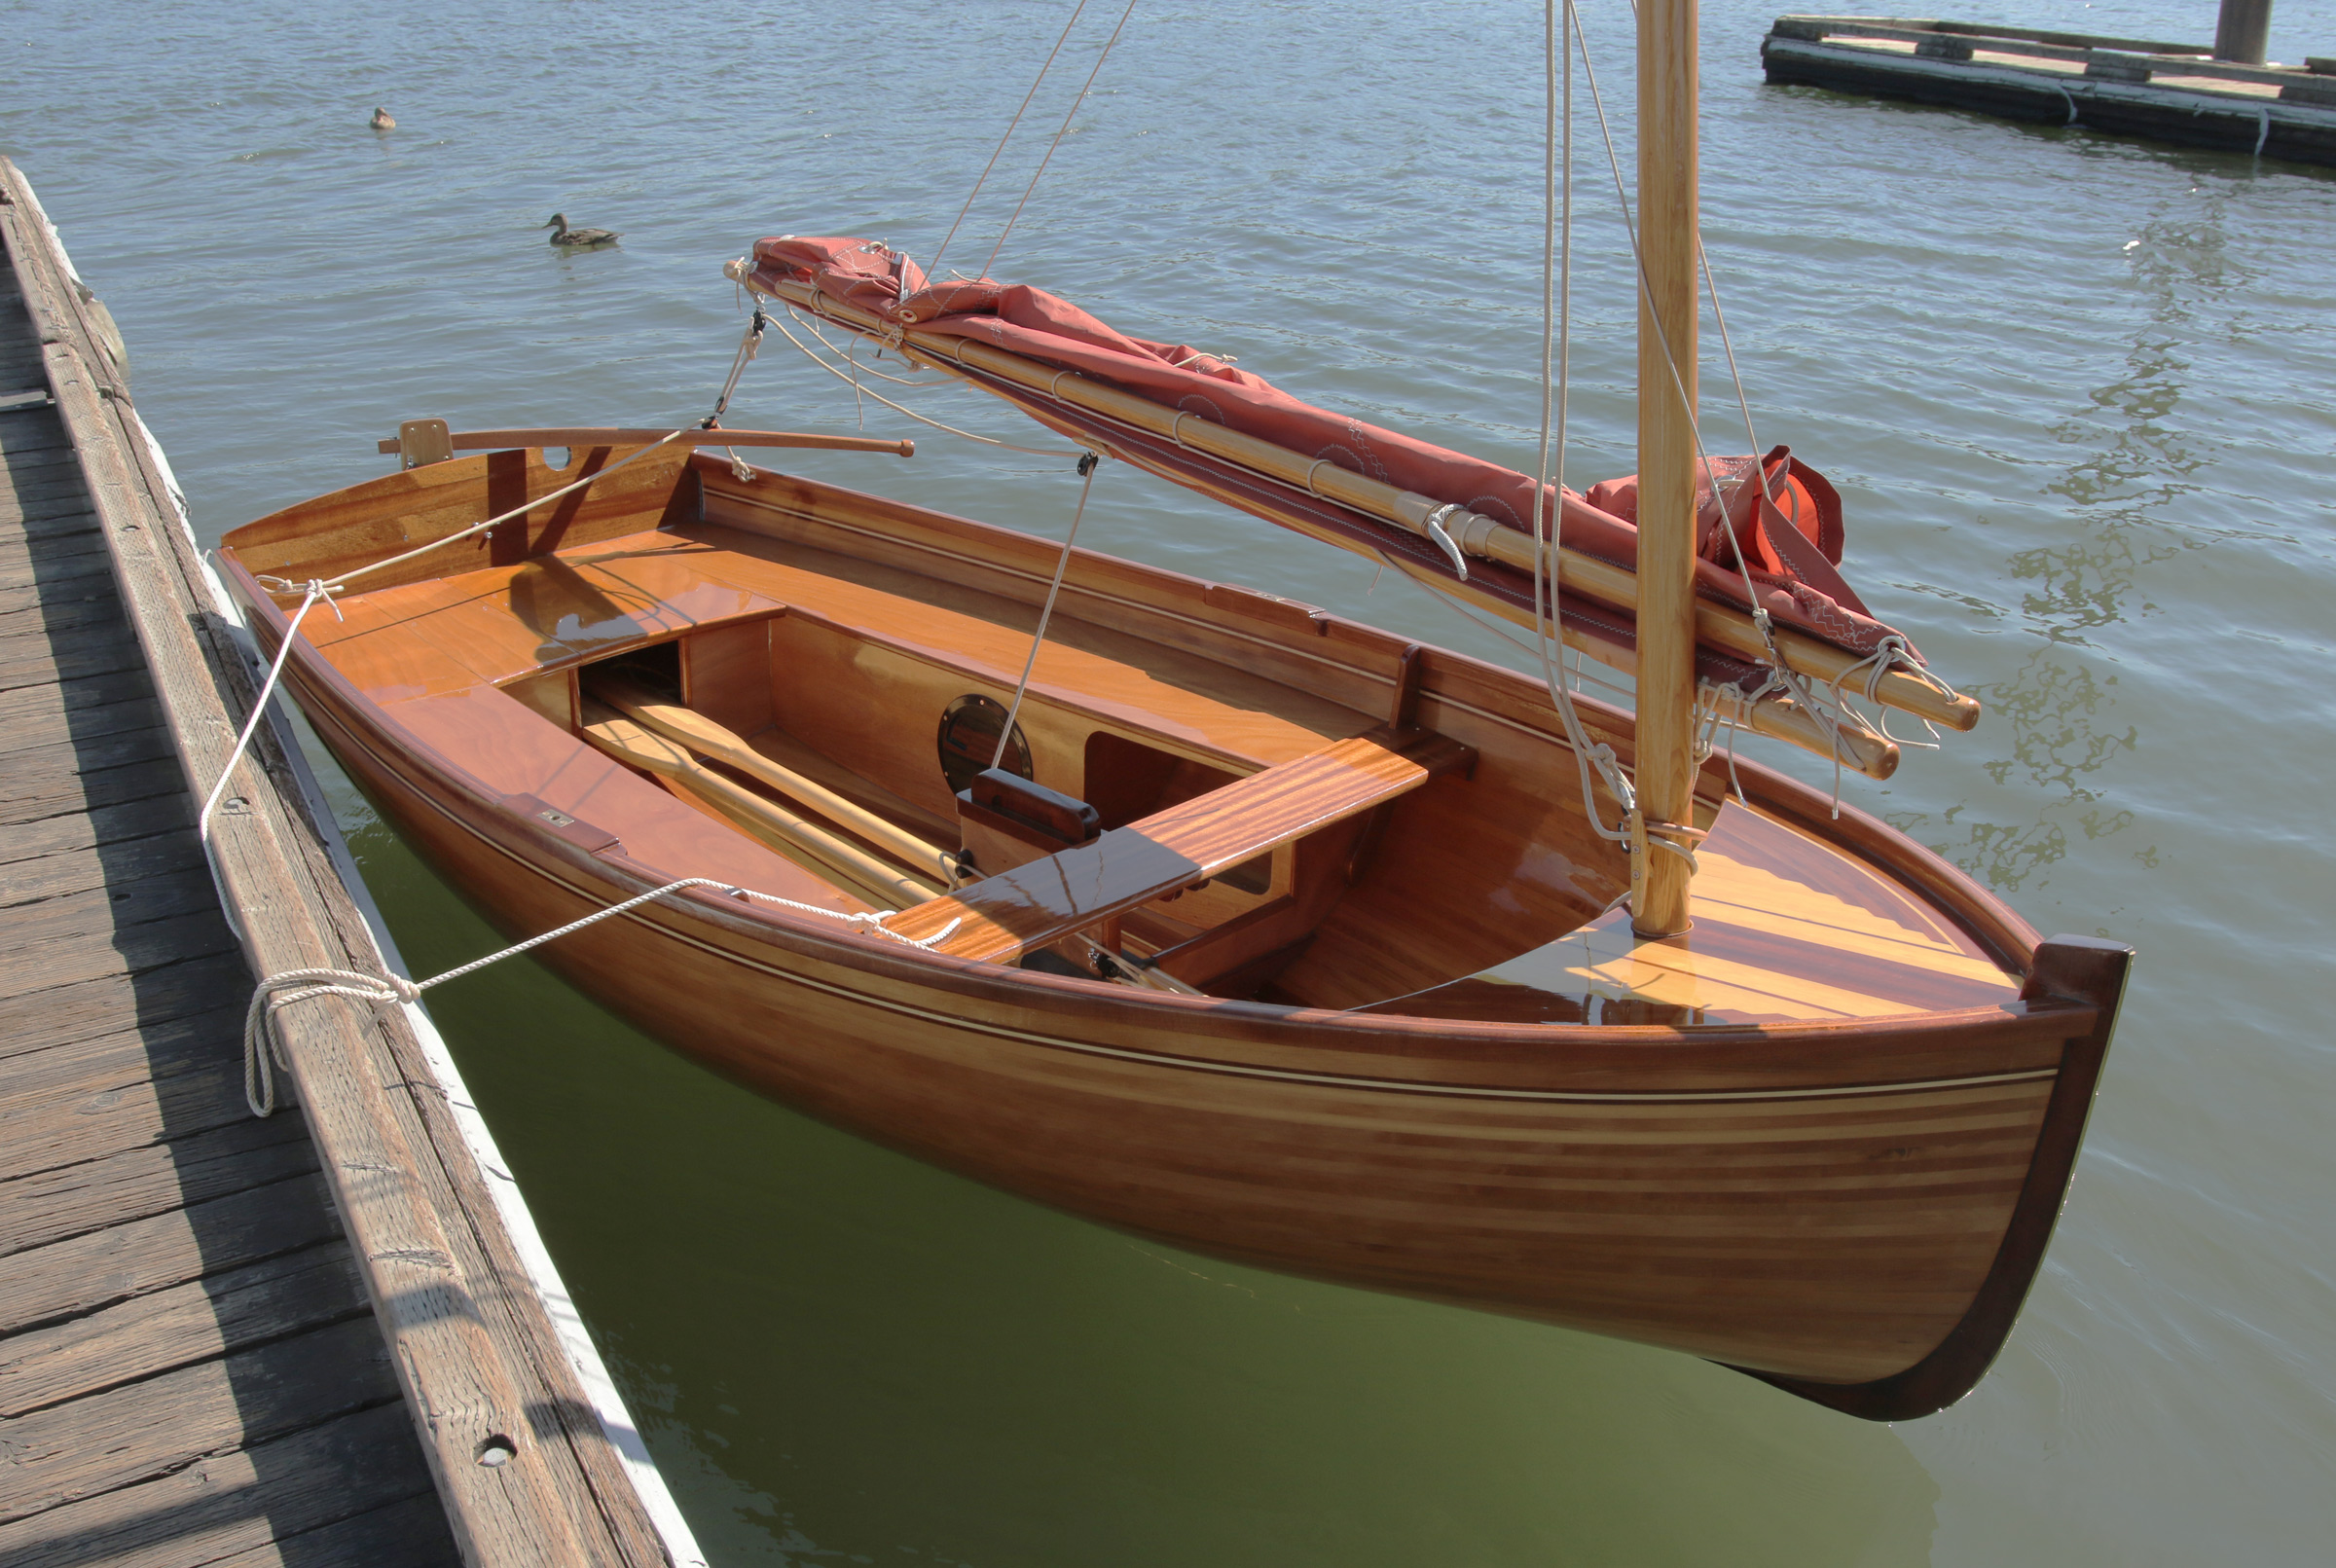
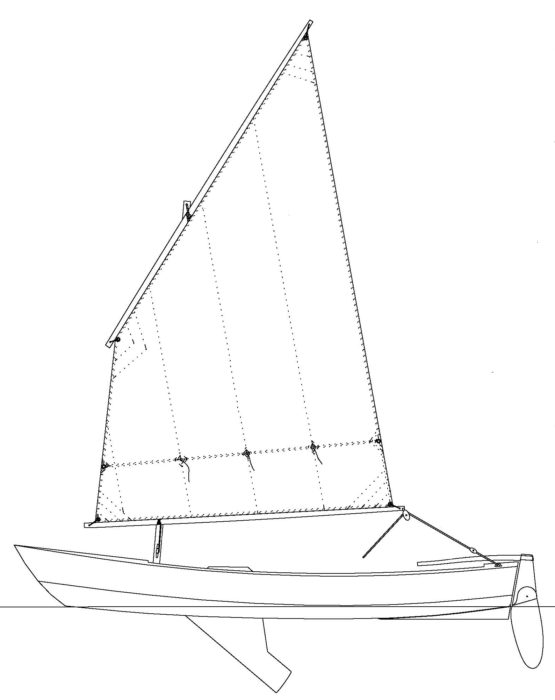
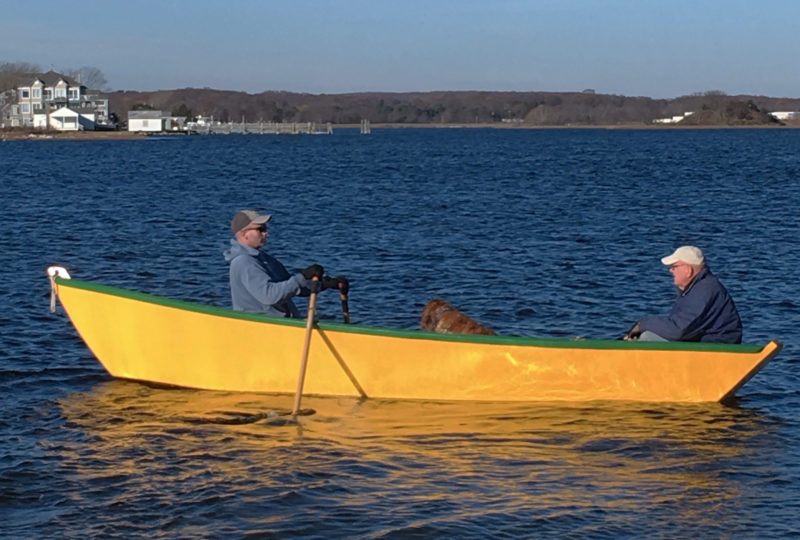
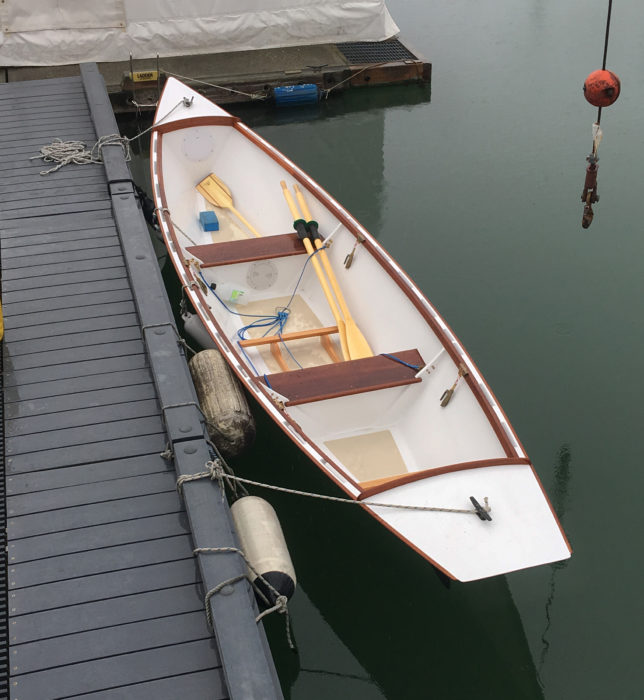
Brooklin, Maine, boatbuilder and designer Doug Hylan is happy to acknowledge that a RIB (rigid inflatable boat) can be a maneuverable, soft-sided, towable, and stable platform for working and transporting people on the water but, for him, a RIB’s appeal ends there. It won’t motor well at slow speeds, can’t sail decently and, famously, rows so horribly that he considers it “an airtight excuse for not rowing.” Doug designed Oonagh “to combine some of the best qualities of inflatables with the advantages of a traditional dinghy and put it into a package that is a little less hostile to the planet.” This 11′8″ x 5′ glued-lapstrake pram is a small, stable utility boat that can row and sail well, and use a small motor without requiring a lot of power (not to mention noise and fuel).
The Oonagh has a look that inspires confidence, which struck me when I first saw it and was an important factor in my decision to have Hylan & Brown build one for me. I have built several boats and, although an Oonagh would have been a perfect project, I lost my shop space when my wife and I moved to a condo. For anyone with the space and time to spare, the boat can be built from plans or a kit. The construction of Oonagh is a doable project for a motivated first-time builder, and a delightful project for a boatbuilder of almost any skill level. The plan’s seven sheets include: lines plan, construction plan, building jig, full-sized patterns, plank layout, and sail plan. No lofting is required, and the frames to which the plywood is attached are easily cut from the full-sized patterns. Kits for the Oonagh are made up of CNC-cut plywood parts. Off Center Harbor, the source for plans and kits, also offers an 18-part series of instruction videos that are so detailed and carefully described that there should be few if any questions as construction on an Oonagh progresses.
Bill Boyd
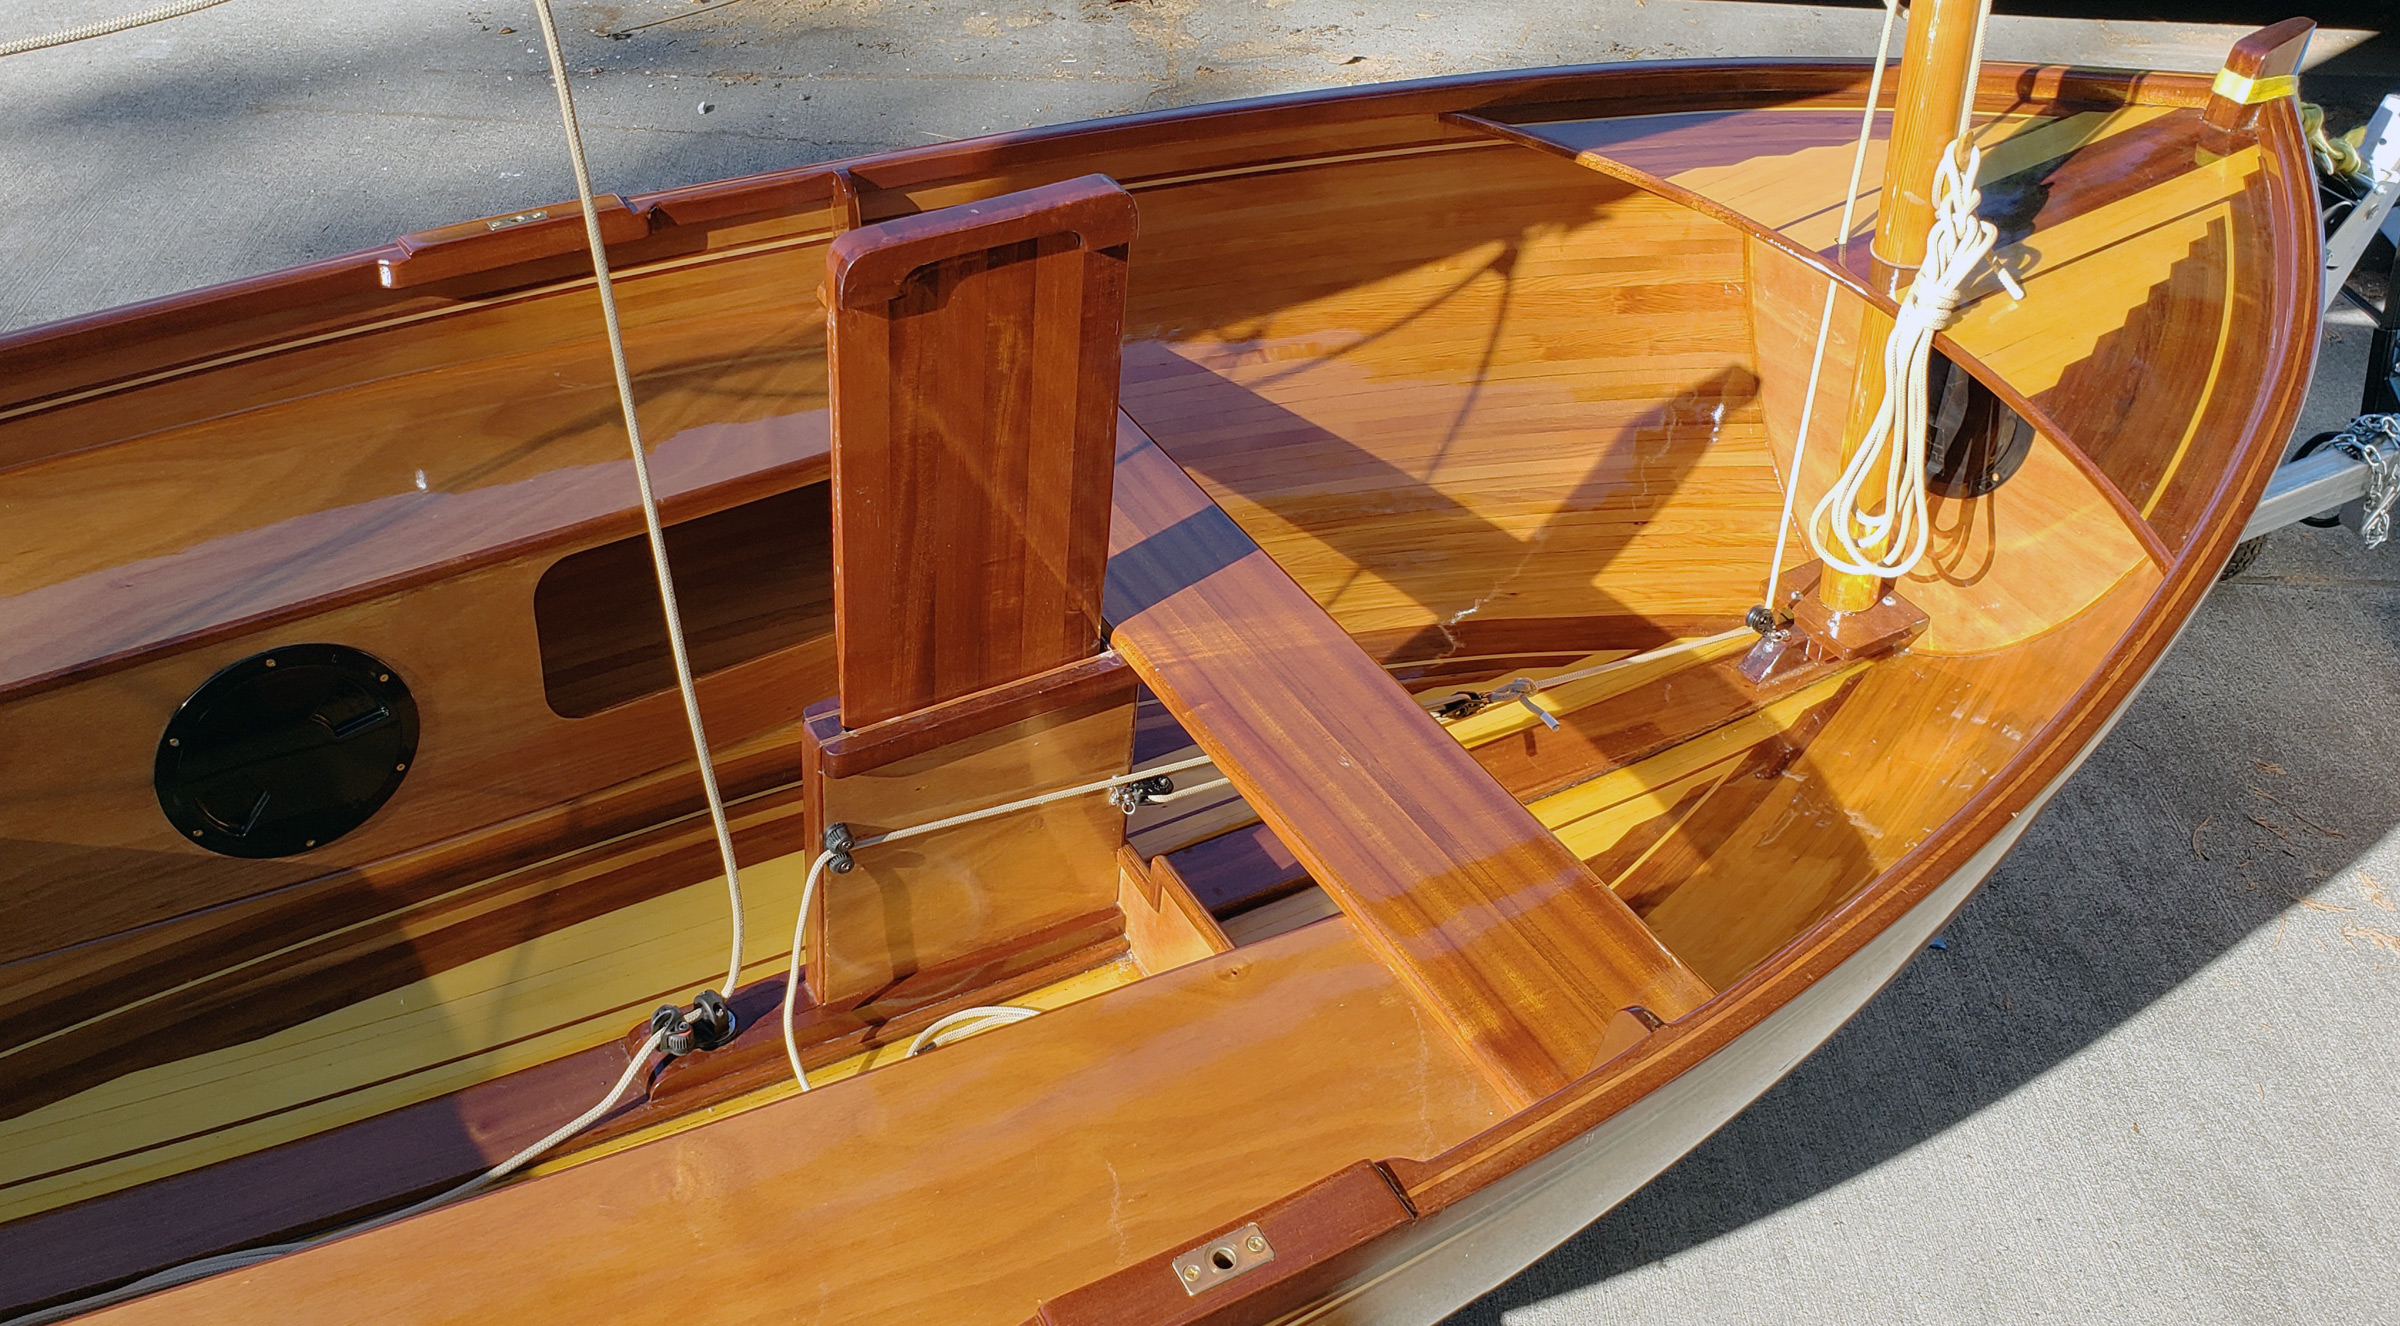
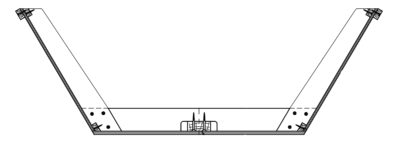
The seating incorporates bulkheads and hatches to create ample storage space, eliminating clutter for the occupants.
Large seating areas in the bow and stern and two thwarts amidships have lots of enclosed storage space under them, accessed by hinged lids. These spaces are not airtight, so some might choose to include drybags or foam as flotation. The center thwart has a slot for the daggerboard, and the forward thwart accommodates the mast. My Oonagh has “firehose” gunwale guard around the coaming to protect nicely finished boats when coming alongside.
At 170 lbs or so, the Oonagh is not really cartoppable, but it can be easily slipped into a truck bed that is at least 60″ wide. I followed the designer’s recommendation and opted to trailer the boat. A light trailer that was intended for a jet ski proved an uncomplicated and easily maneuverable solution for me, and launching the boat with the trailer is an easy, singlehanded operation.
Bill Boyd
For a sailor seated in the bottom of the boat, the angled sides provide a comfortable backrest.
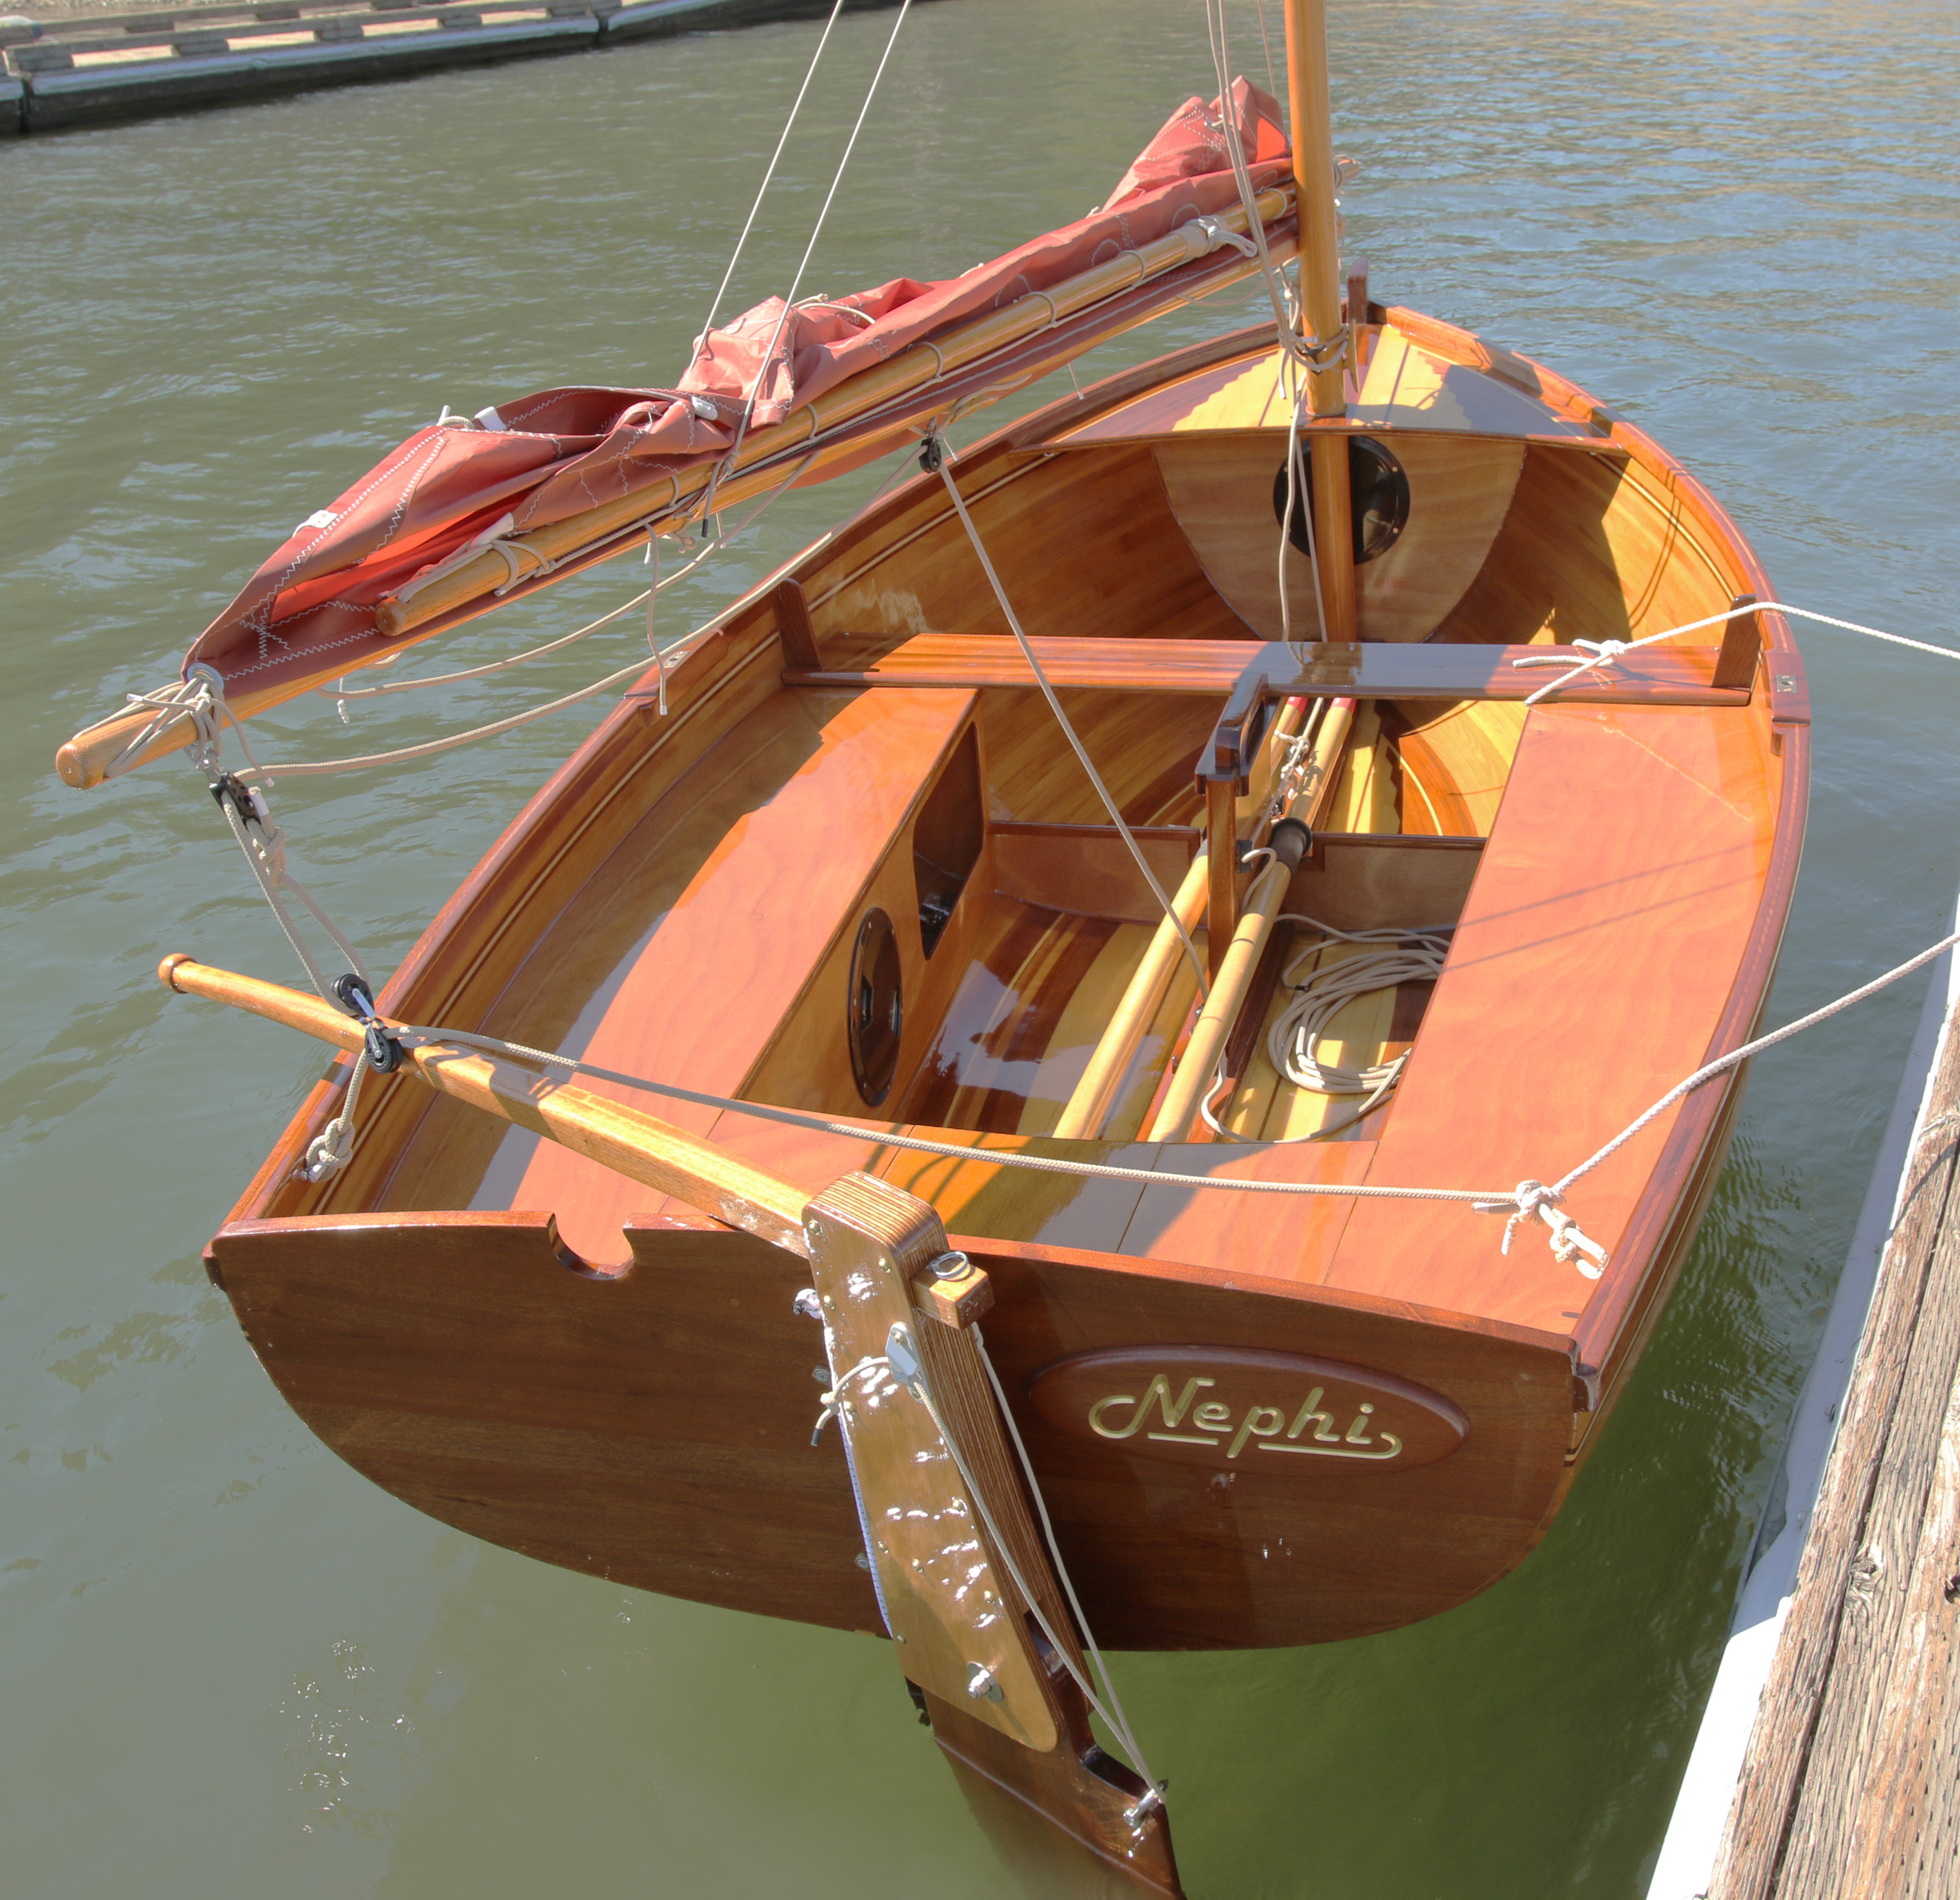
Designs for prams vary widely, but typically the bow is carried well above the water and therefore provides little stability. If you go forward in such a pram, your weight tends to make the boat roll and tip easily, and standing in the bow can be precarious. Oonagh is different. Its bow is relatively wide and low and, therefore, buoyant. The hull’s breadth runs aft to a 5′ wide maximum beam before it tapers slightly to a relatively broad stern. When I climbed aboard for the first time, the bow looked stable, so I boldly stepped down from a height of at least 2′, over the bow transom, and onto the forward deck. I noticed that the boatyard crew nearby grew quiet as I prepared to drop down, but there was no need to worry; the bow dipped slightly under my 200 lbs, but the boat supported me well when I landed. Stability, I found, is an important characteristic of Hylan’s pram, and he notes that an adult can step with some confidence on the gunwale while boarding another boat or climbing onto a dock.
Bill Boyd
The standing lug rig has a sail area of 68 sq ft.
The Oonagh is designed as a family boat, and there is enough space for a family if it’s just two kids and two adults, with the kids in the bow. I find it a little too cramped for four adults, although a sedate trip motoring up the river could be pleasant for four. Considering the boat’s stability, kids can be reasonably safe when they take the boat out to have fun on their own.
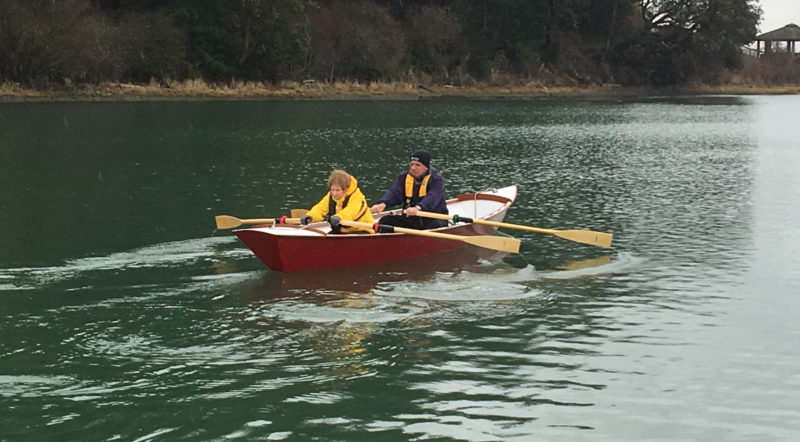
Under oars, the pram tracks very well and has considerable carry between strokes. It pushes through a moderate chop most satisfactorily and is just plain fun to row. I have found 7′ or 8′ oars are the best. There are two rowing stations; you can row from the forward station with a passenger seated in the stern, or solo from the aft station. “The same tucked-up transom that makes for decent rowing will preclude planing,” Doug notes, “so there is no point in putting anything more than 2 horsepower back there. In fact, 1 horsepower is as much as she can really use effectively. This begs the question—why not electric? Why not indeed! A small trolling motor will push her along nicely.” I have a 3-hp Torqeedo electric outboard for outings under power. The motor moves the boat fast enough—5 mph—at full power. I always carry oars as a back-up in case I exceed the battery’s range.
Bill Boyd
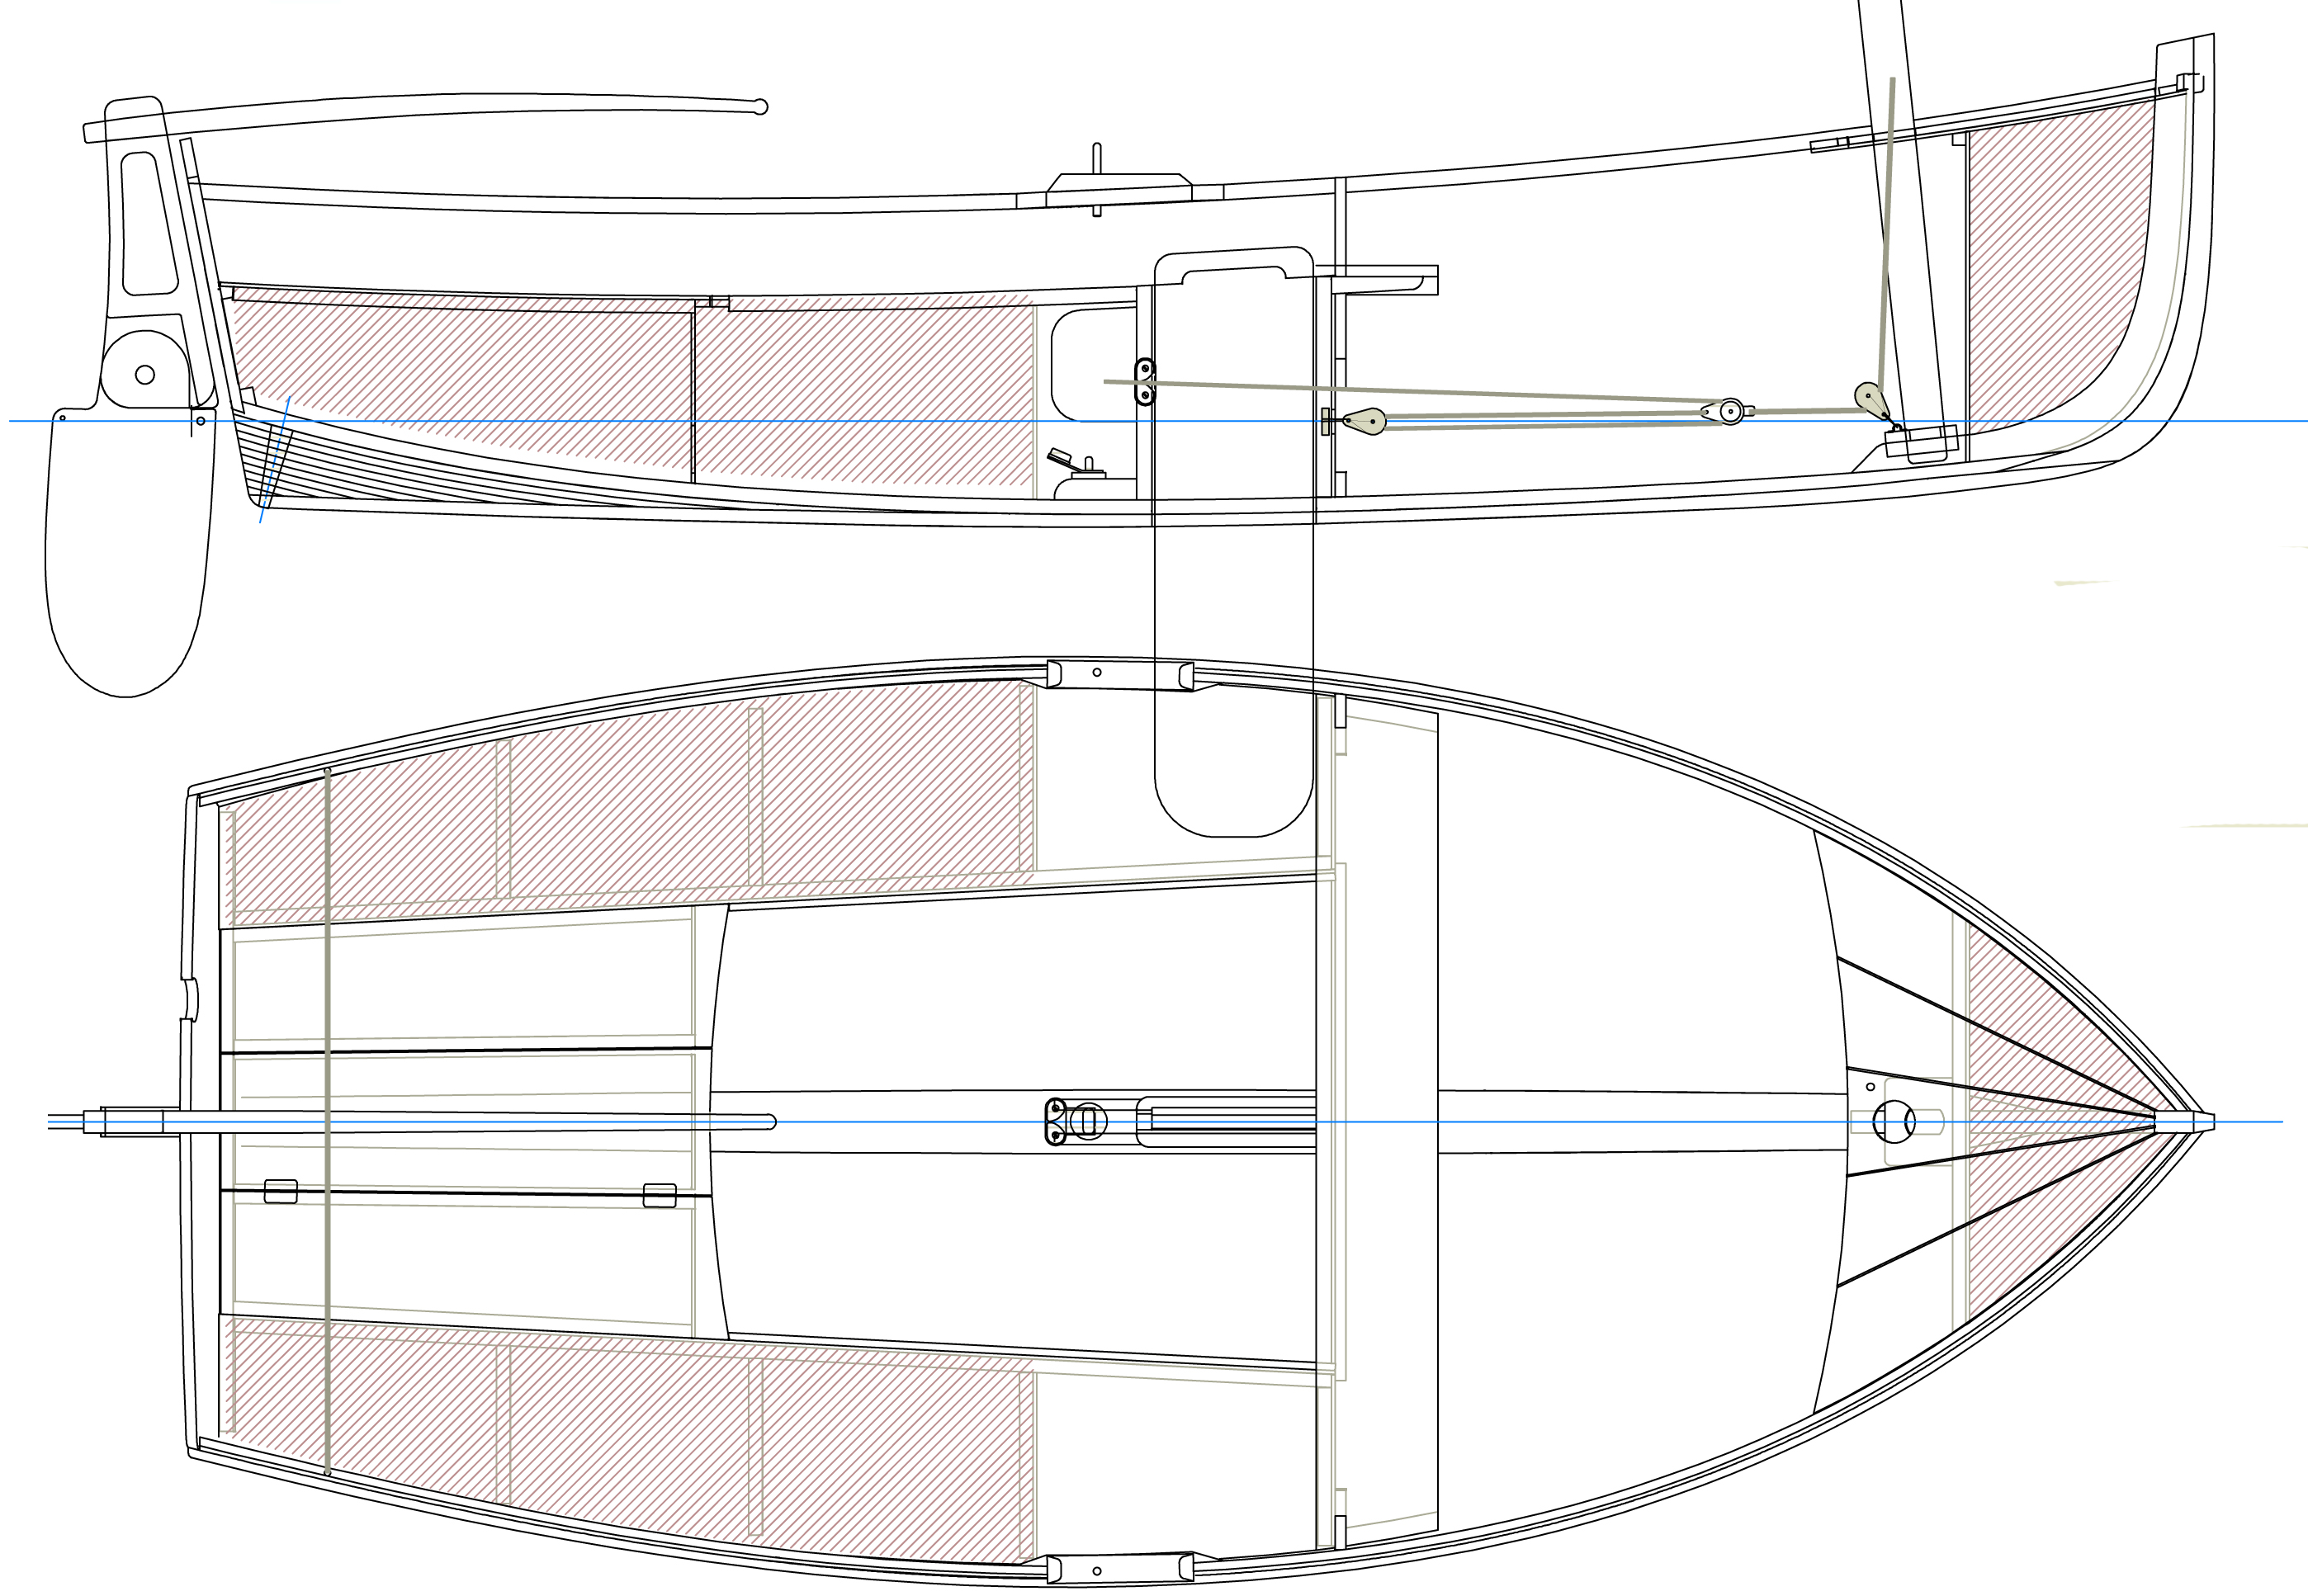
The pram bow gives the Oonagh more volume, buoyancy, and stability forward than a boat with a sharp bow without adding to its length.
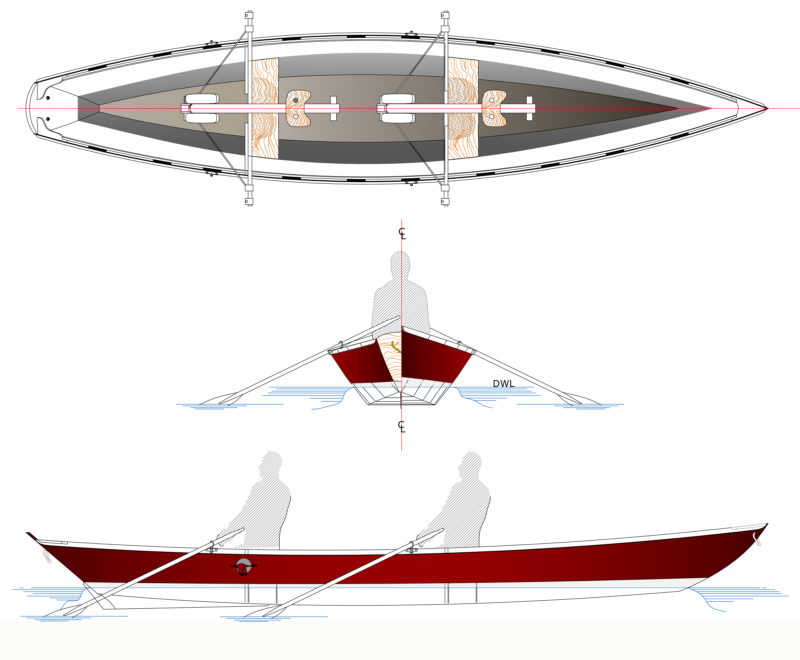
The Oonagh has a standing lug rig, with a boom and yard, which makes the 68-sq-ft sail particularly efficient and easy to control. The spars are all short enough to fit inside the boat for storage and trailering. Sailing the Oonagh is satisfying; it performs like a well-designed 12′ or 13′ sailing dinghy. It tracks quite well and points decently into the wind. Because of the high initial stability, it will heel only slightly, but in a stiff wind the sail will have to be shortened or carefully attended to. In an emergency while sailing, the yard can be dropped quickly along with the sail. The boom is attached to the mast with a single boom jaw and is easily controlled, but the yard can fly away from the mast when halyard tension is released, as it will be when lowering the sail. There are several good ways to prevent this from happening and, overall, the rig is simple and safe; excellent for kids or those learning to sail. When rounding up and coming alongside a float or dock the daggerboard, which draws 22″, makes the maneuver simple and quick, almost like turning on a dime.
Benjamin Mendlowitz
The Oonagh carries its way well when rowed. The notch in the transom can accommodate a small outboard for those so inclined. The designer notes that a 1-hp gas outboard is plenty powerful enough for the displacement hull and that an electric motor would be a good choice.
I am a senior citizen, and in the Oonagh I have found a boat that can take care of me as much as I take care of it. Size is not an important factor for me; 11′-plus of length is plenty. Much more important is stability and the sense that, with care, I can stand or move about in the boat with confidence, and that once I find my spot while sailing or motoring, I can’t be easily thrown off balance or moved unexpectedly. It is a wonderful boat to come to terms with: if I sail the boat carefully, the boat will do me no harm. The Oonagh’s “nautical competence” enables me to feel totally comfortable while stretching out my legs while motoring slowly down the river or sailing in semi-protected waters. If I raise the board a bit, I can cruise among the grasses at the edge of the marsh, or I can reach for the oars to go to windward a bit before trimming the sail for the long reach home. I feel confident aboard the Oonagh. I noticed that right from the beginning, and the feeling is with me whenever I put it in the water.
The experience of owning an Oonagh for two years has not diminished my enthusiasm for the boat. I have owned a 19′ Caledonia Yawl, a 14′ catboat, and several double-paddle canoes and kayaks, and I consider myself to have a fairly good sense for performance, seaworthiness, and safety in a small boat. In those three categories I consider the Oonagh to be an excellent and remarkably capable boat.
Edgar “Bill” Boyd was attracted to boats the moment he moved near the Maine coast. He and his family summered for more than 50 years on an island in Eggemoggin Reach across from the WoodenBoat campus. He has built six boats including a Caledonia Yawl and a 22′ Ninigret, a John Atkin–designed bassboat. He and his wife now live in Yarmouth, Maine.
Oonagh Particulars
Length/11′ 8″
Waterline length/9′
Beam/60″
Draft/5″ board up, 22″ board down
Weight/Approximately 170 lbs
Sail area/68 sq ft
Power/electric or gas up to 2 hp
When my wife wrote “Love it!” on the study plans for Ken Bassett’s 18′ Firefly, a performance rowing boat, it seemed I had the green light to build it. My boats had already filled the garage, barn, crawl space, and shed, and my wife, being more reasonable than passionate about my boatbuilding, drew the line at eight boats. When she began to get interested in rowing and having a rowing boat for herself, it became my opportunity to build another boat.
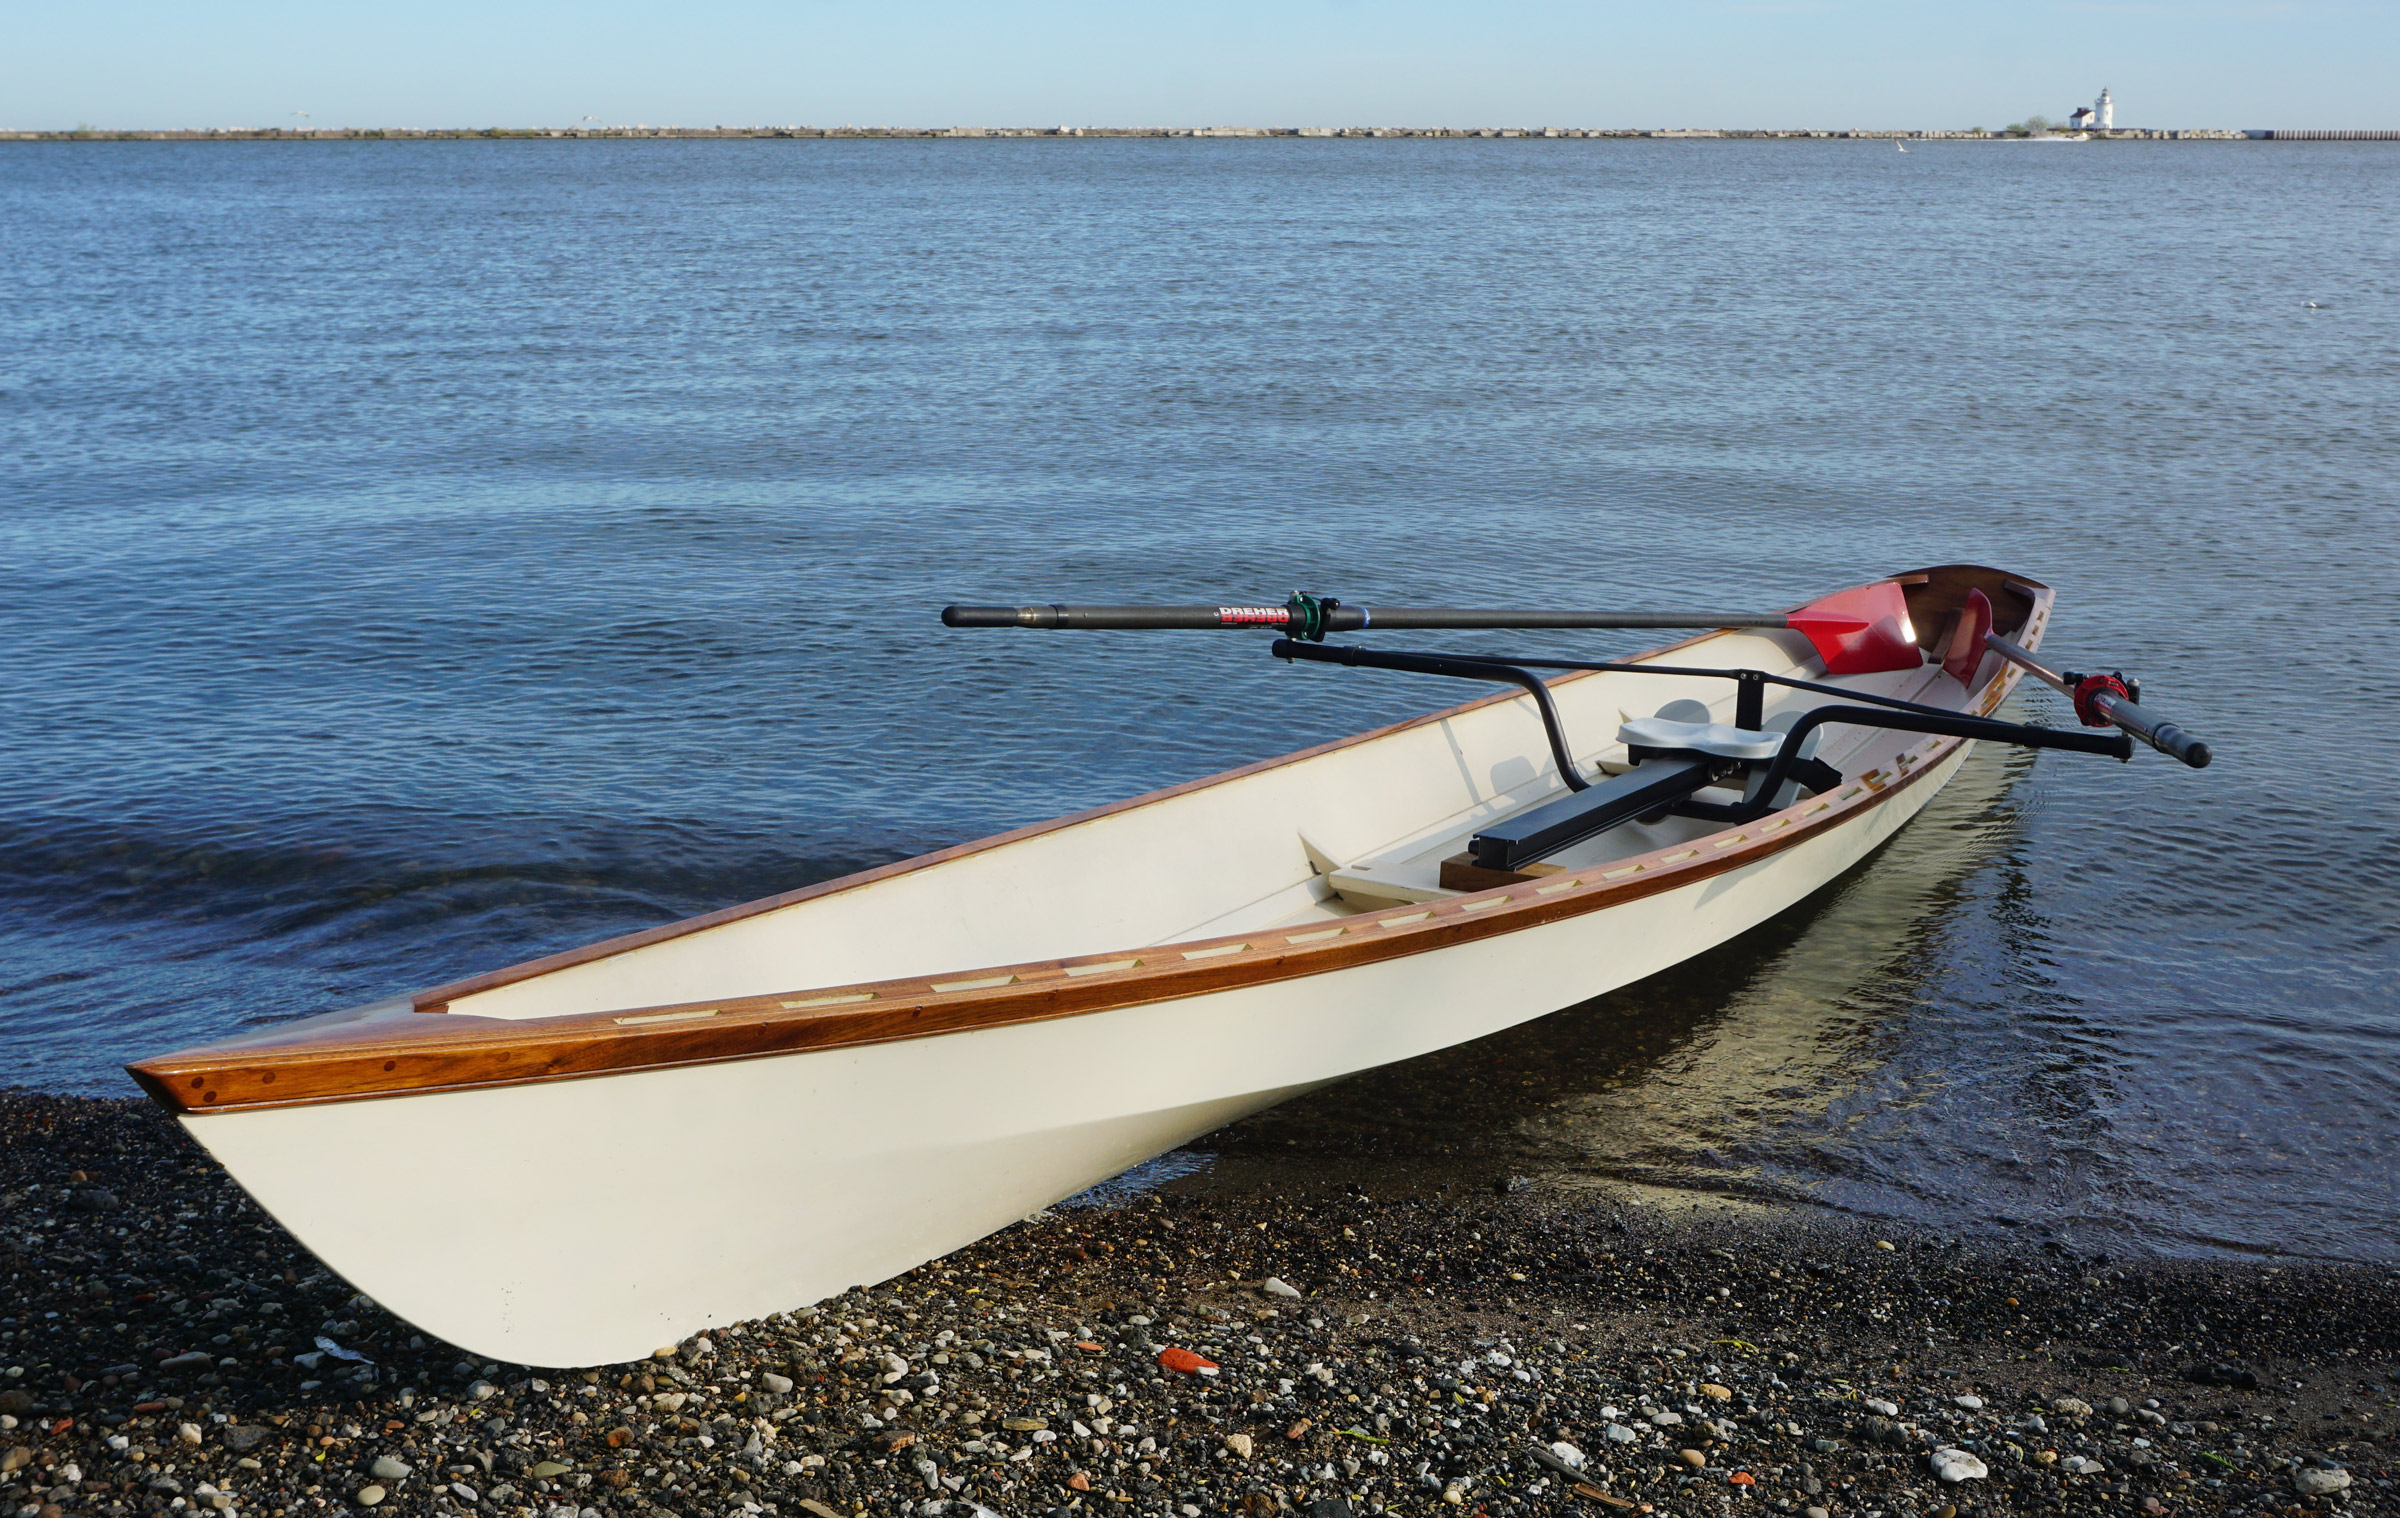
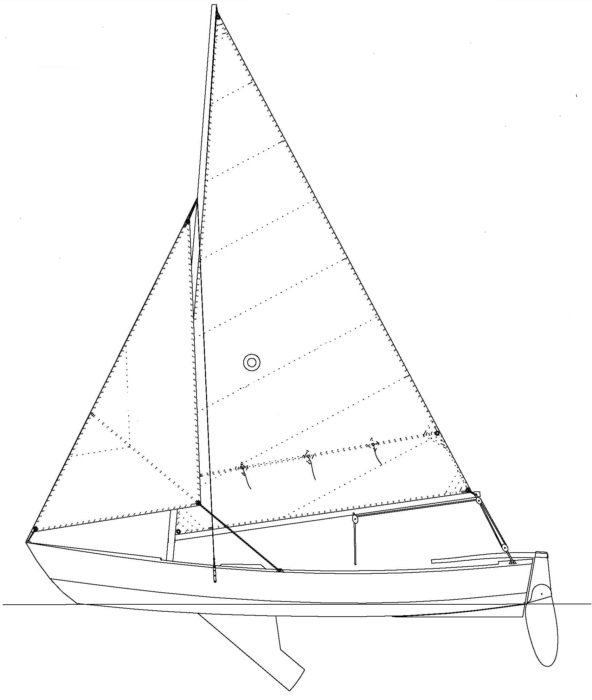
The Firefly, 18′ overall, has a waterline length of around 16′ for performance rowing. Its beam of 34″ means it can easily balance itself without the need for oars to be in the water. The low 7″ of freeboard would present a small profile to the wind, and the long chines and skeg would give it good directional stability. The Firefly has all the attributes for a fast boat appropriate for novices focusing on rowing for exercise or sport. The panel-on-frame construction lends itself to backyard boatbuilding, and the low count of individual parts signals a reasonably quick construction.
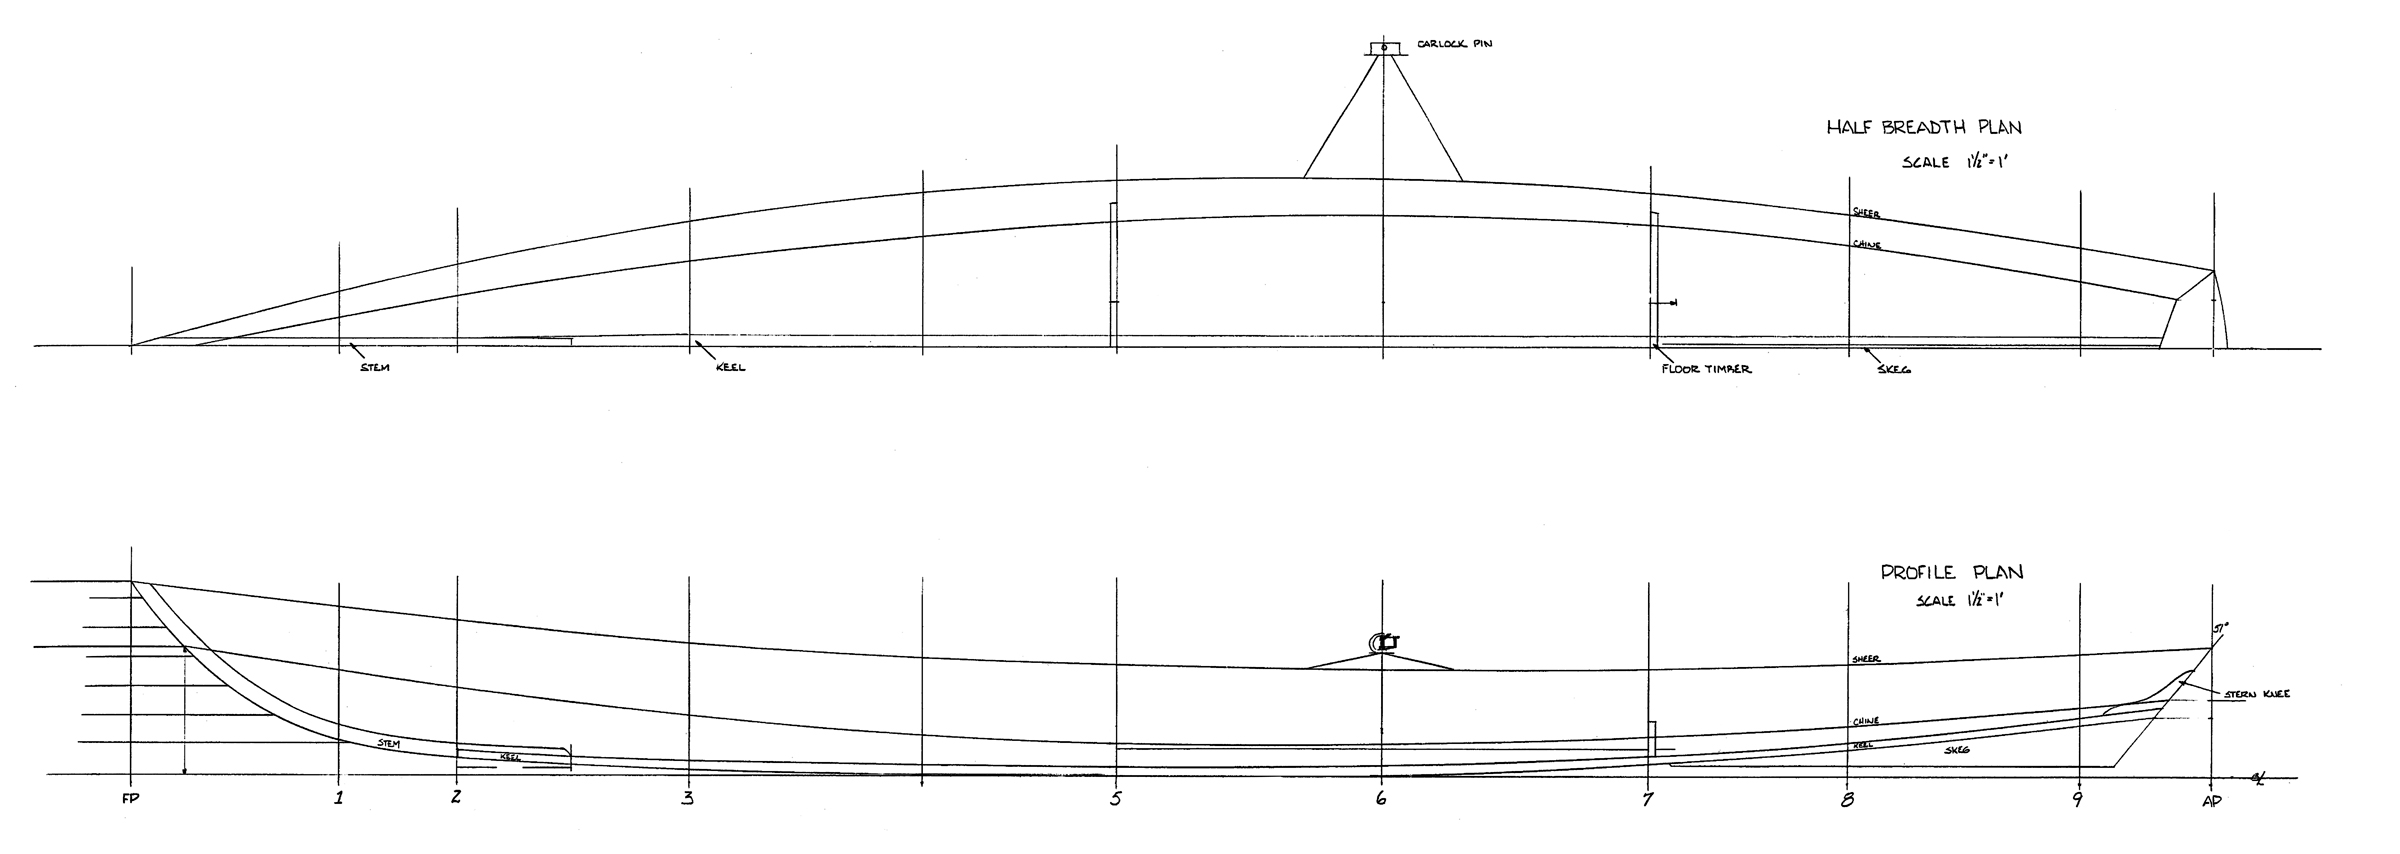
I ordered the plans from The WoodenBoat Store. They consist of five sheets of drawings: profile and inboard arrangement; lines, offsets and construction, and rigger details; sliding-seat mechanism, full-sized mold patterns, stem and keel details; and transom pattern, construction sequence, transom dolly, and keel details.
Photographs by the author
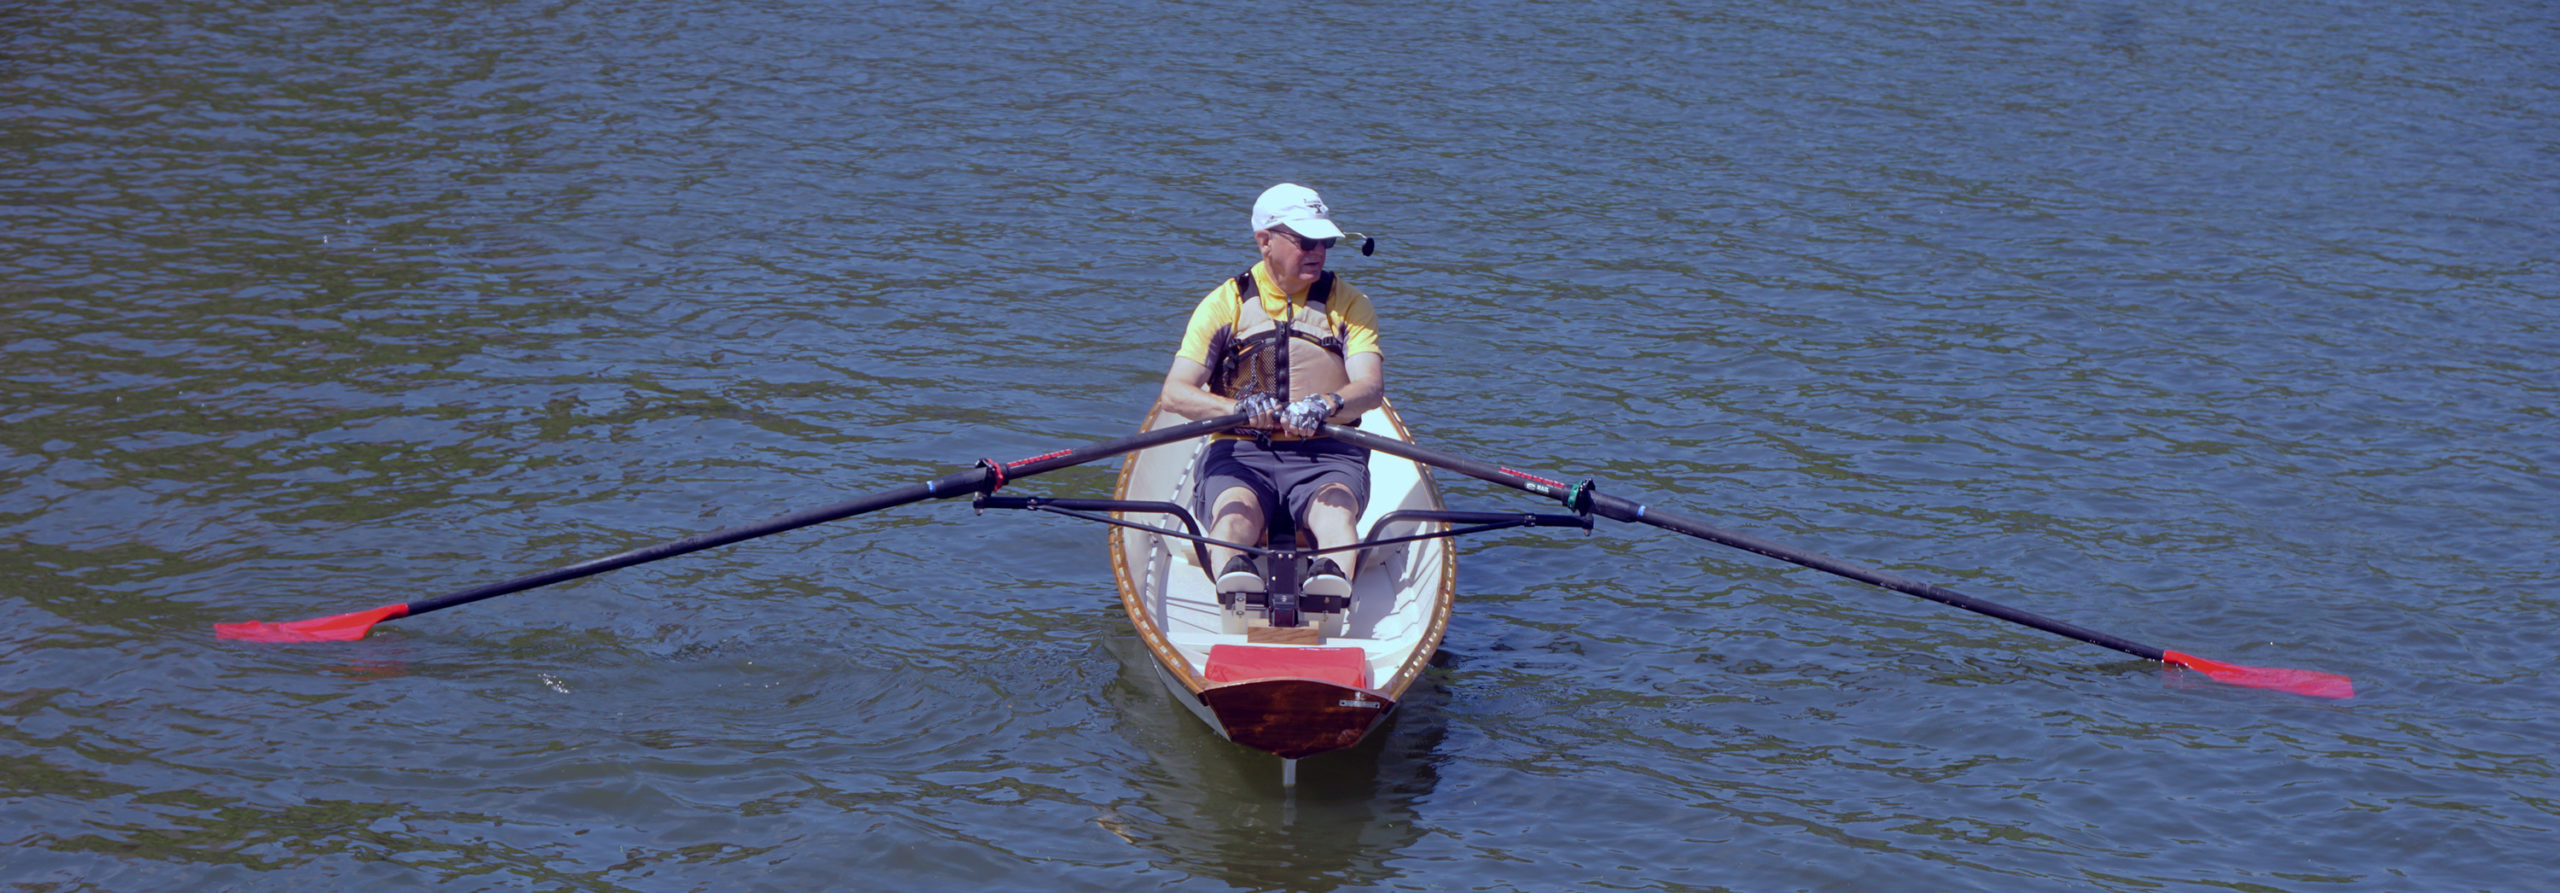
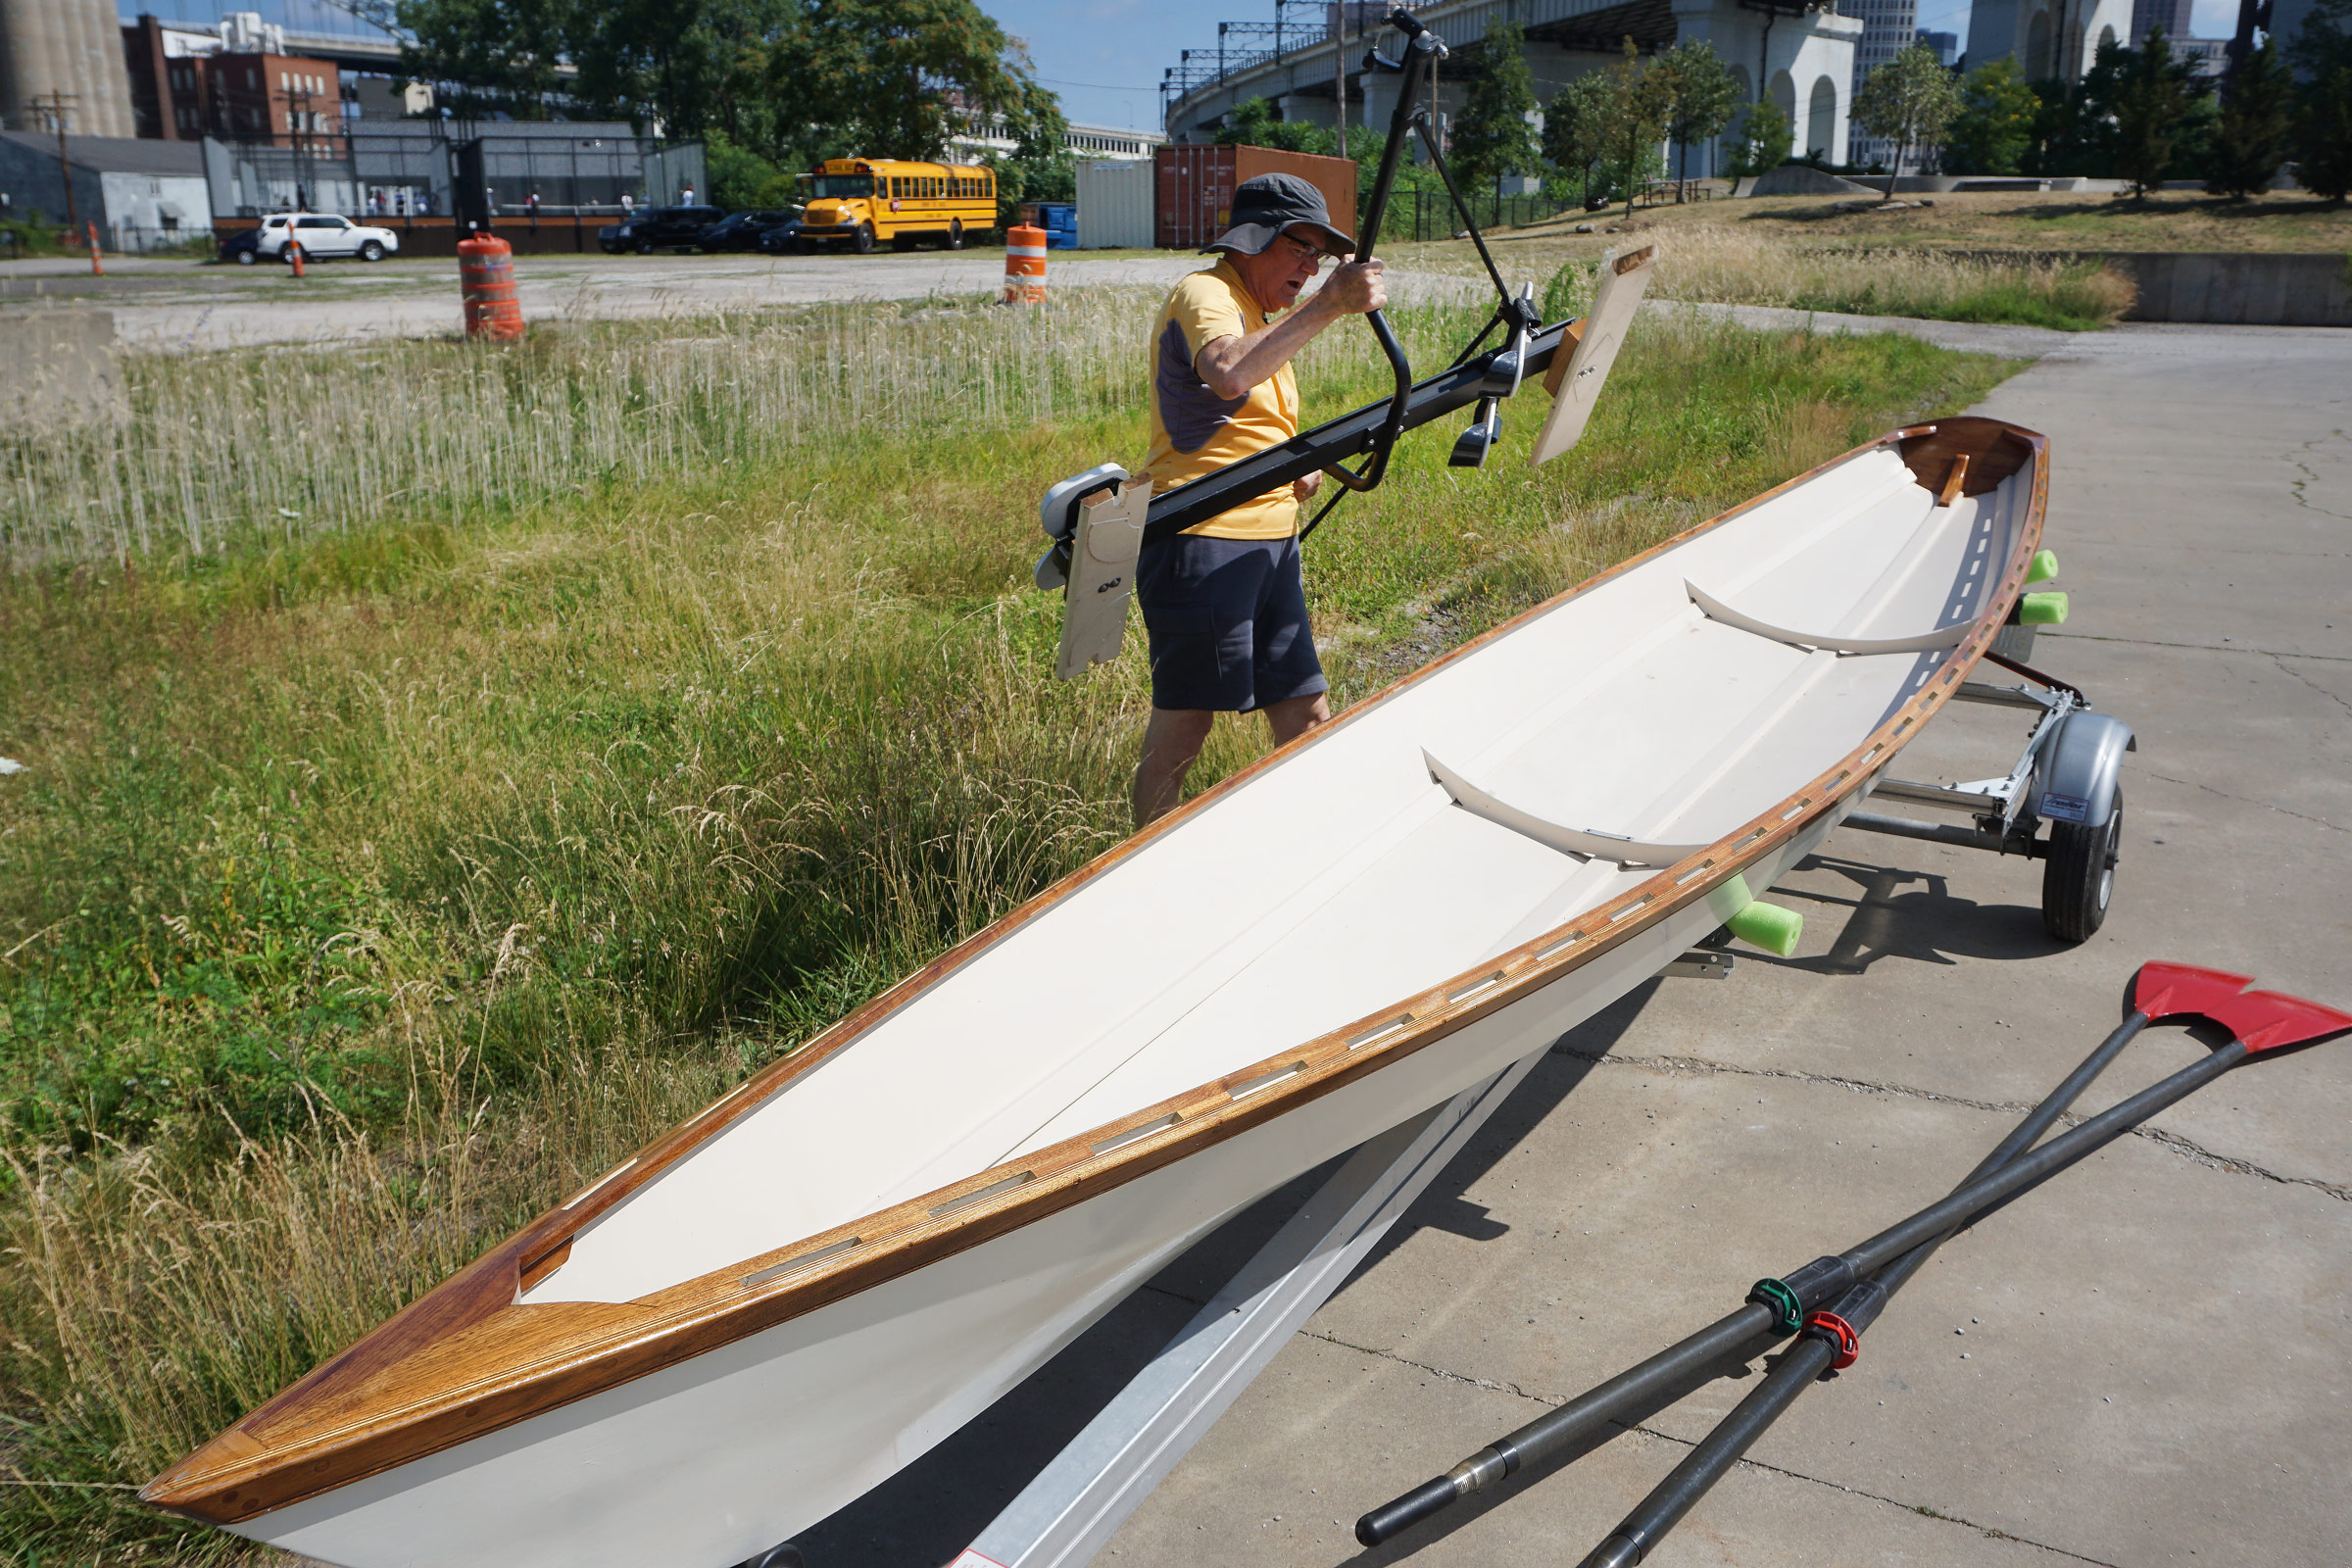
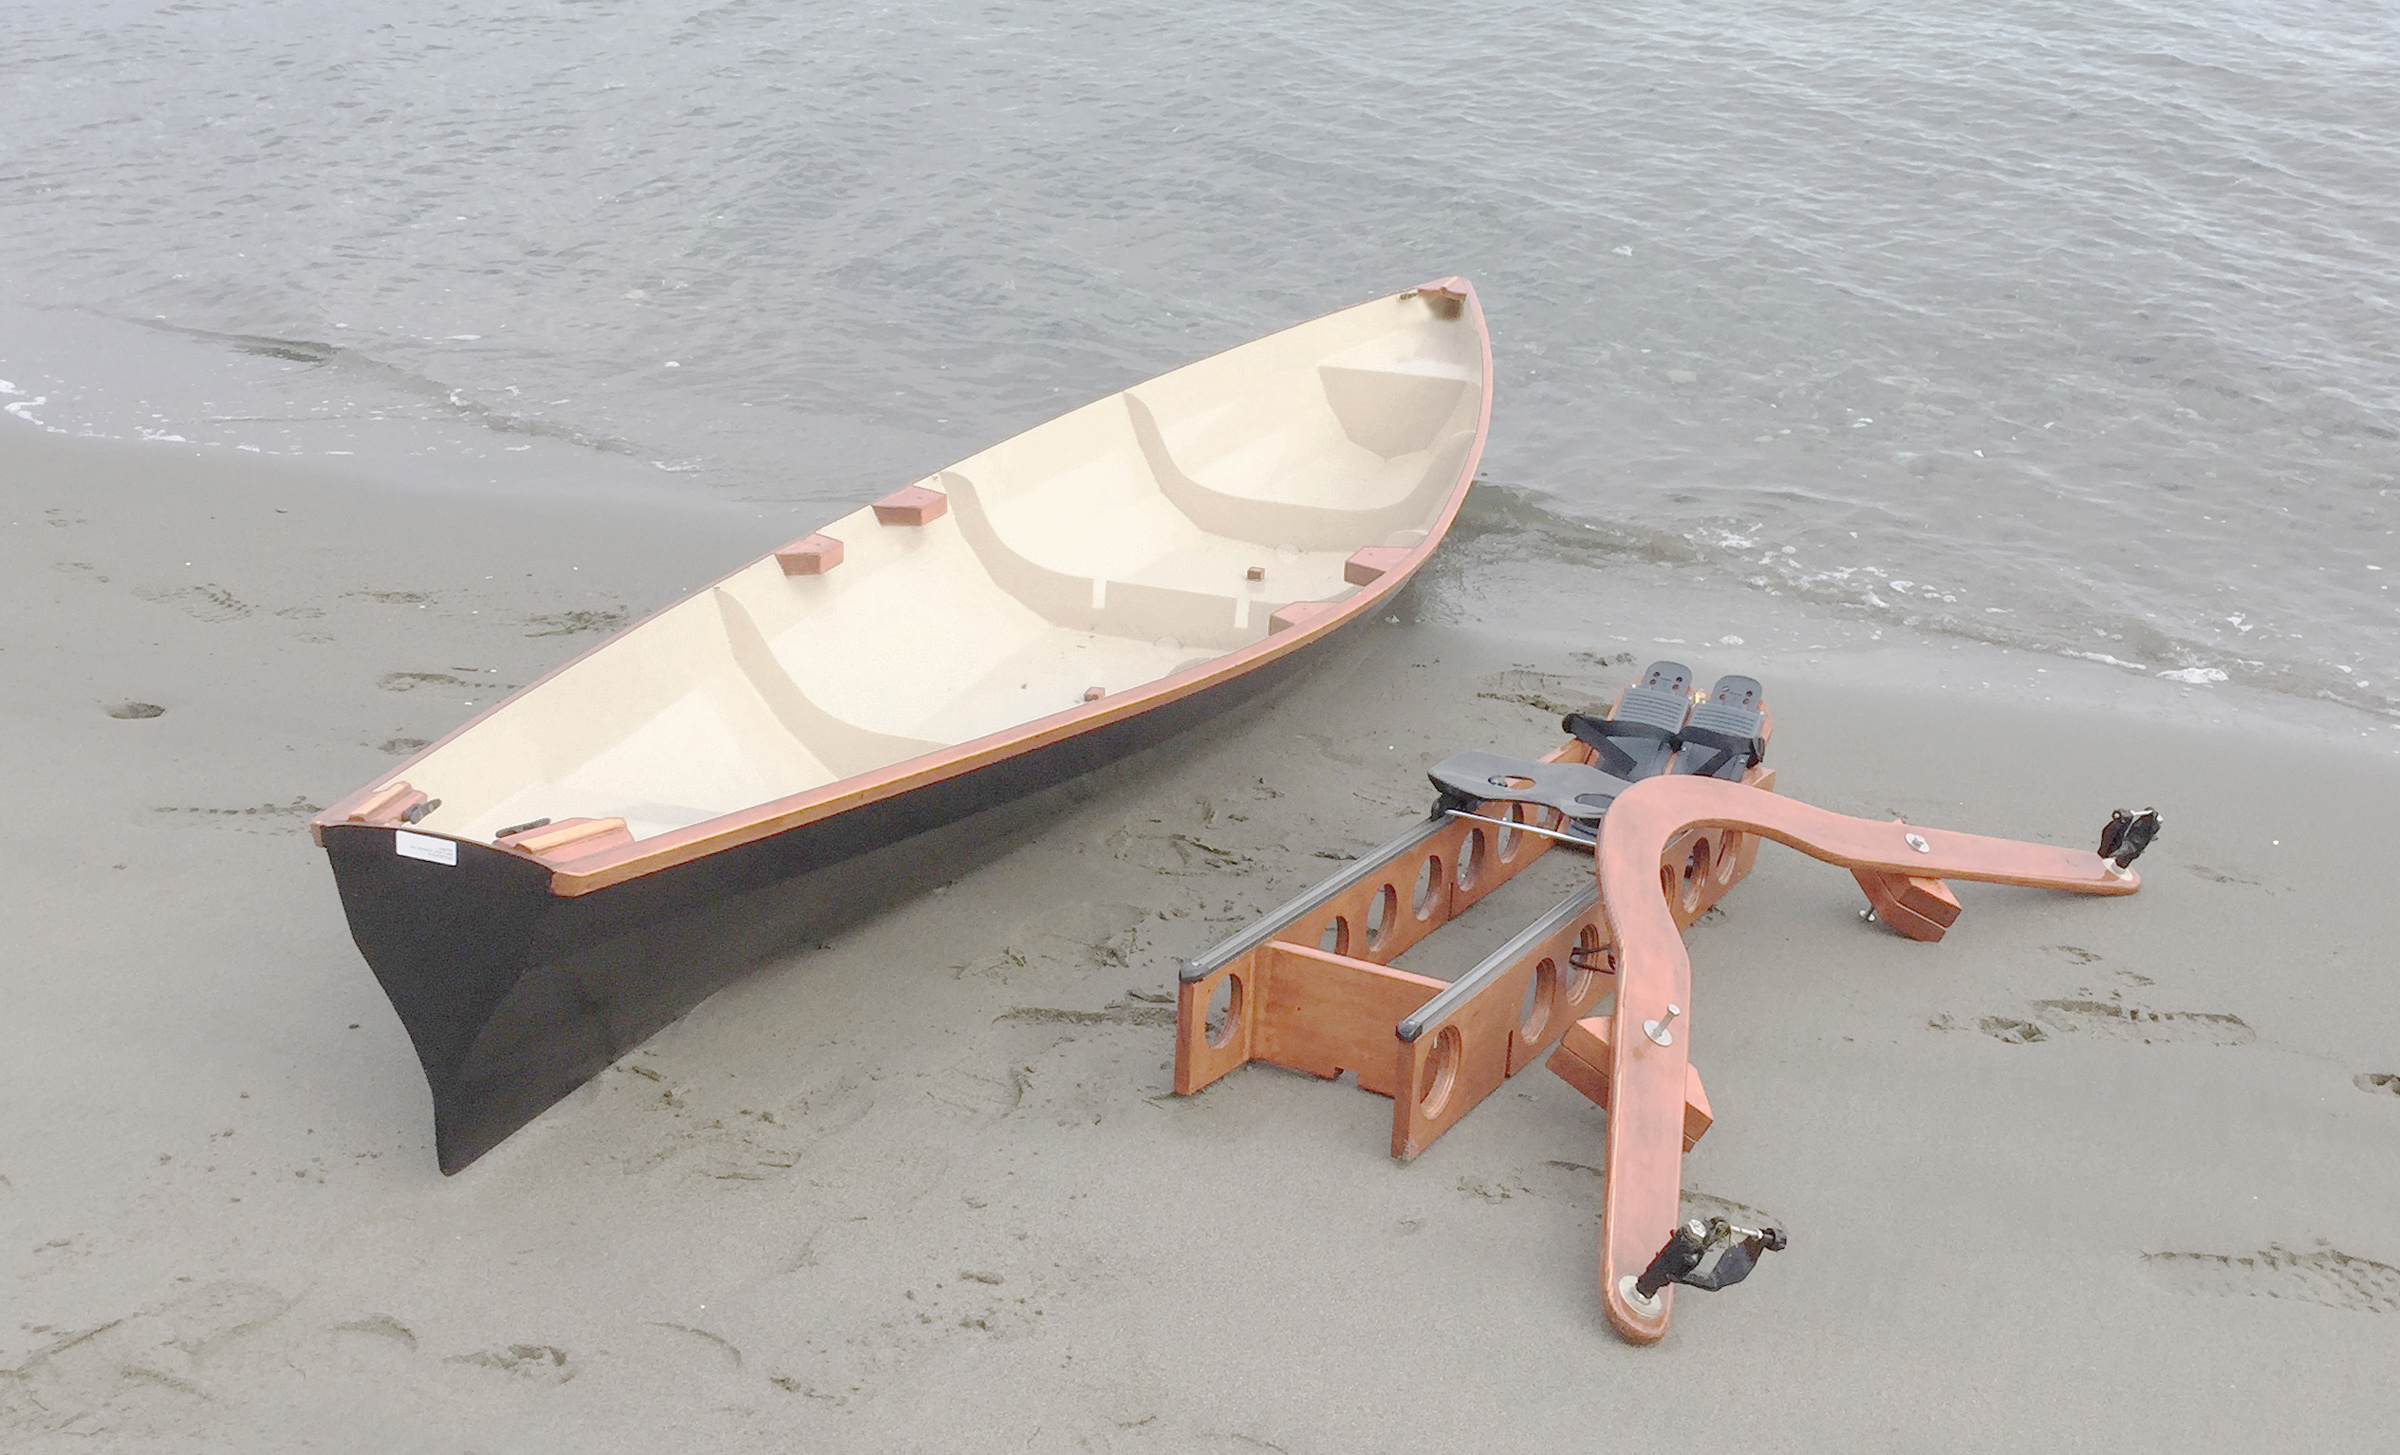
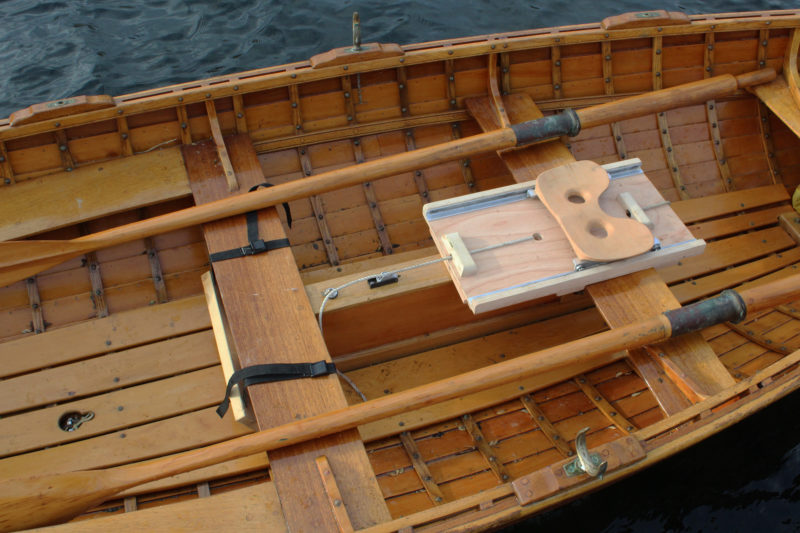
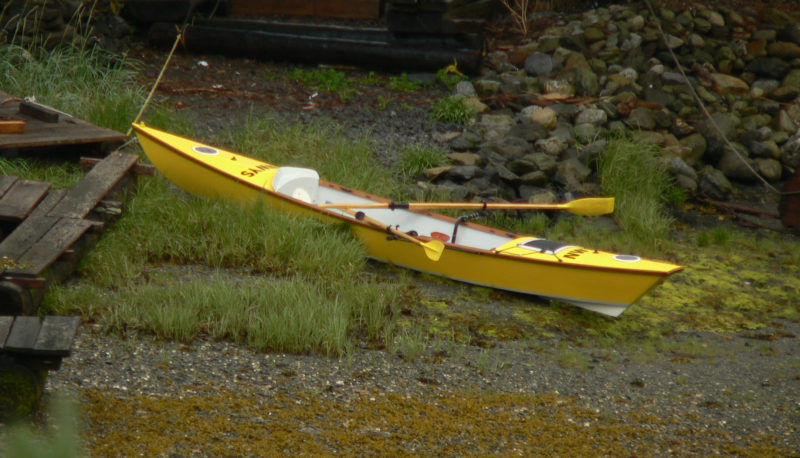
The plans include drawings for a sliding seat and outriggers, but a drop-in rowing unit, like the Piantedosi Row Wing here, is a ready-made option. The bare hull, weighing about 85 lbs, can be cartopped, but with a small, lightweight aluminum trailer the heavy lifting can be avoided.
I got to work setting up a strongback and cutting out the molds. The full-sized mold patterns eliminate the need for any lofting. The hull frame is very simple in construction: a laminated stem, a keel, two chines, two laminated frames, a transom, and a knee. The frame is covered by bottom and side panels cut from 6mm marine plywood. A skeg, breasthook, knees, and gunwale complete the hull. I chose Aquatek’s meranti plywood for the panels, spruce for the frame, and local black walnut for the transom, knees, breasthook, and gunwales.
The chine makes a sweeping curve that starts at the stem, drops just below the waterline amidships, and ends at the transom. As the beauty of the boat lies in that line and the sheer, I wanted those chines to be very crisp and fair. The joint of the sheer panel and the bottom panel would have to join in a perfectly smooth, unwavering sweep for about 17′. I knew from experience as the chines get beveled, the pencil-drawn centerline that defines the sweep would get planed away and be tedious to reestablish. I needed a better way.
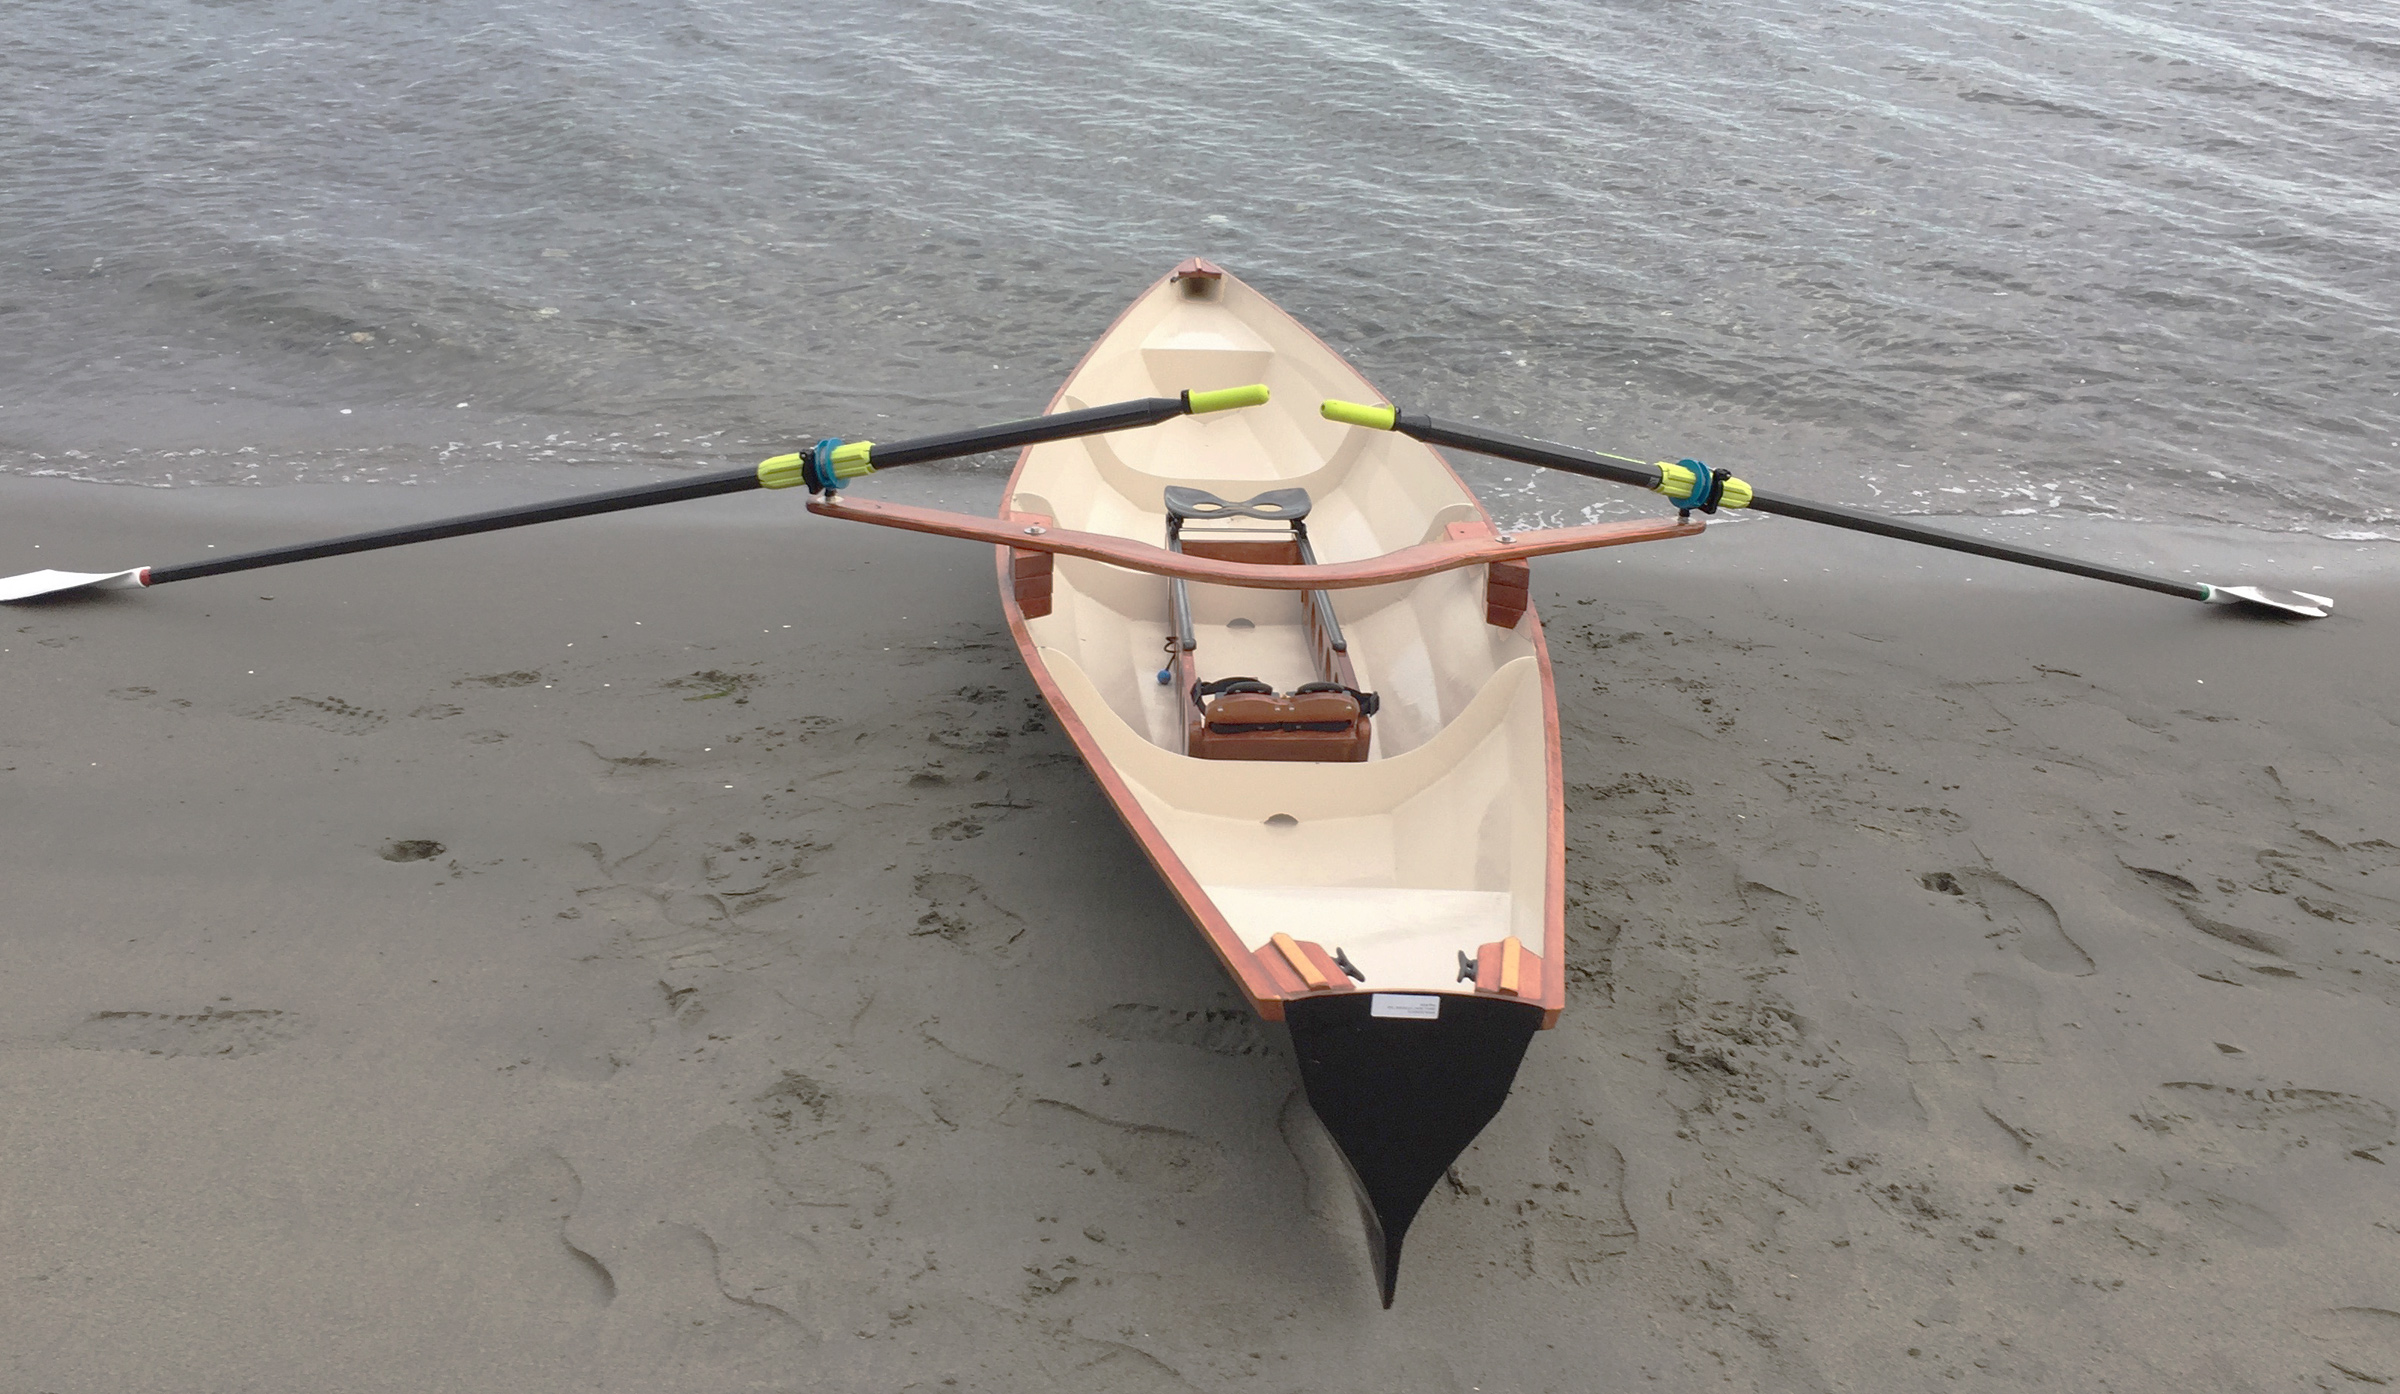
The 34″ beam provides good stability for getting aboard from either a beach or a dock.
To make a lasting centerline in the chine, I routed a 1/4″ groove about 3/8″ deep down the center of the outer face of each log. I then mounted the chine logs into the molds and planed them to create the bevels for the bottom and side panels. There was enough of each groove left to glue a 1/4″ × 1/2″ wood spline into it. The spline perfectly defined an accurate curve of the chine. Then, rather than butt the planking panels to each other, I butted them to the spline. With the spline carefully planed flush with the plywood, voilà, a perfect chine!
I sheathed the hull in 6-oz fiberglass cloth set in epoxy. After painting, the bare hull came in around 85 lbs. Although I didn’t keep track of time, I would estimate it took 150 hours of off-and-on evenings and weekends work to complete.
The plans detail a sliding-seat setup made of cherry wood and riggers constructed from 3/8″ stainless-steel tubing. Rather than fabricate all that, I chose to purchase a Piantedosi drop-in rowing frame. I thought the off-the-shelf solution would probably be cheaper than finding a metal shop to fabricate and weld the tubing, and I’d eliminate the time making the sliding-seat system.
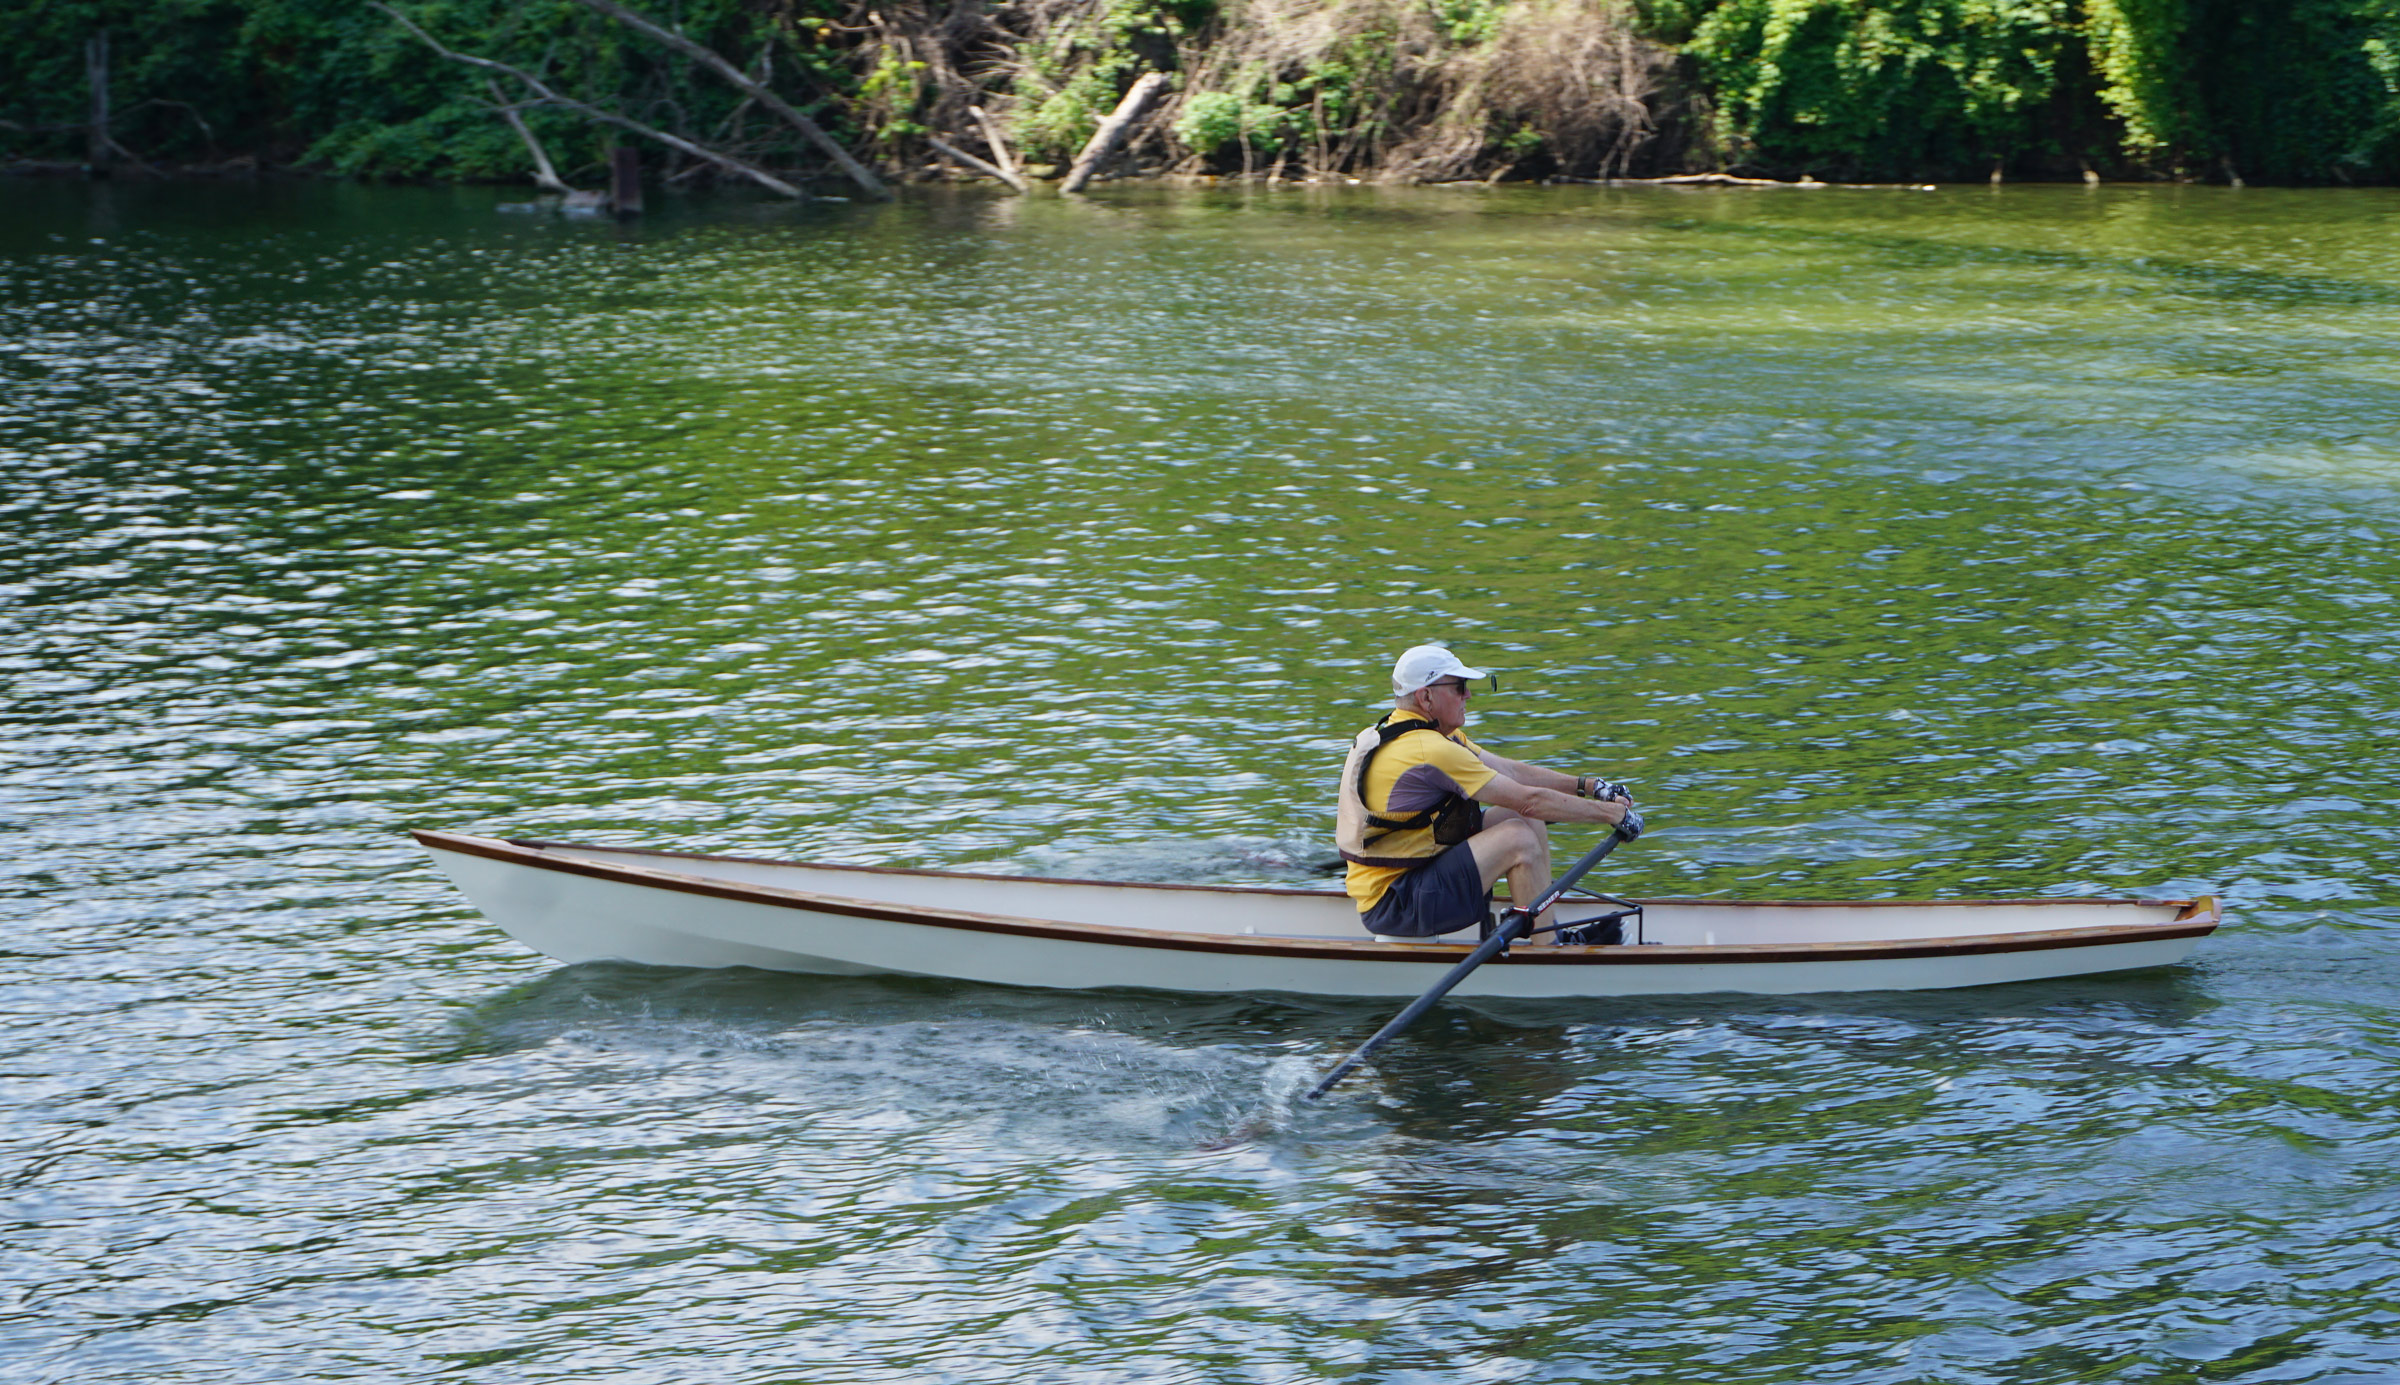
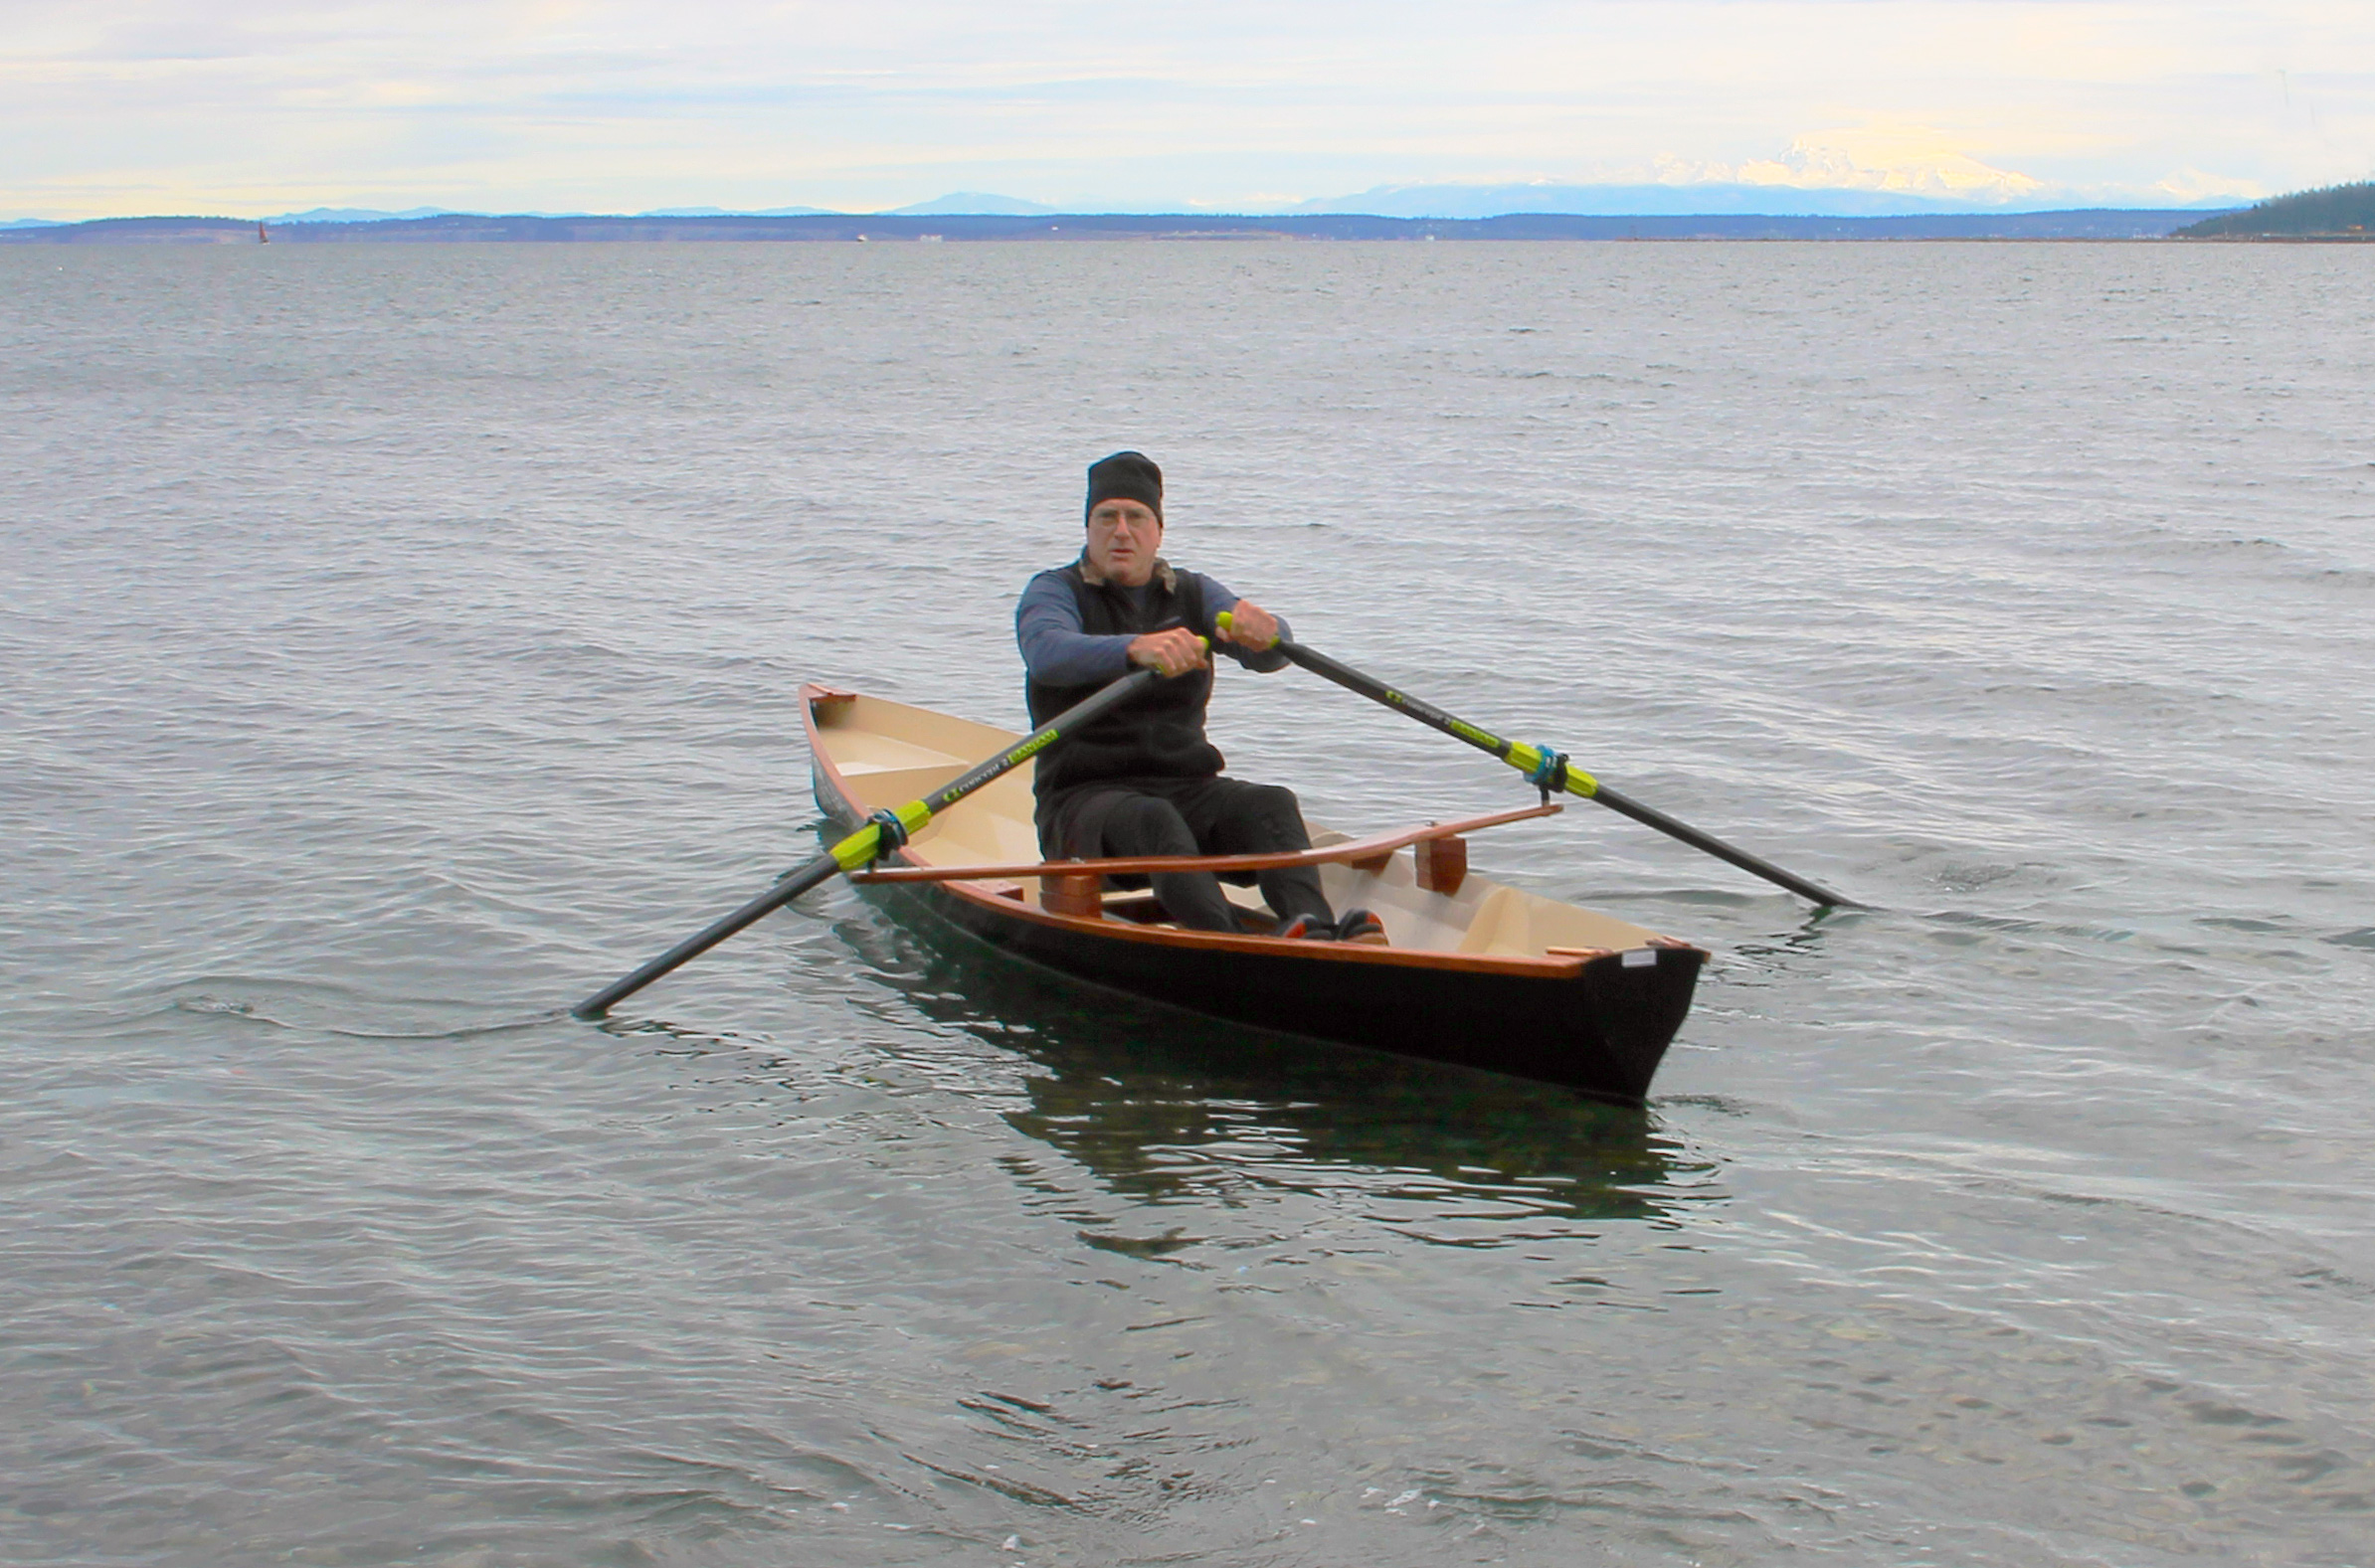
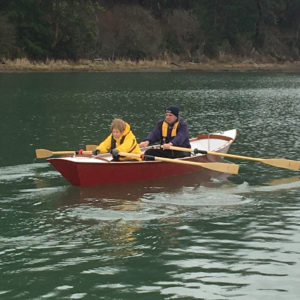
At the catch, with the rower’s weight at the aft end of the slide, the transom just kisses the water.
At the finish, the bow supports the rower’s weight at the forward end of the slide without the hull going out of trim.
I mounted the rowing frame so that it could be easily detached from the two ribs. Separated, it would fit in the pickup bed and I could hoist the boat, right-side up, onto the boat rack above. With ratcheting tie-down straps and some auxiliary foam wedged around the shallow V-bottom, the boat rode secure. Although the plans detail a transom dolly for moving the boat around inverted, I simply shouldered the hull to the water and then attached the rowing frame to it. Eventually this car-topping approach got awkward, and I purchased a lightweight aluminum trailer to make a simple package for towing and hand launching off the beach.
Getting into the boat off a beach is simply a matter of floating the boat, reaching for the opposite gunwale, and hopping in. The boat keeps its balance while you grasp the oars and get adjusted. No need to rush. Getting off a dock is another matter. The rigger not only positions the boat 14″ away from the dock, but it can also wedge itself into the dock structure in a variety of ways and be quite a nuisance. Attention is necessary to ensure that the boat is not trapped by the rigger. One can step onto the bottom panel and once aboard, the boat balances itself and is as stable as a canoe.
On the water two pulls at the oars brings the Firefly up to speed. That is once you clear the dock or the beach shallows. The 298cm recreational sculls recommended in the plans (racing oars are measured in centimeters, 298cm is 9′ 9-1/4″) and 62″ outrigger spread are amazingly awkward in tight situations. Since the boat has good stability without relying on the oars, I sometimes use a kayak paddle as auxiliary propulsion to help maneuver in and out of tight spots to avoid using the oars.
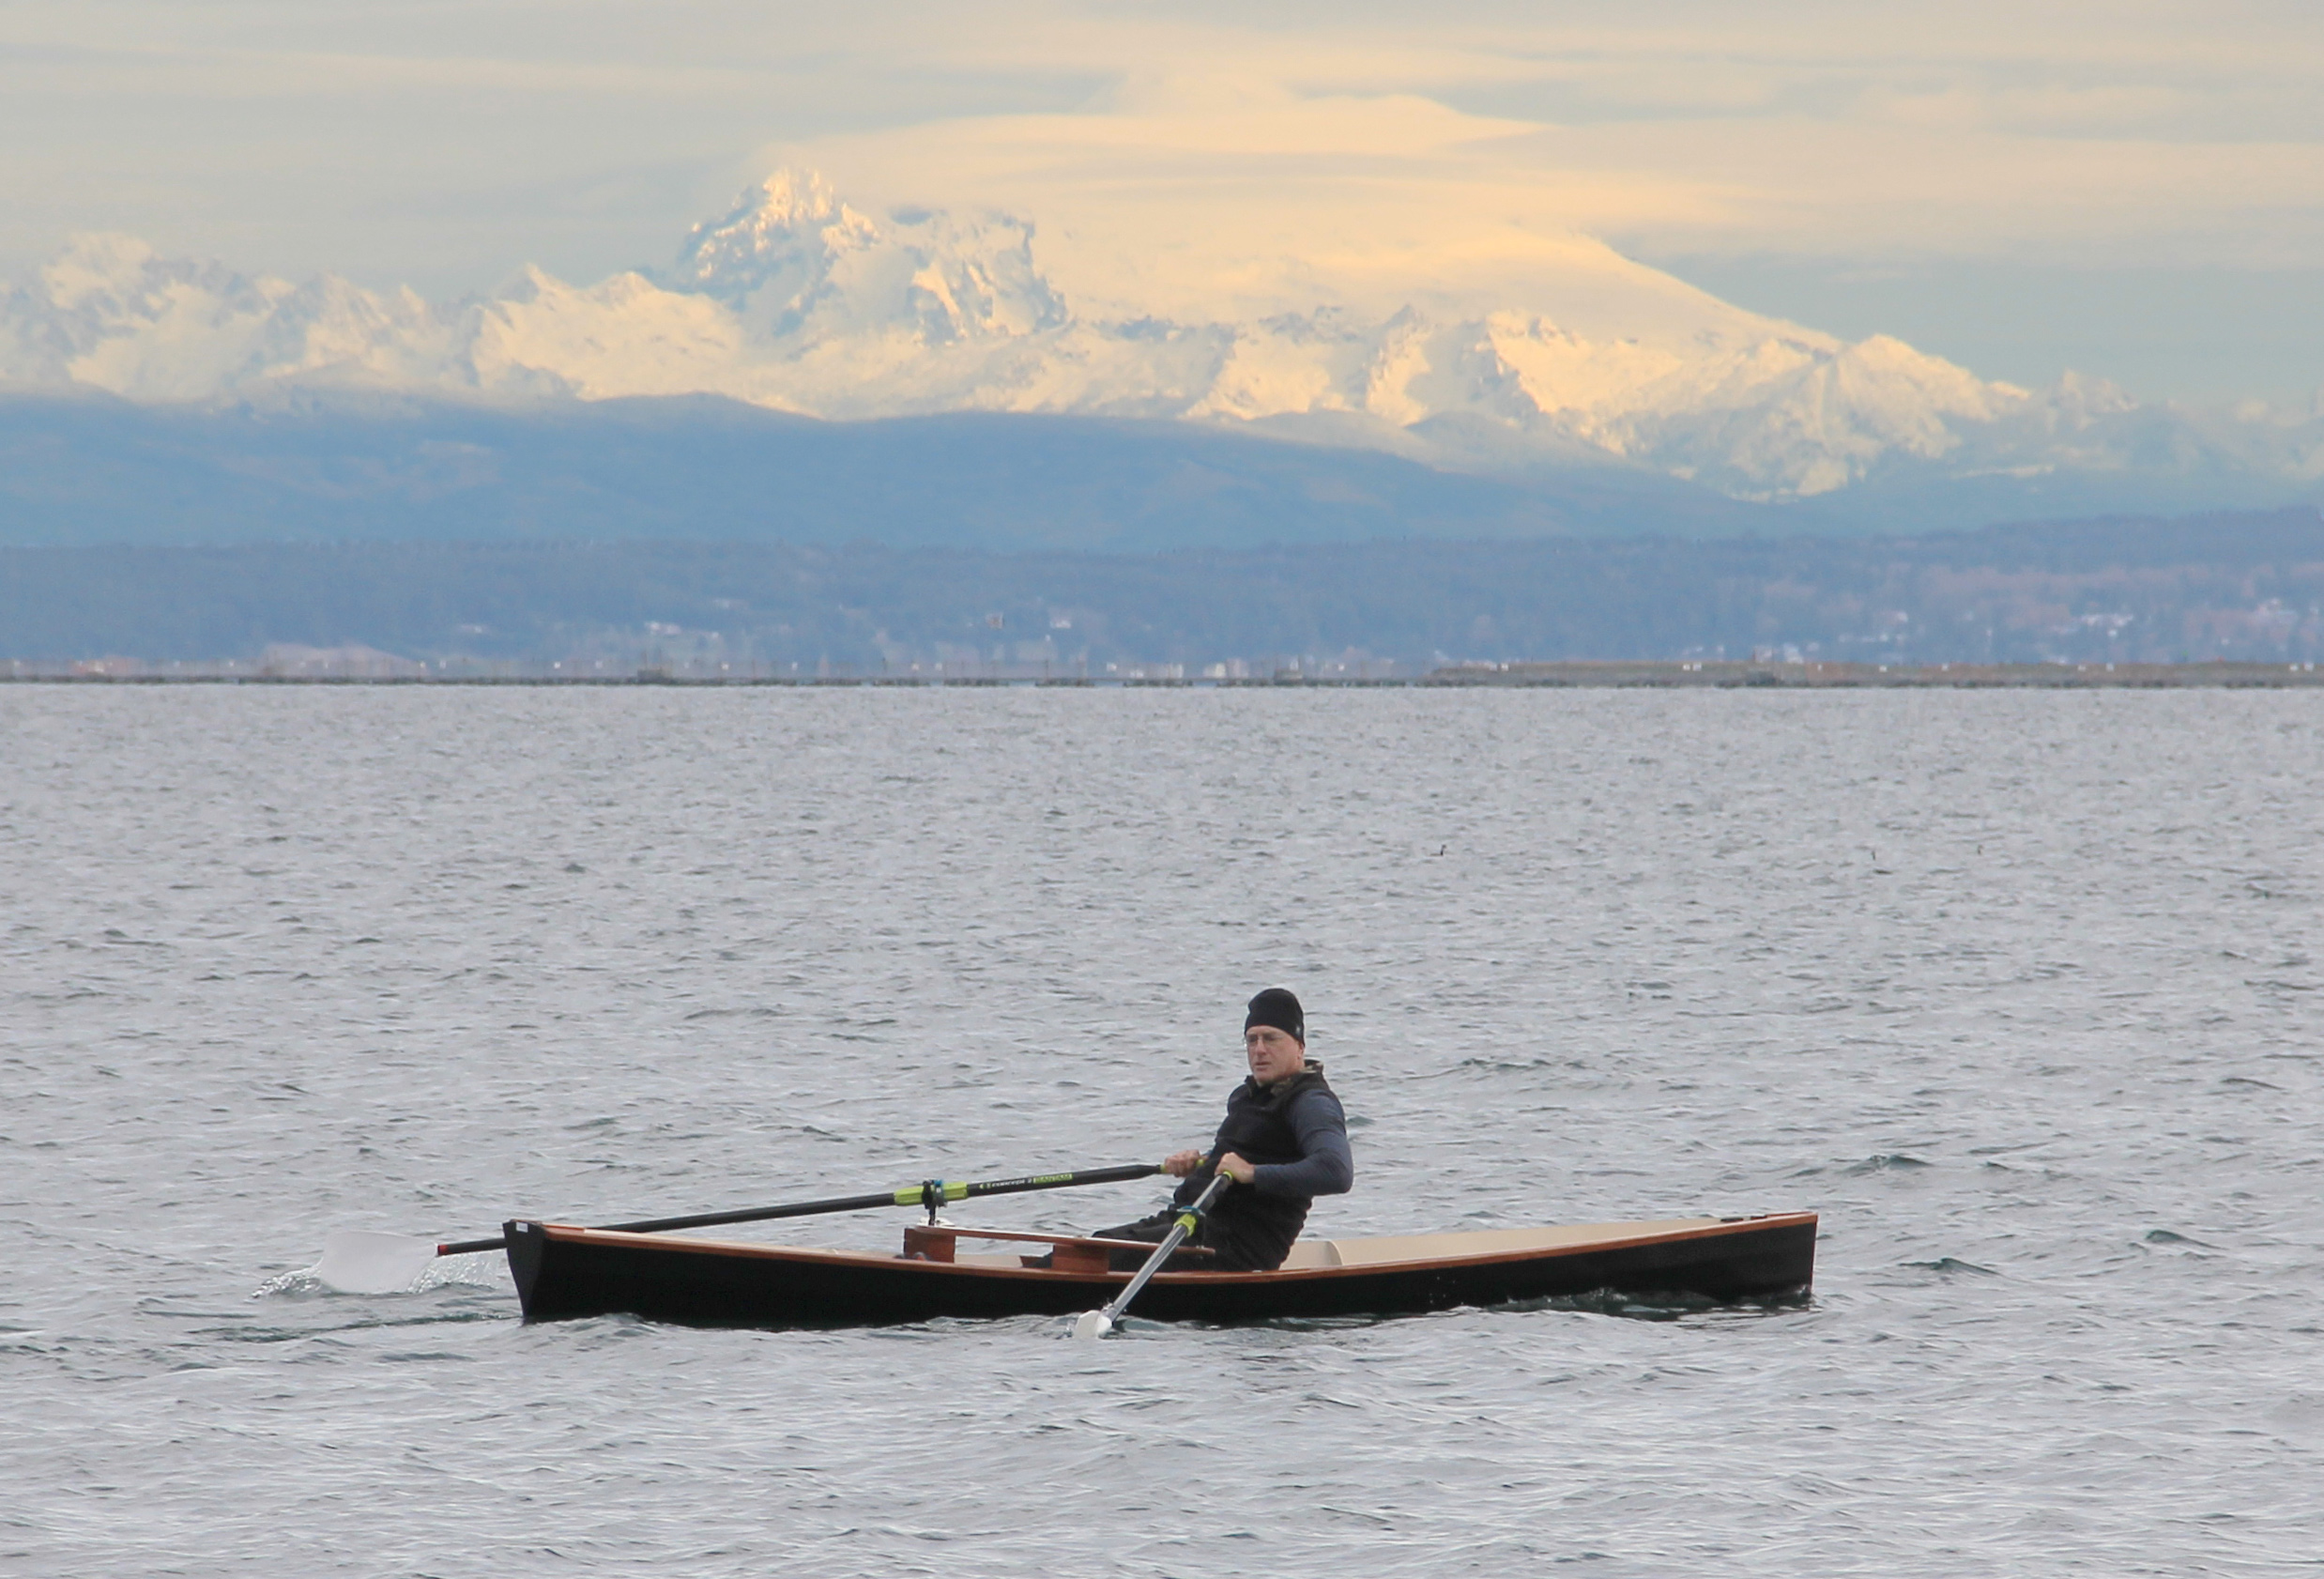
The boat cruises easily at 4-plus mph, demanding no more effort than a brisk walk, and is surprisingly seaworthy. Once caught out in 1′ to 3′ waves by a sudden change in the weather, the boat found its way through the chop without shipping water. It stays where you point it; it takes a bit of coaxing on the appropriate oar to change direction. Underway, the boat feels fast and nimble, comfortable and stable.
I had no experience in performance rowing and at the time knew no one who had, so I set up the rowing frame according to Piantedosi’s directions. The first few rows were frustratingly awkward and brief, but there were one or two brief moments when it all came together and the boat flew along the water with such grace and ease that it seemed effortless to propel it. I felt a spiritual lift and delight and I had to have more of that. Those brief moments were enough to keep me engaged as I made guesses as to what were issues with the boat, rowing frame, or me. Over time, by trial and error and with incremental adjustments, the Firefly became comfortable for me to row. During the winter, workouts on the gym rowing machine got me in better physical condition. Some coaching tips from an experienced rower got me to the point where I could put miles on the boat.
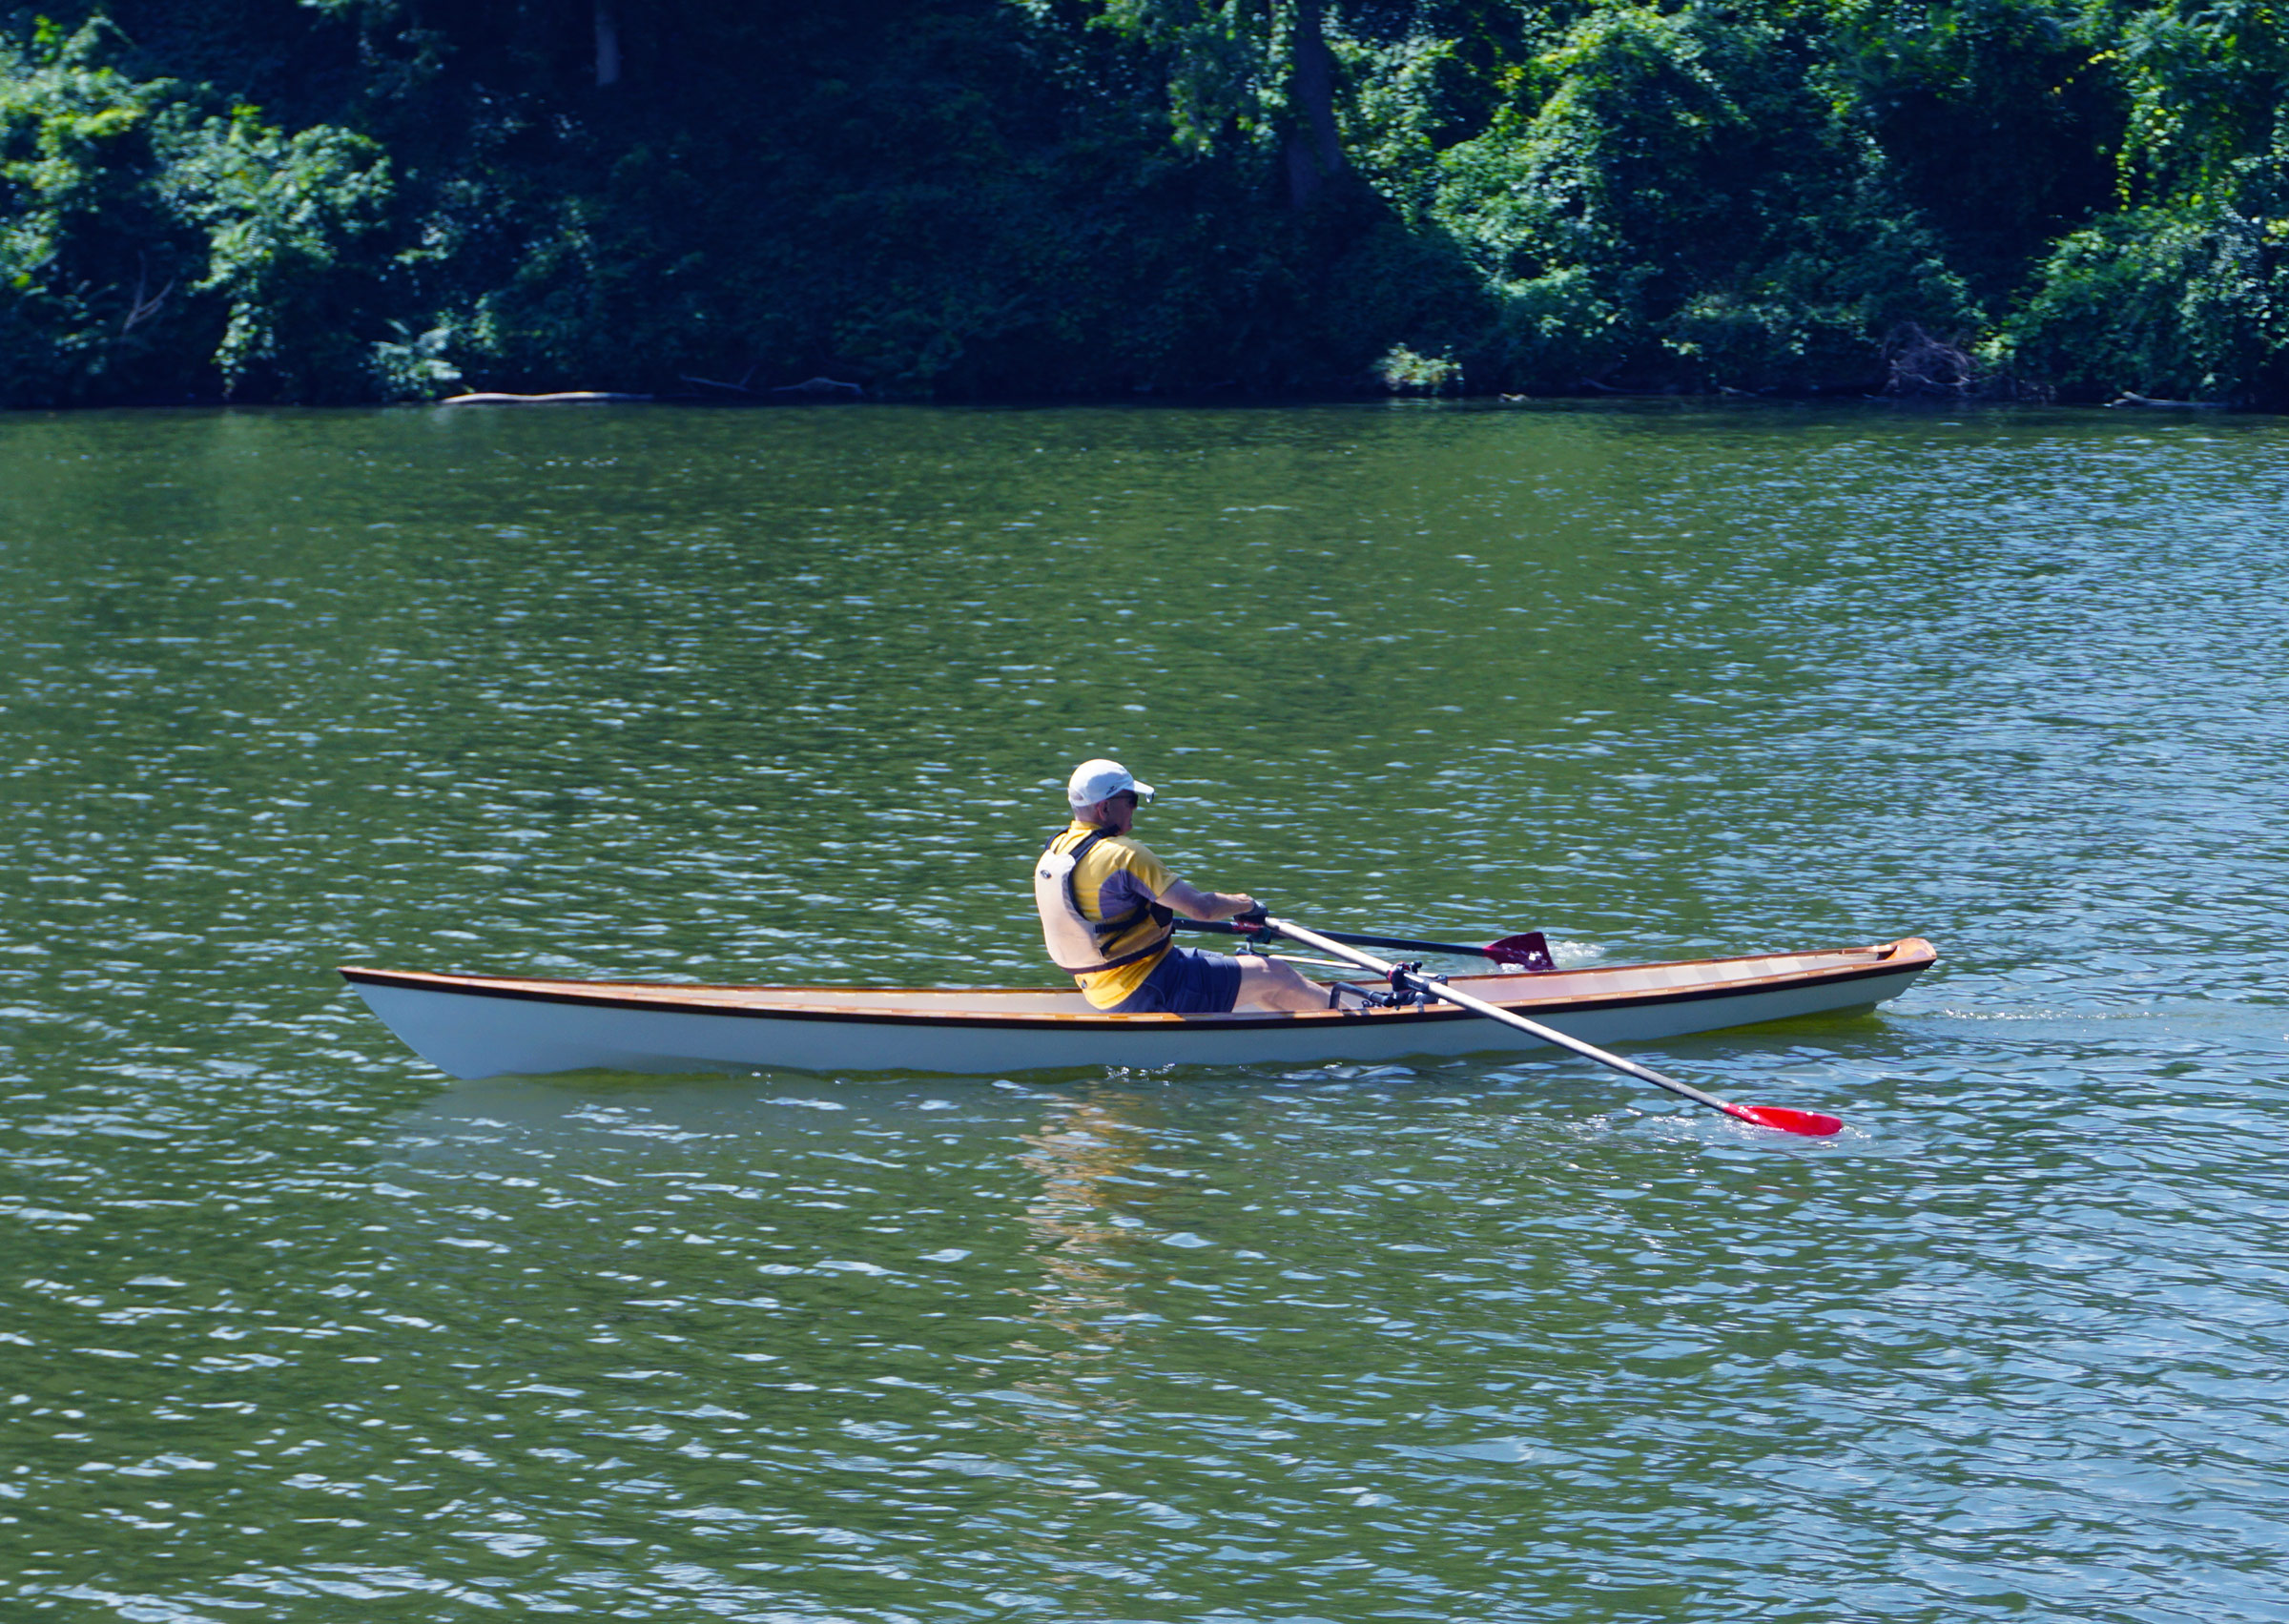
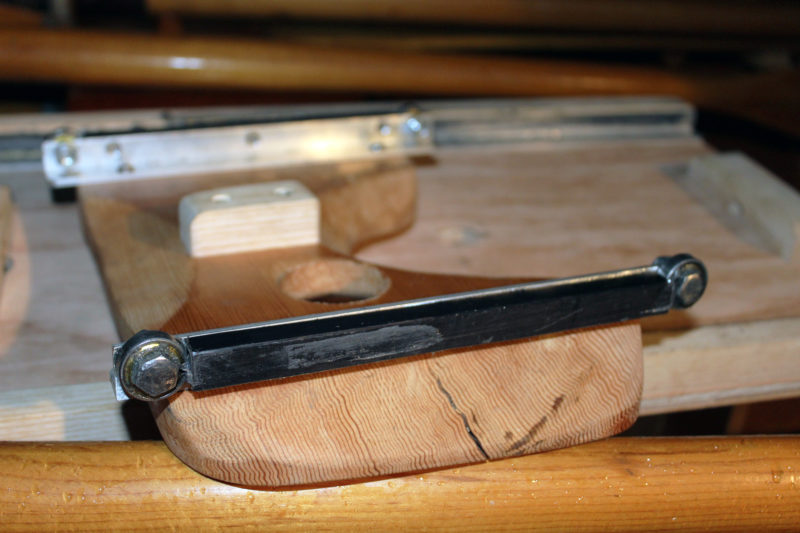
The drop-in unit has a span of 62 1/2″, just 1/2″ greater than the outriggers drawn in the plans. The sculls used with the Firefly are between 9′ 6″ and 9′ 9″ in length.
The Firefly started out as a boat for my wife, but in the prolonged tune-up phase, I monopolized the boat to make the setup work for my tall stature. I thought I could dial it in for her smaller size, but after seeing me get used to rowing the boat, she was reluctant to take on the learning curve I went through. Casual rowing with a fixed seat and drifting were more to her liking. She’s now talking about a St. Lawrence Skiff, a boat more like what she had in mind from the beginning. No problem, it’s another opportunity for me to build a boat!
Coming from a boating background where each of my boats had multiple uses, it took time to recognize that the Firefly is a thoroughbred: it does only one thing and does it exceptionally well. It is meant to fly across the water in light wave conditions with grace and ease. It has the speed to put the miles behind without exhaustive effort, and when it’s time to rest one can drop the oars, unpack a snack, and comfortably drift while watching the scenery. Back at the beach or ramp the boat’s good looks draw comments from the passersby. The boat’s simple construction will get you on the water quickly and introduce you to lively, nimble performance. I’d call that joy.
Ed Neal of Cleveland, Ohio, started his interest in woodworking as an 11-year-old Boy Scout, whittling neckerchief slides. Twenty-something years ago he came back from a wilderness canoeing trip in Canada wishing to add an outrigger to the canoe for additional safety. He went to the downtown Cleveland Public Library looking for a book that might be helpful. There he fell down the boatbuilding hole and has yet to surface. He is now the executive director of the Cleveland Amateur Boatbuilding and Boating Society.
Firefly Particulars
[table]
LOA/ 18′
Beam/ 2′ 10″
Draft/ 4″
Weight/ 90 lbs
[/table]
Plans for the Firefly are available from The WoodenBoat Store in print and digital format for $60.
Is there a boat you’d like to know more about? Have you built one that you think other Small Boats Magazine readers would enjoy? Please email us!
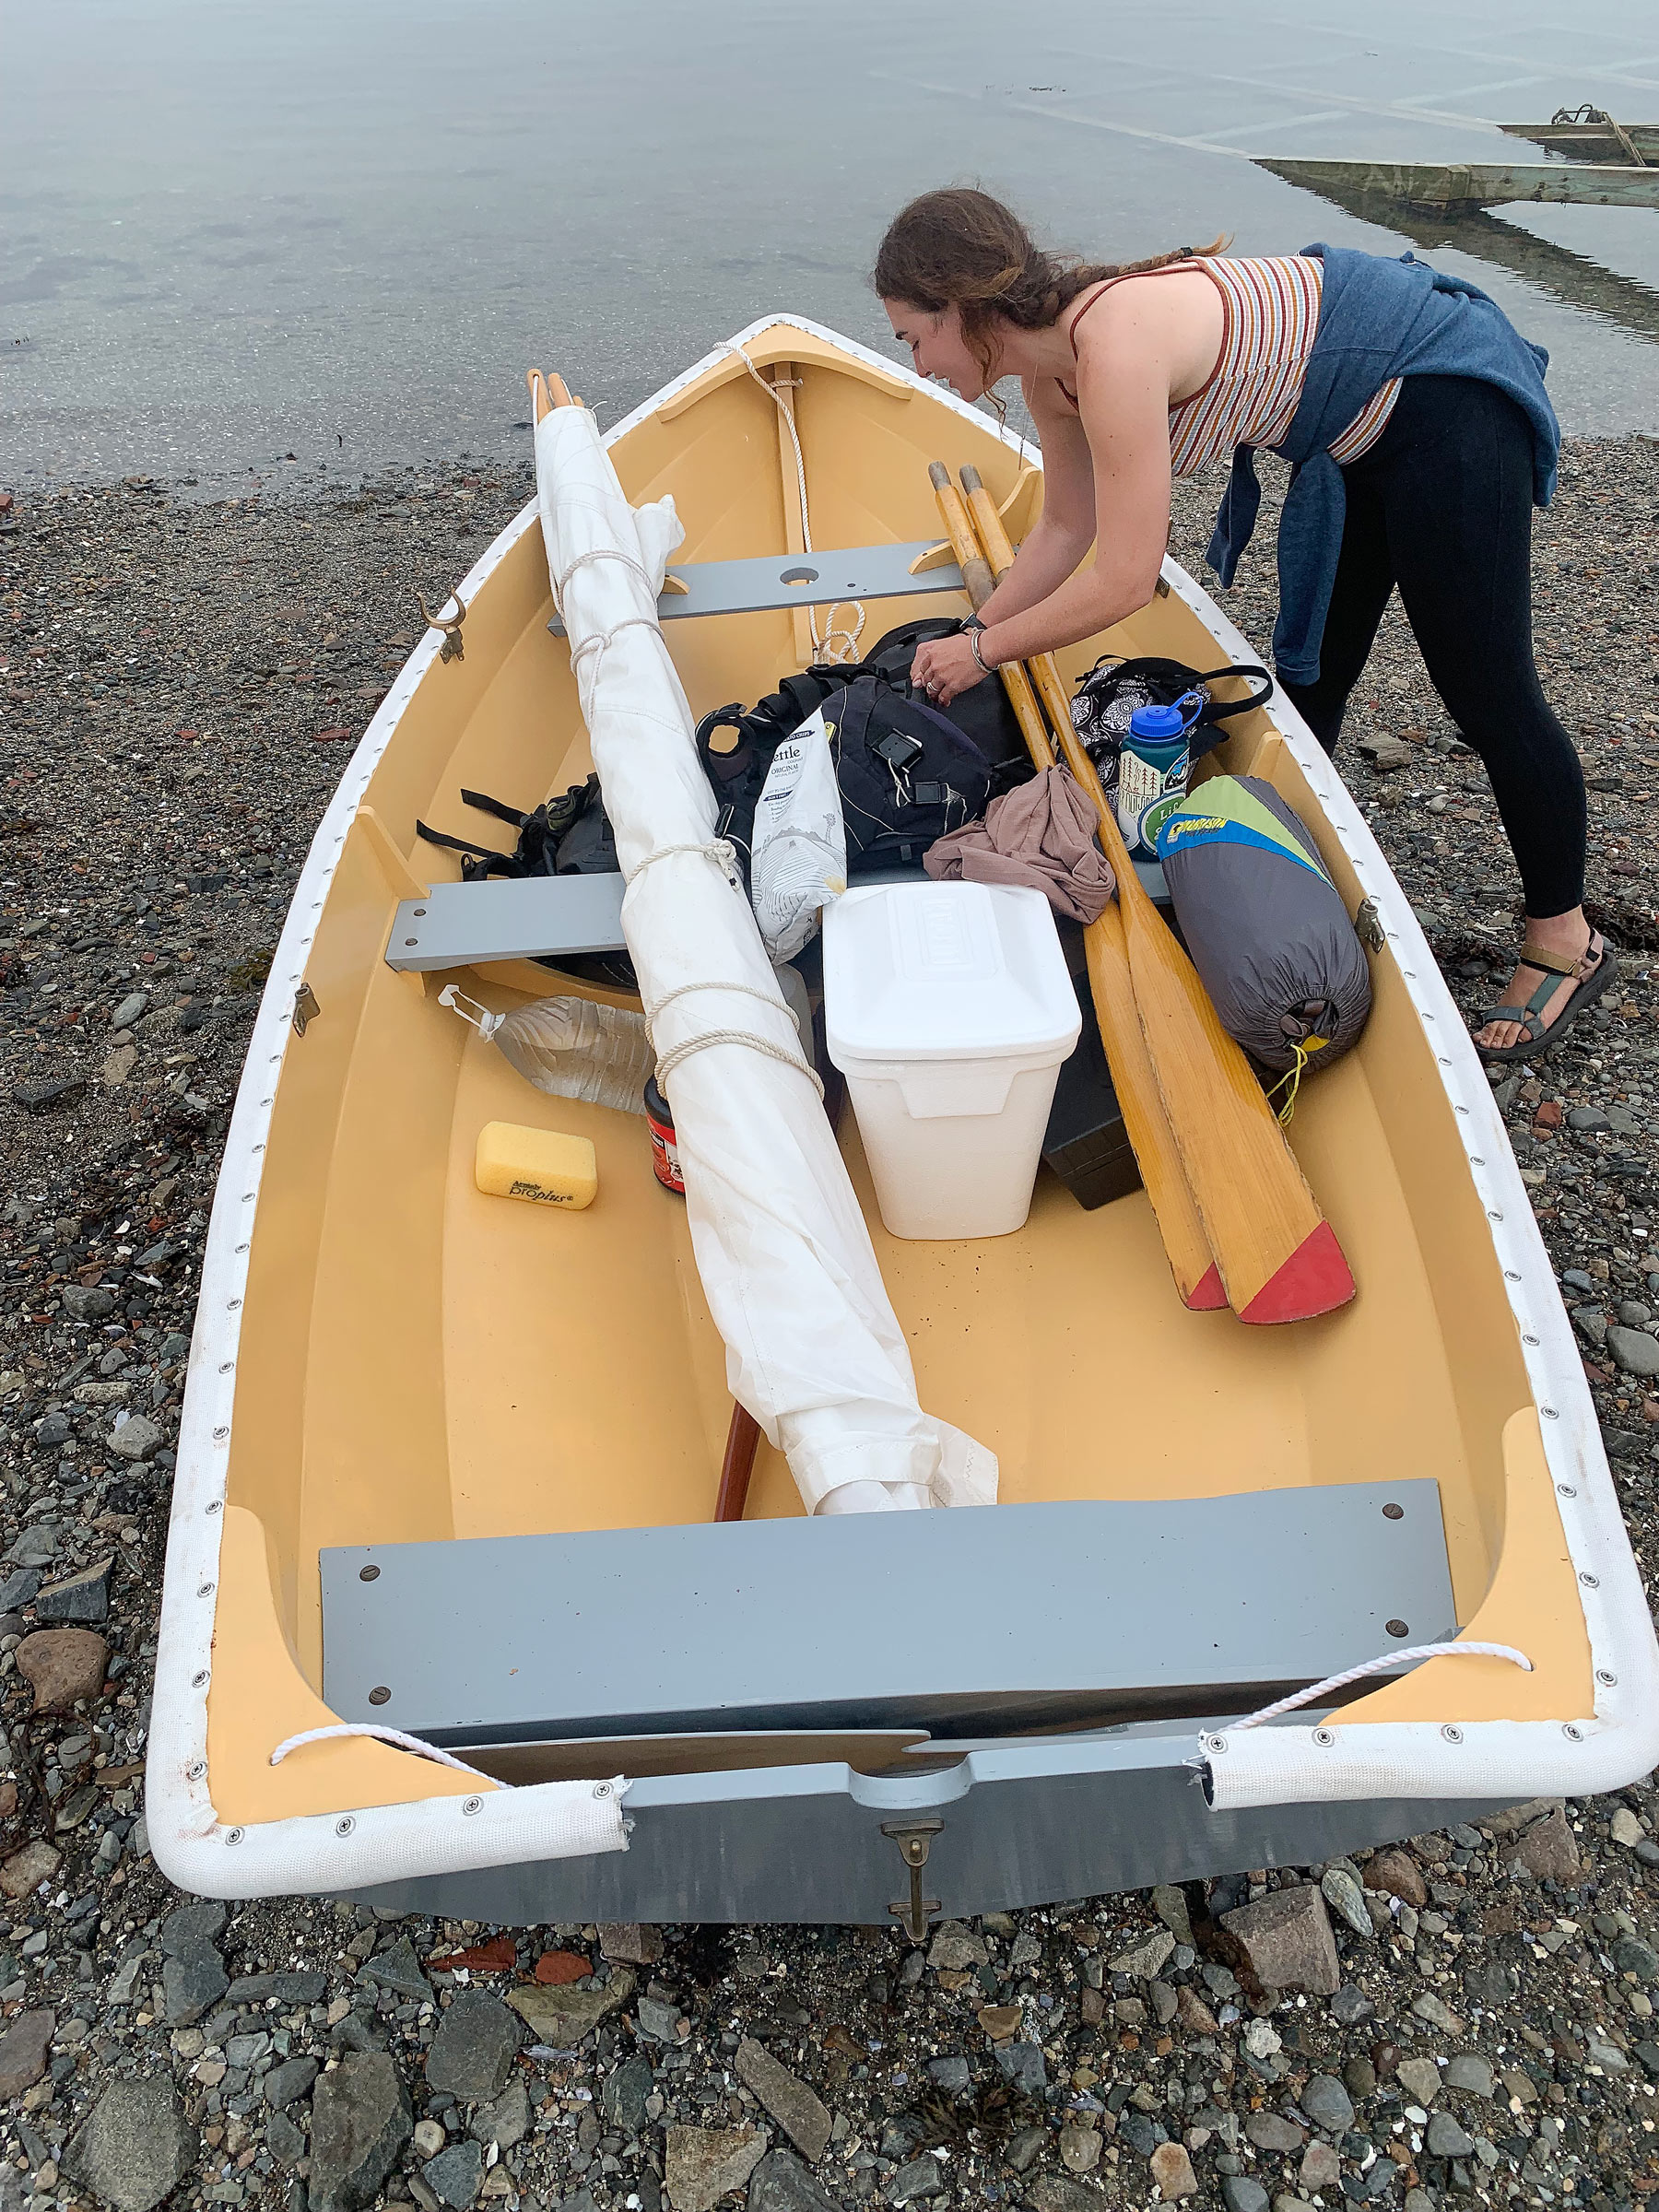
It was a Saturday morning in September, and my not-quite-girlfriend Delaney and I had just left the fishing dock in Bass Harbor on Mount Desert Island, Maine, in RIDDLE, my Shellback dinghy, for a weekend of camp-cruising in Blue Hill Bay. In spite of a late start—it was almost lunchtime—the morning fog, damp and breathless, had failed to burn off and visibility was measured in oar lengths instead of miles. With RIDDLE loaded down with two days’ worth of food and camping supplies, we floated the boat—sunk down well past the waterline—off the beach and headed out into the opaque white, using an aviation navigation app on my phone as our GPS.
Photos by Delaney Brown and Tom Conlogue
When Delaney loaded up RIDDLE, the boat’s paint was unscratched and our muscles were still fresh.
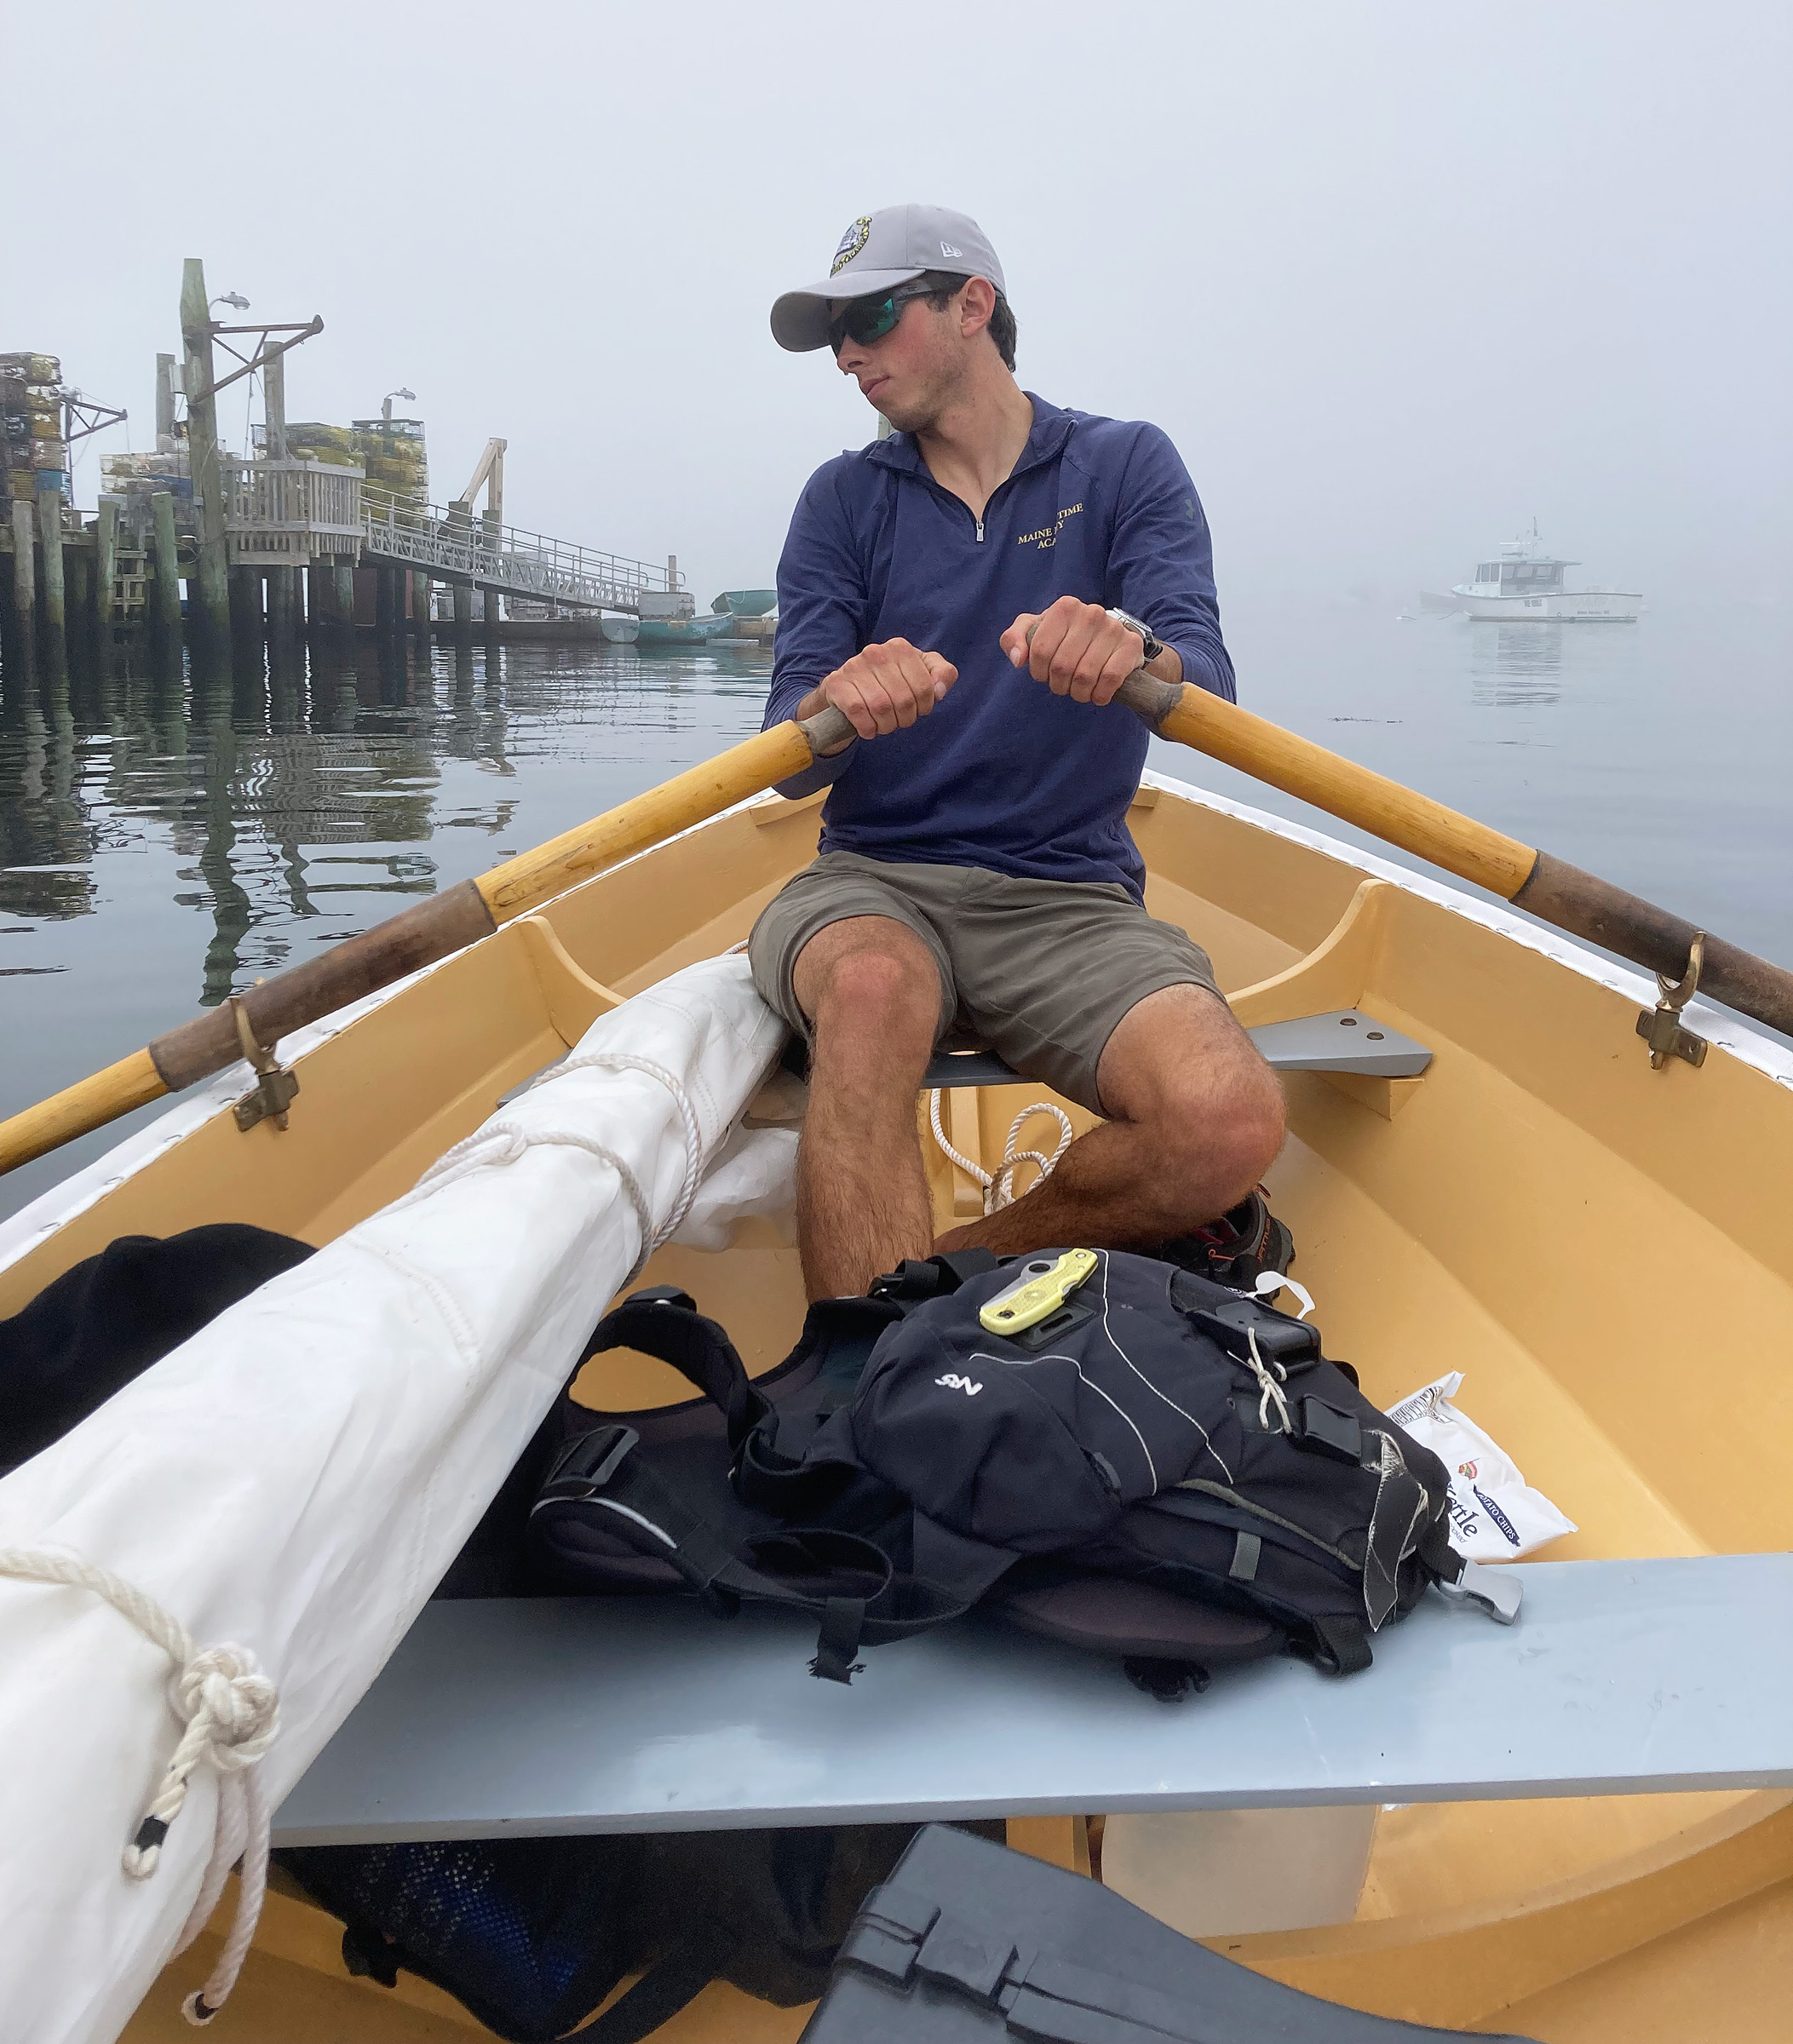
Delaney sat in the sternsheets serving as chief navigator; I was in the forward rowing station, and RIDDLE was cutting through the still water at a brisk clip when we heard the Swans Island ferry get under way somewhere off to our port side. The rumble of the ferry’s engines changed from a dull idle to a persistent growl, sifting through the fog and telling us it was in gear and under way. I grinned at Delaney in what I hoped was a confidence-inspiring way and pulled a little bit harder on the oars until I felt RIDDLE dig into her bow wave. The water quietly lapped along the hull as we pulled southwest, leaving astern the gritty beach and oil-slicked surface waters of the fishing dock shrouded in hazy gray.
Fresh off the beach with the fishing pier to port, I rowed out toward the fog bank as Delaney, reading off a flight-navigation app, guided the way.
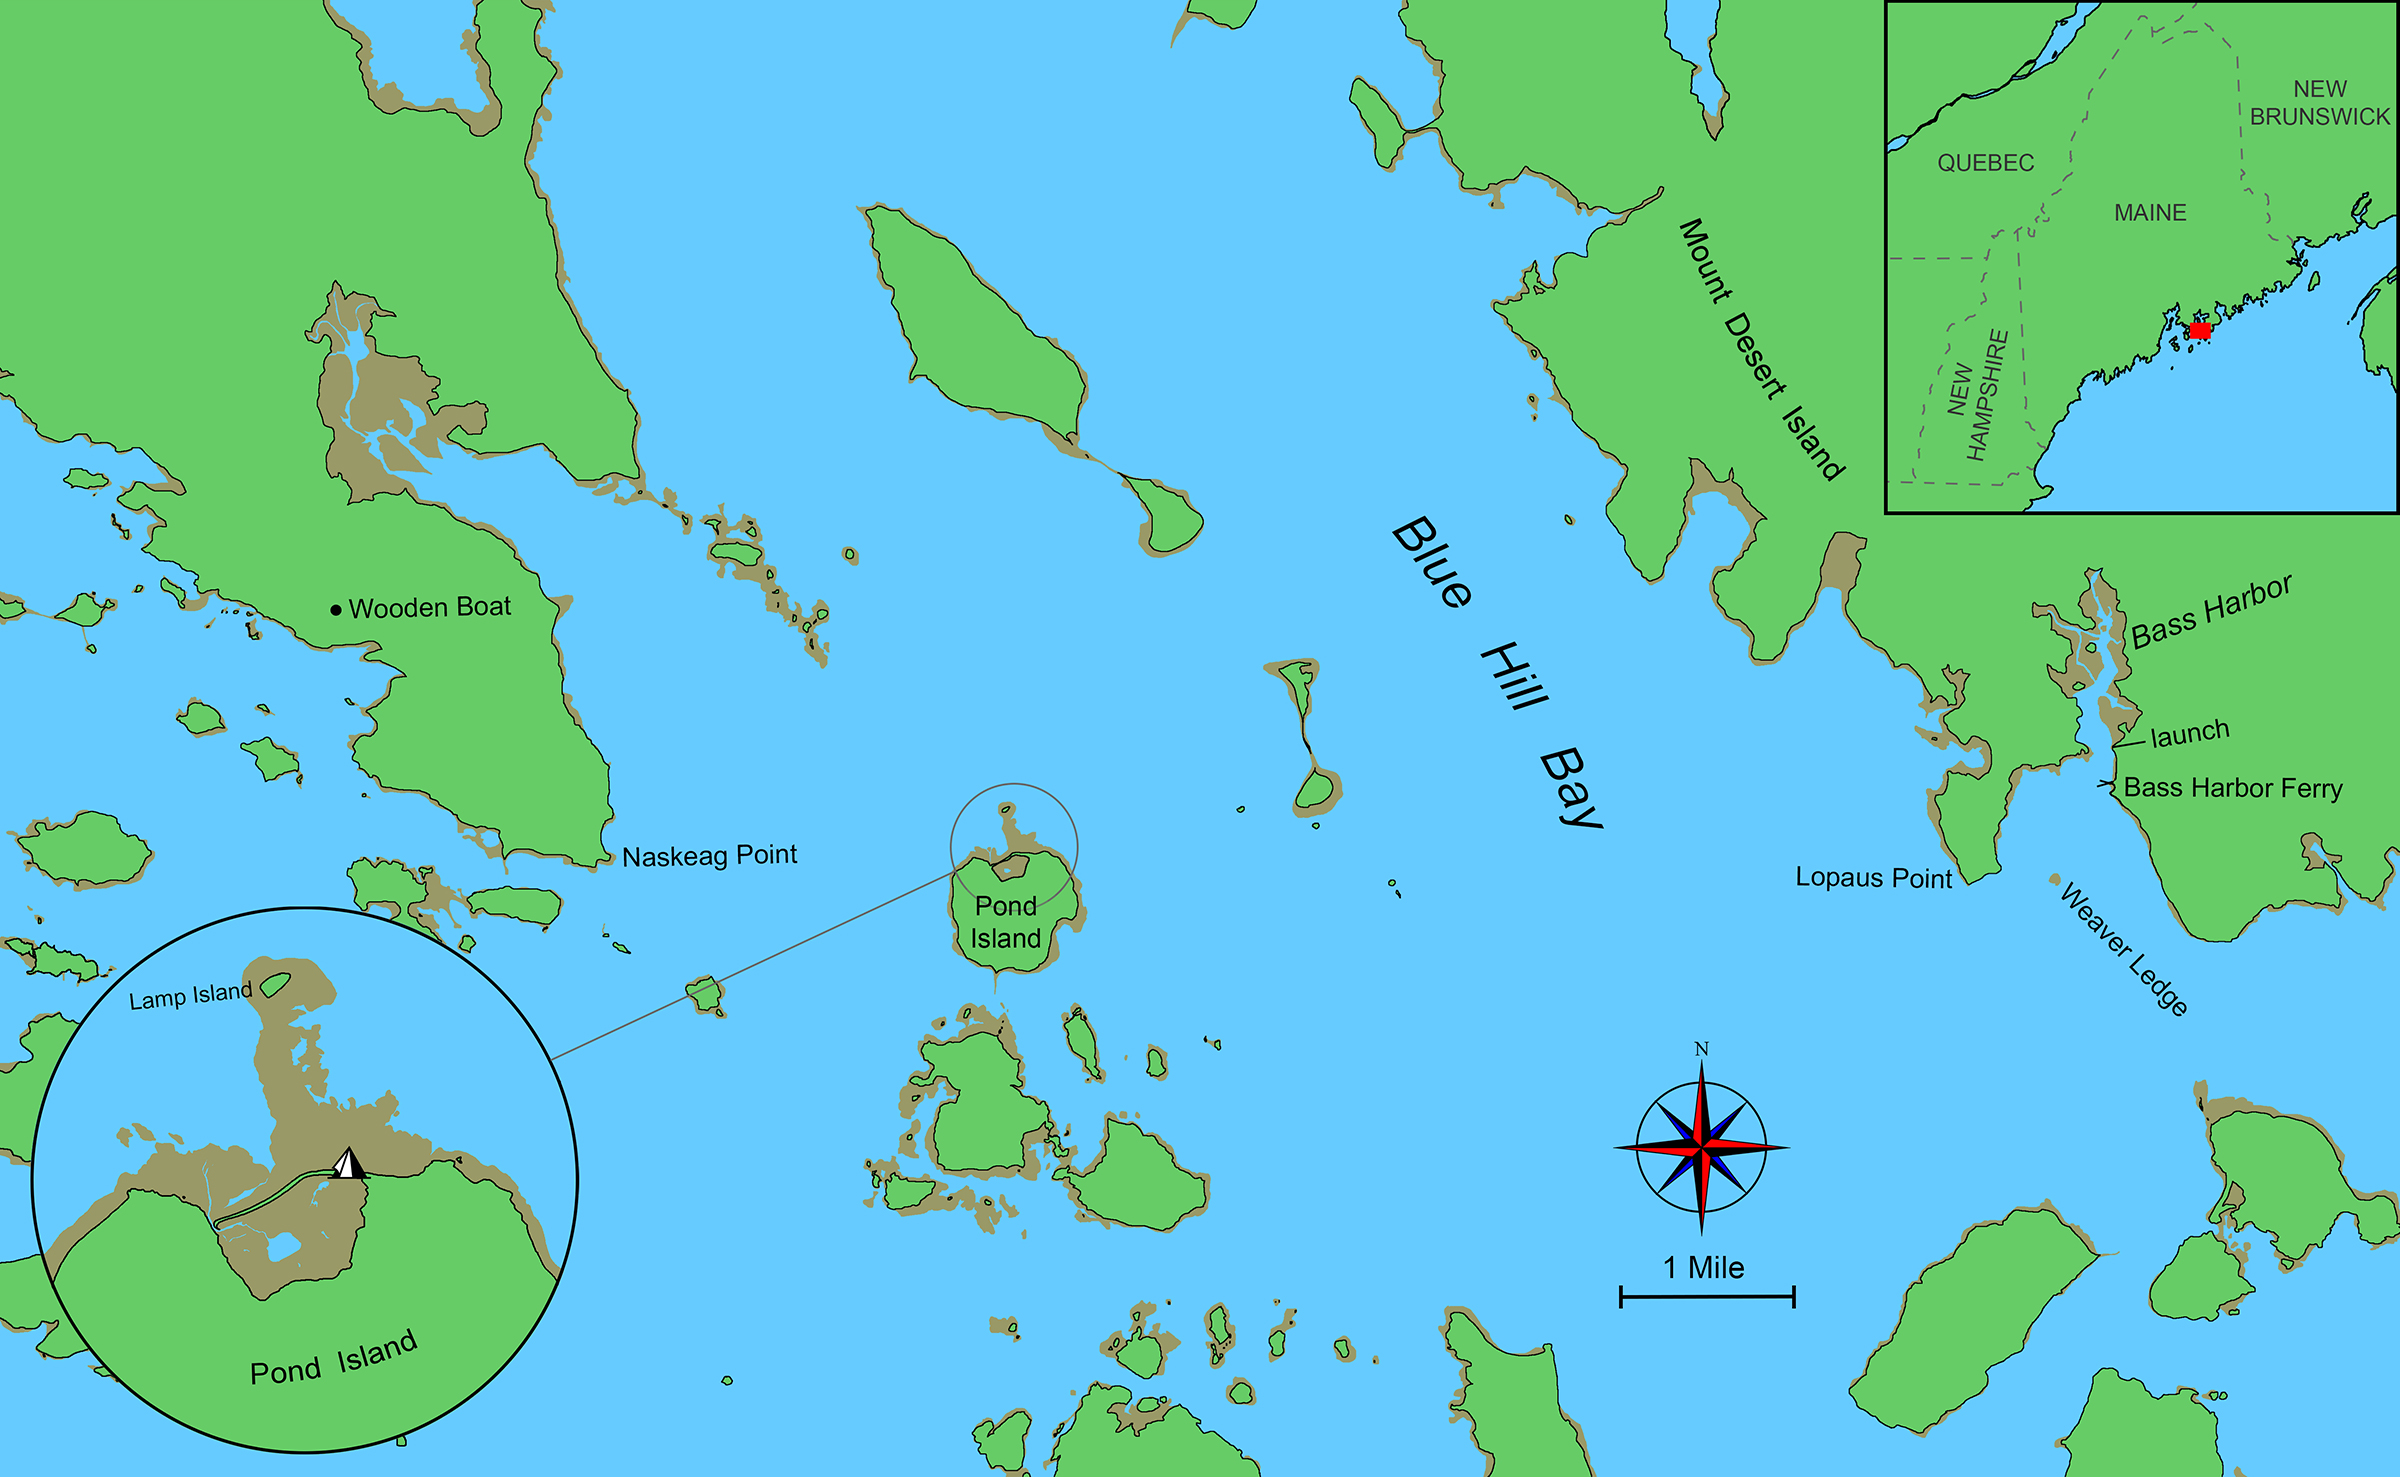
While I had never launched here before, I thought I had a firm grasp on the water’s hazards and the standard ferry route. Bass Harbor is a cove that runs north to south with Weaver Ledge at its entrance just west of center. I had assumed that the car-carrying ferry, which left from a pier a few hundred yards to the south of our launching point, would stay east of the ledge, keeping to the deeper waters. Under this assumption, and in the interest of minimizing mileage, we kept to the ledge’s western side.
Roger Siebert
.
With the ferry’s low hum nearly enveloped by the fog behind us I rowed ahead, confident in our course and that the ferry would pass well to our port side. Delaney, who had laid back and seemed to be enjoying the subtle rock and acceleration of each pull of the oars through the flat water, started to look around as if led by a hook in her ear. Hesitantly, she said: “I think we’re in the ferry’s path.” A half-minute later she repeated that, but now firmly. Though neither of us could see the ferry, the sound of the engines was rising to a crescendo, and I knew she must be right.
After a quick consultation of the chart, I turned hard to port and pulled for the ledge in the middle of the channel, using every bit of skill and muscle I possessed to propel us as fast as possible while listening to the ferry bearing down on us. Suddenly, the red buoy marking the west side of the ledge came out of the murk ahead, just as the ferry loomed from the fog 20 yards off our port beam. Suppressing a yelp, I made straight for the nun and we shot past it at hull speed as the ferry blew by, cutting a few yards from the marker on its way out the harbor. Quickly, I dug one oar in to spin us around, and we met its wake head-on, bouncing wildly and grinning like idiots.
Once the ferry had passed and our heart rates had settled to an acceptable level, we resumed our course and felt our way out around Lopaus Point, striking out westward into Blue Hill Bay. With the fog still closed in, muffling the sounds of the seagulls on the rocky shore until all was quiet, our world was soon contained in a circle of off-white nothingness, with only the occasional lobster buoy disturbing the scene.
We switched places, passing each other while stepping over coolers and dry bags filled with gear, and Delaney took over the oars while I reclined in the stern assuming a more managerial position. While she is an excellent sailor, having raced at a high level during college, this was only her second time rowing, so I got to enjoy the sight of a determined Delaney trying furiously to keep the oars in the oarlocks and our course a straight line. With laughter and a little not-so-helpful coaching as I pantomimed vague angles of oar blades and lever arms, we splashed our way west as the fog began to brighten around us.
After a half hour and about a mile of progress, we had just switched places again when I saw a pair of shiny dark heads bobbing in our wake. The seals stayed about five yards behind us as we plodded along at 2 or 3 knots, providing a welcome variation on the scenery for an hour or so.
By noon the fog had burned off over most of the bay, and the sun beat down on us without a breath of air to alleviate the heat. Stripped down to swimsuits, we rowed on impatiently and the 5 miles of bay between us and our destination seemed to stretch on indefinitely.
Pond Island is less than 3/4 mile across, is mostly tree-covered, and has a small tidal pond on the northern side that we planned to camp by. There is a 1/4-mile-long beach hiding this pond, and that spit of sand happens to be a popular picnic spot for locals, so I wasn’t particularly surprised when we rounded the corner and saw a white Boston Whaler pulled up on the beach with a flock of small children cavorting around it. The tide had carried us slightly south of the island on our passage over, so we turned north to get out of the current running parallel to the shore. We had been looking forward to jumping into the 50°F water to get away from the heat. Since we didn’t feel like socializing, we stopped rowing once we saw the beach was infested with youngsters and drifted slowly south with the ebbing tide, each of us sprawled on opposite ends of the boat too exhausted to be upright. Of course, this setback meant it was time to break out the beer and chips to help ease the pain of being cooked to medium-rare in the midday sun as small flies bit our ankles.
When the powerboat and its associated munchkins finally called it a day and vamoosed, we picked ourselves up and rowed over to the beach. The tide was almost fully out at this point, leaving about five yards of sandy beach above a hundred yards of rocky mud below, with scattered knee-high rocks sticking out at the perfect height to catch the propeller of a picnic-goer’s outboard at mid-tide. We grounded on the beach to the screech of plywood on rocks and dragged the loaded boat to the high-tide line. RIDDLE seemed to have grown much heavier while the biting flies stung like needles. Delaney and I made a frantic run to the water, with a comet’s tail of flies trailing behind us until we plunged into the water, the shocking cold of the emerald green a welcome relief.
After beaching on Pond Island, we took a quick break to take pictures and look around before the flies drove us into the water for a swim.
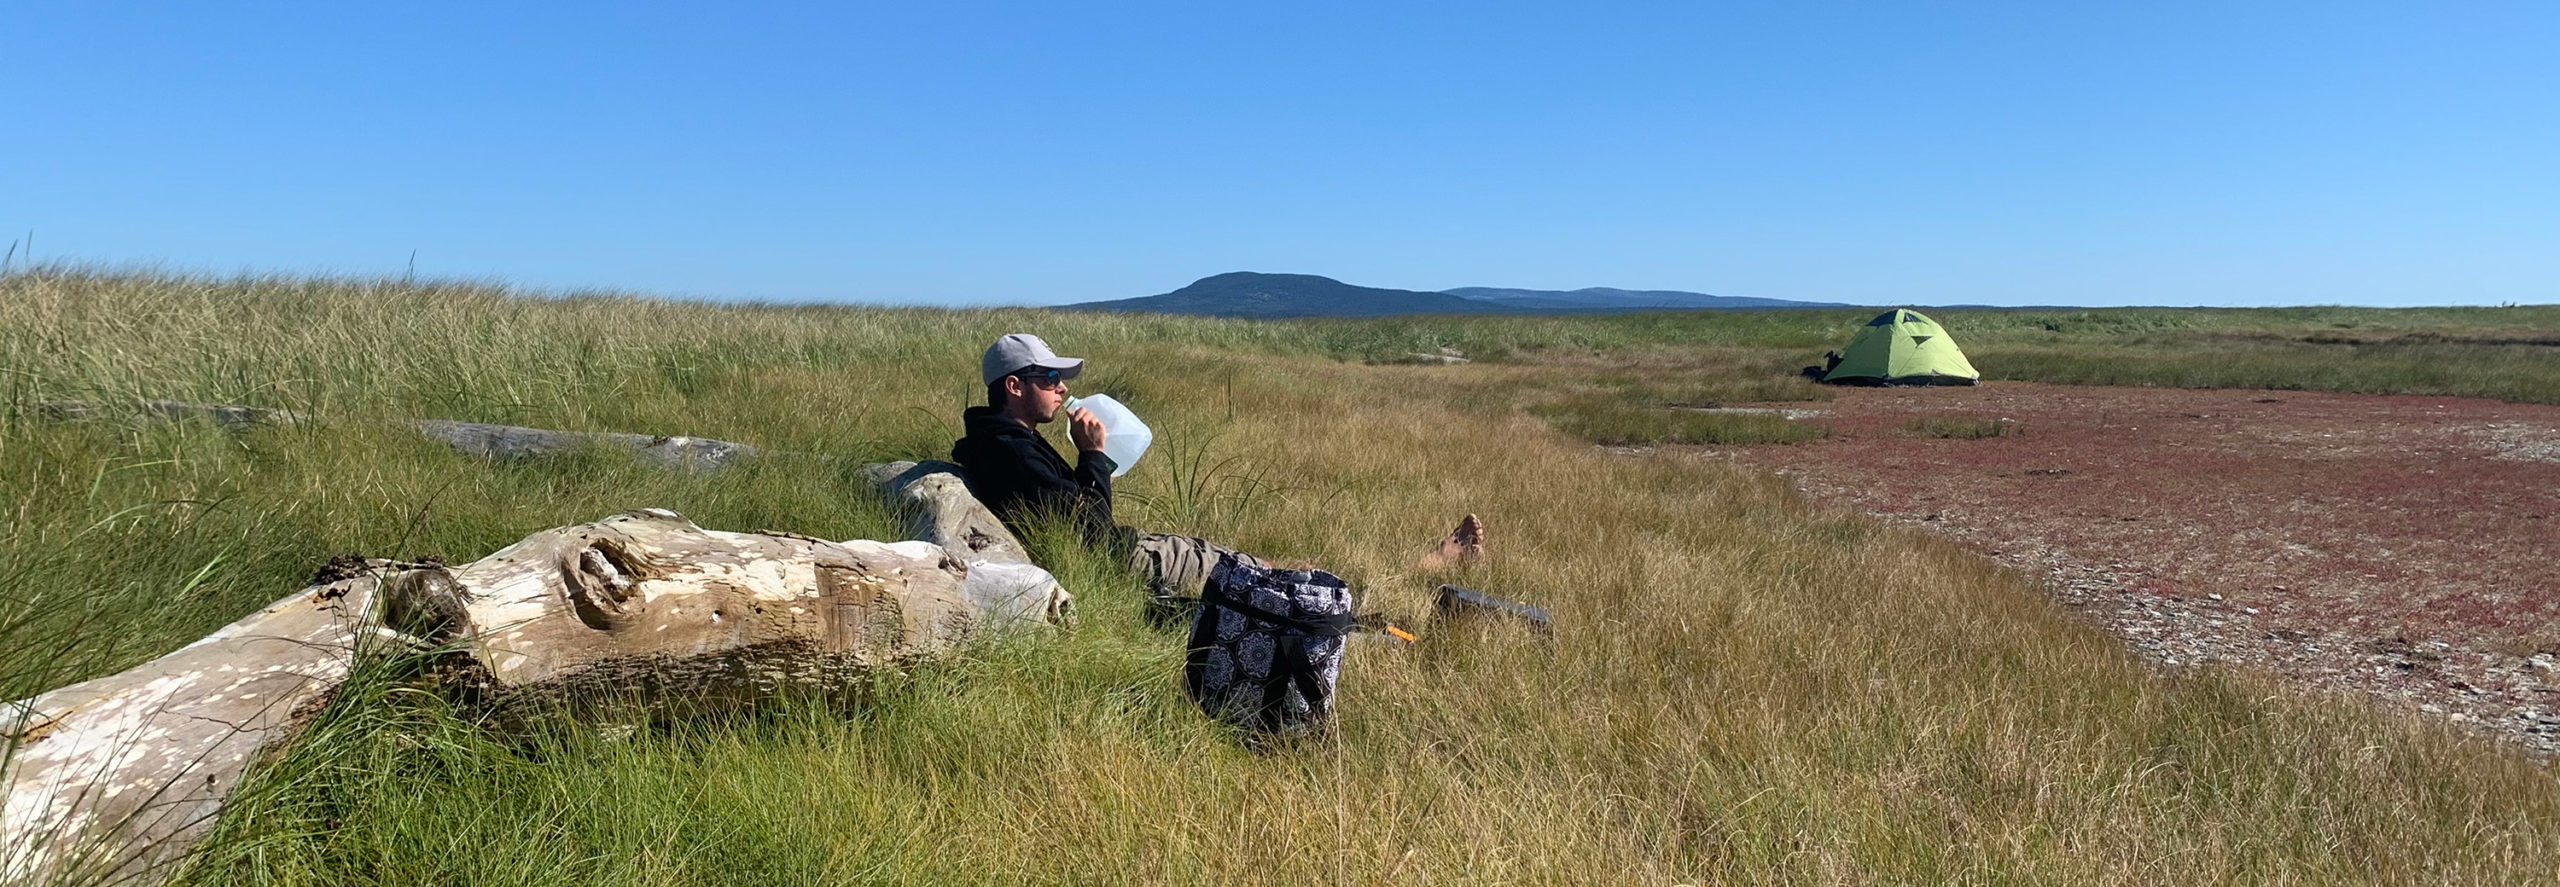
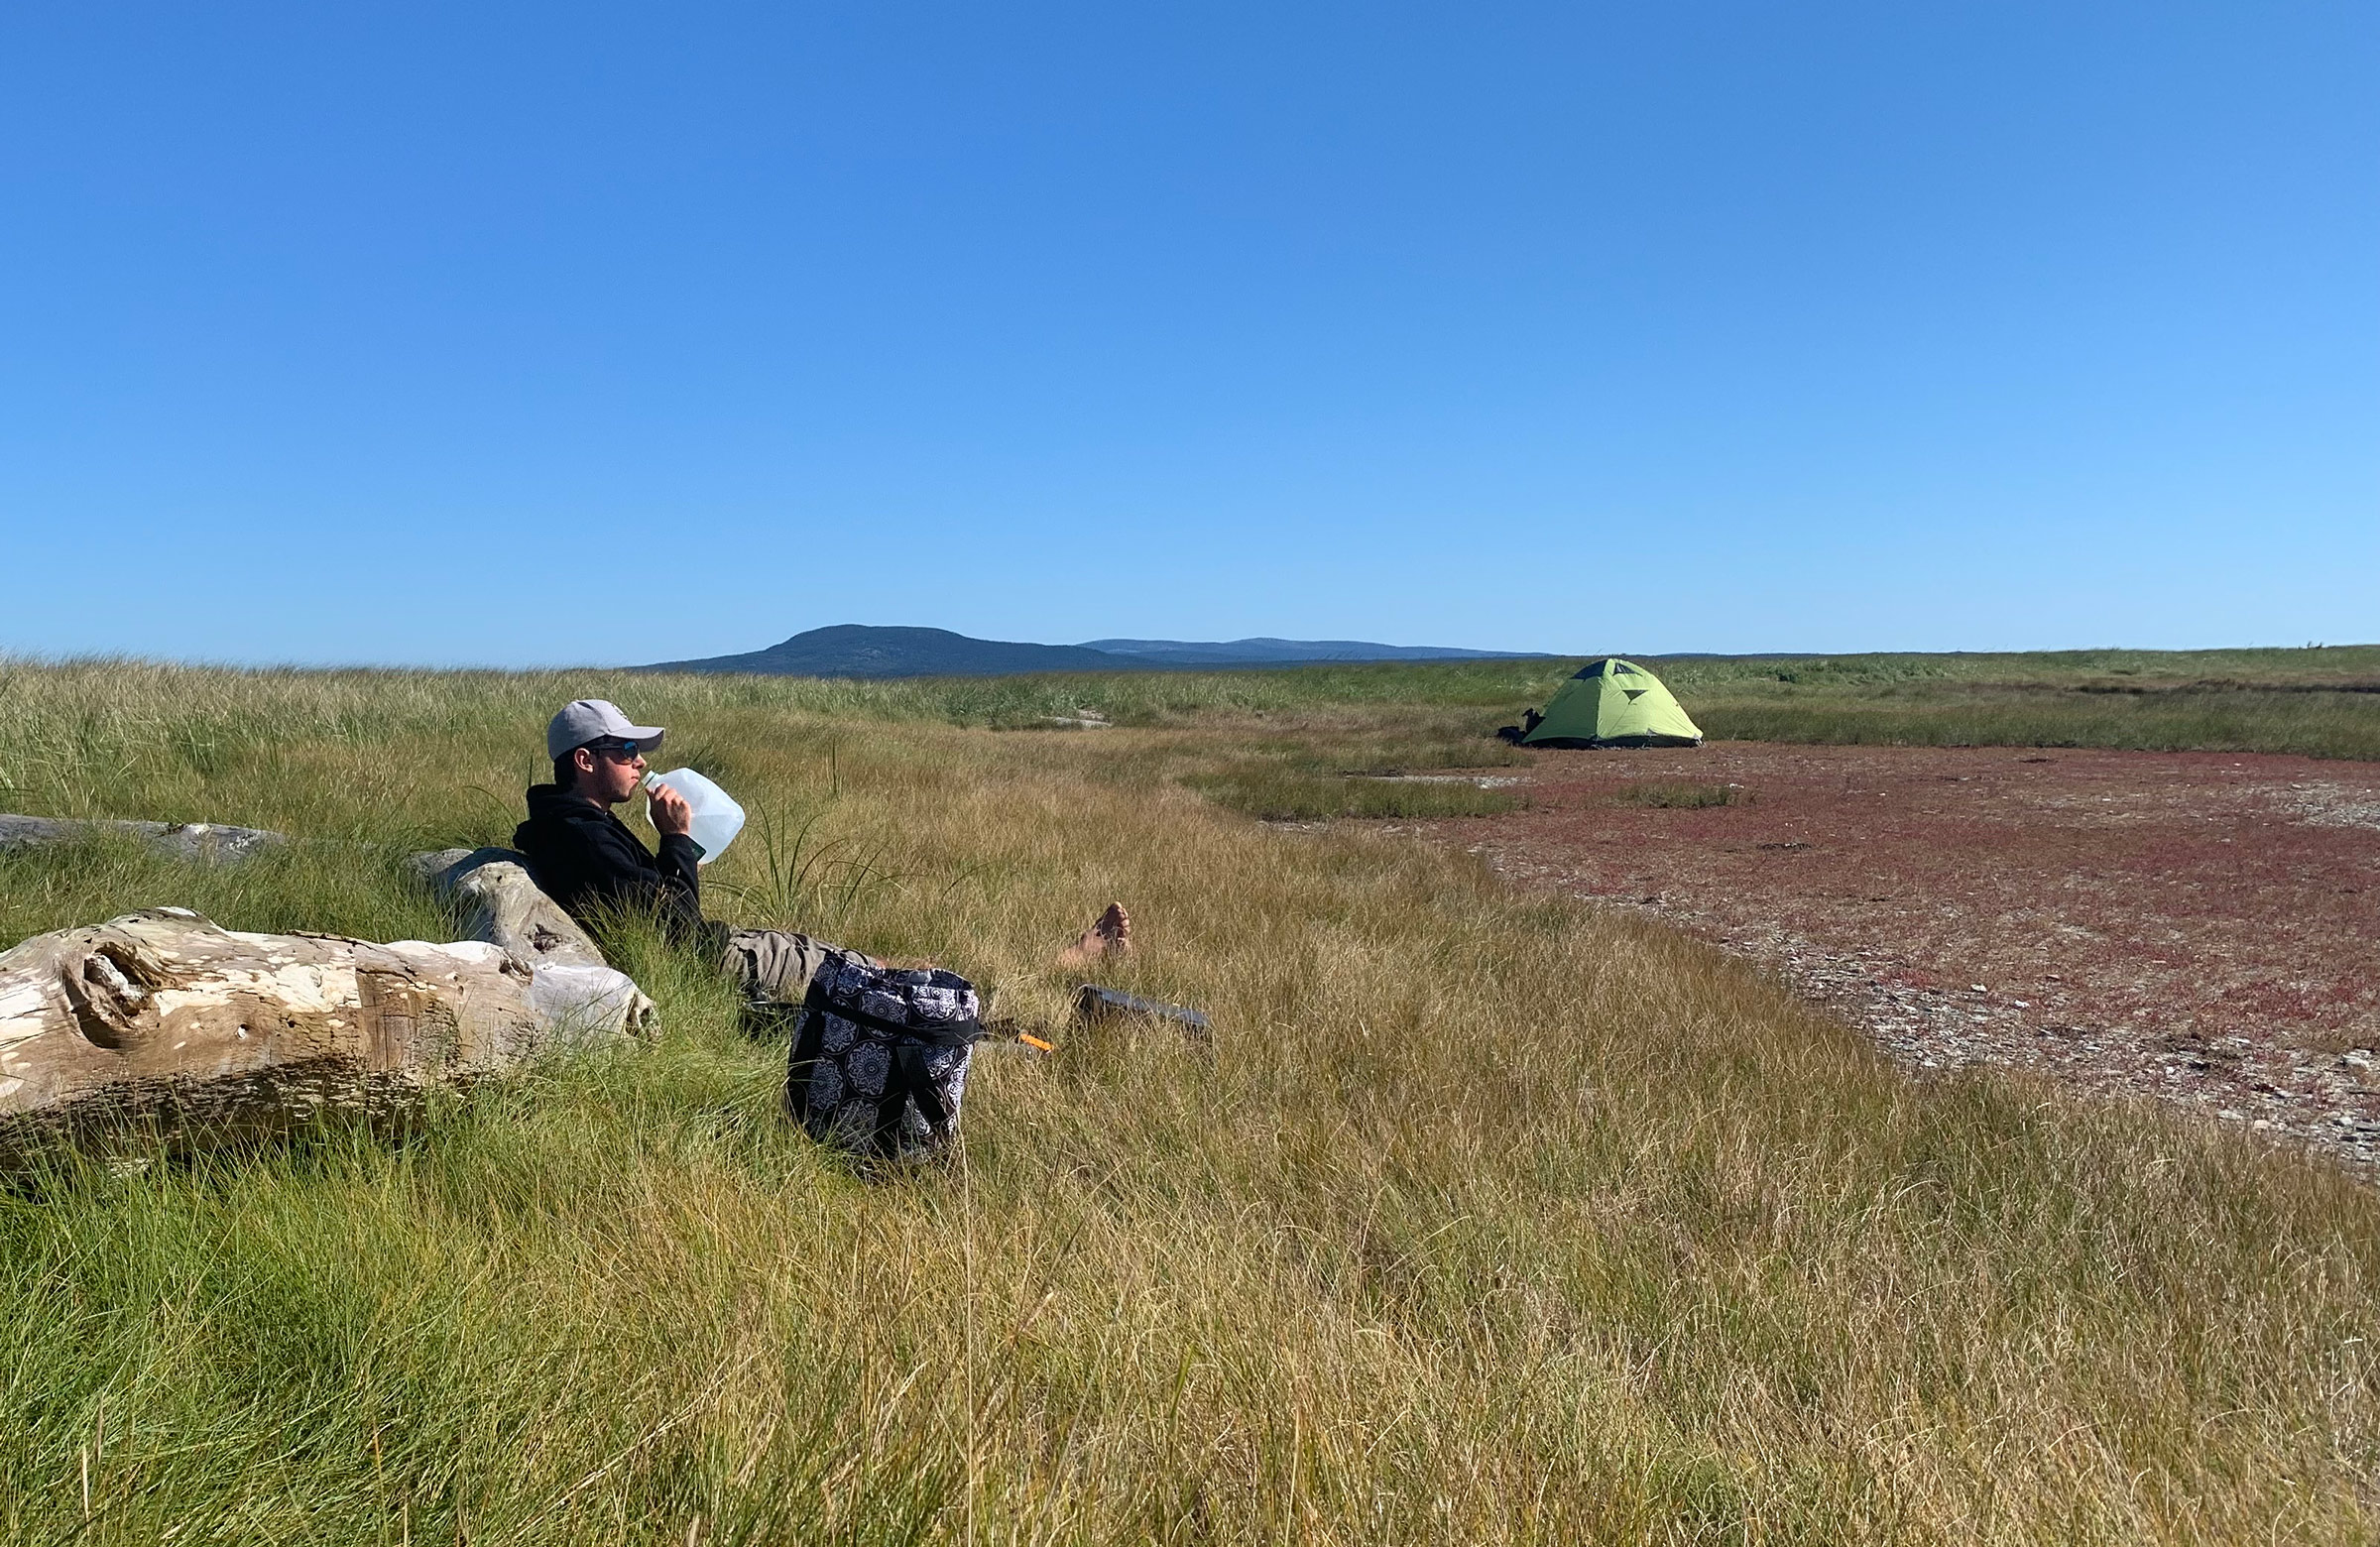
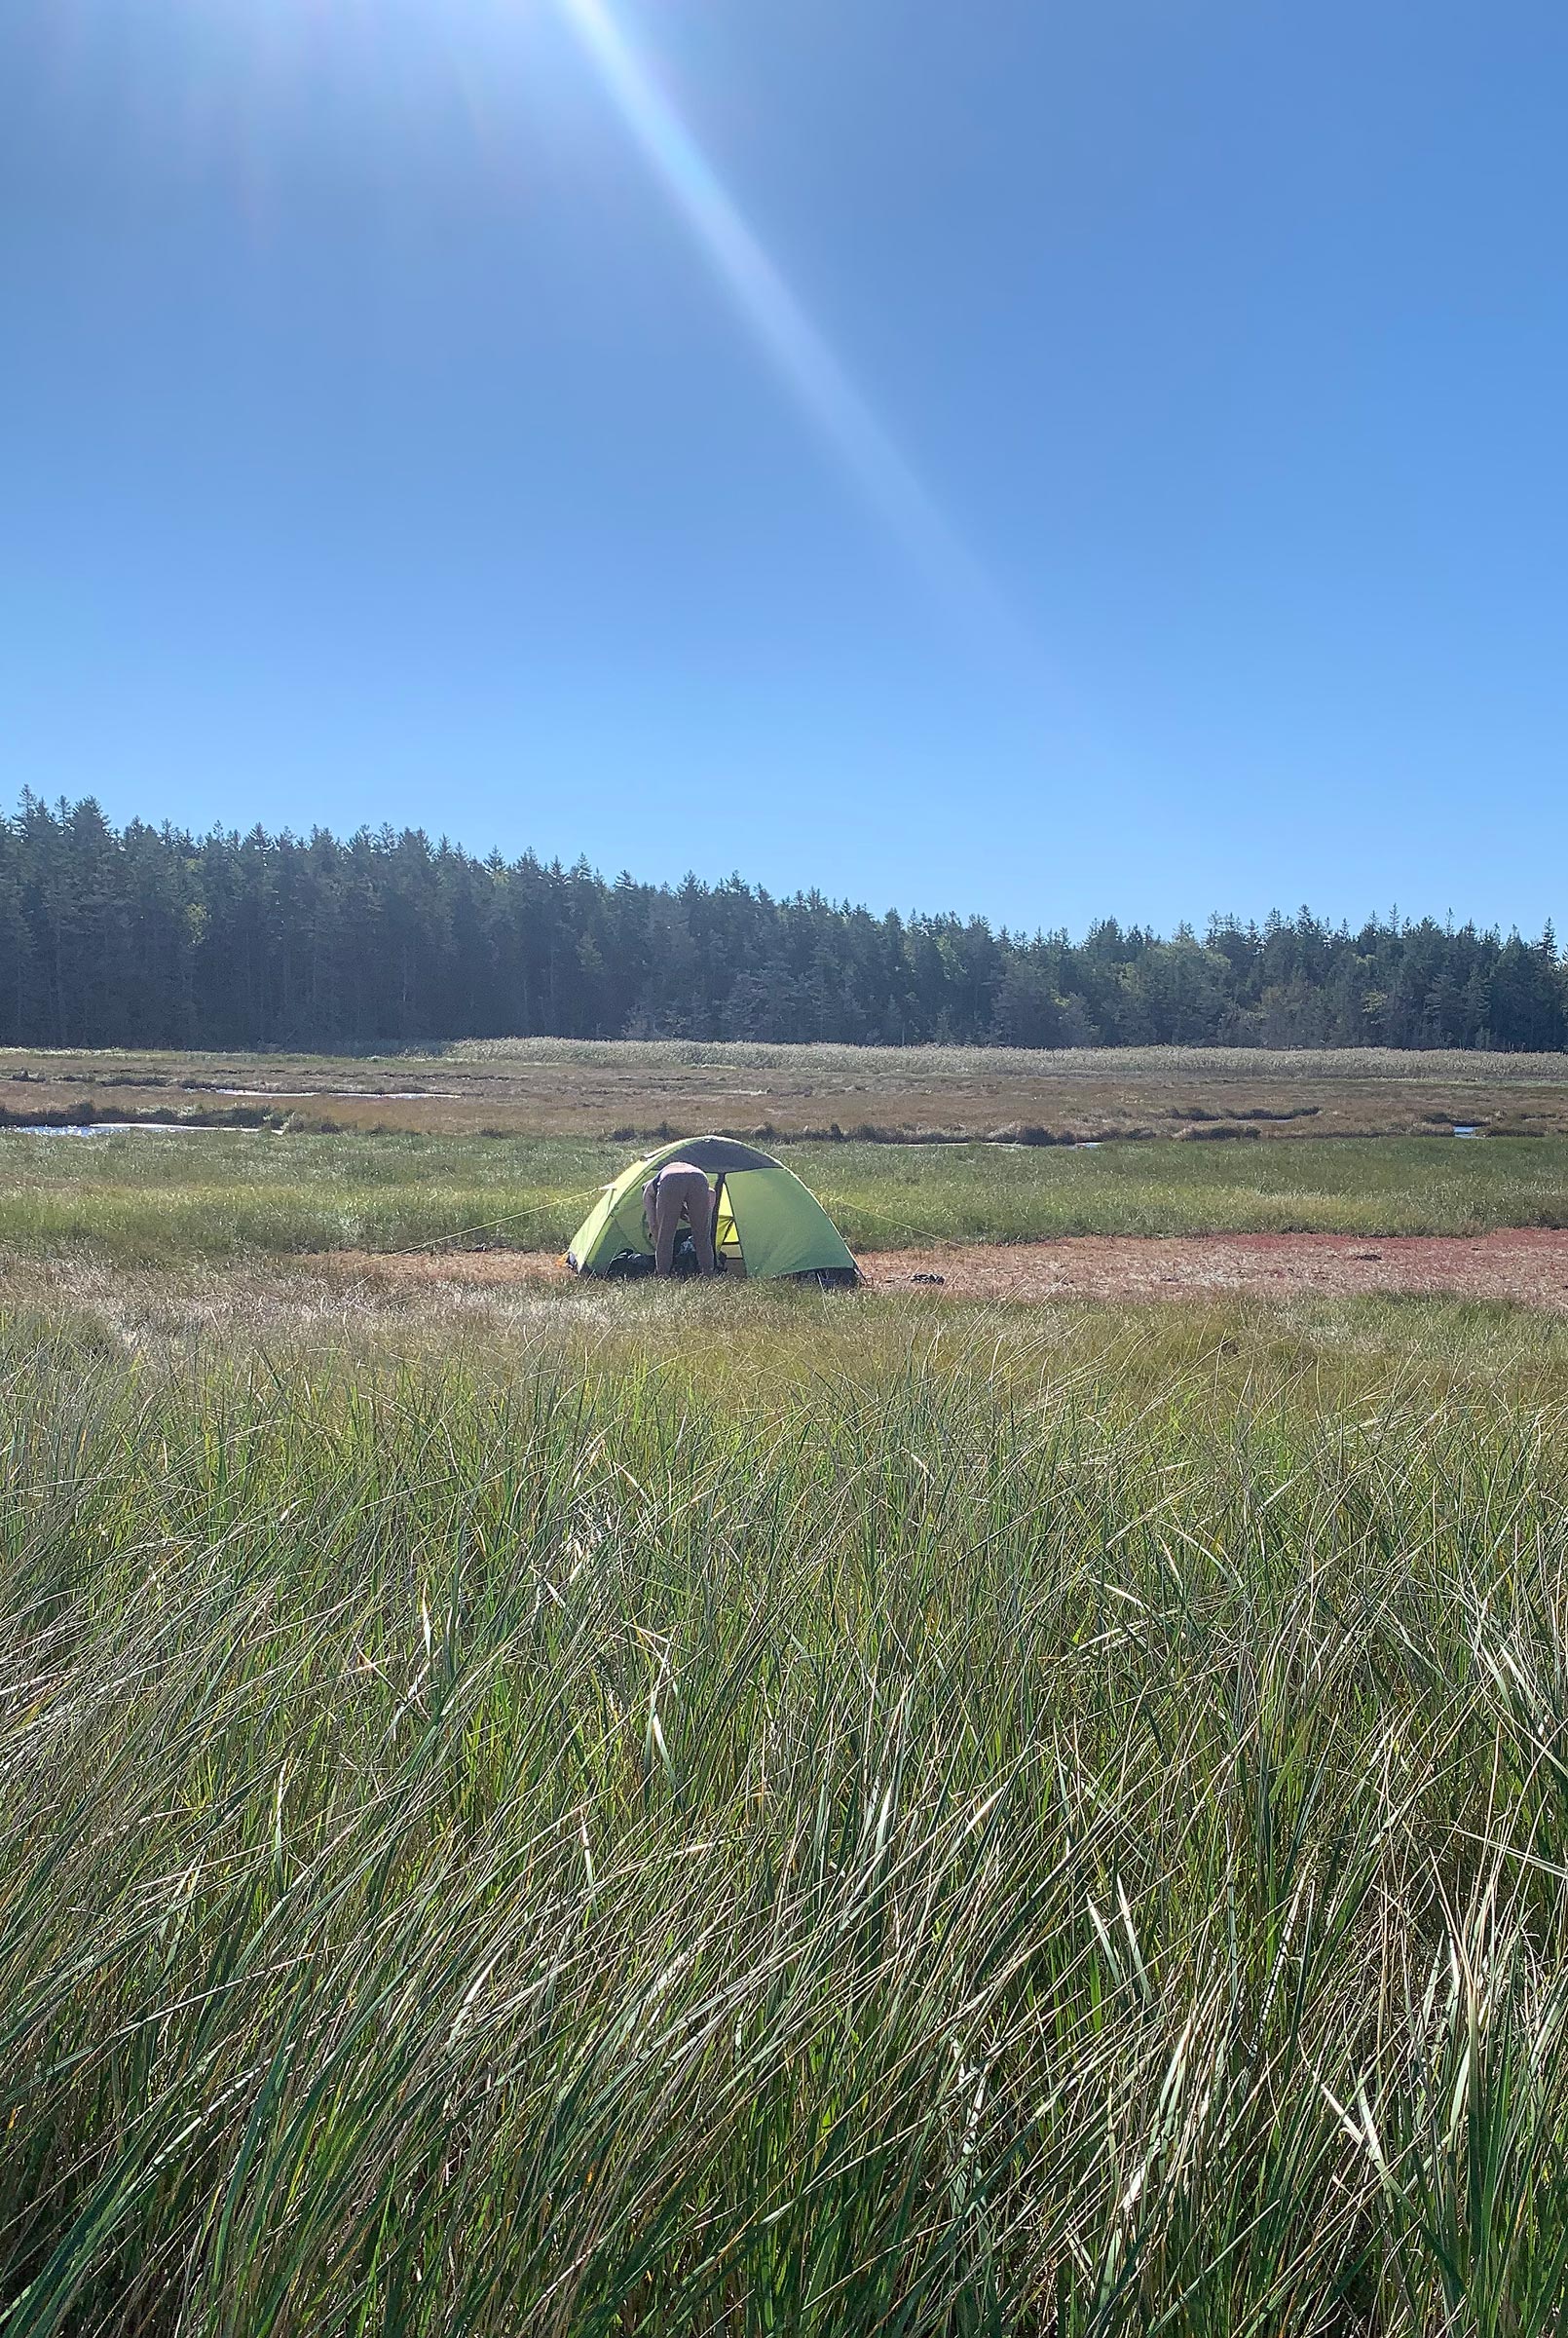
Once our feet were numb and the flies had subsided, we trekked back to the dinghy to unload and begin setting up camp. After about five minutes of searching, and stretching ourselves out to judge the ground’s levelness, we found a tent-sized flat spot in the knee-high grass above the beach and decided this was just the place to make camp for the night. It was shielded from wind to the north by an embankment at the top of the beach, and the ground was covered with rounded, sea-tumbled rocks and shells interspersed among them. We set up the tent, pleased with the views of Acadia Mountain to the northeast and Blue Hill Mountain to the northwest. The grass on the embankment hid the ocean, so it looked like we were in a field that stretched for miles.
By now it was only around two in the afternoon, and the sea breeze had finally started to fill in from the southeast. I grinned at Delaney, “Should we go for a sail? Maybe we could make it to Brooklin and surprise everyone.” She grinned back, “Of course!” So, we dragged RIDDLE back down the beach, although the haul wasn’t quite as far this time; the tide had just turned and water was creeping up the beach steadily.
I unrolled the sail, a standing-lug arrangement that fits inside the boat when stowed, and rigged the boat while still on the beach. Then, after a quick shove from shore, we began sailing north with the wind behind us blowing away from the island. Since the water just offshore was too shallow for the rudder, I had an oar over the stern for steering. With the daggerboard partially down, we scudded out past the last line of rocks and into deeper water. I pulled the oar back into the boat, letting RIDDLE luff up to head into wind while I set the rudder.
It was about 4 miles to Brooklin where Delaney is an editor for WoodenBoat magazine and I was on staff at WoodenBoat School, and we were hoping to blow in and surprise everyone that we had made it all that way in the fog. We settled onto a beam reach heading west, with Delaney wedged in forward by the mast looking very pretzel-like in the barely human-sized space while I sailed. I tried to concentrate on the sail and wind, doing my best not to stare at the beautiful girl lounging up forward. I can’t say I was particularly successful. Low, cotton-ball clouds built up over the mainland, the fog stayed in a solid bank to the south, and the breeze wavered at an inconsistent 4 knots as we worked our way west.
By the time we made it to Naskeag Point, the closest land on the western side of Blue Hill Bay, it was clear the breeze was dying quickly. We admitted defeat—our blistered hands had had enough rowing—and went to tack around to head back to Pond Island. RIDDLE came head-to-wind in the light breeze, but then faltered and fell back onto the port tack as we were barely making steerage way. Trying again, I pumped the rudder a few times to get the bow through the wind and we made a slow, languishing tack to port back toward camp. We made it back to the beach as the sun began to sink close to the horizon, and we hurriedly dragged the dinghy past the high-tide line and scrambled to find firewood. Delaney had brought a vegan pineapple curry she’d made for us to heat up for dinner. As a fervent meat eater, I was rather skeptical of a vegan meal, but, regardless of my food inclinations, we needed to hurry up and build the fire before the sun set. Delaney amassed a pile of driftwood while I made shavings from what looked like a promisingly dry piece of cedar and lit the fire; white smoke from the damp wood settled over the water like fine gauze.
The flames built up to chest height and sparks shot skyward like miniature rockets on an unstable trajectory. As the sun turned the western sky blood orange, we let the fire burn down to a bed of coals. We dug through the cooler, bypassing the breakfast food to get to the curry. I’d brought a wok from the boathouse at WoodenBoat, and once the flames subsided, I put it on the side of the fire with the exceedingly healthy-looking curry settled down at the bottom of it. After a few minutes, the curry was bubbling promisingly, and it smelled delicious, even to a diehard meat eater like me.
With the sun gone and the stars out, the driftwood fire burned steadily as it was fanned by the onshore breeze.
We had just dug into dinner with the ravenous hunger of a pair of young adventurers who had received too much sun for one day, when Delaney’s grandmother called. Since no amount of hunger should ever get in the way of talking with a worried grandparent, dinner was postponed until Delaney could assure her grandmother that we were indeed still alive and weren’t endangering ourselves too severely. After the phone call, we settled down for a few hours of storytelling and breeze-shooting as the wind began to build from the north and the tide crept up to lap quietly at the edge of our fire. With the sun long gone and the breeze blowing directly onto the beach with the urgent feel of a cold front, we snuggled by the fire in a Navajo blanket to keep the cold at bay.
Around midnight we ran out of firewood, so we decided to call it a night before we fell asleep on the beach with the sand fleas. We doused the fire and scuttled through the waist-high dune grass to the safety of the tent, our laughter carried ahead of us by the building wind.
The morning dawned cool and crisp, the kind of late-summer day that reminds you fall is coming. After languishing in the tent for about an hour, unwilling to leave the warmth of the sleeping bags, we crawled out of the tent around 10 to a stiff north wind flattening the coarse grass around the tent. Making my way to the site of the fire from the night before, I could still smell the smoke on my clothes and feel on my skin the grit of the sand still stuck there from the evening. I tracked down the single-burner propane stove and set it up on a driftwood tree trunk lying shielded from the wind behind the bank of the beach.
Acadia Mountain made our tent look tiny as we hid from the wind amid the grass.
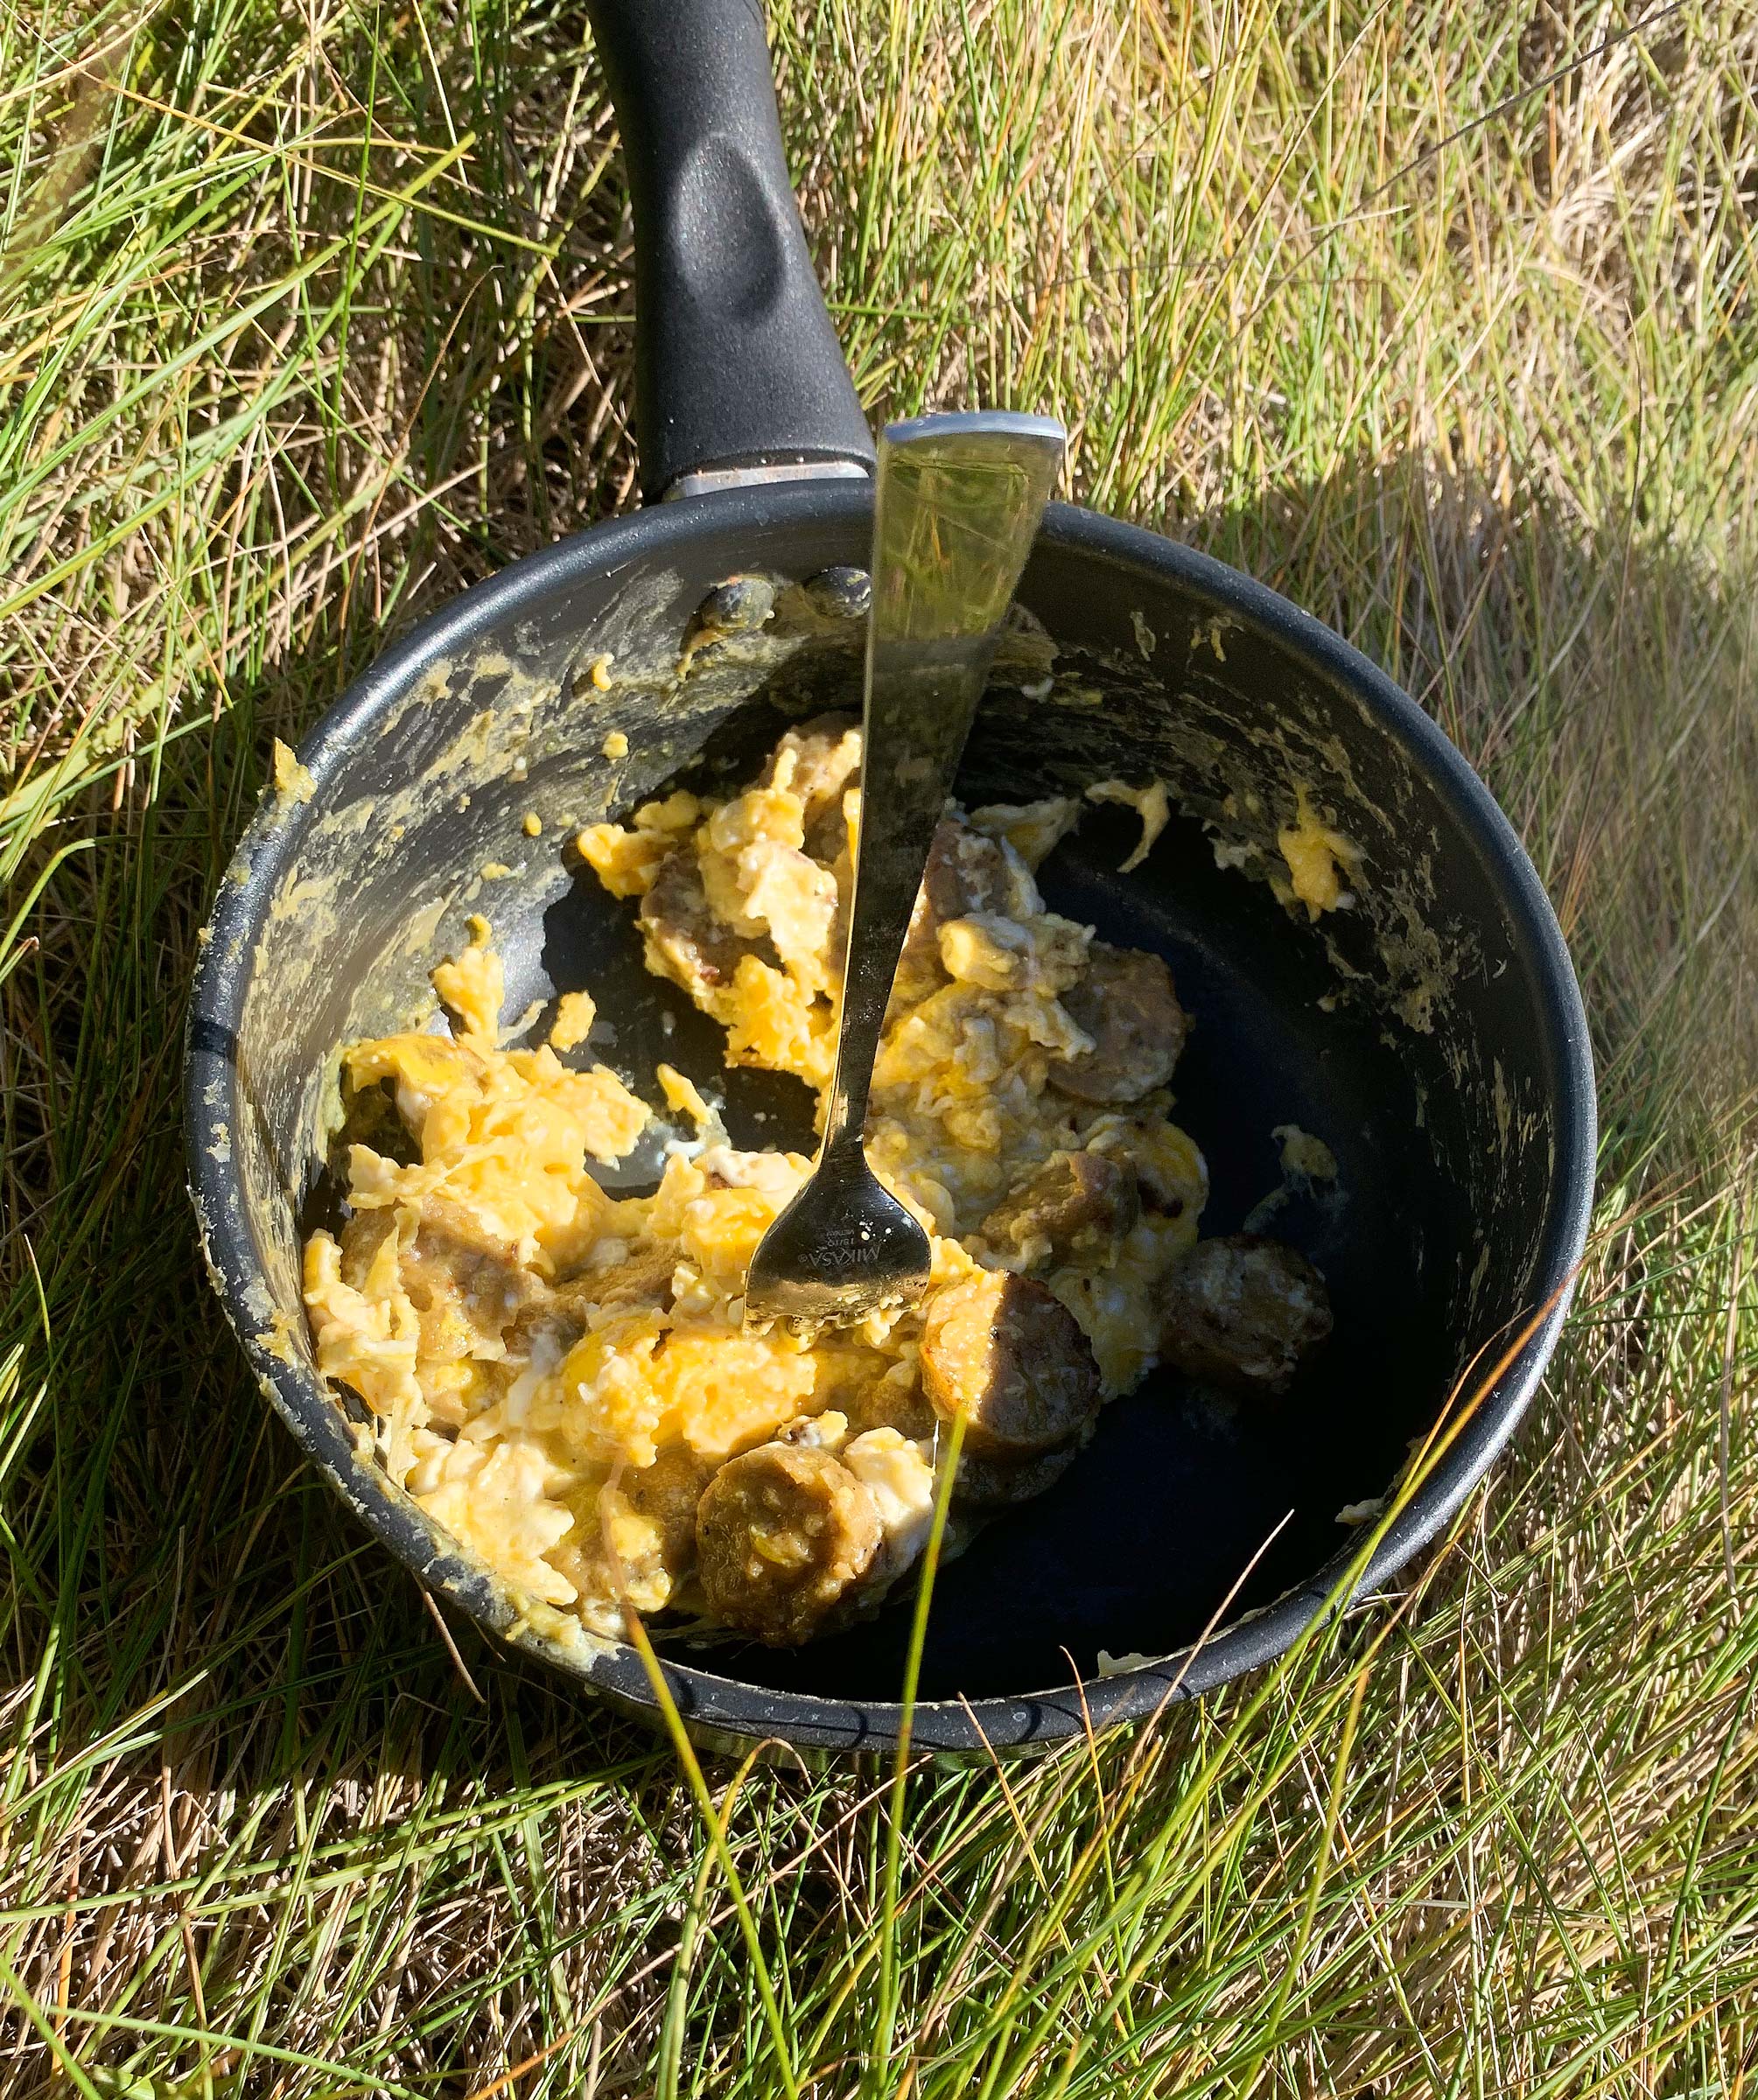
We propped ourselves against the log and Delaney made us a breakfast of eggs and vegan sausage, which I had to admit was almost indistinguishable from the meat it was trying to impersonate. Sitting in the grass with the log pressing comfortably against my back, I stared at the salt pond 100 yards away. “Do you think we could get the boat in there?” I asked.
Waking up to bluebird skies and a crisp breeze, Delaney packed up the sleeping bags from the tent while I stalked off to the cooler bag to rustle up coffee and unpack what we were going to have for breakfast.
We ate an oxymoronic breakfast of eggs and vegan sausage. It proved to be an easy meal that paired well with instant coffee and pleased both the vegetarian and carnivore.
“We could row up the creek that feeds the pond,” she suggested, reading my mind and already packing up breakfast and moving toward the dinghy.
We launched RIDDLE into a steep, short chop crashing onto the sand. The spray salted my lips as we launched and sent shivers down my spine while I rowed us 20′ off the beach. Turning to port, we paralleled the shore, the beam sea trying to slide me across the thwart until we came to a cut in the sandbank with the creek that fed the pond. It was just wide enough for the oars to clear. We shot in with a following sea, and I pulled aggressively to keep us from getting thrown sideways by the breaking waves. Passing through the head-high cut in the bank, we were suddenly in the calm waters of the creek. The passage had gotten considerably narrower and soon there was not enough room for the oars. Seeing the perfect opportunity to impress Delaney, I asked her to switch places with me, then threw an oar over the stern to begin sculling us along. “Wait, let me try that!” she exclaimed.
If rowing had been hard to explain, it soon became clear that sculling was even more difficult. But Delaney was a quick study and was soon wiggling her wrist in just the right way to move us along, cursing colorfully every time the oar jumped out of the sculling notch in the transom. There is an advantage to learning to scull in a strip of water 5′ wide: the close banks let the boat pinball off them, so keeping a straight course isn’t much of a concern. However, the creek was made up of many short, 20′-long straight sections followed by 90-degree turns as it worked its way back to the pond, so just as Delaney got us up to speed, RIDDLE would ram into the bank and ride up onto the grass.
When not fending the boat’s bow off the bank, I “explained” sculling by flopping my hand like a fish. When not popping out of the sculling notch, Delaney laughed at my pantomime inevitably forcing me to fend off the bow again.
After a few such collisions, the stream became even narrower, and the dinghy was soon wedged between the grassy banks. As I stepped easily over the side and onto the grass, RIDDLE didn’t budge. The pond was only 20′ away, so once Delaney had piled out, I grabbed the breasthook and dragged RIDDLE the remaining distance over land, the skeg hissing as it cut through the grass. Once in the water, I triumphantly jumped into the dinghy and rowed the circumference of the 8/10-acre pond as the oar blades dragged on the shallow bottom. The pond wasn’t as spectacular as I had hoped and only about 5″ deep with shallows that persistently grabbed at the skeg of RIDDLE in an annoying way. After I’d made a lap, Delaney and I dragged the dinghy straight back to camp over the grass.
After successfully carrying RIDDLE the last 20′ and splashing down into the pond, it was time for a victory lap.
Turning back toward camp, I poled the first few feet with an oar before Delaney and I pulled the boat out of the diminishing creek and dragged it over the grass berm to get back to the beach.
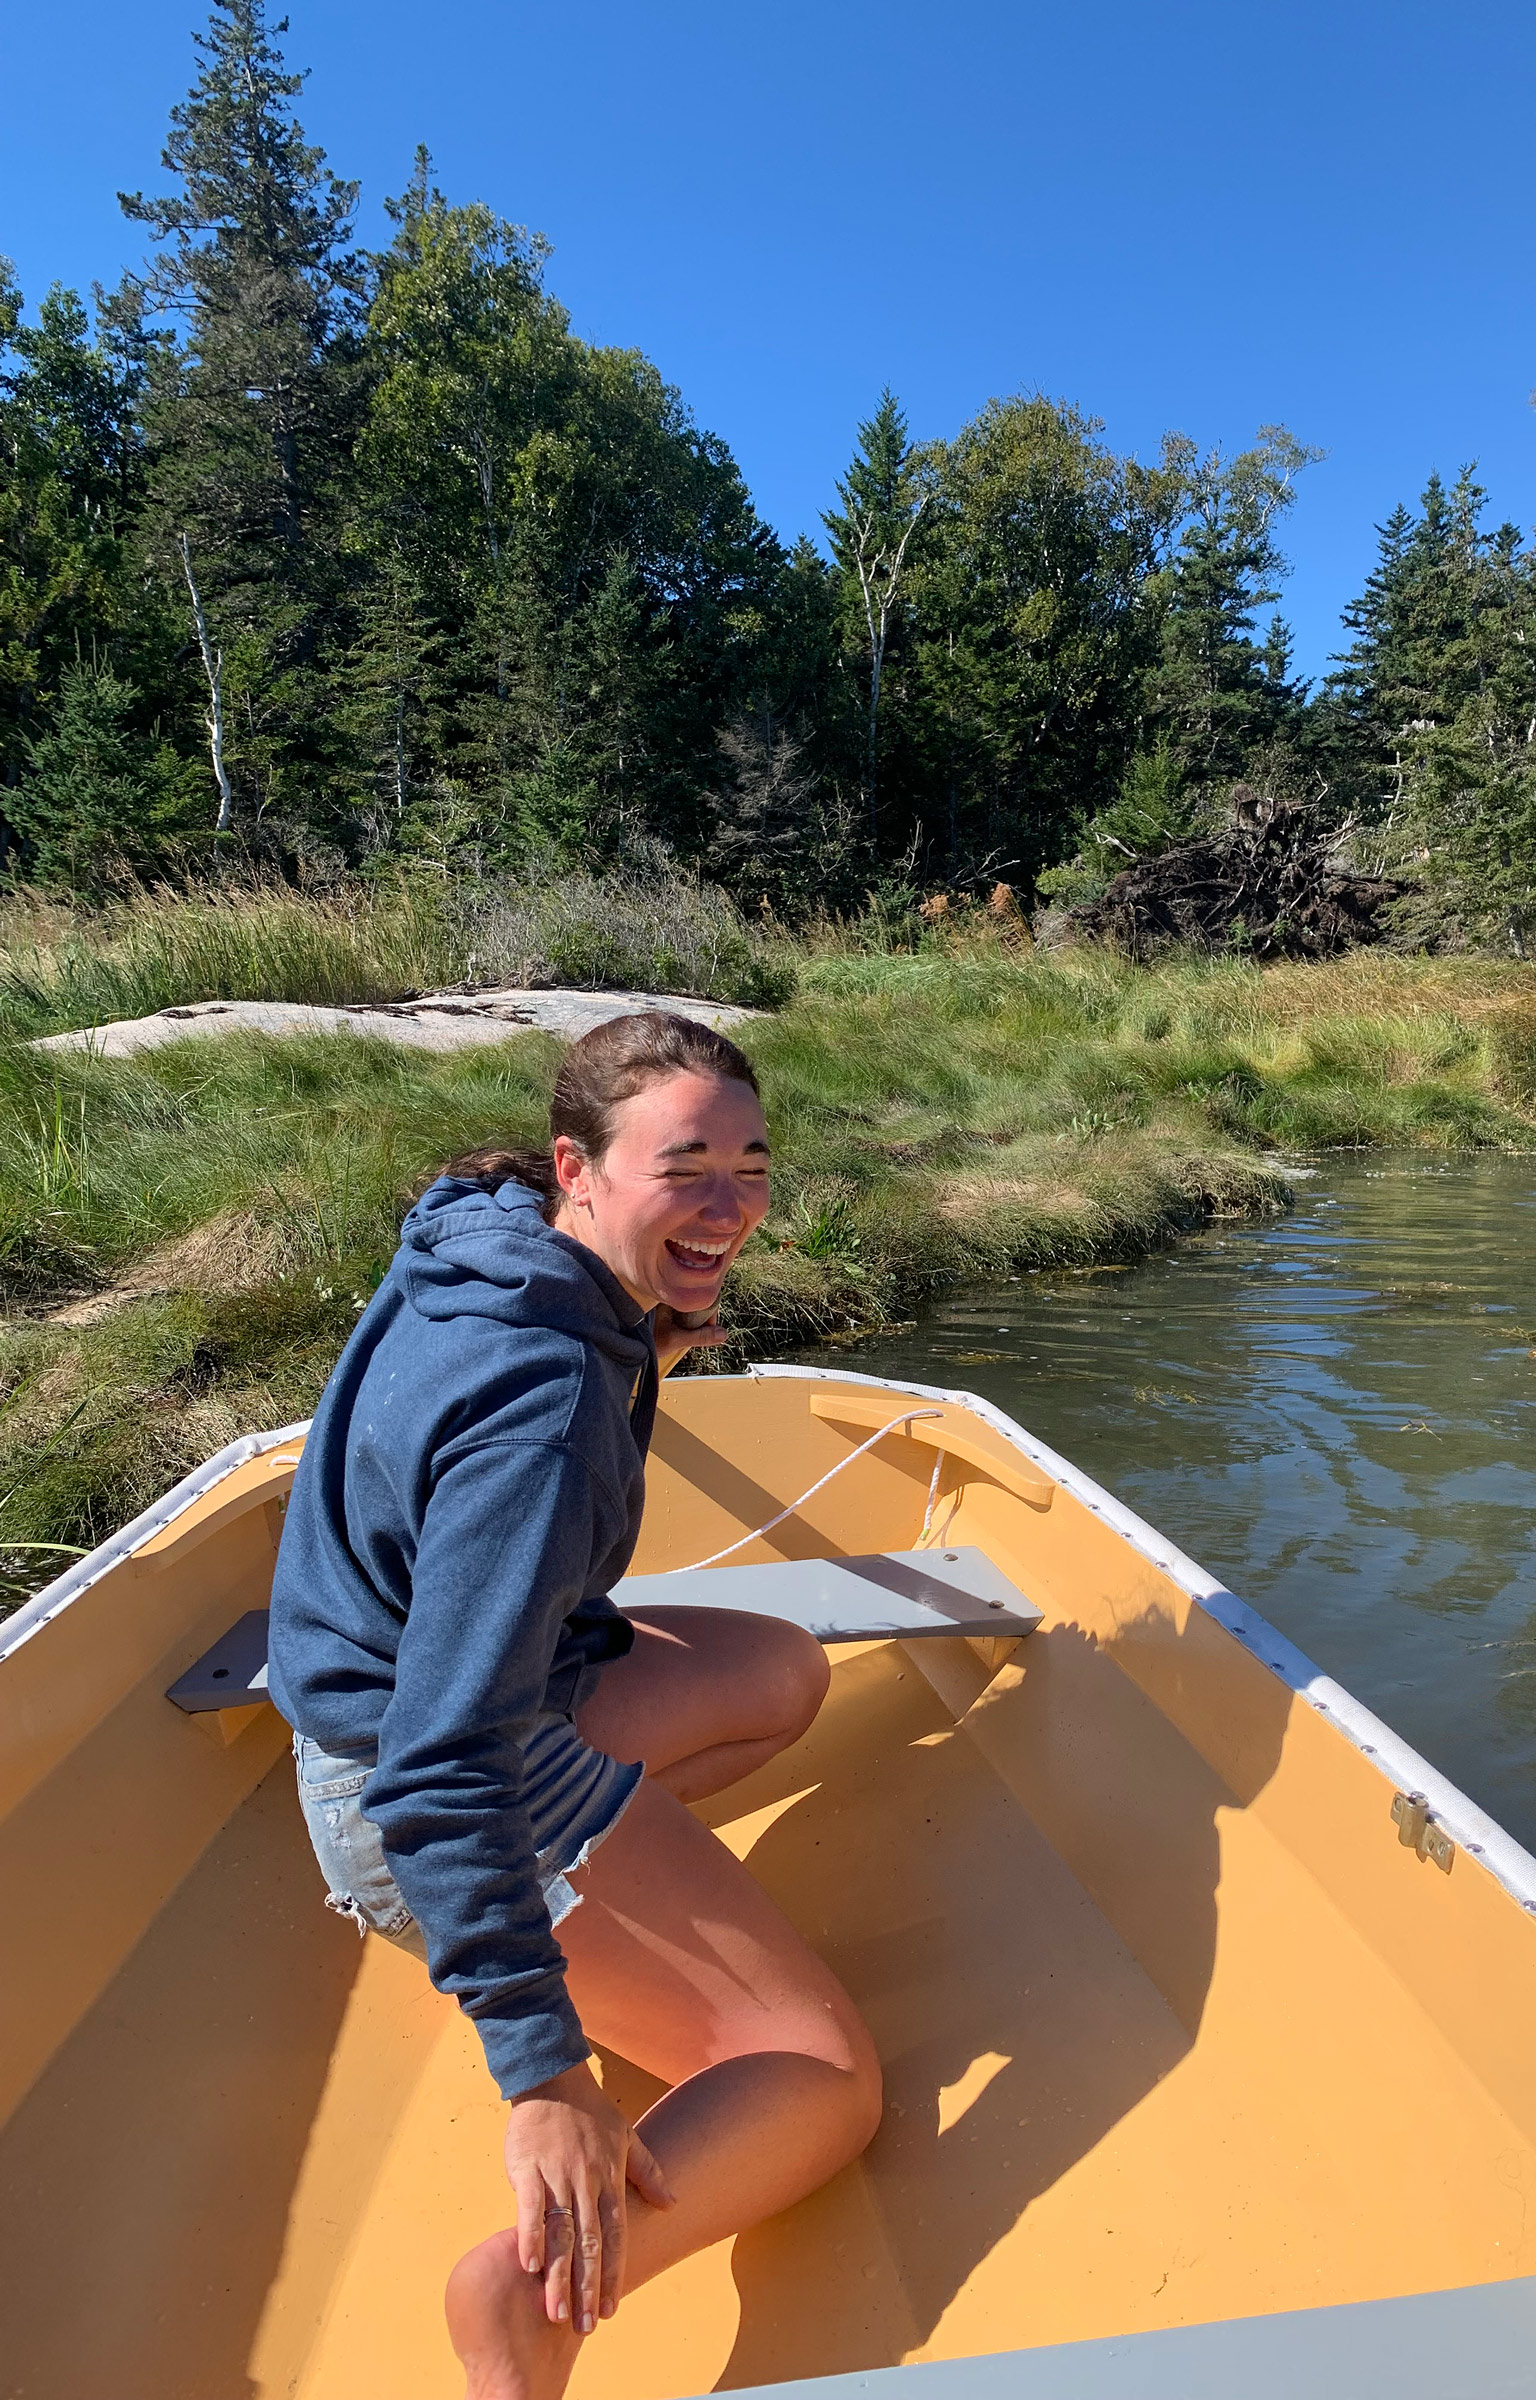
By now it was about 11:30, so we decided to make one last excursion before heading back to Bass Harbor. Lamp Island, a hillock only 50 yards long and a third as wide, lay ¼ mile north of Pond Island’s beach. I have a penchant for high places, and this tiny islet seemed to be the tallest rock in the immediate vicinity, so we dragged RIDDLE down to the water yet again, leaving a trail of blue bottom paint on the golf-ball-sized rocks. Delaney jumped into the front before I could get there and told me she would do the rowing. We went bashing directly to windward, spray soaking our sweatshirts while whitecaps rolled past as we crawled toward Lamp Island. Making landfall on the lee side, I ran up to the sandy bank and climbed to the top. I pulled myself over the edge, but instead of the soft grass I had anticipated, the top was covered in exceedingly prickly bushes, and I was bleeding by the time I managed to stand up. Delaney laughed at my cursing as I made my descent but when I reached her, she consoled me with a kiss.
Delaney was reminded that rowing is actually pretty hard, and she popped out of the oarlocks a few times in the choppy conditions. However, we didn’t take any green water onboard and eventually made it to Lamp Island.
After relaxing on a half-tide rock on the north side of the island as the breeze kept the noonday heat at bay, we jumped back in the dinghy. The breeze was blowing an exhilarating 15 knots, more than enough to be downright sporty in our Shellback, and with the wind at our backs we flew back to Pond in about three minutes flat. Packing up camp, we threw gear loosely in RIDDLE in our excitement to go sailing. With Delaney on the tiller and me on the sheet, we tore off toward Bass Harbor on a beam reach, the water hissing on its way past. Doing 5 knots, RIDDLE threw cold spray onto us every time we met a wave, but we couldn’t stop laughing and were having too much fun to mind the cold. The fine water droplets hung in Delaney’s hair, adding silver to her auburn mane. The 5-mile passage that had seemed so long the day before flew by, and about an hour after leaving Pond, we had hardened up to a close haul and began tacking north up Bass Harbor.
With spray flying and sprits high, RIDDLE made excellent time back toward Bass Harbor on a beam reach.
Once we were inside the protection of the harbor, the breeze became fluky, and sections of calm water were darkened by catspaws barreling down from all sides. The winds converged on us in a frustratingly inconsistent manner. It took us the better part of an hour to work up the mile of harbor, but we eventually ran up on the beach by the fishing pier we had left from. RIDDLE protested loudly as we ground onto the barnacle-covered rocks, and we climbed out soaked in seawater and once again gritty with sand. Our adventure had come to an end, the two of us none the worse for wear and RIDDLE losing only a little bottom paint. We packed the boat into the back of my truck, and with sand clouding the rearview, my girlfriend Delaney and I peeled out in search of food and a shower, muscles sore but spirits high.
Tom Conlogue is a former WoodenBoat School waterfront staff member who is currently feeding a crippling boat addiction as a student at Maine Maritime Academy. He can usually be found near some patch of water messing about in small boats.
Editor’s note: Pond Island is administered by the Maine Coast Heritage Trust and camping is permitted only at the established site on the east side of the island. The author learned of the restriction only after the trip.
If you have an interesting story to tell about your adventures with a small boat, please email us a brief outline and a few photos.
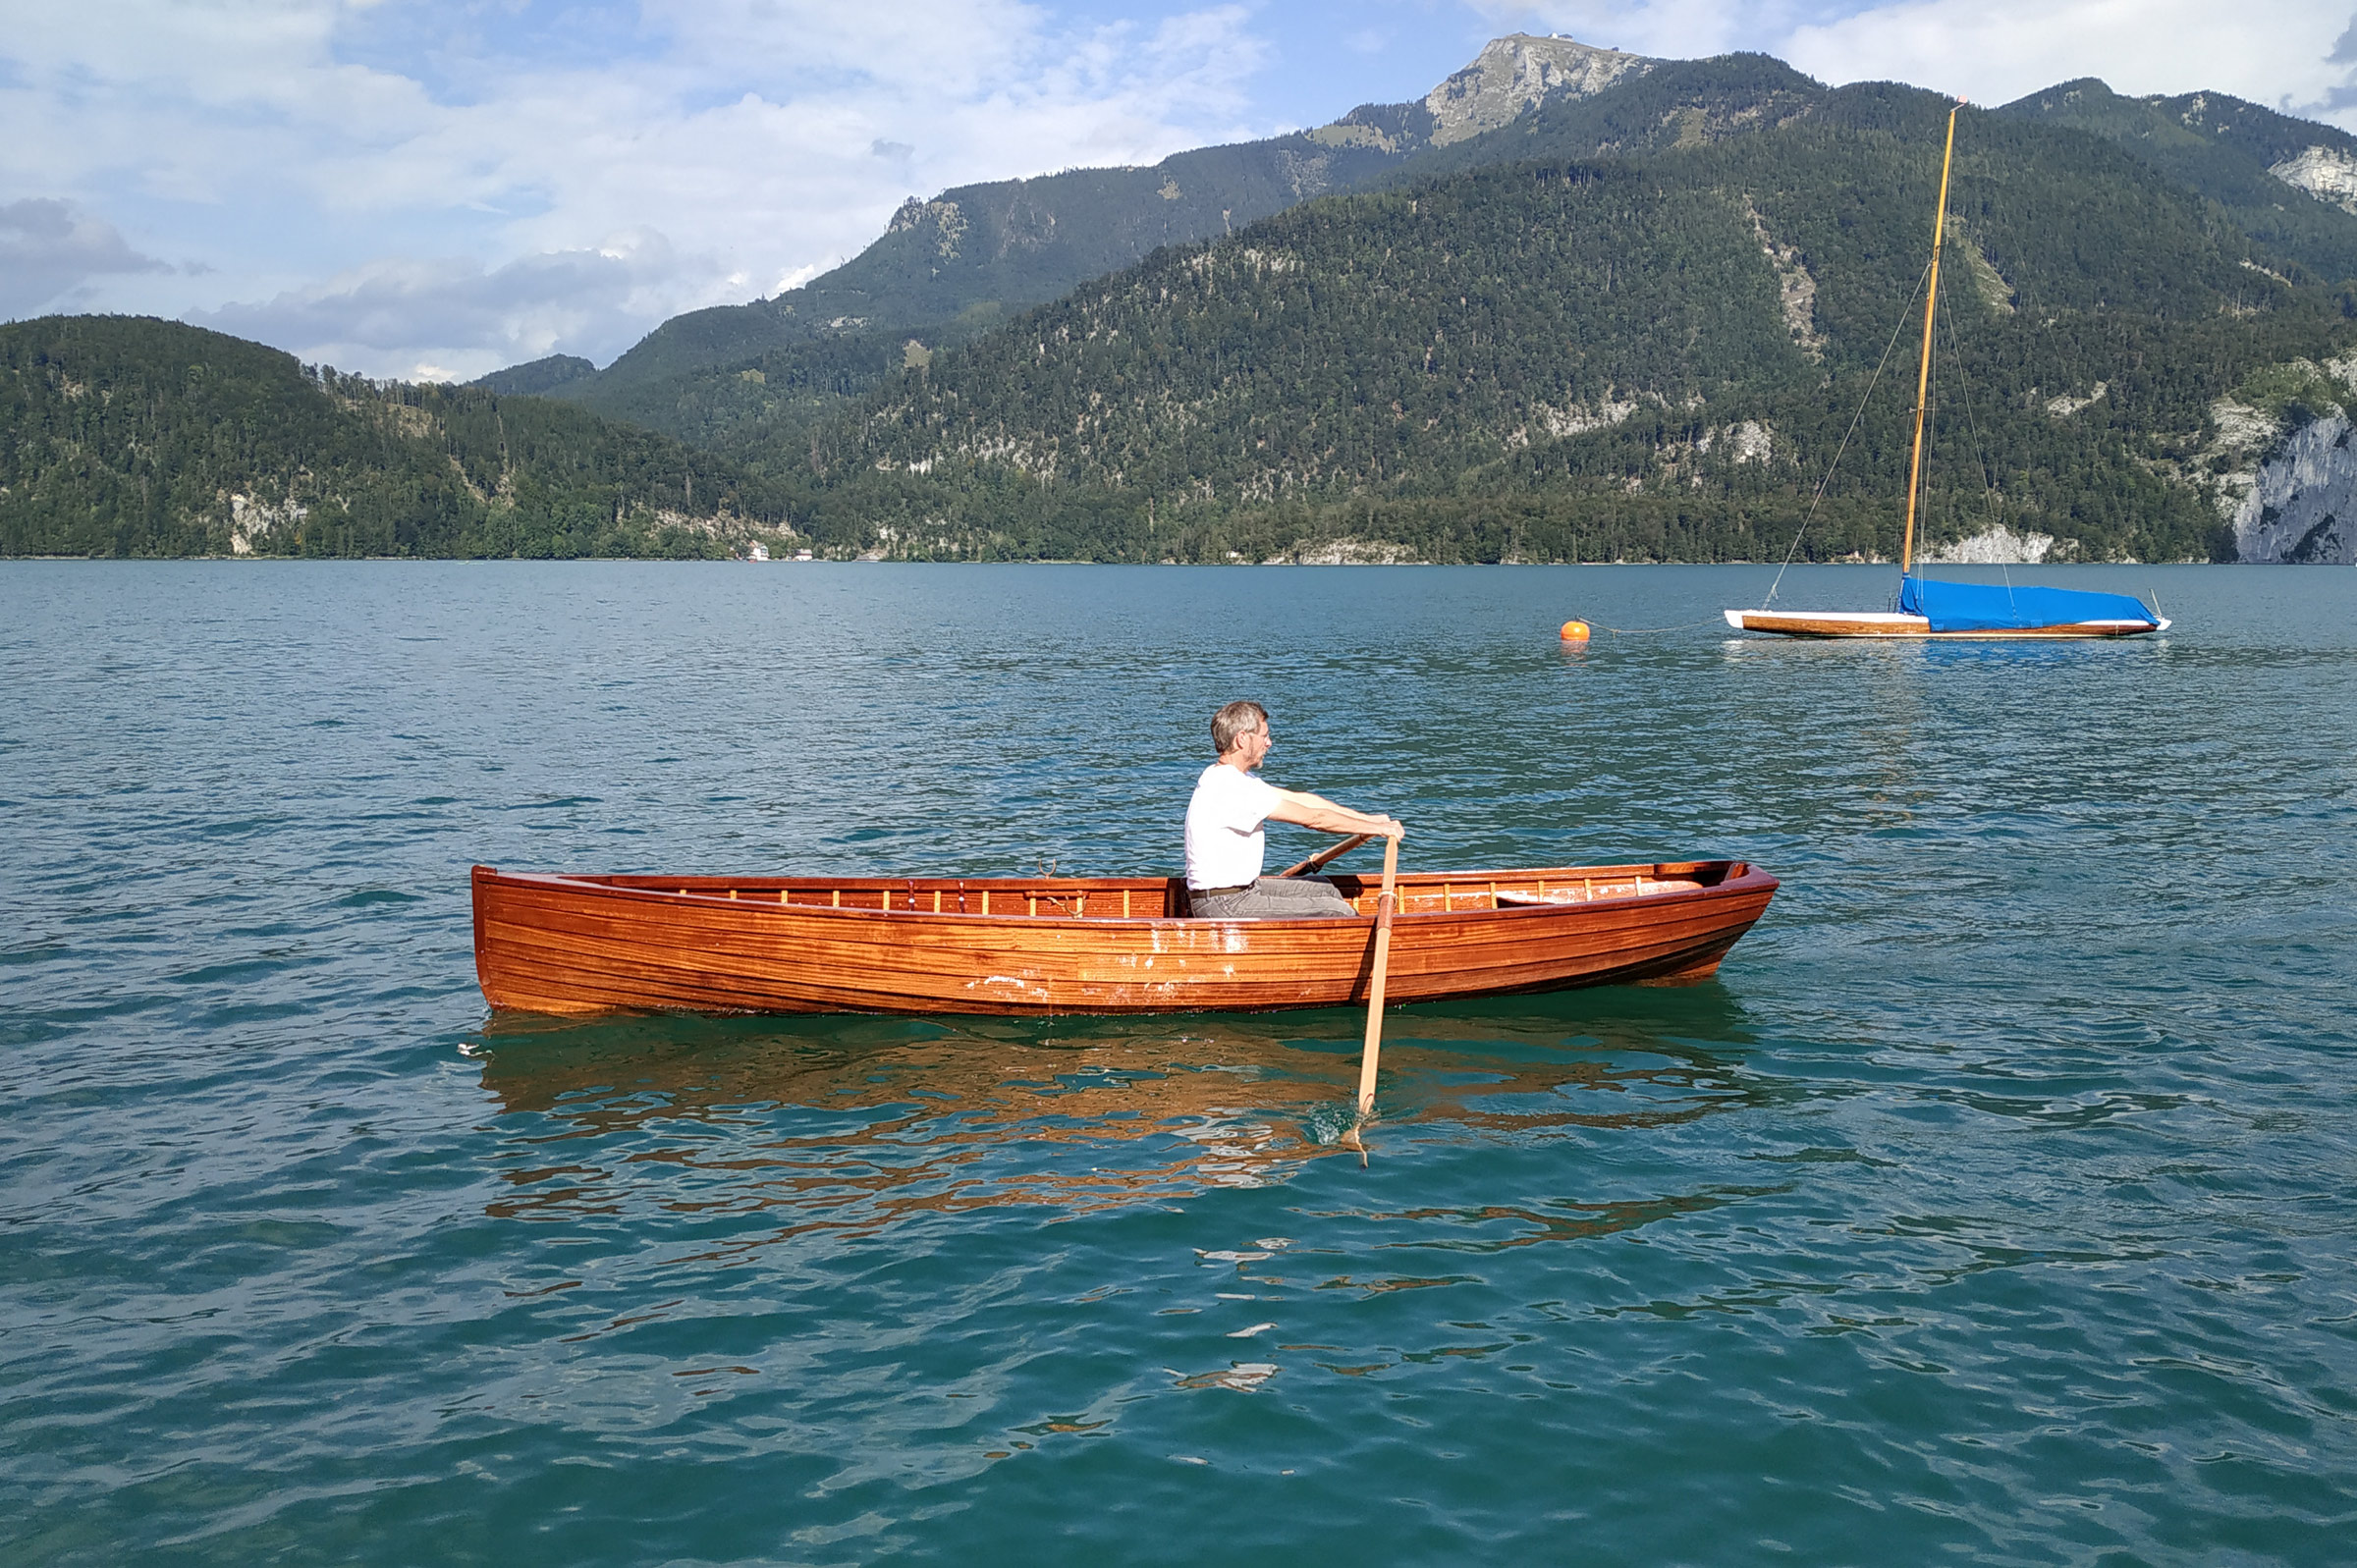
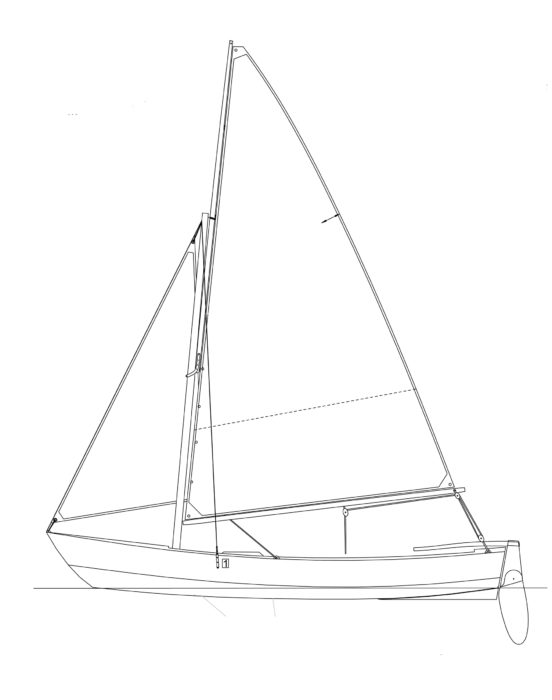
Lukas Schwimann’s home is in the village of St. Gilgen, Austria, at the top end of Lake Wolfgang—Wolfgangsee in German. A friend who lives near him owns a 16′5″ rowing skiff that has been in his family for about 100 years. The boat is not in great condition, but it is still serviceable. Over the years it has been patched up with chopped-strand mat and polyester resin. Lukas has had several opportunities to use it and has found it to be an enjoyable boat to row. He already has three sailboats, and his wife, Irmfried, insisted that if he were going to attend the Boat Building Academy at Lyme Regis and build a boat there, it would have to be a rowing boat. Lukas decided he would build a replica of the skiff.
Lukas Schwimann
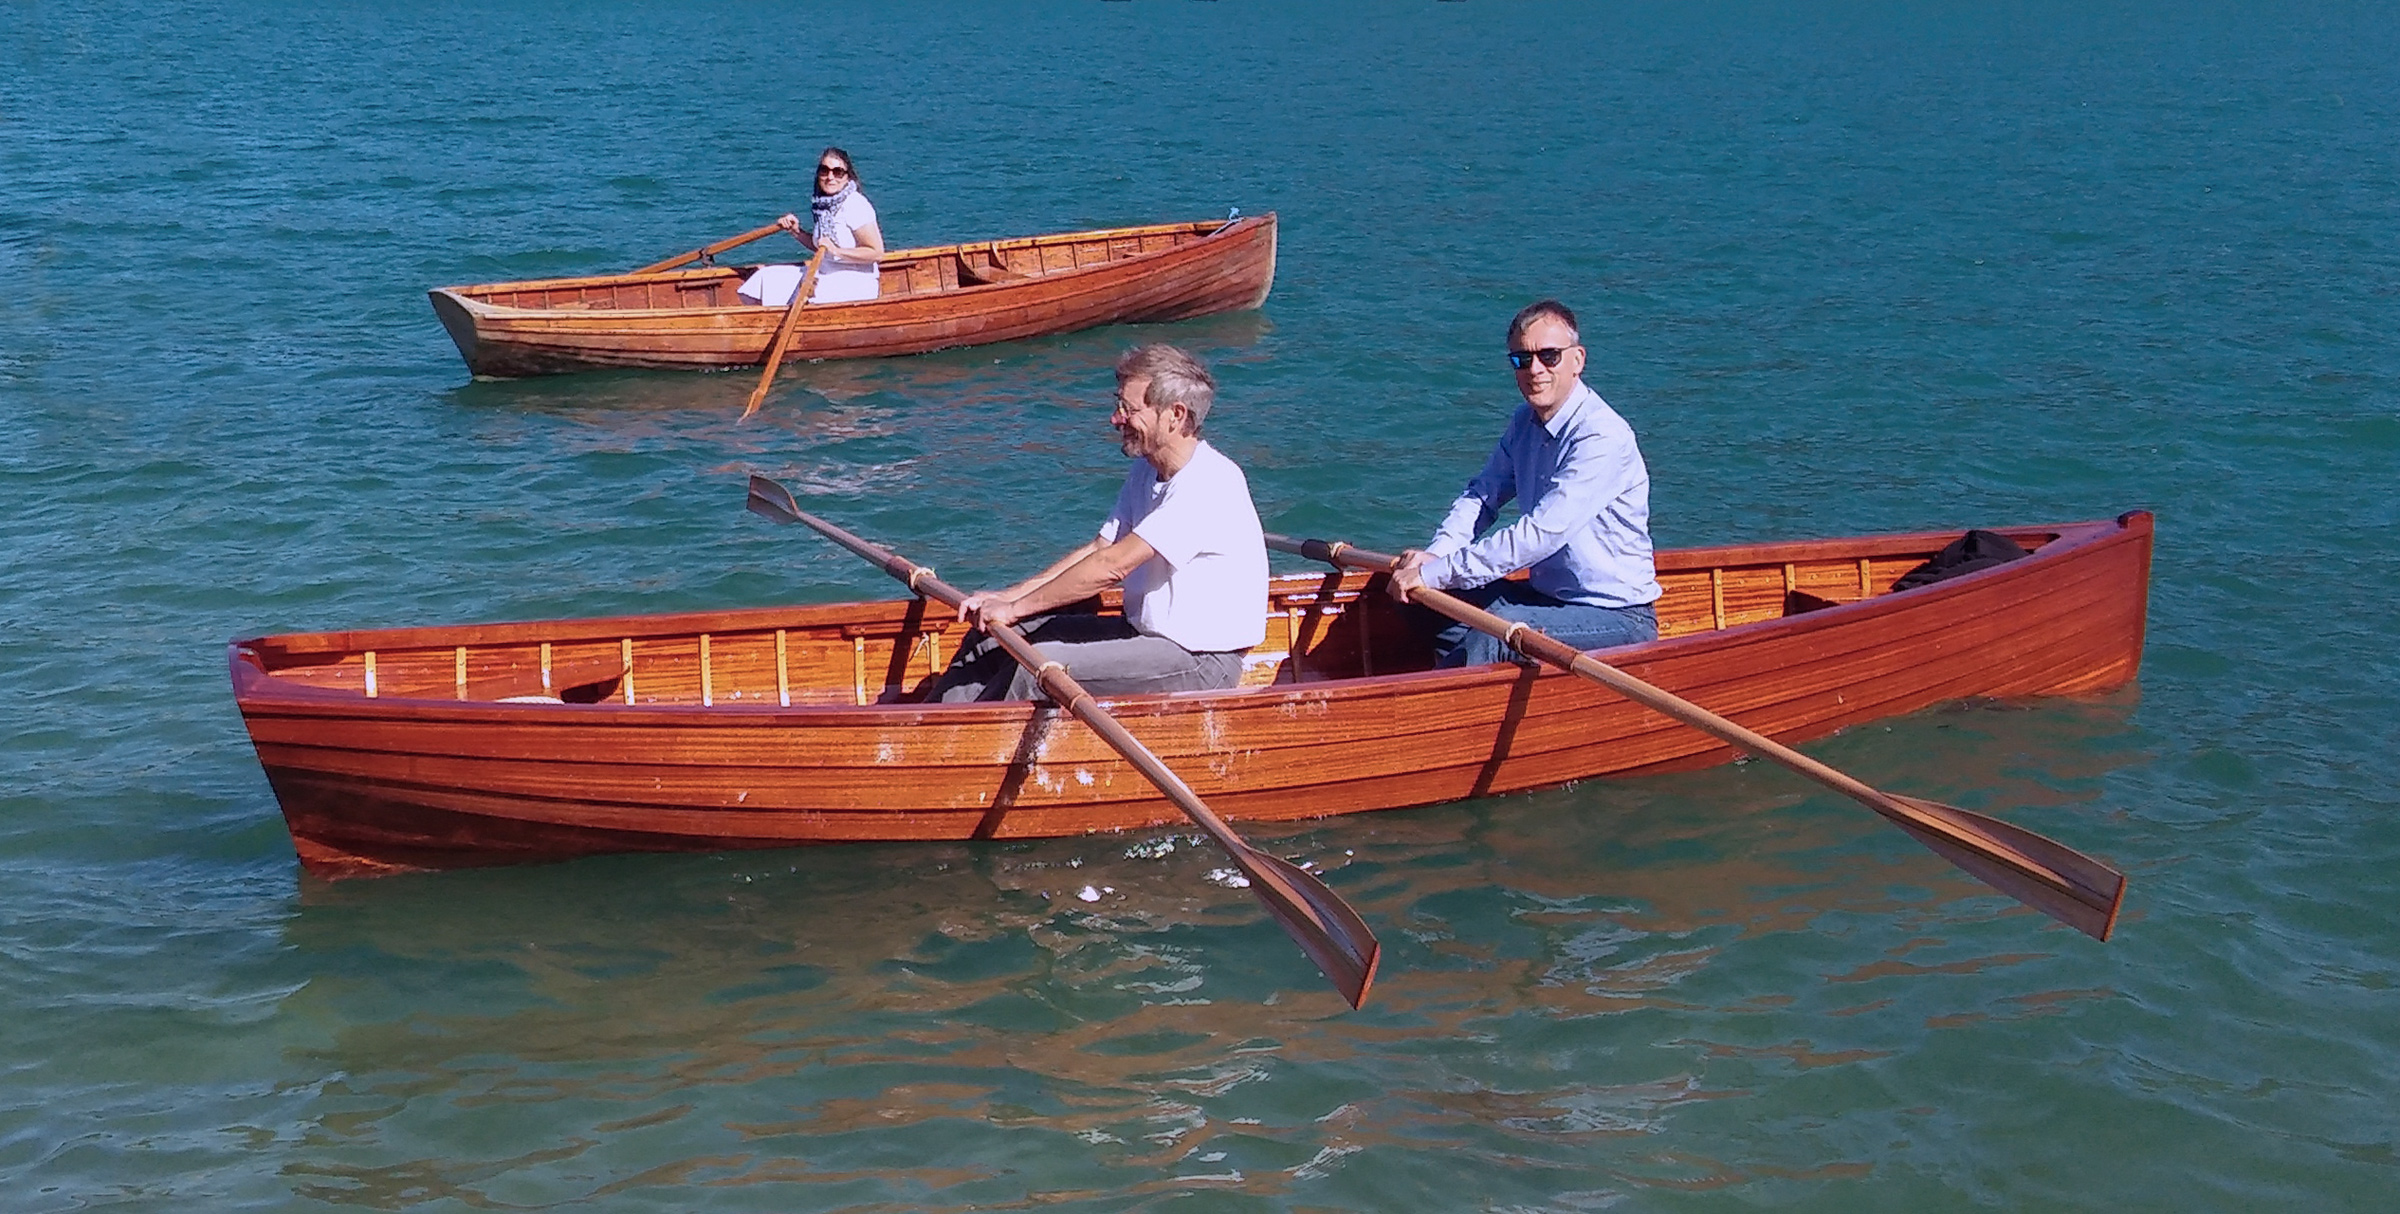
New and old: the reproduction, here rowed tandem, has the same flat sheer as the original skiff behind it.
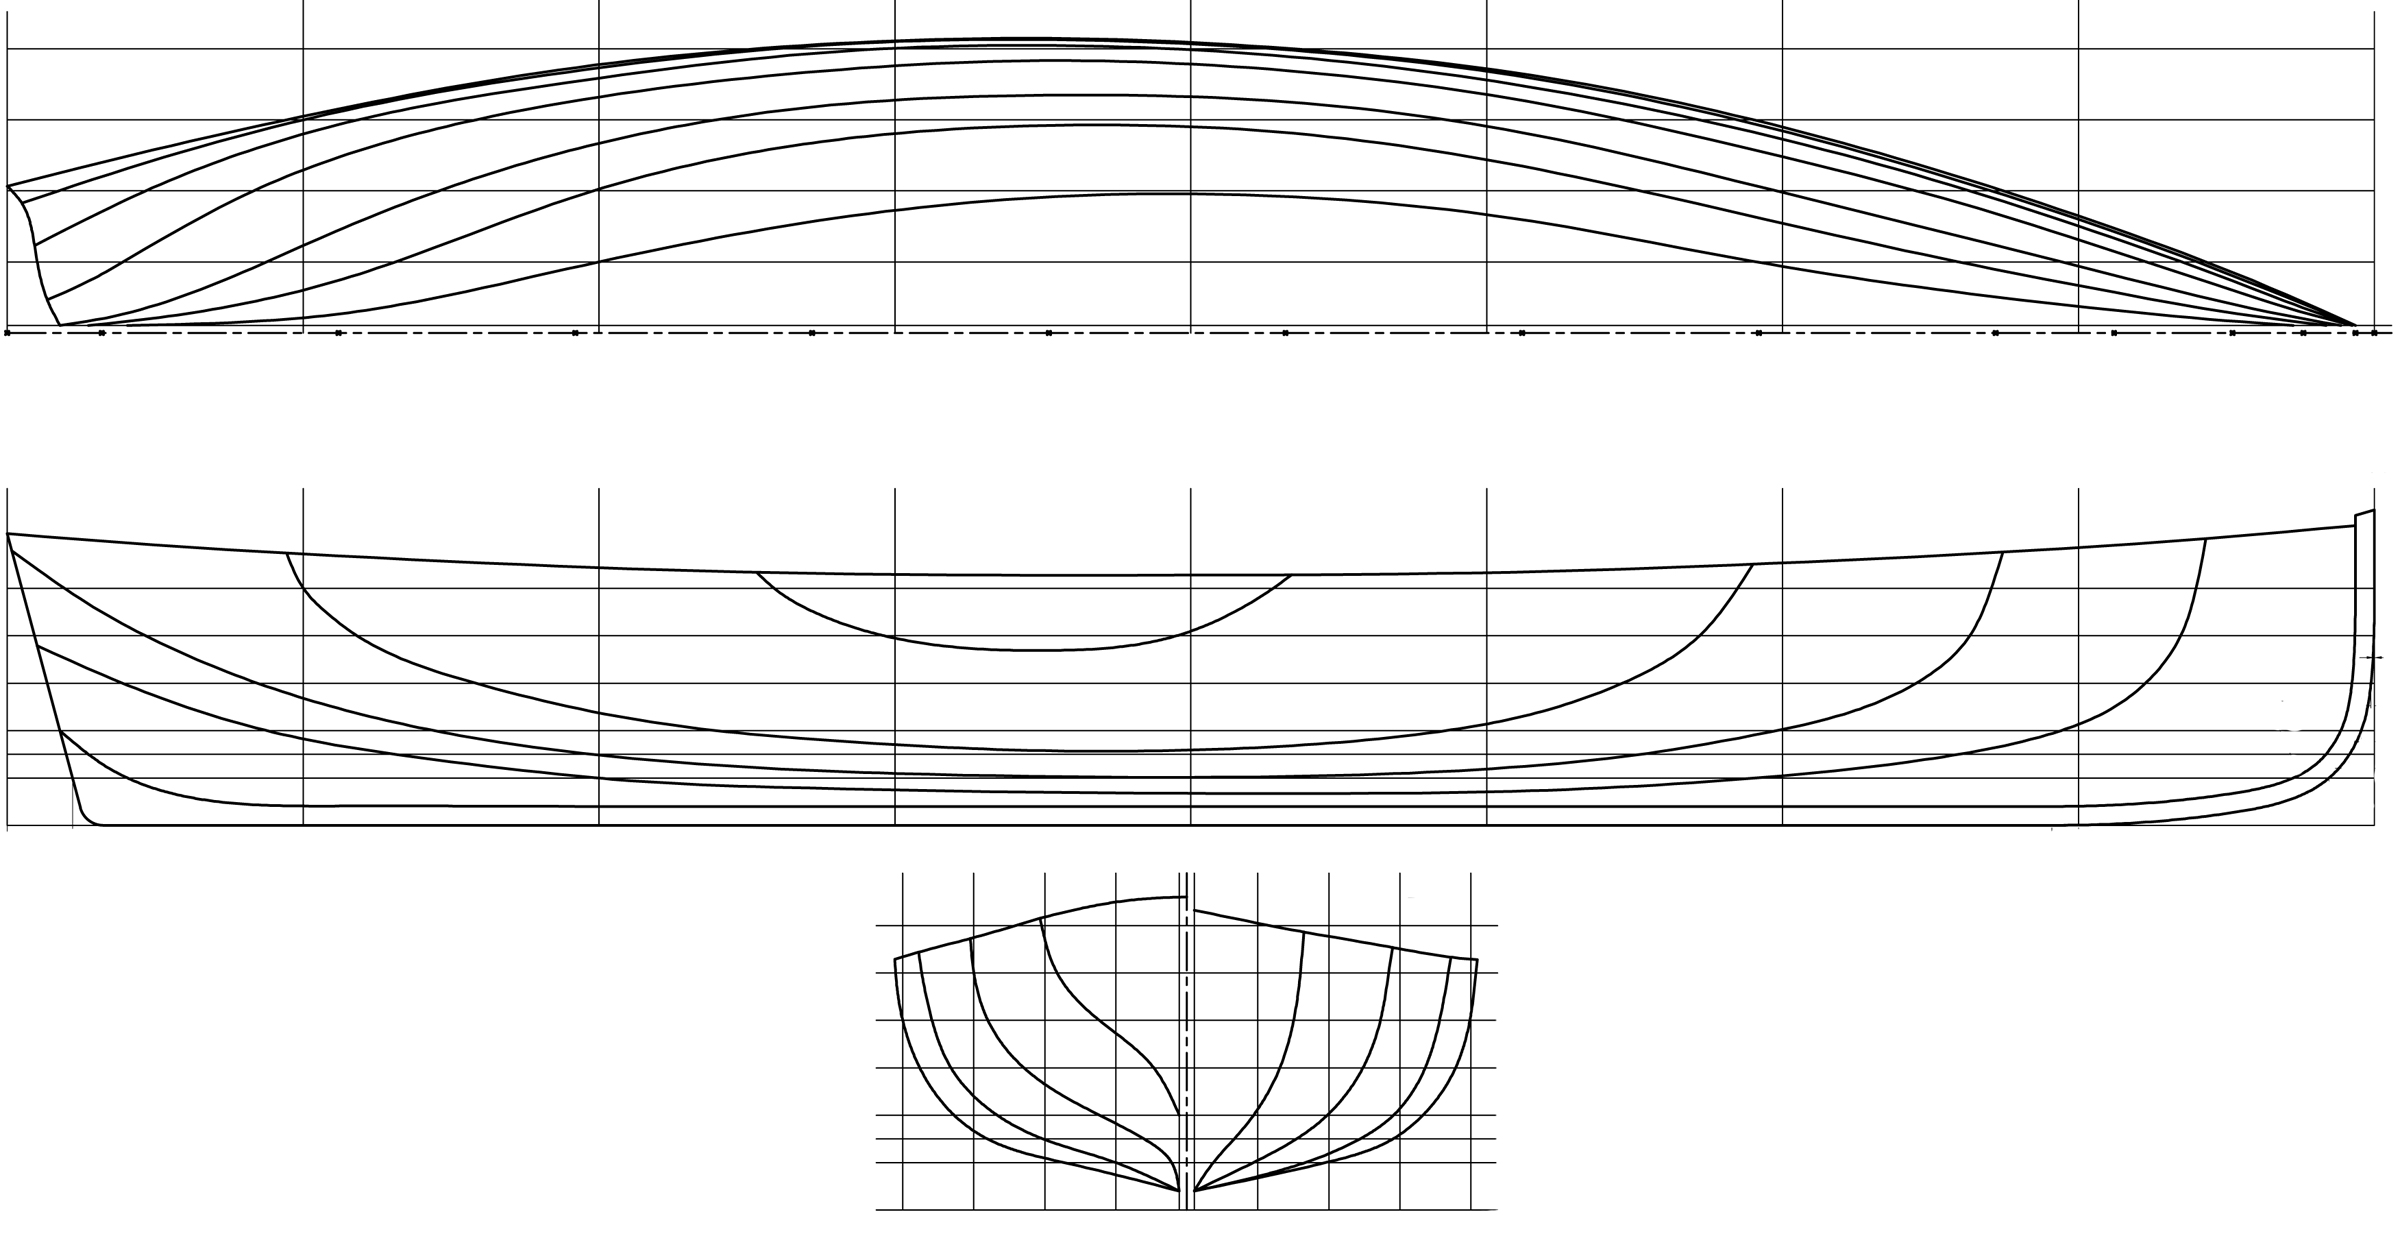
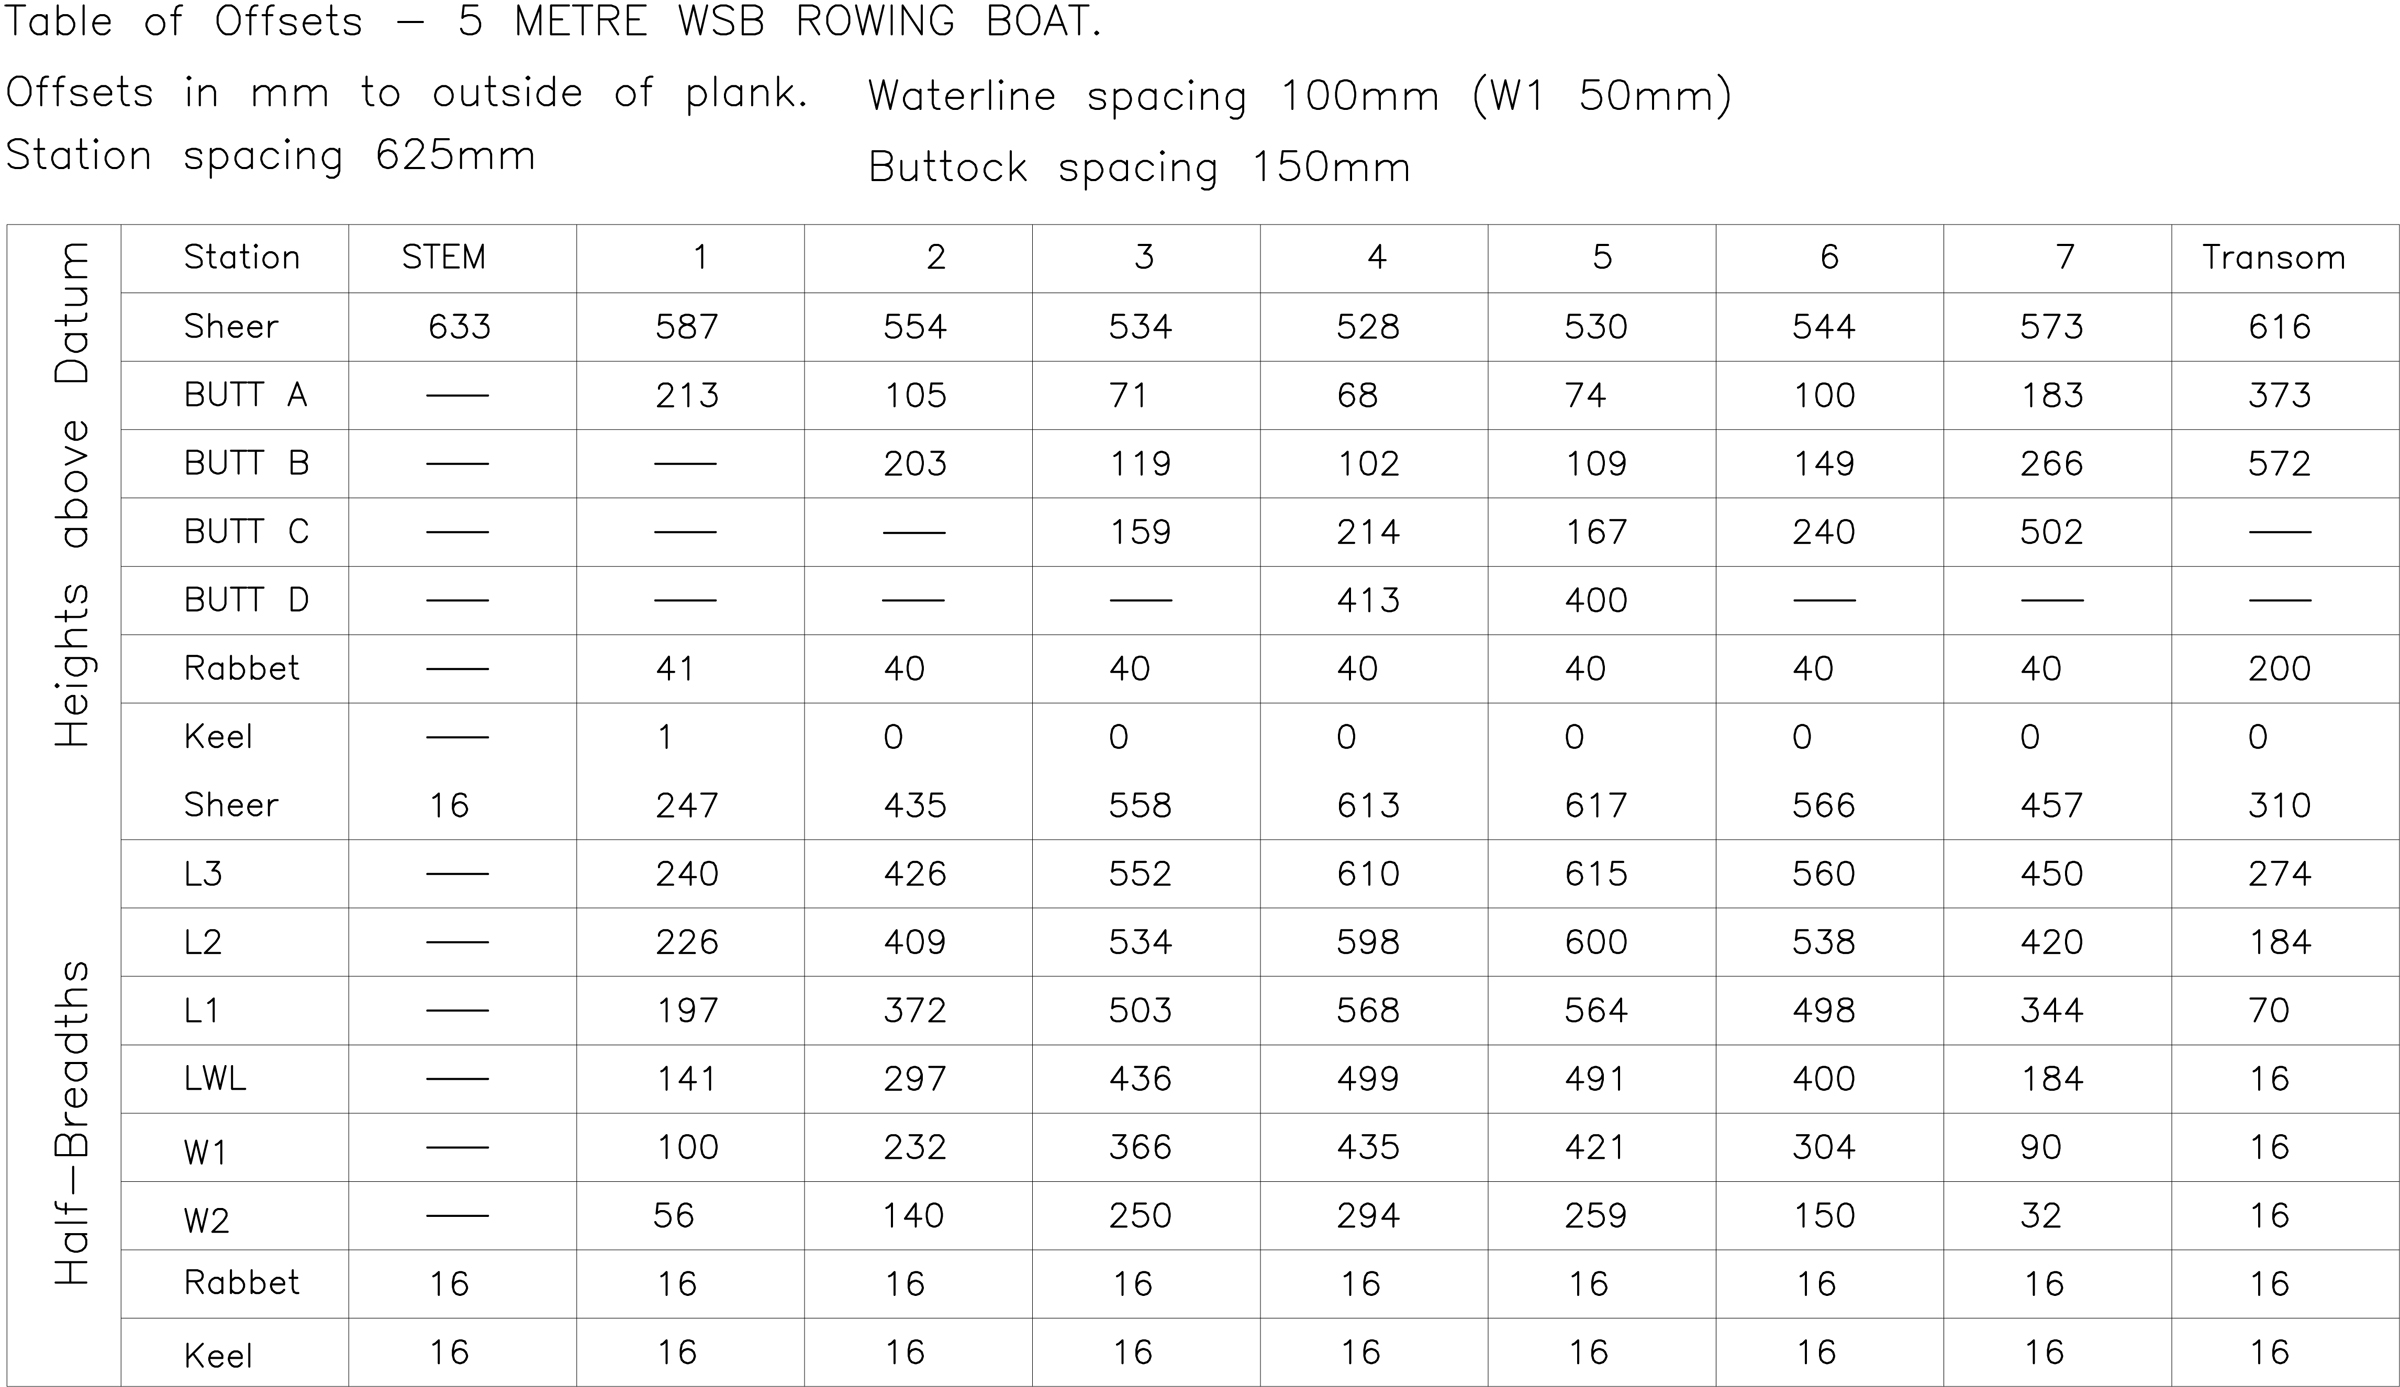
Lukas’s starting point was to take the lines off the old boat, although this proved particularly difficult as its shape had distorted somewhat over the years. “It was kind of hogged and sagged all at the same time,” said course tutor Mike Broome. When Lukas arrived at the Academy, he gave Mike the information he had. “It was a bit like a fairground ride,” said Mike, “but I breathed on it a bit with CAD and produced a table of offsets.” From this, Lukas and his fellow students lofted the boat full size and then “tweaked it here and there.”
Despite the distortion in the original boat, Lukas recognized that it had a fairly straight sheer and that was one characteristic that he was keen to retain. Although it is thought that it was originally used as a leisure boat, Lukas thinks it is a “workboat type and doesn’t have any fancy features” and he was also keen to replicate that. When he measured the skiff’s scantlings he kept coming across the figure of 44mm (1-3/4″) or neat divisions of it and used that as a guide through the lofting details.
Nigel Sharp
The cleats below the oarlocks have a hole to brace the bottom ends of the oarlocks and to slow the wear on the sockets. The feature was built into the original boat. Removable, adjustable heel braces anchor the rowers.
The boat was built upright, and before construction could begin, a strongback was set up with its top about 2′ off the workshop floor, and directly below an overhead beam. These were put in place with great care and accuracy—partly with the aid of a laser—to ensure the centerline components would be exactly in line. Assembly of the boat’s sapele backbone components could then proceed, beginning with the perfectly straight keel (1-3/4″ thick at its maximum) and hog (3 1/2″ x 7/8″). The stem was composed of a grown outer part in two sections scarfed together and with the lower section scarfed to the keel and hog; and an inner part, or apron, which was laminated from 11 layers to give a thickness of 1-3/4″ and which overlapped the top of the hog over a length of 16″. The 7/8″-thick sapele transom was supported by a 1-3/4″-thick sapele stern knee. All of the centerline components were glued together with epoxy and fastened with bronze screws.
The seven plywood molds produced from the lofting were temporarily fastened to the hog and braced with cross spalls and struts going up to the overhead beam. Battens secured to the stem head and cross-spalls held the molds in their vertical positions.
Lining off the eight strakes was done with a 13/16″ x 1/4″ batten, the same width as the planking laps. The rabbets for the planking had been cut into the keel, hog, and stem as part of the lofting process and had now been faired, so with the laps marked on the stem, molds, and transom, now everything was ready to fit the 3/8″-thick khaya planking. The garboards were dry-fitted, checked for accuracy, and then permanently installed with silicon bronze screws and butyl rubber mastic as a sealant.
The rest of the planks followed, riveted together at the lapse with copper rivets spaced at 2-5/8″ intervals, skipping where the steam-bent frames would be installed later and fastened with longer rivets. All of the planks needed some steaming to cope with the twist at both ends of the boat. Lukas found the mastic “messy to work with and I am not sure if it was necessary apart from with the garboards and the hood ends. The garboards are obviously a critical element and as they were the first planks we fitted, we were learning fast then, so I am glad to have mastic there.”
Lukas Schwimann
The solo rower can choose between the two rowing stations, aft for downwind work, forward for rowing to windward.
The molds and their supporting struts were removed, leaving struts from the transom and stem to the roof beam, and adding two new temporary braces across the boat and notched over the sheerstrake.
Oak frames, milled to 7/8″ x 7/16″ and tapered to 5/16″ at the ends, were steamed into place at 8″ spacings and riveted to the planking. They were continuous from one side of the boat to the other, except for the forwardmost three, which were taken down to the outer faces of the apron, and the aftermost two, which were taken down to the top of the hog where the garboards are nearly vertical. The framing started amidships and worked toward the ends. A few of the amidships frames broke as they were being fitted, and a piece of that was used to make a shorter rib at one end of the boat.
After the frames were installed, their ends were cut a little below the sheer. The sapele inwale was notched to fit over the frame heads, then steam-bent into place. Mastic sealed the frames’ end-grain. The sapele outwale was not steamed but left overlength initially to help with the bending. The finished gunwale, perhaps not surprisingly, has an overall gunwale thickness of the “magic” 1 3/4″.
Ten 7/8″-thick sapele floor timbers were fastened with bronze screws through the planking. The 1/2″ khaya floorboards bear on the structural floors; both rowing positions have adjustable stretchers. The khaya thwarts had individual end supports rather than full-length risers. The sapele breasthook, transom quarter knees, and thwart knees were each made from two pieces with a half-lap joint between them.
Part of the course at the Academy involves making spars and oars, and Lukas managed to persuade three other students to make oars in the same size and style as the one he’d made in spruce with a sapele inlay, giving him a matching set of four oars.
Lukas Schwimann
With two rowing, the bow trims well when the rowers lean aft at the catch. When their weight moves forward at the release, the bow dips a bit.
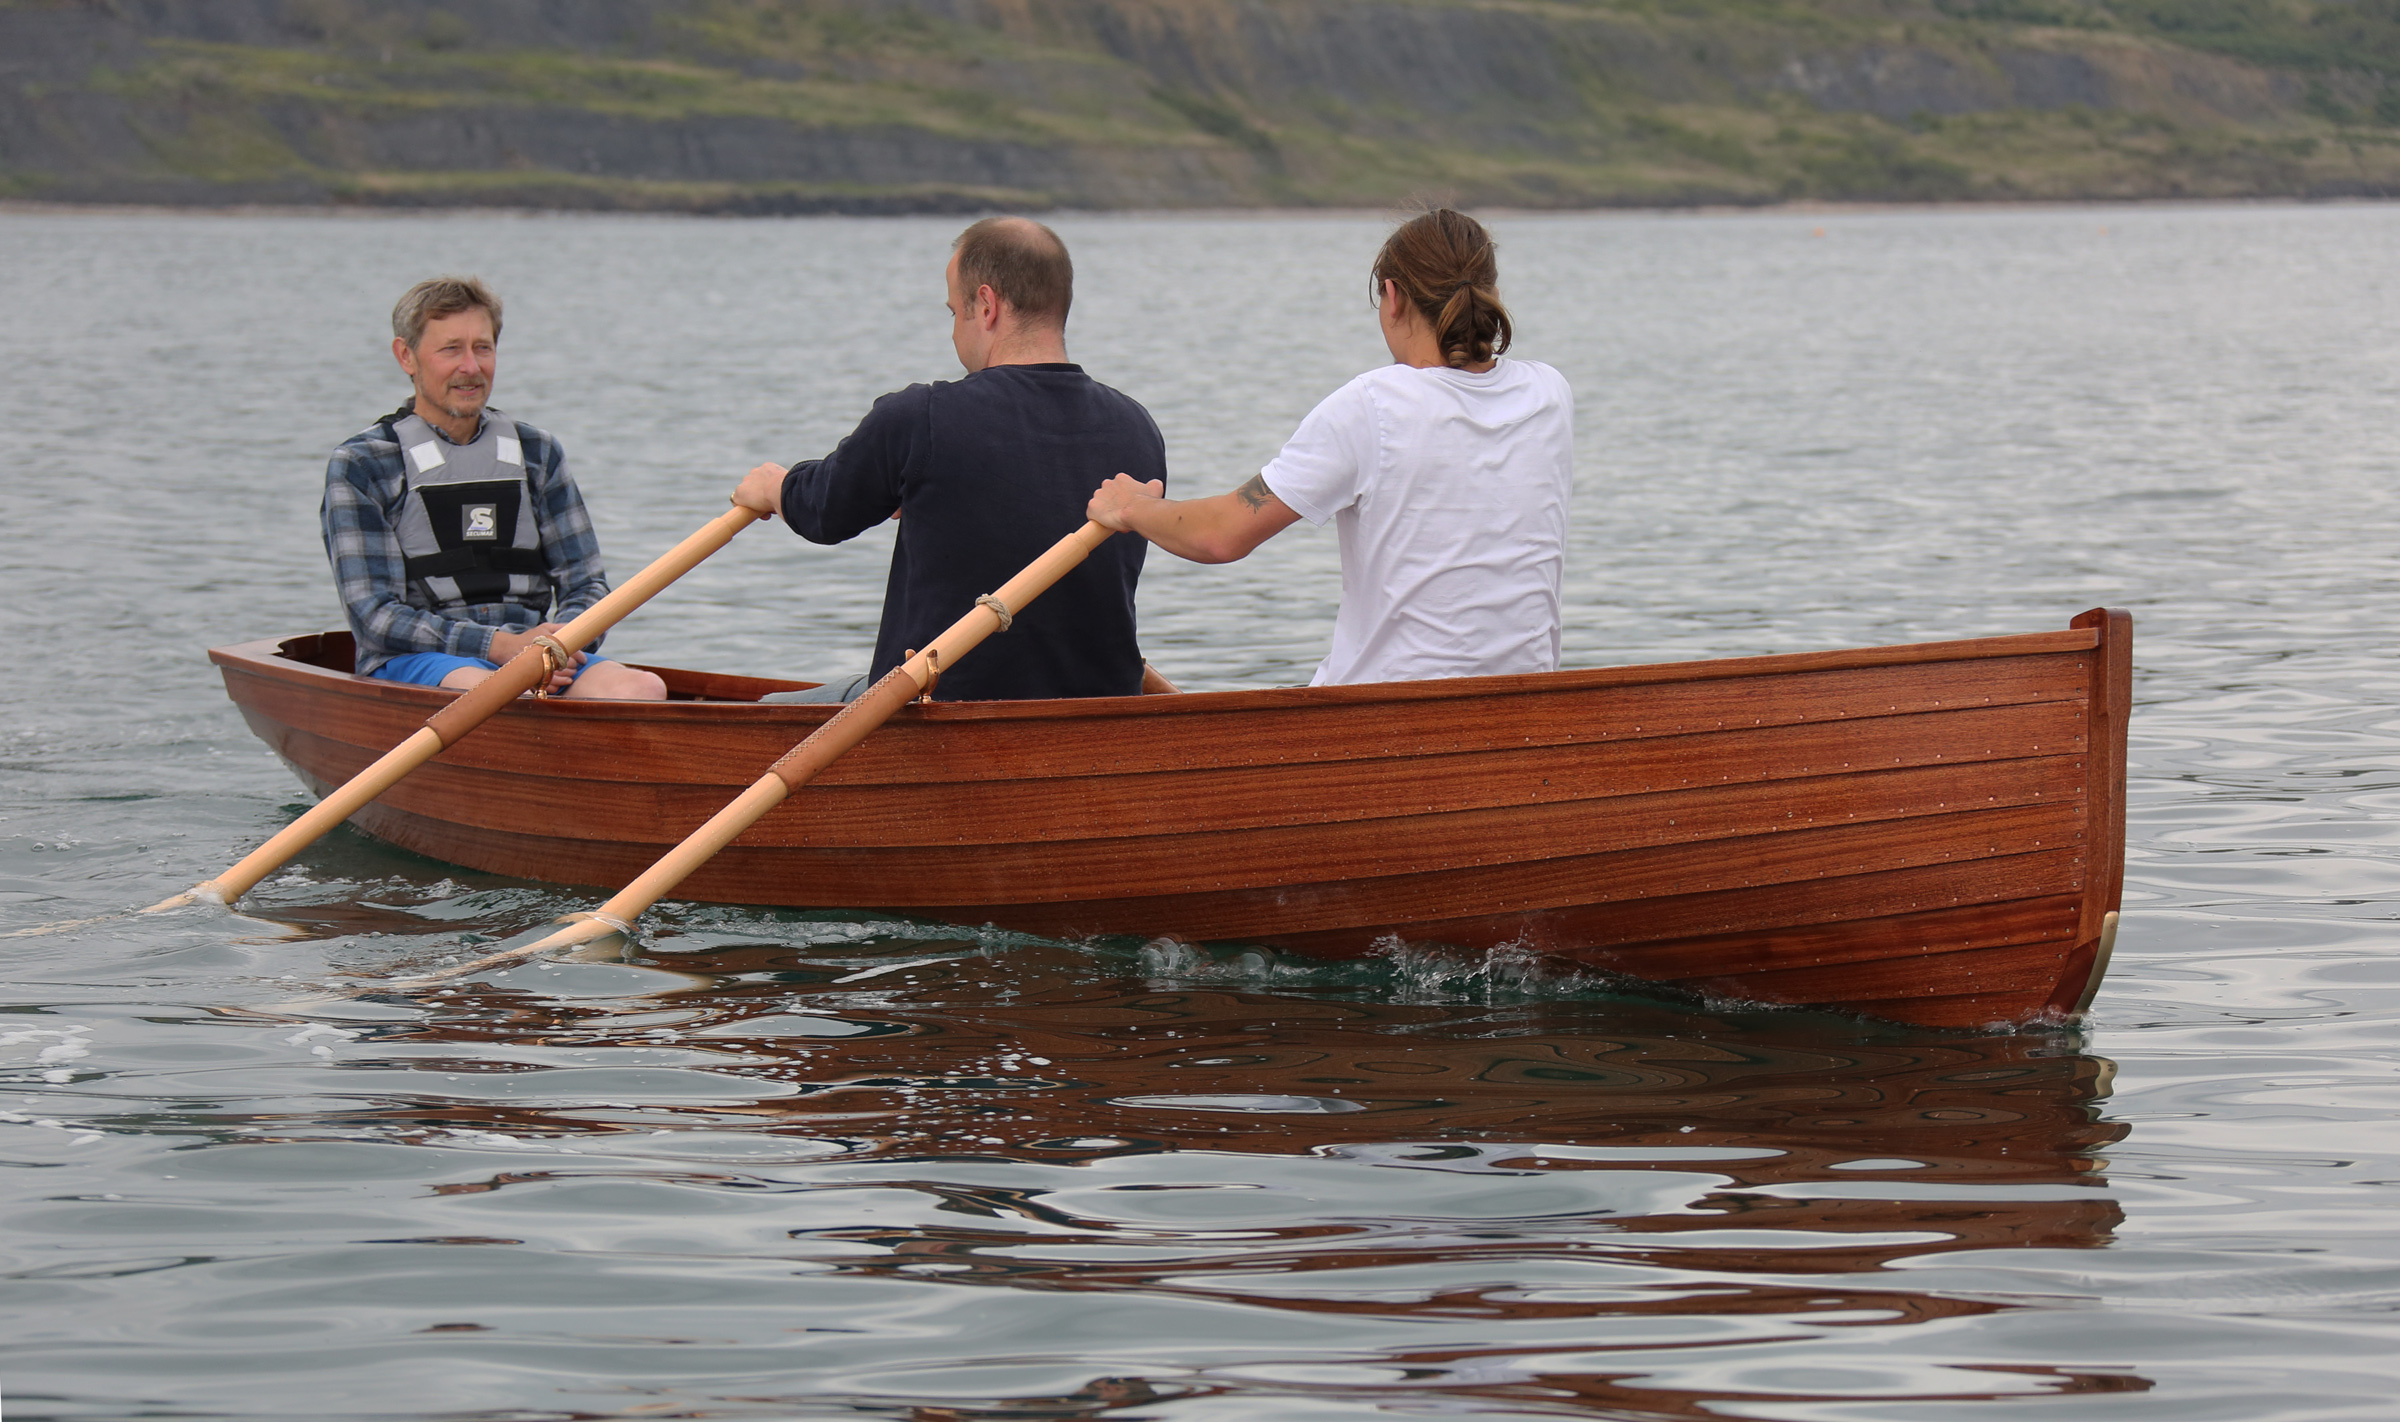
A long time ago, I spent several years sculling and rowing competitively in everything from single sculls to eights on various English rivers, and I have always enjoyed rowing my own yacht tender. With Lukas happily leaning against the transom keeping watch forward, I took the bow rowing seat in his newly launched Wolfgangsee skiff. A fellow student, Will Mackie, set the pace from the stern station. The boat felt like the best of all compromises. It was more stable than a river-racing boat, of course, but at the same time considerably faster and easier to row than the average yacht tender; it really was a joy.
There was practically no wind, so we were lucky enough to enjoy flat water, but even the wash of a passing speedboat did little to concern us. The new boat has a beam of 4’ and the oars are 8’ long, proportions that felt just right, as did the relative heights and fore-and-aft positions of the seats and rowlocks.
Nigel Sharp
With the builder rowing in the stroke position, the skiff carries a passenger without sousing the stern.
On its home waters in Austria, Lukas was able to report further on its performance. “Interestingly enough there is not much difference in the speed with one or two rowers,” he said. “The maximum speed is somewhere between 6.3 and 6.8 knots, and it depends more on the wind and waves. When crossing the lake with some side wind you feel the boat going off to one side, as is to be expected, but it can easily be compensated when pulling a few strokes stronger on one side. To turn the boat, by pulling with one oar and pushing with the other, it takes about four strokes to turn around. It is also interesting how the boat sits in the water: it is best with either one rower or with two rowers and a passenger. With two at the oars and no passenger, the bow dips a little bit with the rowers’ layback at the finish of the stroke.”
Irmfried is particularly keen to use the boat to row across Wolfgangsee to their favorite restaurant. Lukas plans to set up as a boatbuilder and he is very much hoping that the original boat’s owners, when they see his reproduction of it, will be eager to have him build a new one for them.
Nigel Sharp is a lifelong sailor and a freelance marine writer and photographer. He spent 35 years in managerial roles in the boat building and repair industry, and has logged thousands of miles in boats big and small, from dinghies to schooners.
Wolfgangsee Skiff Particulars
[table]
Length/16′5″
Beam 48.8″
Depth amidships/20.75″
[/table]
For more information about the Wolfgangsee skiff, email Mike Broome at the Boat Building Academy, or the builder, Lukas Schwimann.
Is there a boat you’d like to know more about? Have you built one that you think other Small Boats Magazine readers would enjoy? Please email us!
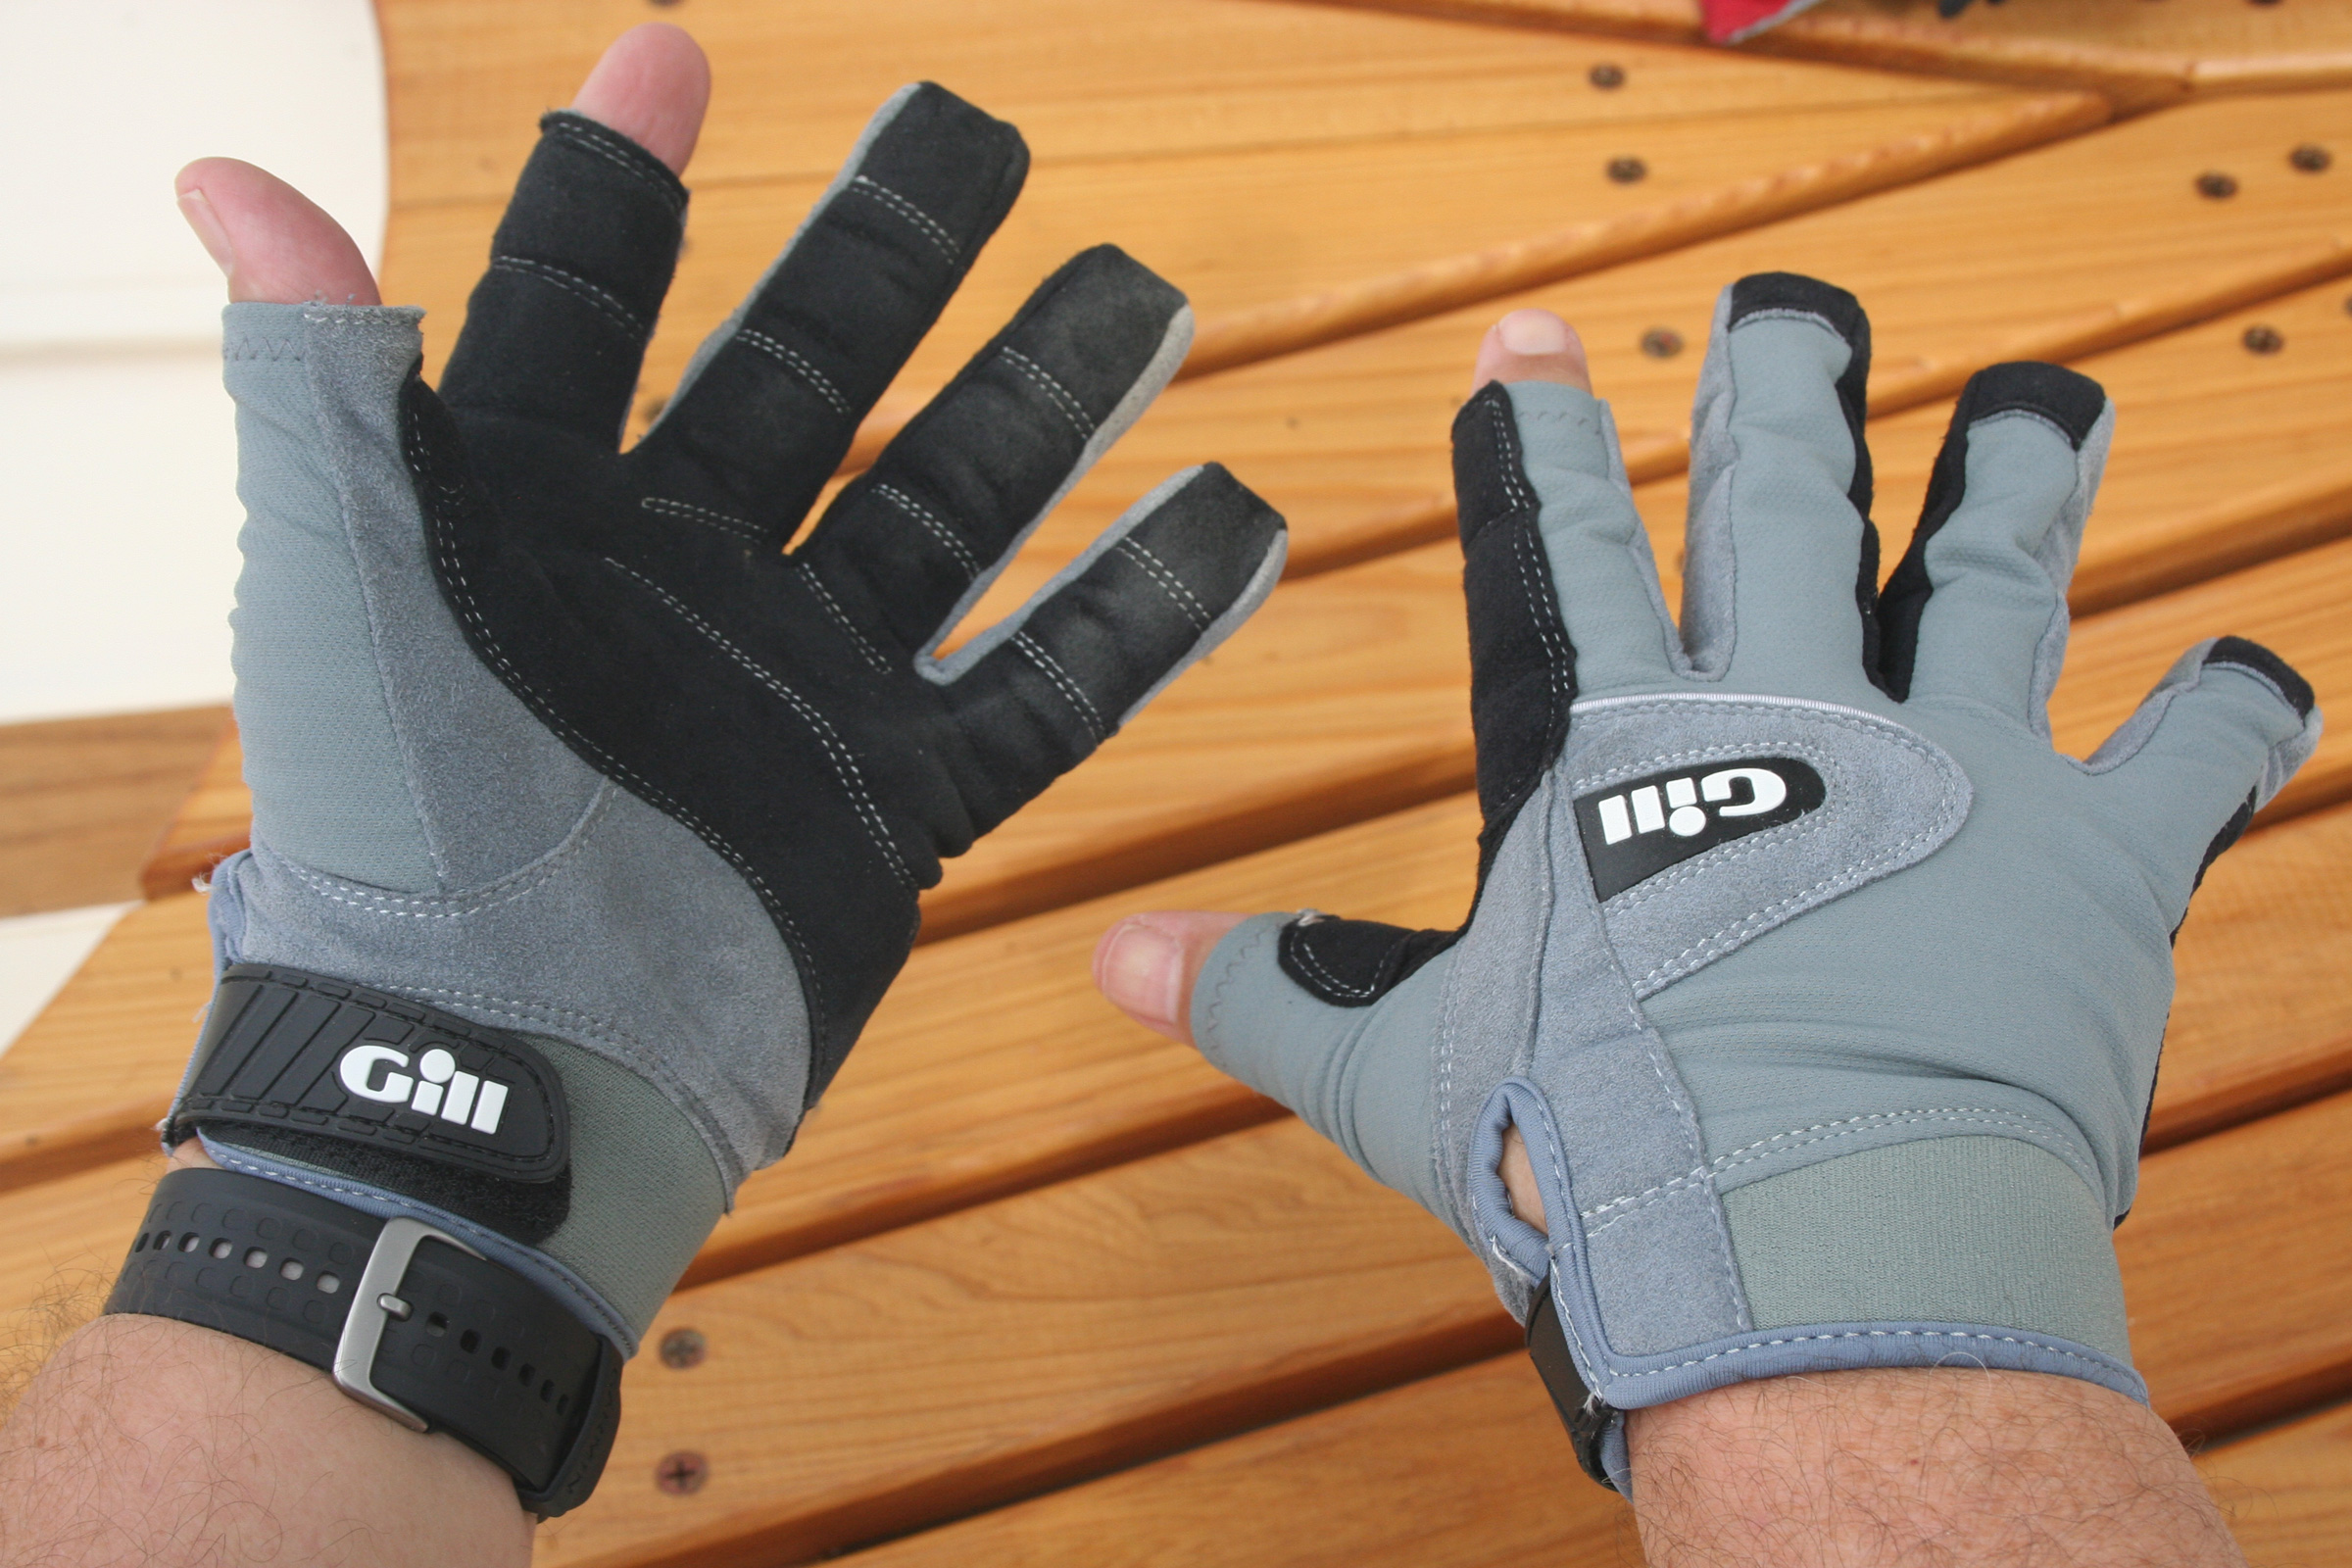
When I finished our Penobscot 14 back in 2017, I intended to row it around the river inlets and shoreline of our bay. One of the pieces of gear that I was going to need was a nice pair of gloves to prevent blisters on my hands, as I didn’t row frequently enough to develop calluses. I had tried a few styles but was not happy with the fit or feel until I came across Gill’s Long Finger Deckhand Gloves.
Audrey and I do a bit of sailing and paddling in addition to rowing, so I also wanted gloves that were versatile, easy to put on and take off when wet, and that dried fast. The Deckhand Gloves have lightweight polyester-spandex shells with doubled synthetic suede Amara reinforcements and padding. None of these materials hold much water, so they dry fast. The elasticity of the shell makes it much easier to put on and take off than a leather glove. A side benefit is that the materials provide UV50+ protection, an important factor for us in Florida.
Photographs by Audrey Lewis
After a year in use, the gloves show little evidence of wear.
Audrey, a talented seamstress who has made gloves in the past and knows how they’re put together, looked the Deckhand Gloves over, inside and out. The fabric panels on the sides of the fingers, the fourchettes, are cut from synthetic suede for lightness and comfort and the tops and bottoms, the tranks, are cut from spandex. The palms and the insides of the fingers are reinforced with the Amara suede for better grip and padding; the suede is wrapped around the tips of the middle, ring, and pinky fingers, which places the seams on the backs of the fingers to keep from creating pressure points. The thumb and index-finger tips are open for an undiminished sense of touch. The suede also wraps around the side of the index finger and thumb, which makes a big difference when handling lines. The hook-and-loop closures at the wrists are easy to grip and adjust.
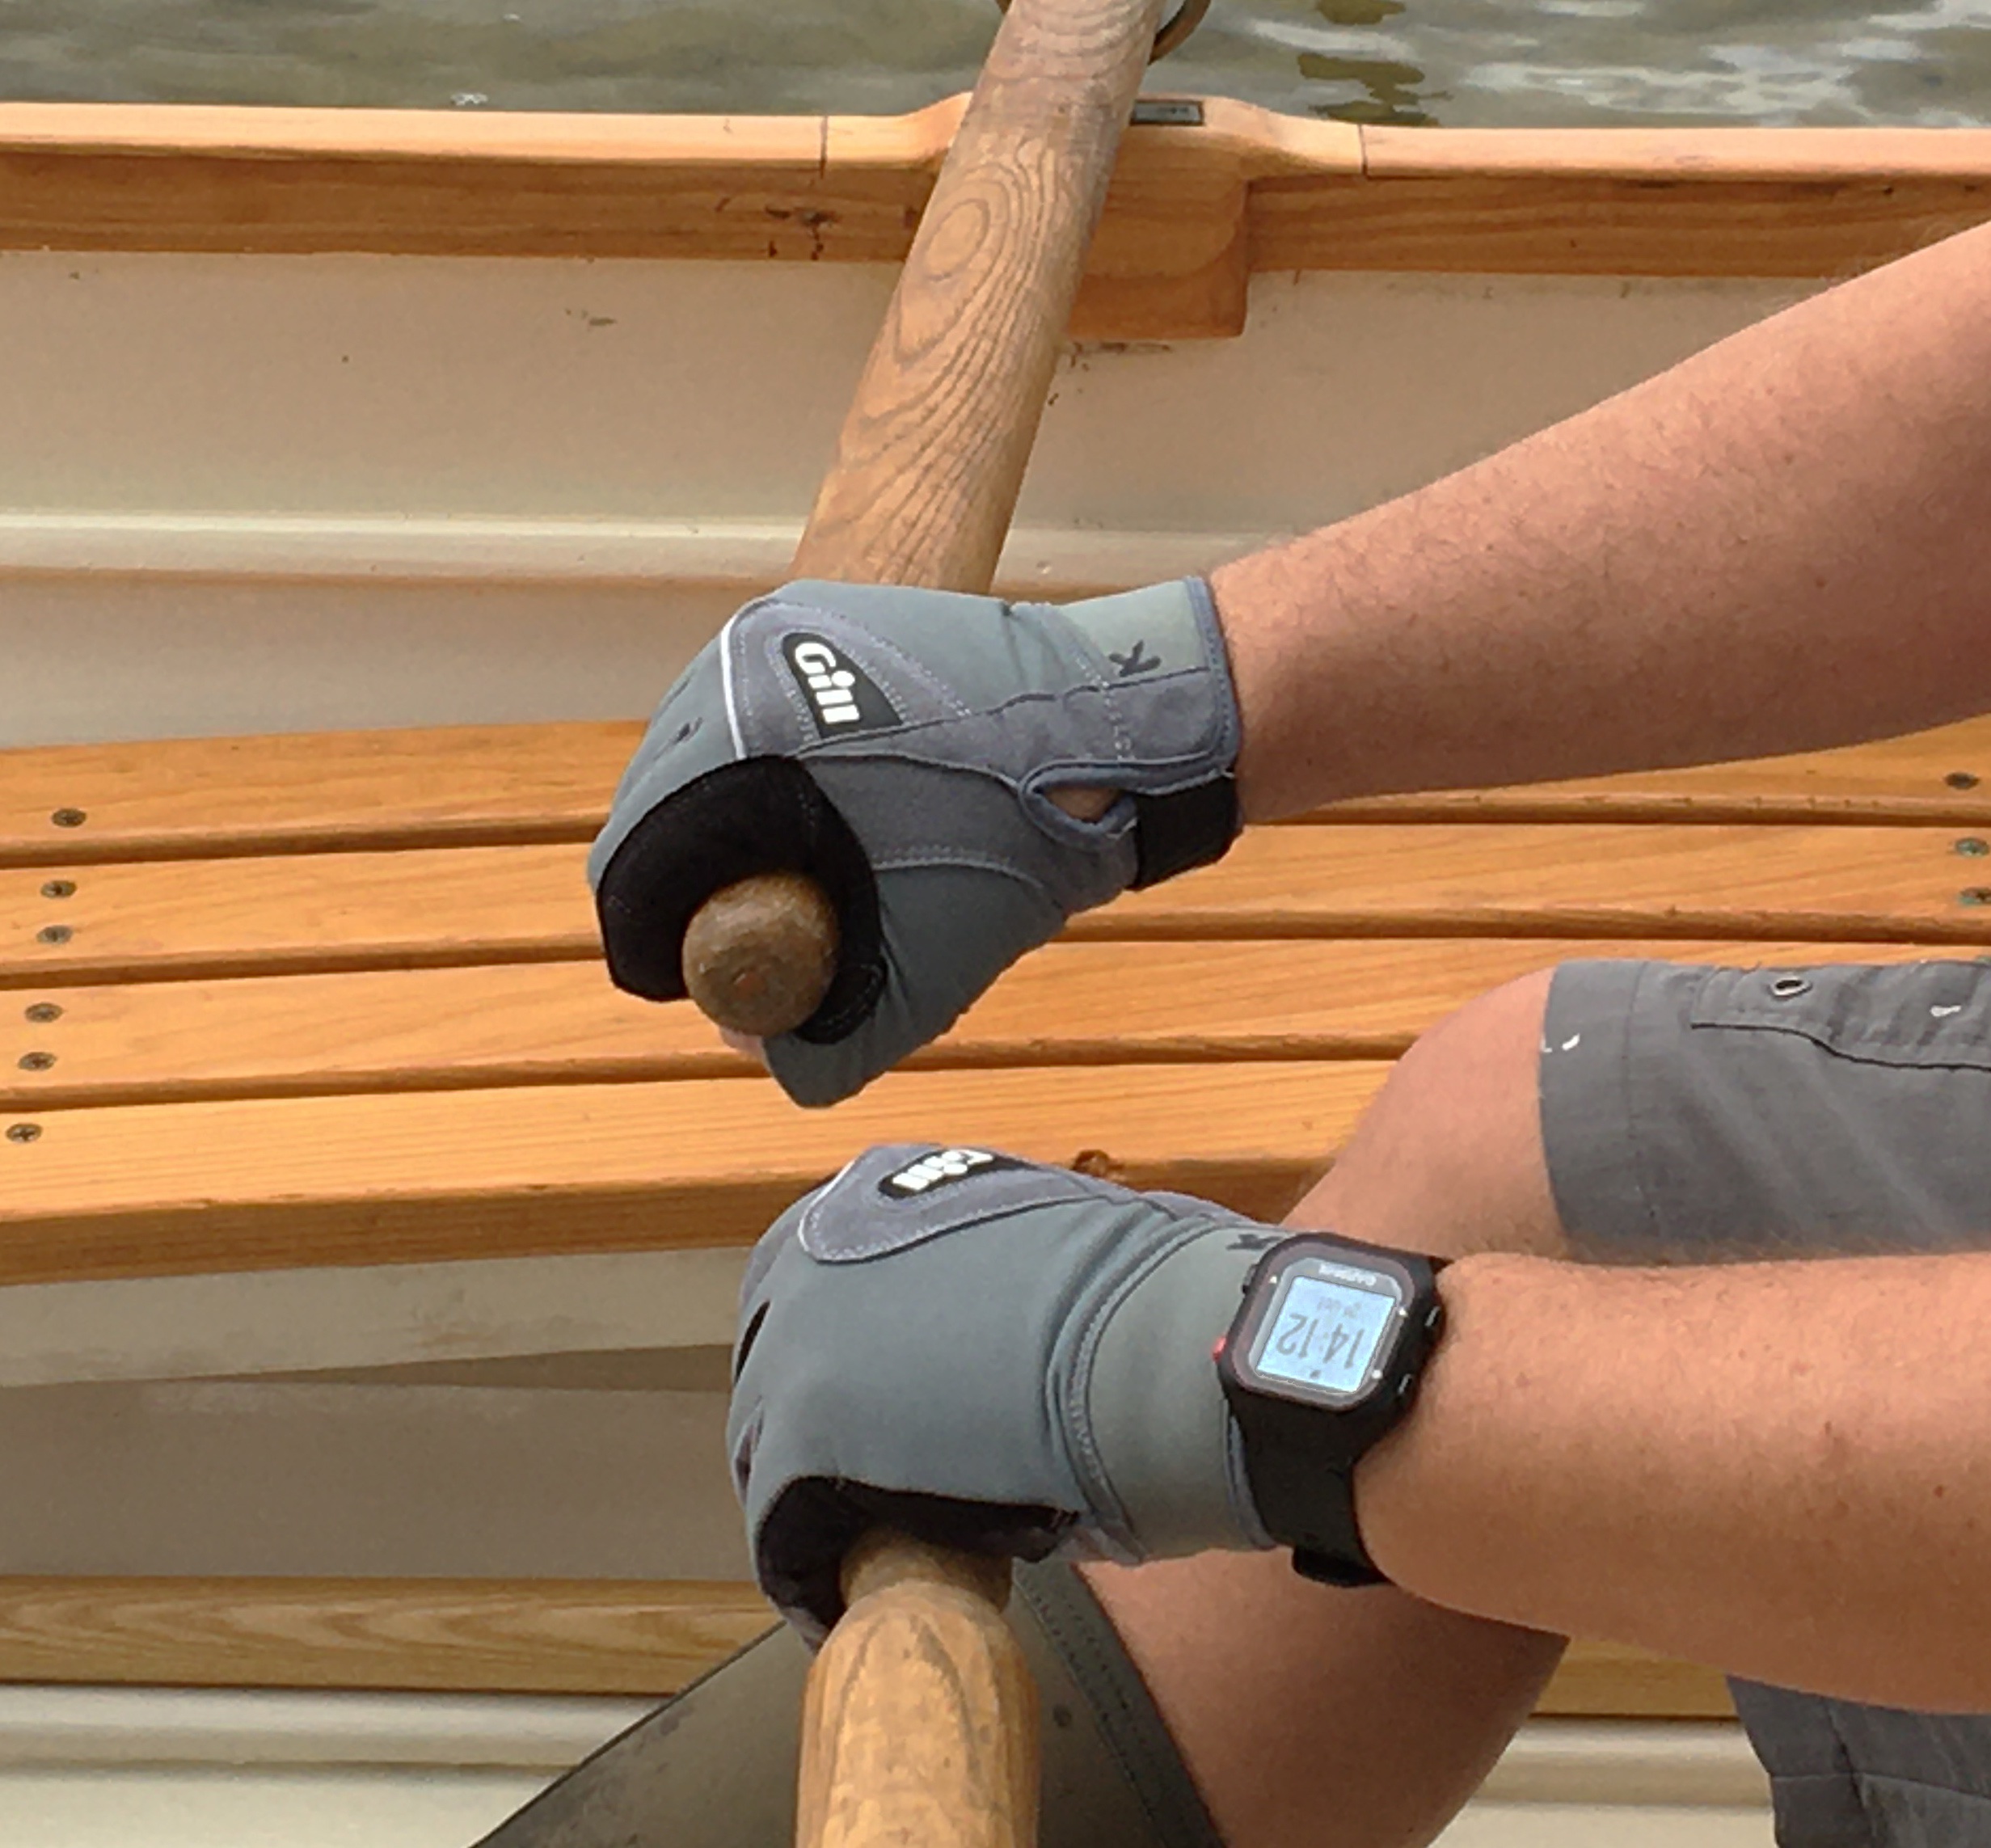
The open thumb and index-finger tips come in handy when manipulating small bits of hardware, using electronics, and fastening gear like PFD buckles and zippers. I also tried gloves with all of the fingertips open but found that I didn’t really need the tactile feel on the other three fingers for rowing and paddling. I prefer the protection of closed fingertips.
The fit of the gloves allows gripping oar handles without forming creases in the palm. The black suede material wraps around the thumb, over an area where the skin is prone to blistering during long rows.
As for sizing and fit, they gloves are snug, which is what prevents loose material bunching up in the palms while rowing. If you prefer a looser fit, I’d suggest ordering one size up. There three versions: Short Finger, Long Finger, and Junior Short Finger. The Long Finger version I have comes in five sizes, XS to XL. I’ve been using the Deckhands for a year now and, they have proven durable and comfortable. They are thoughtfully designed, sturdily made, and affordably priced.
Audrey and Kent Lewis mess about in an armada of small boats on the bays and rivers of the Florida Panhandle.
[M]y “gateway drug” into boatbuilding was that innocuous fitness device, the rowing machine. Whenever our CrossFit coach incorporated rowing in our workout of the day, most people groaned. I celebrated. My love of stationary rowing led me to sign up with a crew program on the Willamette River in Portland, Oregon. I’d forgotten how I loved spending time on the water, and rowing on the river is sublime. I wanted a boat of my own, but sliding-seat shells are expensive and of limited use. A friend mentioned the ease of stitch-and-glue boat building, which triggered my optimism, and in no time, without any fine-woodworking experience, I began scouring the Internet for boat plans.
Photographs by Suzanne Eggleston
Weighing just over 50 lbs, the bare hull can be carried solo. The blocks that anchor the outrigger provide handholds.
Angus Rowboats of Vancouver, British Columbia, has a nice selection of performance boats with options ranging from plans to kits to completed boats. I thought the Oxford Wherry would give me the workouts I wanted with the option to bring my wife, Suzanne, along. Angus offers the boat as a kit or as digital plans with CNC router files. I gambled that I could hire a CNC router, and ordered just the plans.
I bought the marine plywood I needed and found a guy who makes his living with a CNC router. I delivered the plywood and digital files to him, and he charged me just $90 to cut the pieces. When I glued up the finger joints, some were a little loose which, judging by the reviews, would not have been a problem if I had ordered an Angus Rowboats kit.
Stitching the panels together was one of the best parts of the building process, as a boat rose from the pile of plywood in just a day. Of course, as an enthusiastic rookie, I didn’t pay strict attention to the instructions and tightened the copper wires too tight. I had to loosen them and adjust the boat as I stitched the frames and transom in. More carefully following the very thorough and readable instructions of the 49-page manual, I injected epoxy into the seams, tacking the planks together and then to the three frames and two flotation-compartment bulkheads.
The drop-in sliding seat rig, available as a hardware kit and plans from Angus Rowboats, is an alternative to the fixed thwarts provided with the wherry kit.
After the epoxy cured, I pulled all of the copper wires, leaving tiny holes in the hull. While fiberglassing the interior, I used too much epoxy and it dripped out on the floor and the tops of my boots. The instructions don’t say to fill those holes with thickened epoxy, so I think I just used too much epoxy.
After the hull was ’glassed it was time to move on to the flotation compartment covers, quarter knees, breasthook, and gunwales. Kit builders would have the advantage with the knees and breasthook, as precut mahogany pieces are included and require only a little trimming to fit; each gunwale is made of three pieces with the scarfs already cut and ready for gluing. I don’t have a tablesaw, so I bought 1×1 red oak to piece together the breasthook, knees, and gunwales.
Despite my budding workmanship and a few errors, I finished the project and had a beautiful, shapely hull sitting in my garage. The build process was very satisfying because the design was simple yet elegant and the instructions were thorough and not overly complicated.
The instructions next called for seat installation. The kit comes with three precut cedar thwarts, but I had decided to equip the hull with a sliding seat. A commercial drop-in rig, like the Piantedosi RowWing, would fit the Oxford wherry, but I purchased the Angus sliding seat/rigger hardware kit with a carbon-fiber seat. I used clear vertical-grain Sitka spruce, as recommended by the instructions, for both the rigger and seat rails. The rigger has a span of 64” and is made of two pieces of spruce. A 1-1/2″ -wide lap joint brings the two 33-1/2″ lengths together and fiberglass is then used to reinforce it. This piece is the most beautiful length of wood I’ve ever fashioned.
An alternative to the sliding seat rig is the installation of fixed thwarts at each of the three frames and a pair of short wooden outriggers.
I had ordered Angus’s plans for hollow-loom oars, but the contractor’s tablesaw I borrowed from a friend didn’t seem capable of safely cutting the narrow strips I needed to cut, so I ordered up a pair of Concept2 carbon-fiber oars. When the oars arrived, Suzanne and I loaded the boat on the car and headed for Lacamas Lake in Washington State. The water was smooth, the late-September weather gorgeous, and with the rowing rig set in the forward position and Suzanne sitting in folding camp chair just aft of the outrigger and facing forward—a good arrangement for conversation—I managed to row the lake without crabbing an oar.
The designer sets the Oxford Wherry’s cruising speed at 3 to 4 knots and the top speed at 6-1/2 knots.
Our next outing was on Vancouver Lake, a venue for rowing competitions. We rowed across the lake and then tested our navigation abilities rowing the 16′ span between the blades down the narrow, serpentine Lake River. Once accustomed to rowing, we found the boat tracked beautifully. Course corrections are as easy as pressing harder with one foot, which translates into about a 5-degree change of direction with each stroke.
The stability added by the long sculls made it easy to get in and out of the wherry. I generally row early in the day on smooth water, and in calm conditions, the boat tracks well and glides quickly. At 235 lbs, I’m a large person, and rowing solo I have enough freeboard. Rowing with a passenger is very smooth and comfortable with minimal loss of speed and maneuverability. When I venture out alone on windy days I feel safe and rarely have water splashing aboard. With Suzanne and some gear along, the load is likely over 400 lbs and I pay more attention to chop and wakes. A bit of water may splash over the gunwale and make some bailing necessary. As with any rowing boat, it is more work to control the boat in chop, especially if taking the chop or wind on the side or the port or starboard bow. When taking waves head-on or running with a following sea, the boat handles well.
The designer compares the seaworthiness of the Oxford Wherry to that of a canoe. Equipping it with outriggers and sculls provides another measure of stability.
When I retired, I decided to do the things that I regretted not doing when I was younger. I’d been drawn to crew in college, but had been unable to participate while working full time and going to classes. It wasn’t until I was pushing 60 that I finally signed up for rowing lessons. Building the Oxford Wherry had a few of the frustrations common to a budding boatbuilder, but it was a grand adventure and rowing it has been a joyful experience.
Bob Eggleston graduated from college with a degree in psychology and a passionate belief that the only meaningful job would be helping people. He found employment in secure psychiatric facilities working with pre-teens, teens, adults, and finally the elderly, but the sadness of the work took its toll. Bob moved to a more technical career with a large Oregon power company and worked his way into grid operations, partnering with brainy engineers and former Navy nuclear submariners. After a decade there, he took an early retirement to live a more interesting life and do the things he wished he had dreamed about. He moved to Port Townsend,Washington, and enrolled in the nearby Northwest School of Wooden Boatbuilding, to answer this question: “Can a 58-year-old former cube dweller become a productive craftsman?” Bob contently works on answering this question every day.
Oxford Wherry Particulars
[table]
Length overall/15′ 10″
Waterline length/15′ 7″
Beam/38″
Weight/53 lbs
Depth/11″
Freeboard at 250 lbs displacement/7.5″
Freeboard at 600 lbs displacement/5 ″
Cruise speed/3-4 knots
Sprint speed/6.5 knots
Maximum recommended touring load/500 lbs
Maximum recommended short-distance load/600 lbs
[/table]
Angus Rowboats offers the Oxford Wherry as digital plans with CNC router files for $129 and a complete kit for $1,399.
Is there a boat you’d like to know more about? Have you built one that you think other Small Boats Magazine readers would enjoy? Please email us!
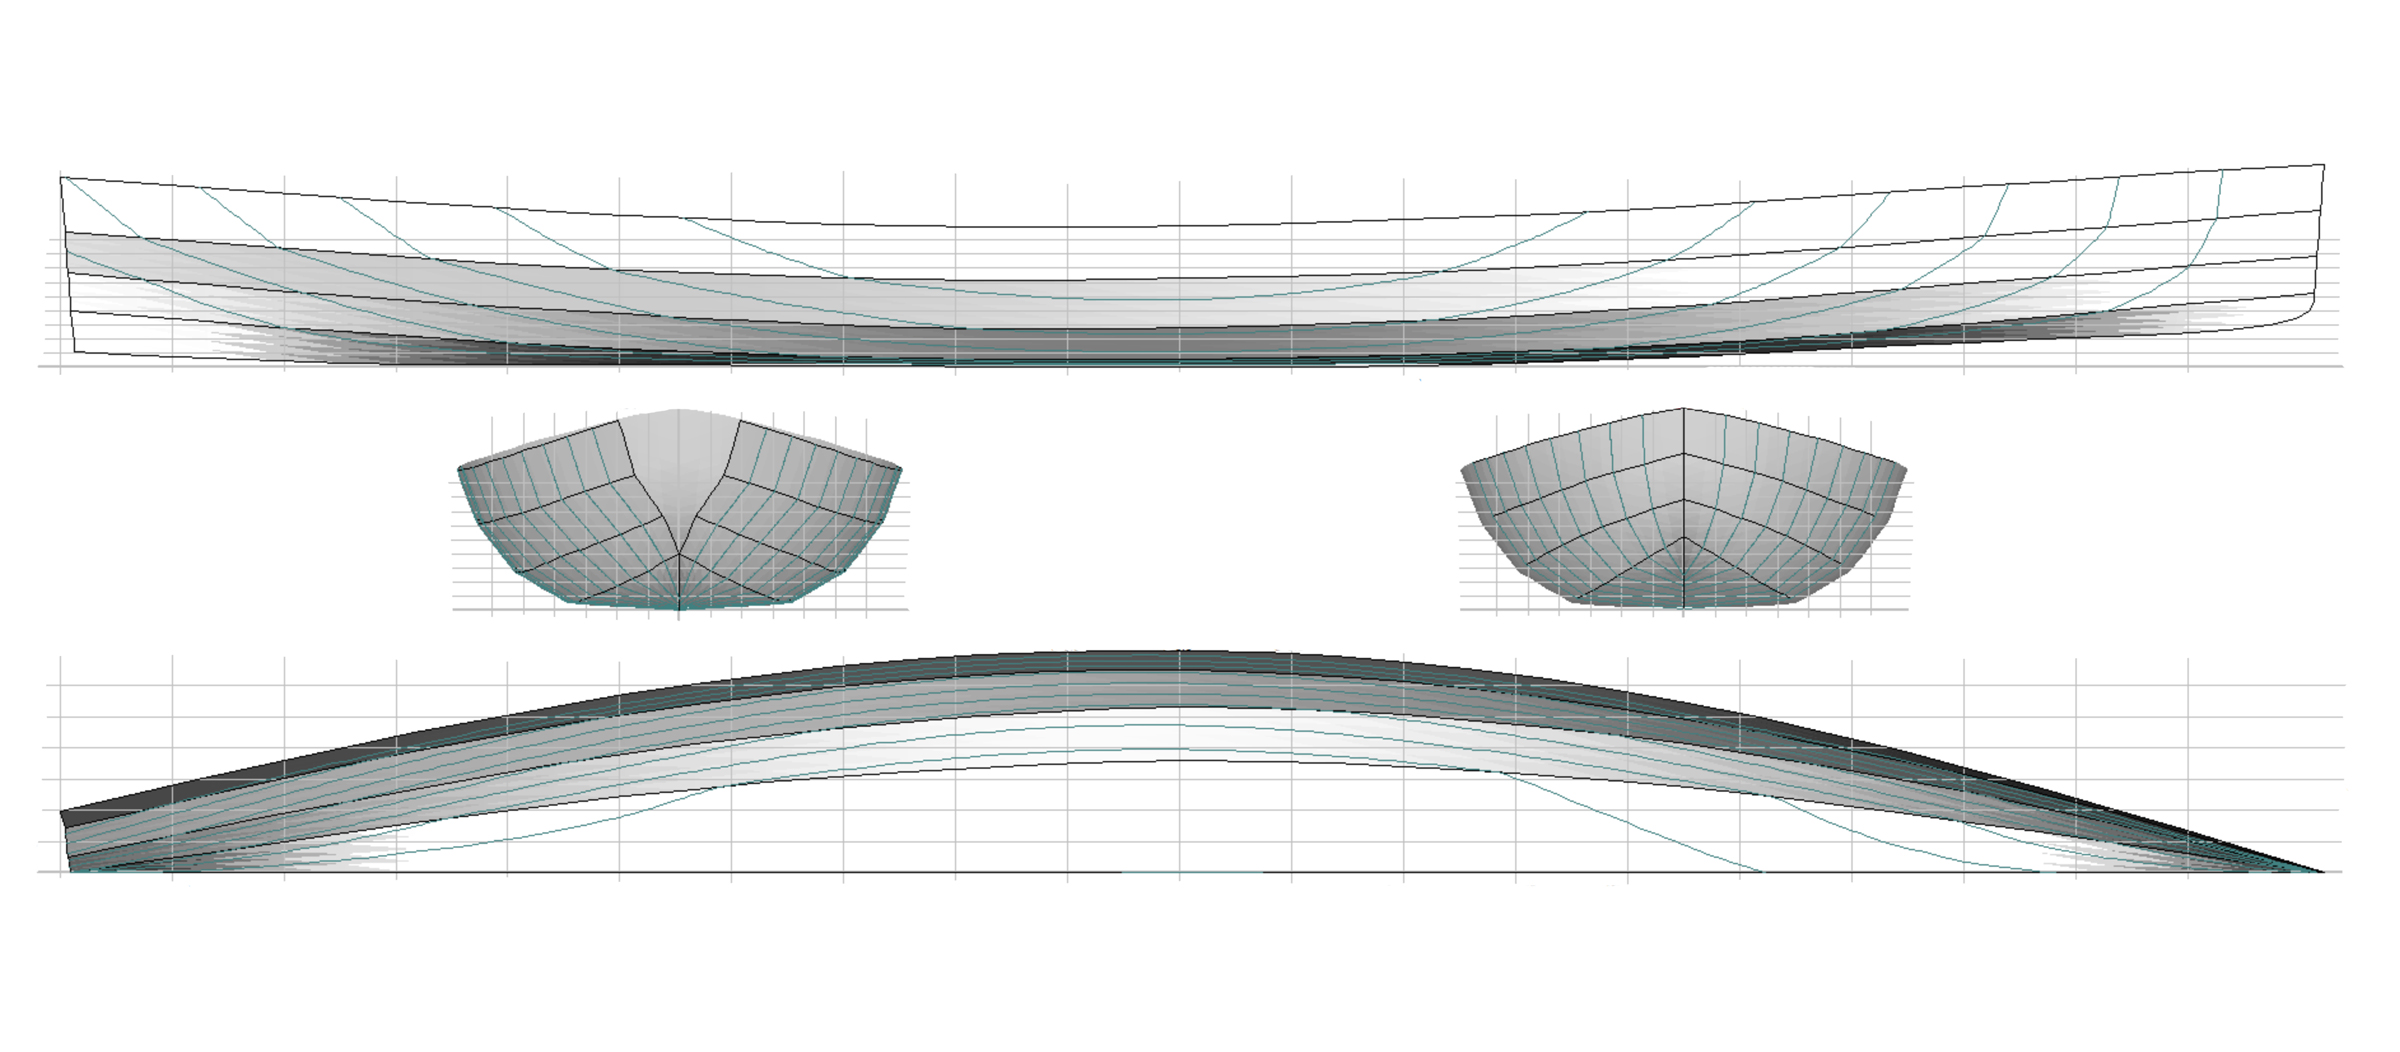
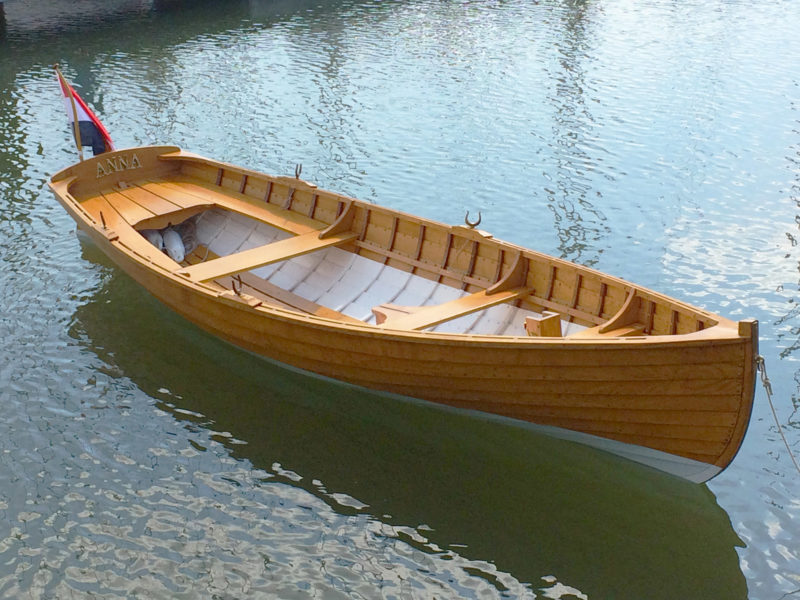
Up the coast of Maine and just over the Canadian border lies Deer Island, New Brunswick. The island has a long-standing tradition of first-rate boatbuilding, and the late Lindon Parker did much to uphold it. In the 1940s he likely started with a half model that he had carved to design and build what is now known as the Parker Dinghy. “Dinghy” may not suggest the elegance of this boat, whose shape is clearly linked to the small working craft of the area. Powered by oar, and used, among other things, to tend herring weirs around Deer Island, they were typically carvel planked and had a moderate beam, relatively steep deadrise, and a generously raked transom. These elements produced a hull with the ample reserve buoyancy needed to tend the nets.
Plans for the Parker Dinghy are available from Harry Bryan, a wooden-boat builder in Letete, New Brunswick, one of two places with ferry service to Deer Island. He writes: “Deer Island was known for well-designed dinghies, when good performance was valued by local fishermen. A family from Colorado who summers on a small island off Deer Island bought one of Lindon Parker’s boats, and because they used it for only a week or two every year and stored it in a shed, it is in good condition and one of the last surviving Deer Island dinghies. We did some minor work on the boat in 2002, including removing 27 lbs of paint. Retired biologist and boatbuilder Mike Strong and I took the lines off the boat with a fundamentals class at WoodenBoat School. Mike went on to build the boat and I drew up the plans.”
Opening photograph by Steven Businger, above by Cyrus Dworsky
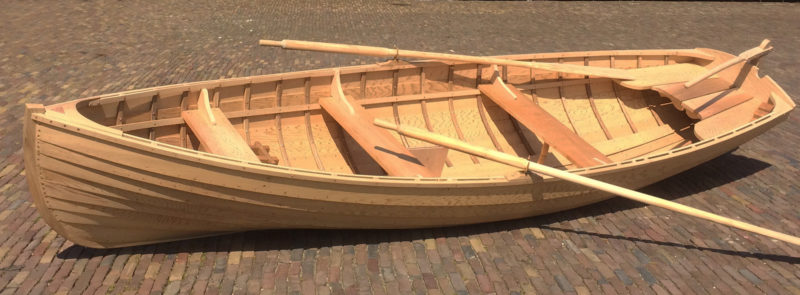
Builders on Deer Island favored carvel planking for small boats, but the Parker Dinghy could be easily be built with either traditional or plywood lapstrake planking.
The plans are a single 18″ x 23″ sheet with lines, offsets, construction drawings, and scantlings—all the information a boatbuilder with intermediate skills needs to build the boat, and nothing extra. There are no patterns included, so the boat requires lofting. The plans call for steam-bent frames and carvel planking typical of the small boats of the area, though one could certainly use lapstrake or glued-lap-plywood construction.
Having had my sights set on building a plank-on-frame rowboat in the 12′ to 16′ range, I was immediately sold on the Parker Dinghy when I saw her lines. I ordered the plans and set about lofting the boat and picking up all the patterns for the backbone and transom as well as building the five molds required. The plans call for woods all native to New Brunswick, a nod to the way Lindon Parker would have built them, and perhaps to Harry Bryan’s belief in using what’s around you. I was building this boat in the Pacific Northwest and had a different array of wood species to choose from. I found a nice piece of tight vertical-grain western larch for the keel, deadwood, and sternpost. Though it’s a softwood species, it is quite hard and rot-resistant.
Ferdi Businger
There are three thwarts in the dinghy, but only two are rowing stations. The boat was originally skippered by a solo rower, who took the center or forward thwart as boat trim required.
The one departure that I took from the construction plan was adding a keel batten to provide a solid backing for the garboards as well as a secure place to bed and fasten them. This can go a long way toward keeping that leak-prone seam watertight. As drawn, the rabbet in the keel would have been too shallow for most of its length to provide much of a landing for the garboards. The 3/4″ x 3″ keel batten was cut from western larch, bedded in 4200 and screwed to the top of the keel and deadwood at the apex line (the innermost corner of planking as it enters the rabbet). Joining the keel and keel batten at the apex line allowed me to rough out the bevels for the rabbet very easily while the two pieces were separate; it needed only small adjustments once it was time to plank.
In the construction plan, the stem is drawn as a natural crook running right down to the keel, joined by an overlapping stem knee. I wanted to stick with this detail if possible, as it is structurally superior if done right, and the process presented the intriguing challenge of finding a suitable piece of wood. It just so happened that a friend had recently been given a load of black locust branches from a blowdown, and was nice enough to let me bring my stem pattern over and have a look. I found a branch with just the right shape. If I hadn’t been able to obtain a natural crook I would have either laminated a piece to suit or I’d have assembled a stem, knee, and gripe as is commonly seen.
Lexi Heiser
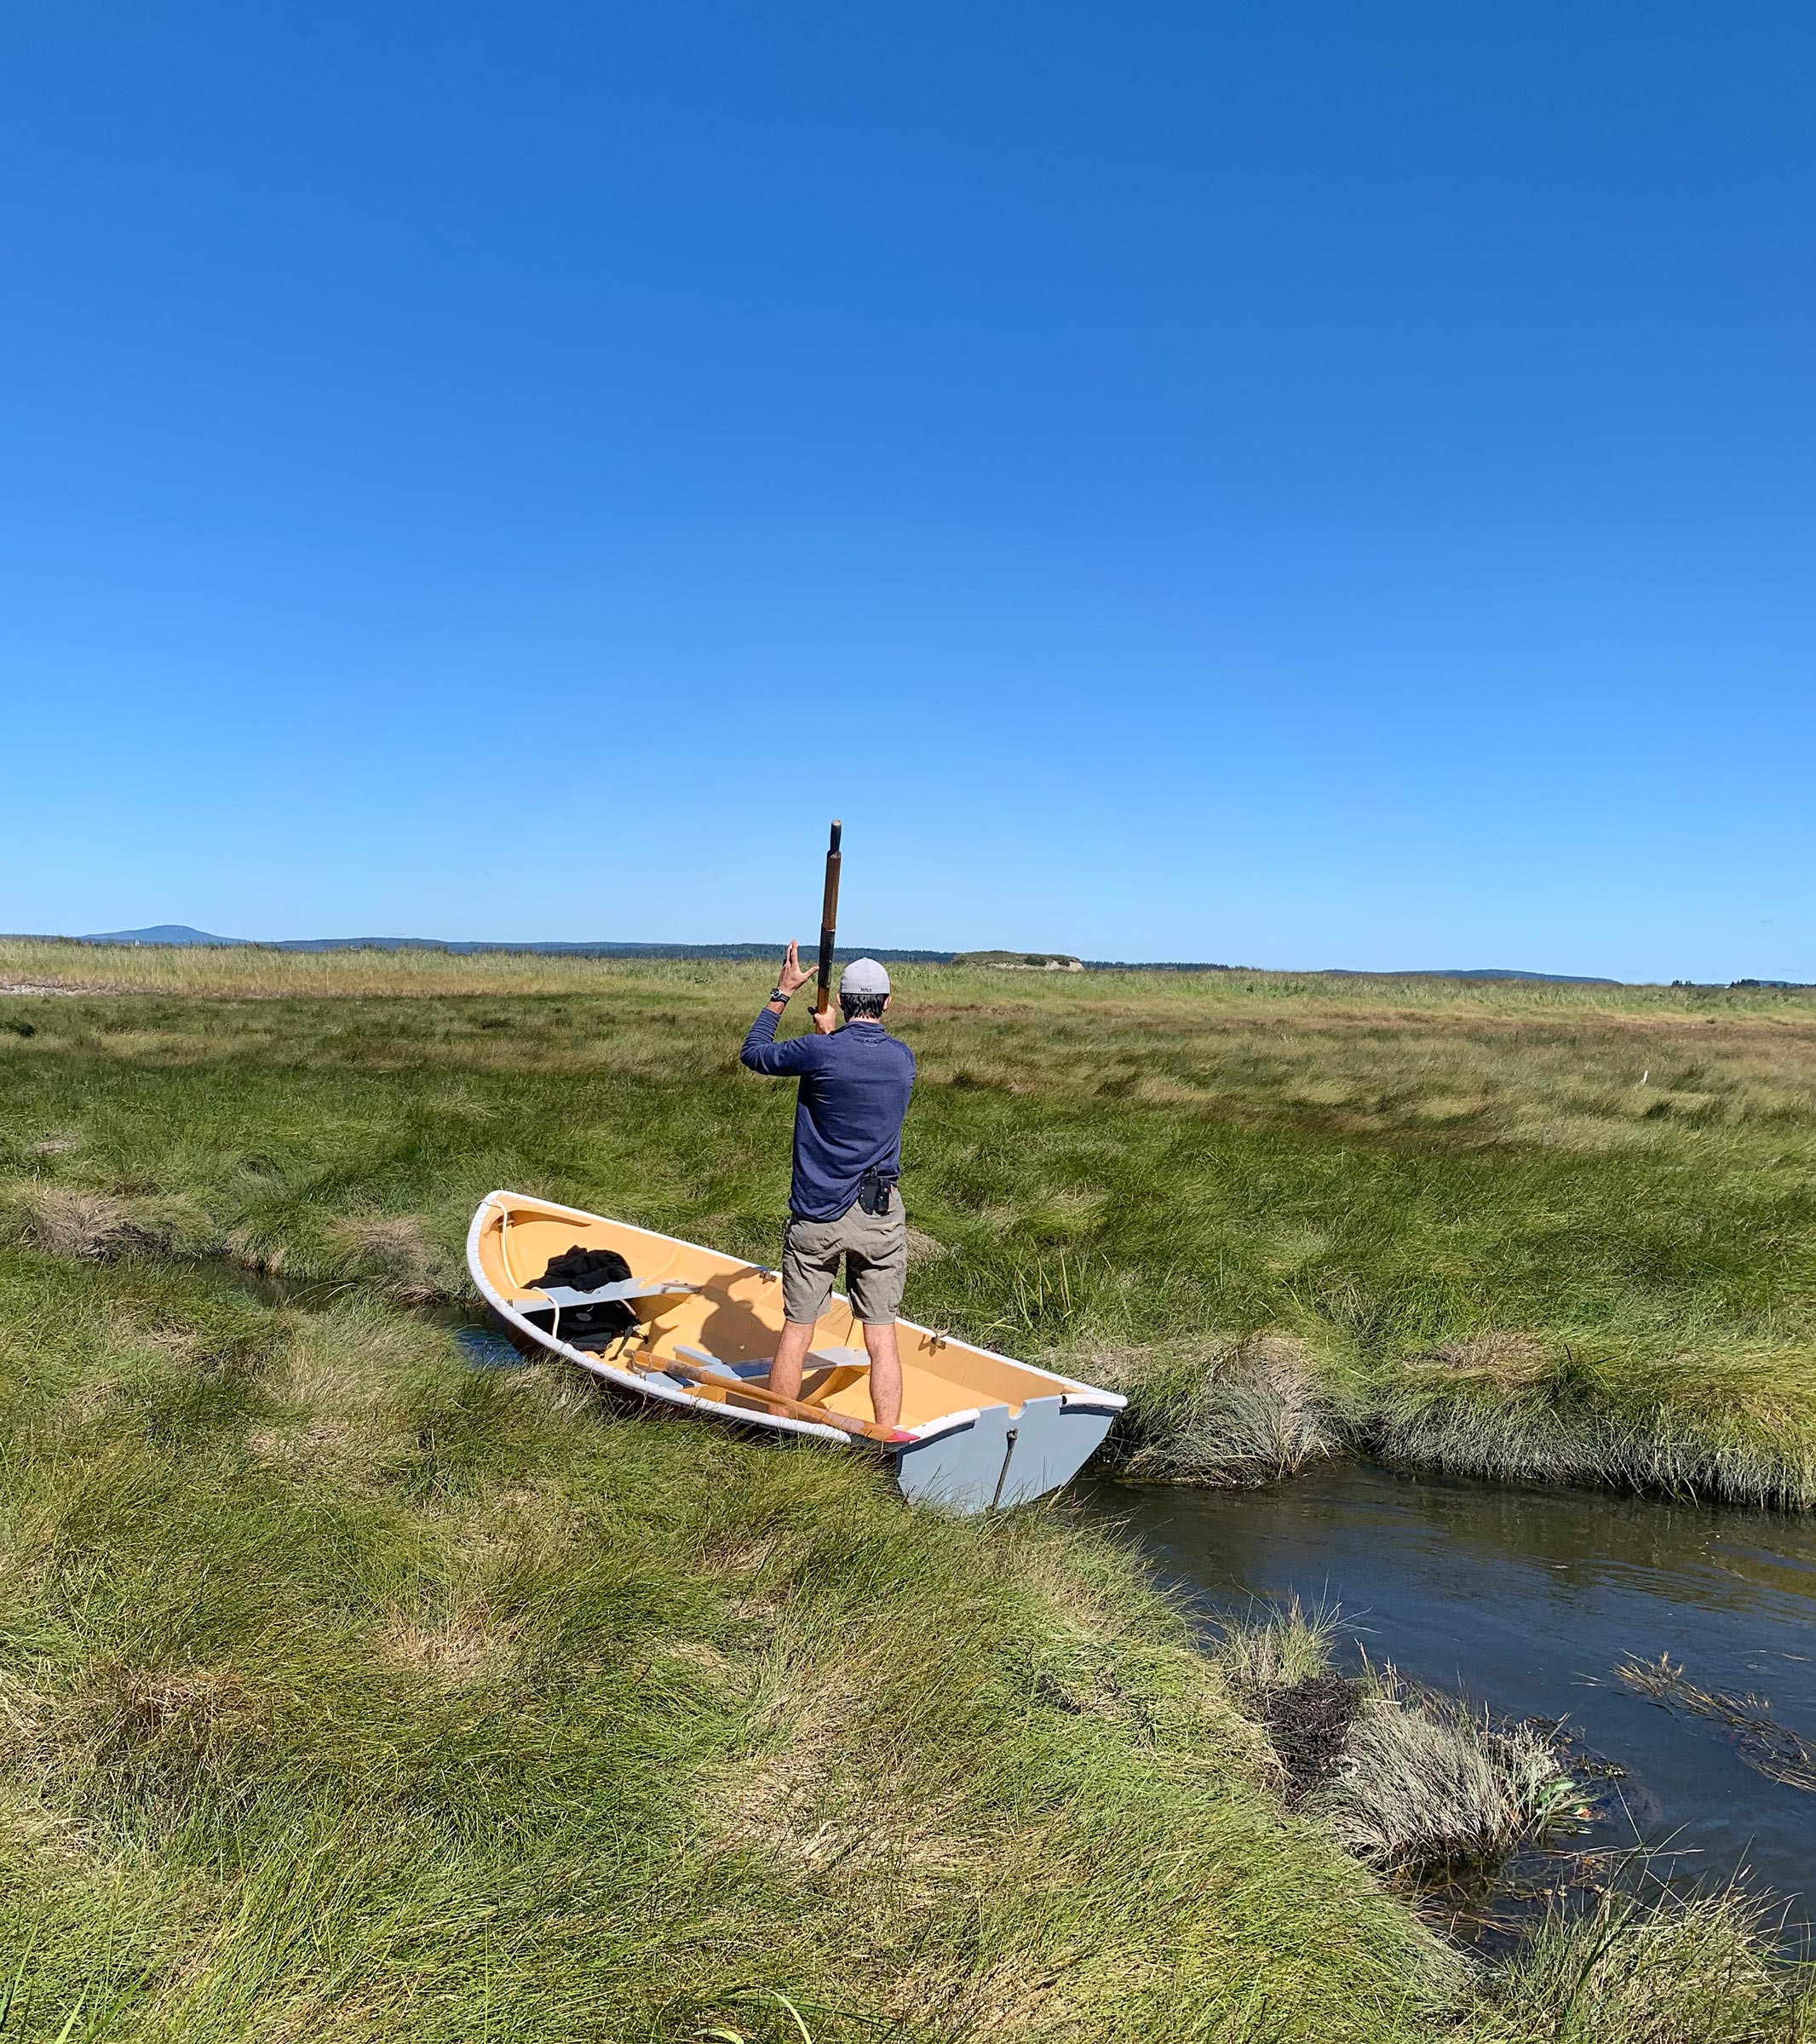
The keel isn’t deep but it’s long, good for tracking but slowing the dinghy through tight turns in confined spaces.
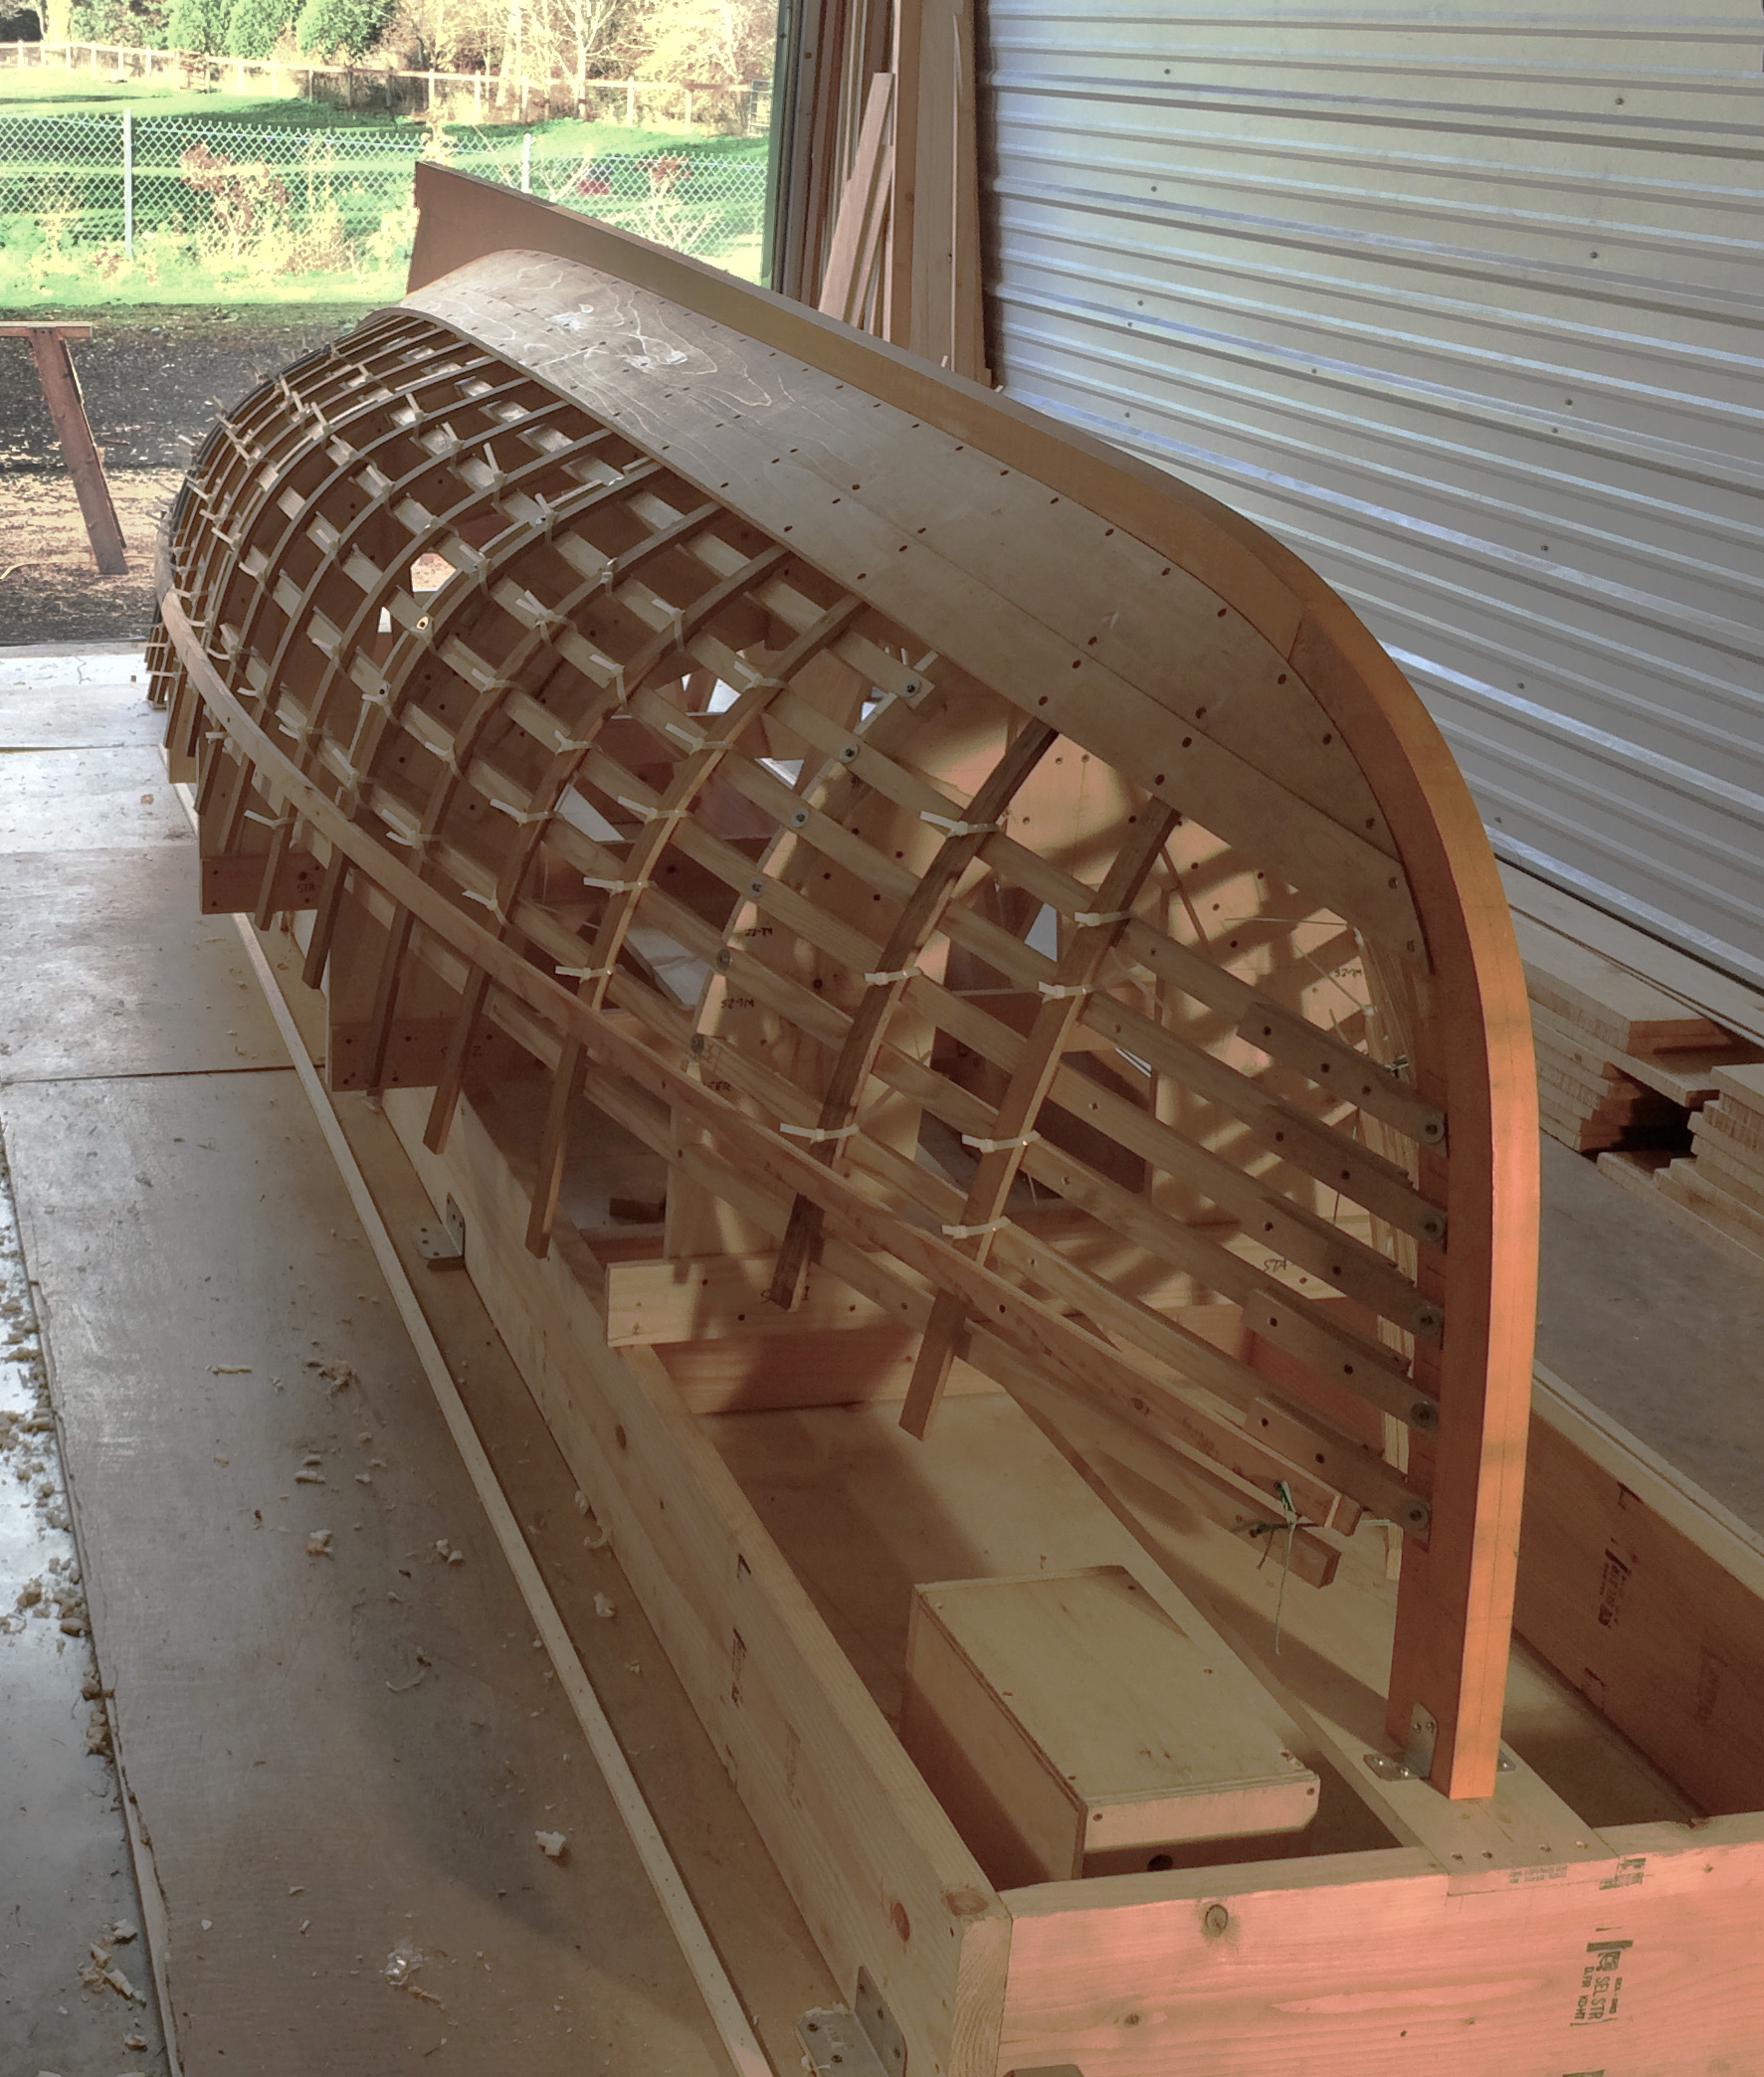
I set up the molds on the strongback at a convenient working height, and proceeded to affix the backbone and transom to the setup. Building the boat upside down in this fashion puts accessibility and gravity on your side. I chose to line off the plank locations at this point, before installing the ribbands. The plans show eight planks per side, and that proved to be the right number with strakes neither too wide to accommodate the curvature of the boat, nor too narrow to be practical. Once the plank locations were lined off, I notched the ribbands into the molds, spacing the ribbands in between the planking marks so that they could remain in place as planks went on. With the ribbands set into the molds, the frames would be bent on the outside of the ribbands rather than the inside. This eased the process of bending the frames, as I could push them down around the ribbands instead of having to feed them inside the ribbands and pull them from the outside until I could secure them to the ribbands.
The 1/2″ x 1-1/4″ white-oak frames were steam-bent from rail to rail over the top of the keel batten for most of the boat; toward the ends of the hull, frames were installed in halves. I used zip ties to hold the frames to the ribbands temporarily, eliminating the need to put any unnecessary screw holes in them. Once this was complete, it was time to start planking.
Ferdi Businger
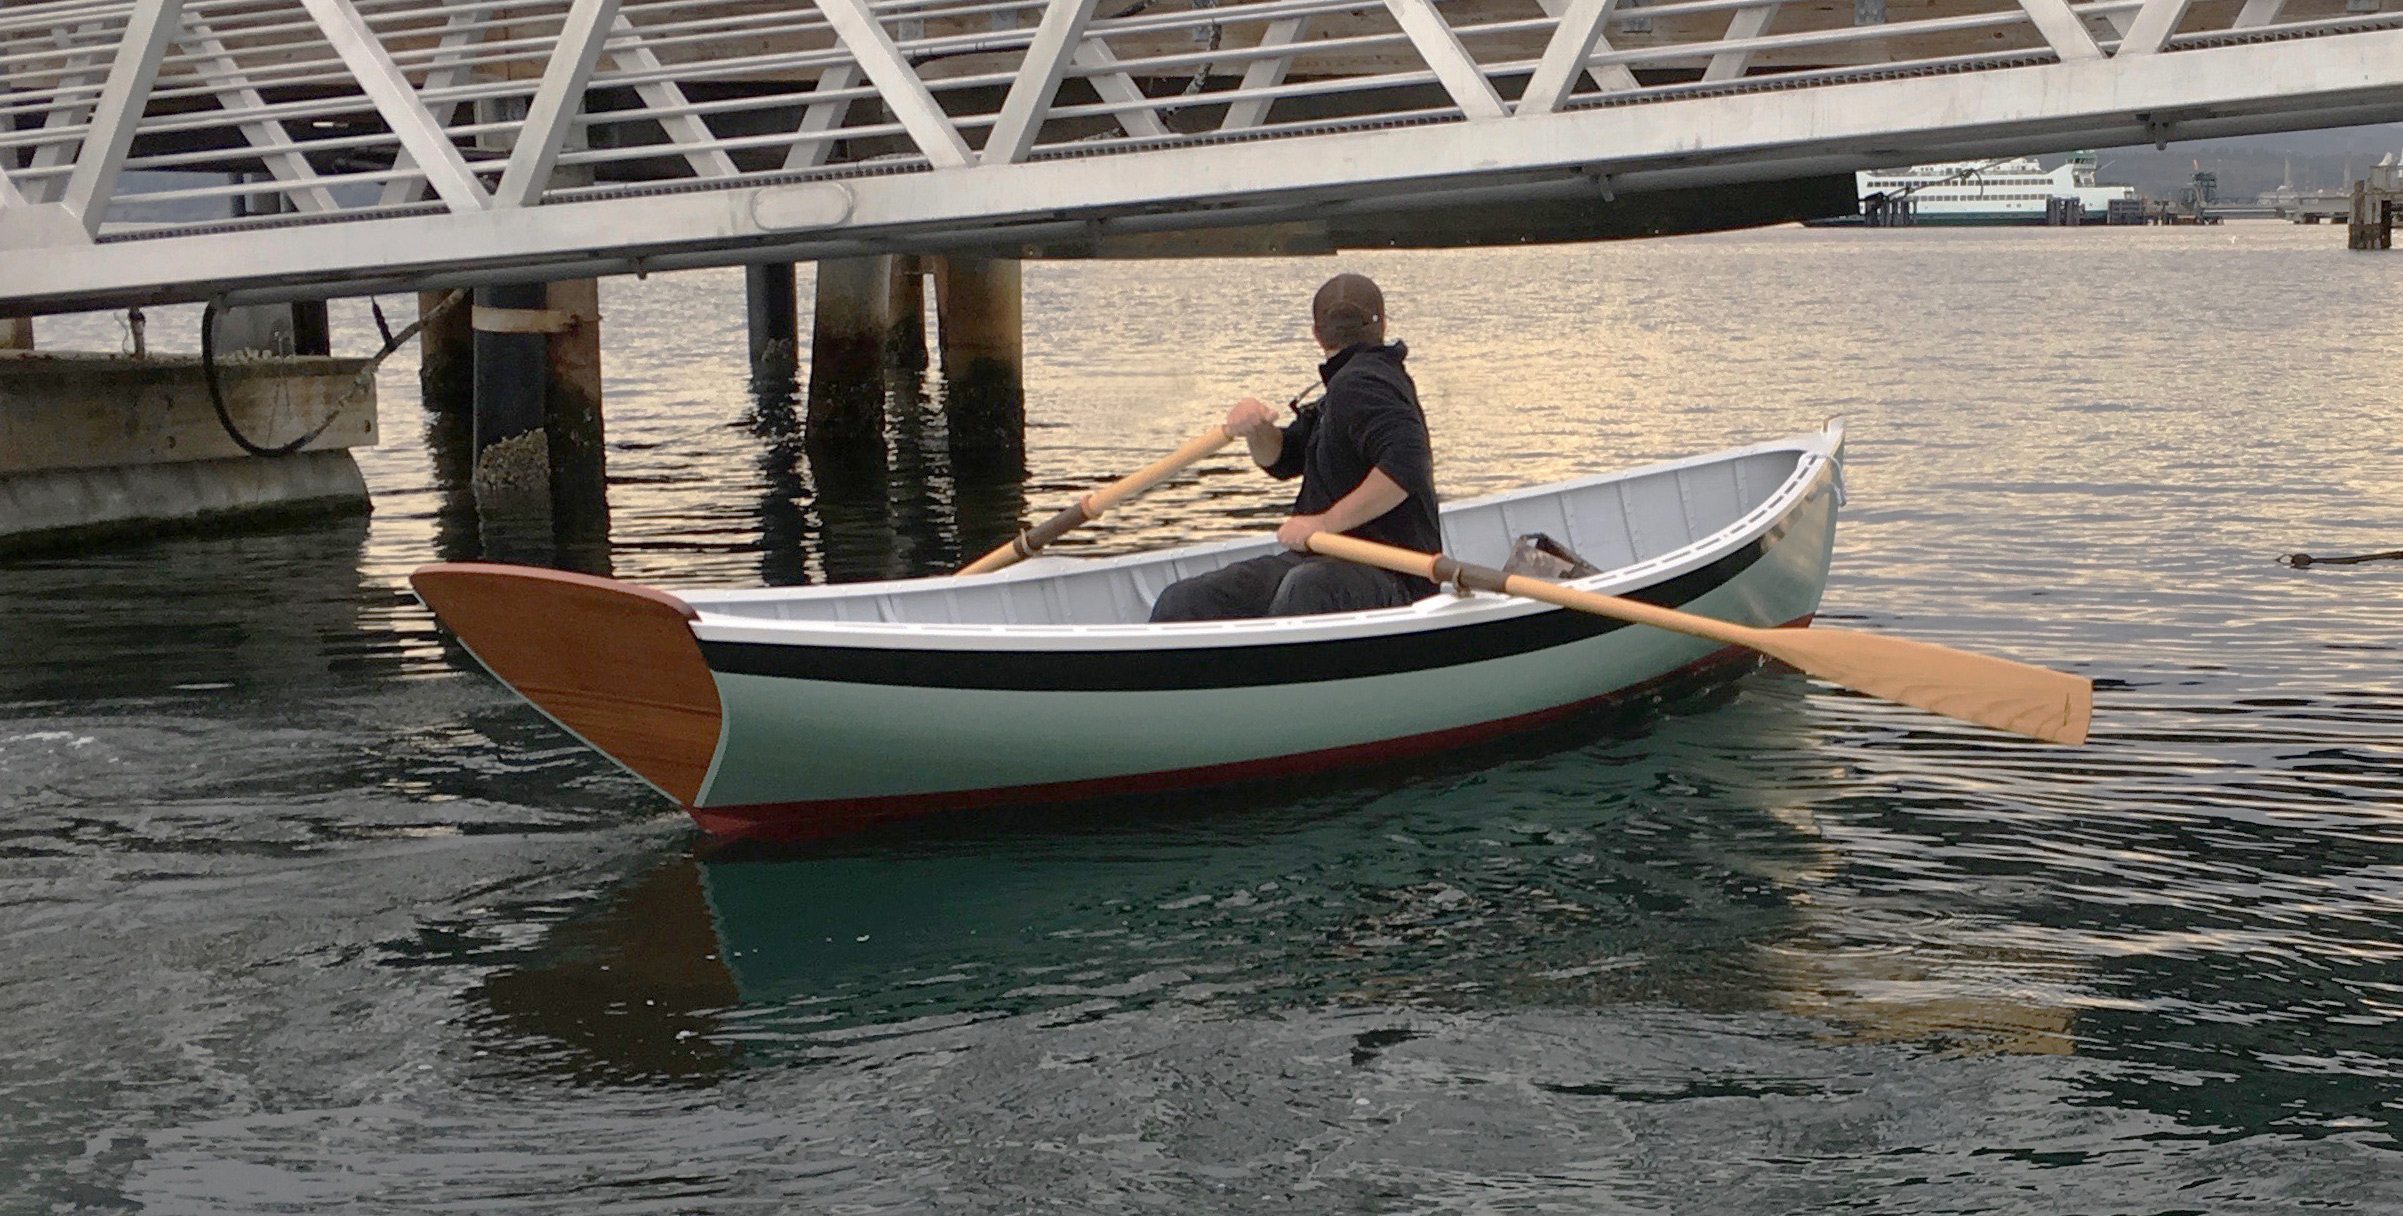
When traveling with a single passenger, the rower takes the forward station to achieve the best trim. The dinghy here is outfitted with oarlocks, but the original boat had tholepins.
The western red cedar that I acquired for planking stock wasn’t long enough to get planks out of single boards, so I elected to scarf two boards together to make up the length. A 12:1 scarf and a good marine-grade epoxy makes a very strong bond, and eliminates the work of fitting and fastening butt blocks which would have been required otherwise. The other advantage I found was that I was able to scarf the boards together on varying angles to accommodate the shape of the plank, and keep the grain running in the right direction as much as possible.
This boat planked up fairly easily, not having any real extreme shape to accommodate. However, here was enough twist leading into the stem that the hood ends of the garboards and the following several planks required steaming. I did the steaming in place with a polyethylene bag slipped over the first few feet of the plank and an electric steam generator. Specific plank-to-frame fastenings were not specified in the plans, so I used copper rivets for both because they are a reliablefastening and because the 1/2″-thick frames wouldn’t provide enough depth for screws to get good bite.
Once the planking was complete, I flipped the hull right-side up and finished off the rivets. Up until then the planks were held to the frames by the nails alone, now it was time to apply the roves, nip off the excess, and peen the cut ends.
The Parker Dinghy’s interior is finished off simply. There are three thwarts and the sternsheets. The ’midship and forward thwarts are the two rowing stations. They are set up not for two people to row together, but for one rower to choose a position to achieve proper trim when a passenger or load is carried. Though the plans show tholepins, I decided to go with common bronze oarlocks. Tholepins surely would have done the job just fine, but I prefer the solid connection of an oarlock in a socket, and think it looks a little nicer as well. I painted all surfaces with the exception of the transom, which is varnished on its outer face. The topside and interior paint is an alkyd enamel from George Kirby Jr. Paint Co., which looks good and provides great protection for the wood.
Ferdi Businger
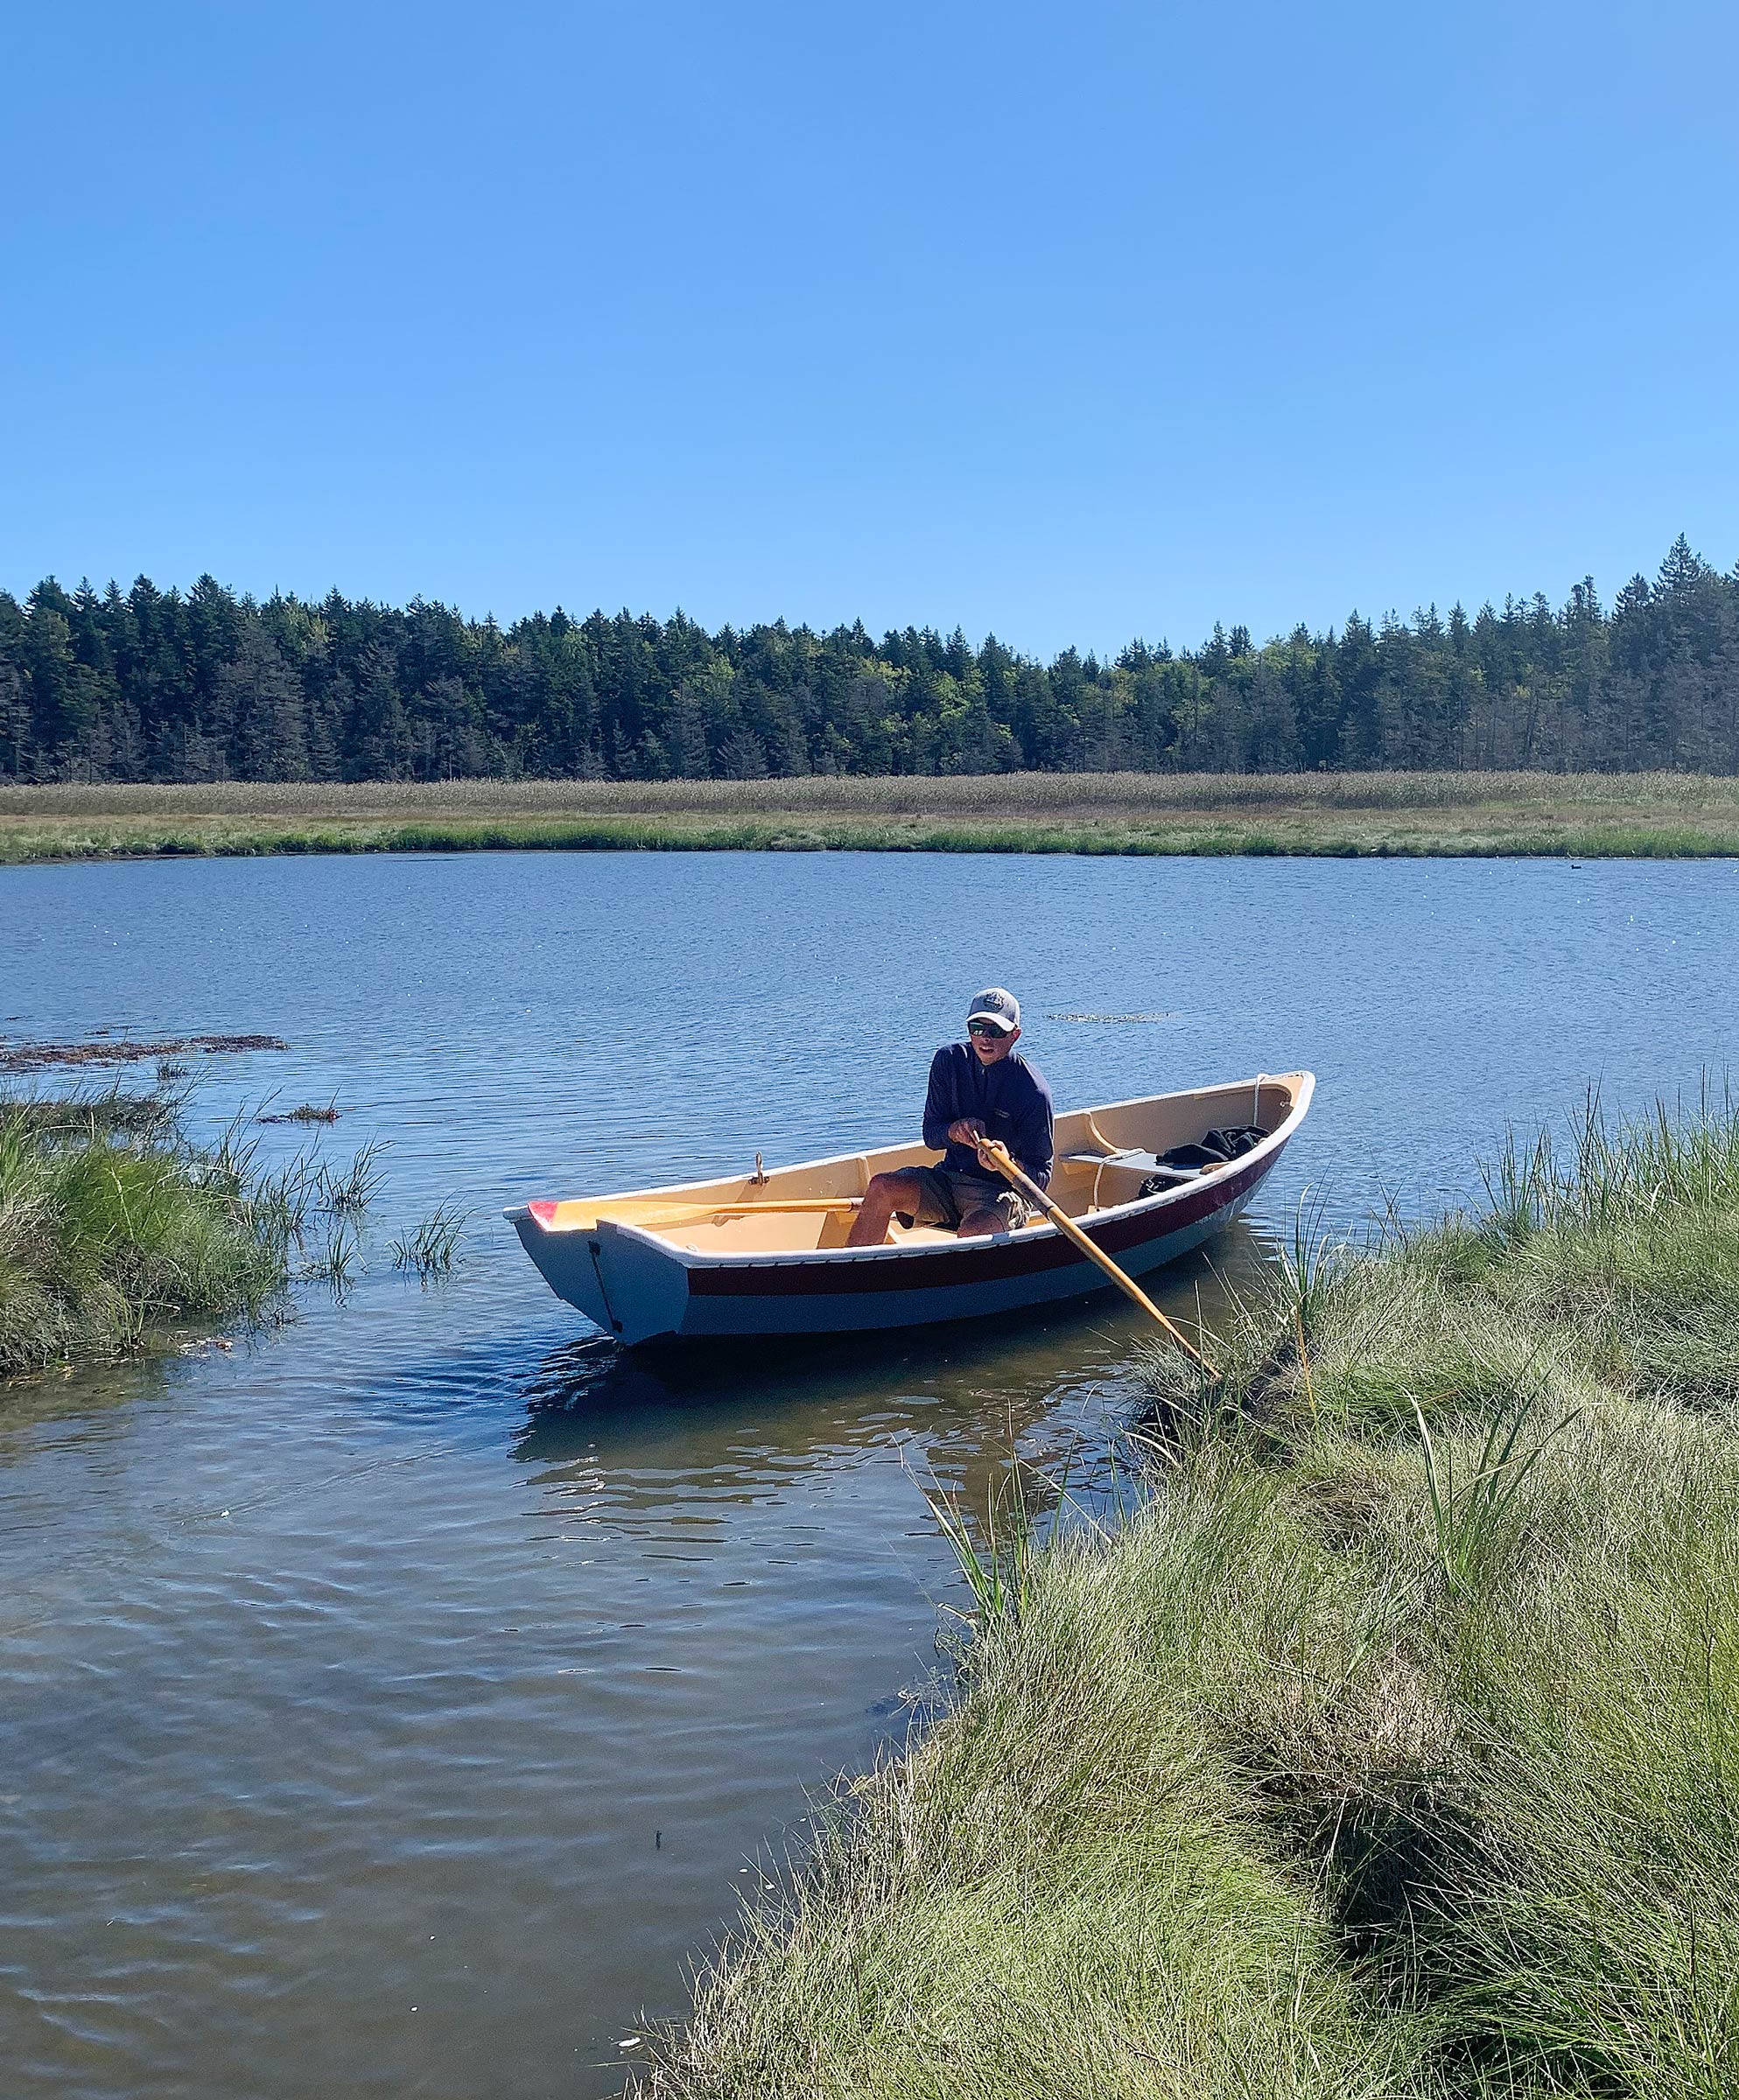
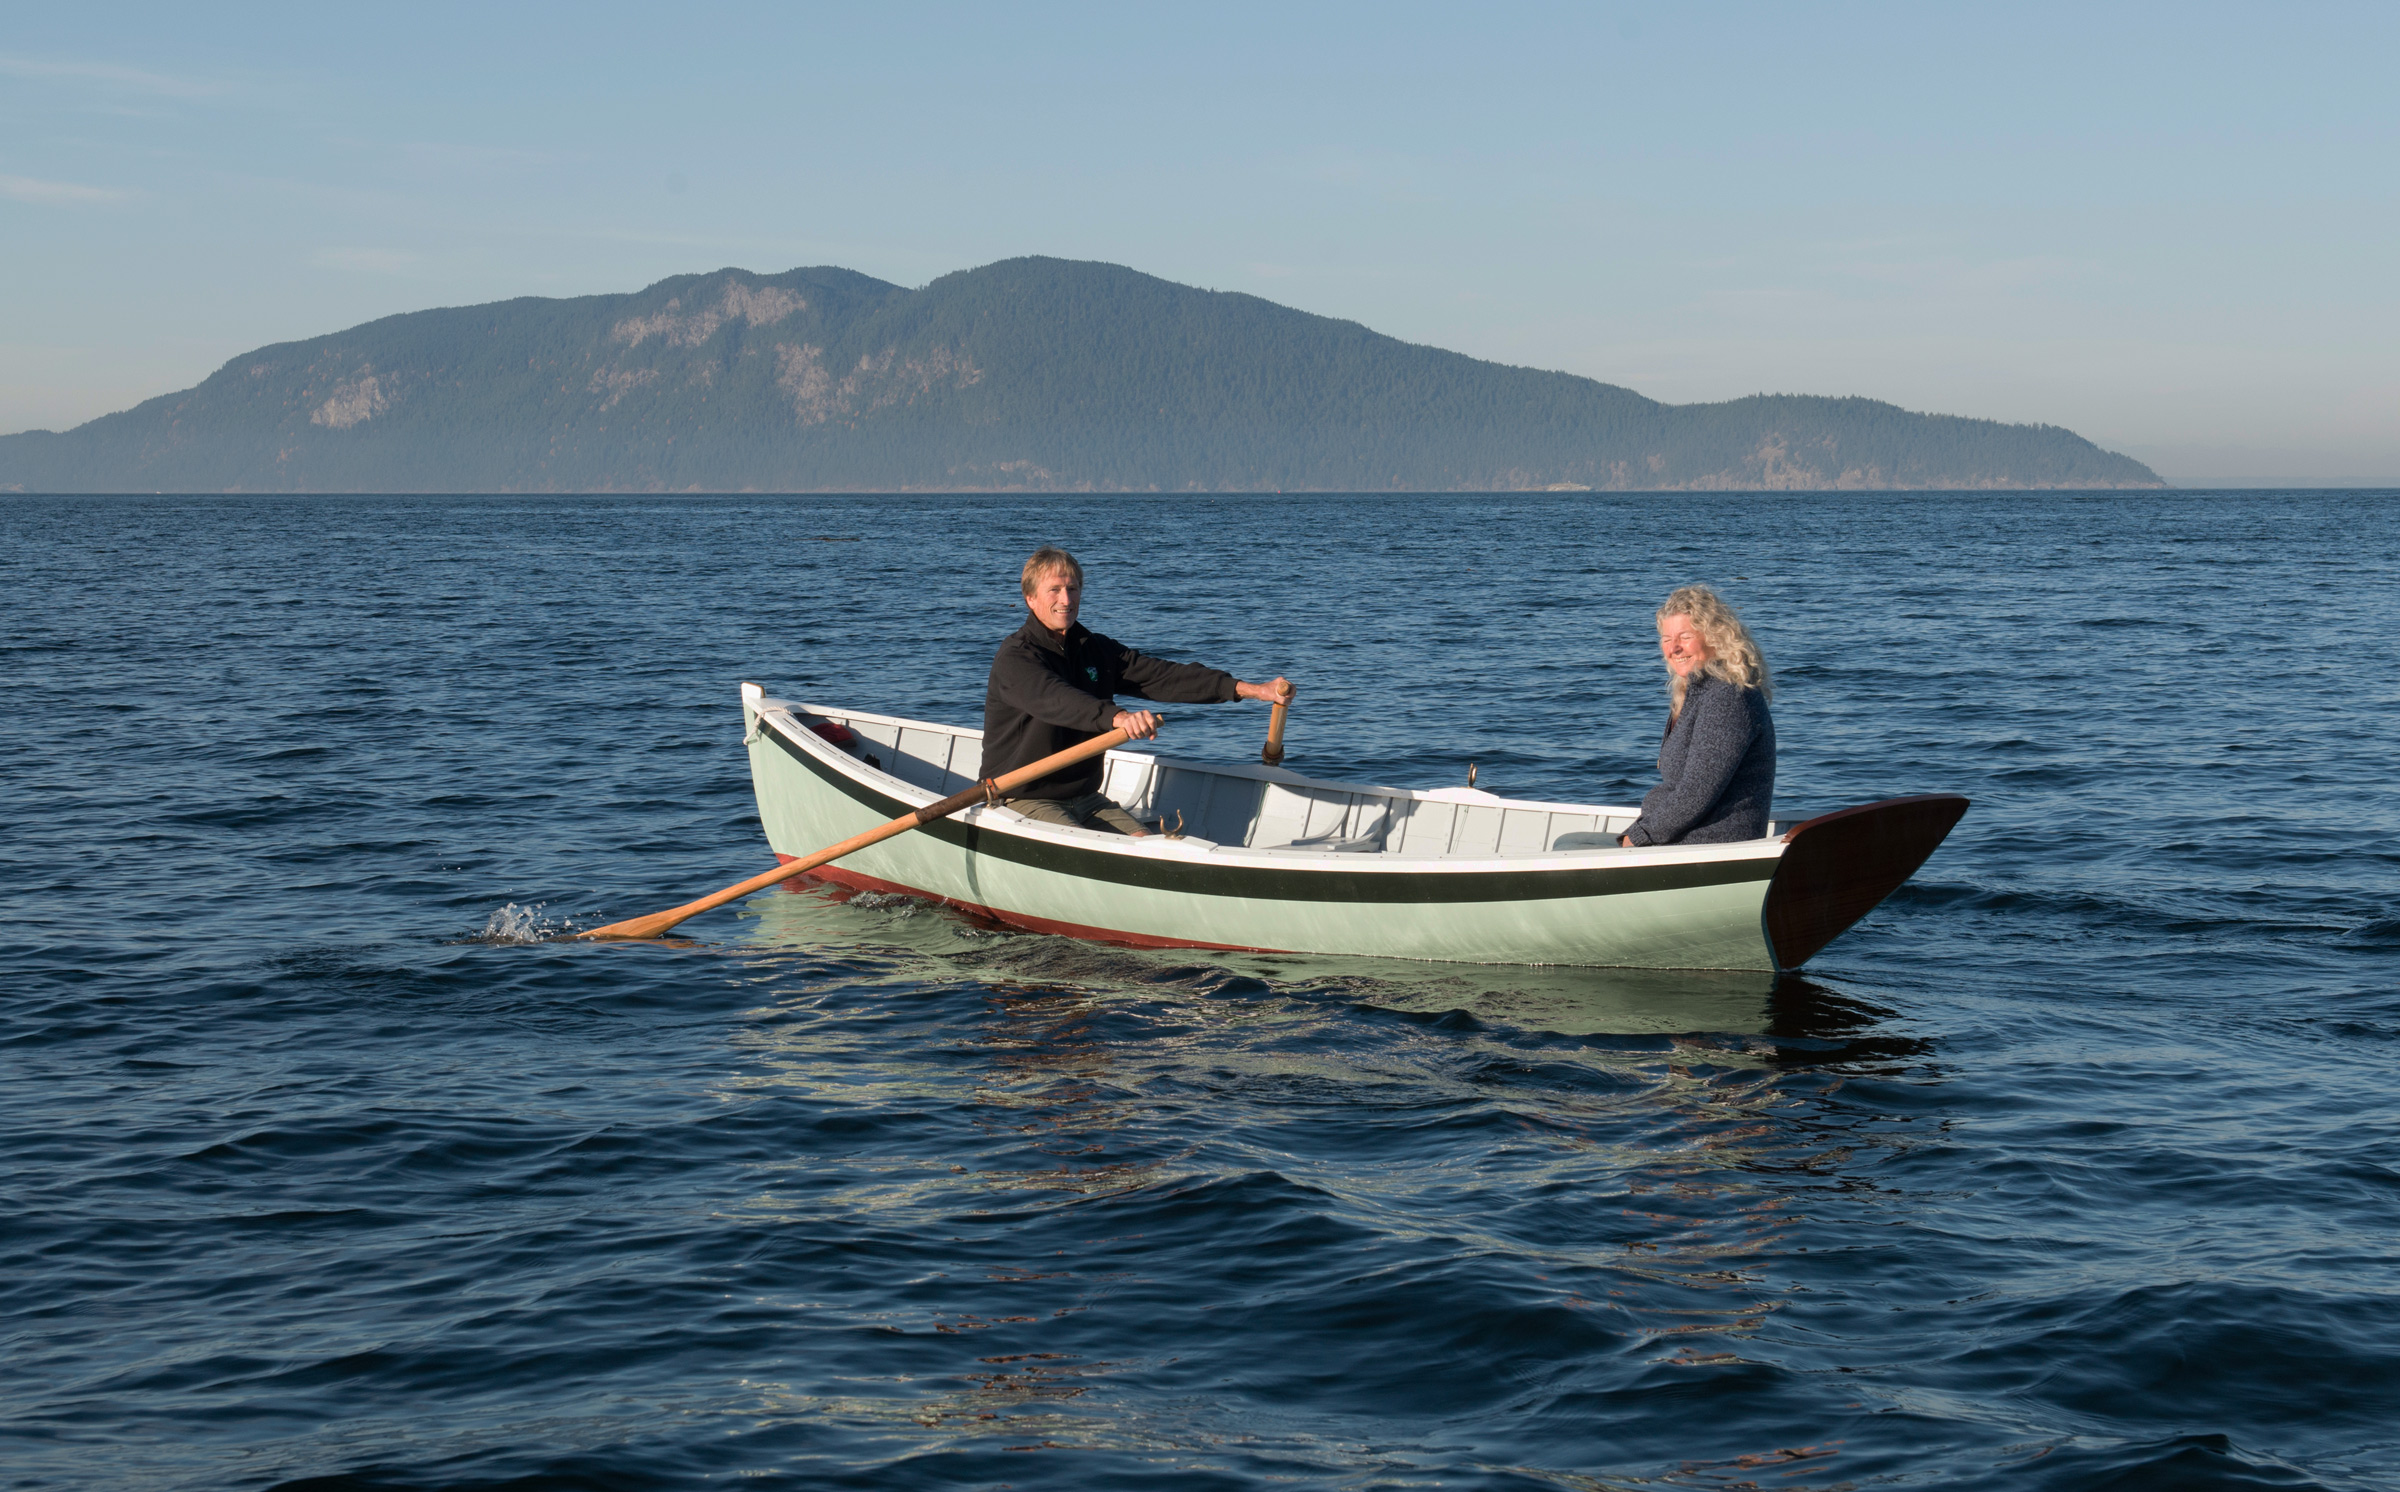
With three aboard, the dinghy rests lightly on the water with only a bit of the transom immersed.
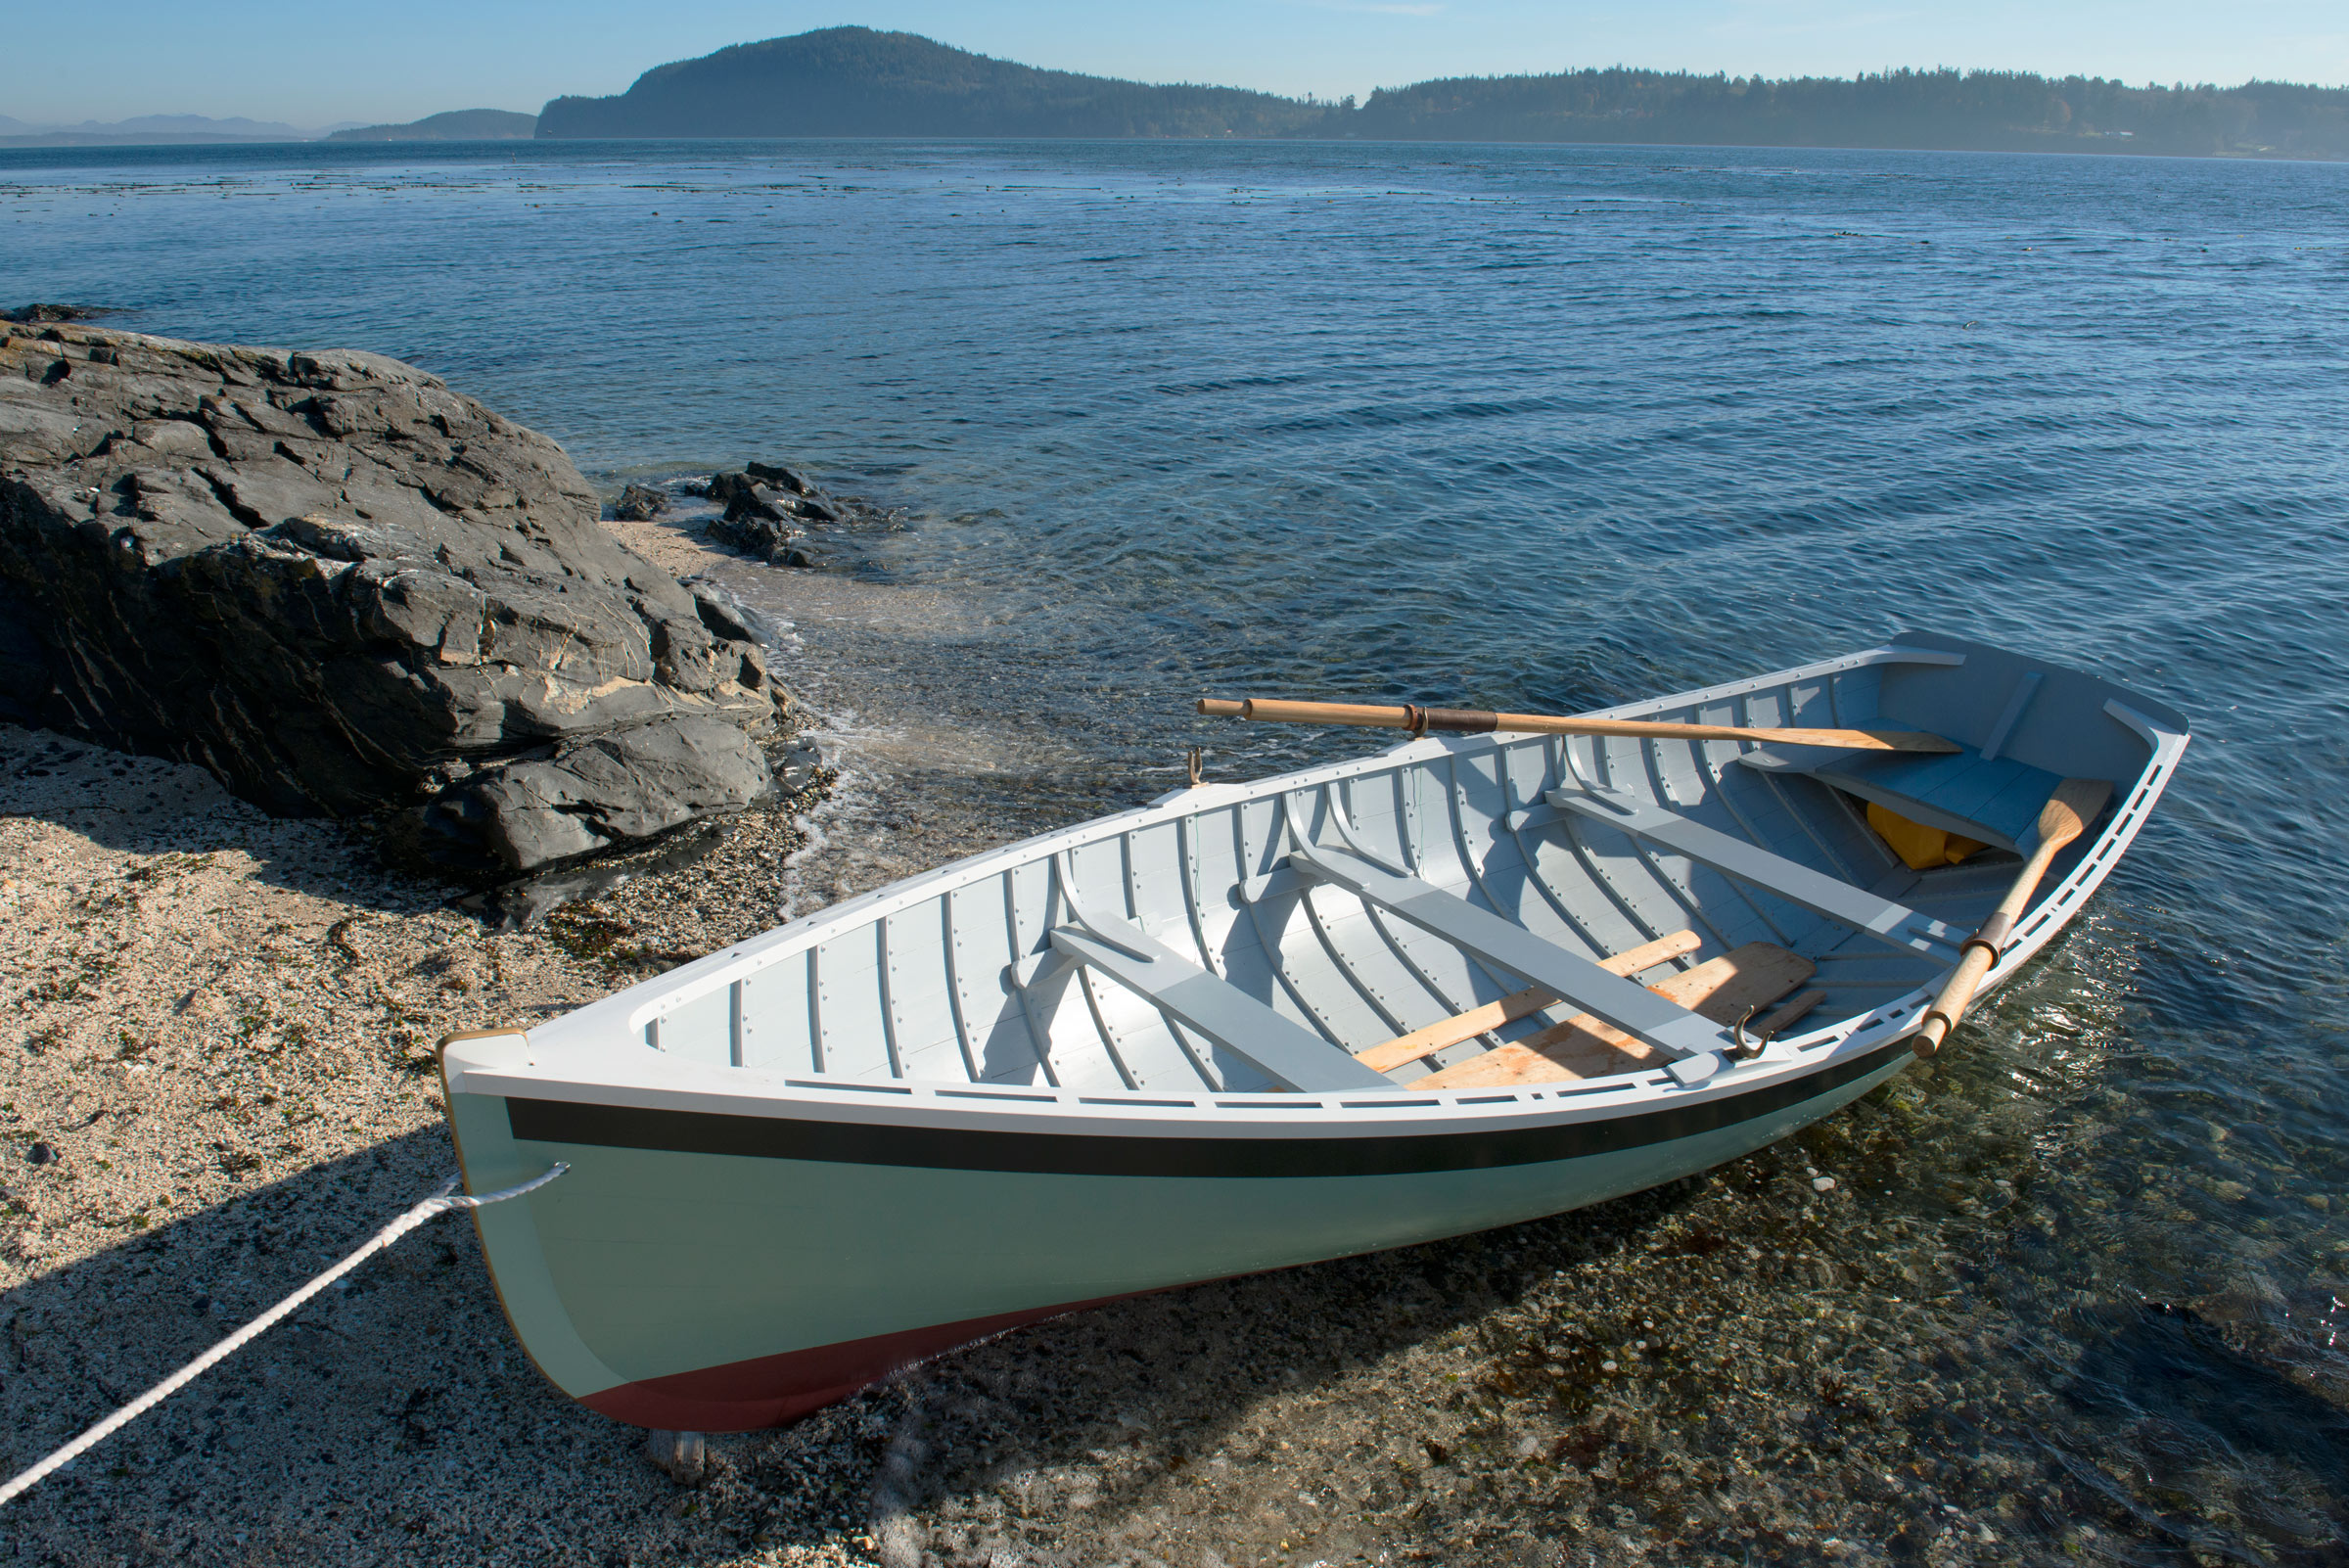
Rowing the Parker Dinghy is a wonderful experience. It’s refreshing to see a boat that is aimed purely at rowing, rather than one that has to function as a sailboat and motorboat as well. Without having to accommodate different modes of propulsion, it really excels at its intended purpose.
When rowed solo, the boat carries the rower at the ’midship rowing station; when carrying passengers in the sternsheets, the forward station is employed. With just one person aboard the boat it may feel a little tender; however, what it lacks in initial stability is made up for in secondary stability—the deeper you push the bilge in the water, the more stability you gain. With even just one other passenger aboard, the hull will settle down in the water and stiffen up considerably, a characteristic that harks back to the design’s net-tending roots.
The Parker Dinghy’s deep keel diminishes quick maneuverability but makes the boat track beautifully. A pair of 8’ oars keep it moving along nicely, and are suitable for either rowing station. The Parker Dinghy is a fairly large boat to be rowed by one person, but I have found that it gets up to speed quickly and carries its momentum well, requiring less effort from the rower once underway. In a chop and through large boat wakes it has proven to be dry, and really gives the feeling of a small boat that will keep you safe.
There are few, if any more enjoyable ways to explore a coastline than aboard a well-designed rowboat, and the Parker Dinghy is the perfect little craft for the purpose, whether going solo or loaded up with family and friends.
Cyrus Dworsky grew up lobster fishing out of Stonington, Maine, first with his father, and continuing on for much of his life. He’s always had a strong interest in boat building and boat design, as well as a love for the ocean and sailing. After living in the Pacific Northwest for several years and attending the Northwest School of Wooden Boatbuilding, he turned his focus more seriously toward boatbuilding, and has now moved back to Stonington. He currently has a 12’ yacht tender under construction.
Building a wooden boat had finally made its way to the top of my to-do list, and building a small one would be sufficient to satisfy that dream. At the time, we still had a 27′ trimaran and have since moved to a 35′ sloop, both wonderful sailing machines, but a sailing dinghy, capable of rowing, would provide a very different sailing experience. And, if light enough, we could potentially put it on top of our SUV and explore new waters. My son Tyler commented this would be a perfect new hobby for me combining two of my favorite interests: sailing and woodworking. I was eager to get started.
Inspired by the beauty and light weight of strip-built kayaks, I decided I’d use the same method for a sailing dinghy. I scoured the Internet but just couldn’t find a design that got me excited enough to invest a few hundred hours of my time. Then I found the Morbic 12 sail-and-oar dinghy, designed by the French naval architect, François Vivier.
I contacted François in the fall of 2016 to inquire if his Morbic 12, designed for lapstrake plywood, could be built with strip planks. He replied, “Yes, with some modification,” and asked me more about my requirements to make sure the Morbic 12 would meet my needs. After discussions on weight, cockpit arrangement, rowing ability, and rig, he decided a new design would be in order.We agreed to go forward with a Morbic 11 as a lightweight strip-built hull with a balanced lug rig, daggerboard, kick-up rudder, buoyancy compartments, and a bit of dry storage.
François delivered comprehensive plans with more than 60 pages including detailed drawings, a hydrostatic analysis, layouts and dimensions for lumber and plywood components, and assembly instructions filled with 3D color drawings. This would be my first boat build, so I was pleased with the clear instructions in English, and François was very responsive when answering the few questions I had along the way.
Lorena Brown
The 70-sq-ft lug sail performs well to windward, as evidenced by GPS tracks showing the Morbic 11 tacking through 90 degrees.
The recommendations for wood species were provided with several options. I used sapele for the stem, keel, and transom glued up with epoxy. These were attached to seven plywood stations on a temporary box frame. The plans do not include instructions for strip-planking, as there are plenty of books on the topic, and the creative decorative aspects are left to the builder. I used a combination of light and dark western red cedar and Alaska yellow cedar with accent strips of sapele and maple. Strip edges were beveled and edge-glued with Titebond II. I wanted to avoid staple and nail holes in the hull, so strips were held in place using hot glue, clamps, and Shurtape CP66, a stretchy and strong masking tape.
I had read plenty of warnings on how labor-intensive strip planking is; even so, I wondered what I had got myself into. Fitting a total of 220 strips was tedious work, but at least no steam was required for bending. I did resort to using a heat gun to coax some of the strips into shape on the deck, as the bends were tighter than on the hull.
After completing planking and adding the skeg and full-length keel, sanding began and the pay-off for building a strip-planked hull became apparent. The smooth-flowing lines on this boat are a thing of beauty.
Lorena Brown
The stern-sheets’ center panel is removable to allow the oars to be tucked under the center thwart and stored in the bottom of the boat. Magnets hold the panel in place.
After applying fiberglass and six coats of epoxy and sanding fair once again, I flipped the hull. The temporary stations were removed by slowly softening the hot glue with a heat gun until they could be wiggled out, without damage to any strips. I sanded and fiberglassed the interior, applying a second layer of cloth on the bottom for additional strength.
The bulkheads are of 6mm okoume plywood to save weight, and carefully fitted and filleted. There are three buoyancy compartments with access through 8″ deck plates for dry storage for wallet, keys, and other small items. I made very few changes to the design detailed in the plans, but I did move the bulkhead of the aft storage compartment back about 10″. The original placement is better for weight distribution while rowing with a passenger in the stern, but I thought I’d need a bit more for space for my feet while sailing, so sacrificed a bit of storage for it. As it turned out, I sail sitting farther forward and the original layout would have been fine.
The rudder case, built of laminated okoume plywood, is hollow to reduce weight and give access to the nuts that bolt gudgeons to the rudder. A specific brand and size of pintles and gudgeons are called for in the plans, and I could only find one source for them, at Classic Marine in the U.K. The kick-up rudder and tiller install securely on the hull in seconds and have a solid feel.
Lorena Brown
After the lugsail’s yard is hoisted, the halyard is cleated and the downhaul—a gun tackle with a 3-to-1 advantage and a cam cleat on the daggerboard trunk—tensions the sail.
The laminated Douglas-fir mast isn’t hollow, yet it is light enough for me to slip through the foredeck partner into the step. The step is keyed to prevent the mast from rotating. The yard has an adjustable attachment point to a mast traveler that I built and wrapped with leather. The halyard attaches to a ring on the mast traveler to raise the yard. A downhaul pulls the boom down and aft; raising the aft end of the boom gives the sail a nice, full shape without creases. The downhaul has blocks for additional purchase and a conveniently located cam cleat on the starboard side of the daggerboard case for downhaul adjustment. This makes for a super-easy 10-minute launch.
The plans do not call for lazyjacks, but I added some to keep the boom and yard from banging around on deck when the sail is in a lowered position. They are also helpful for reefing, which only takes a few minutes. To use my reefing system, I release the downhaul, lower the sail, tighten the new tack and clew to the boom by tying off a single reef line to the cleat to the center of boom, make fast the foot to the boom with the five reef lines on the sail, then raise sail again. There are two reefpoints, and this system has been proven on two outings in a little more than 15-knot winds.
I built my Morbic 11 in 540 hours, working on and off over 15 months. It certainly could be built in less time, but this was my first build and I was in no hurry to get it done. I joke (with some truth) that 200 of those hours were spent scratching my head. Woodworking is not my profession; my experience with it is mostly from high school, so the boat is clearly suitable for amateur builders.
Lorena Brown
A taut luff is the key to getting the best from a lugsail. Having a powerful downhaul that’s handy to the helmsman makes maintaining tension easy.
Like any dinghy, the Morbic 11 feels tender initially, but its 5′ beam stiffens up quickly and is amazingly stable. The boat accelerates quickly due to its light weight, and I regularly achieve speeds of 3 to 4 knots sailing to weather in anything more than about 8 knots of wind. I wondered how well the Morbic 11 would point with the balanced lug, and it exceeded my expectations. GPS tracks show nice 90-degree tacks upwind. We recorded a maximum speed exceeding 6 knots downwind—what a blast!
Sailing the Morbic 11 is a real kick, particularly when singlehanding. One day, sailing downwind in a blow, I suddenly caught a gust of over 20 knots that surprised me. I immediately eased the boom completely forward, over the bow, something that wouldn’t have been possible with a stayed mast, and then steered up to weather keeping the sail luffing with the wind the entire turn. Then, I dropped sail and rowed the short way into the marina, impressed that the Morbic 11 took care of me.
With two of us aboard, I’ll often take the helm and my crew will sit on the ’midship thwart facing aft and handle the mainsheet, shifting position to keep the boat at a proper heel and ducking under the boom as it comes across during a tack or jibe. With a small child joining us, their favorite spot is forward of the thwart, safely out of the way of control lines, with the mast or foredeck to hang onto as needed an unobstructed view forward.
Matthew Putegnat
With its light weight, the Morbic 11 comes up to speed easily. When sail is set, the oars stow neatly inboard.
When the wind dies, one can always row. The lazyjacks are slackened so that the boom and yard can be dropped all the way to the thwart, and the forward ends of the spars get tucked under the foredeck so they don’t get in the way. The 8′ oars, stowed either side of the daggerboard trunk, are easy to unstow after removing a magnet-held seat panel aft.
The Morbic 11 rows handily being a “classic” French sail-and-oar design. She tracks well due to the full-length keel, and is easily driven because of her light weight. There is a notch on the transom for sculling, but I haven’t learned to do that well yet. It does provide a convenient spot for the mast to lie into while trailering.
Lorena Brown
A loop of bungee holds the kick-up rudder blade down but lets it pivot over obstructions. A cord on the back side of the rudder stock runs through a shackle to make it easier to pull the blade up when approaching a beach. The sculling notch is offset to allow sculling while the rudder is in place.
Coasting onto a beach is no problem with a daggerboard that lifts right out and the kick-up rudder which stays in the raised position with a clam cleat. A full-length bronze band protects the keel.
The Morbic 11 is designed to take a small outboard, but in Oregon, where I live, that would require registration and unsightly numbers stuck on the hull, so I don’t plan to use a motor.
Many have commented to me that this boat, with all the pretty woodwork and varnish, belongs in my living room and not on the water, but that would be such a waste! It’s a wonderful sailboat, and we get much enjoyment from her the way she was designed to be—on the water.
Gary Brown, husband and father of five, is a family man and recently retired electrical engineer living in Aloha, Oregon. A boater all his life, he has owned sailboats the last 15 years, and loves to race. He kept a construction blog for Hull #1 of the Morbic 11. Gary is in the process of evaluating boat designs for his next build as he continues his woodworking hobby.
This group of students at De Bootbouwschool in the Netherlands built the school’s 114th boat— and its seventh Catherine.
Bert van Baar runs De Bootbouwschool (The Boatbuilding School) in an old navy yard in Den Helden, a canal-laced city on the coast of the Netherlands. The boats he and his students have built over the 20 years since the school’s founding are mostly traditional, open, lapstrake boats for oar and sail, though not, as you might expect, inspired by Dutch designs. Bert has a fondness for what he calls “the American Style,” and among his favorites is the Catherine design, the boat detailed in Richard Kolin’s book, Building Catherine: a 14-foot pulling boat in the Whitehall tradition. Bert describes the Catherine as “sleek, tender, and gracious, and builds like a miracle.”
Like its predecessors, this Catherine took shape over the course of a nine-day class.
The first Catherine to come out of the school’s shop was built in 2007, and was the 77th student-built boat. During the nine-day class the students finished everything but the floorboards, a project that was left to the student who won the raffle to take the boat home. The sixth Catherine, christened ANNA by the retired doctor who won his class’s raffle, was planked in oak, making her heavy but tough. Bert has used mahogany too and has looked, without success, for white pine that’s suitable for planking, but most often uses western red cedar.
Original Whitehalls usually carried sprit rigs, author Rich Kolin opted for the standing lug rig in his book about building the Catherine, and ANNA carries a balanced lug.
Students often wonder why such a soft wood is used to plank the boat, and Bert explains “that it works so easily, and once the boat is finished and you know how much effort went into her building, you sail her very carefully!” Riveting the laps takes a light touch to avoid burying the heads too deeply into the cedar, but the students are eager to learn and soon grew accustomed to the demands of the work.
Catherine #6, christened ANNA, was planked with oak.
Bert works closely with the students for the first few days of the class, then gradually steps back, letting them take the lead. For this most recent Catherine, the students, ranging in age from 42 to 63 and by trade from a carpenter to a flight controller, were eager to finish the boat. They worked hard and had completed everything but the last two floorboards.
The most recent Catherine was planked with western red cedar.
Bert offered them a chance to take the boat out for a row on the canal just outside the shop, but the group had given all they had to the construction, and settled for coffee and cake. They agreed to have a reunion in Friesland when Gerrit, the carpenter and winner of the raffle, had the boat ready to be christened.
The crackle and pop that mangroves make on a falling tide has faded astern, and the sounds of wind and open water surround me. I’m reclined aboard a Ross Lillistone First Mate, embarked upon another Friday-evening solo micro-cruise, to Outer Newry Island, just off Australia’s Queensland coast, the kind of outing the boat is admirably suited for. Rigging it is a quick, one-person job, and I was on the water minutes after arriving at the ramp. I have a brisk breeze for a quick passage, and in barely an hour I’ll be tucked in behind the island to enjoy the last of the daylight, a rising full moon, and a comfy night’s sleep. An easy dawn sail (or more likely, row) will get me home before the family has stirred much beyond breakfast. These brief overnight getaways give me the feeling I’ve been on a proper trip, and I still have most of the weekend ahead.
Of the various sailboats I’ve owned over the years—the largest a 26′ Folkboat and the smallest a lovely 11-1/2′ Bolger Cartopper—the 15′ First Mate is by far the most versatile. For me, it has been the answer to the Goldilocks Equation: not too large, not too small, just right, The younger sister of Ross Lillistone’s Phoenix III, it has the same interior and the same rigs, but has been adapted from glued-lap plywood to a stitch-and-glue, taped-seam construction that is robust, elegant, and easy to build.
The search for a boat to build, which ultimately led me to the First Mate, started with a list of requirements. The boat had to have straightforward construction that is quick and economical. At the launch ramp it had to be quick and easy to rig, launch, and retrieve singlehandedly. Afloat, it had to be, above all, a rewarding boat to sail, but also a pleasant and capable rowing boat serving as a comfortable cruiser able to look after itself and the crew. And I required, of course, elegant good looks. In the First Mate, Ross achieved all of this in spades.
Ian Hamilton
The cockpit’s removable side benches can be pushed to the center to serve as a sleeping platform; an extra pair would make a broader surface. A line keeping the yard and boom from swinging has taken up residence in the motor well.
The plans for the DIY-builder are brilliant. They include 30 pages of scale drawings, showing all of the various pieces, including sails and spars for the three sailing rigs: a sprit sloop with an 81-sq-ft main and a 23-sq-ft jib, a balance lug with 76-sq-ft main, and a Bermudian sloop with a 67-sq-ft main and a 22-sq-ft jib. An illustrated manual provides 70 pages of detailed, step-by-step instructions.
Ross built my First Mate. Originally, he only wanted to go as far as cutting out the hull panels to check the expansions before releasing the plans to the public, but then just kept going and finished the boat for me. He drilled holes 4” apart for the cable ties and only needed to use a fraction of them as the panels came together so easily. No lofting or strongback is required. He thinks the project took about 250 gently paced hours of his time, including spars. There are many detailed construction photos in the First Mate gallery on the Lillistone website.
The First Mate is quite small for her length, with slender lines to address the rowing part of the equation. Some folks who are used to beamier boats may think her tender, but I don’t. She is a fine daysailer for two; three would be okay, though I haven’t tried it. For me, First Mate is primarily a solo boat, and is set up accordingly. I’ve read about lengthy cruises aboard the smaller Phoenix III design, with two sleeping aboard using the same accommodations that the First Mate offers. They must have been cozy.
What I like best about the First Mate are the many small details. Let’s start at the stern and work our way forward. The outboard well is a beauty. It’s small, self-draining, and puts the outboard on the transom where it should be. No messing with a bracket. A 2-hp outboard is more than sufficient.
The cockpit is completely uncluttered, except for the twin self-bailers, which don’t get in the way and are worth their weight in gold. Only a few store-bought fittings are required for the rig, yet all the necessary controls are there. I sail sitting on the bottom (there are no floorboards), leaning against the sides of the hull. It may be counterintuitive, but resting against the turn of the bilge is far more comfortable for my aging bones than sitting on a thwart. Even in a strong wind, I haven’t needed to hike out. The plans detail a pair of movable side seats that rest on cleats mounted on the thwart and stern seat edges. I stow them aft, lying across the stern seat (they are the only things in the boat, other than myself, which aren’t tied in), and I usually only use them as my sleeping platform, or to sit on slightly offset from center while cooking my dinner. With additional pieces, you can make the sleeping platform as wide as you wish.
Ian Hamilton
The author prefers stowing the side benches and sitting on the bottom of the boat with the hull sides as his backrest.
Moving forward, we come to the centerboard trunk, which has a shape similar to those in traditional sailing dories. The lowered aft portion accommodates a thwart for a rowing station and the taller portion forward houses a broad upper half of the centerboard, which provides more lateral resistance and fills more of the slot when deployed, reducing drag and fluttering. This arrangement caused the only disagreement Ross and I had over the design of the boat: I wanted to mount the compass on the angled aft edge of the case, right where he put the cam cleat for the centerboard. I would have preferred a weighted board lowered with a lanyard, but Ross turned out to be right. The rigid rod effectively solves the problem of grit jamming the board, and more importantly, indicates how deep the board is set. I had been in the habit of sailing with the centerboard either fully up or fully down, but now I make fine adjustments, and my sailing has consequently improved. I mounted the compass on a board held in position with bungee cord so I can move it to one side if I’m on a very long tack, or I can place it on the aft seat to serve as a rowing compass.
The forward end of the trunk is braced by a half bulkhead that also serves as a “bin” to organize cruising gear. I particularly like the arrangement for stepping the mast. The hollow mast is light and short, and even my sadly arthritic hands have no problem raising it into position. Standing beside the trailer, I lift the mast to the vertical, drop the heel in the step, and hold it in the partners with one hand while lashing it in place with the other. Securing the mast with a lashing is easy and bombproof and avoids the need for a rattly gate.
Splashboards top the foredeck to keep water out of the cockpit. Under the foredeck is a 6.45-cu-ft flotation compartment. Together with the 5.72-cu-ft aft flotation compartment, the First Mate has 755 lbs of buoyancy in fresh water, 779 lbs in salt water. Both of the airtight compartments fore and aft have small access ports, but I leave the compartments empty and the ports sealed while I’m out cruising. The buoyancy of the hollow mast and yard keep the boat from turning turtle after a capsize. The built-in flotation gives me great confidence in open water.
My requirement for a boat with pleasant rowing ability has certainly been met. Under oars, the First Mate is easy to move and balances well in wind from any direction. I happily leave the rig at home to use her as a fishing and crabbing boat, and enjoy trolling as I row. For solo rowing, the boat trims properly and performs well. With three aboard, maintaining trim is easy as the two passengers can sit in the ends, but rowing with two aboard poses a problem for trim if the passenger takes a seat forward or aft. Ross trimmed the First Mate with me sitting on the bottom at his feet while he happily rowed it 6 nm on the Clarence River. If I were going to carry a crowd, I would ship the oars, fire up the outboard, and be done with it.
The First Mate makes a fine launch with an old 3-hp Johnson I have. Since the engine sits on the transom and the aft deck is quite narrow, getting to it from the aft seat to raise and lower it is easy. For steering, I prefer to lock the motor with the steering friction adjuster, and steer with the boat’s tiller. It’s long enough to let me sit forward to trim the boat. It’s a bit quieter too. While it is possible to hit the prop with the rudder, I’d have to try pretty hard. When sitting on the port side seat, the tiller stops at my ribs before the rudder hits the prop. If sitting farther forward, you would need really long arms to push the tiller far enough.
In calm conditions, the motor, running barely above idle, easily gets the First Mate up to hull speed. When our kids were using the Phoenix III as a fishing launch, they would leave the sailing rig and the rudder at home and steer with the outboard’s tiller from the aft seat. They found that flat out, she runs a good bit faster than they might have expected. (No…I don’t know how fast!)
Ross Lillistone
The balance lug rig is the smallest and simplest of the three rigs detailed in the plans, and is a good choice for windy coastal waters.
The Central Queensland coast is windy, so I opted for the smallest of the three rigs, a balance lug of 76 sq ft. I am no racing sailor—some might say I’m not any sort of sailor—but over the years I have managed to sail most of the Queensland coast and have only drowned a little bit. Overall, I’m extremely happy with the rig and the handling of First Mate. It’s fast, responsive, dry, points up nicely, and requires little effort to sail well. The First Mate moves along fine in light air, but really shines when it blows.
On my second day out in the new boat, I caught the edge of a thunderstorm while sailing on a large freshwater reservoir. I hadn’t yet set the rig up for reefing, so I should’ve dumped the rig. With a balance lug, the whole thing will instantly and reliably lower in any conditions, so I should have dropped the sail. But I didn’t, and off we went, skittering away, depowering in the gusts, with rain pouring off the foot of the sail, to be sucked away by the self-bailers. I stayed in control, didn’t ship any water, and was very glad to have been on a lake and not the open sea. I may not have gotten off so easily with a larger, more complex rig. Guess what I fitted up the next day? Haven’t needed to use that reef since!
Ross Lillistone
This crew of three has also opted to sail without the side benches, using the side decks instead as seating.
For cruising, I have ample space for all the gear I need. My panic bag stows securely on the aft seat. My overnight gear and galley equipment live in waterproof duffels on the port side of the centerboard trunk. Eventually, I’ll build the galley box shown on the plans. It is designed to stow neatly under the thwart. Anchors stow to starboard and water bottles fit in the forward bin either side of the mast. This arrangement gives me room to scramble up the starboard side to deal with mast, sail and anchor.
I prefer sleeping aboard: there’s nothing to cart ashore, I can bug out at a moment’s notice, and crocodiles are more likely to leave me alone than if I am sleeping on the beach. On my full-moon trips, the tides are typically 20′. A low tide would leave a lot of exposed sand. I often arrive near the bottom of the tide and anchor way out on the flats.
Compared with the sleeping accommodations aboard my little cartopper, the First Mate seems commodious. That’s not saying a lot, but there is plenty of room for one. I haven’t constructed any sort of fancy tent, so my setup is pretty basic, but I have a place to sit, a place for my little camp stove, and a place to sleep in comfort.
I have yet to make an extended passage in this boat, but, based on my experience with her so far, and bearing in mind some very successful cruises undertaken in Phoenix III, I am confident that she’ll do very well under both sail and oars. I should be shortly taking her on a decently long and exposed trip up to the famous Whitsunday Passage, but life keeps getting in the way. Until then, thank goodness for Friday micro-cruises.
Ian Hamilton is a recently retired teacher living in Mackay, Queensland, who was born into a family of surf lifesavers and fishermen. He built his first boat, a tin canoe, as a kid up in the Torres Straits, and consequently learned to swim well. Since then he has always owned a selection of paddle, oar, sail, and power craft in various and sometimes quite isolated parts of Queensland. He is currently operating a Bolger Sharpshooter and a Lillistone First Mate.
My father’s father was born on Cape Breton Island, Nova Scotia. Though he emigrated to New York before my father was born, he took his family on summer trips back to visit his family in Louisbourg. My father has fond memories of these trips, but most of them revolve around adventures in dories. Slab-sided with tombstone transoms, these stalwart workhorses of the Canadian Maritimes have a well-deserved international reputation for being easy to build, easy to row, exceptionally stable, and capable of carrying heavy loads.
My father has owned a couple of small, traditionally built dories, and when I was in my early twenties he bought a 15′ Gloucester Gull based on the famous Philip Bolger design. A few years later, Roger Crawford of Marshfield, Massachusetts, built a 16′ Swampscott dory for him. My father has had this boat for 20 years, and still enjoys it.
Kevin Power
The manual includes a section on types of wood and notes that some types of common construction can be used for Spira’s ply-on-frame method for the dory.
Naturally, when I decided to get a boat, I started looking for a dory. It didn’t take much searching on the web to realize that there weren’t many available, and with my limited boat funds I couldn’t afford to hire someone to build one for me, so I started looking at plans. Jeff Spira and his business, Spira International, were among the top hits on Google for “dory boat plans.” Jeff’s site is mesmerizing. There are pictures of boats, videos of builds, a blog with builder contributions, and over 100 plans to choose from. I knew I wanted a Grand Banks–style dory about 16’ long, and Jeff’s Nova Scotian fit the bill perfectly.
Jeff goes to great lengths to promote the ease with which his boats can be built, even for those with no boatbuilding experience. He goes so far as to say you can complete the project with no prior woodworking experience, although he suggests building a couple of sawhorses first to get acquainted with some of the tools required for boatbuilding.
The beauty of Jeff’s designs is their simplicity and accessibility. The wood is all readily available at the big-box stores and is relatively inexpensive—about $250 for lumber and plywood. The epoxy and fiberglass cloth totaled about $400, and I found all the stainless fastenings on eBay for another $150.
Kevin Power
The plywood panels take their shapes from the chine logs and inwales. The butt joints will be backed with plywood plates.
The construction begins with the assembly of the five frames and the transom. In his plywood-on-frame construction manual, Jeff recommends using a framing square on a large surface (a sheet of plywood, for example) to draw up the five frames according to the measurements provided, then to assemble each frame piece over its drawing. The framing members are joined with simple lap joints, screwed and glued. The transom frame pieces are assembled with butt joints. Here I used pocket-hole joinery, which I favor for a tight attachment.
The hull build takes place on a strongback. The assembled frame members are spaced along it according to the measurements in the plans, with the bottom crosspieces of frames one and five placed directly on the jig and frames two, three, and four raised up on blocks cut to give the bottom its rocker. The ends of the strongback are cut at angles to fit the stem and the transom, which get temporarily secured in place. Once the frames are in position, the 2×4 keelson is set in notches previously cut in the five frames. After I applied epoxy at the intersections, I used ratchet straps to bend the keelson over the frames and hold it while I screwed them all together.
Kevin Power
Plans from Spira typically don’t include the arrangements for the interior but outfitting the dory with risers and thwarts requires little guidance.
The chines and sheer clamps follow. I wasn’t able to find 1x2s in the proper length, but Spira provides instructions for scarfing pieces together by cutting the ends at a 1:8 ratio. I built a jig to make consistent angles in the ends of my 1x2s, then simply glued pieces together. The full-length longitudinals are then glued and screwed in notches in the frames. Then I did a bit of fairing to bevel the bottoms of the chines and to present a smooth surface for the plywood sides.
The plywood sides and bottom are then screwed to the framework and cut to fit while in place. This is the part of the process that makes Spira boats particularly easy to build: there is no precise precutting and fitting prior to attaching the sides. I clamped the oversize plywood panels to the sheer clamp and the chine log and screwed them in place. I needed three pieces of plywood to get from the transom to the stem. The two seams created are butt-blocked with a 6”-wide piece of the same plywood spanning 3″ to each side of the joint on the inside of the hull. Once the sides and transom are skinned with plywood and the excess material is removed, the bottom is put on in the same manner. I was able to get from stem to stern on the bottom, creating only one seam.
Sean Power
The plans leave the outfitting of the interior up to the builder. Installing a rowing station at each of the three central frame was an easy task and in keeping with traditional Banks dories.
The screw holes and seams get filled with epoxy mixed with wood flour. I had never worked with fiberglass before, but there are tips in the Spira book and in the blogs on his site. The plans recommend two layers of glass on a smaller boat like this one. In the guide included with the plans, Spira notes that some people opt to use fiberglass tape on all the seams before applying the sheets of cloth. Just the suggestion of it was good enough for me. I’d be using the boat at times on rocky shores, so I added extra ’glass tape and strips of cloth along chines, and particularly, over the stem.
To finish the exterior of the hull I found paint of excellent quality in a nice selection of colors from George Kirby Jr. Paint Company in New Bedford, Massachusetts. One gallon of yellow for the hull exterior and a quart of green for the trim (a common color scheme for Nova Scotia dories) were more than enough.
When the dory comes off the strongback and sits upright for the first time, you’ll have an empty hull. Jeff Spira does not give any direction for the interior of the boats, leaving that up to the builder. That was fine for my boat, because I was never planning on any decks, consoles, or cabins. I did fancy a place to sit, though. I used frames one and five to create compartments in the bow and stern, and filled them with foam for flotation. I used 1x3s as risers to support 2×10 thwarts at the second, third, and fourth frames. Banks fishing dories had removable thwarts so they could be compactly nested on the decks of fishing schooners. My dory’s thwarts are not permanently attached but slotted to slip around the frames. I installed three pairs of bronze oarlocks so there would be a place to row from each thwart.
There are few things in life more satisfying than launching a boat you built. I was so pleased with the way the boat rowed and tracked, that I had to remind myself to be critical of the build. At first I could not tell if I was just riding on the excitement of the accomplishment. But many hours and many nautical miles later, I still love rowing this boat.
My original intention was to have the dory join the family kayak fleet and become a part of our adventures in the rivers and bays of southeastern Connecticut, and it exceeded my expectations. It easily handles the loads of coolers, beach chairs, blankets, towels, two big dogs, and anyone who gets too tired to paddle their own kayak. It does this with ease.
Courtesy of the author
With two passengers and a dog aboard, the dory still has plenty of freeboard and the capacity to carry even more weight.
The middle rowing station is the most preferable for a single rower, and the forward and aft rowing stations are ideal when one of the kids wants to lend a hand with rowing. Once you get the Nova Scotian moving, it tracks beautifully and glides effortlessly. Typical of dories of its type, it is a bit tender at first, but the secondary stability is reassuringly solid. You can lean it over to one side, but it’ll stop there. I’ve hauled my 110-lb golden retriever over the side more than once without feeling I was risking putting the rail under. I also intended to use the dory to extend the boating season. I now enjoy getting on the water year-round and row through the winter when the Mystic River isn’t iced over. My dory doesn’t go into storage; it is always ready to go.
Kevin Power is a home inspector who lives with his wife and three teenage kids in Mystic, Connecticut. He has been boating for 44 of his 47 years and his fleet includes the dory, two kayaks, a rowing dinghy, a sailing dinghy, a Sunfish, a sloop-rigged centerboard dinghy, and a 20′ outboard fishing boat. He has always enjoyed simple woodworking projects such as rolling cooler carts, beer-growler caddies, and Adirondack chairs. As a beer-fueled joke, he started the Mystic Cornhole Company. The dory is the first boat he has built. His wife works at Electric Boat Division of General Dynamics in Groton, Connecticut, where the U.S. Navy gets its nuclear submarines. Kevin notes she doesn’t find it as amusing as he does when he says they are both boatbuilders.
Nova Scotian Particulars
[table]
Length/16′
Beam/4’10”
Height of stem above bottom/2’6″
[/table]
Update: Jeff Spira passed away unexpectedly in the spring of 2022. His website is no longer operating and it is presumed that his boat plans are no longer available.
Is there a boat you’d like to know more about? Have you built one that you think other Small Boats Monthly readers would enjoy? Please email us!
Many years ago, I built a sliding seat for my Delaware Ducker using salvaged tracks and a carriage from a canoe’s rowing rig. The Ducker is a pretty quick rowboat, and can be kept over 4 knots; while I couldn’t go faster, with the sliding seat I could go fast longer. Equipping a traditional rowing boat with a sliding seat—without outriggers or longer oars—is an idea that has been around for a while. Mystic Seaport’s elegant Bailey Whitehall, built in 1879, has one and in the early years of the rowing revival, Dick Shew of South Bristol, Maine, was rigging his 16’ Whitehalls to switch between fixed and sliding seats, rowed with the same oars and with the locks set on the gunwales.
I’d been thinking about building a sliding seat for my dory, so I clamped the Ducker slide into it for a test. I knew there would be clearance for the oar handles over my thighs, because I could sit on a throw cushion and still have room. I rowed 15 or so miles in 4 hours, much farther than I anticipated. I liked it, and decided to make one for the dory.
Ben Fuller
The sliding seat rig, spanning a thwart in the author’s dory, has tracks shorter than those used in racing shells, but appropriate for using the same oars and locks that he uses for fixed-seat rowing. Note the foot brace secured to the floorboards under the aft thwart.
I dug around my shop and came up with a couple of tracks and a seat. The tracks didn’t need to extend very far forward of the fixed thwart—as with most fixed seats, my legs are fairly straight when I am on the thwart. I found I could move 7″ or so aft of the thwart before my shins hit the after thwart. The standard length for tracks is 32″ to 34″, longer than required for the length of the stroke in my dory; I trimmed mine to 20″, a couple of inches longer than I needed. The tracks each had a stop in one end, and I split some dowels for the other. Another option for stops is to secure blocks of wood across the ends of the tracks.
The distance between the seat’s wheels determines the span between the tracks and the length of the boards they’re mounted to. Some careful layout is required to make sure that the tracks are parallel. When everything was square, I drilled holes for the bolts to hold the tracks.
The extruded aluminum tracks are very strong and don’t require any additional support where they cross the thwart. If I had a nice varnished thwart, I’d glue a bit of carpet or neoprene to the track undersides. The wood boards joining the tracks also serve to locate them on the thwart; turn-buttons made of 1/8″ aluminum bar hold the rig in place. I put a hinged strut under the edge to help support my weight when I’ve moved aft for the catch.
Ben Fuller
On the bottom of the sliding seat there are two aluminum toggles to hold the rig in place on the thwart. The support for the overhanging aft end of the rig folds flat for storage and transport.
With a GPS logging my speed, I found that switching from the fixed thwart to the sliding seat consistently added half of a knot. The 16’ dory isn’t fast, and I have to work hard to maintain 3.5 knots rowing from the thwart; with the sliding seat it is easy to maintain that speed. Rowing 24 strokes per minute, I could have kept going for hours. Pushing off with the balls of my feet helps power the drive; to get the full advantage of the sliding seat you should have a stretcher at the appropriate height. With the sliding seat I can reach farther aft at the catch, so the oar blades reach farther forward , and with the longer stroke I can get the blades buried and have more time to apply more power through the middle of the stroke where it does the most good.
One of the biggest issues with dory is its windage. The additional power of legs makes a significant difference on those days where I only gain half a boat length on a stroke. I took the dory out on an unpleasant rowing day; when I stopped rowing, a nasty chop with wind and tide pushed me downwind at 1.5 knots. With the rig in place I was able to make 2.5 knots to windward, barely 2 without it. I did switch to my shorter oars, shortened the stroke, and sped up the stoke rate, and if it had been rough enough to roll the seat off the tracks, or I had a problem getting the blades out of the water, I could have easily removed the seat and rowed from the thwart.
At only about 20″ long, the sliding-seat rig is compact enough to stow easily. Not having the outriggers and long oars typical of drop-in sliding-seat rigs keeps the versatility of a fixed-seat boat. Perhaps the most interesting possibility is the ability to use this compact slide with a sail-and-oar boat.
This design, with the tracks right on the fixed thwart, keeps the sliding seat as low as possible, so if you can sit on a boat cushion and row, you’ll have enough clearance. You could make higher rowlock socket pads if needed. The length of the rails depends on the rower, but they won’t extend much further forward than where you ordinarily sit. To check how far aft of your fixed thwart the tracks can go, take some scrap and make a temporary seat.
Seats and tracks can be bought from Latanzo or Pocock. They’ll run about $150 to $200. If you are near a rowing club, you may be able to find an old wooden seat, as most racing shells have converted to carbon-fiber seats.
Ben Fuller, curator of the Penobscot Marine Museum in Searsport, Maine, has been messing about in small boats for a very long time. He is owned by a dozen or more boats ranging from an International Canoe to a faering.
Editor’s notes:
I liked Ben’s idea and decided to put a sliding seat in my New York Whitehall. (If you’re wondering why they’re called sliding seats when they actually roll rather than slide, the earliest sliding seats, circa 1870, were wooden seats that had grooves on the bottoms that fit over brass tracks fixed to a thwart. They required lard for lubrication and would slide 10″ to 12″. The “sliding” part of the term stuck even after the transition to wheels.) All during my childhood, my father repaired racing shells and our garage was full of seats, wheels, and tracks. They were just common objects then and it didn’t occur to me then that one day I’d wish I’d kept a few for myself. To make my sliding seat I had to improvise with readily available materials.
Christopher Cunningham
If a carved seat (center) isn’t an appealing project, a carriage with flat plywood base can support a manufactured seat (left) or a homemade closed-cell foam pad.
I had kept a lot of worn-out inline-skate wheels, and the bearings would serve as wheels. I carved the seat from a piece of 1-1/4″ vertical-grain Douglas fir from a salvaged gymnasium bleacher. Modeled after the molded seat shown above, it is 12-3/4″ wide, 7-1/4″, front to back; the centers of the 1-7/8″ holes are 4-1/2″ apart and 3-1/4″ forward of the aft edge; and the notch is 2-3/4″ deep. The carved contours are only about 1/2″ deep. If that project is a bit more work than you’d like to take on, a piece of dense foam cut to the outline of a rowing seat will serve well. The the large notch and the holes take the pressure off your tailbone and sit bones.
Christopher Cunningham
The inline-skate bearings fit 5/16″ bolts. The hole in the aluminum angle is threaded and the nut opposite the bearing locks the bolt in place. I filed the bolt head smooth and polished it to minimize drag when it contacts the track’s upright surface. Grease on the tracks’ horizontal and vertical surfaces makes this arrangement run smoothly (see Update below).
The skate bearings fit nicely on 5/16″ bolts. Two pieces of 3/4″ aluminum angle serve to hold the bearings; they’re drilled and tapped and nuts lock the bolts. The same aluminum angle stock serves as the tracks. The bottom part needs to be kept smooth, so I added 3/4″ square ash pieces to the plywood base and drilled holes and countersinks in the vertical sides of the angles to fasten them to the ash. I screwed a block to the underside of the seat and two blocks to the plywood base as stops to keep the seat from running off the tracks.
I spent about $10 for the aluminum and the rest of the pieces were shop scraps. The bearings and the bolts can drag on the aluminum tracks, but an application of grease makes for smooth rolling (see Update below). I’ll be rowing my Whitehall a lot more now. My thanks to Ben for a great idea.
Christopher Cunningham
The support on the aft end of the base is a shouldered tenon that fits into a mortice that extends through the plywood into the hardwood stop block.
Christopher Cunningham
The aft thwart is my preferred rowing position. I have a full foot board solidly attached to the floorboards and no obstructions for the sliding-seat stroke.
Christopher Cunningham
With a few modifications to get the centerboard pendants out from under the base, the sliding seat fits over the the center thwart. The footbrace is slung from straps around the aft thwart. While that works for fixed-thwart rowing, I’d prefer a fixed footboard that braces the entire foot for sliding-seat rowing. My reach into the stern for the catch is slightly limited by the contact of my shins against the aft thwart.
UPDATE
While taking a long row with the sliding seat in my Whitehall, I discovered that the lubrication on the bearings, bolt heads, and tracks would get pushed away and the bolt heads would then create some drag on the sides of the tracks. This was especially noticeable when I turned to look over my shoulder. That would twist the seat in the tracks, and when there wasn’t enough lubrication for the bearings to slip back into alignment with the tracks, I’d feel the bolts grating on the aluminum. I added strips of UHMW plastic in between the bearings. The surface of the plastic is just proud of the bolt heads and still fits in the tracks; it keeps the seat aligned and provides a low-friction contact against the aluminum. A dense hardwood, well greased, might be an adequate substitute.
Strips of dense, slippery plastic now keep the bolt heads from grating against the sides of the aluminum tracks.
You can share your tricks of the trade with other Small Boats Monthly readers by sending us an email.
The Fairhaven Flyer is a sturdily constructed, easily rowed light dory. It is also simple to build since Sam Devlin, a master of stitch-and-glue boat design and building, refined the dory into a sleek, elegant shape created by three scarfed marine-plywood panels and a laminated plywood transom. If necessity is the mother of invention, then I am a bit involved in the birth of the 20′ 4″ Flyer.
I had built a 17′ 4″ Devlin-designed Oarling, equipped it with a sliding seat and outrigged oarlocks, and rowed it through the Canadian Gulf Islands 15 years ago. The following year, Sam and I discussed what design changes would be needed for a similar, but larger boat for me to row solo from Ketchikan, Alaska, to Bellingham, Washington. The boat would have to handle potentially large ocean swells, have reserve buoyancy that would lift the stern above breakers when driving through surf toward a beach landing, plus carry me and up to 700 lbs of food, clothing, and camping, cooking, and anchoring equipment. Simply stretching the Oarling would not produce the performance I needed.
photographs by the author
The author’s Fairhaven Flyer, BELLA, was built for solo expeditions, with watertight compartments in the ends and a single rowing rig.
Considerable tweaking created an effectively new design with increased displacement. I would have a narrow window—just six months while working a fulltime job—to build the new boat, amass provisions, dehydrate food, buy equipment, and get myself and the as-yet unnamed boat design to Ketchikan. When I let Sam know I had committed to doing the trip, he carved out time to create the new hull and sent a simple plan with offsets and stations to me shortly after I called. When I received it a week later, I called to thank him and during that conversation it occurred to us that the new design needed a name. I lived in a Bellingham neighborhood called Fairhaven and suggested “Fairhaven Flyer.”
In the decade that followed, Sam added details to the Flyer so that it could be rowed single or double, with either sliding-seat with outrigged oarlocks or with fixed thwarts and gunwale-mounted oarlocks. Light dories in general can feel quite tippy when not settled into the water with a load of cruising gear but the Fairhaven Flyer has high secondary stability, meaning it tips to a point and then stiffens up significantly and resists further rolling; anyone unfamiliar with this type of dory will soon get used to this characteristic. As the load in the dory increases, so does its stability, so it can be quite steady as an expedition boat even though it may be tippy when used for recreation and exercise.
When Walt and Susan Guterbock moved to Anacortes, a small city on the shores of Washington’s Puget Sound, five years ago, they enjoyed cruising the San Juan Islands that surround them and wondered what kind of boat would be best for two rowers and camping equipment. They joined the Old Anacortes Rowing Society (OARS), and immersed themselves in the culture of classic wooden gigs and wherries; Susan spent upwards of five hours rowing per week rowing the society’s three boats, and developed a stroke steady enough to allow her to row in the stroke seat and set the rowing pace for the crew. After Walt and Susan investigated several styles of pulling boats like Whitehalls and wherries for their personal use, they settled on the Fairhaven Flyer. They bought the plans and commissioned Andy Stewart of Emerald Marine to build the boat. Andy made a few minor modifications and additions to their new Flyer that are not in Devlin’s plans, but the Guterbocks’ boat, SCARLETT, is all Fairhaven Flyer.
SCARLETT’s fixed thwarts are supported by bulkheads that create watertight storage/flotation compartments. A harness secured to the hull allows launching by a crane or single davit.
Anyone with enough room, competent carpentry skills, and knowledge of fiberglass epoxy applications can build the Flyer. Depending on modifications and wood used, the boat will weigh between 120 and 200 lbs. I built my boat, BELLA, with okoume plywood, mahogany, and 12-oz. fiberglass cloth and tape. SCARLETT was built with Hydrotek plywood, sapele, and biaxial cloth.
Hull speed is a concern if you intend to use the Flyer for long rowing trips and need to make quick work of crossings and exposed passages. Prior to my departure for Ketchikan in 2004 I managed one sea trial with the empty Flyer. The fastest I could sustain with it was 4.7 mph. On my trip south from Ketchikan I encountered a lot of different sea states and rowing conditions, from extreme chop to very large ocean swell, flat reaches, 8-knot currents, debris, breakers, and upwellings. My average speed was 3.9 knots (4.5 mph) for the two-month trip. There were times when I was doing 7 knots with tide and wind, and times I crawled along barely above 2 knots.
All rowing craft have a their own measure of glide after each stroke, and you can judge the effectiveness of your boat length-to-glide ratio by the distance between oar “puddles.” The Flyer, outfitted with a sliding seat, outrigged oarlocks, 9.5′ oars, and carrying 500 lbs, had a consistent 25′ between strokes at 22 strokes per minute and a speed of 3.5 knots. That long glide allowed me to row at a low stroke rate, kept my heart rate low, and conserved energy for long hauls. SCARLETT, with fixed rowing stations and shorter oars than I use also has an exceptionally long glide; even when Walt and Susan stop rowing, the hull will carry them twice its length before noticeably slowing.
SCARLETT is a Fairhaven Flyer built for tandem rowing with fixed thwarts and gunwale-mounted oarlocks.
The flat bottom of the Flyer makes it easy to beach the boat. It takes to the bottom sitting upright and doesn’t roll to one side or the other like a wherry, peapod, or Whitehall. During stops ashore while cruising, I can comfortably stretch out in the cockpit to snooze or eat with an oar braced above me as a ridgepole and a tarp draped over for sun protection. Even for afternoon outings this solid footing ashore a great benefit—wineglasses don’t fall over.
In a following sea, when large steep swells came up astern, I treasured the tendency of the Flyer’s bow to slide forward and lead the stern as we raced down into the trough. A boat with a keel and a more pronounced forefoot, like a wherry, would likely catch the water and veer, and would have a greater tendency to broach. It is the dory’s ability to slide, rather than capsize on the face of a breaking wave, that Chay Blyth and John Ridgway owed their lives to when they rowed across the Atlantic in an open 20′ dory in 1966. It is also the attribute that made me suspect that my Fairhaven Flyer was smarter than me.
The stretchers in SCARLETT can be easily removed to clear the cockpit for cleaning or relaxing in the bottom of the boat. Deck plates in the bulkheads supporting the thwarts offer access to the watertight compartments.
The Fairhaven Flyer can be light enough to cartop but it is a rather long boat and does not lend itself to easy transport on a roof rack. A boat trailer is a preferable way to move it.
If, like Walt and Susan, you can keep it in a marina slip during the summer months, spontaneous picnic rows require little more than packing the sandwiches and thermos, grabbing your rowing kit, getting down to the boat, and rowing away. But if you are drawn to more ambitious outings, as I am, you can head out to the San Juan or Gulf Islands for the week, or row double from Sausalito to Angel Island, or venture from Quoddy Head Light to Grand Manan Island. The Fairhaven Flyer will get you safely and quickly there, happy to take as much gear, food, clothing, and whatever else you might think you need.
Dale McKinnon began rowing in 2002 at the age of 57, and in 2004 rowed solo from Ketchikan, Alaska, to her home town, Bellingham, Washington. In 2005 she rowed from Ketchikan to Juneau. Her previous articles for Small Boats Monthly include rowing the Columbia River and the Columbia River estuary, how to row rough water, and reviews of NewGrips and CrewStop rowing gloves, Exped sleeping pads, and the Devlin Duckling 17.
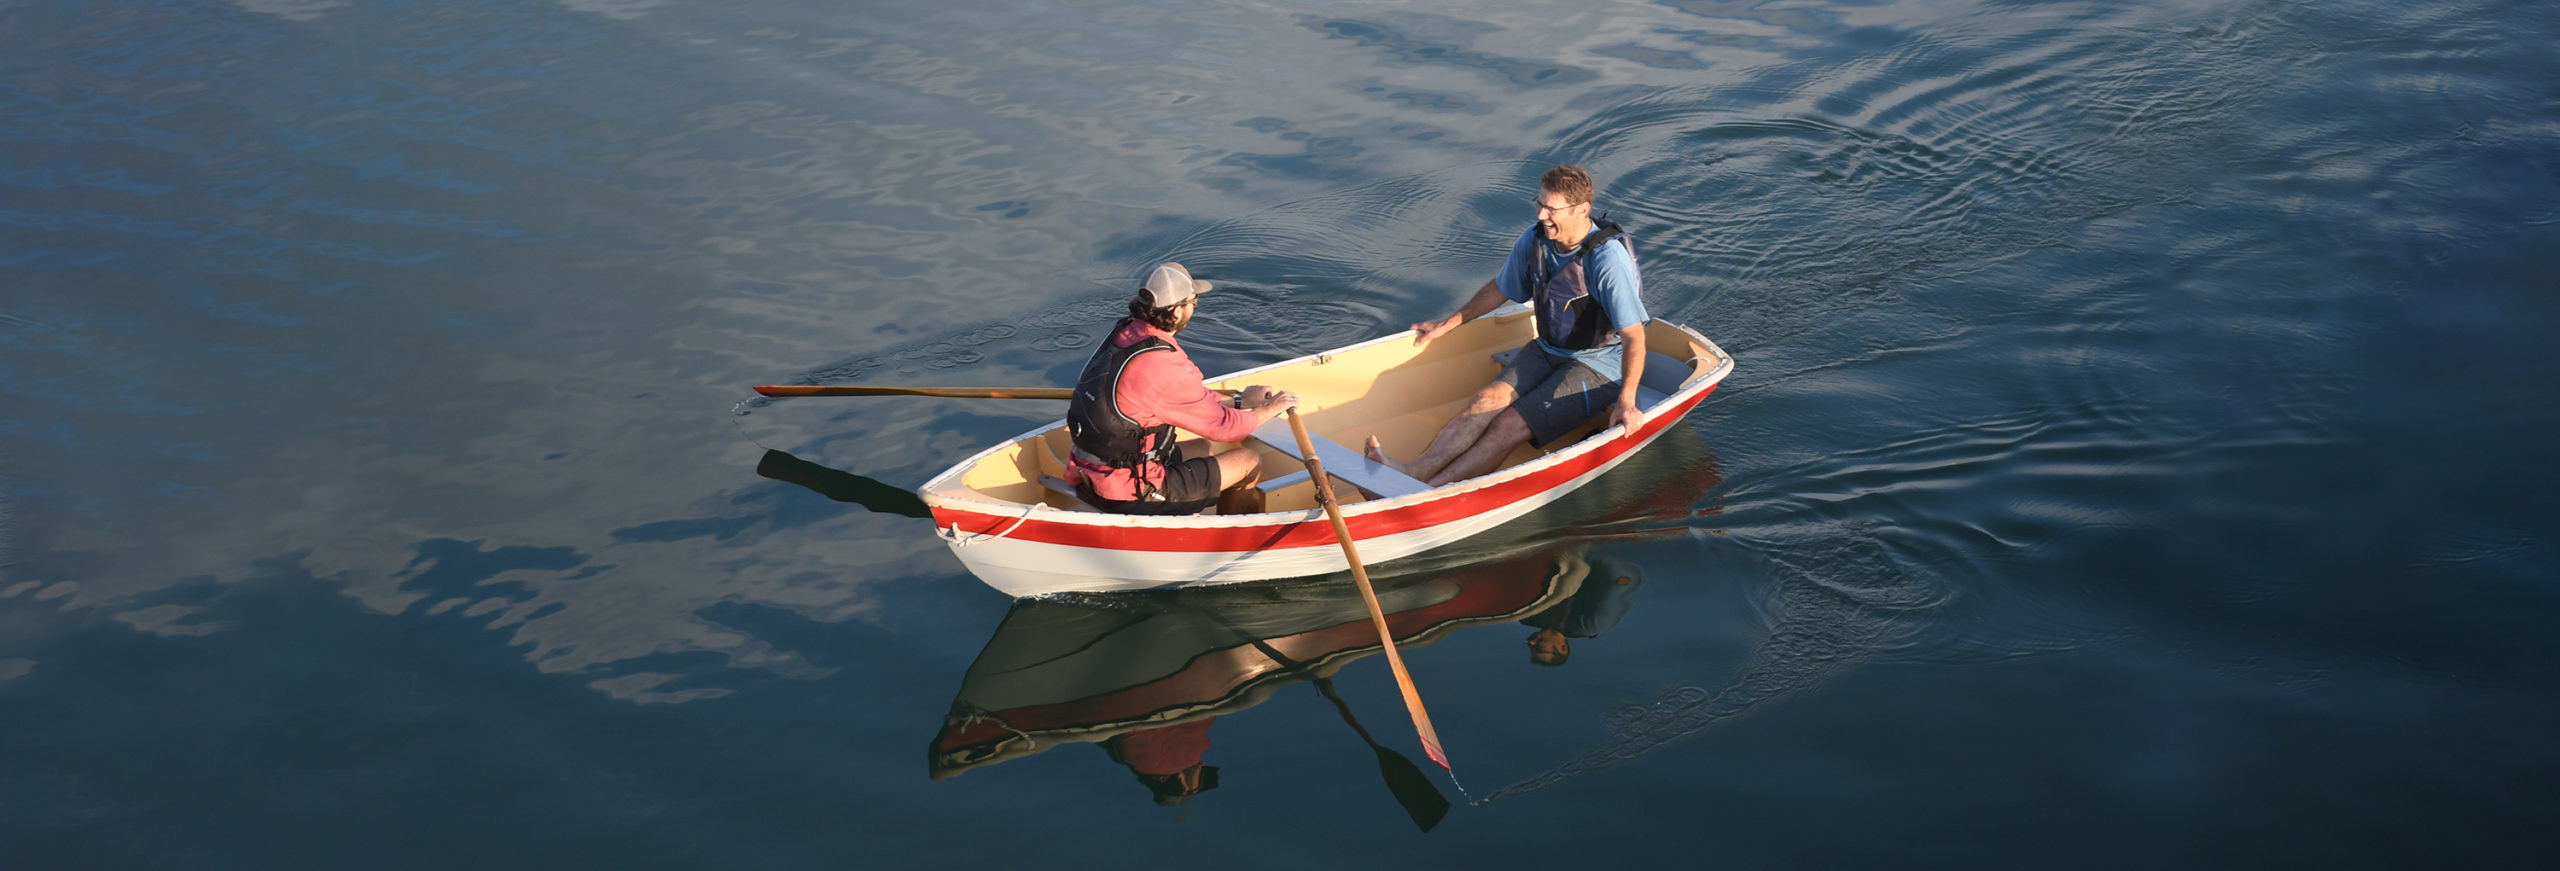
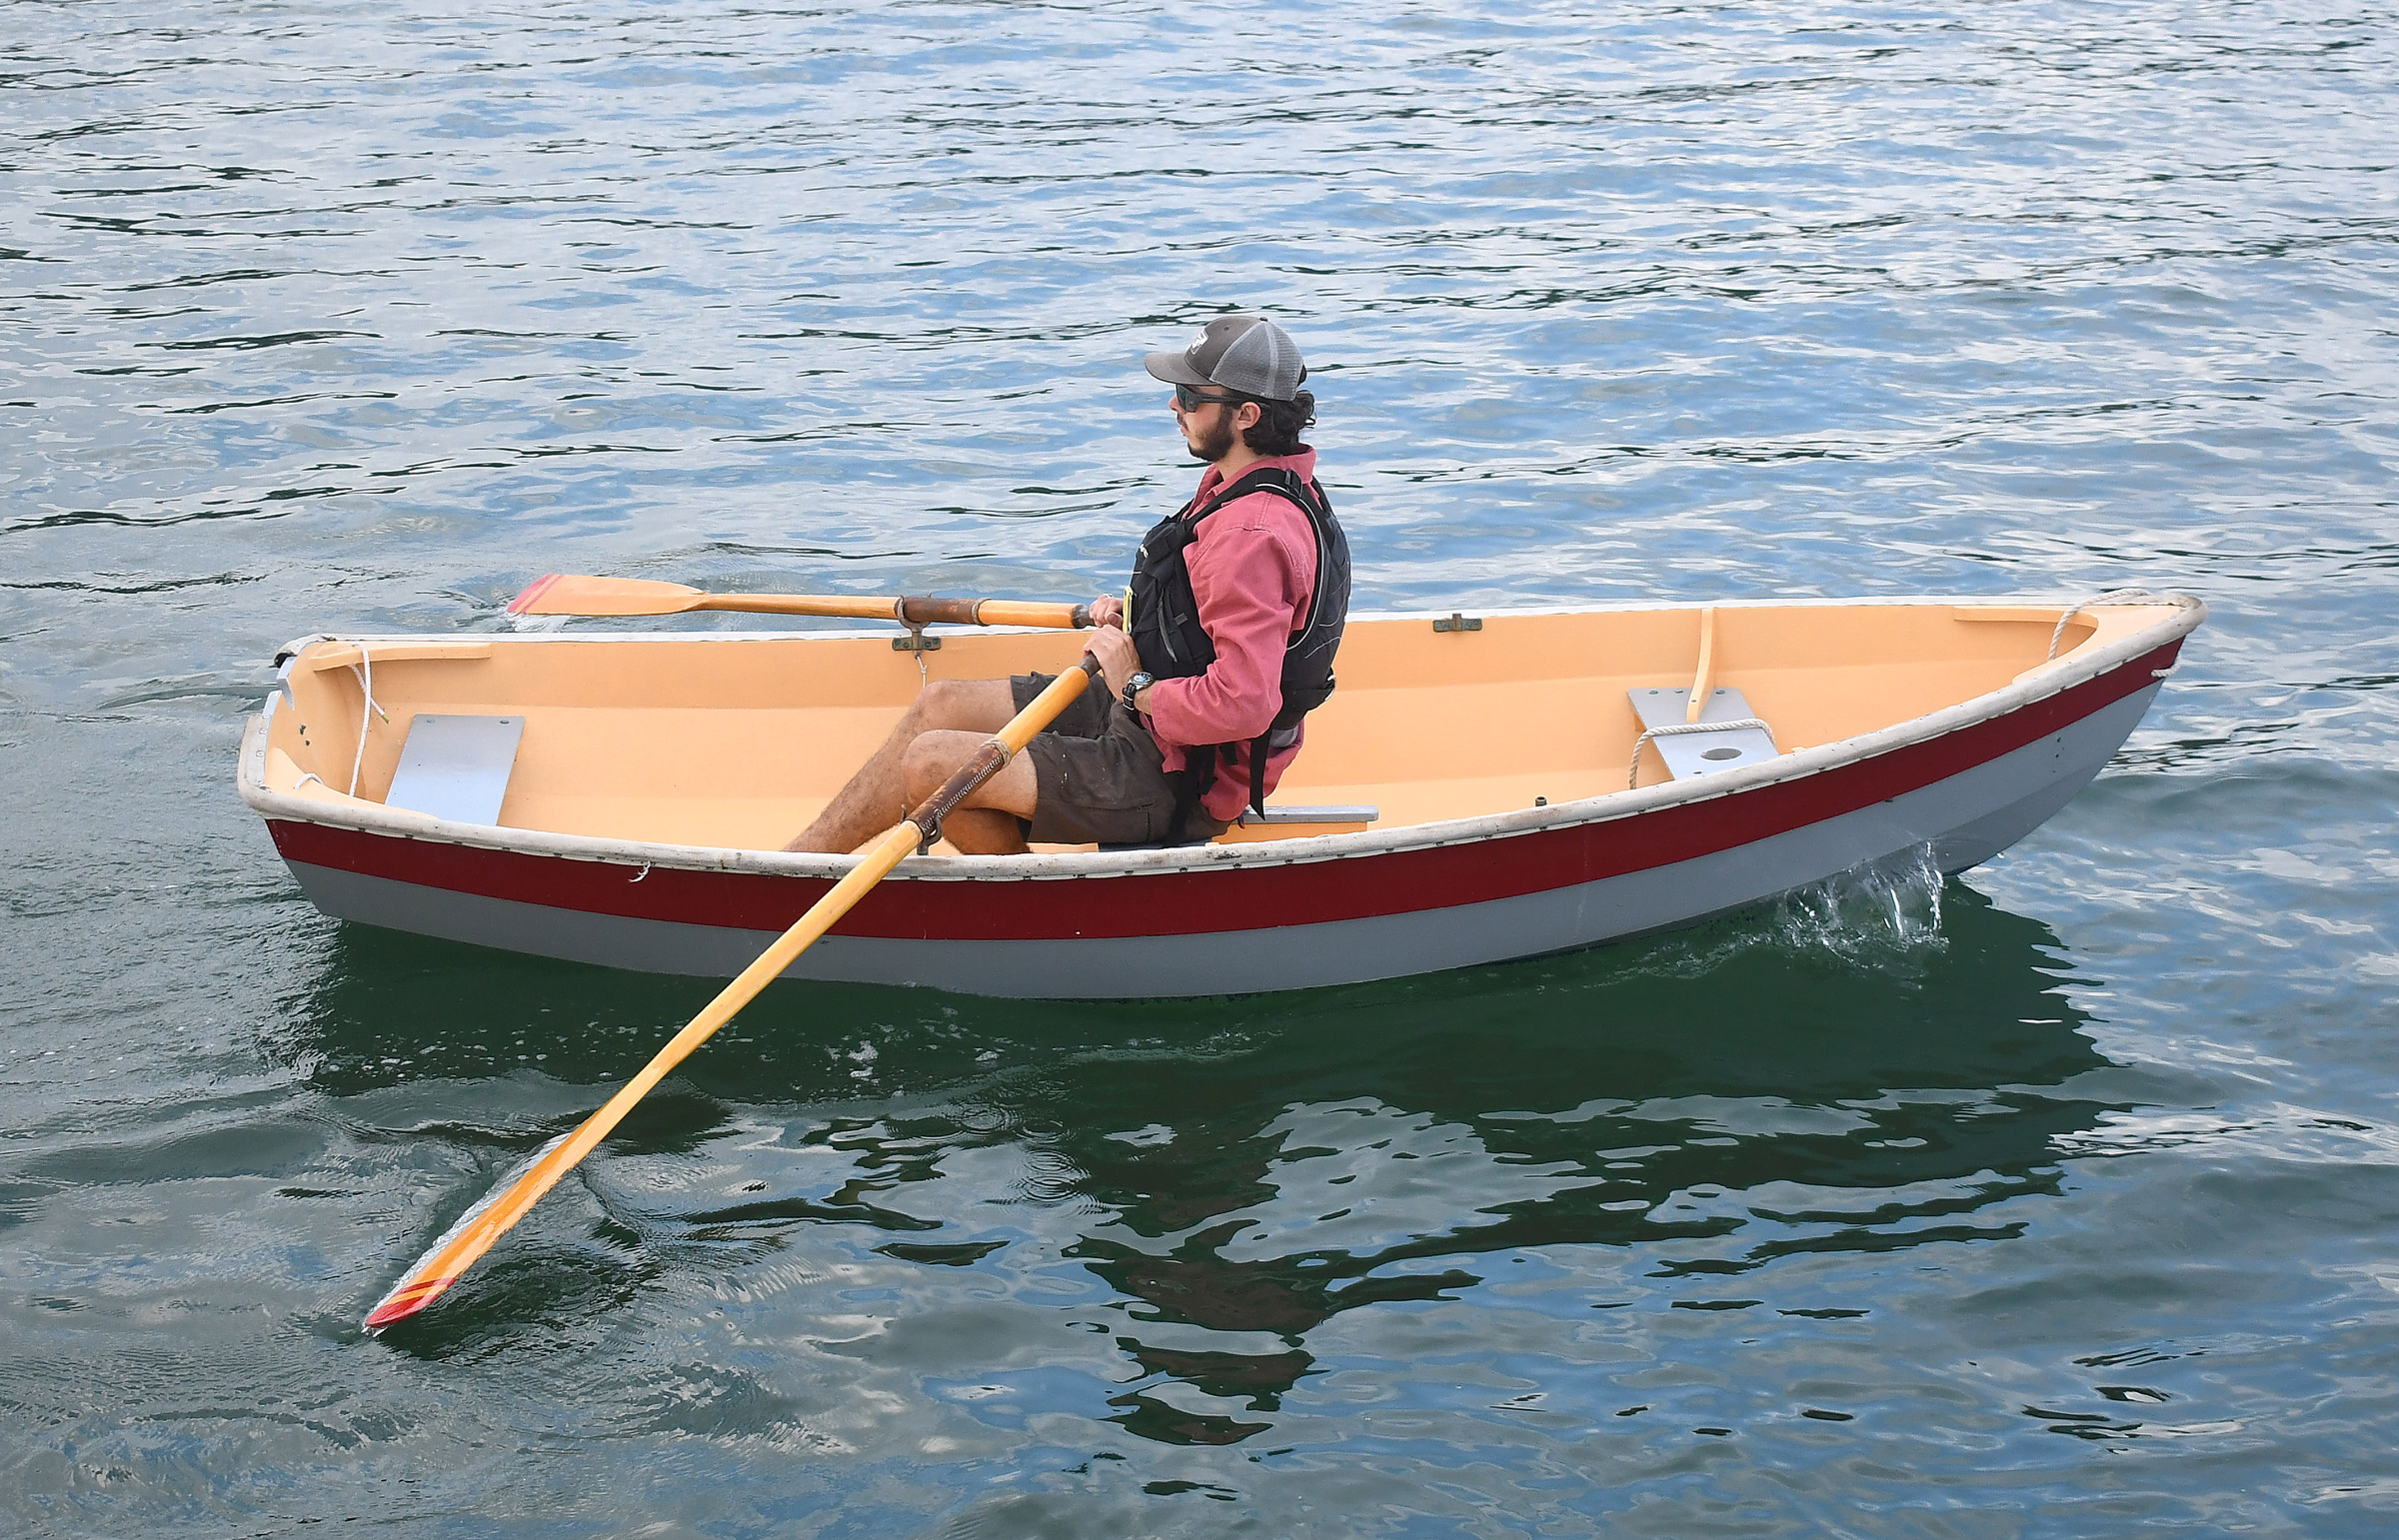 All photos by Delaney Brown