Twenty-five years ago, my method of applying paint resulted in a finish that looked like I’d used a mop and bucket. Then I was introduced to the roll-and-tip method, and I have been using it ever since.
To roll and tip is to apply a thin coating with a roller and then go over it lightly with a brush, using just the bristle tips to smooth the coating and remove the bubbles. The coating can be paint, epoxy, or varnish, but for the purpose of this article we’ll focus on paint.
As with any paint job, the key to getting the results you want is good preparation of the surface, good tools, and good materials. And the key to selecting the right tools and materials comes down to the project in hand—we find a low-nap roller cover works well when applying paint, and a foam cover works best with epoxy resin.
Make sure the surface to be coated is smooth, clean, dry, and dust free, and that any fairing compounds and primer used are compatible with the paint system. We brush off excess dust and then vacuum; some folks next run a lint-free tack cloth over the surface to remove the last of the dust. To ensure system compatibility, we stick to one brand of fairing compound, thinner, primer, and paint and follow the manufacturer’s recommendations on its website. If using multiple brands, check the small print on all products (or consult the relevant web pages) to ensure compatibility.
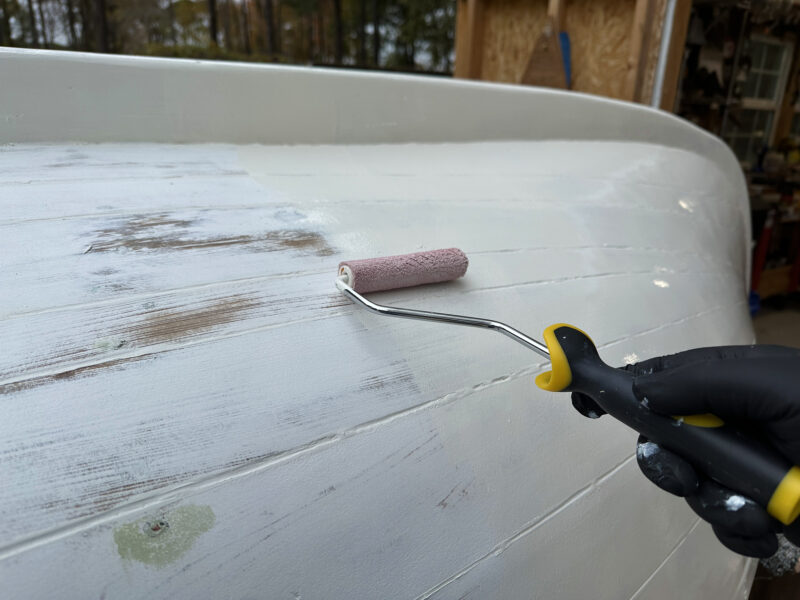 Photographs by the authors
With a smooth-sided hull the paint can be applied either vertically or horizontally. Remember to work only a small area and to apply only light pressure to the roller. Too much pressure will result in bubbles in the paint and ridges forming off the end of the roller.
When applying paint, you want neither too much nor too little. How much is enough? Do you need to thin the paint? Will the paints need to be thinned with brand thinners or mineral spirits, or conditioned with brushing liquid such as Interlux 333 or Penetrol, and what will be the effect of atmospheric conditions? Air temperatures, in particular, can have a marked impact on paint performance: hot temperatures, for example, may cause solvents to evaporate—or flash—before the paint can self-level or be tipped flat. Humidity, too, can make or break a project: high humidity will slow the drying process, which can lead to an uneven finish or, in extreme cases, to the paint never completely curing.
Take time to become familiar with one system of thinner and paint; apply the first few rolls of paint to a test surface. We like to start with a half-quart of strained and possibly thinned paint. While working we leave the can covered so the remaining paint doesn’t lose solvent. We test to see how large an area we can cover before the solvents flash and the leading edge becomes dry. We apply several coats, preferring multiple thinner layers to one overly thick “mop coat.” Our marine carpenter friend Keith likes to apply three coats: a flood coat to get full coverage of a surface, a show coat that “shows” irregularities not visible on the first translucent coat, and then the finish coat.
We use a 4″ roller with a very low nap. There are many options on the market. Our most recent favorite is the Whizz 25003 4″ Velour, which has a lint-free cover with 3⁄16″ nap, and was recommended to us by George Kirby IV at George Kirby Jr. Paint Co. It carries just the right amount of one-part marine-grade paint with minimal thinning, and its covered end works well over seams and in corners and reduces paint ridges on flat surfaces. When choosing a roller cover, it is important to follow the coating manufacturer’s recommendations to be sure it is resistant to whatever solvent is in the paint or resin system (if not, the roller cover can dissolve, which will result in a big mess).
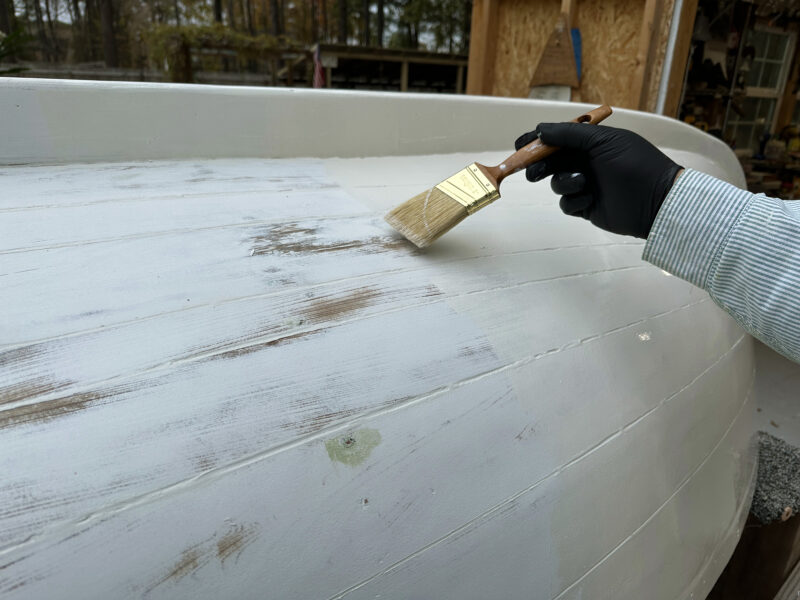
Lightness of touch is everything when it comes to tipping. The goal is not to spread the paint but to smooth out any imperfections such as ridges or bubbles. Remember, even if the paint has been rolled on vertically, when tipping the brush should always follow the line of the planks.
For tipping brushes, we like the Corona Europa 16038 Badger Style Brush, Corona Deck and Trim 3358 Angular, and have also had good success with Purdy’s XL Cub short-handled sash brushes, which come in handy when painting in tight spaces or at awkward angles. As with the roller cover, make sure the brush is compatible with the formula of paint to be used, and be sure to find one with bristles that are soft, not stiff. We prefer the results we get with a bristle brush, but disposable foam brushes can also be used (be aware, however, that some lose their stiffness with solvents).
Be sure not to work on too large an area when rolling the paint. If the leading edge of the freshly painted surface becomes dry, you will not be able to tip out the paint. The size of area to be worked is dependent on the environment in which you are working: for example, when we worked in the humidity and heat of a Florida summer, we would be lucky to roll and tip a 2- to 3-sq-ft area at one time, but in a cool, dry Virginia fall we can cover as much as 6 sq ft before the solvent flashes off and the surface tacks.
When rolling, the goal is to get a smooth coat with as few passes as possible. A light touch is essential—excessive pressure will cause ridges to form off the end of the roller and create bubbles in the paint. How much paint to apply is, again, a matter of testing: too much will require an excess of tipping, and you will have to deal with sags and runs; too little and the paint will dry faster than it can be rolled and tipped.
If a boat is smooth-sided, the paint can be rolled vertically or horizontally. If the hull is lapstrake, we tend to brush-paint the laps before rolling, and then roll horizontally. In all cases, the tipping should be horizontal to follow the line of a plank.
For tipping, use a light touch, passing over just the top layer of paint to smooth any bumps or peaks in the still-wet paint and to take care of any bubbles and ridges. While tipping can be done from either ahead of or behind the leading edge, we prefer to lightly tip from the dry unpainted surface back into the most recently rolled section, across the leading wet edge.
As with all techniques, the more you roll and tip, the better you’ll be at it. Practice and testing are key, as is patience—don’t overwork the paint: roll it, tip it, and then leave it alone to self-level. If you have a choice, work on the side of the boat that’s in the shade rather than full sun—it’s better for the paint and for the painter. If you have a willing friend, ask them to work with you—it’s helpful to have one person roll while the other tips. Don’t worry about whether to paint bow to stern or stern to bow, instead figure out whether you like to work left to right or right to left—you will find one direction gives you better brush control and is less tiring. And finally…don’t be overly self-critical, nobody achieves a perfect paint finish first time out.![]()
Audrey (Skipper) and Kent have been rolling and tipping for 25 years, when not restoring boats or messing about in their menagerie of kayaks, canoe, runabout, and sailboats. Their adventures are logged at smallboatrestoration.blogspot.com.
You can share your tips and tricks of the trade with other Small Boats readers by sending us an email.




Excellent, thanks, Audrey and Kent. That’s very clear and helpful.
You’re welcome. It’s not rocket science 🙂