Getting my larger trailered boats to and from the water is pretty straightforward—the ramps are paved, and my truck does most of the work. My canoes and kayaks, on the other hand, aren’t so easy, especially when my truck and the water are separated by stretches of asphalt, loose cobbles, and sand and I have to do the lugging. Carts with wheels do fine on pavement, but they get bogged down in sand and rocks.
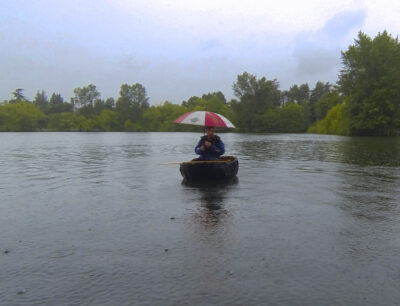
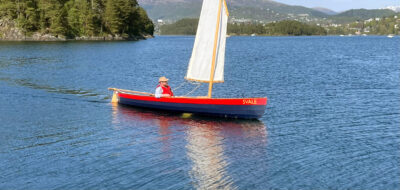
 Photographs by the author
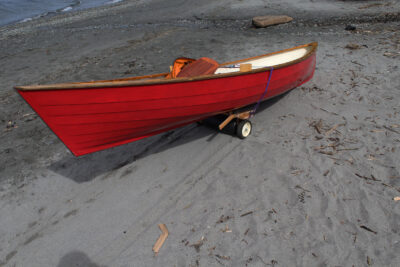
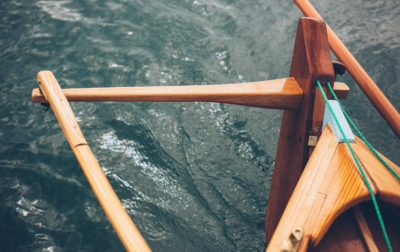
In soft, dry sand the fender supports the weight of the canoe with its large footprint. The wheels are prevented from sinking in the sand and plowing deep furrows.
In the late 1990s I made a cart that fit on the stern of my plywood Greenland-style kayak. It had a 6″ × 15″ fender, the kind with a center rope tube, instead of a pair of wheels. With its much larger footprint it rolled beautifully over dry sand.
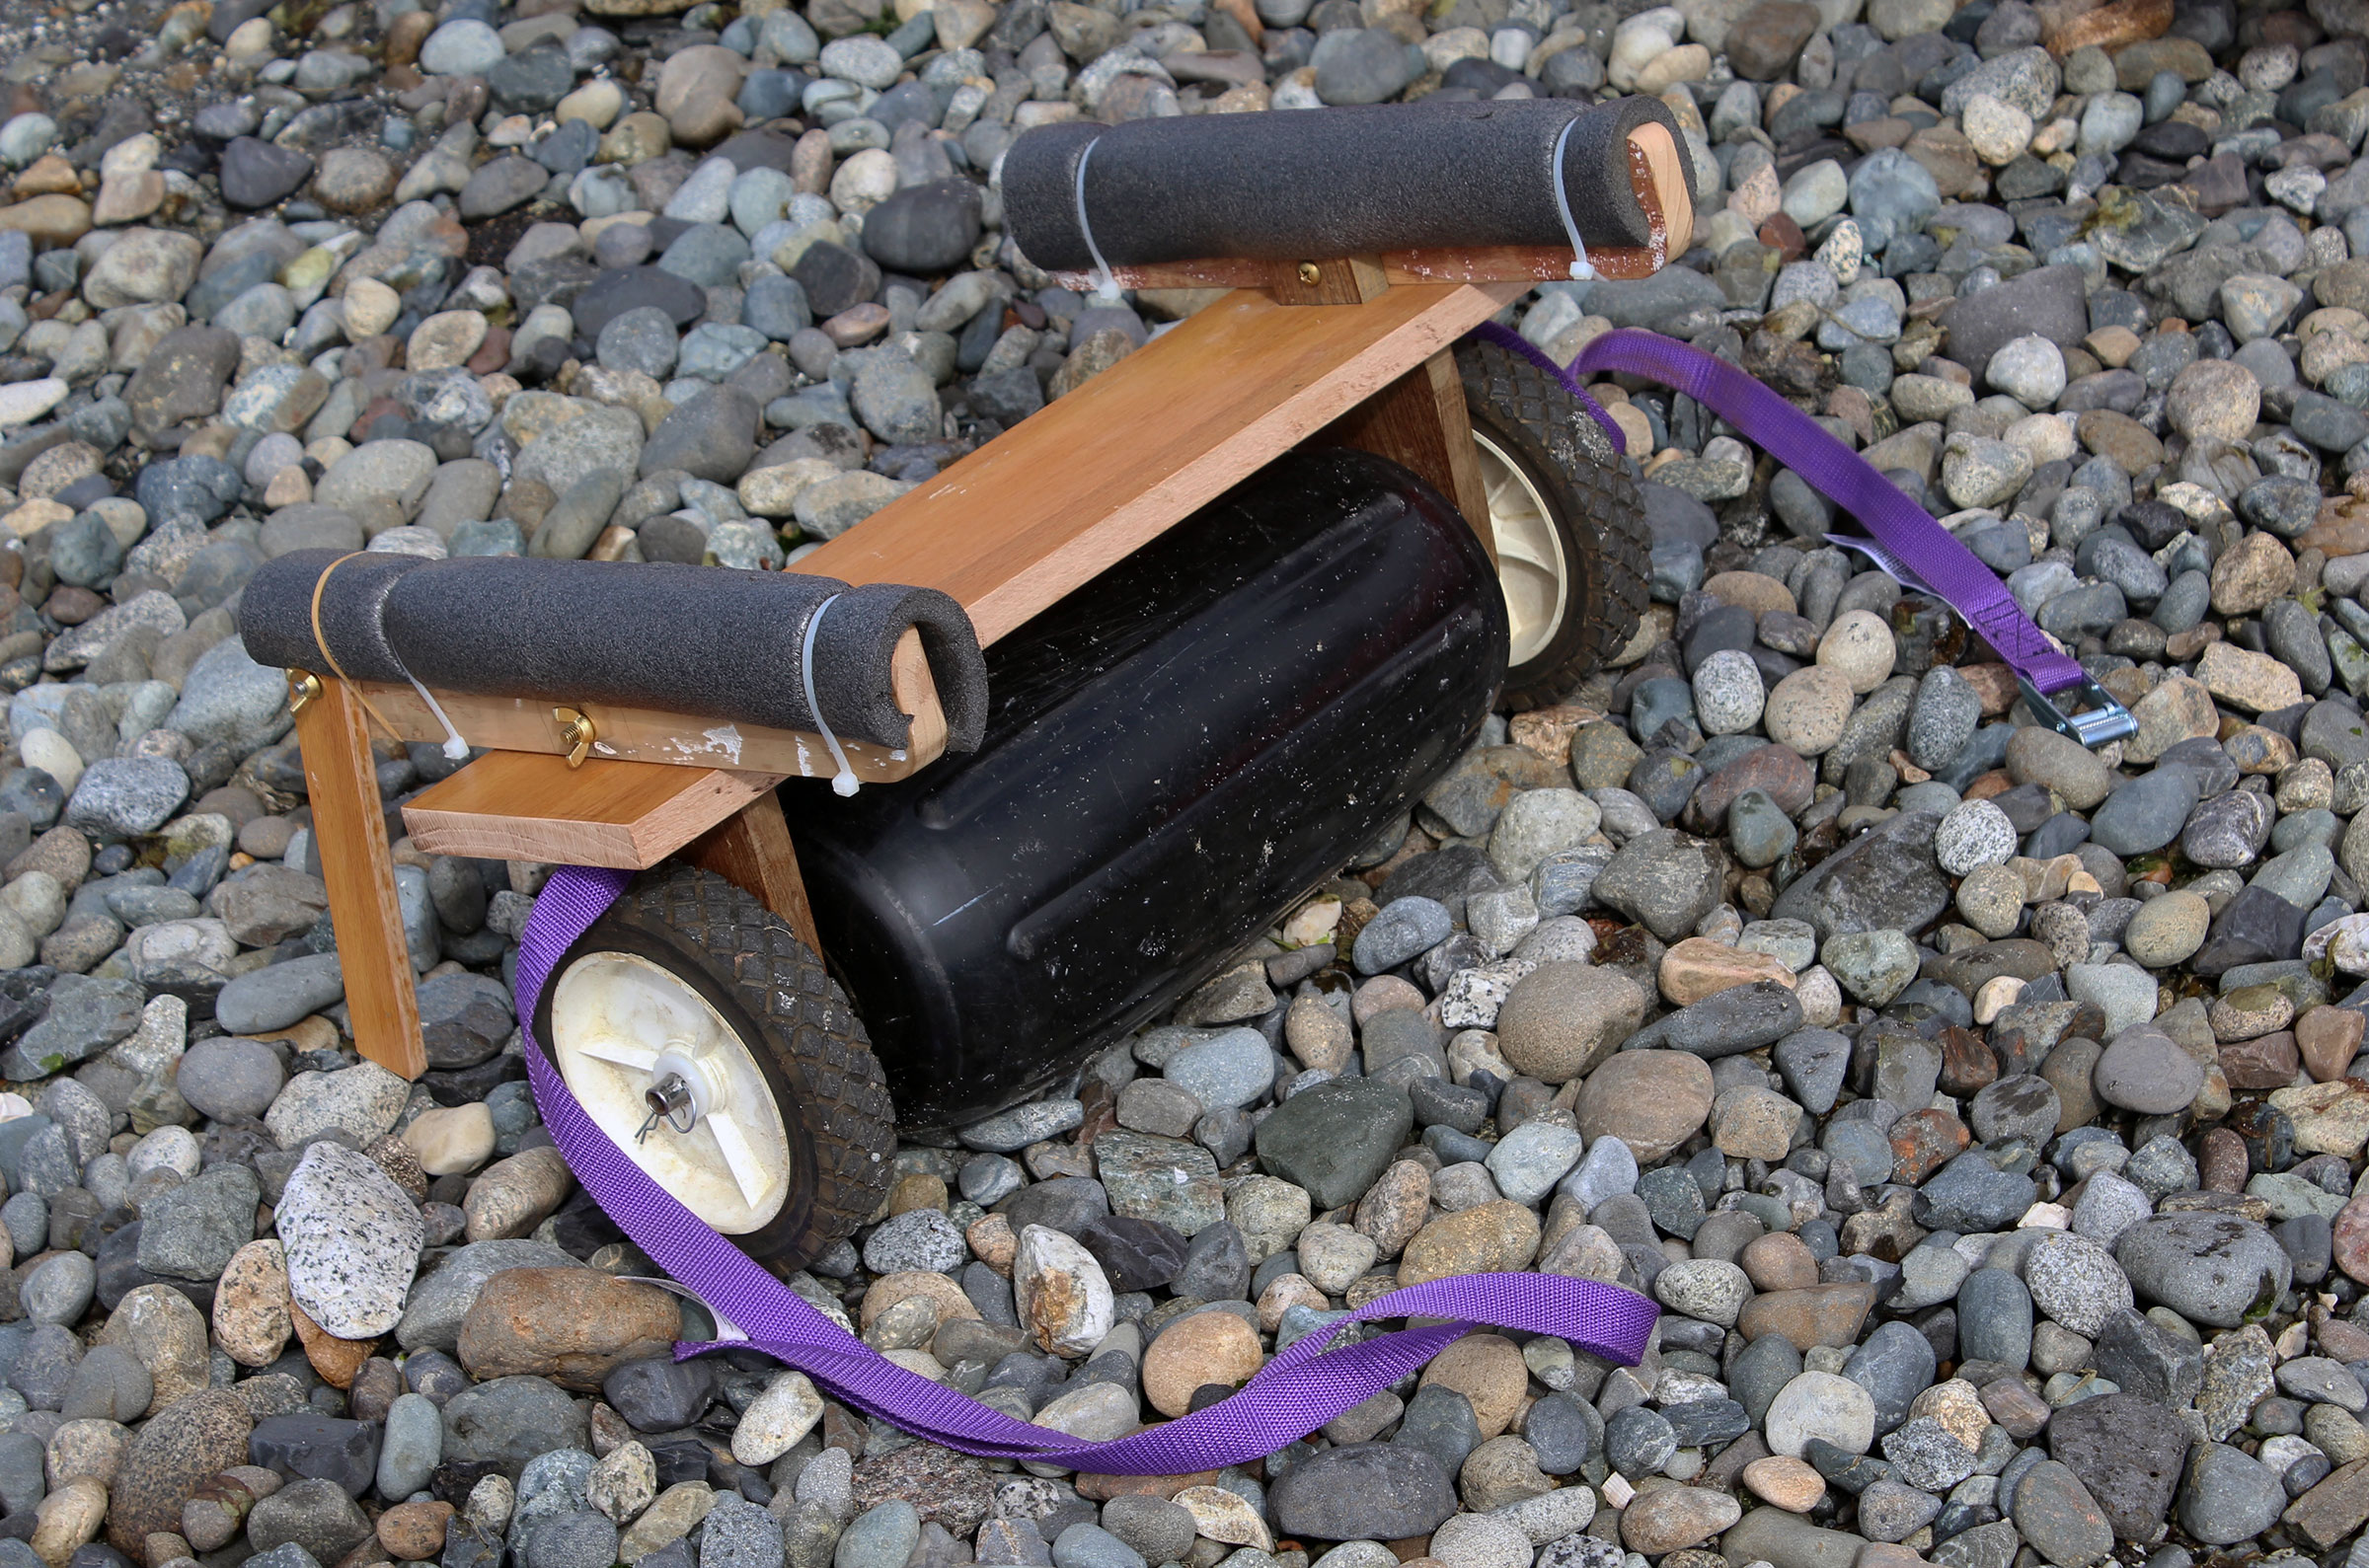
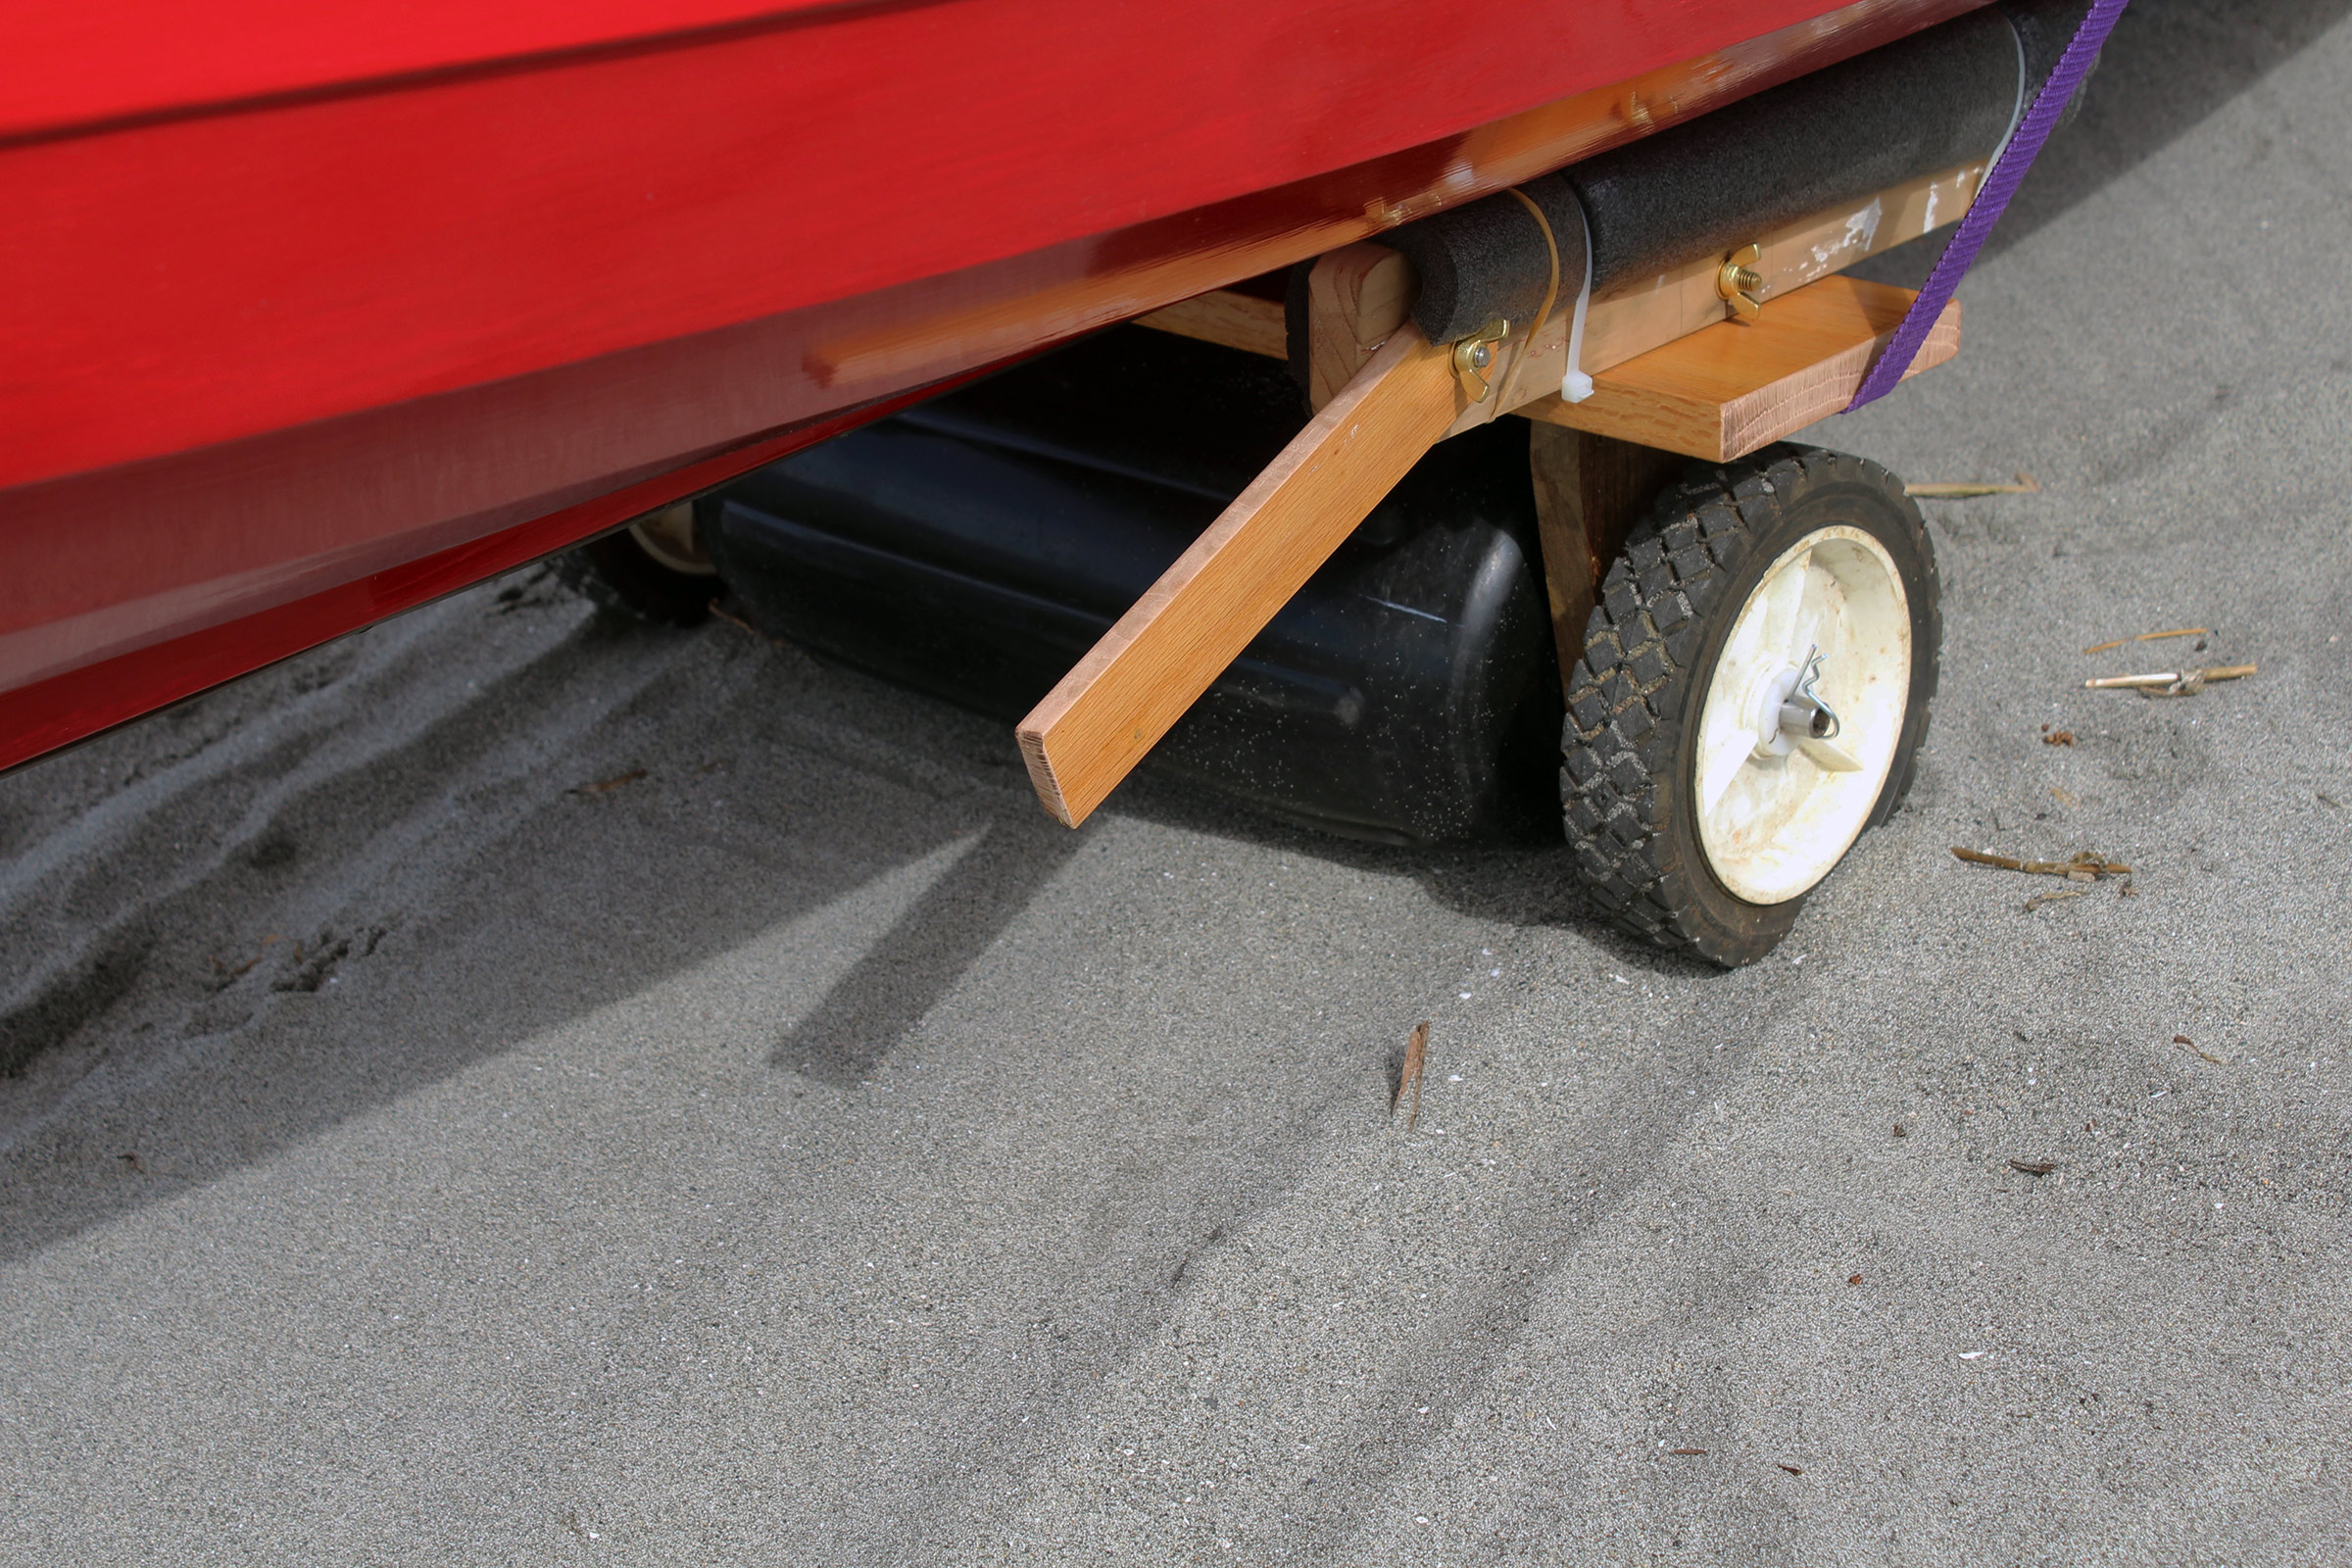
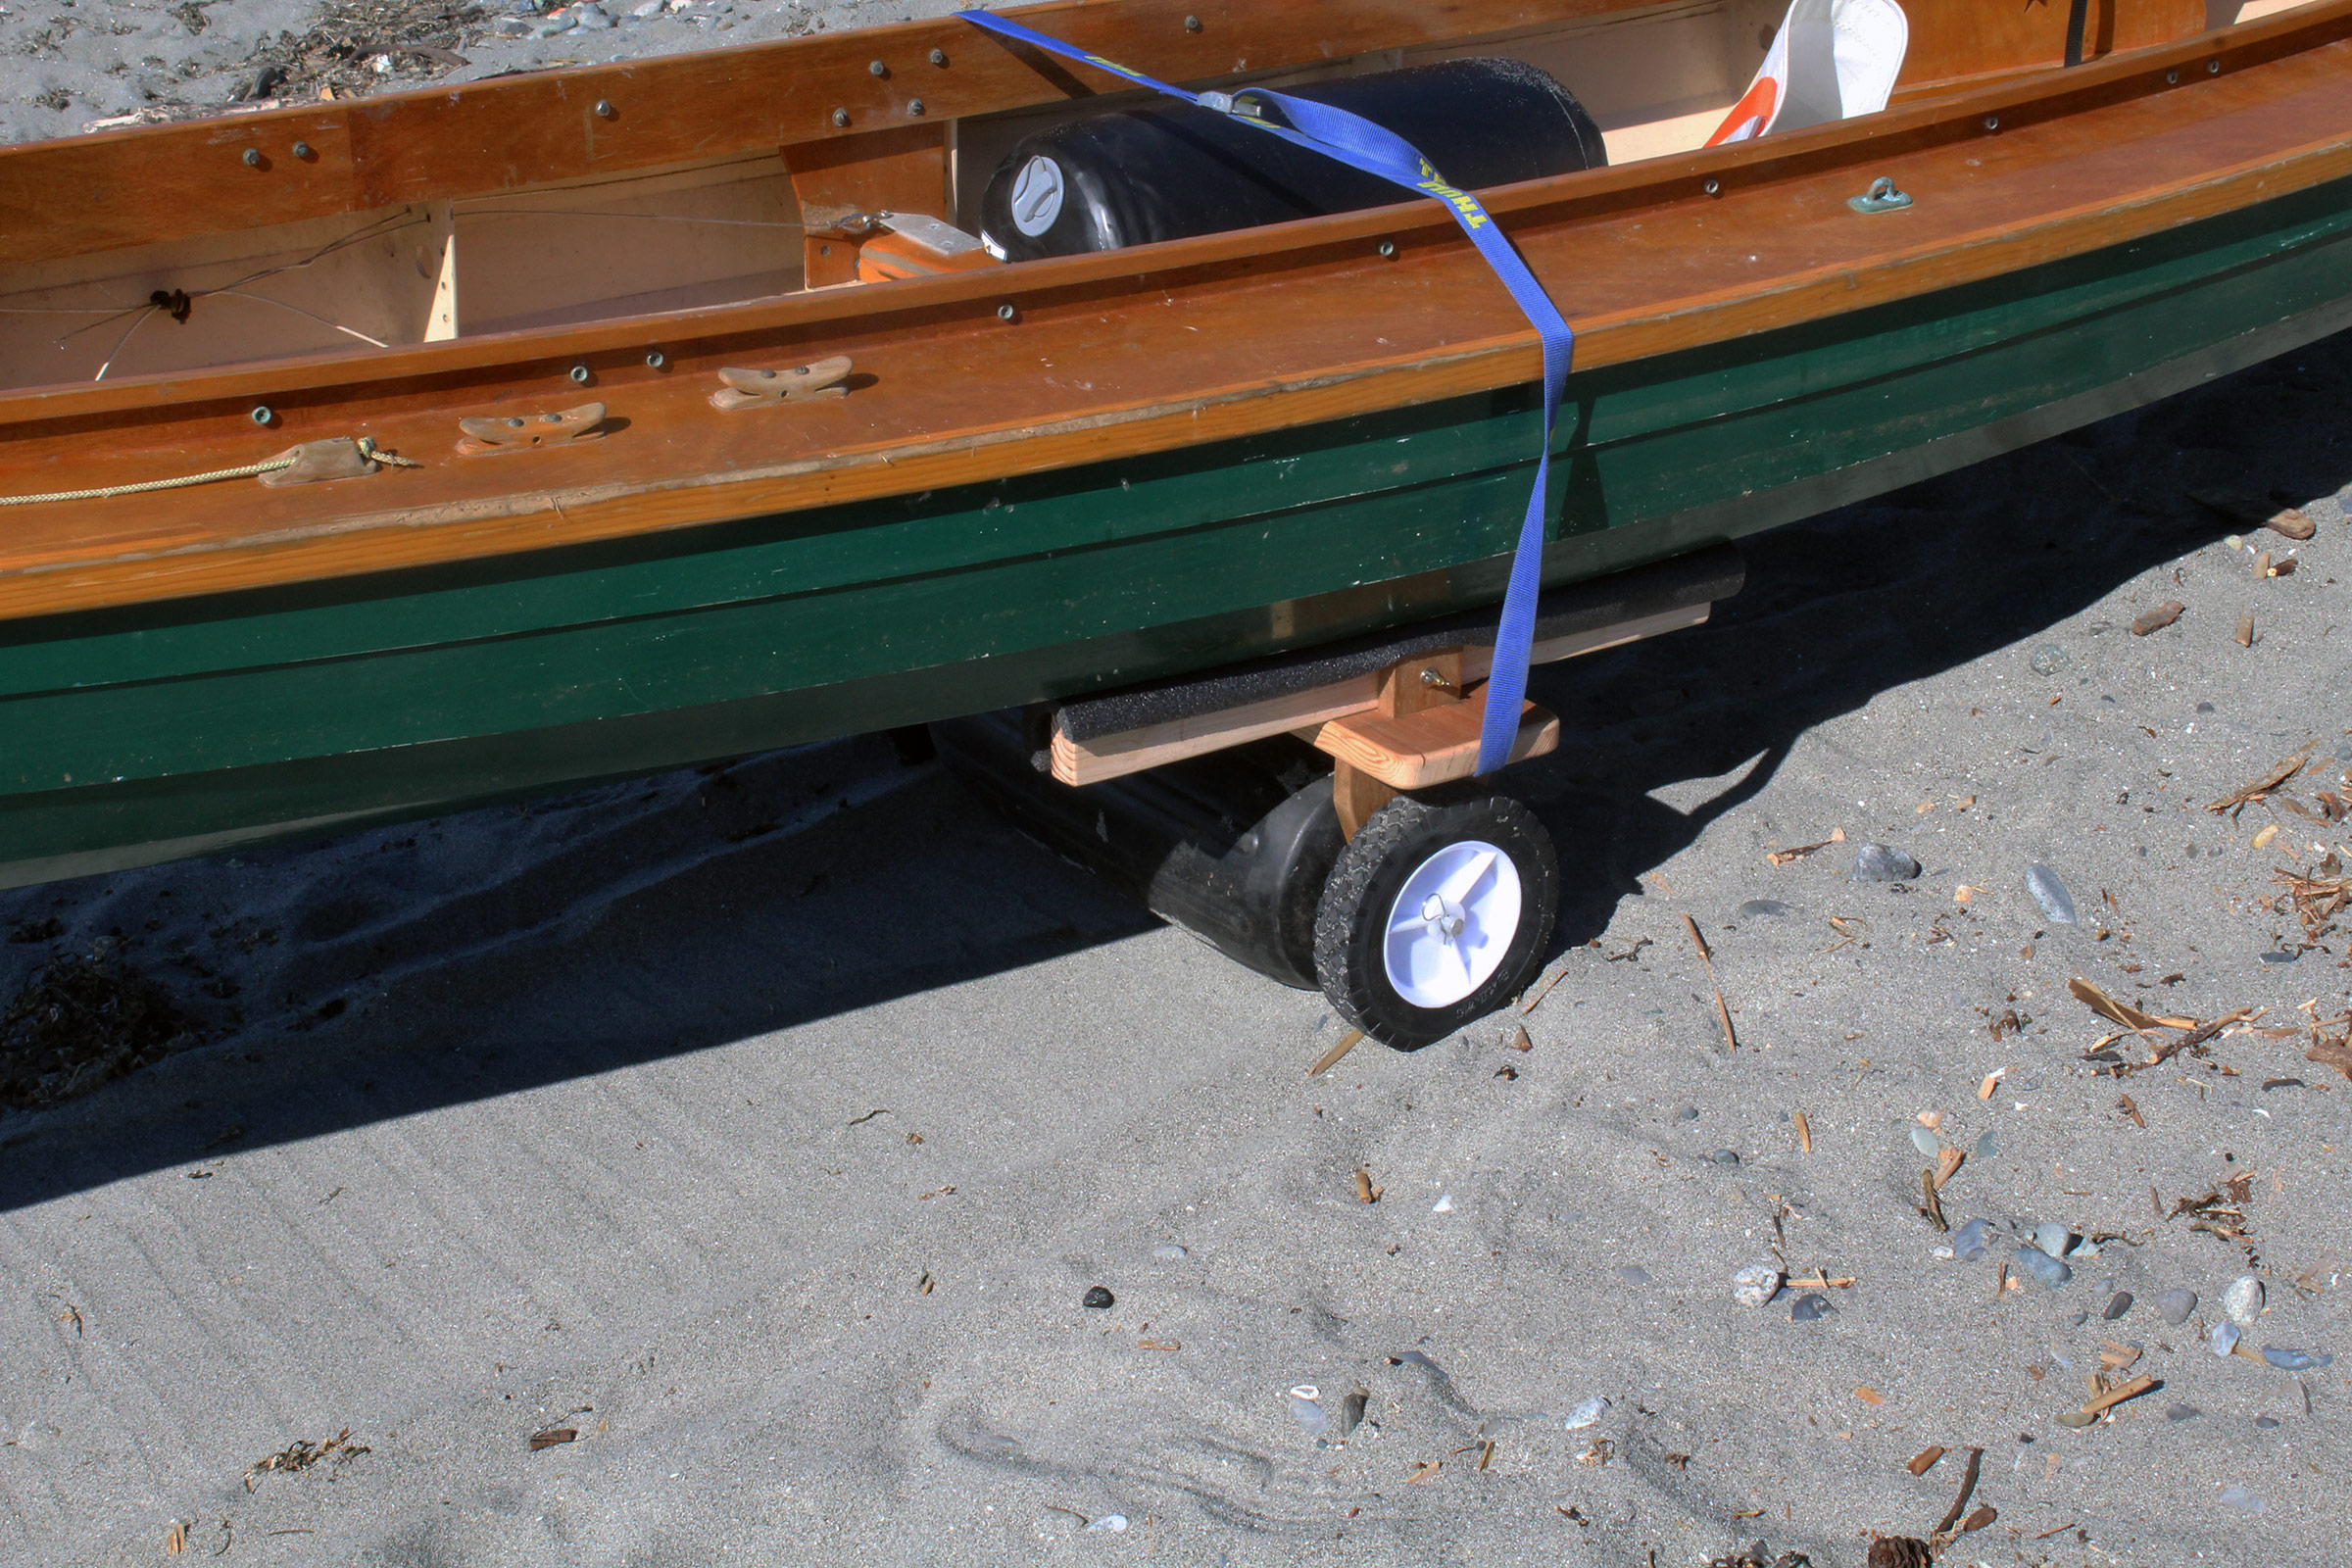
The kickstand holds the cart in position for the canoe to be loaded. A machine screw with a wingnut applies enough pressure to keep it from pivoting out of position and allowing the cart to tip onto its side.
Since that first fender-roller cart, which took only half of the weight of the kayak, I’ve made three fender-roller center carts for my canoes. The center carts take all the weight of the canoes as well as gear and make it very easy to get everything to the water and back in single trips. The one I built in 2017 used a fender alone, and the two I built this year each combine a fender with a pair of wheels on the same axle. These latest all-terrain carts roll well over hard and soft surfaces and use the durability of the wheels and footprint of the fender to good advantage.
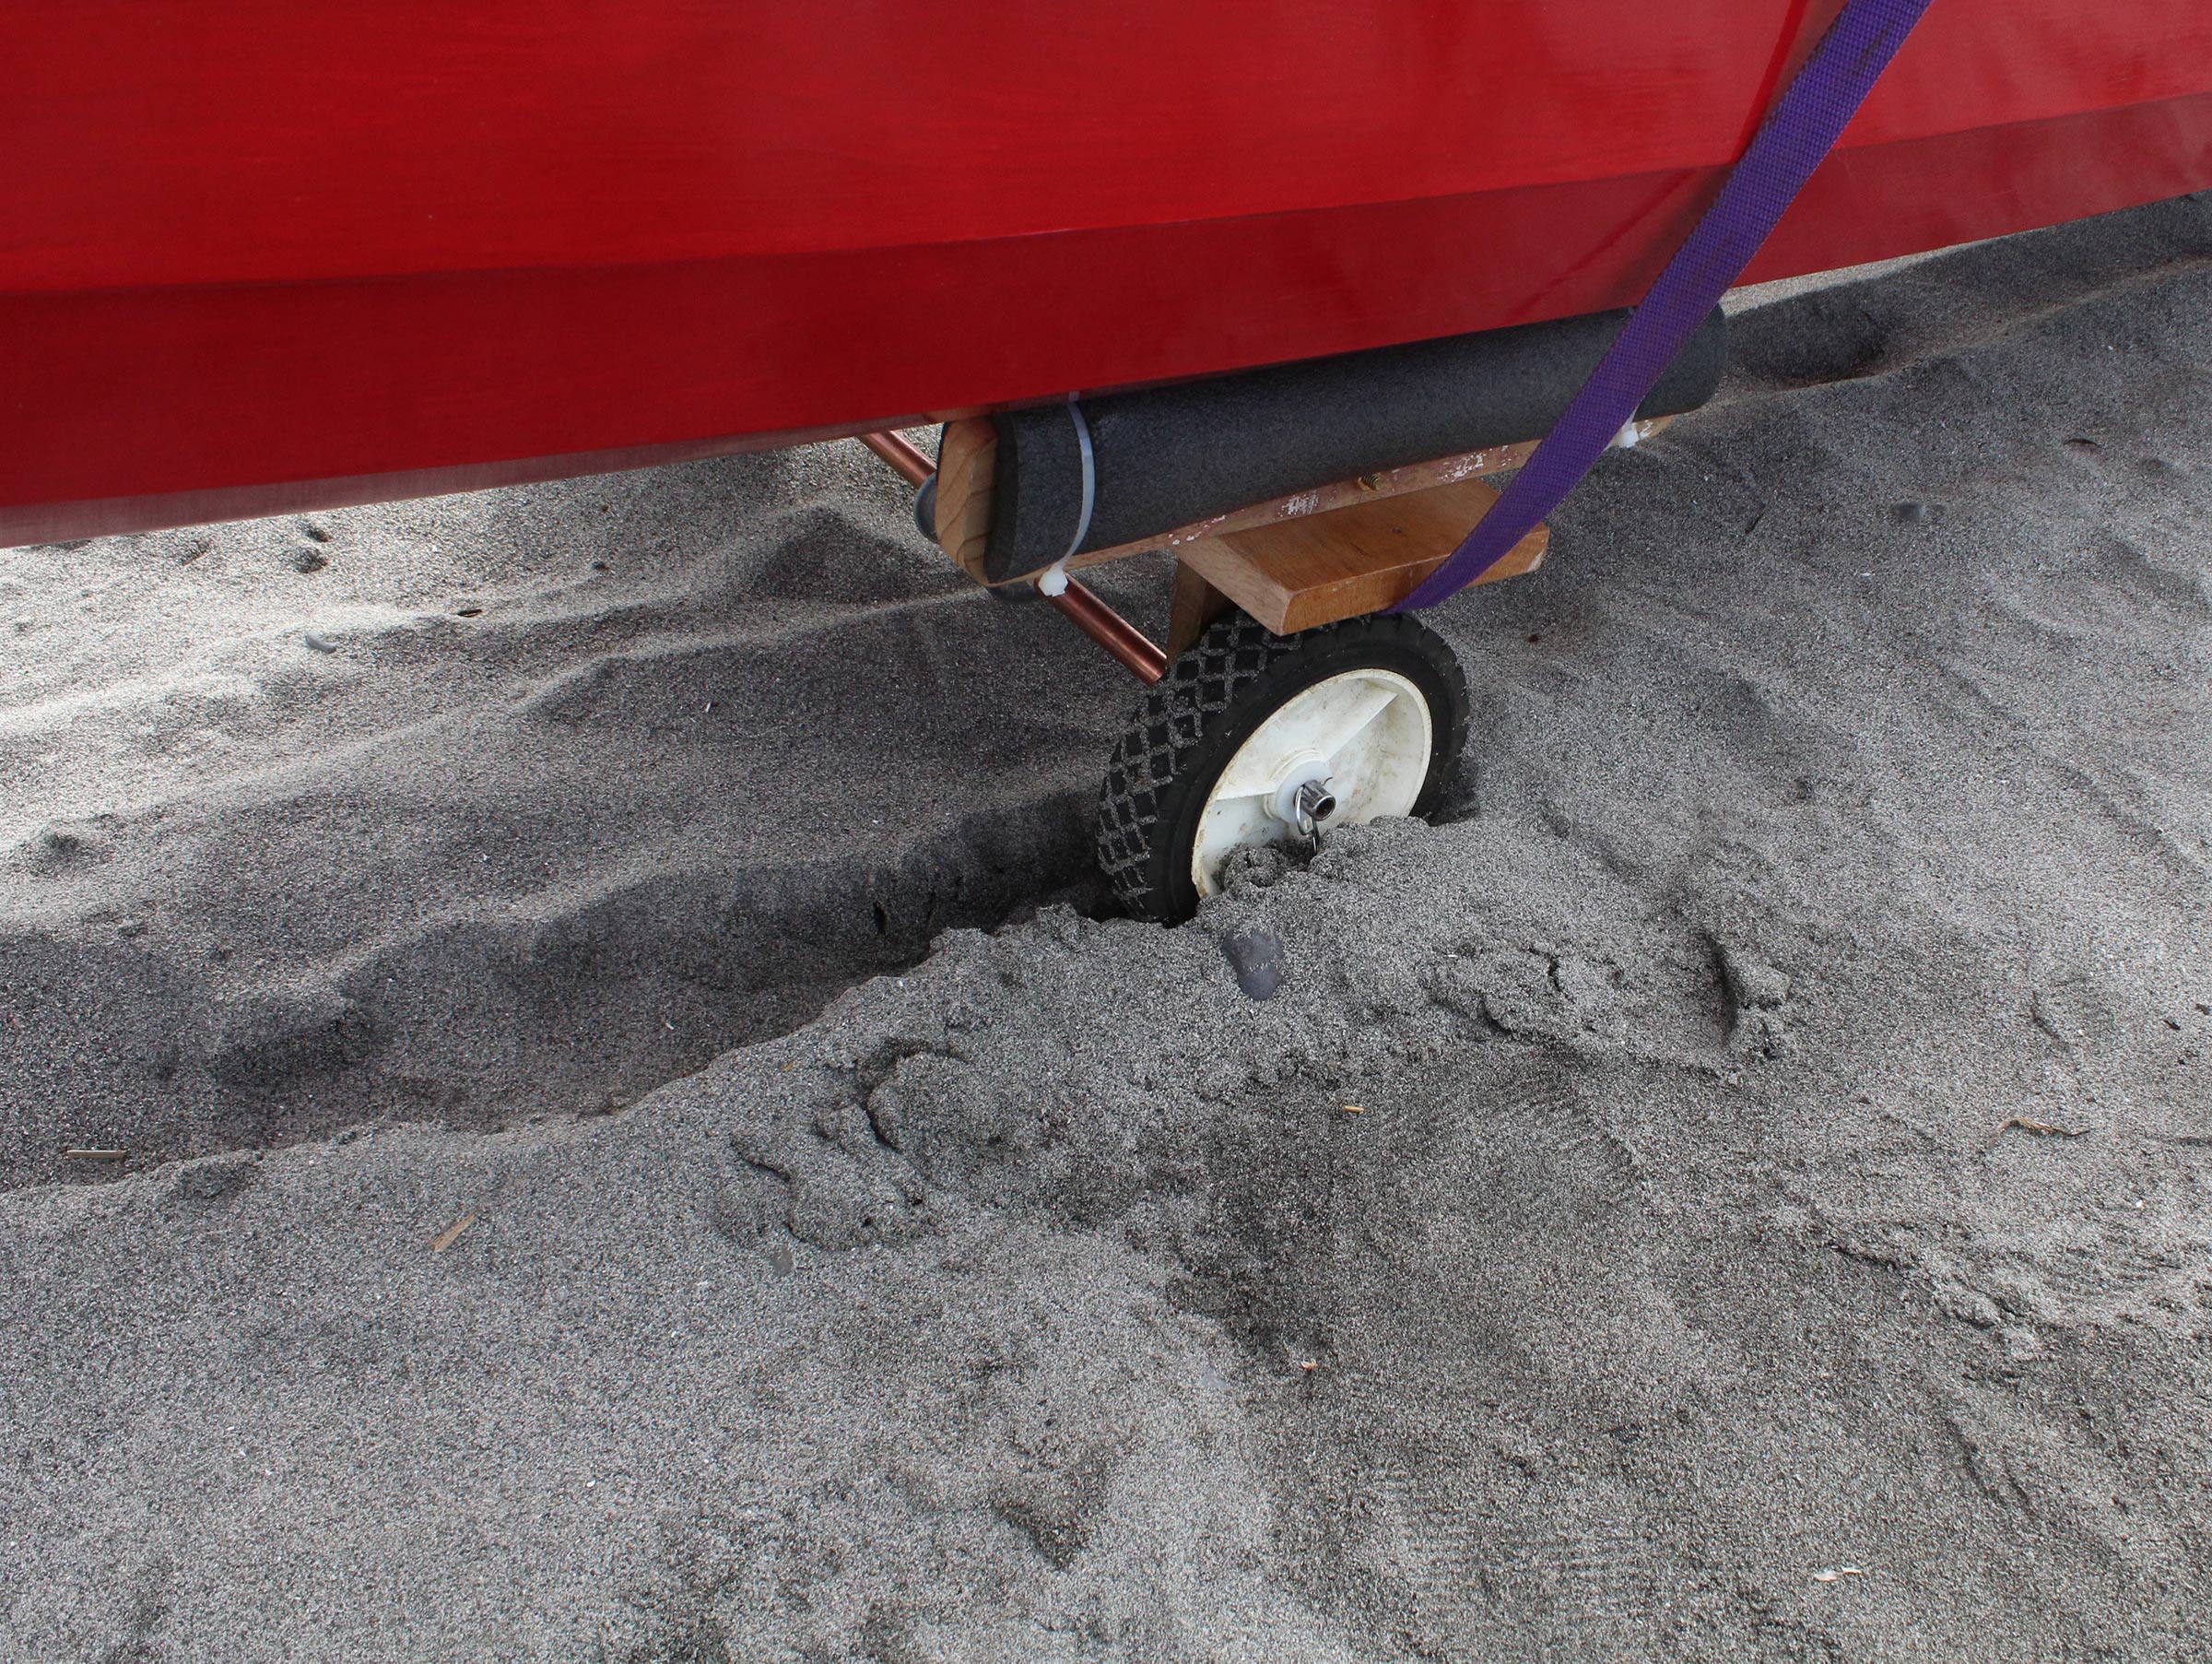
With the fender removed, the wheels have sunk in the sand almost up to the axle and do as much plowing as rolling.
The fender I used for the kayak cart some 25 years ago is a Taylor-Made 6″ × 15″ and has a tube just large enough for a 1⁄2″ PVC water pipe (which has an outside diameter of 0.84″). I beveled the end of the pipe, used a bit of dish soap to lubricate it, and pounded it into the fender tube with a mallet.
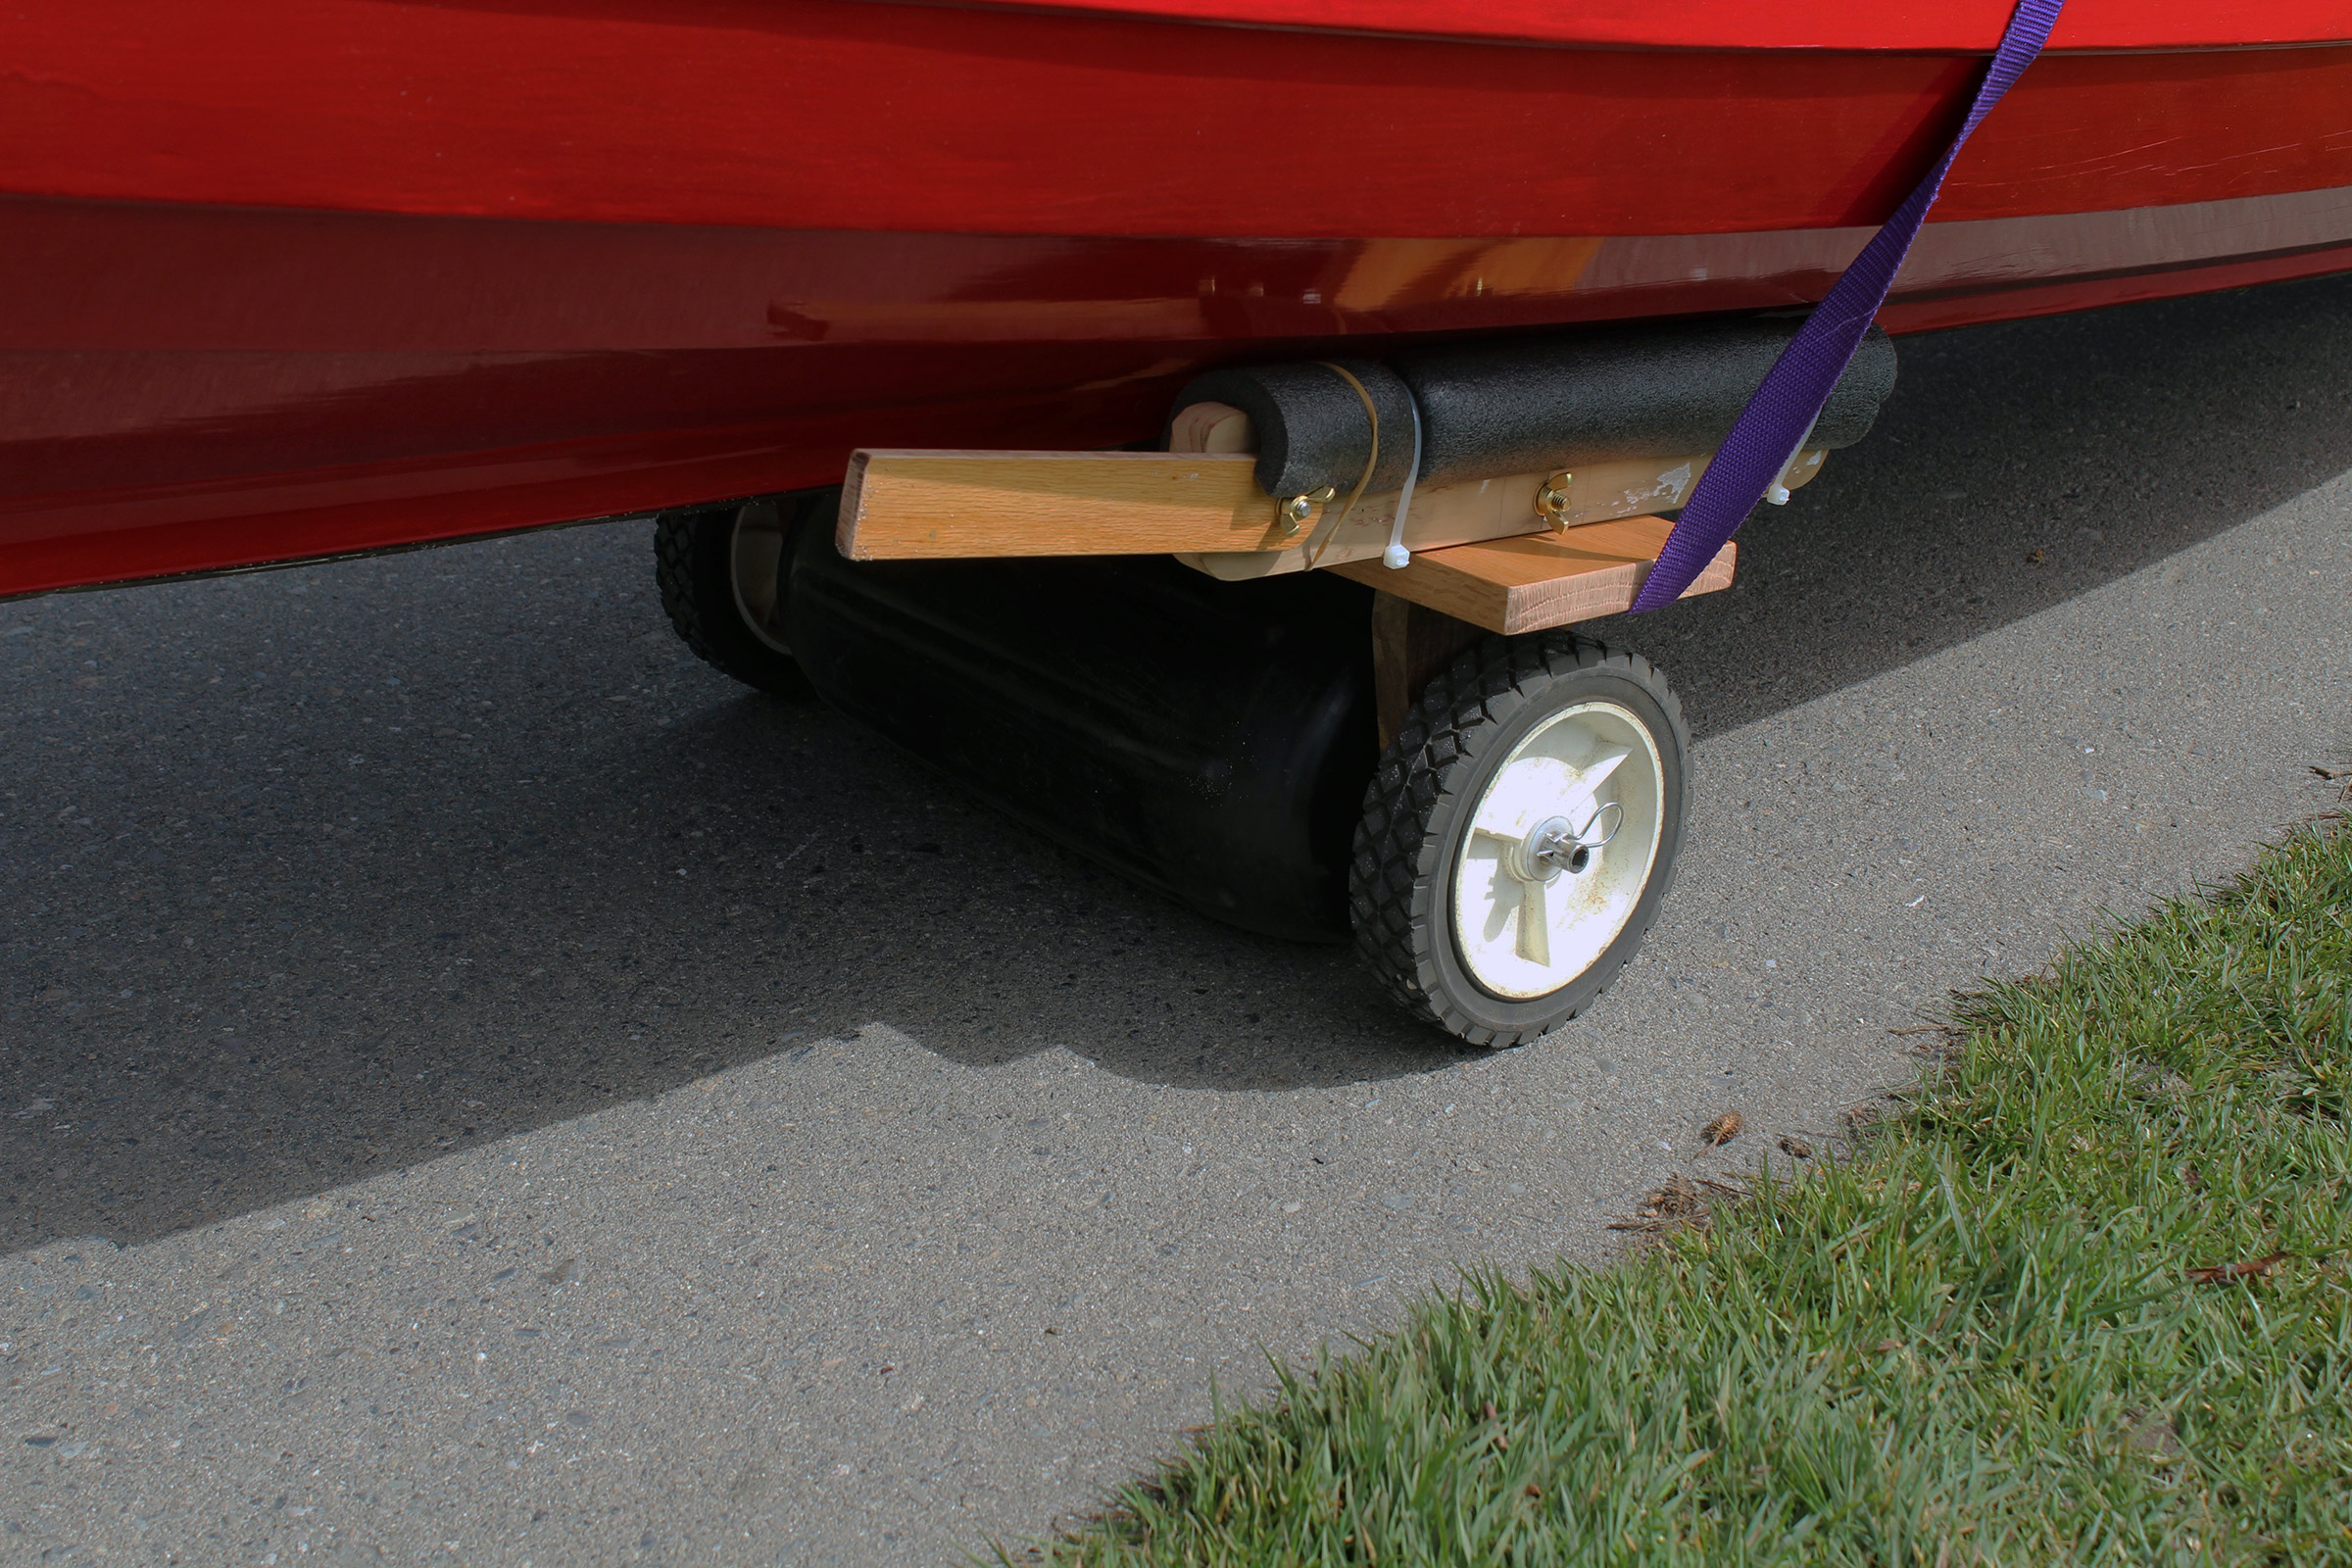
On pavement, the wheels take most of the load and the cart rolls a bit more freely than it would with the fender alone. The wheels also avoid subjecting the fender to wear when the support it provides is not needed.
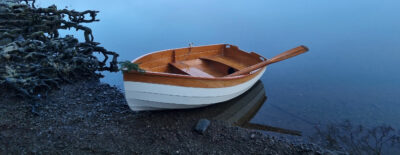
The two carts pictured here are a small one for my 12′ 8″, 35-lb Piccolo canoe and a larger one for my 18′ 9″, 80-lb decked canoe. For the small cart I use a Polyform HTM-1 fender, which measures 6.3″ in diameter and 15.5″ in length, and 7″ wheels. The larger cart employs a Polyform HTM-2 fender, which measures 8.5″ in diameter and 20.5″ in length, and 8″ wheels. (These measurements are from the manufacturers. Both wheels are actually 1⁄8″ less in diameter than their matched fender, and the fenders slightly larger than the wheels.)
On soft sand, the large cart easily supports the weight of an 80-lb canoe and about 25 lbs of gear.
The Polyform fenders have a rope tube that fits 1⁄2″ copper water pipe, which has an outside diameter of 0.625″ and is a slip fit in the fender. The pipe rotates with the fender, preventing its tube from wearing. The axle for both pipe inserts is 1⁄2″; I’ve used solid aluminum rod, solid steel rod, and steel tubing. All have a loose fit in the copper pipe, which has an inside diameter of 0.527″.
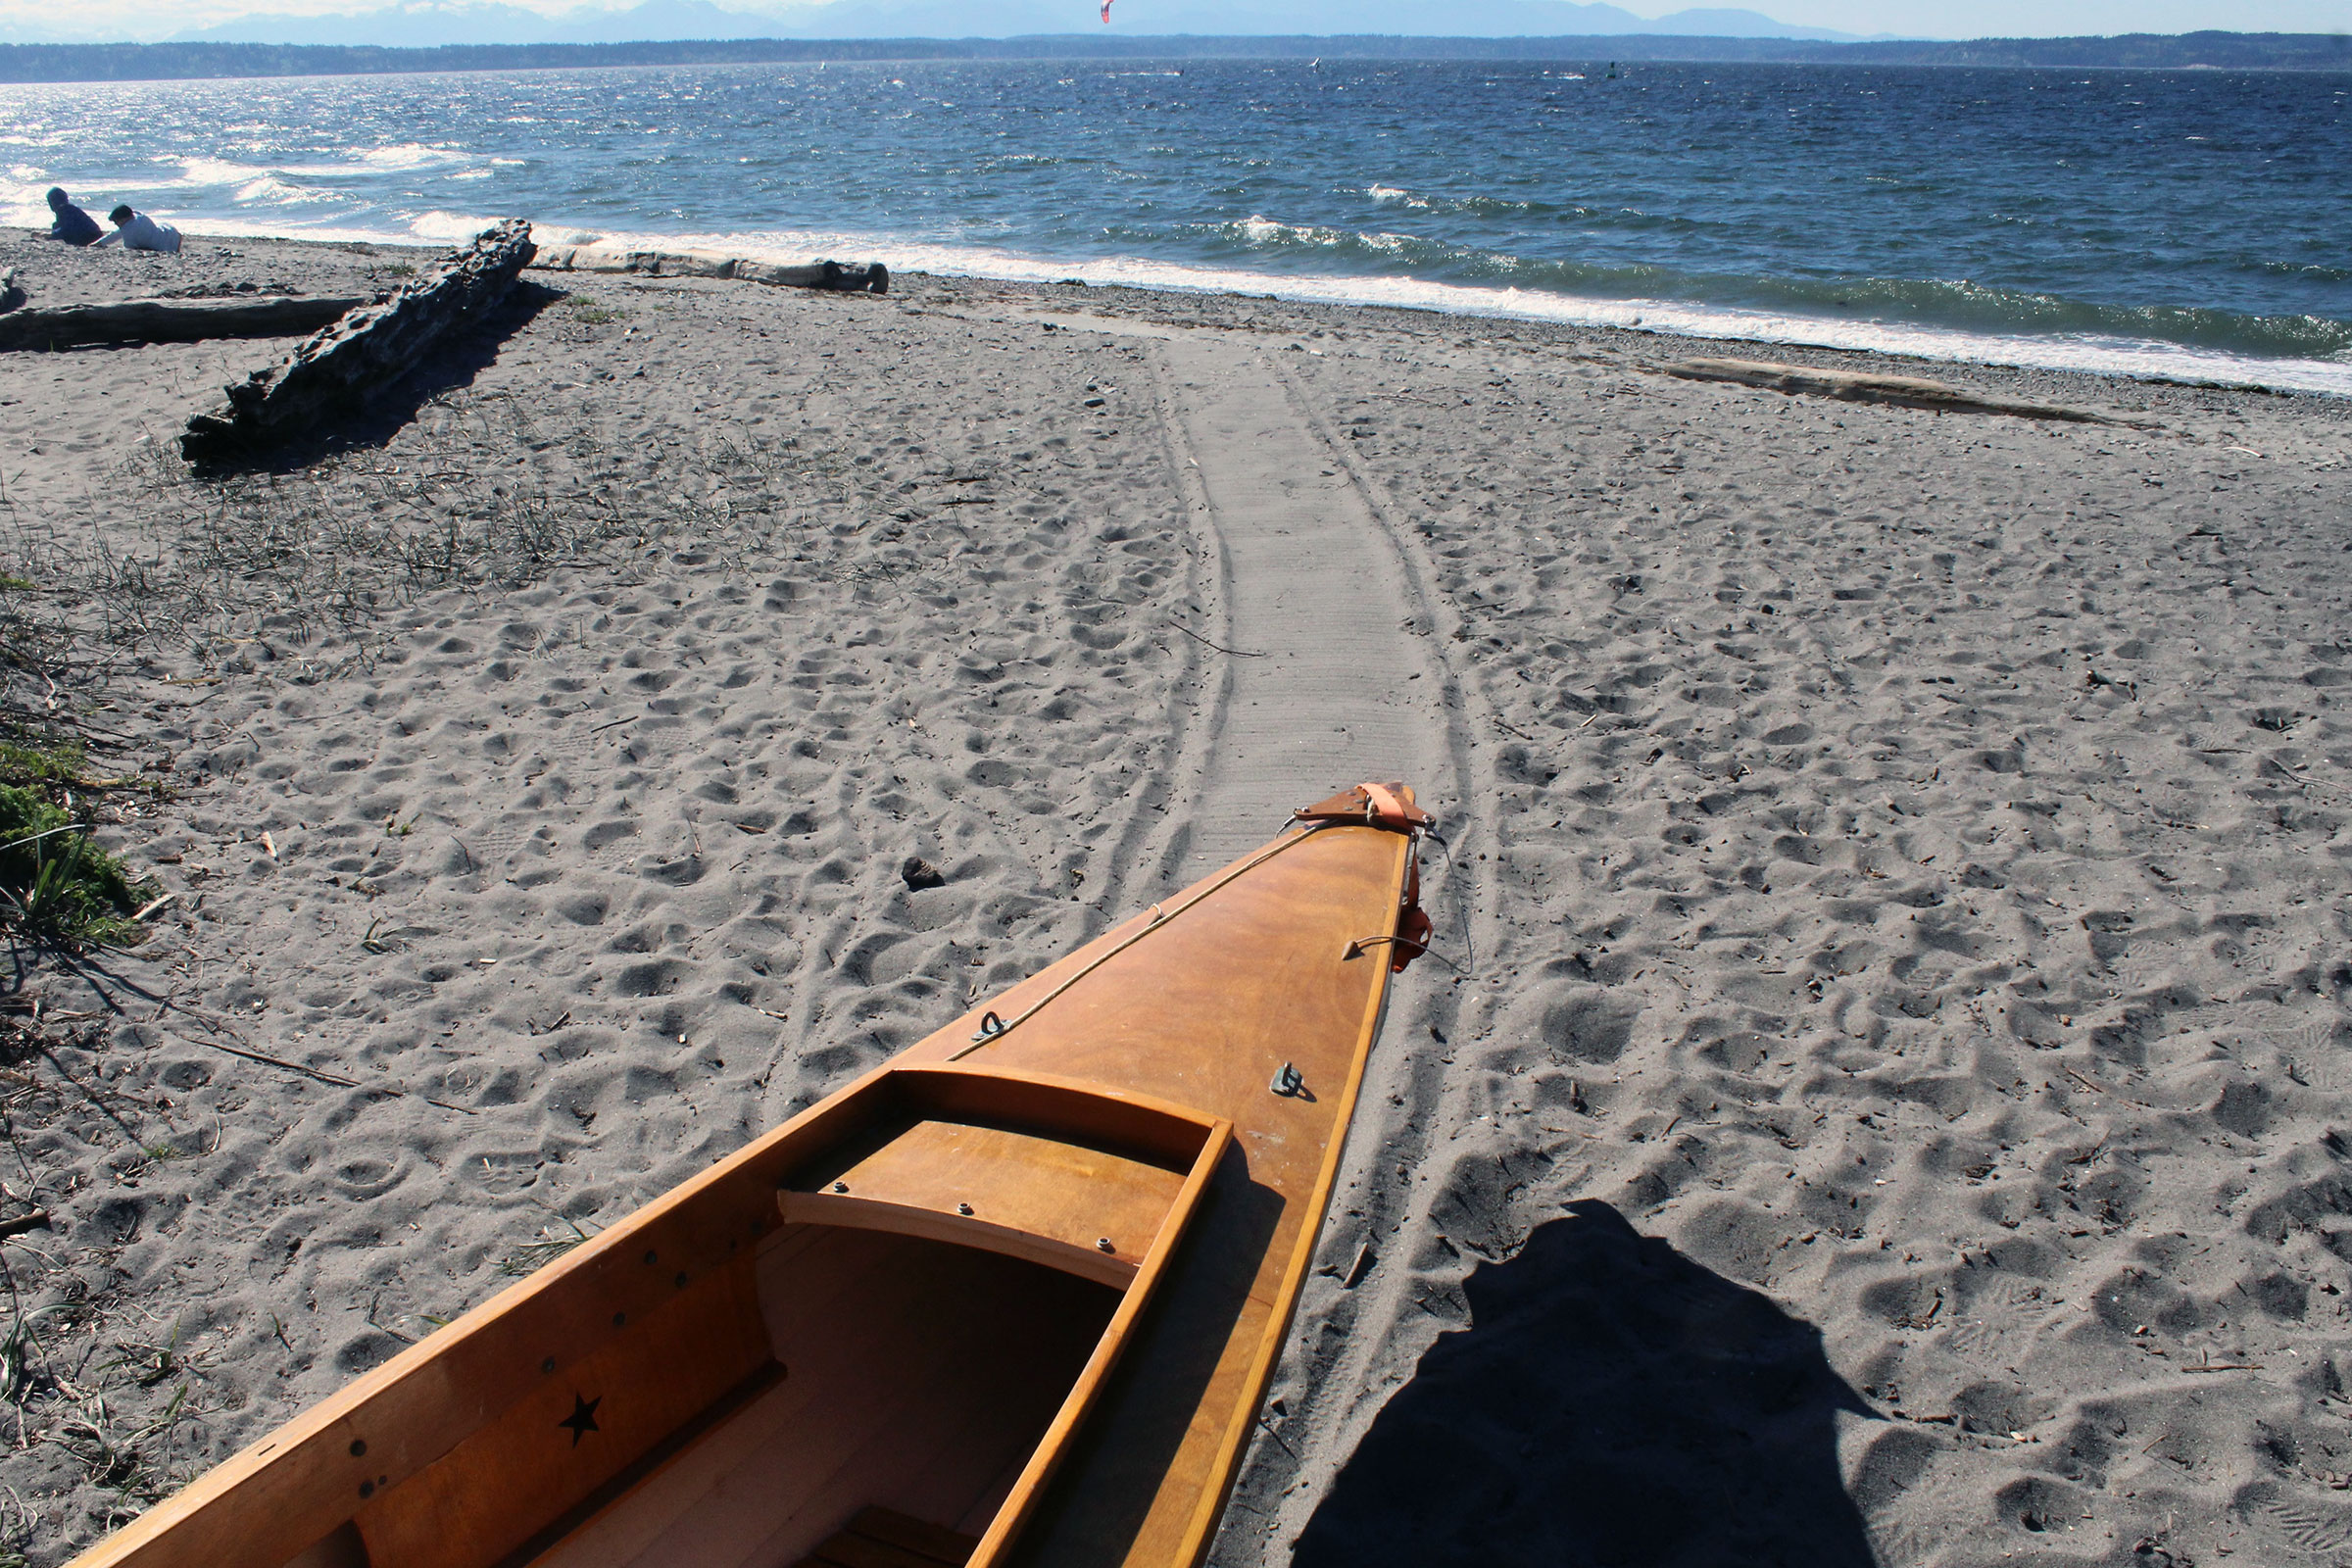
I’ve hauled this canoe across soft sand like this on another part of this same beach using a cart I’d made using inflatable hand-truck tires. It was slow going. With the fender cart it was a breeze.
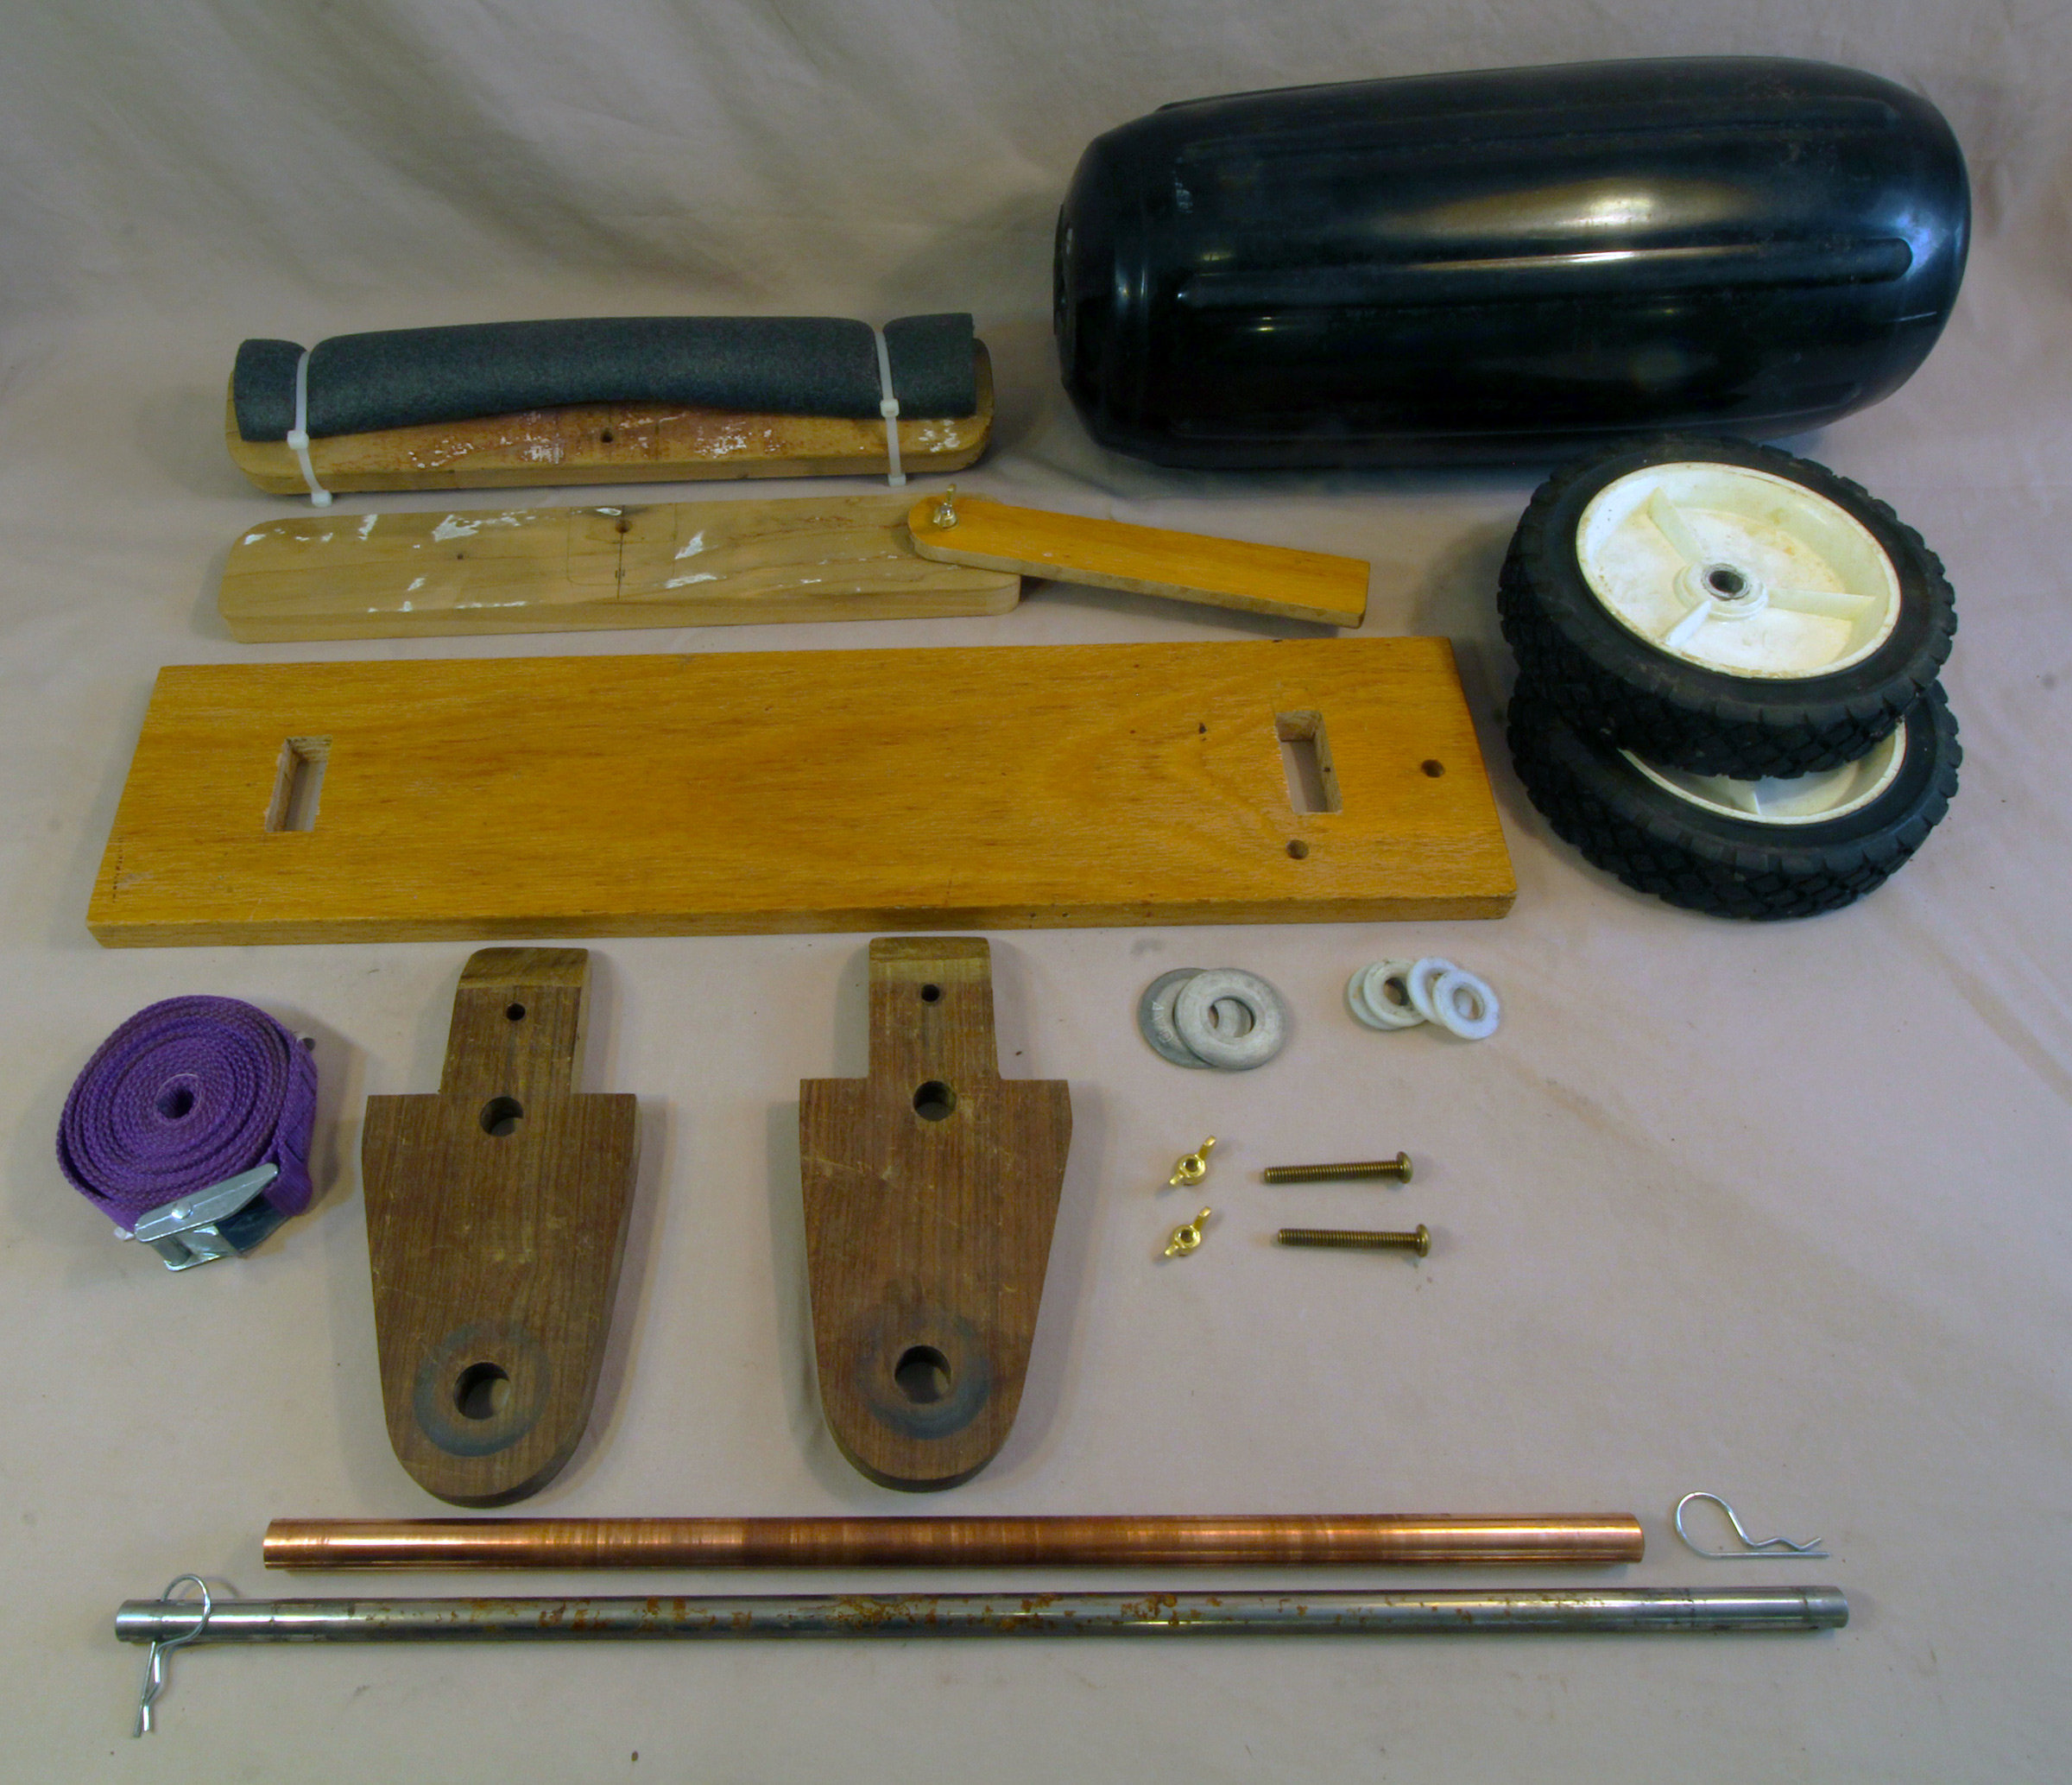
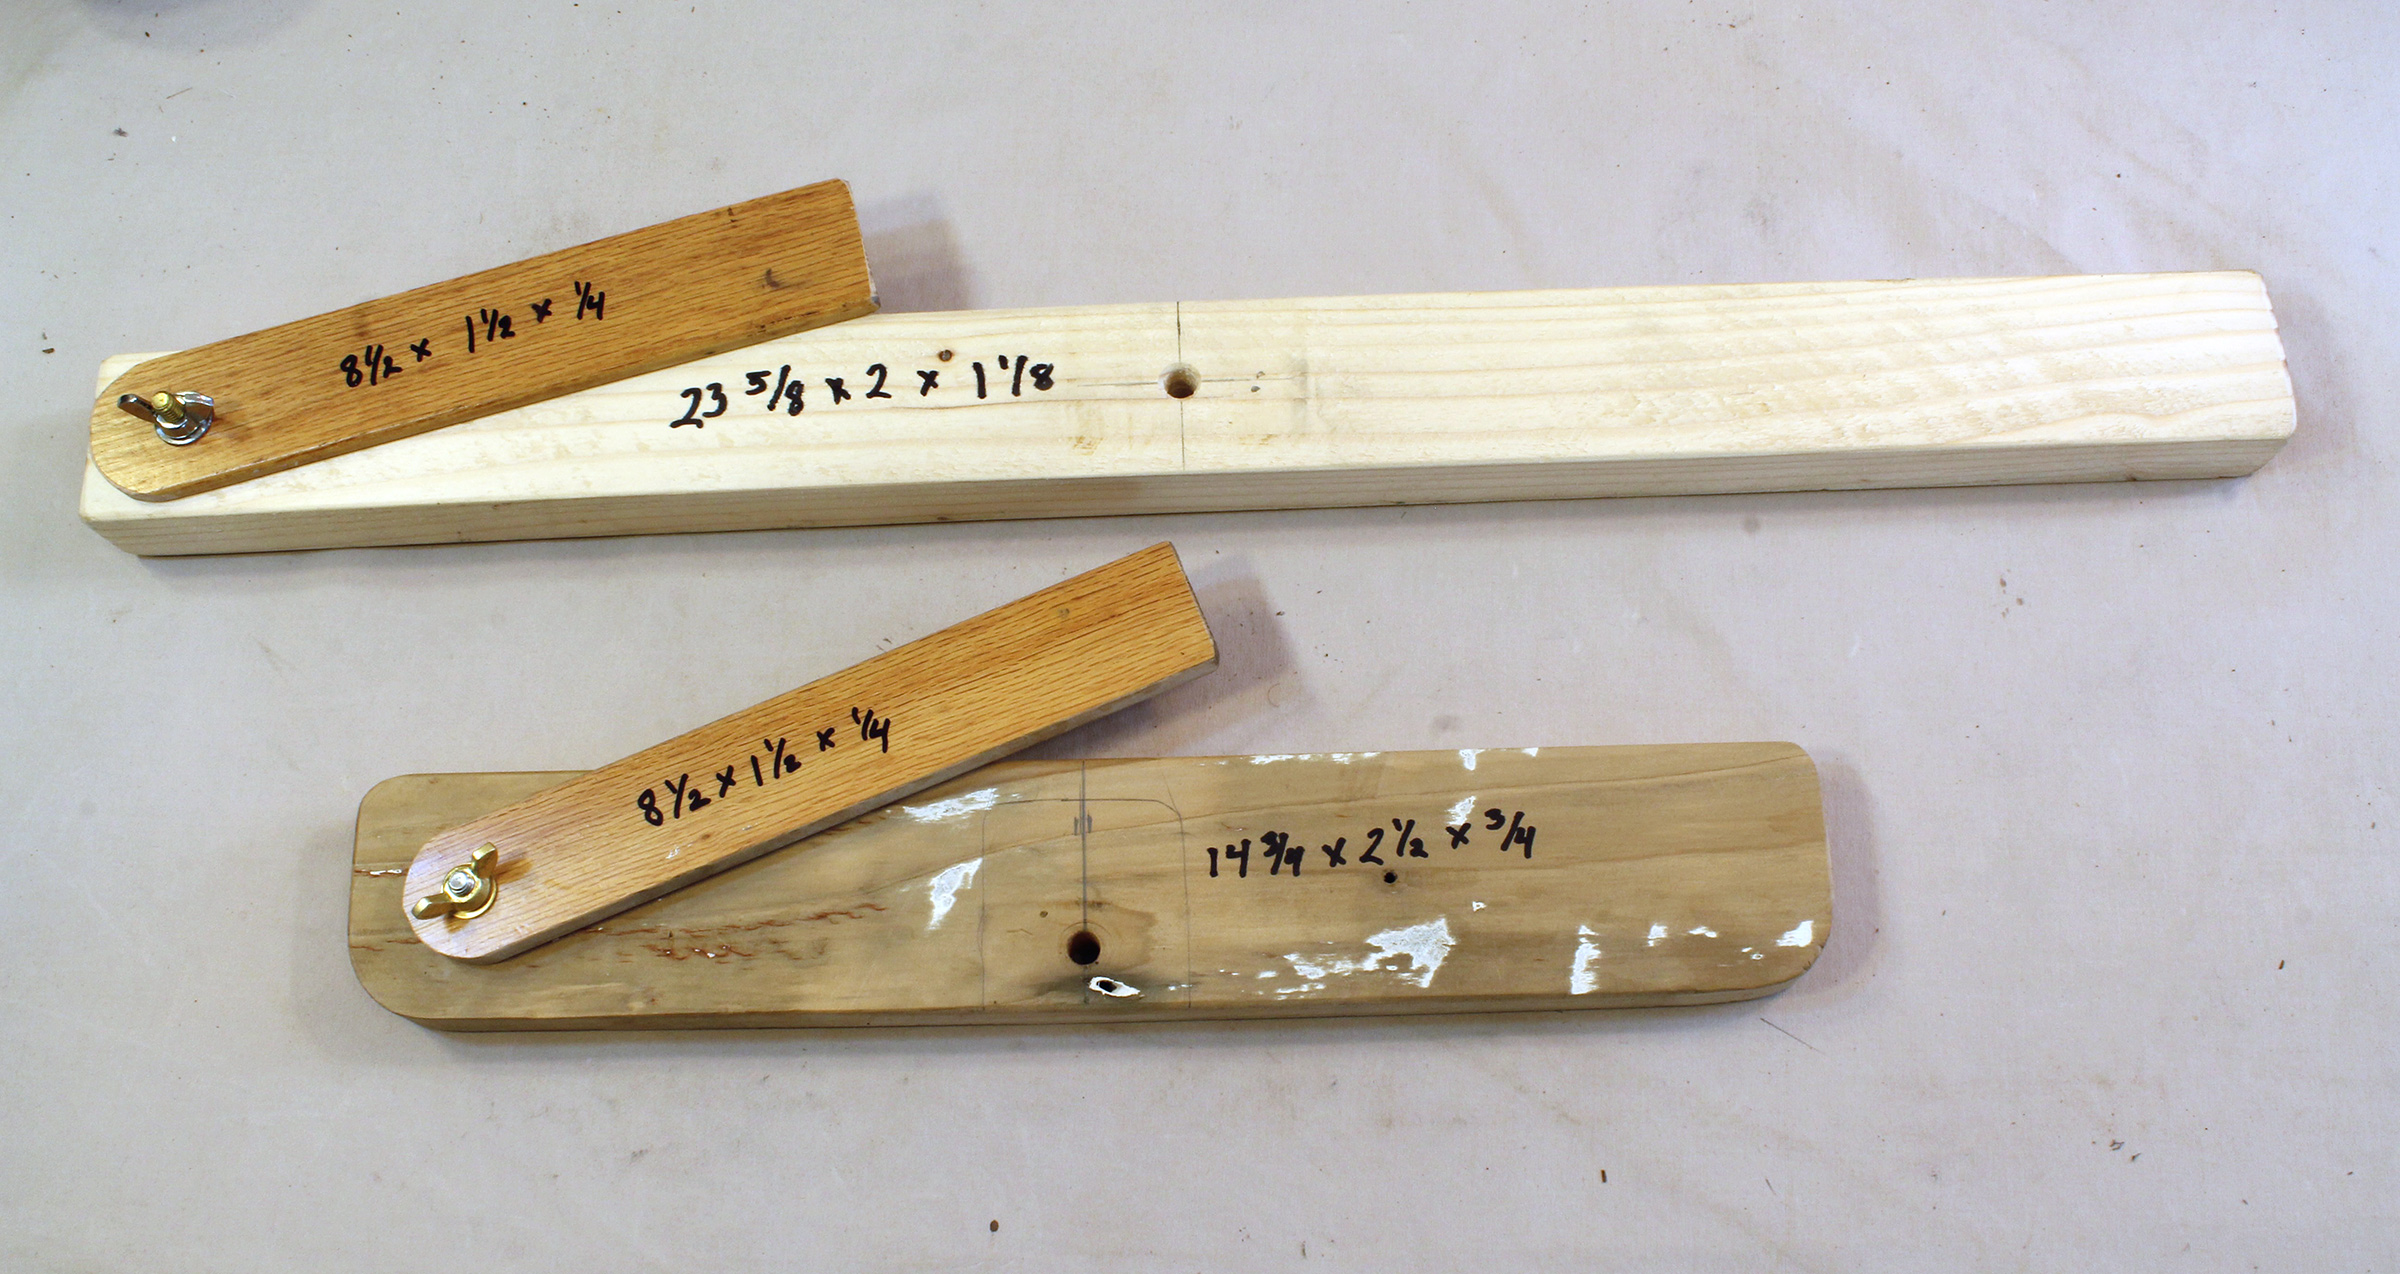
The cart frame consists of three pieces: a horizontal deck with two through mortices and two uprights with tenons to fit. The tenons extend above the deck and are attached to a pair of fore-and-aft bunks for the boat. A kickstand bolted to one of the bunks keeps the cart upright enough for the canoe to be loaded on it. A tie-down strap to hold the cart against the hull slips through holes in the uprights. The axle gets a larger washer to keep the fender away from the uprights and smaller washers inside and outside of the wheels. Hitch-pin clips, inserted into holes at the ends of the axle, keep everything in place.
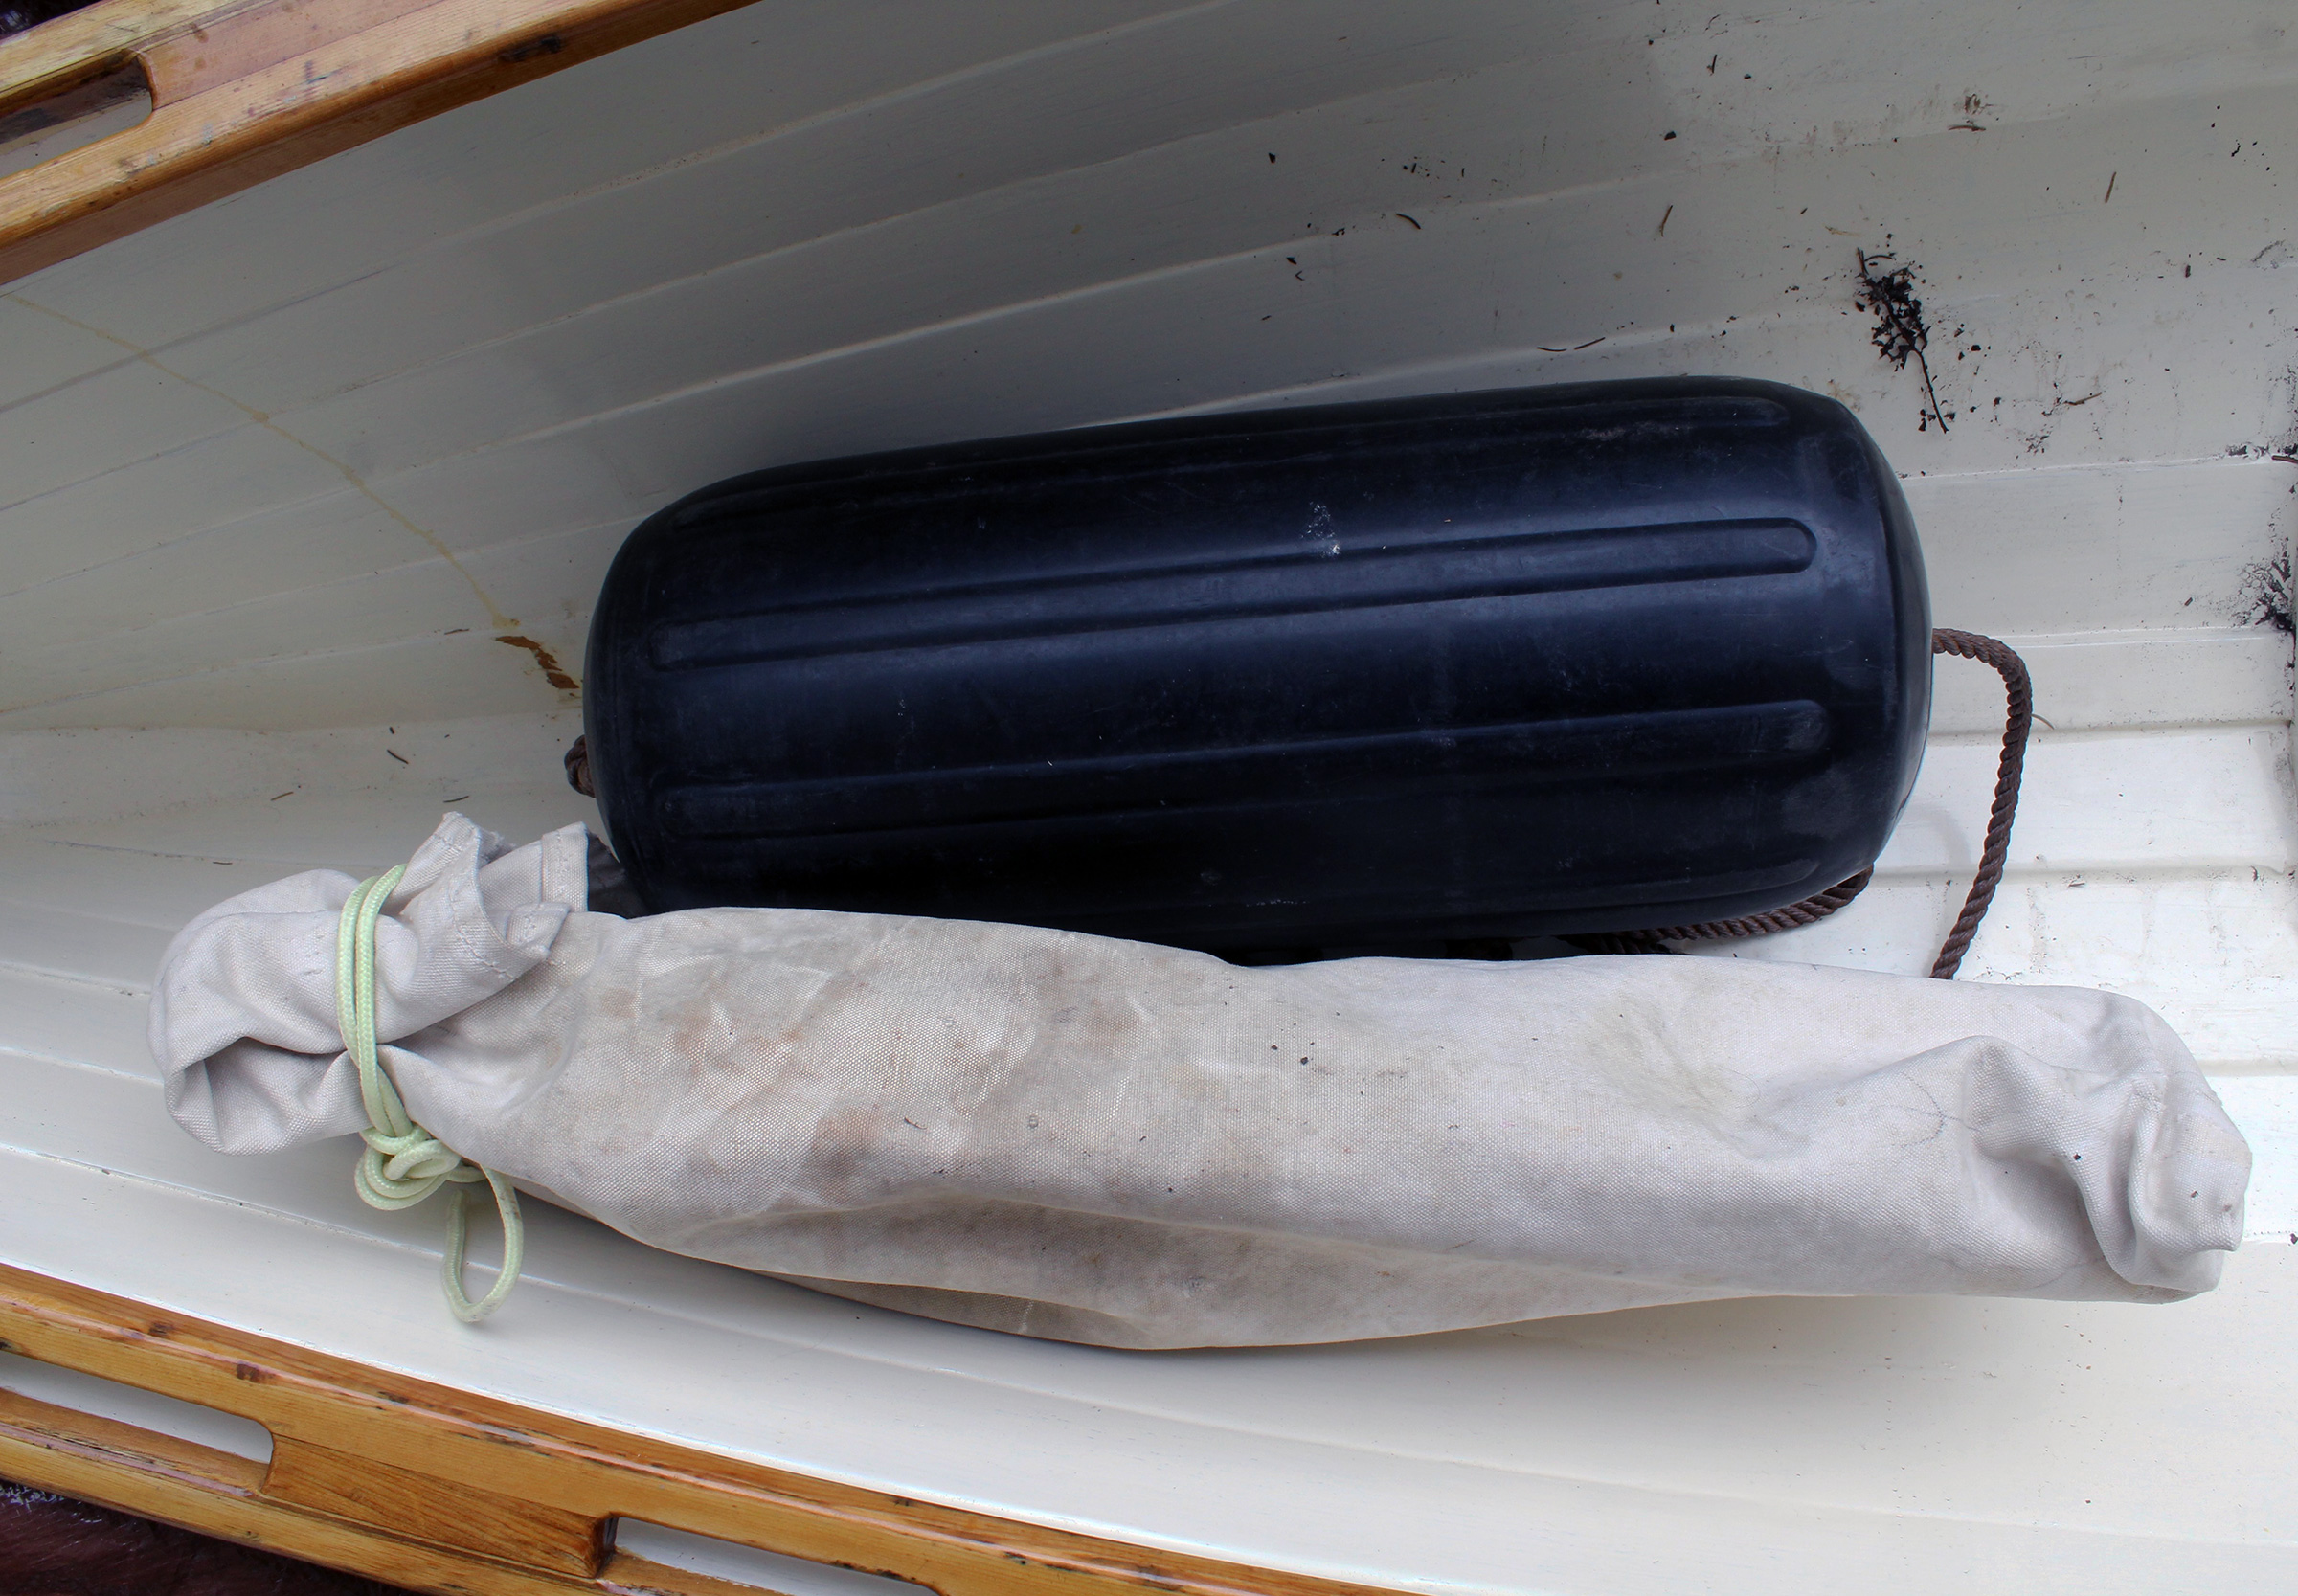
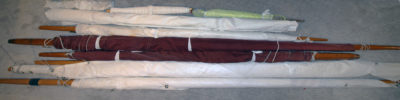
I repurposed an old canvas tote to make a bag for the cart parts. The fender, which can be used for its original intended purpose or as a beach roller, doesn’t need to be bagged up.
I made a canvas bag to hold the cart parts for carrying aboard the canoe. The fender stays loose so it can serve as a beach roller or, with a line threaded through it, as a fender.
The parts for the carts are readily available. The fenders can be a bit pricey new, but I’ve salvaged many that have gone adrift. The fender can still be used for its intended function.
The cart’s bunks and kickstands are nothing special and can be made of shop scraps. Softwoods, like the Port Orford cedar for the longer one and red cedar for the shorter one, will work well without the weight of hardwoods. The kickstands need to be short enough to have the cart lean on them.
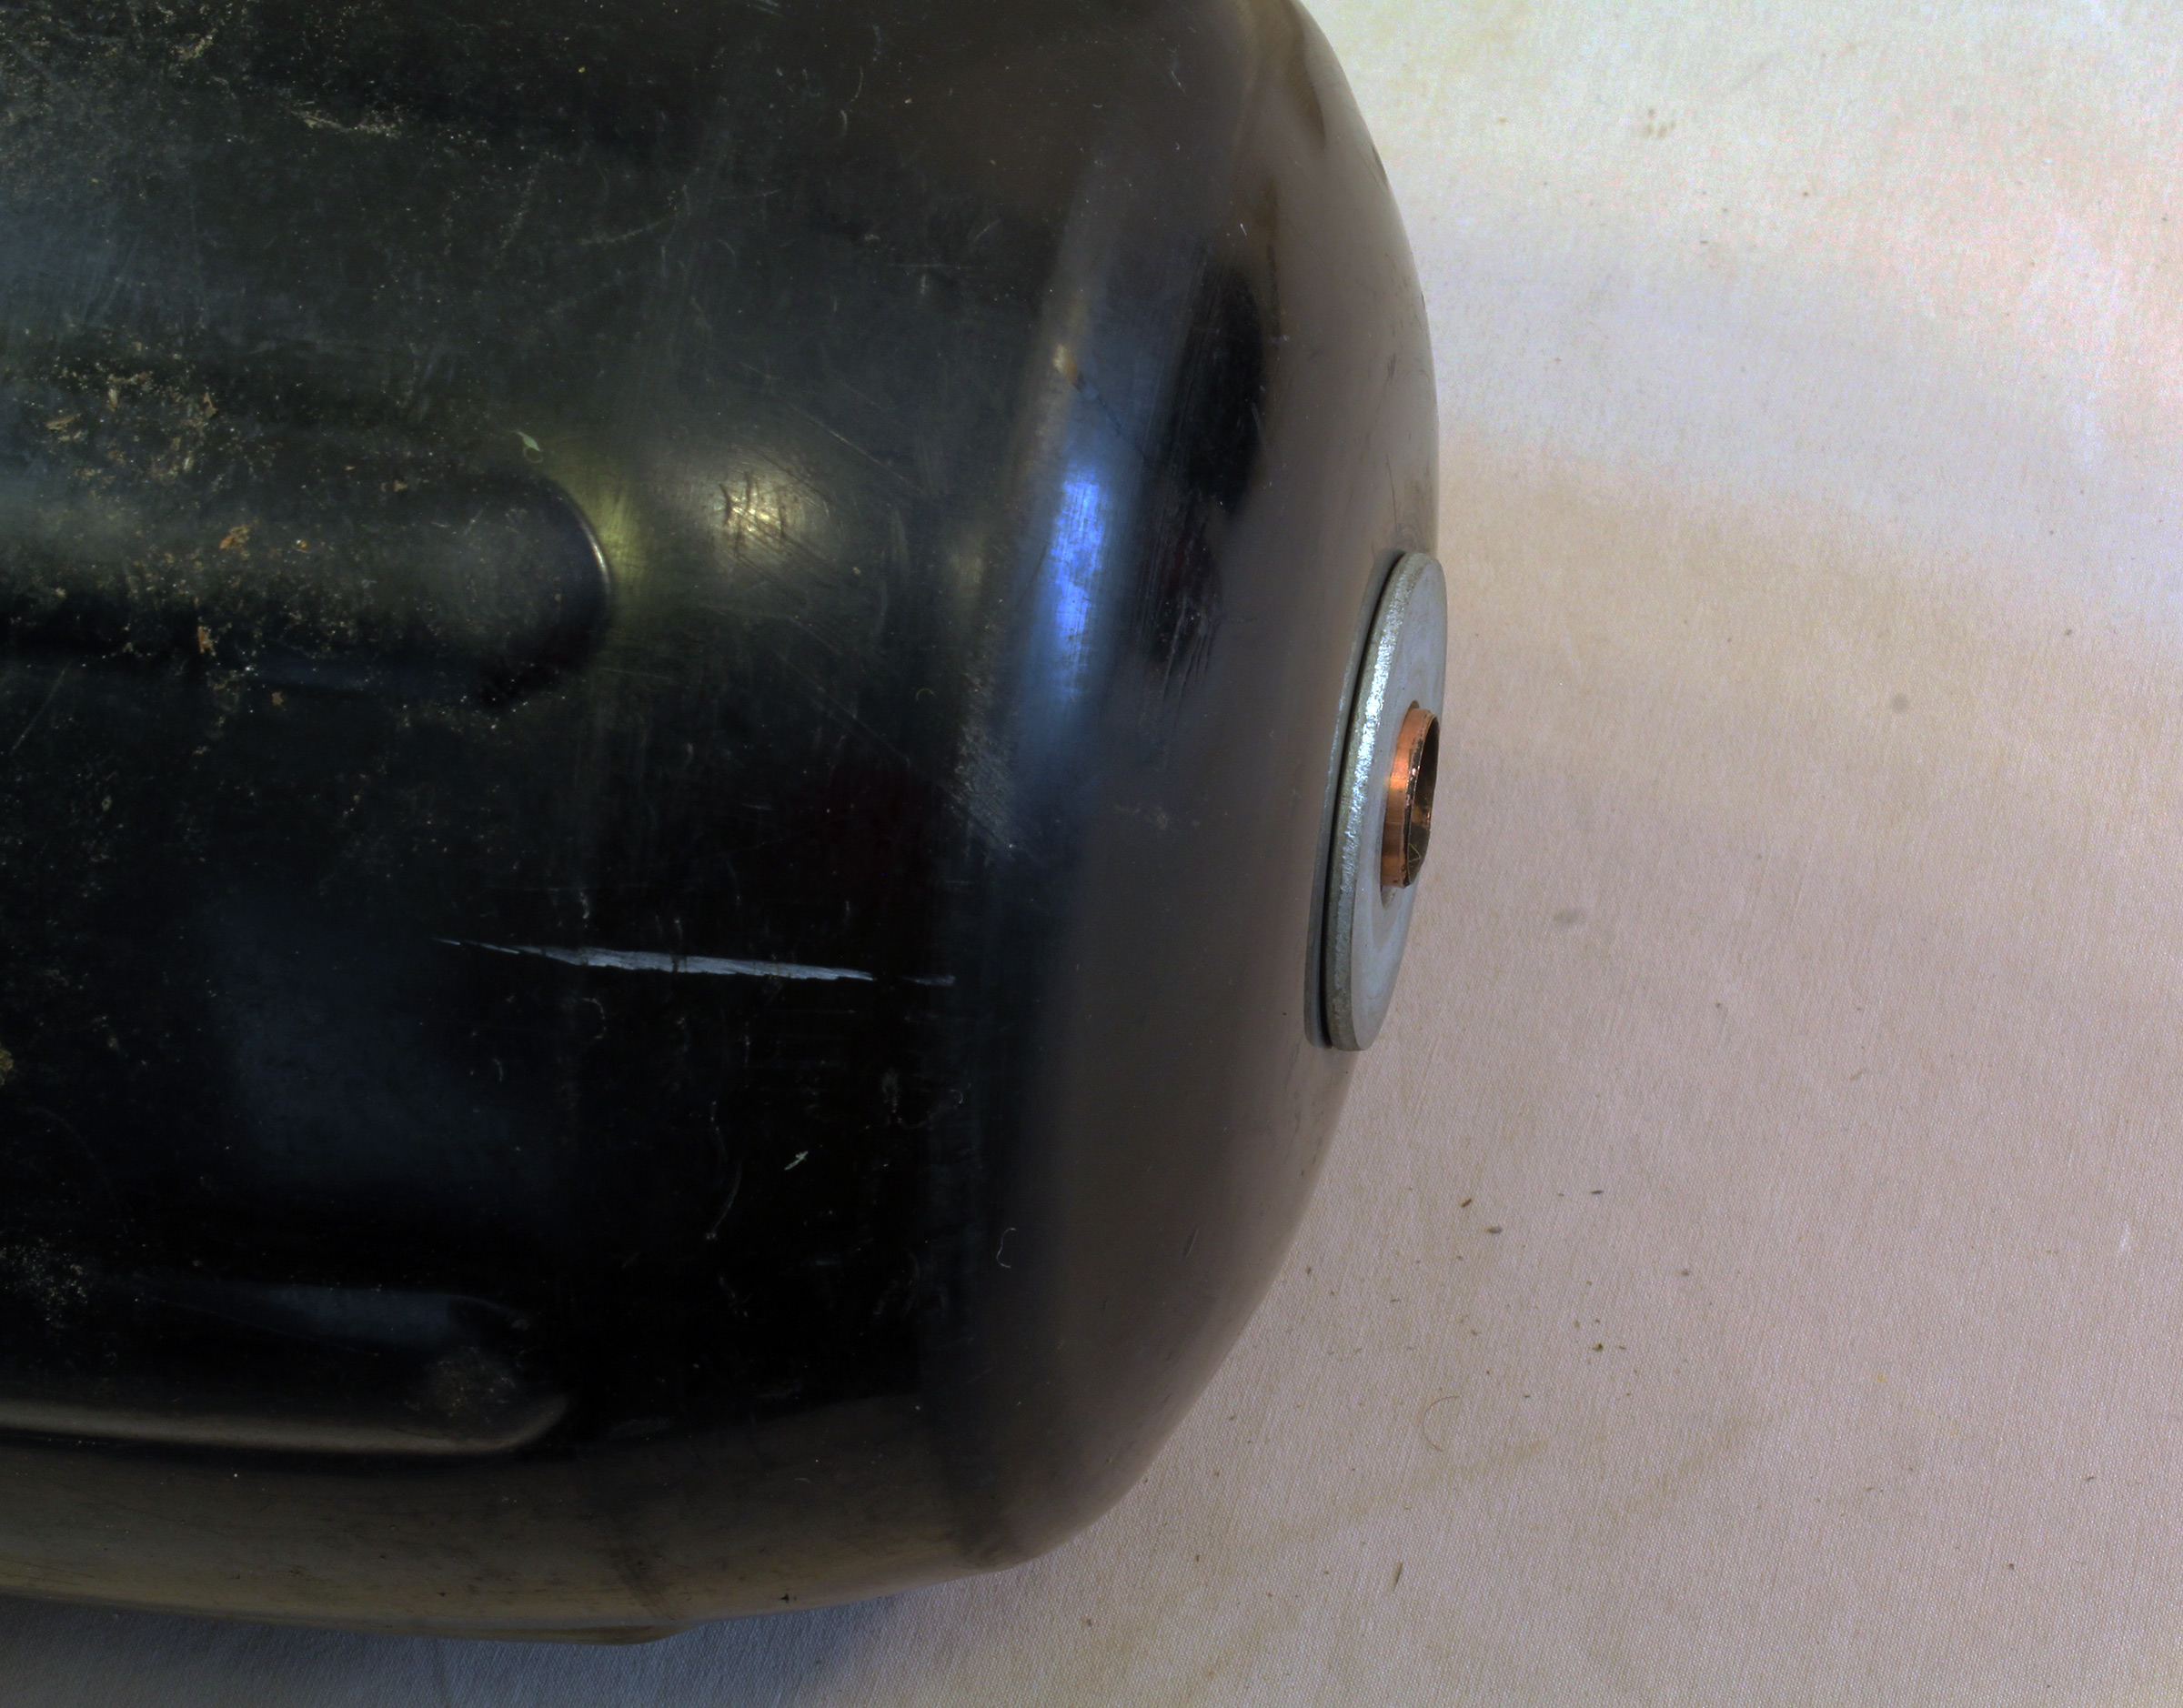
The copper pipe should extend about 1⁄4″ from each end of the fender. A large washer will keep the fender from rubbing against the cart’s uprights. After cutting the pipe to length, file the edges smooth inside and out. This is especially important if using a tubing cutter, which will create a sharp edge that intrudes into the opening.
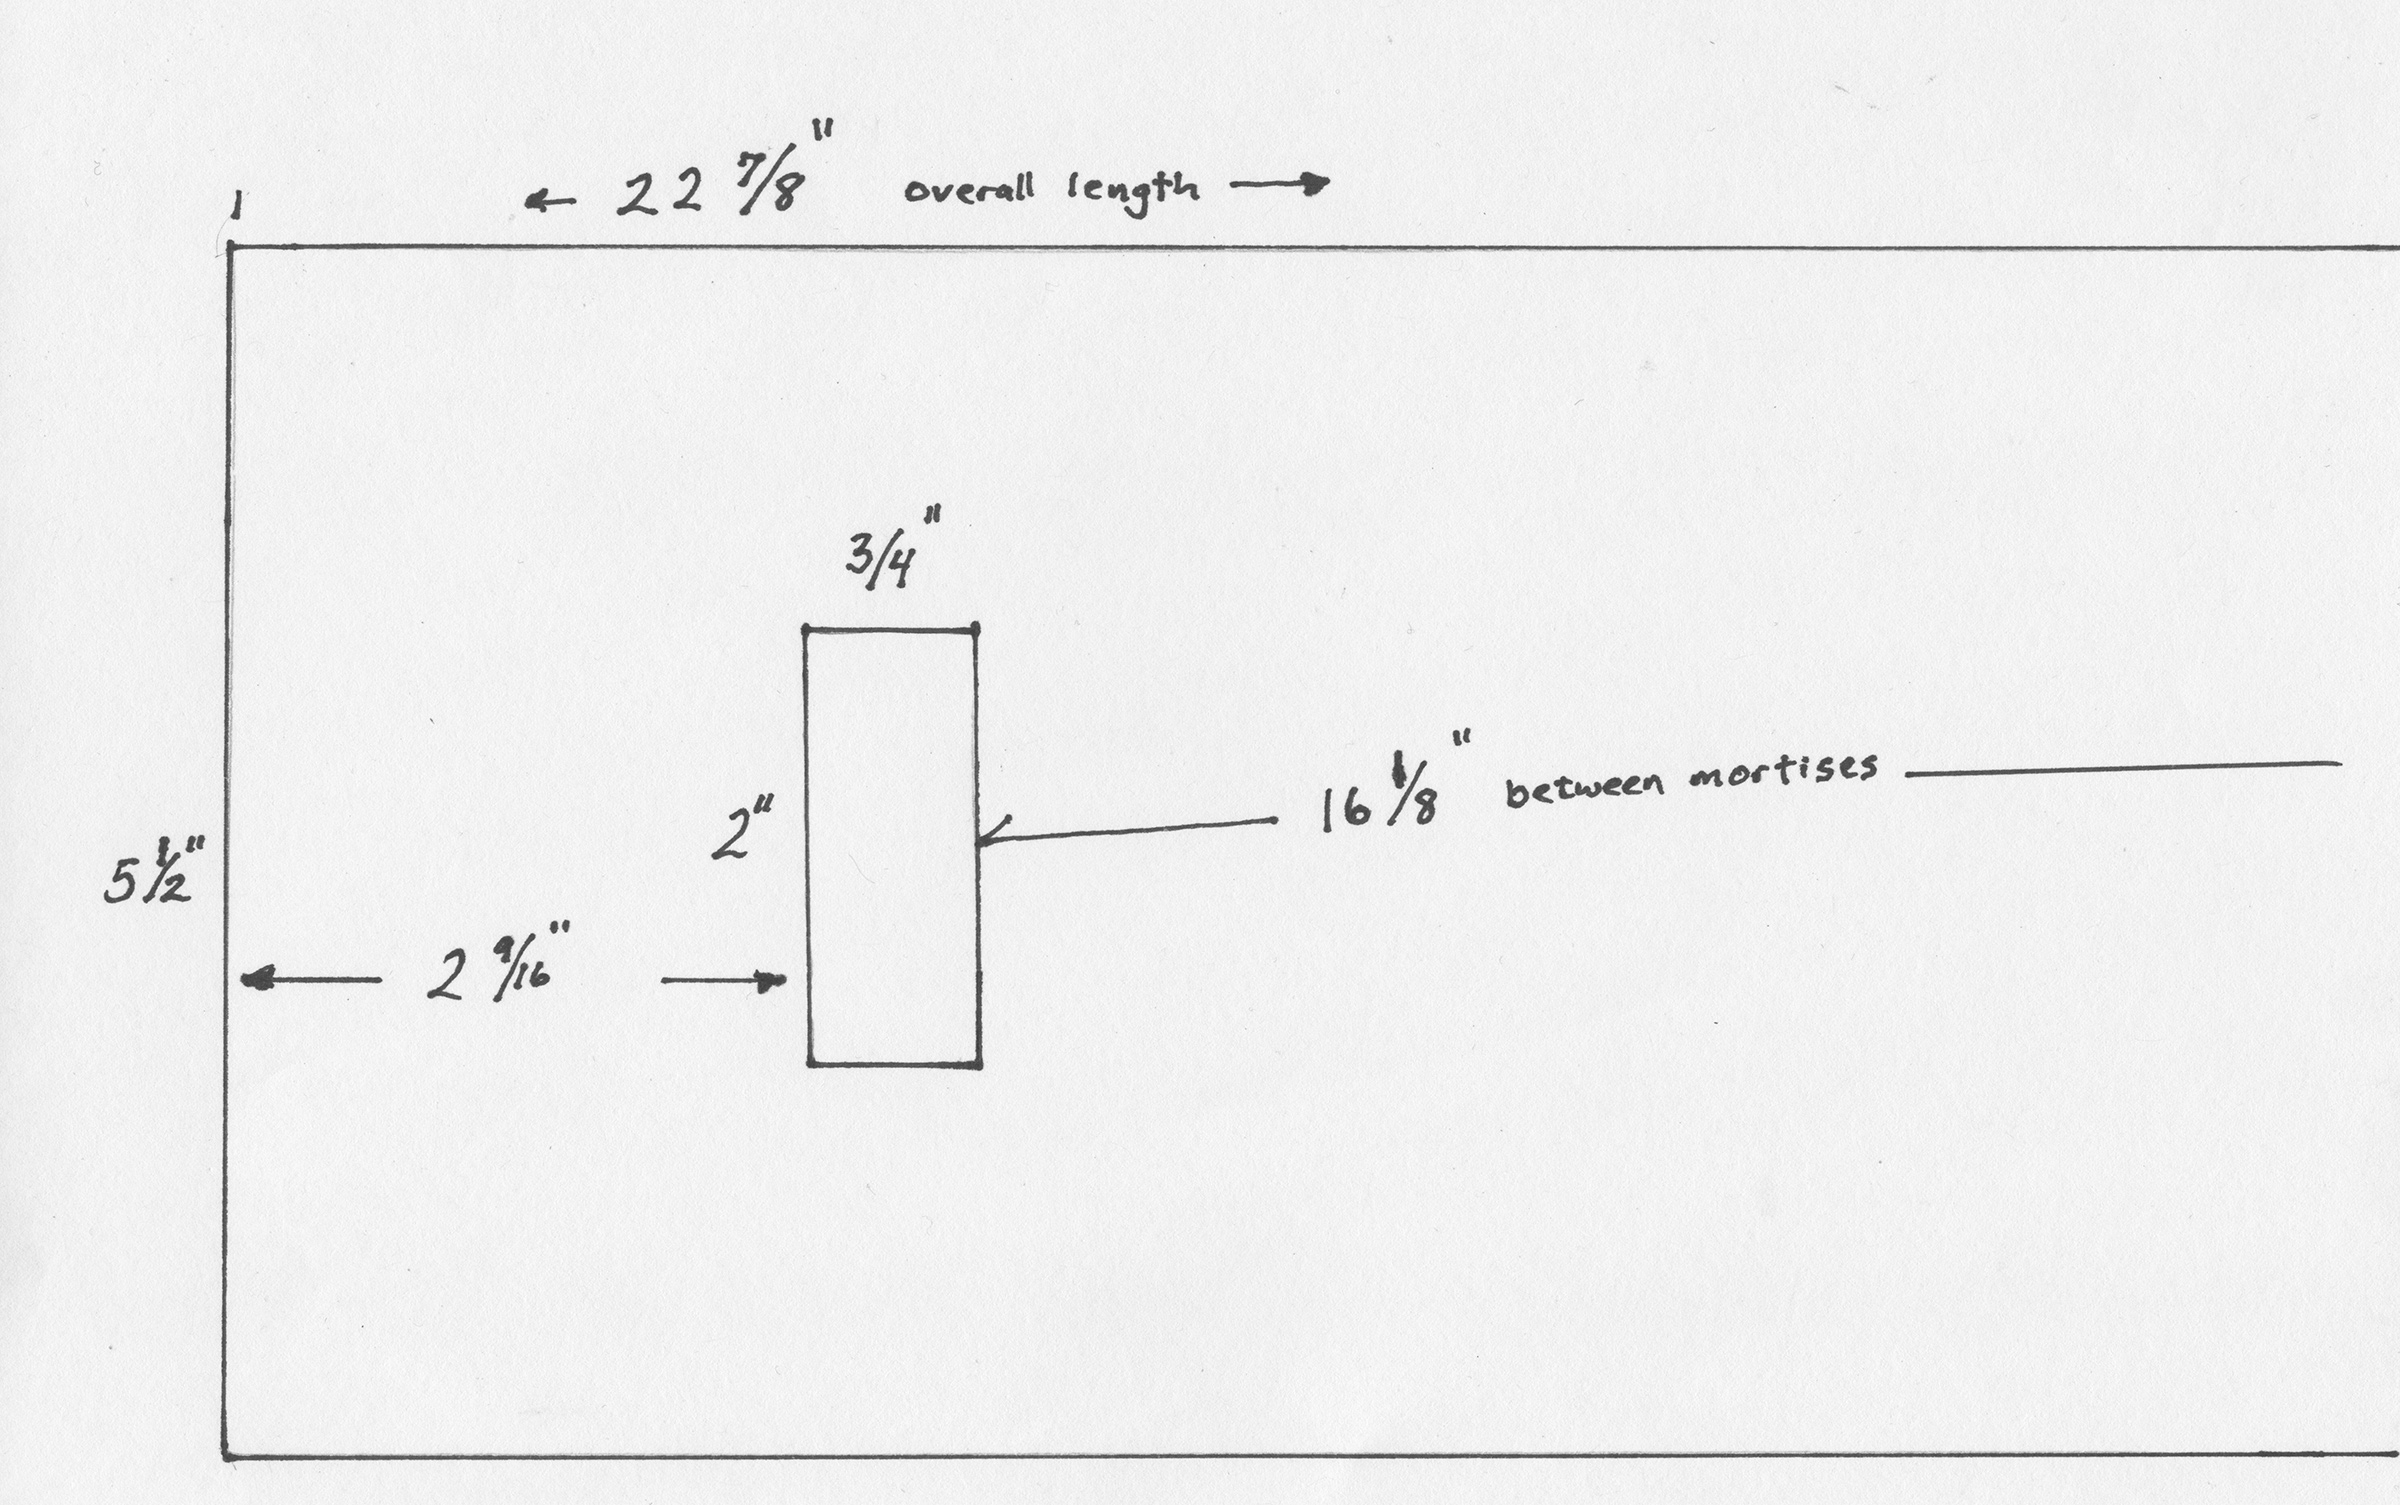
The only critical dimension of the deck, whether the small one here or the large one below, is the distance between the mortices. It should be the measured length of the fender plus ½”. I made this deck of ¾” oak.
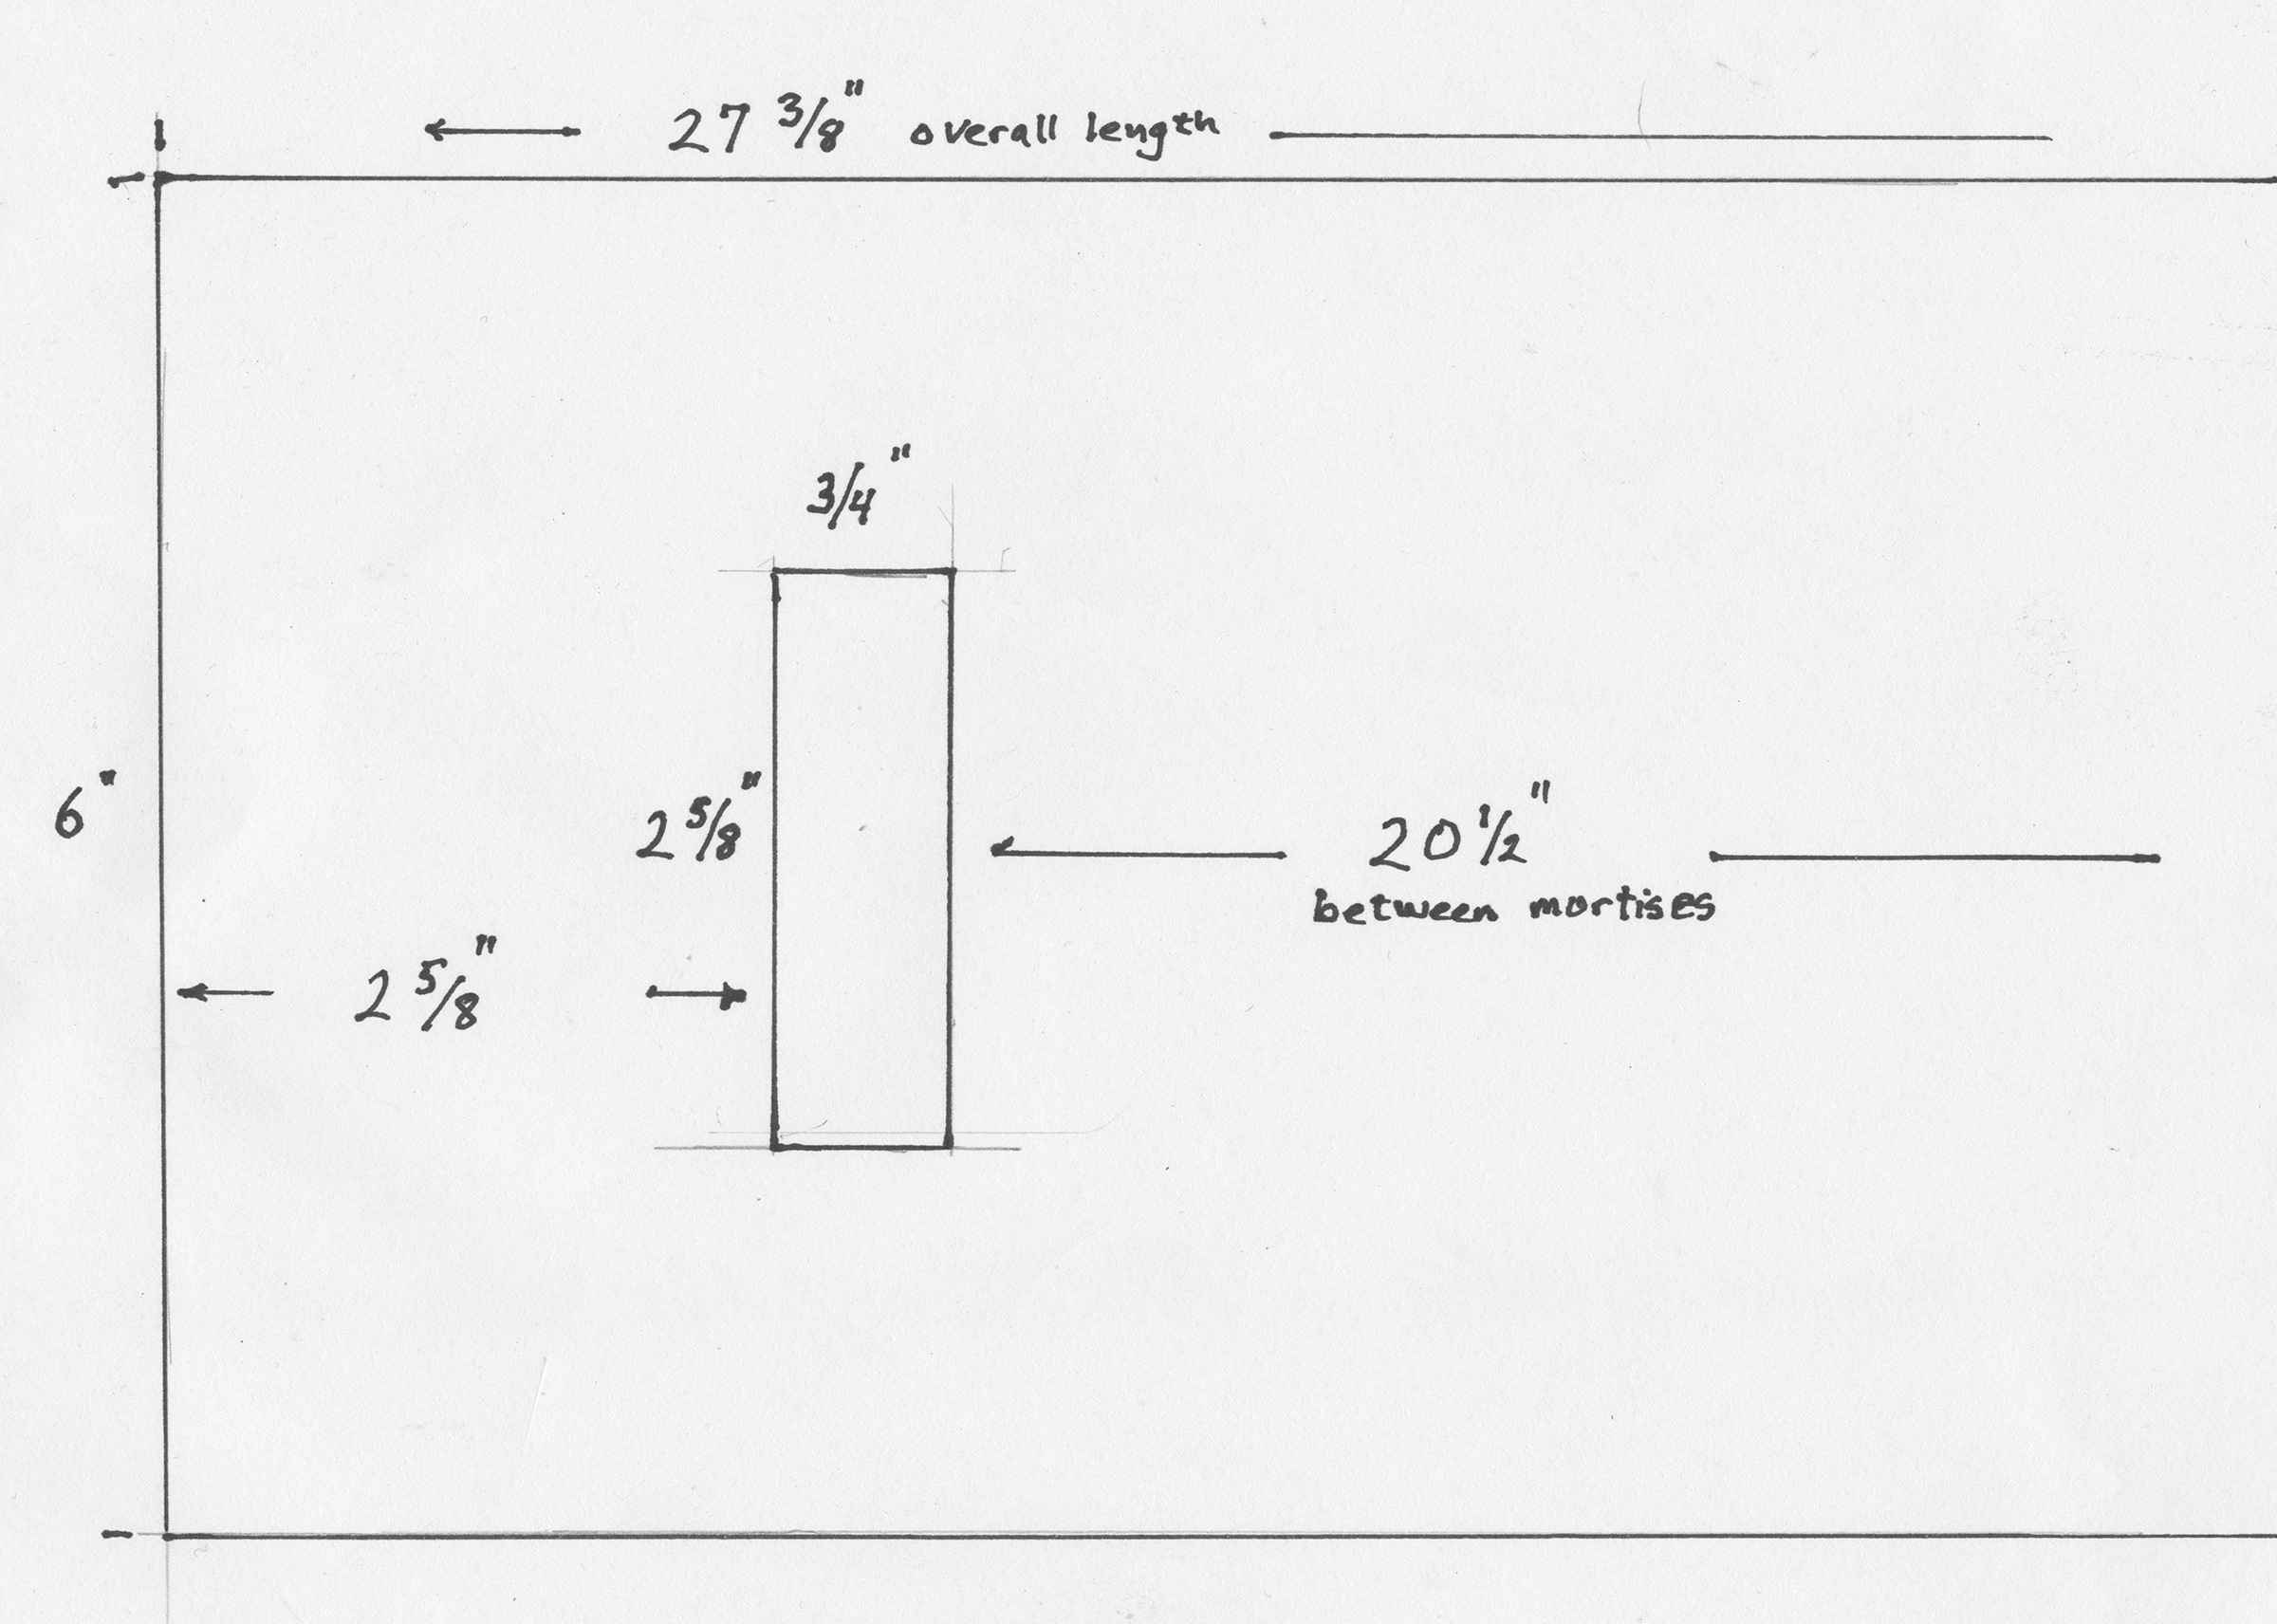
I had a piece of 1″ Douglas fir that worked as the deck for the large cart. A piece of 3⁄4″ hardwood would also work.
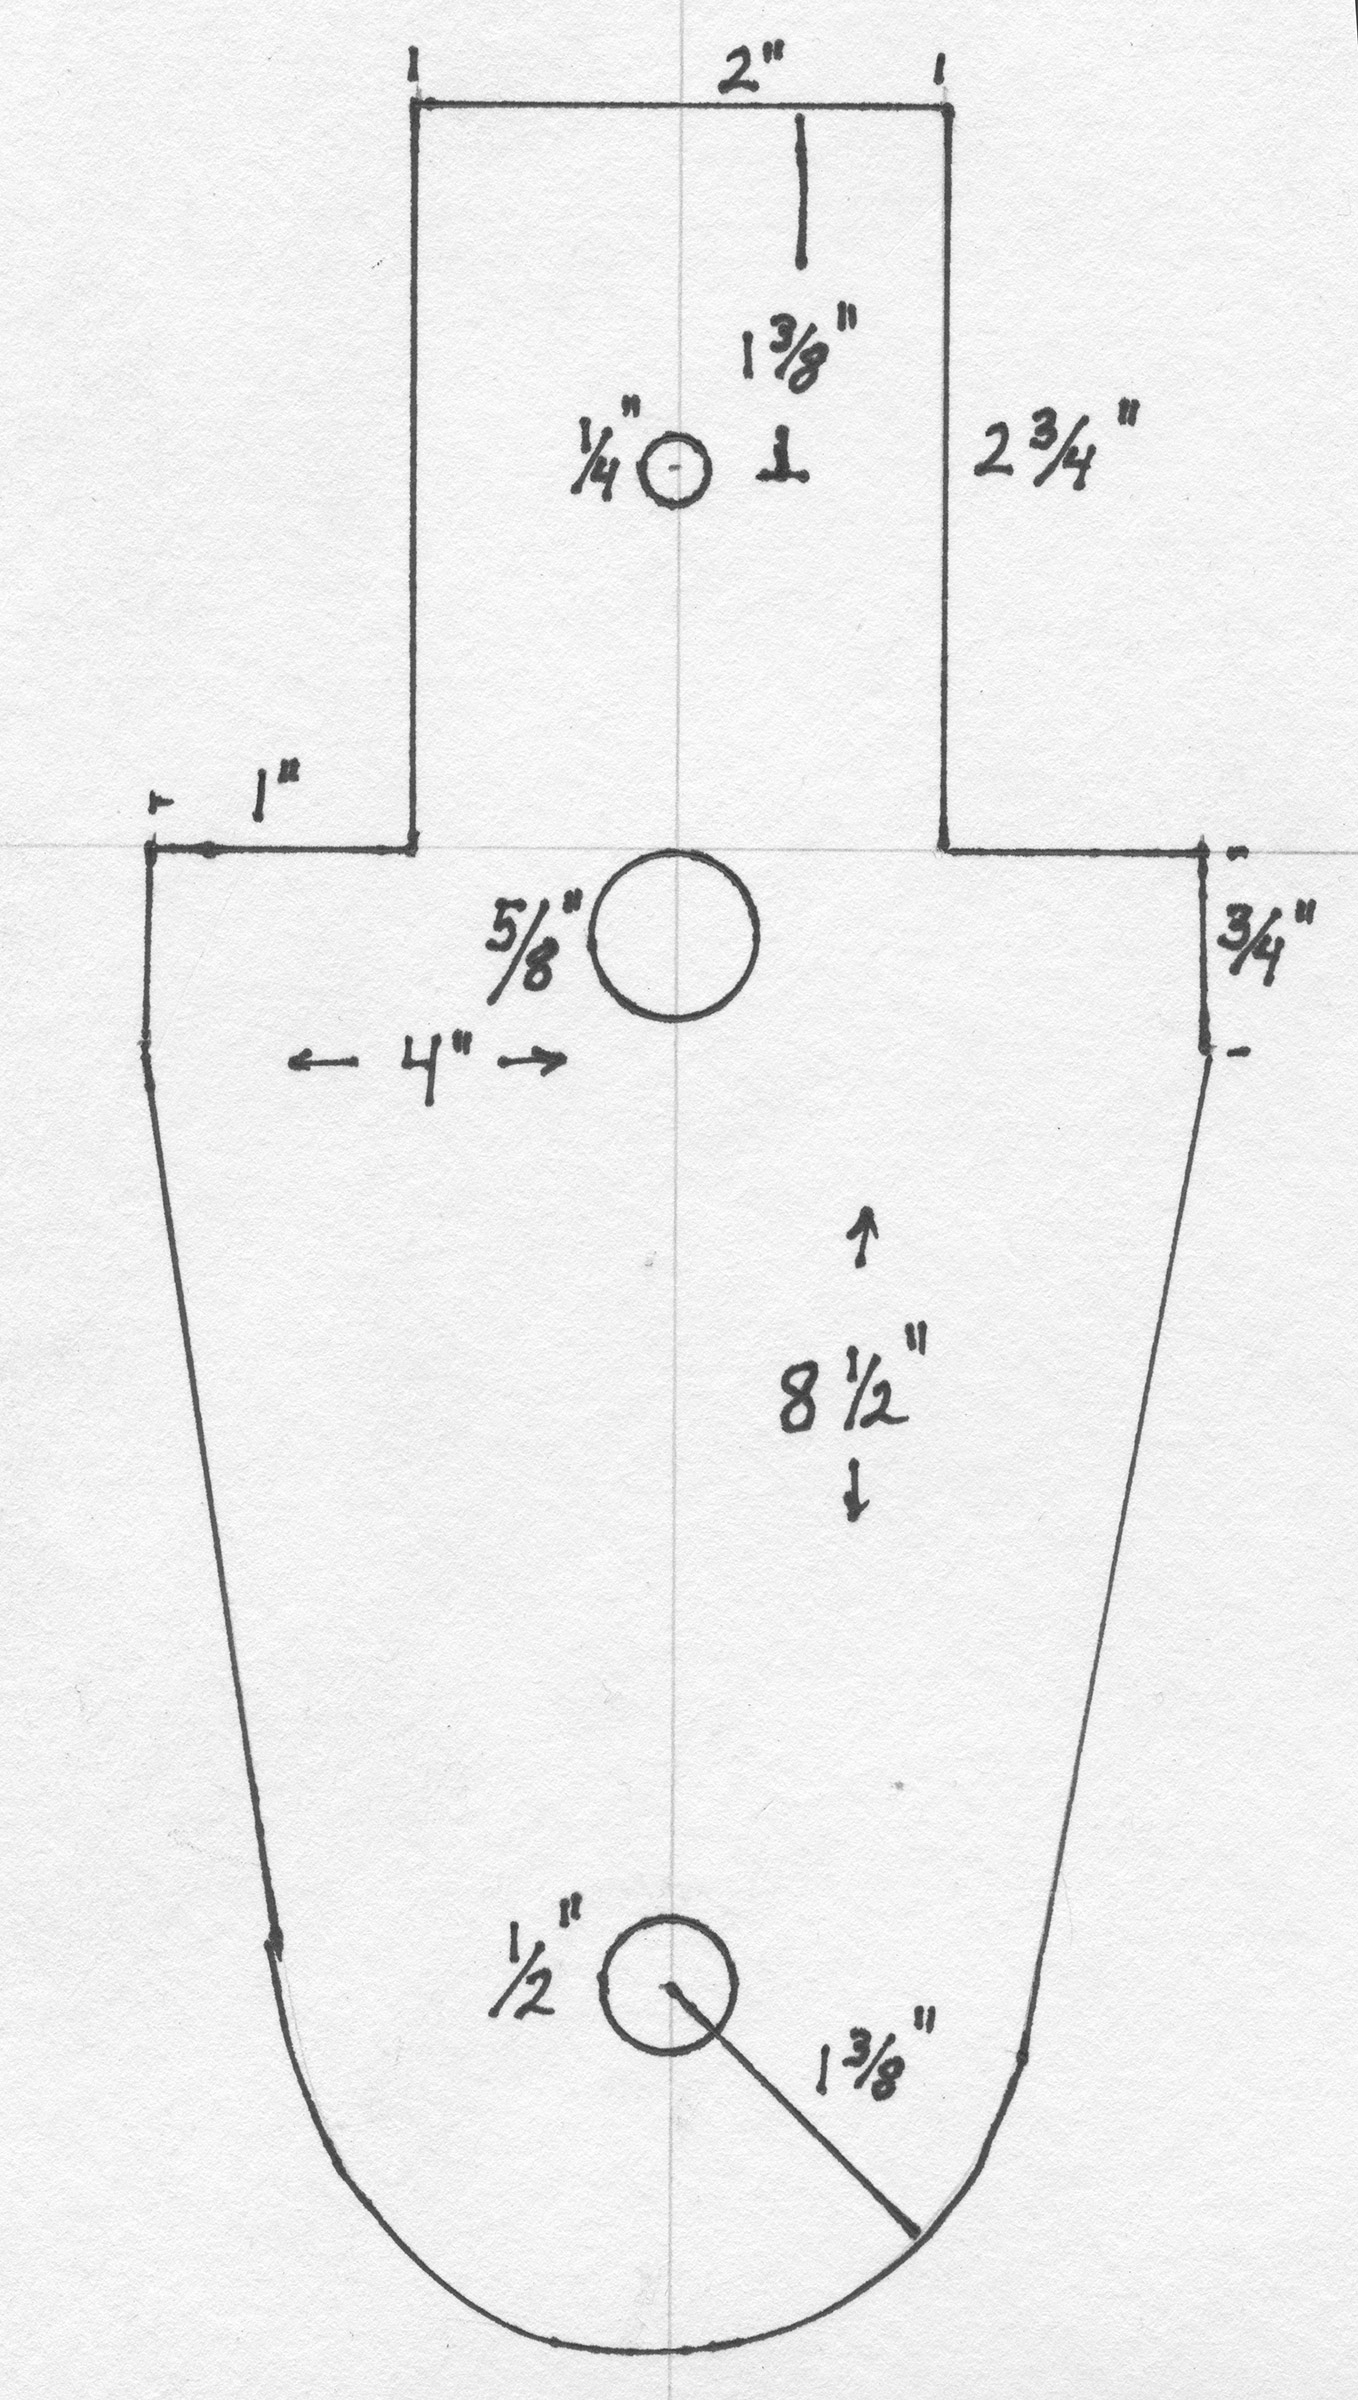
I used cut-offs of 3⁄4″-thick pipe from a decking project for the uprights (oak would work, too). The hole at the top is for the 1⁄4″ × 20 machine screw that holds the upright to the bunk. If the hole is too small for an easy slip fit, a 5⁄16″ hole is fine. A loose fit isn’t a problem. The middle hole is for the 1” strap that will hold the canoe to the cart. It should be just below the level at the bottom of the deck. The undersized hole provides some friction to keep the strap in place. The 1″ hole for the axle can also be enlarged if the axle is a tight fit; it should rotate freely.
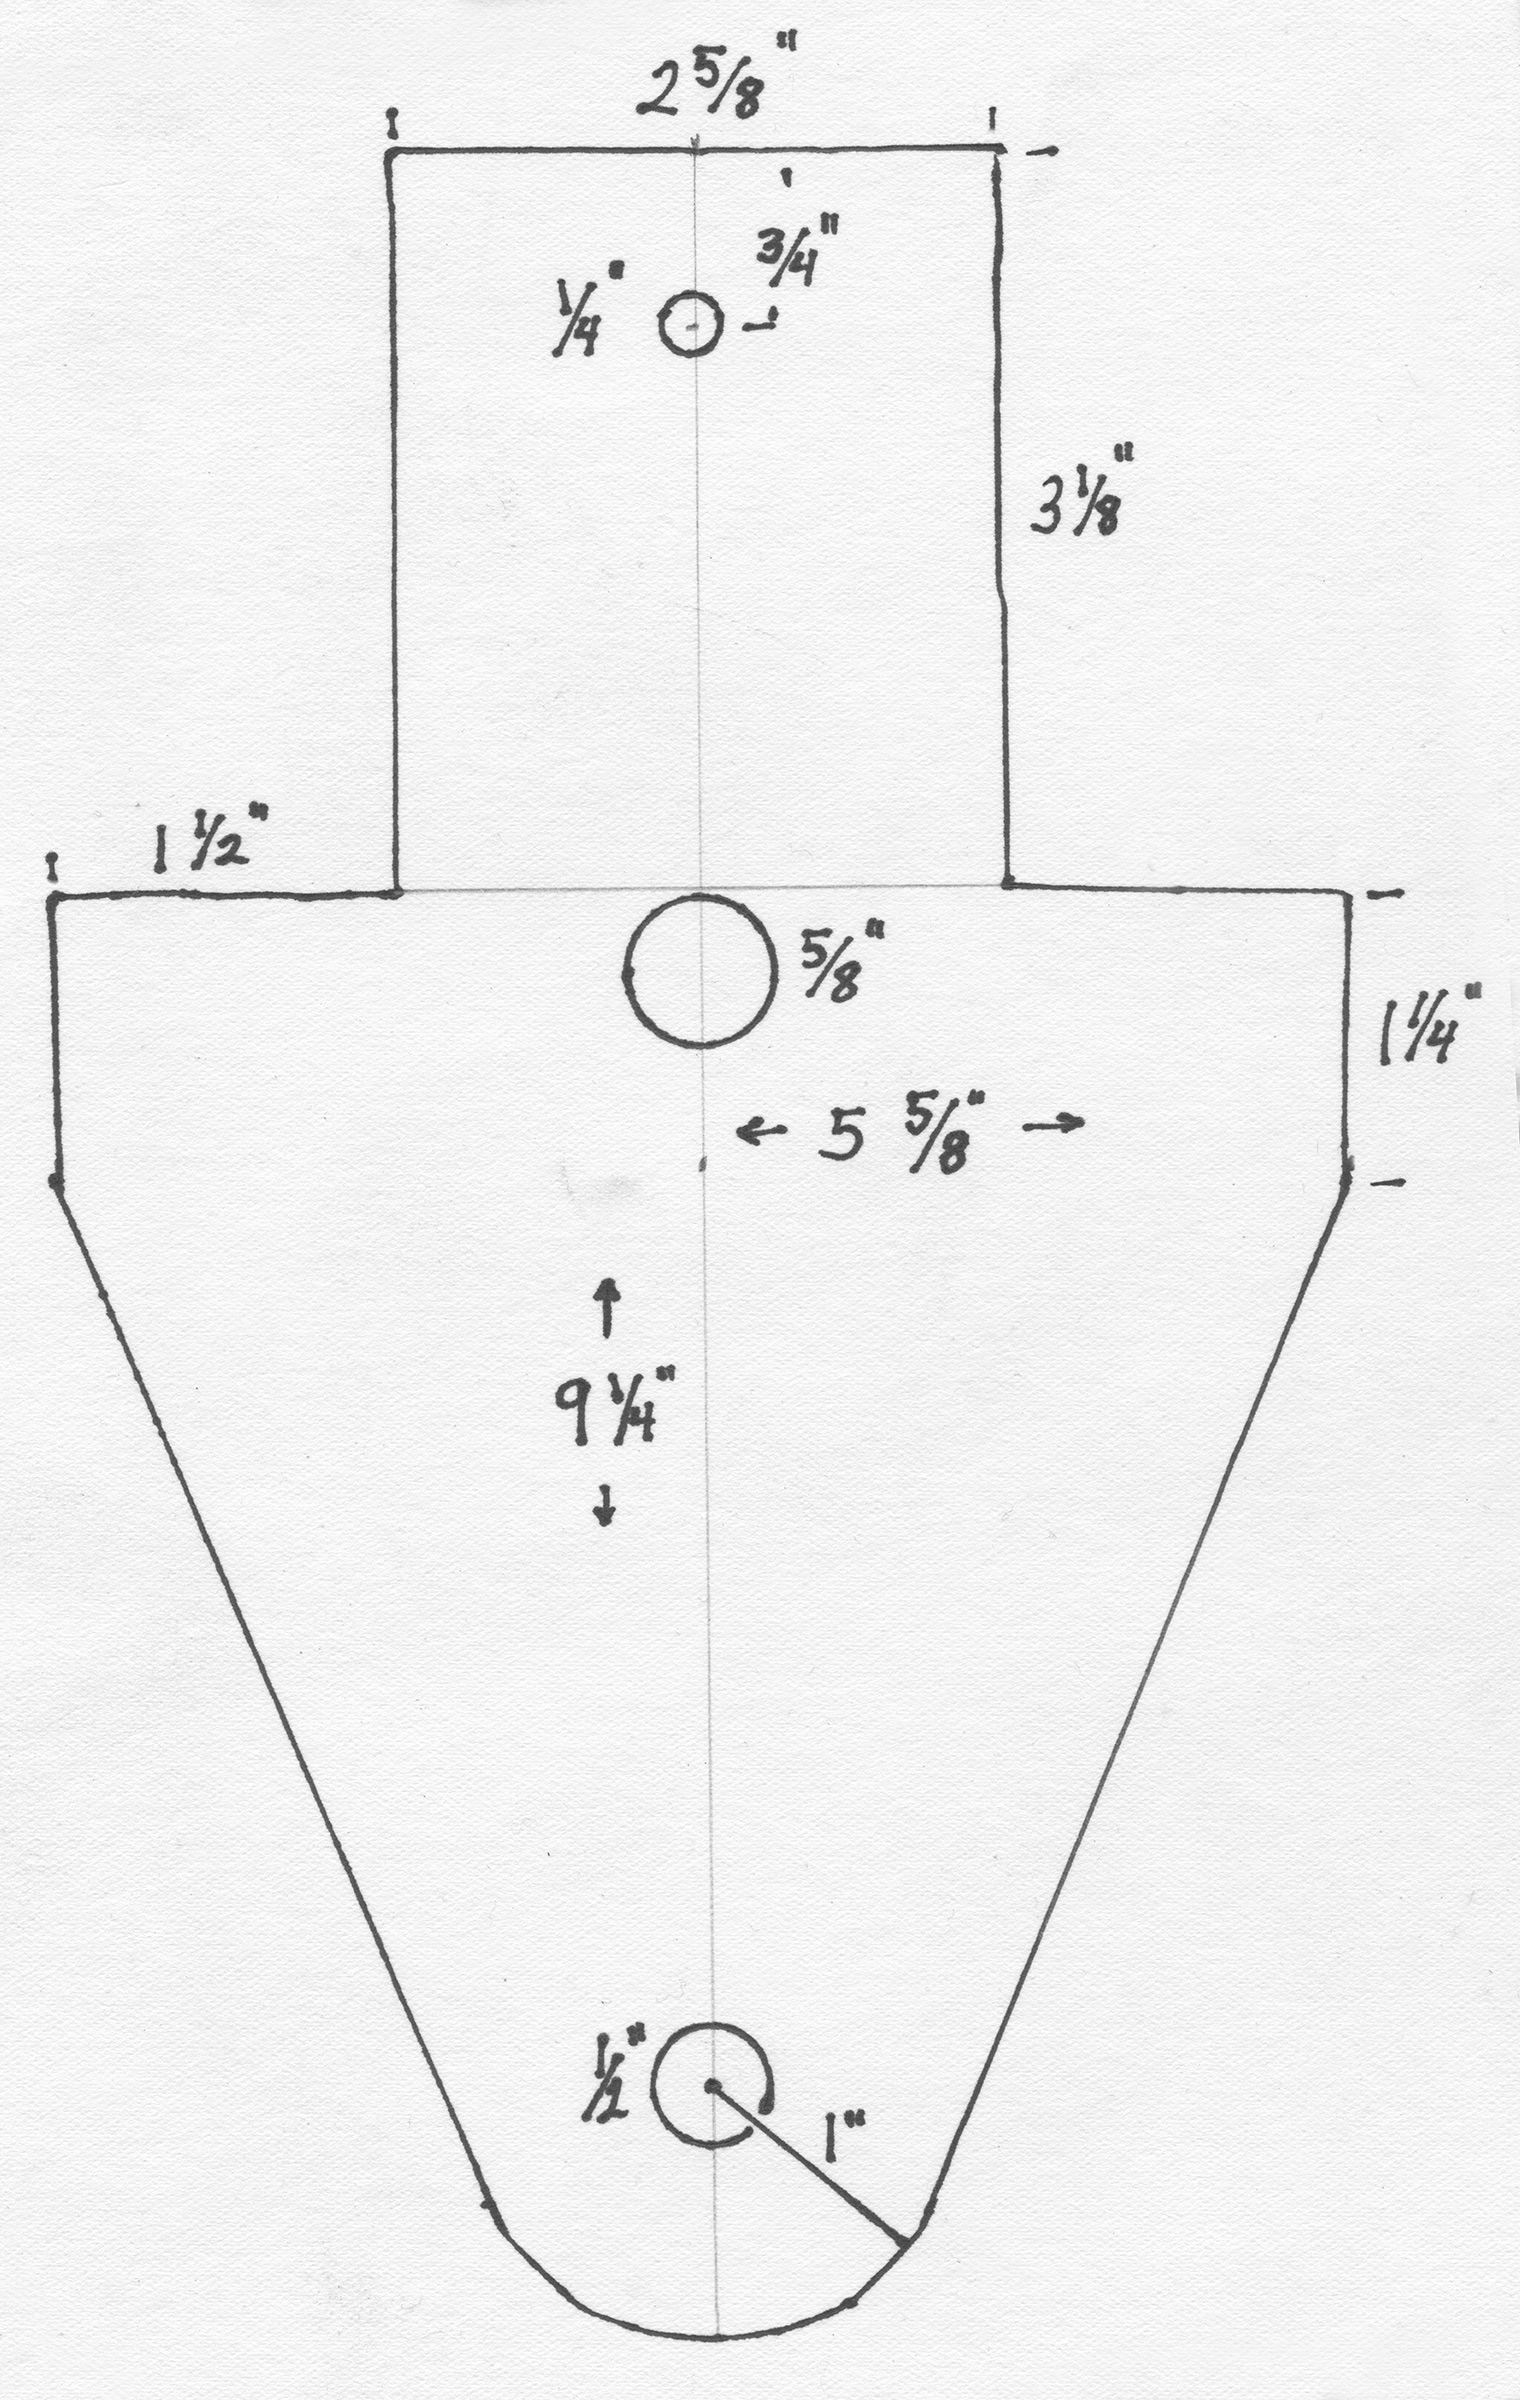
The notes about the small upright apply to the large upright, too. The outside dimensions for the two patterns aren’t identical but they aren’t critical.
![]()
Christopher Cunningham is the editor of Small Boats.
Afterword:
7/12/24—My YouTube suggestions turned up a video about the Rolligon, a cylindrical low-pressure tire invented 1951 by William Albee and patented in 1957. He had been inspired by Inuit using inflated rollers made of sealskins to roll boats ashore. Rolligon tires are currently being used by vehicles for oil-drilling operations in the North to traverse tundra without getting stuck or seriously damaging the terrain.
You can share your tips and tricks of the trade with other Small Boats readers by sending us an email.

Hmmmm?…….Inspiration times 2…….The dim light inside my head brightened a wee bit….I live by the beach on the Outer Banks of NC….Something like this to replace the dragging and tugging of “stuff”… and, being an elder statesman, I’ll bring the idea to a younger neighbor with kids and a lot more “stuff”. ..He’s handy… We’ll see… As always … I look forward to what my small boats buddies come up with..
When I was a canoe outfitter the best solution was a cart with 20” bicycle wheels and quick release mechanism at the hubs for easy breakdown. This setup allows for traversing rough or sandy terrain with loaded canoes. Bon chance!
E. B.
Before I realized the cart included a fender, the brain lightbulb that I lit was to have two wide lawnmower wheels, one on each side of the uprights. In my situation, it is rocky terrain that I traverse. The axle catches on rock outcrops. Four wheels without an axle between the pairs could be an elegant answer.
For the kickstand, I have a supply of broken hockey sticks.
Excellent idea and article. I wonder how a similar design would do with a heavier payload, say 300lbs?
Hey, Chris – I have a friend planning for the NFCT next season, running from the Adirondacks to Northern Maine. Something like 70 carries, not all wheelable. Sometimes serious mud, plus hiking trail type of small rock outcrops. Do you think this fender setup would handle mud and a rough trail? Anybody else have a view, if you are familiar with the NFCT?
I haven’t tried the cart in mud, but I think the fender’s large footprint would be an advantage. In rough terrain the height and slope of the obstruction would be the limiting factor. If I have a chance to do trials in these conditions, I’ll report on the performance.
Yes I say all the way. A little on the heavy side compared to purely tires, but it’ll work great in mud. Think of mud tires on 4wds: the point there is as much floatation as possible to ride above the mud.
There’ll be more resistance on hard pack trails, and more likelihood of blowouts on sharp rock outcrops. And for those reasons I feel he might consider the dual wheel set-up described here. But for a (I hate to condone it!) single-use race tool, I’d suggest looking seriously at the All Terrain Roller Chris wrote up in November ’17. Especially the minutes gained and energy saved by being able shove the boat into the water, jump in, and have the cart pop up out of the water by itself.
Great idea, most helpful. Thank you, Chris
I think wheels slightly larger than the fender would do better. On hard pavement, where the durability of the fender is in question, the wheels aren’t doing much good. And in soft sand, where the fender comes into play, now the wheels aren’t doing any good.
If your tires are slightly larger than the fender, then on pavement the fender won’t contact the pavement.
It’ll be like those mtb tires with a strip down the middle for pavement, and knobs on the rest for when you sink into softer ground.
Here in TN, what I run into is rocks. Softball to cantaloupe size. I like the Take Apart Boat Cart you wrote up for May ’22. I’ll go for a bit larger tires if I can find them reasonably, and try to design the cradle a bit lower profile.