sliding seat Archives - Small Boats Magazine

Oxford Wherry

[M]y “gateway drug” into boatbuilding was that innocuous fitness device, the rowing machine. Whenever our CrossFit coach incorporated rowing in our workout of the day, most people groaned. I celebrated. My love of stationary rowing led me to sign up with a crew program on the Willamette River in Portland, Oregon. I’d forgotten how I loved spending time on the water, and rowing on the river is sublime. I wanted a boat of my own, but sliding-seat shells are expensive and of limited use. A friend mentioned the ease of stitch-and-glue boat building, which triggered my optimism, and in no time, without any fine-woodworking experience, I began scouring the Internet for boat plans.

Photographs by Suzanne Eggleston

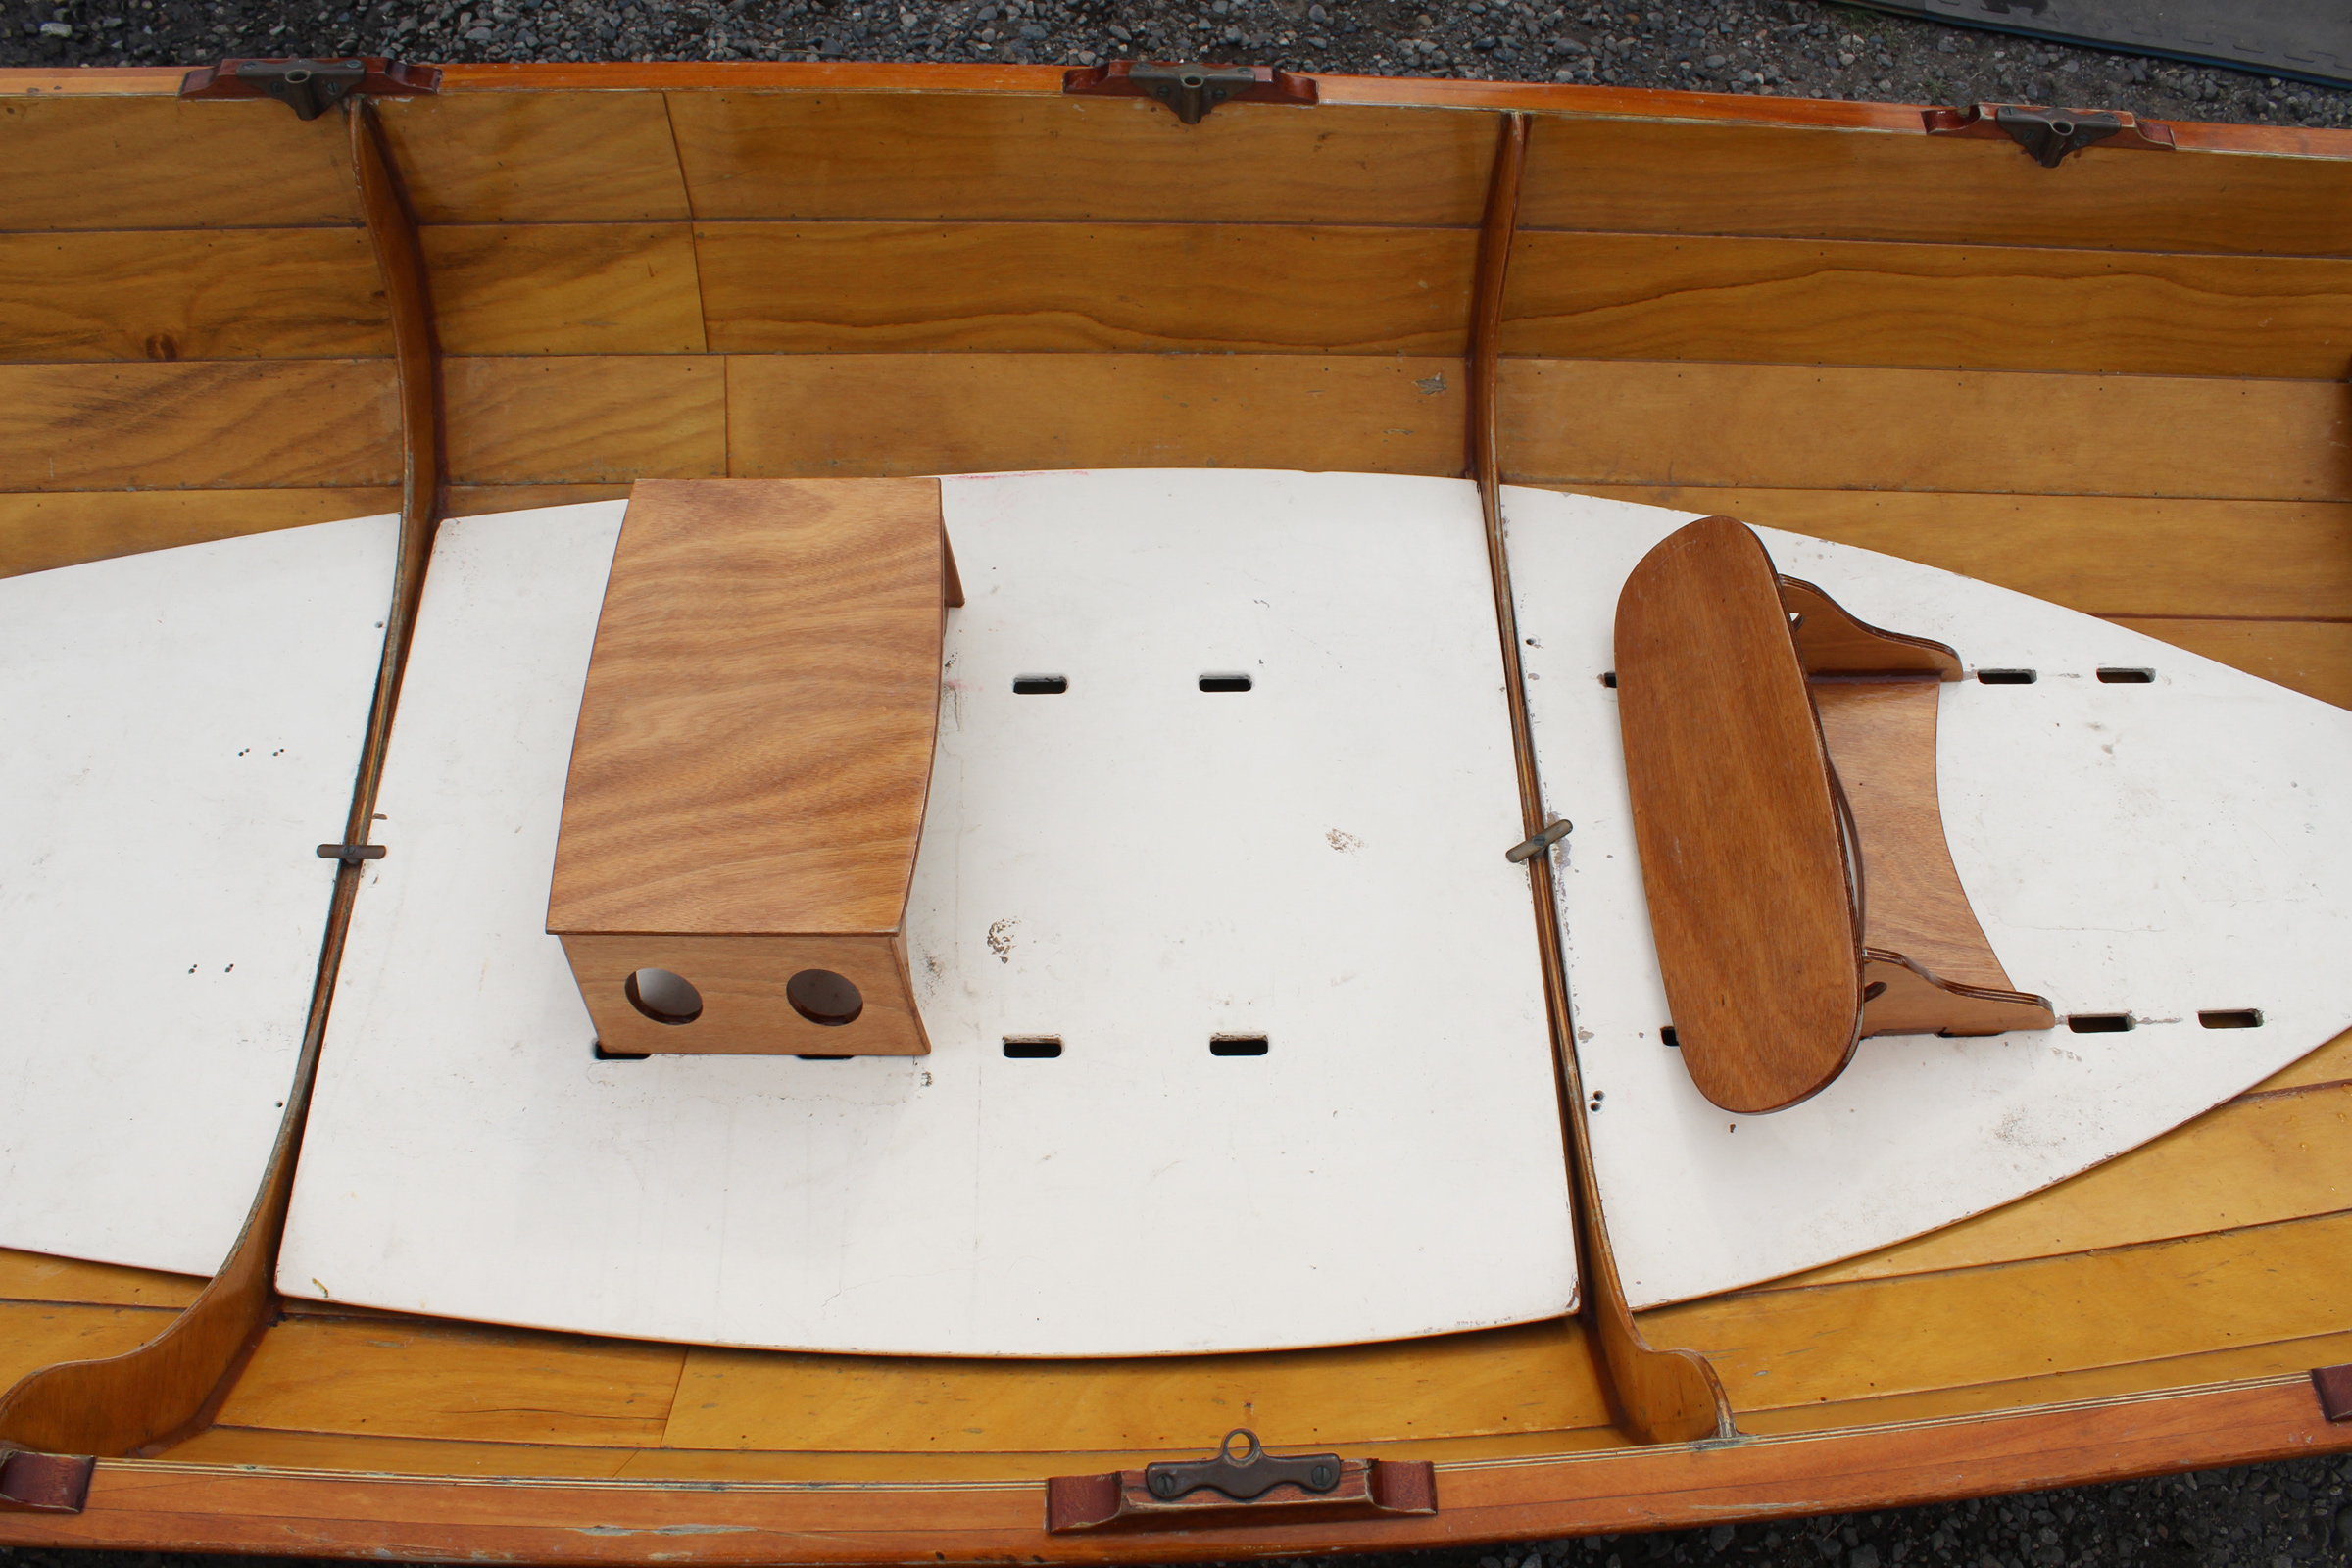
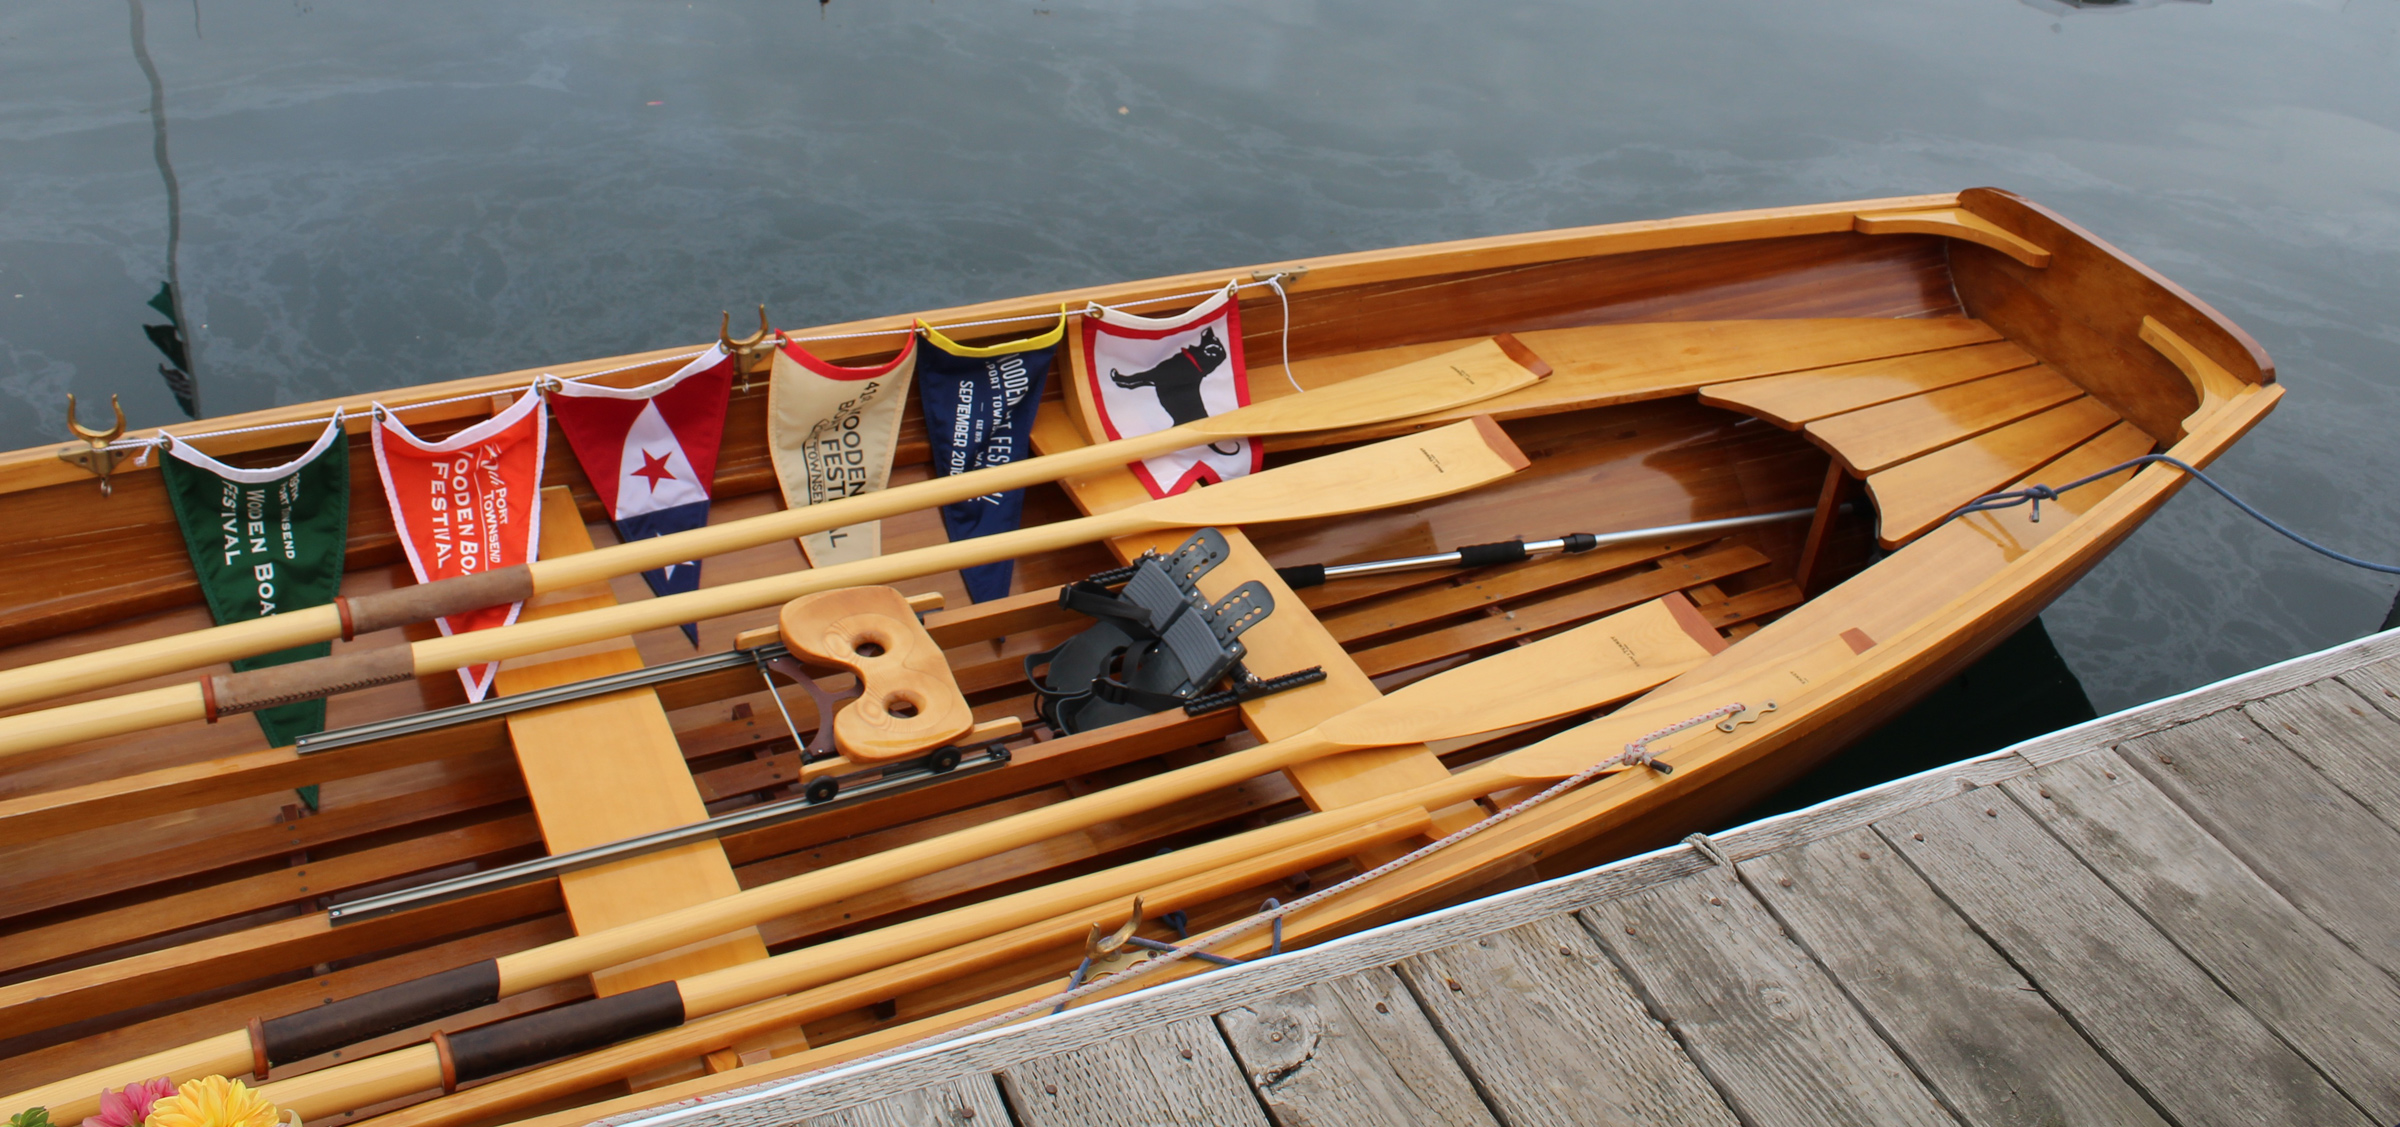
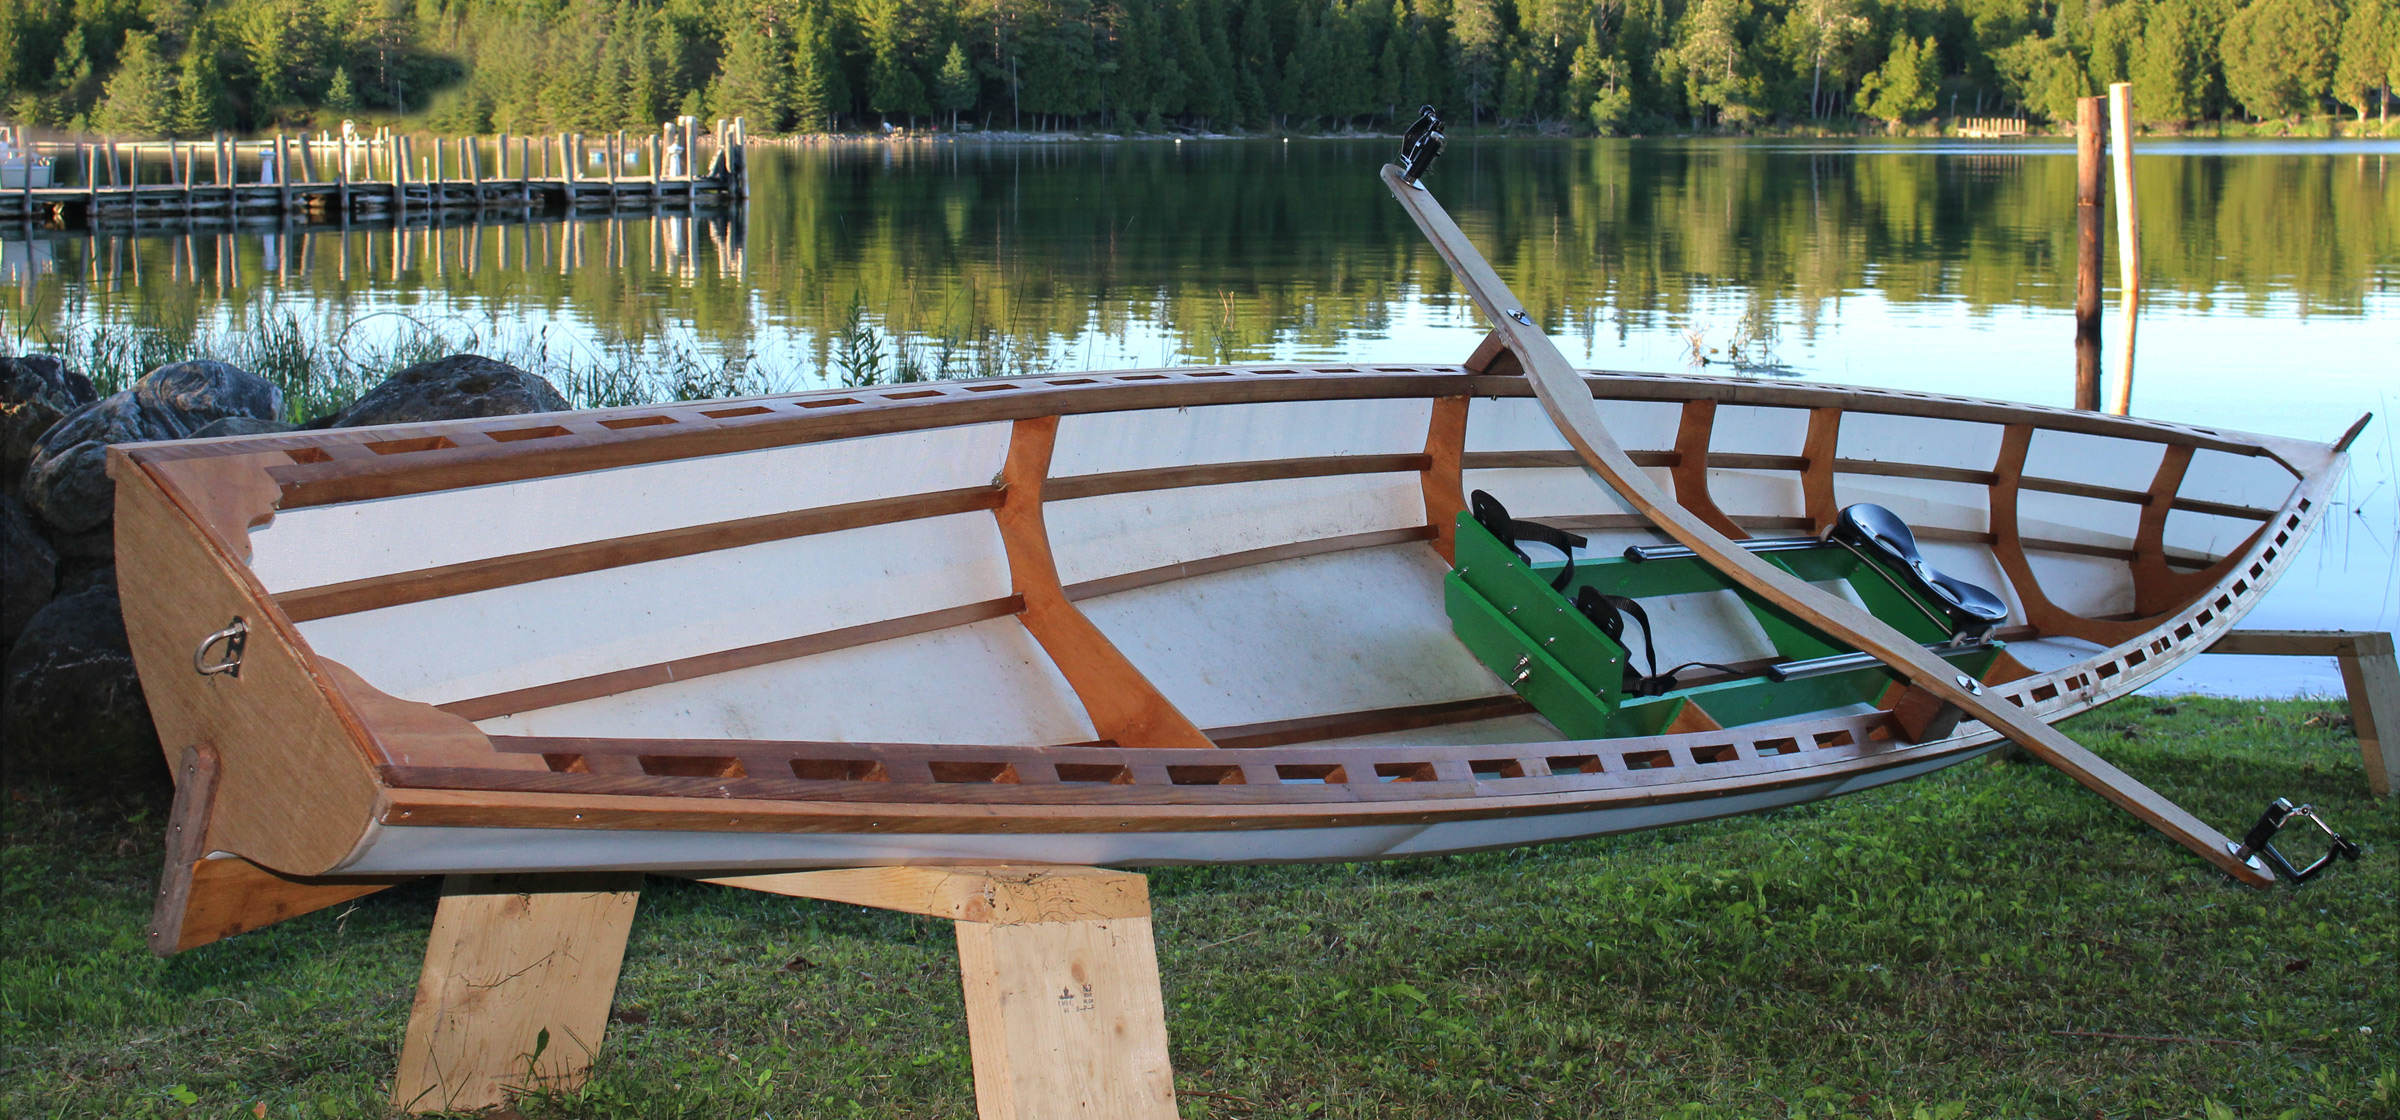
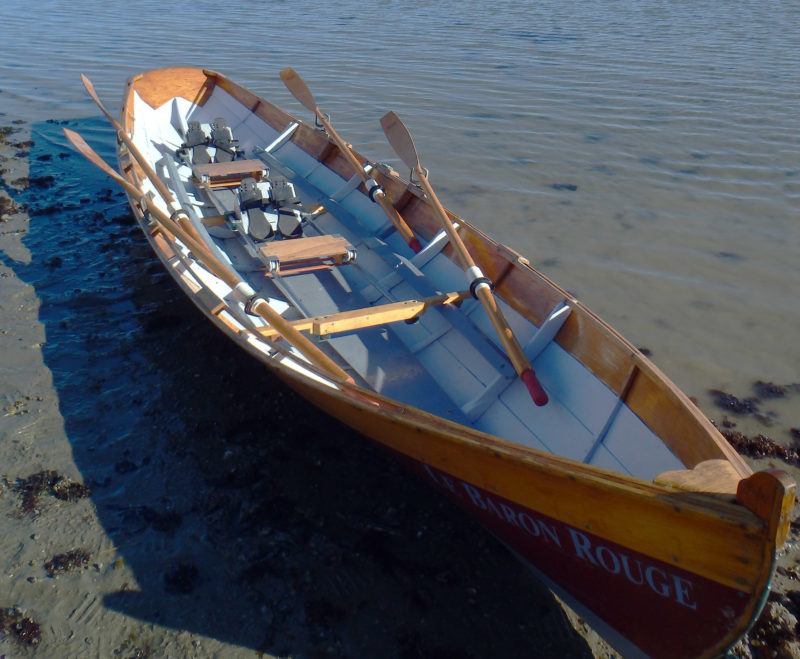
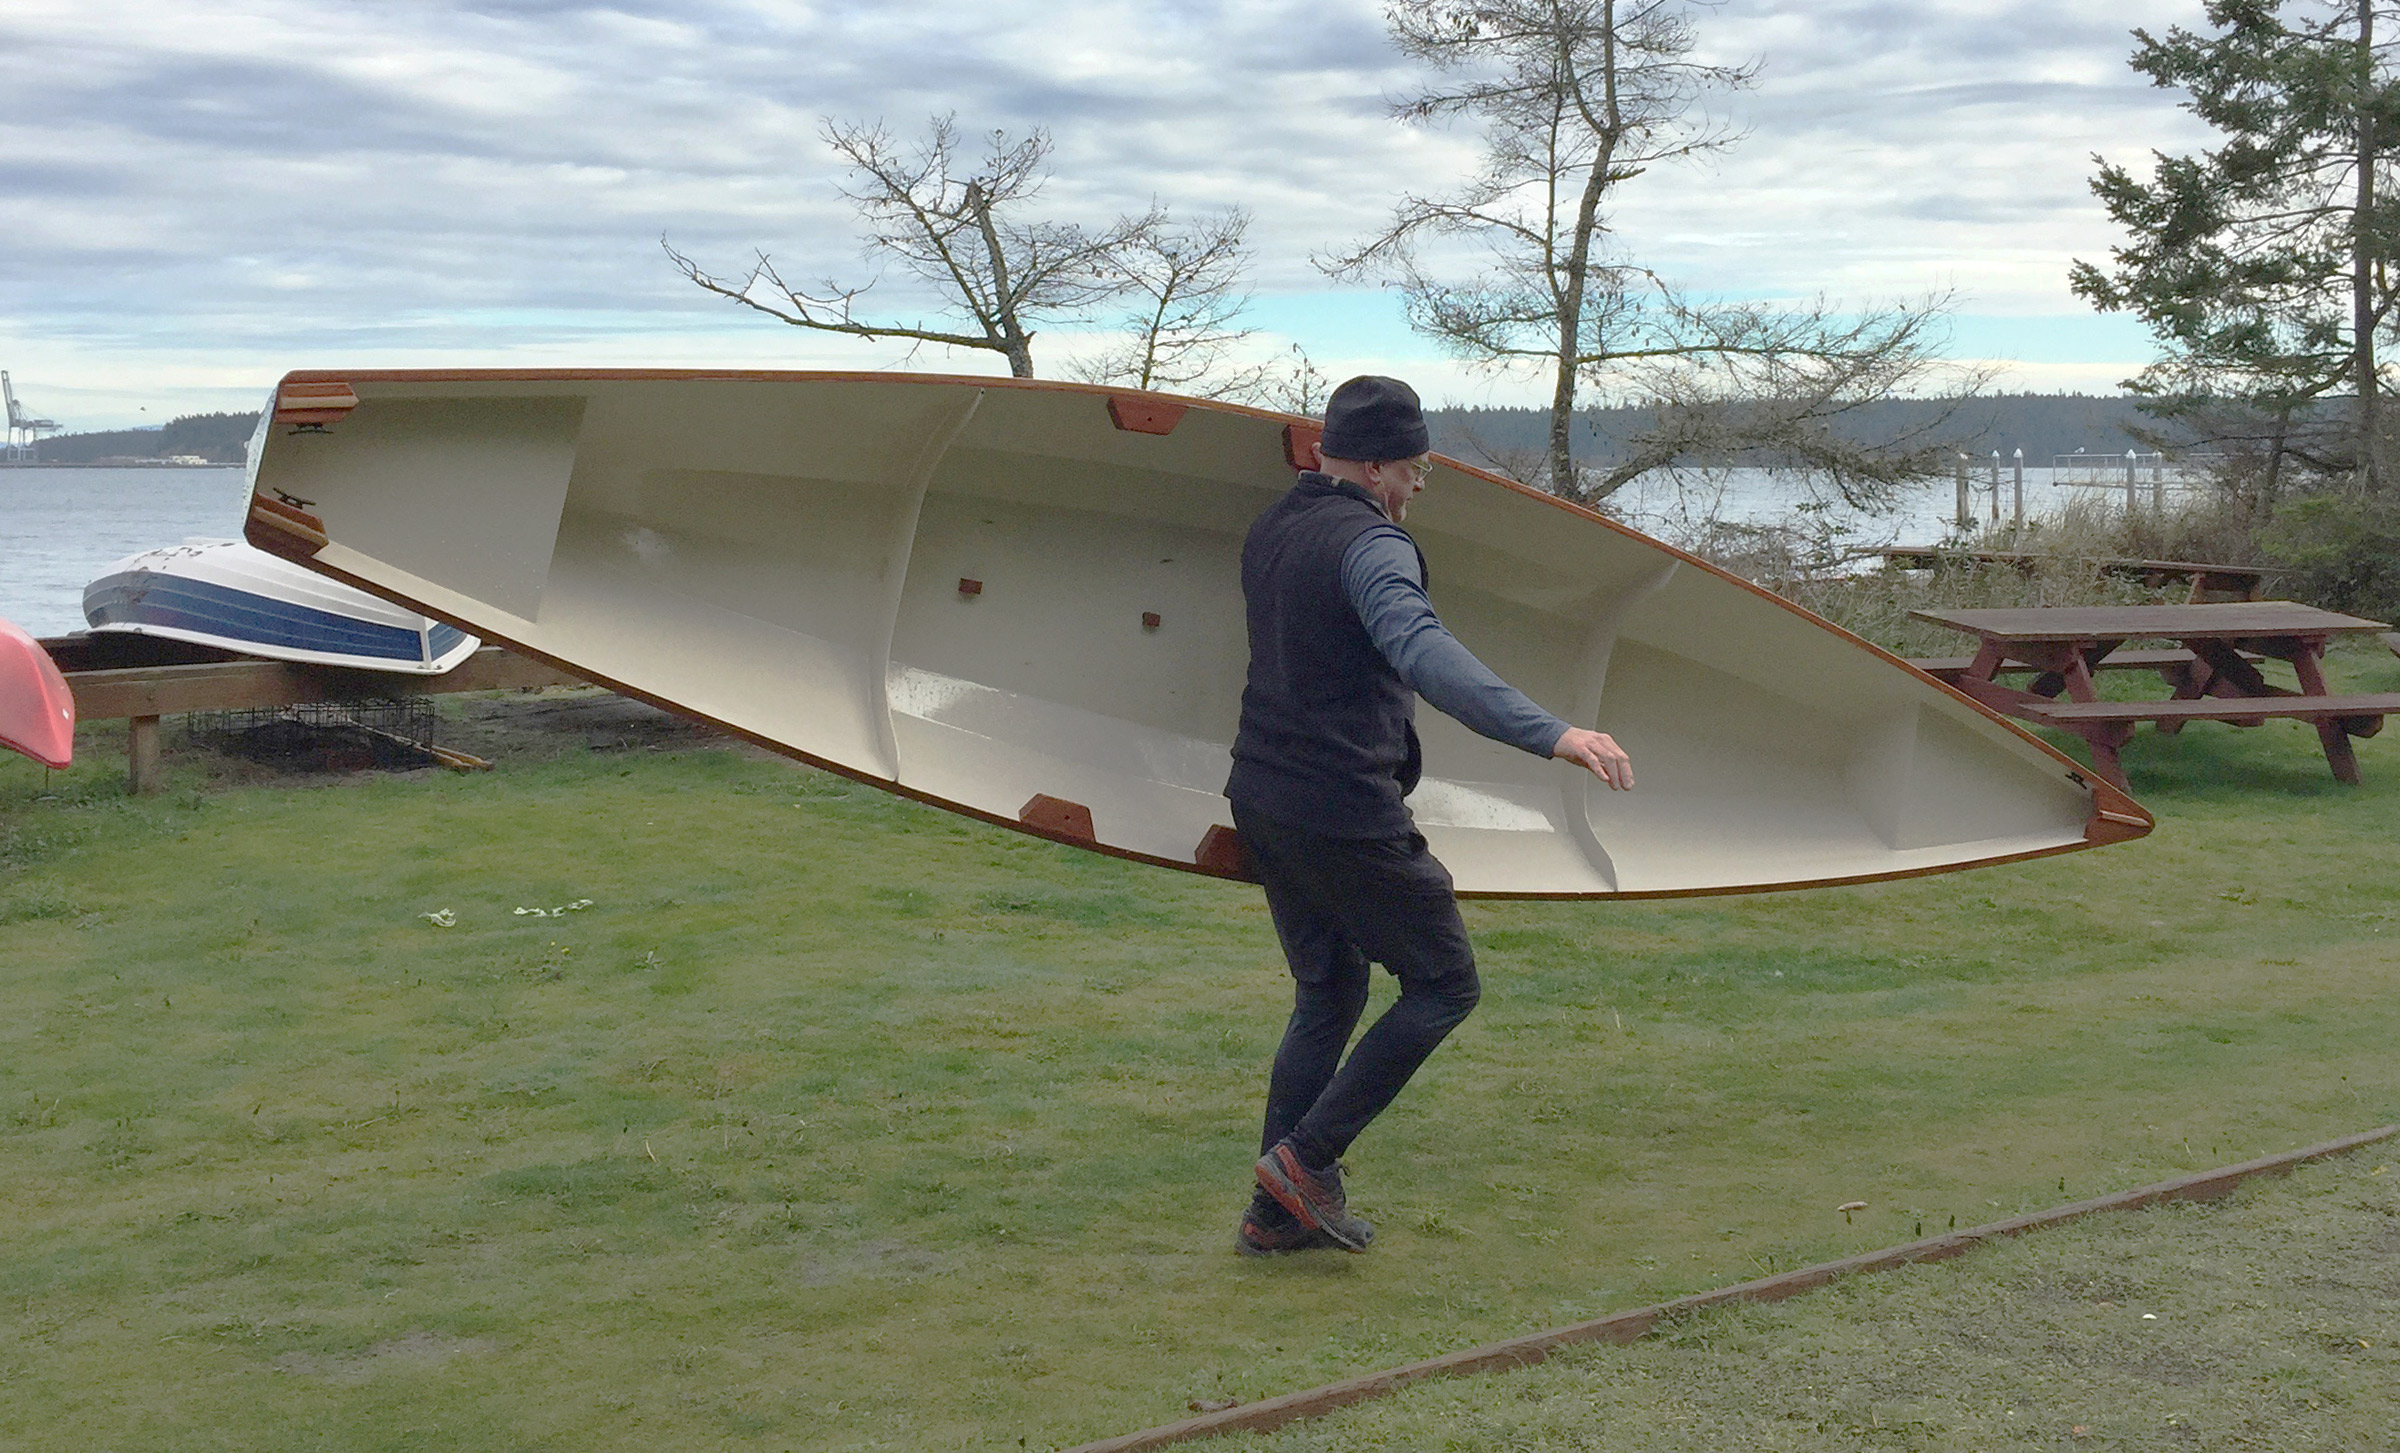
Weighing just over 50 lbs, the bare hull can be carried solo. The blocks that anchor the outrigger provide handholds.

Angus Rowboats of Vancouver, British Columbia, has a nice selection of performance boats with options ranging from plans to kits to completed boats. I thought the Oxford Wherry would give me the workouts I wanted with the option to bring my wife, Suzanne, along. Angus offers the boat as a kit or as digital plans with CNC router files. I gambled that I could hire a CNC router, and ordered just the plans.

I bought the marine plywood I needed and found a guy who makes his living with a CNC router. I delivered the plywood and digital files to him, and he charged me just $90 to cut the pieces. When I glued up the finger joints, some were a little loose which, judging by the reviews, would not have been a problem if I had ordered an Angus Rowboats kit.

Stitching the panels together was one of the best parts of the building process, as a boat rose from the pile of plywood in just a day. Of course, as an enthusiastic rookie, I didn’t pay strict attention to the instructions and tightened the copper wires too tight. I had to loosen them and adjust the boat as I stitched the frames and transom in. More carefully following the very thorough and readable instructions of the 49-page manual, I injected epoxy into the seams, tacking the planks together and then to the three frames and two flotation-compartment bulkheads.

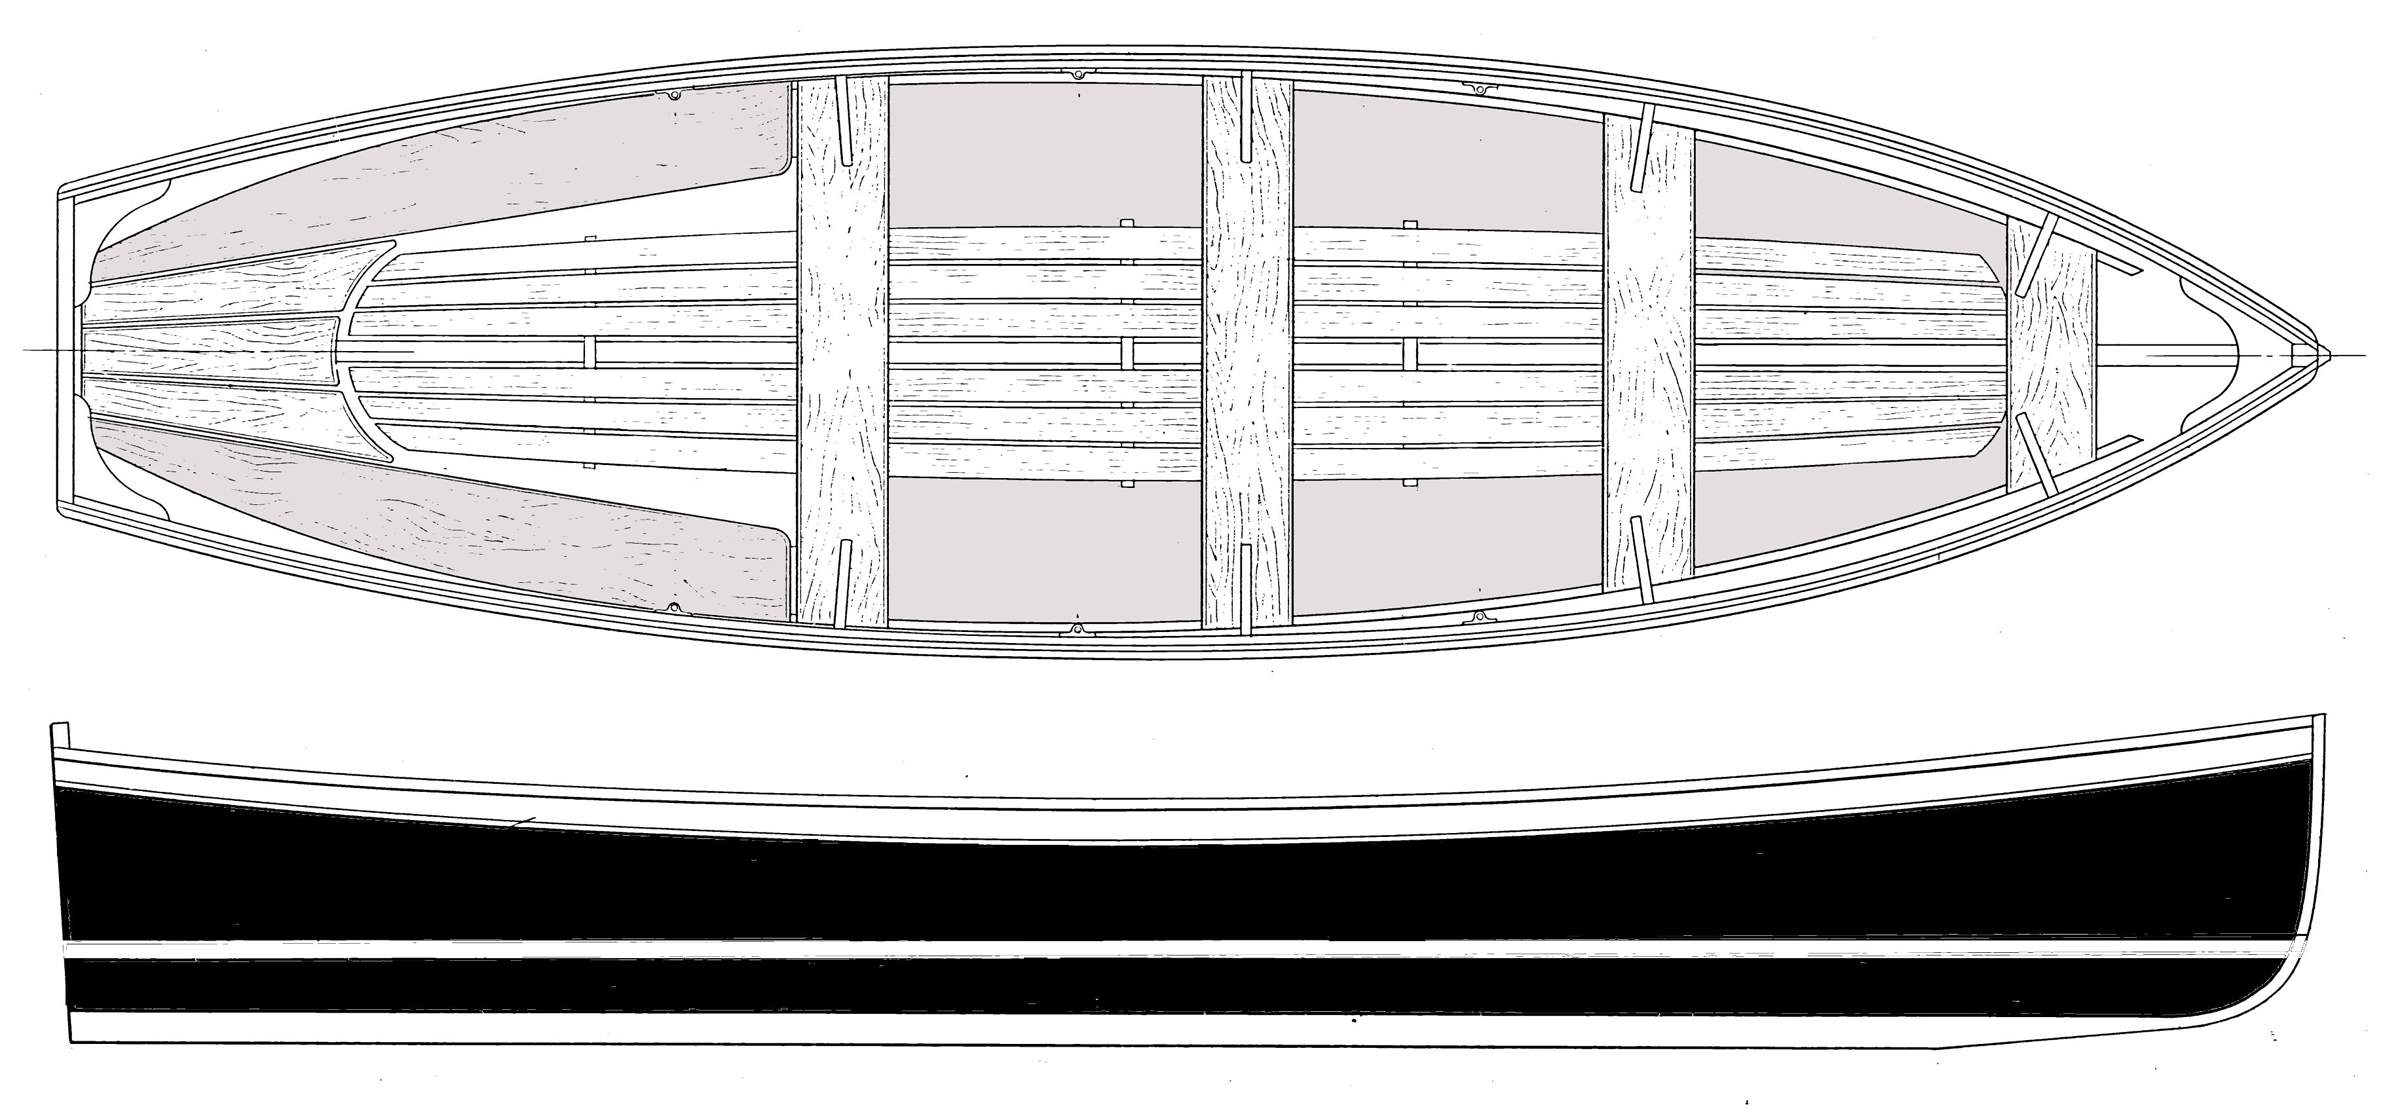
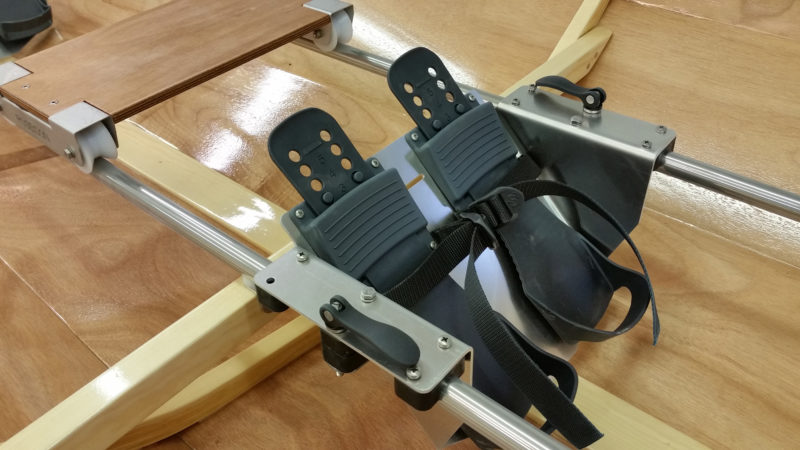
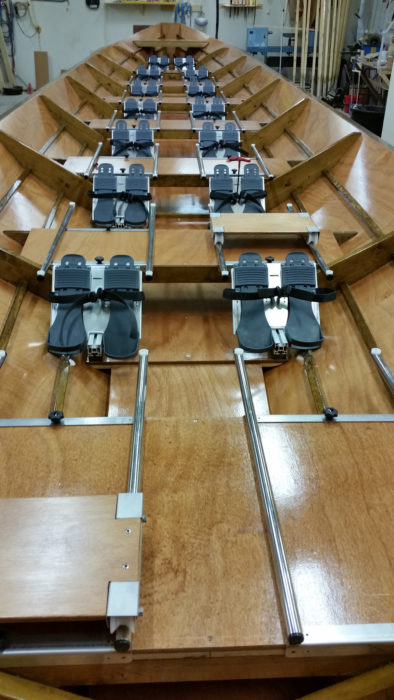
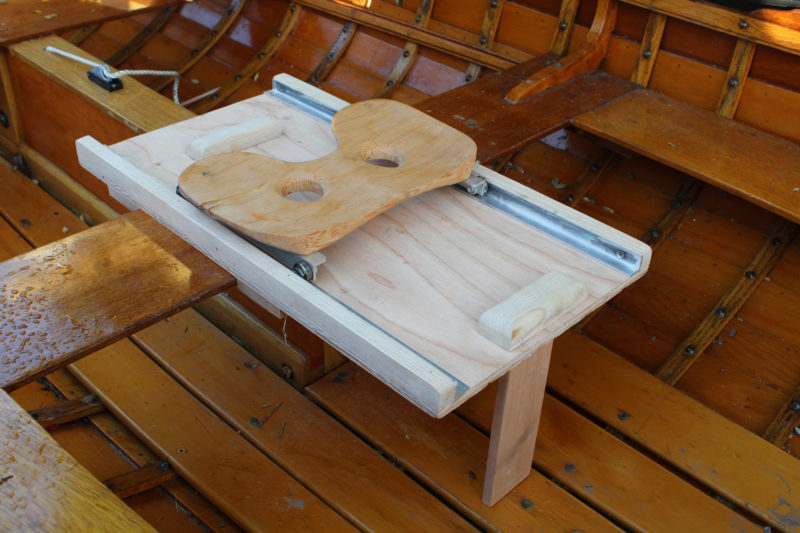
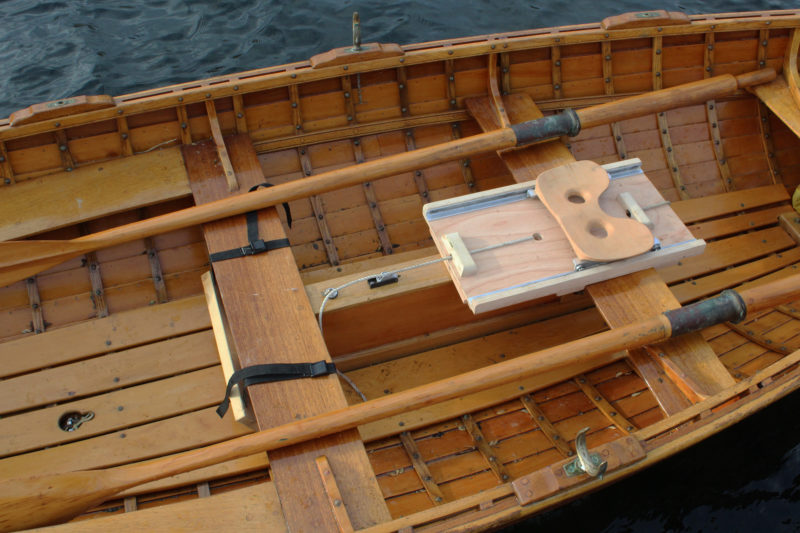
The drop-in sliding seat rig, available as a hardware kit and plans from Angus Rowboats, is an alternative to the fixed thwarts provided with the wherry kit.

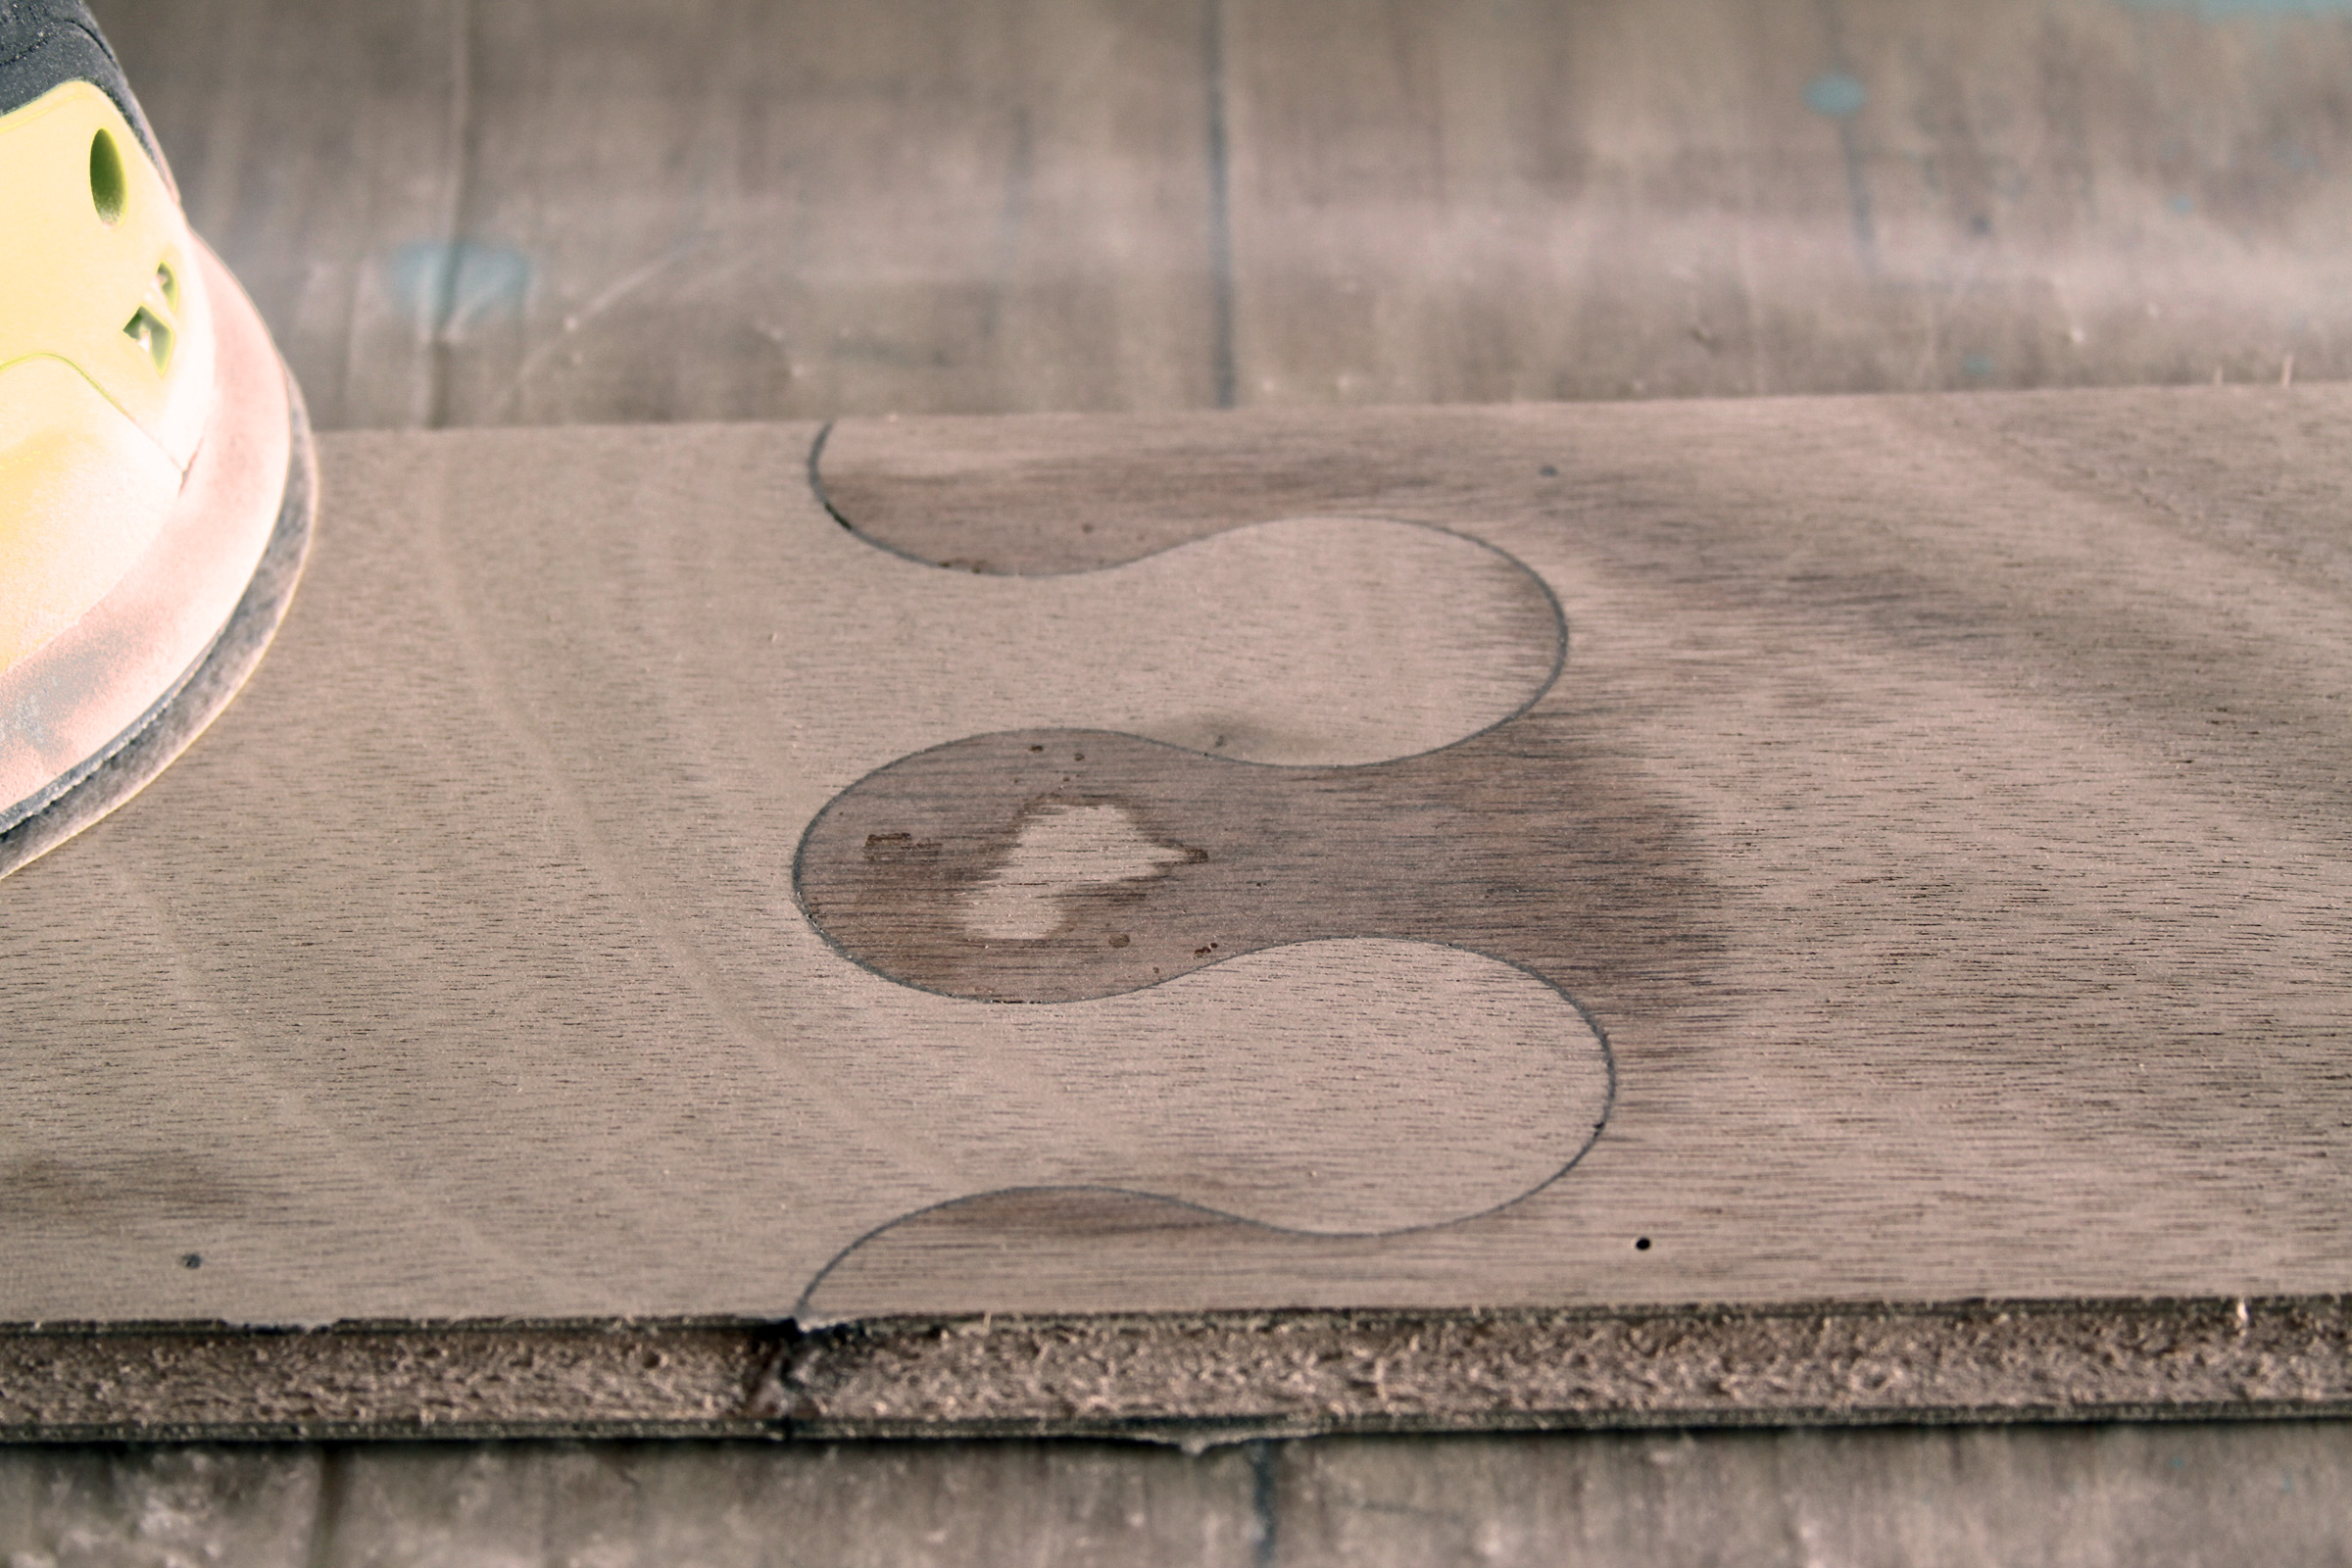
After the epoxy cured, I pulled all of the copper wires, leaving tiny holes in the hull. While fiberglassing the interior, I used too much epoxy and it dripped out on the floor and the tops of my boots. The instructions don’t say to fill those holes with thickened epoxy, so I think I just used too much epoxy.

After the hull was ’glassed it was time to move on to the flotation compartment covers, quarter knees, breasthook, and gunwales. Kit builders would have the advantage with the knees and breasthook, as precut mahogany pieces are included and require only a little trimming to fit; each gunwale is made of three pieces with the scarfs already cut and ready for gluing. I don’t have a tablesaw, so I bought 1×1 red oak to piece together the breasthook, knees, and gunwales.

Despite my budding workmanship and a few errors, I finished the project and had a beautiful, shapely hull sitting in my garage. The build process was very satisfying because the design was simple yet elegant and the instructions were thorough and not overly complicated.

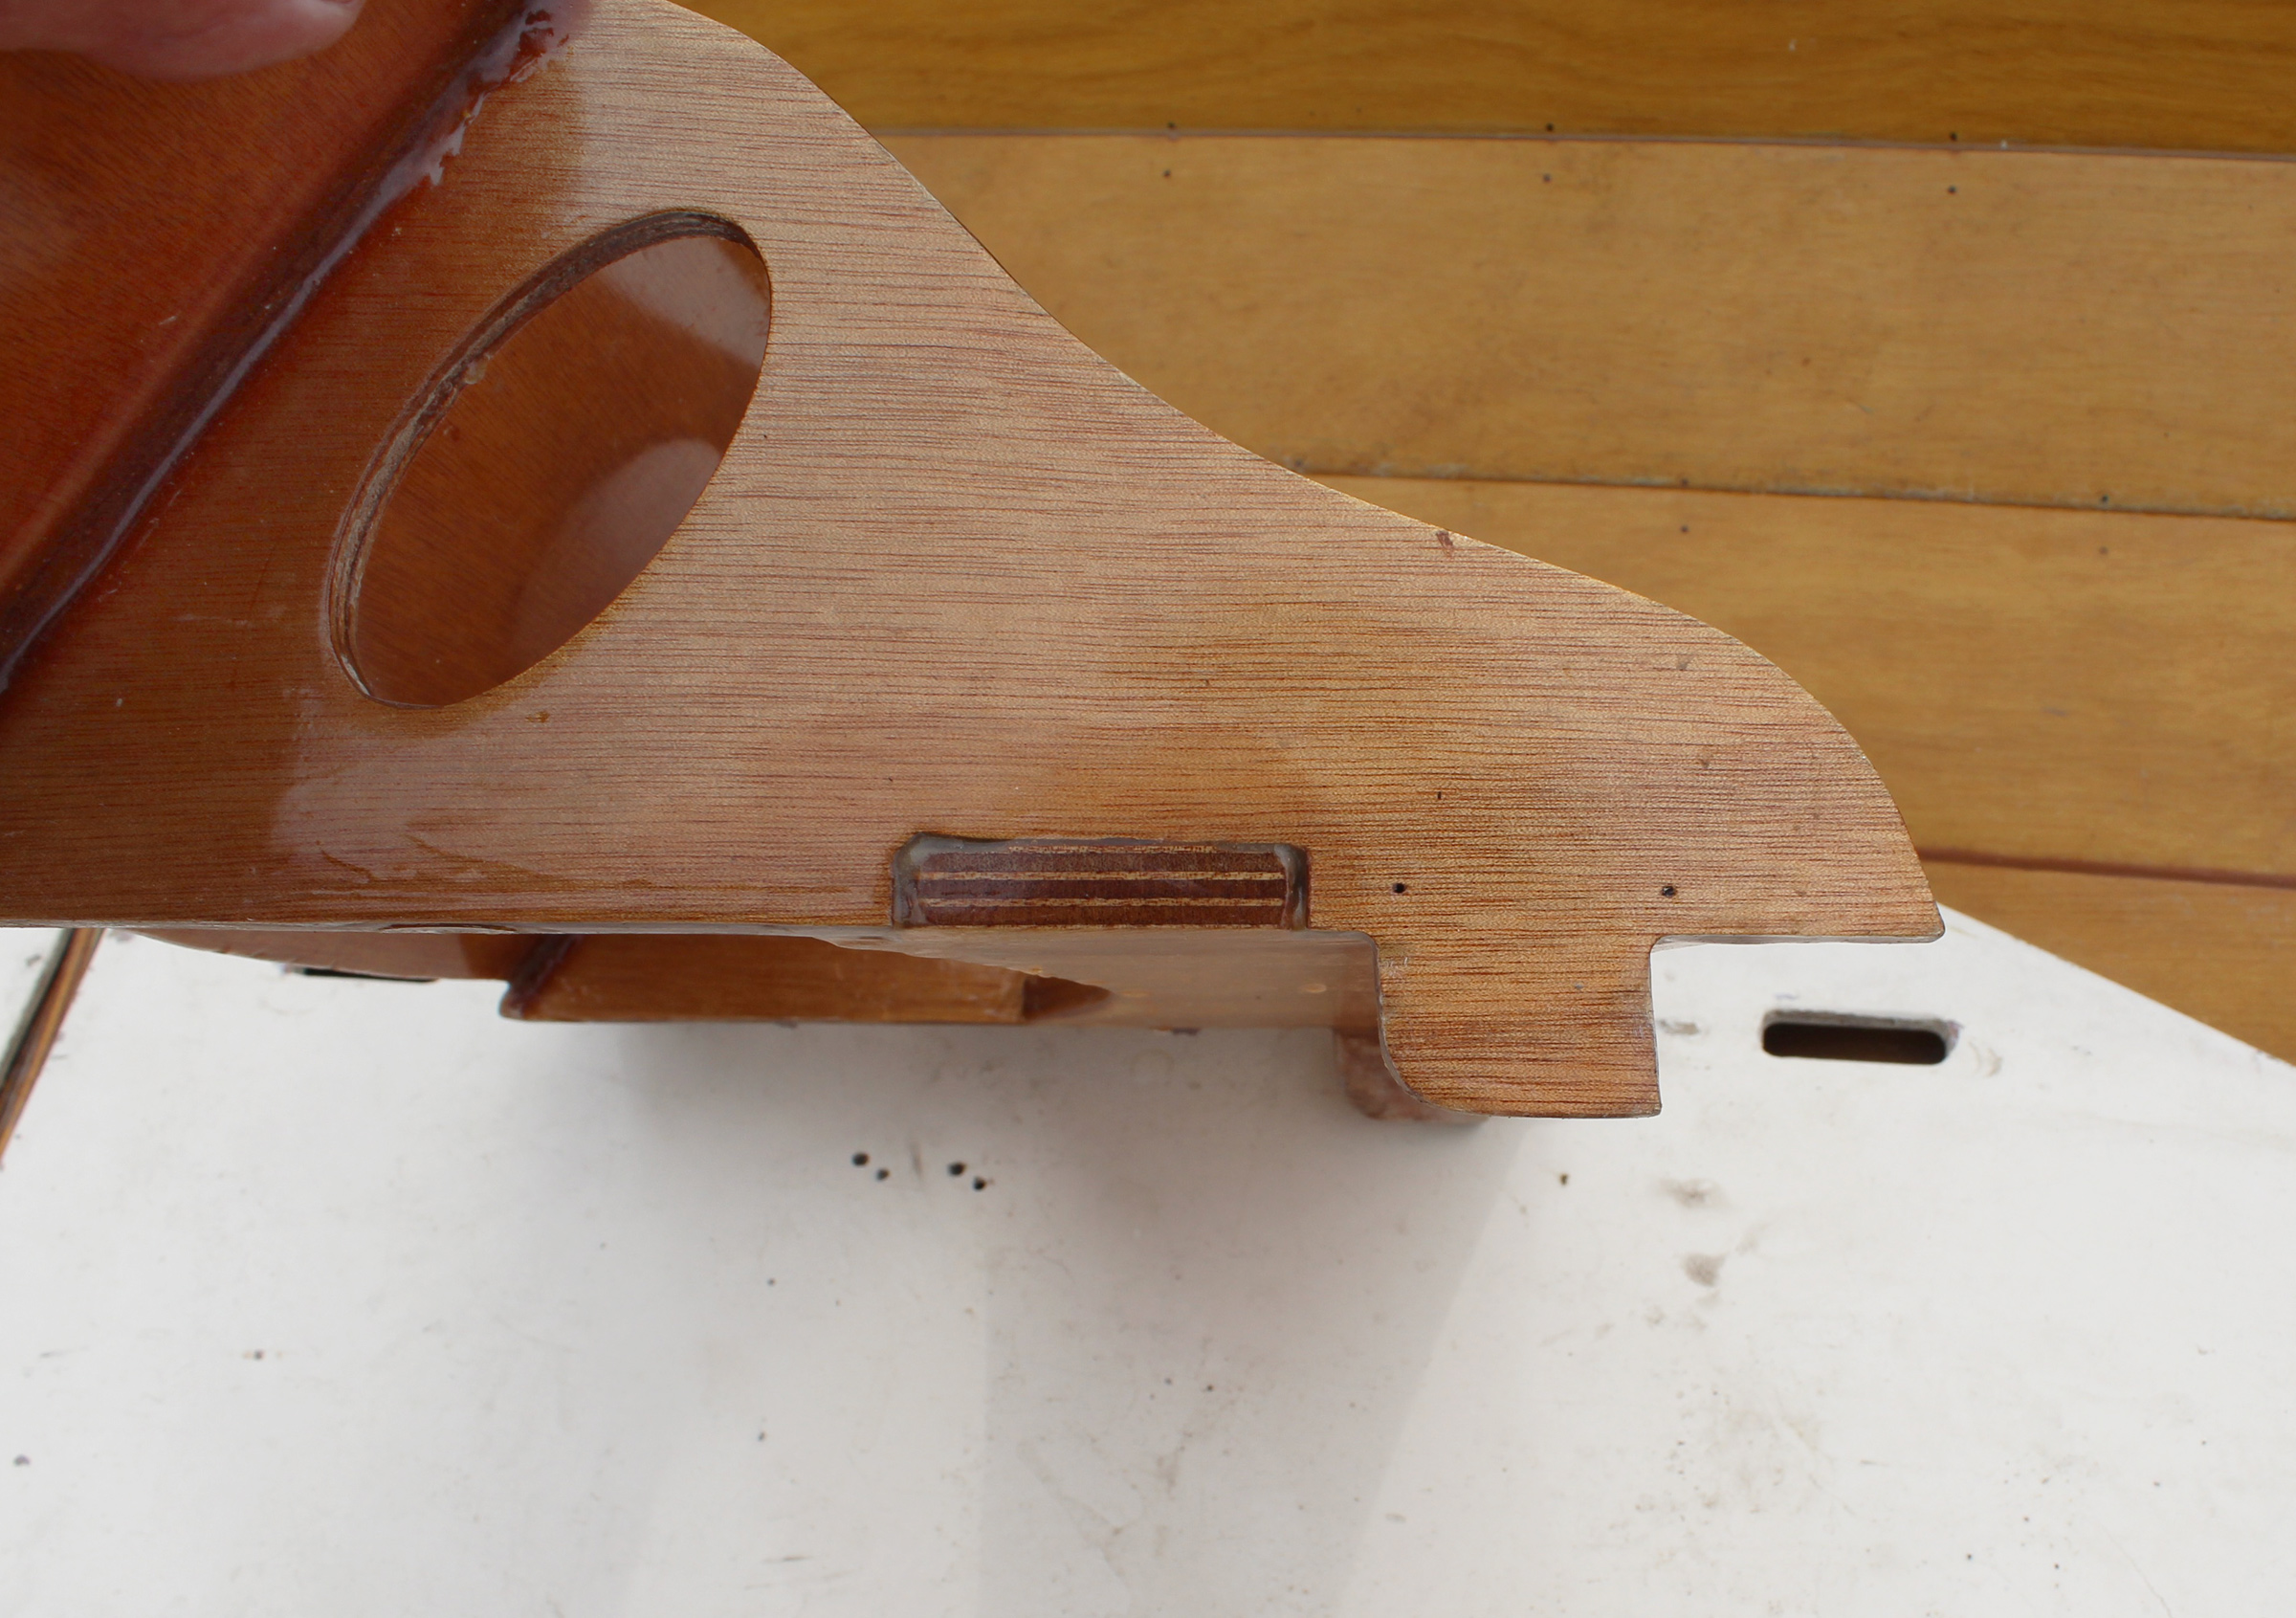
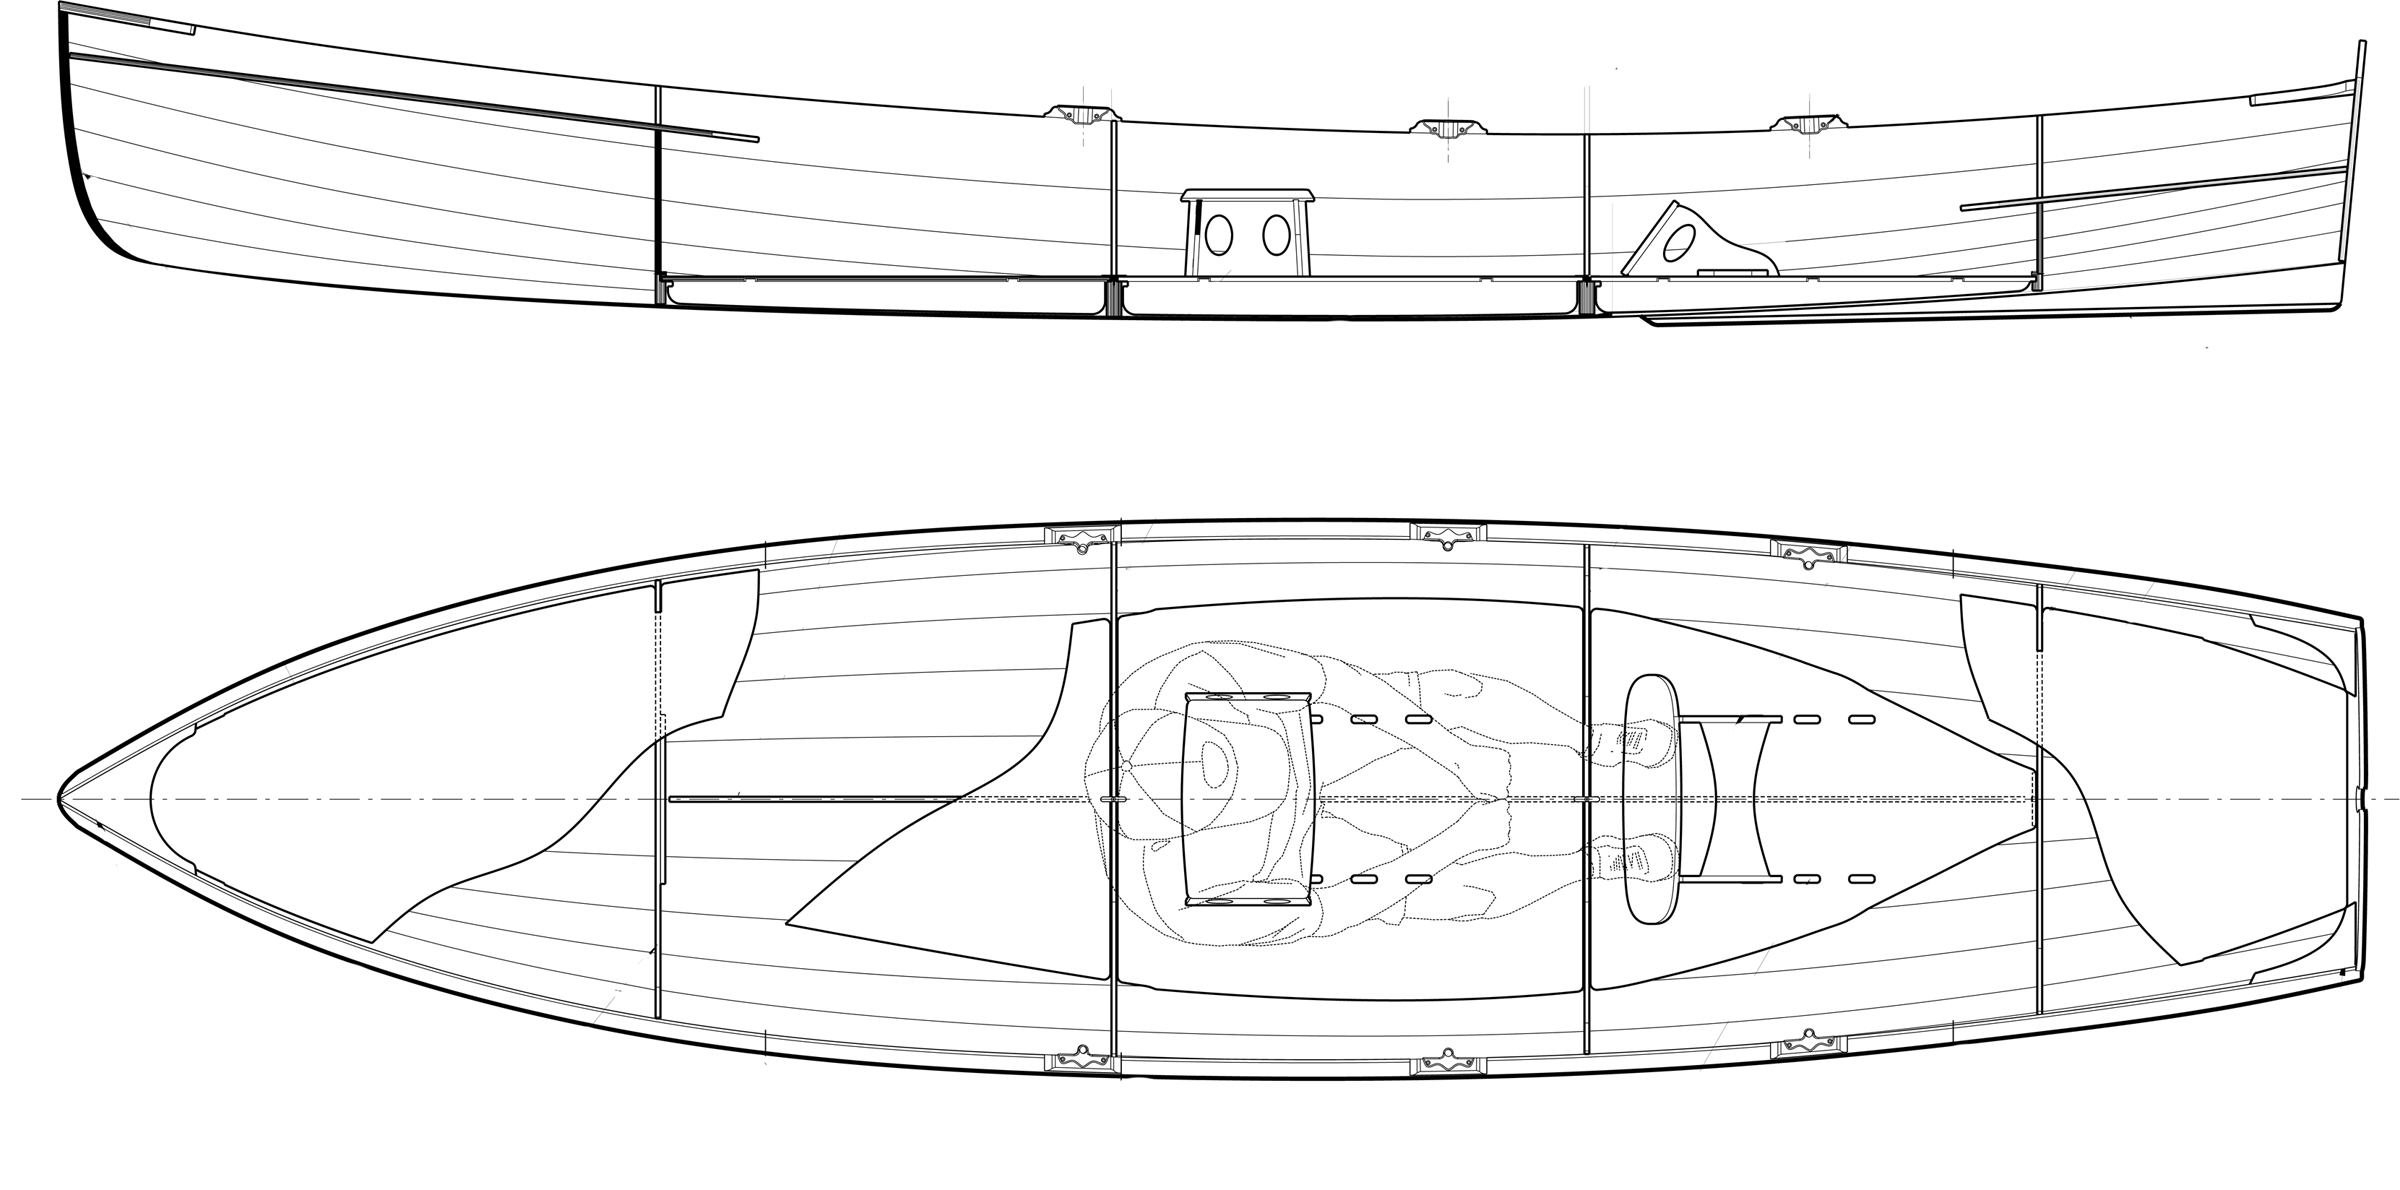
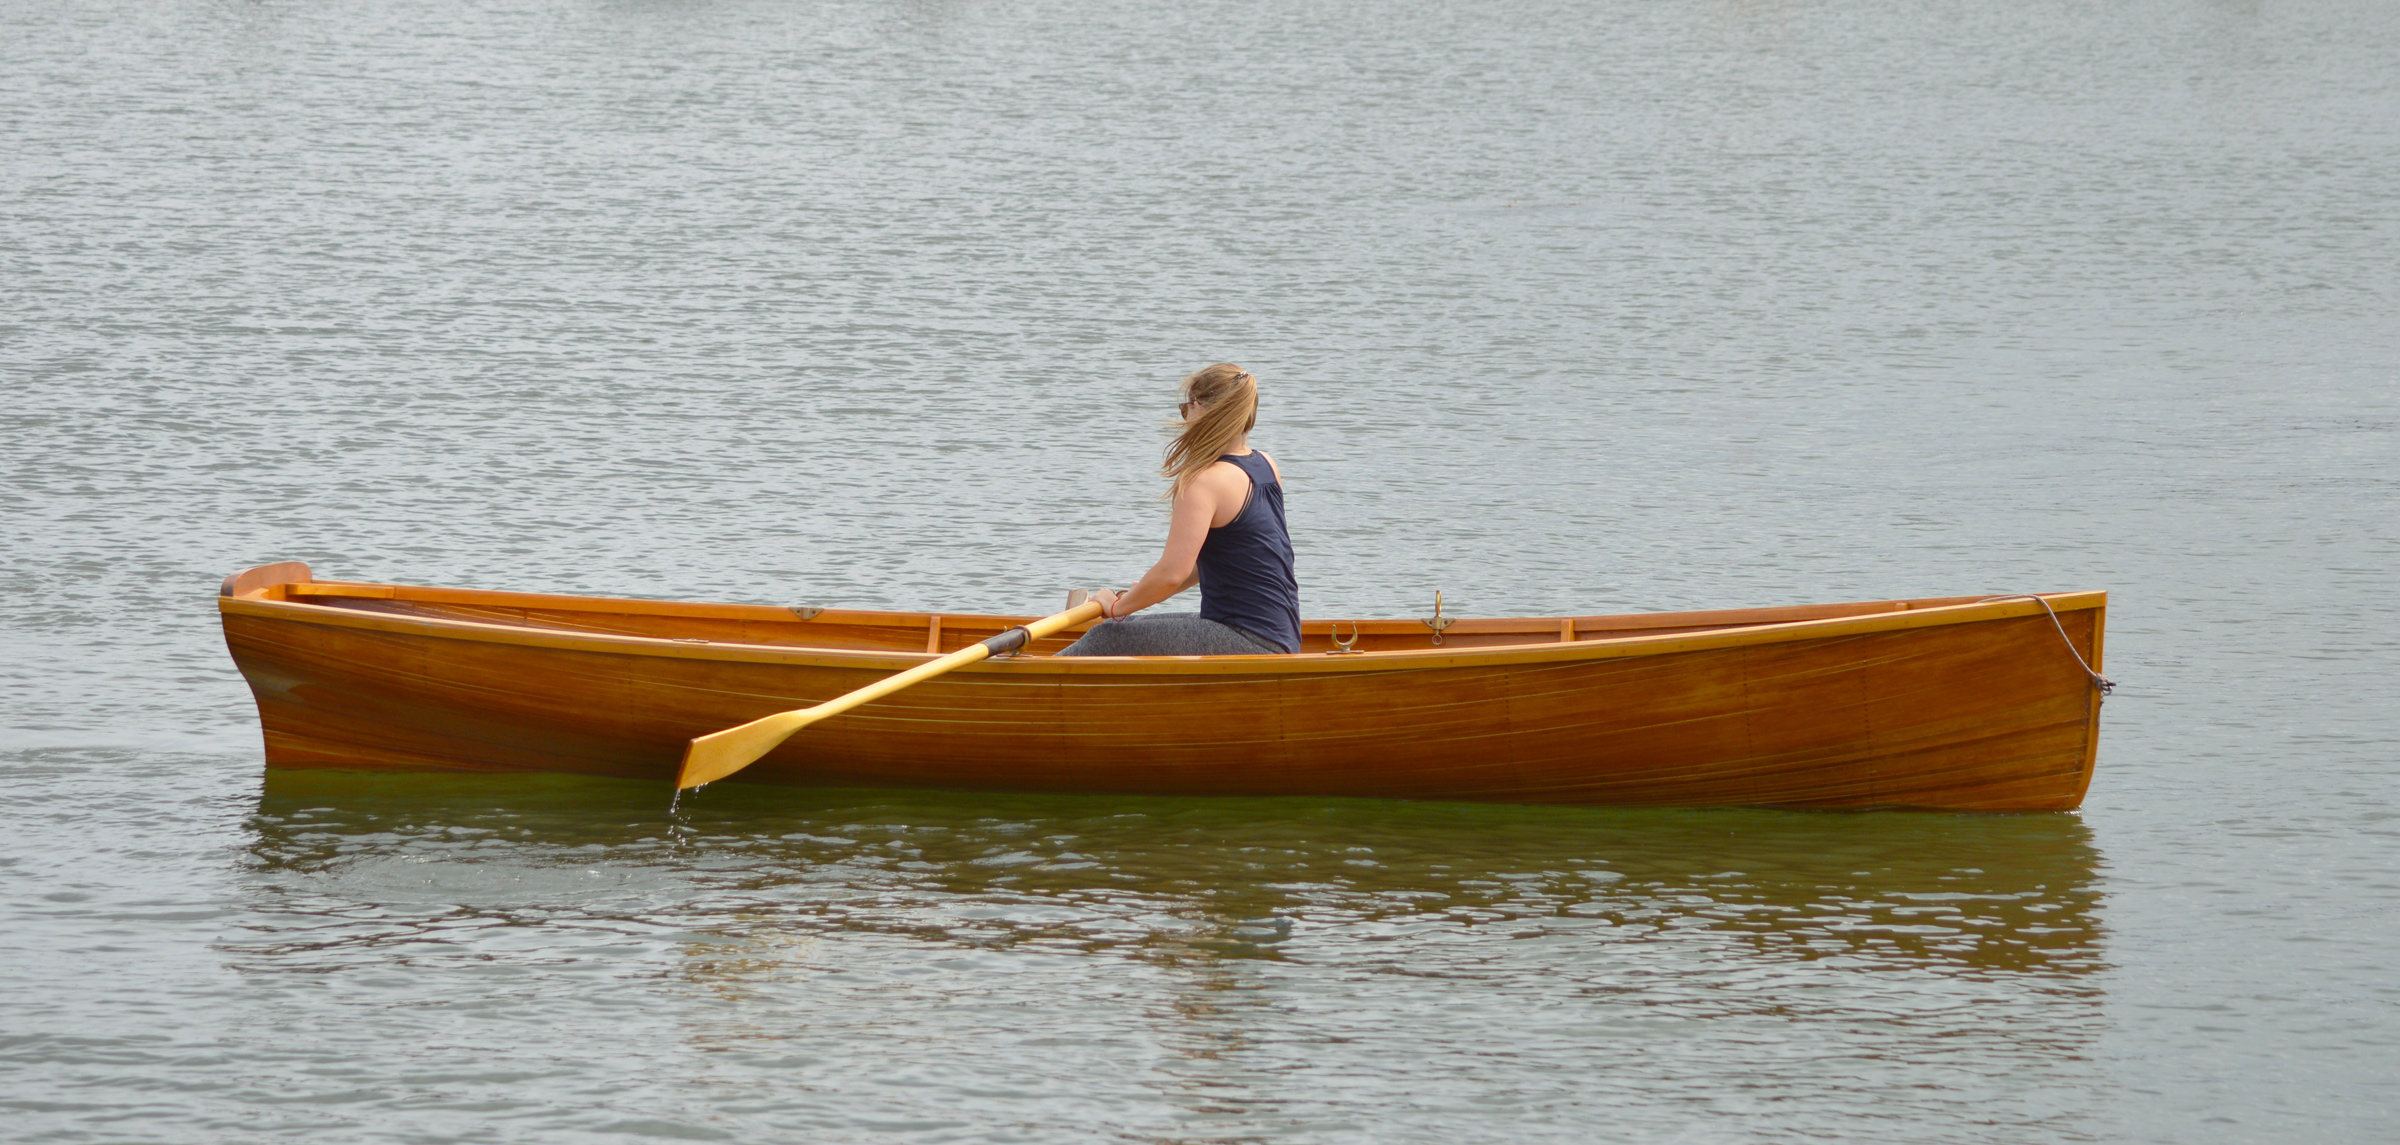
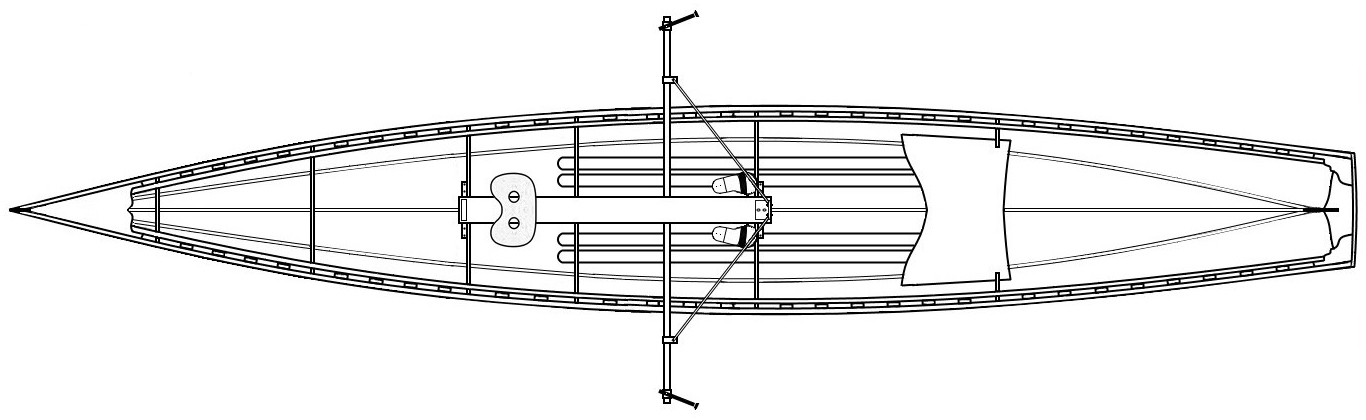
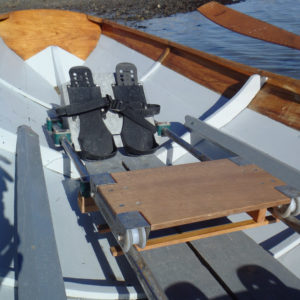
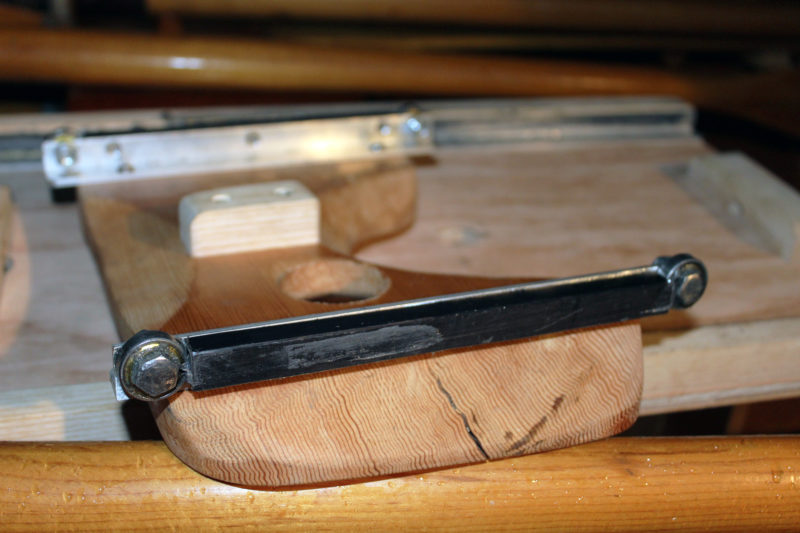
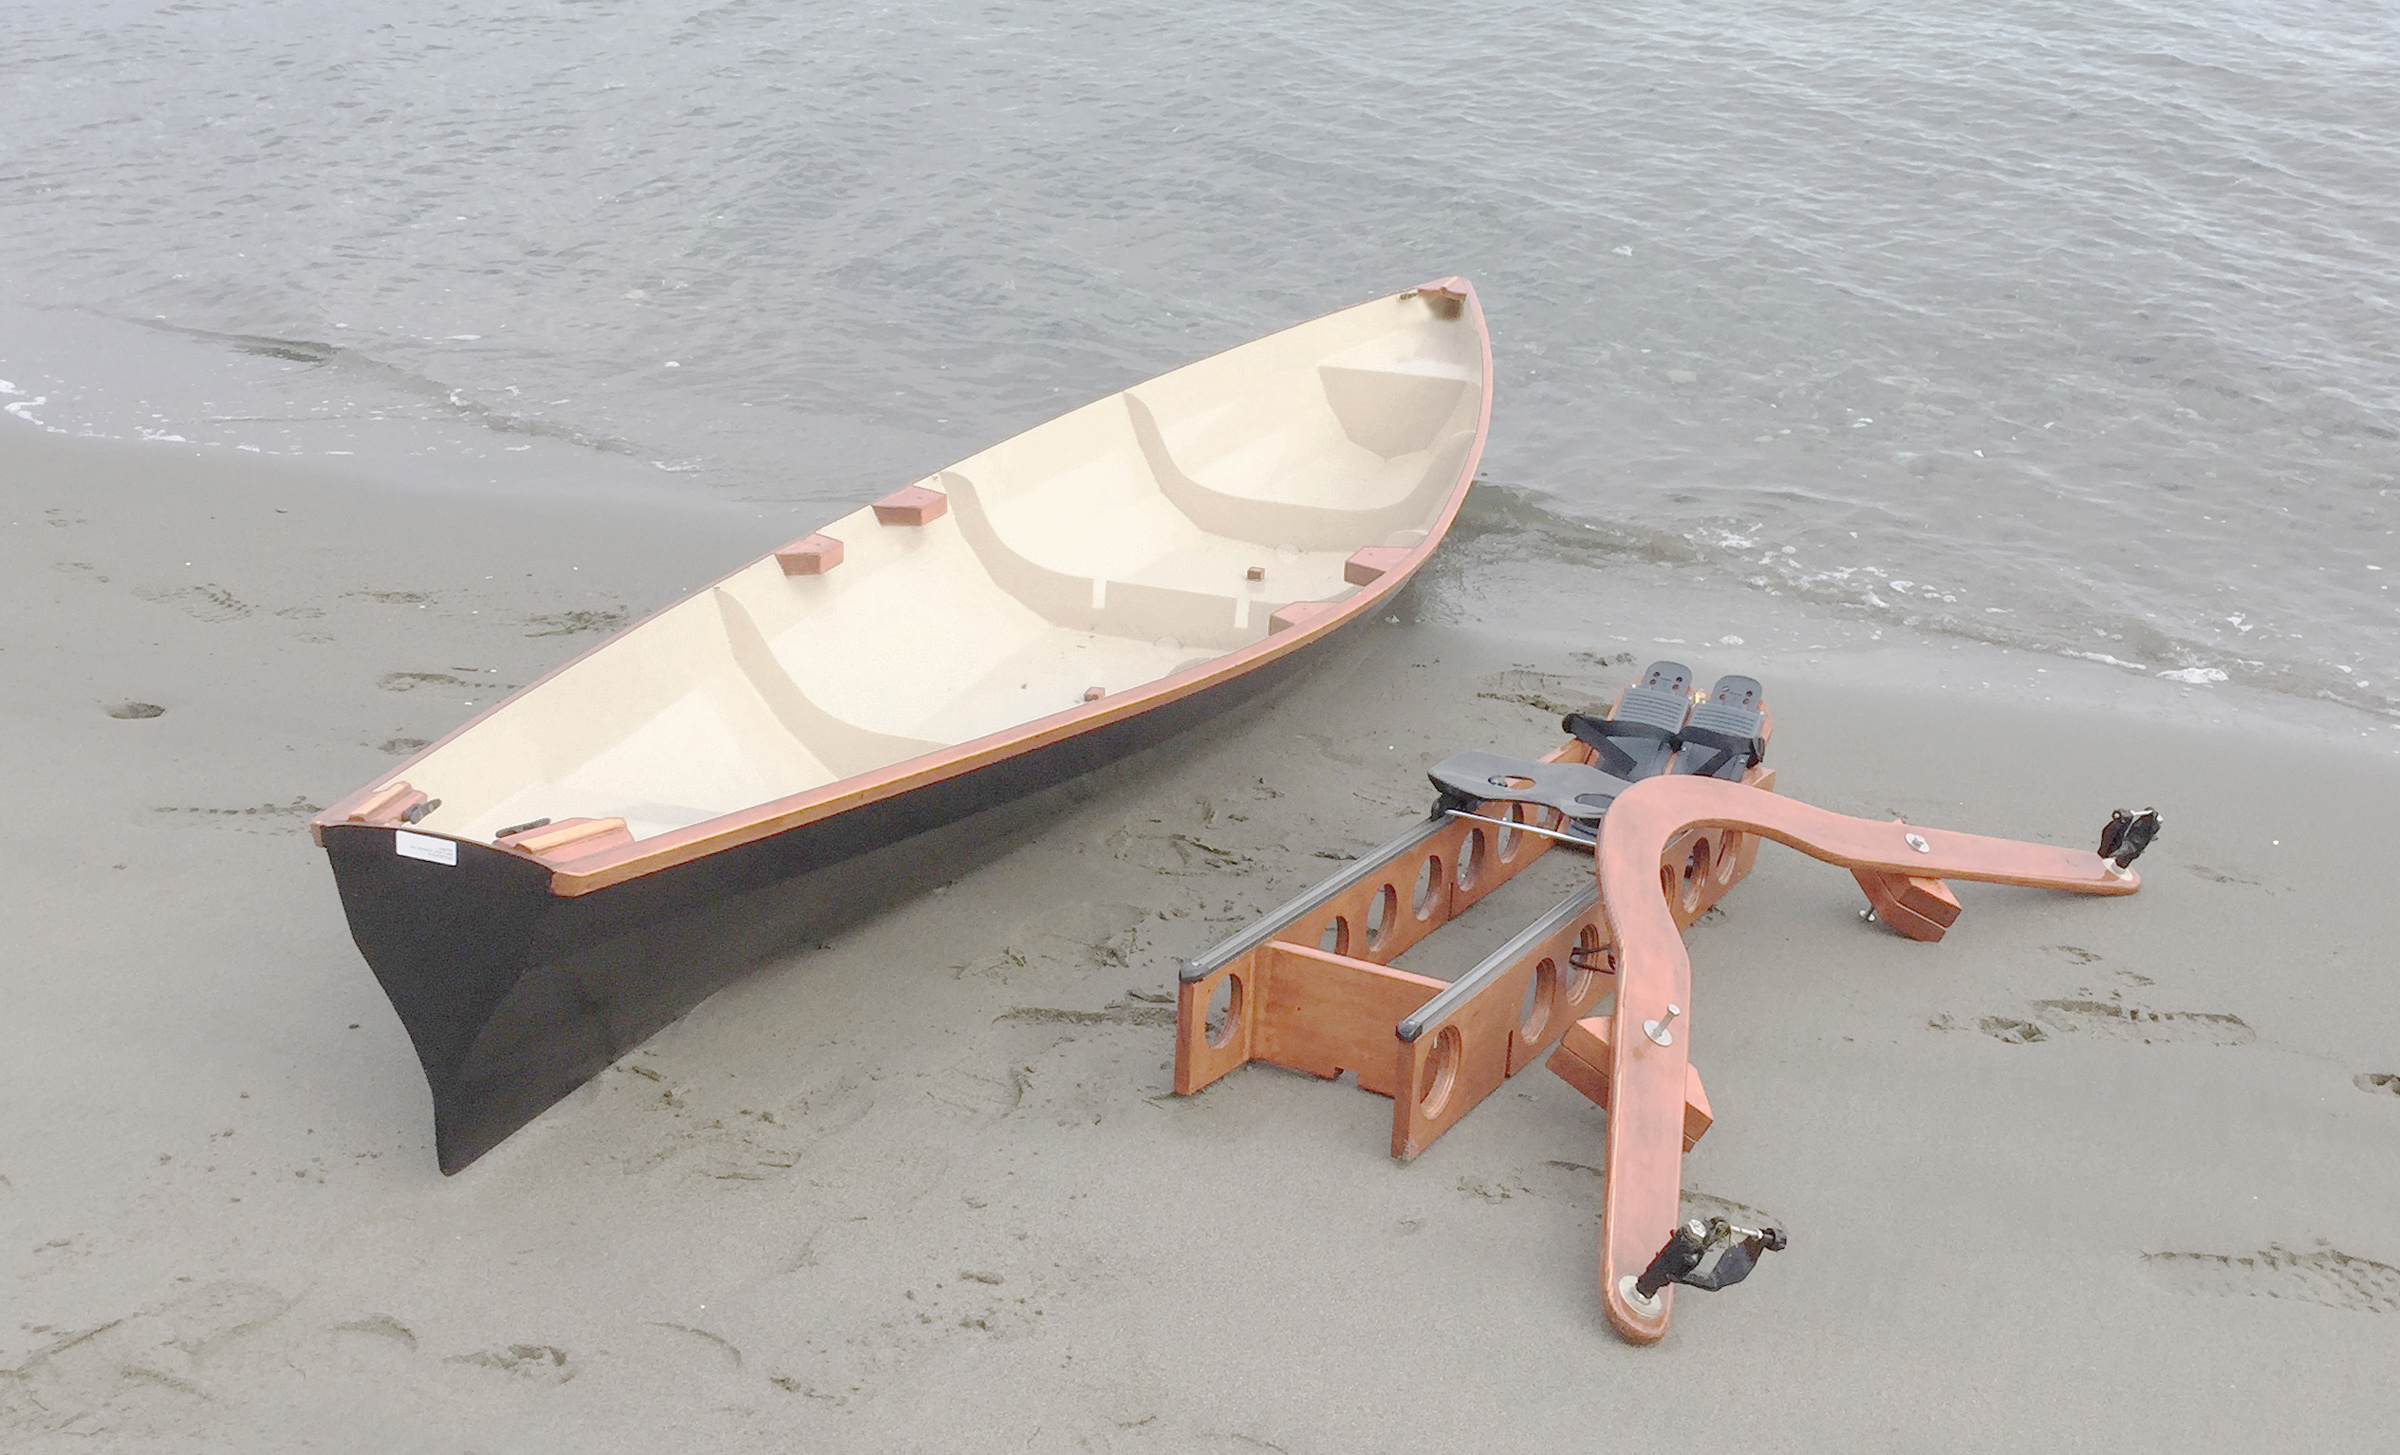
The instructions next called for seat installation. The kit comes with three precut cedar thwarts, but I had decided to equip the hull with a sliding seat. A commercial drop-in rig, like the Piantedosi RowWing, would fit the Oxford wherry, but I purchased the Angus sliding seat/rigger hardware kit with a carbon-fiber seat. I used clear vertical-grain Sitka spruce, as recommended by the instructions, for both the rigger and seat rails. The rigger has a span of 64” and is made of two pieces of spruce. A 1-1/2″ -wide lap joint brings the two 33-1/2″ lengths together and fiberglass is then used to reinforce it. This piece is the most beautiful length of wood I’ve ever fashioned.

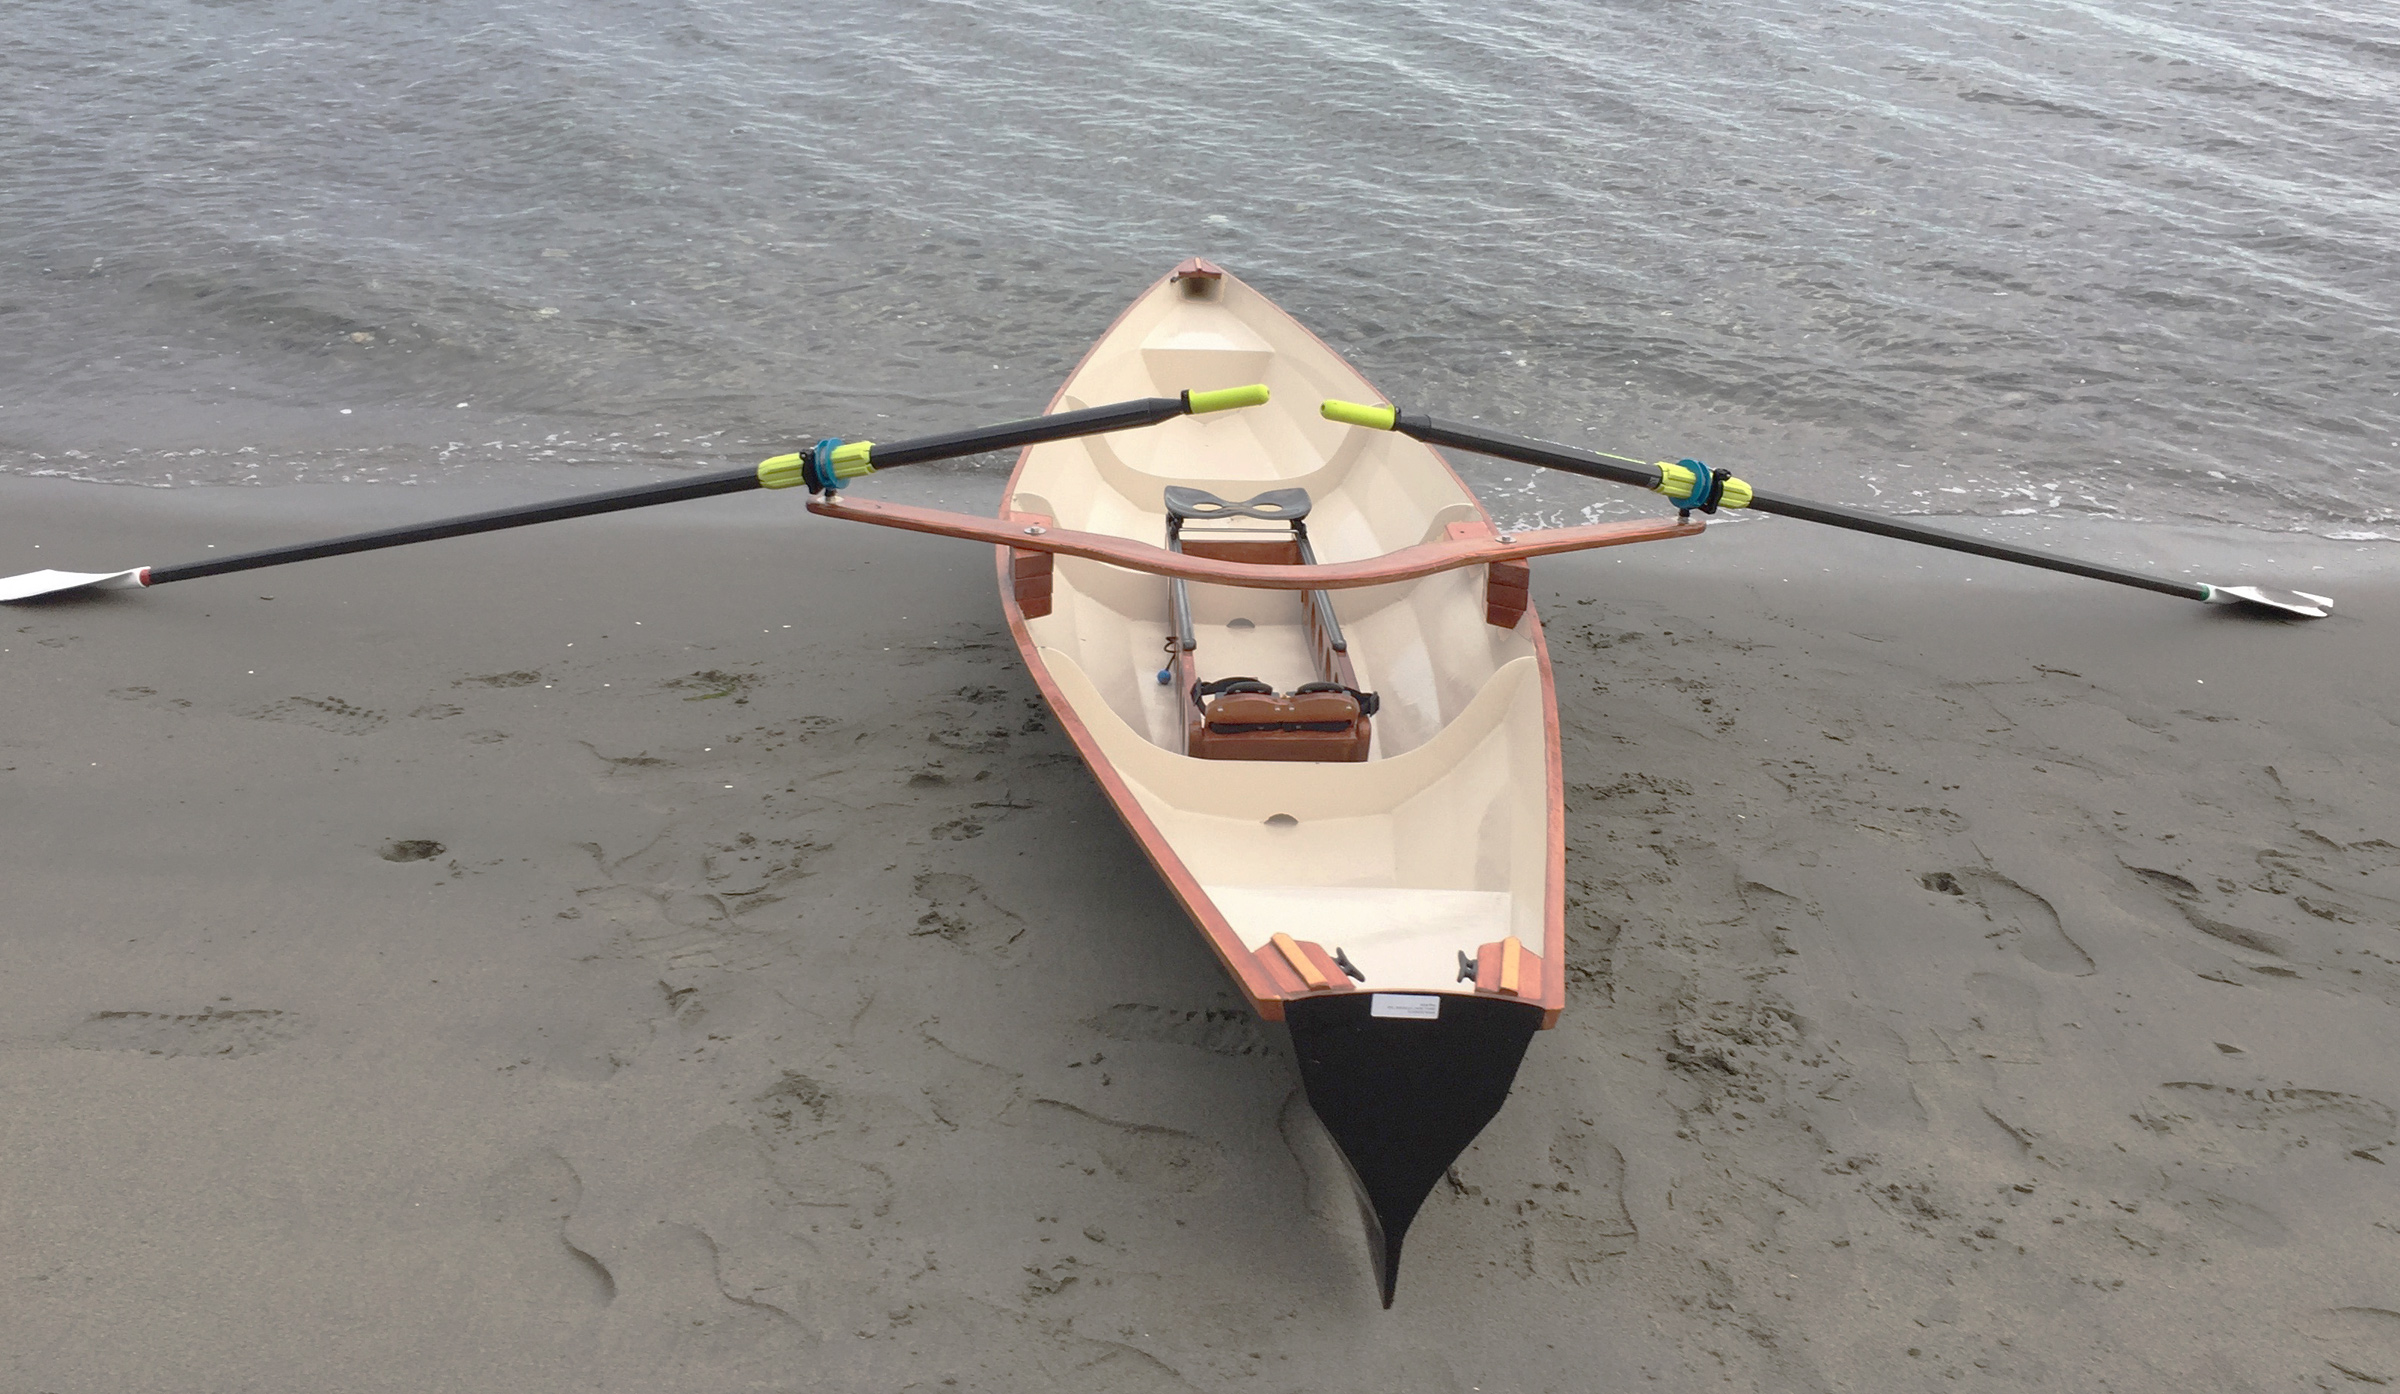
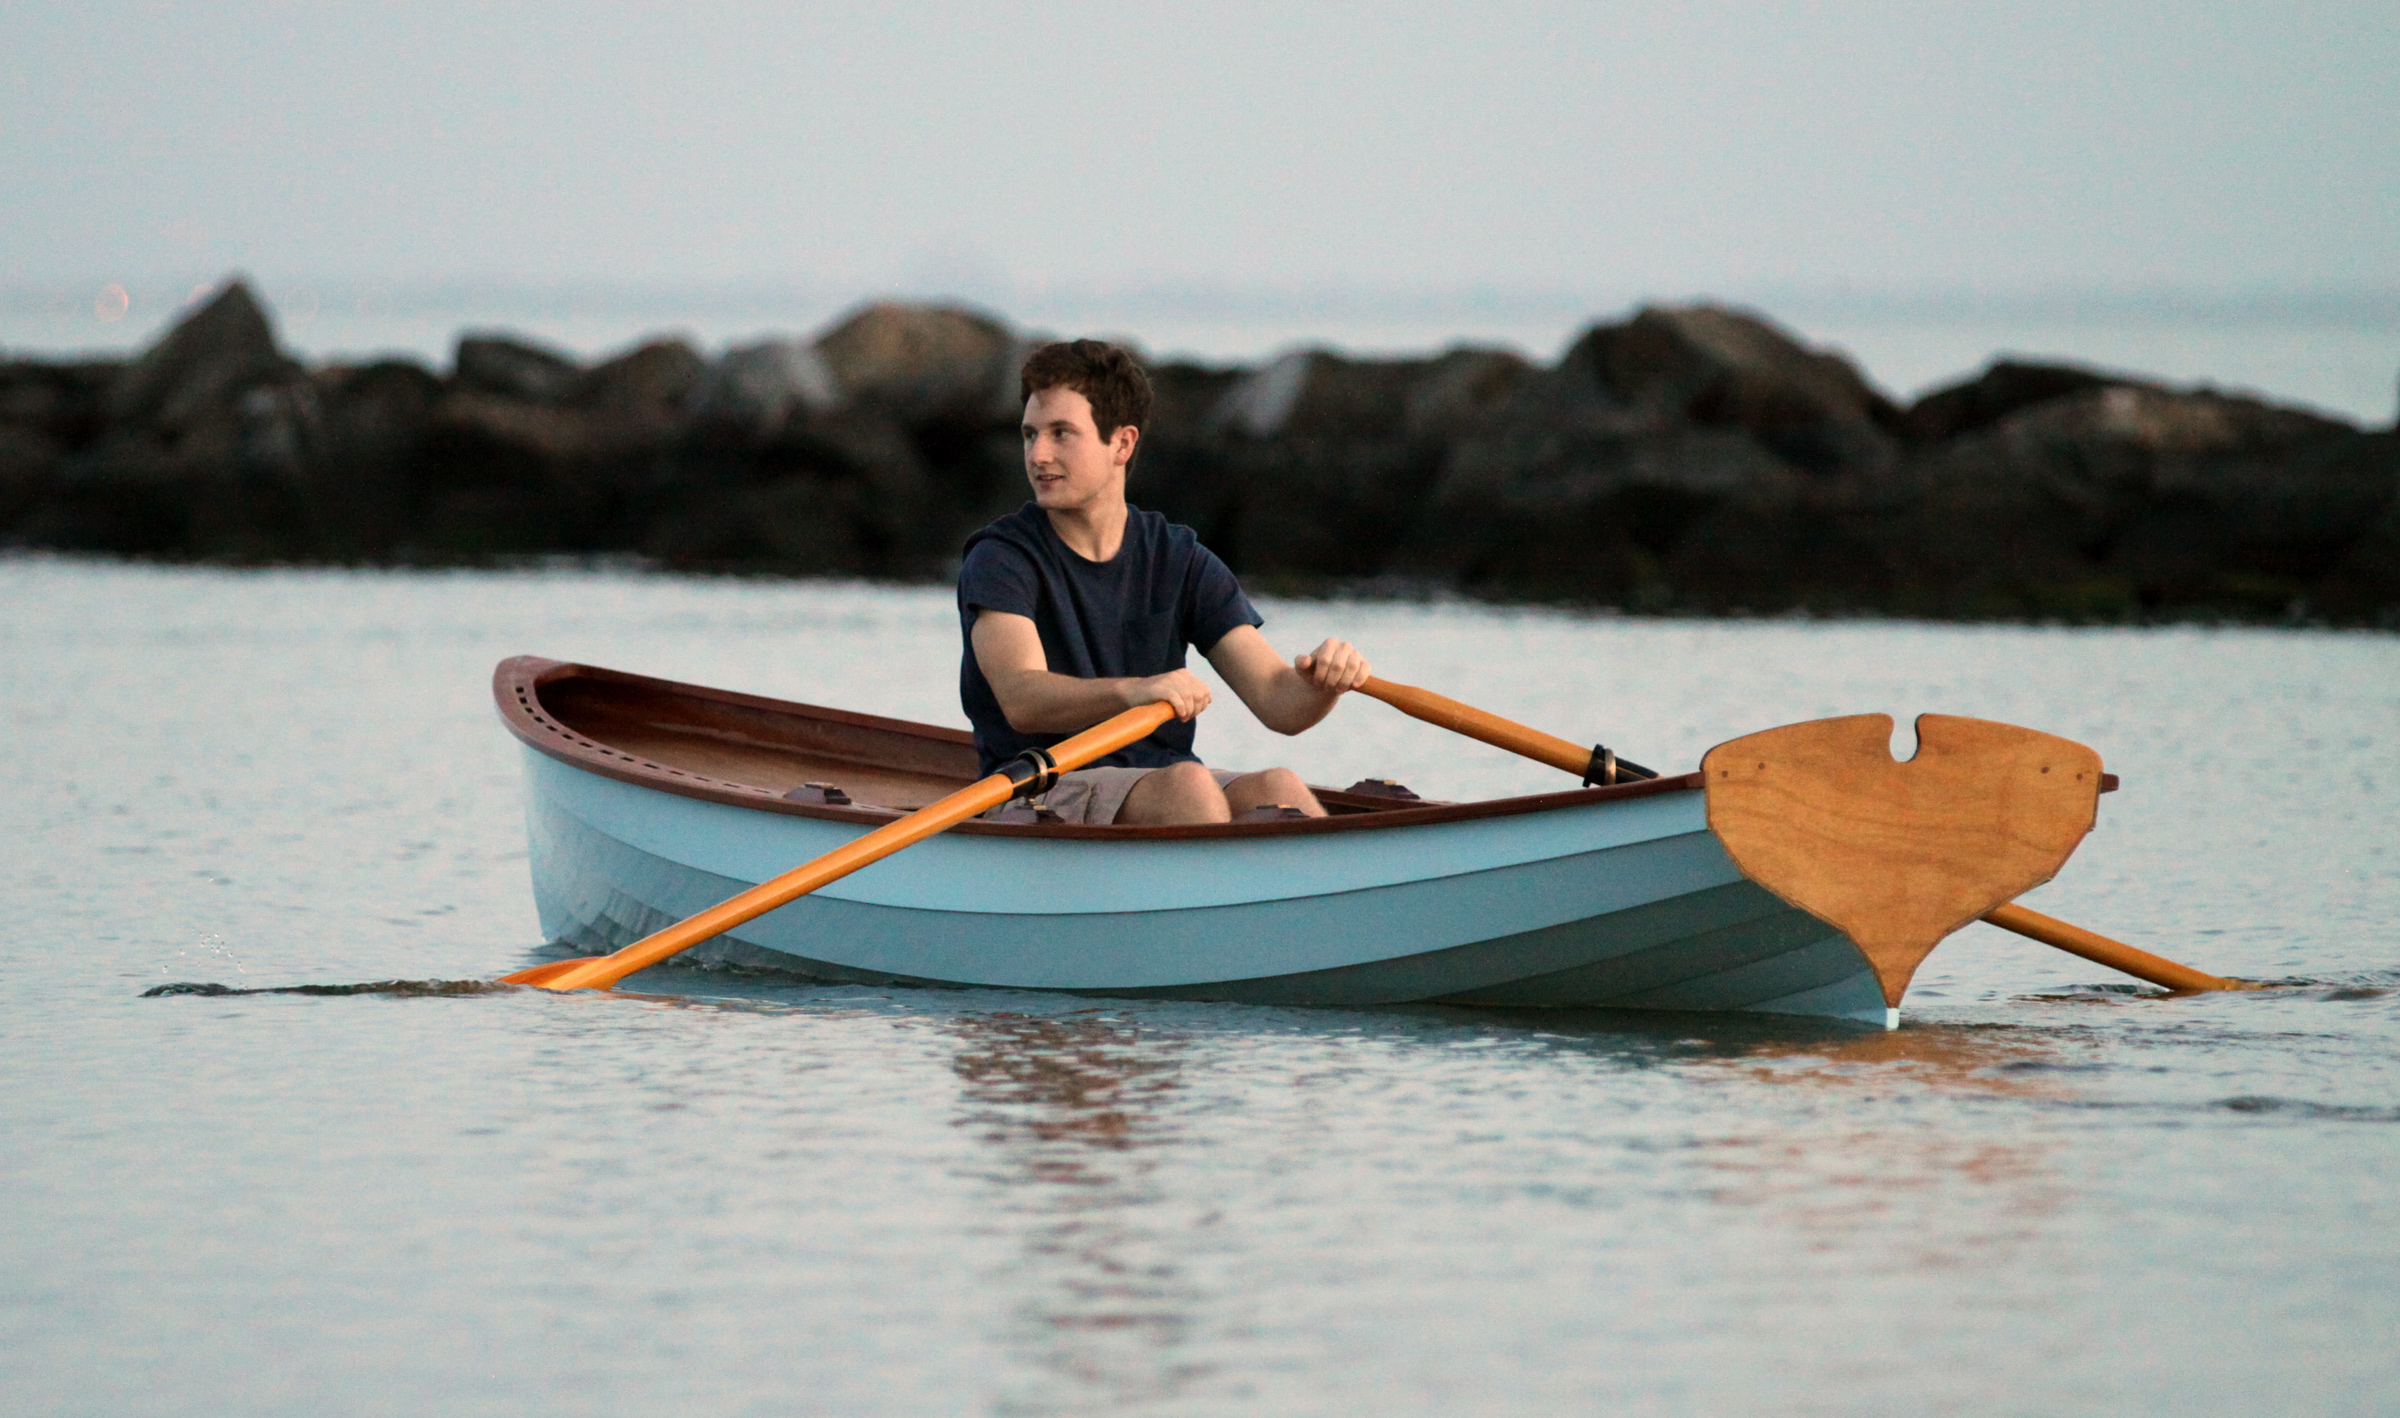
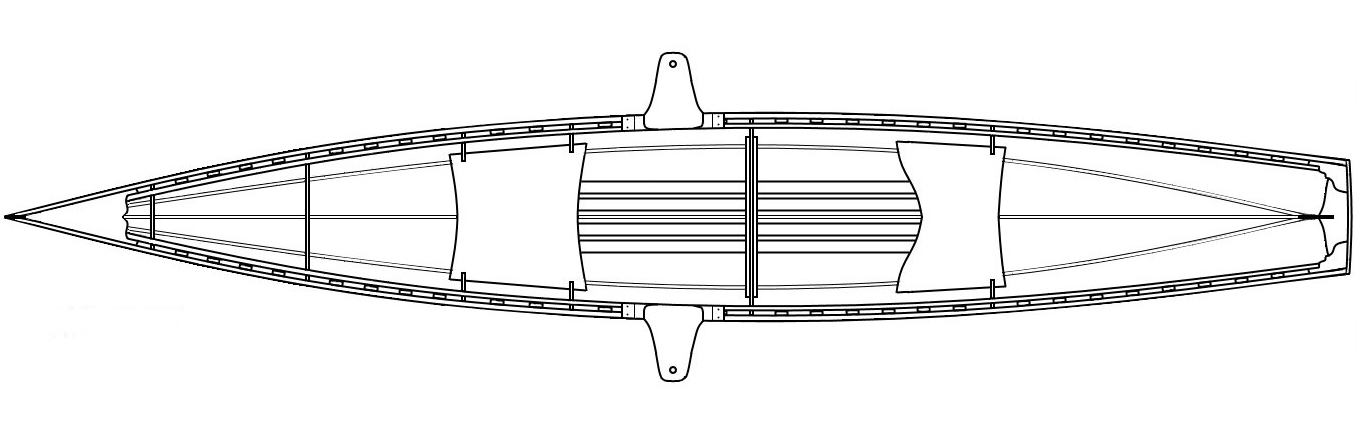
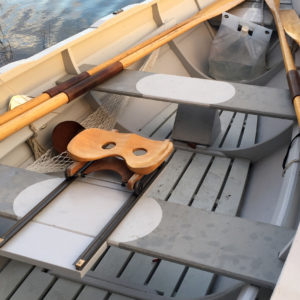
An alternative to the sliding seat rig is the installation of fixed thwarts at each of the three frames and a pair of short wooden outriggers.


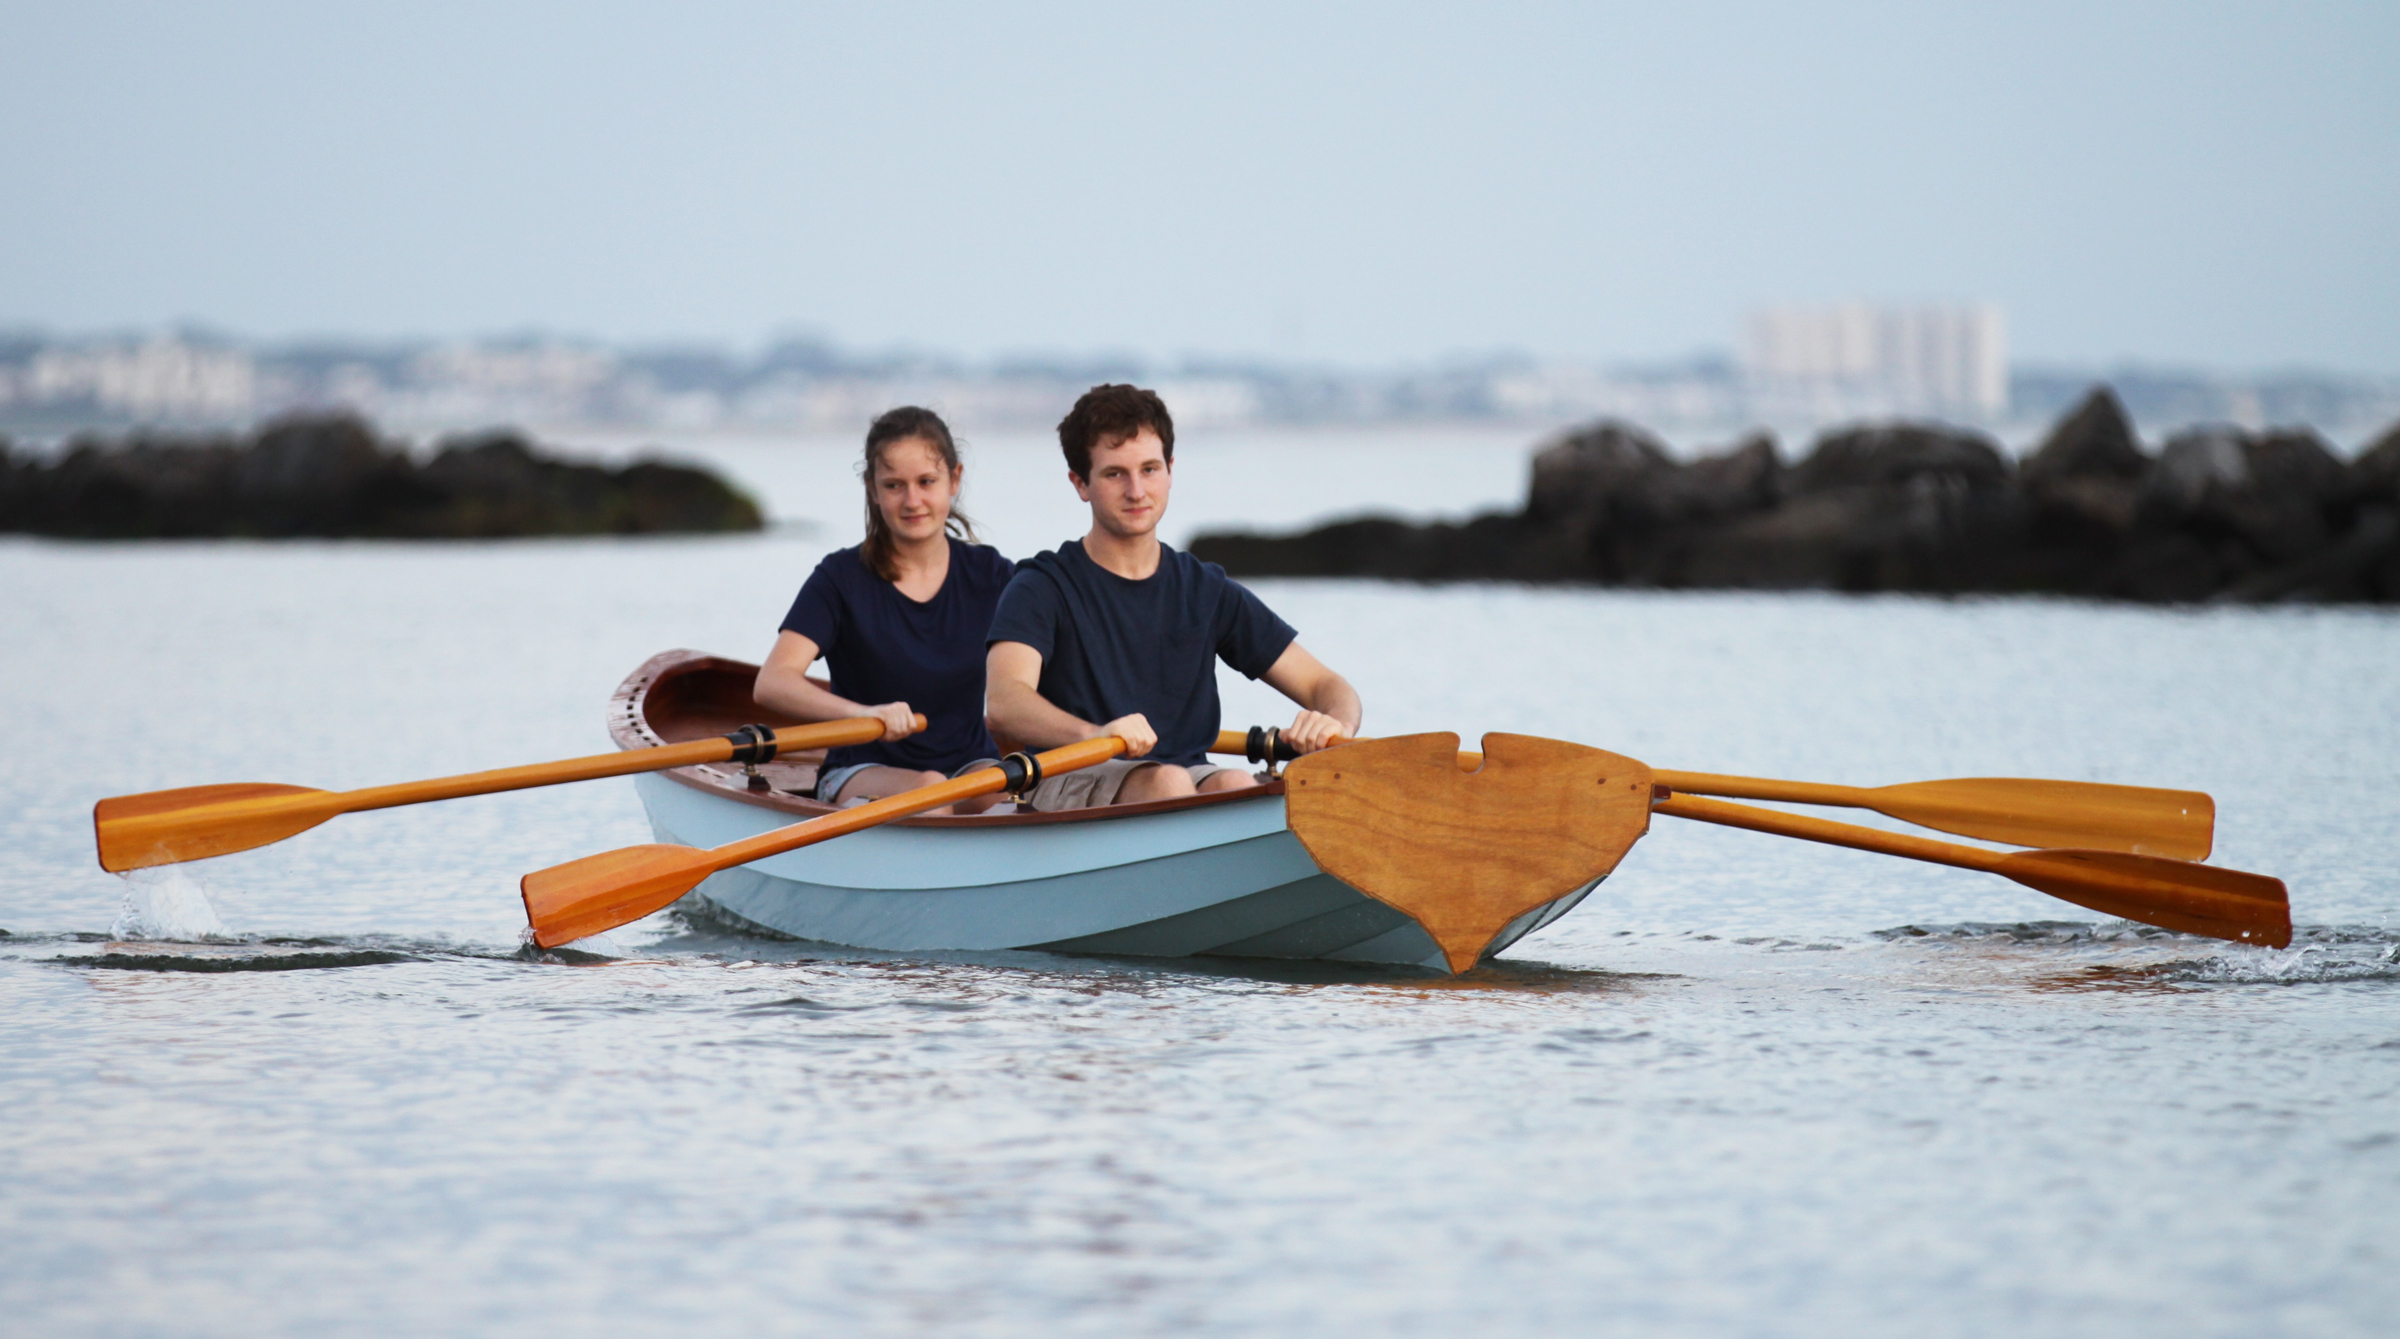
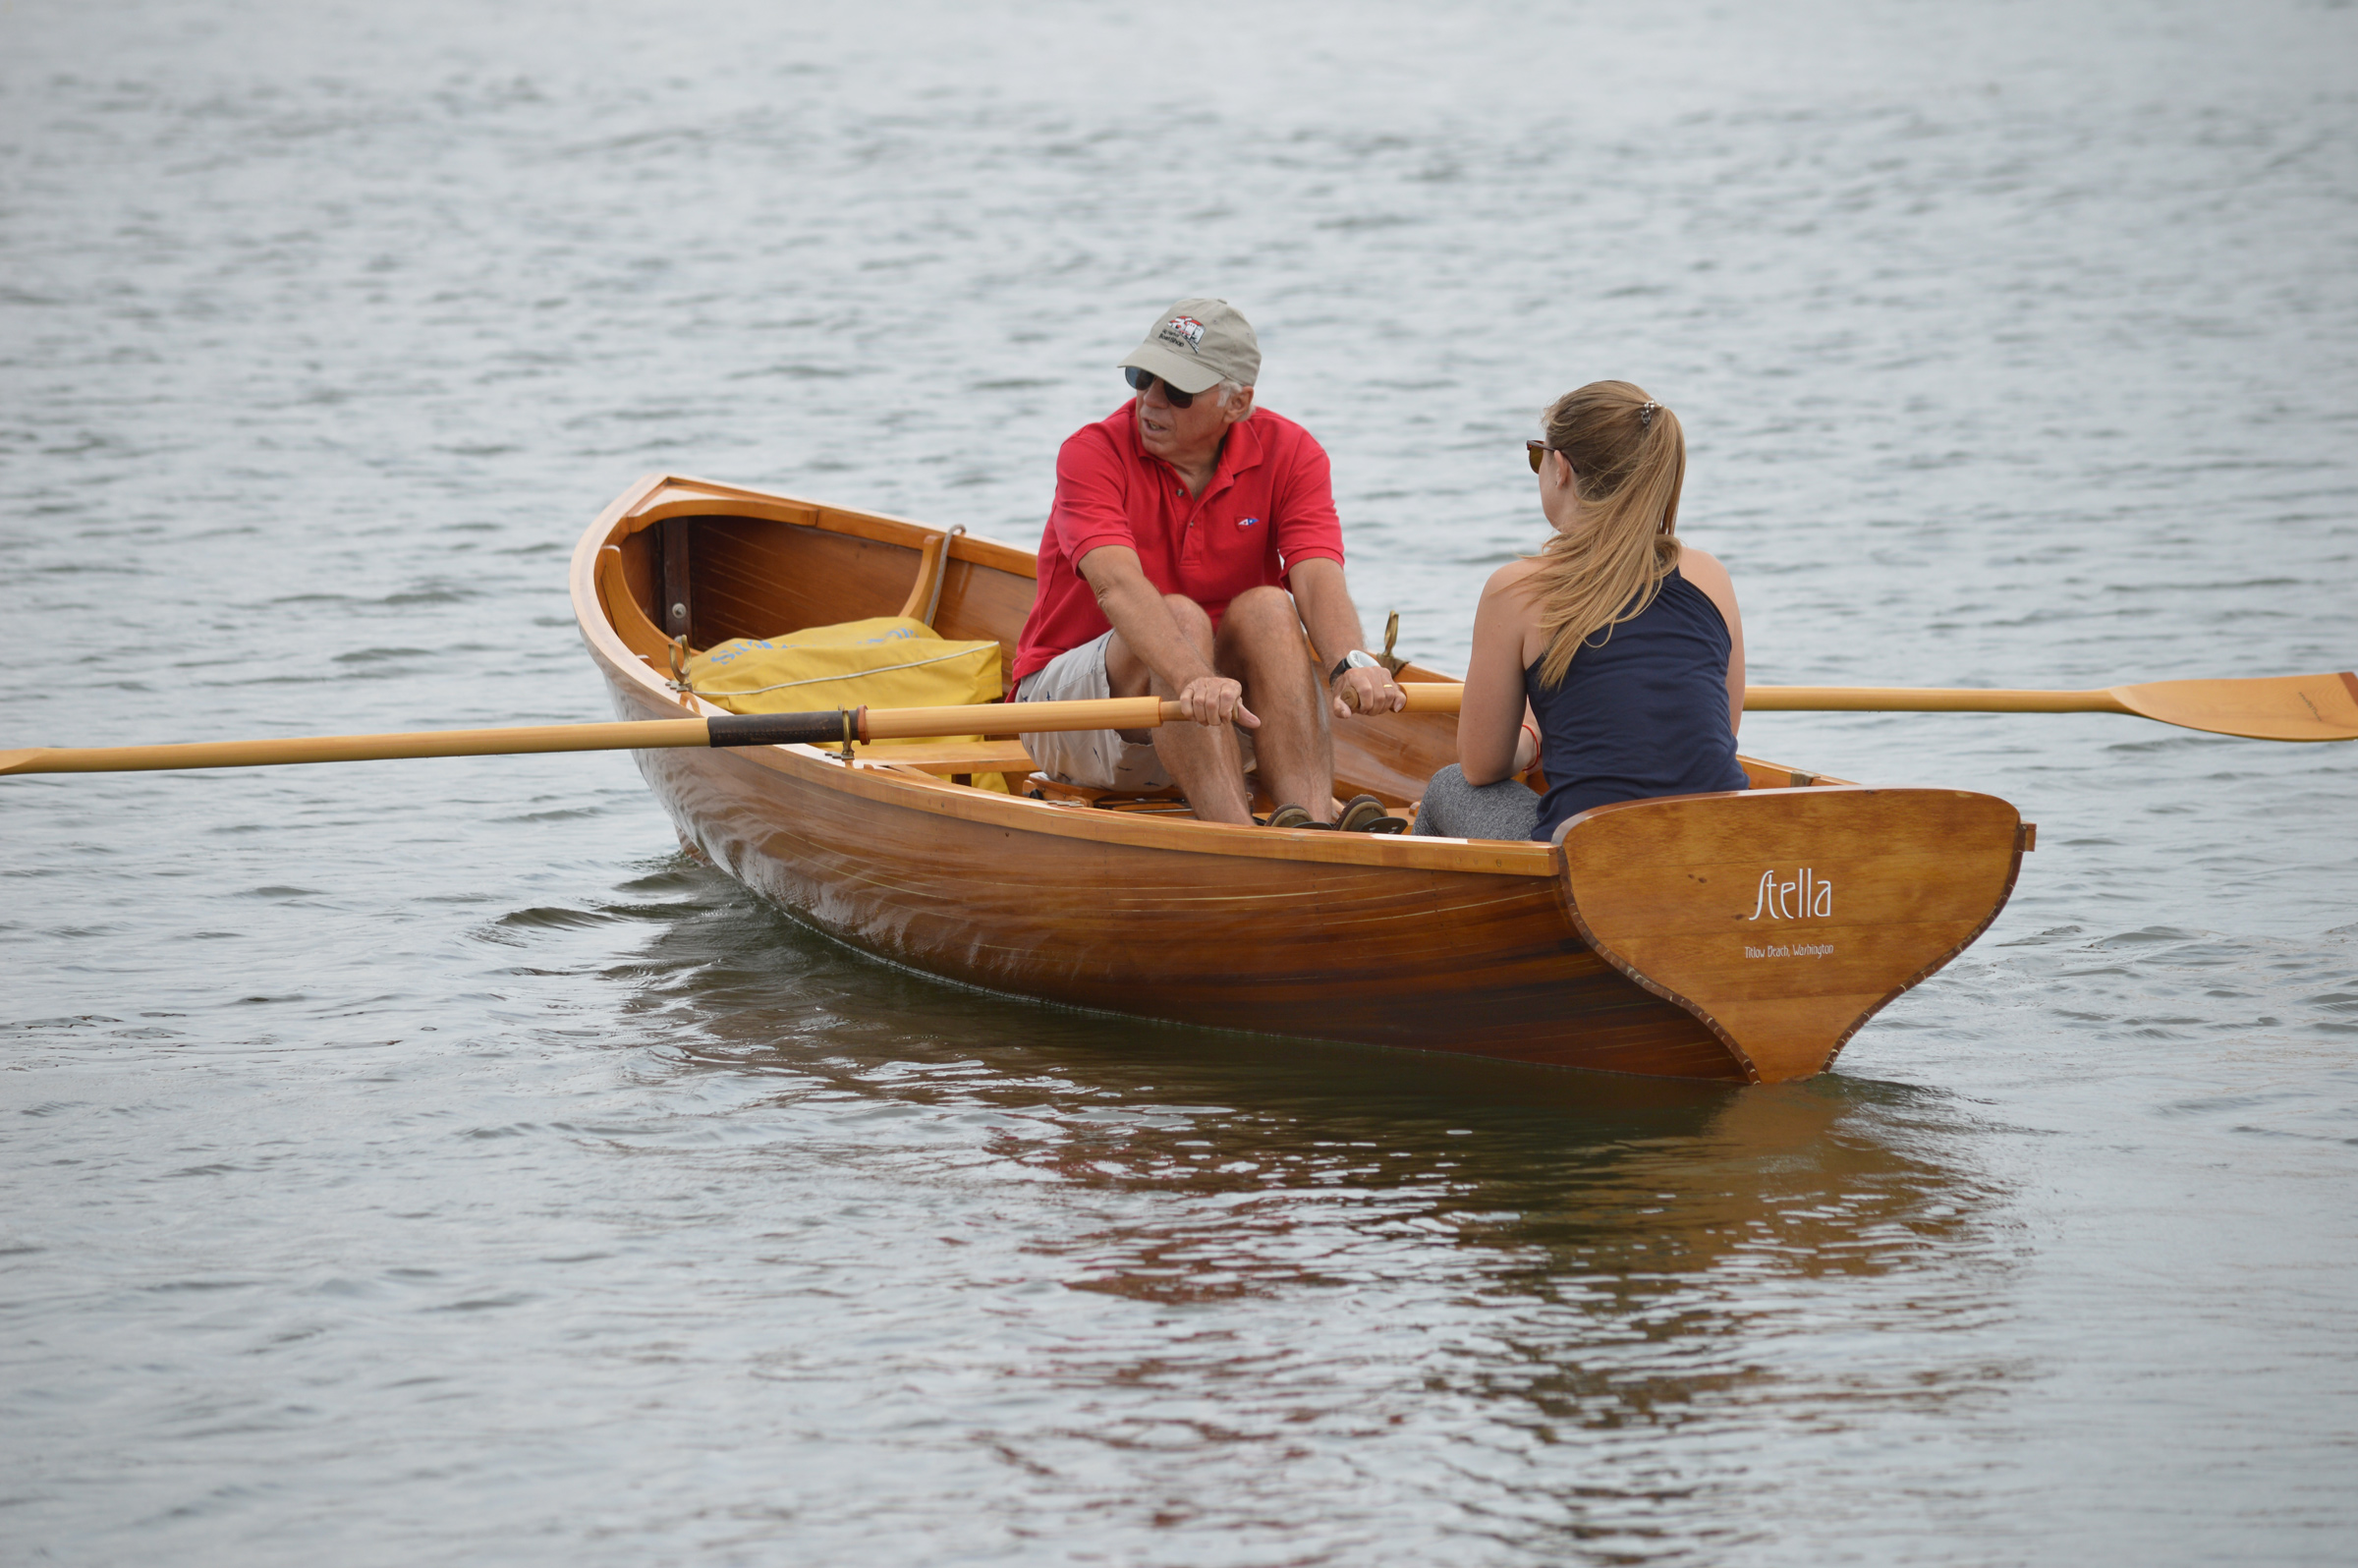
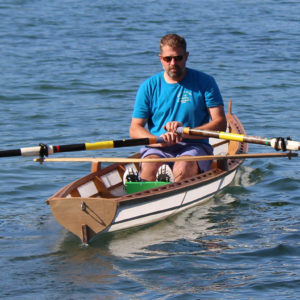
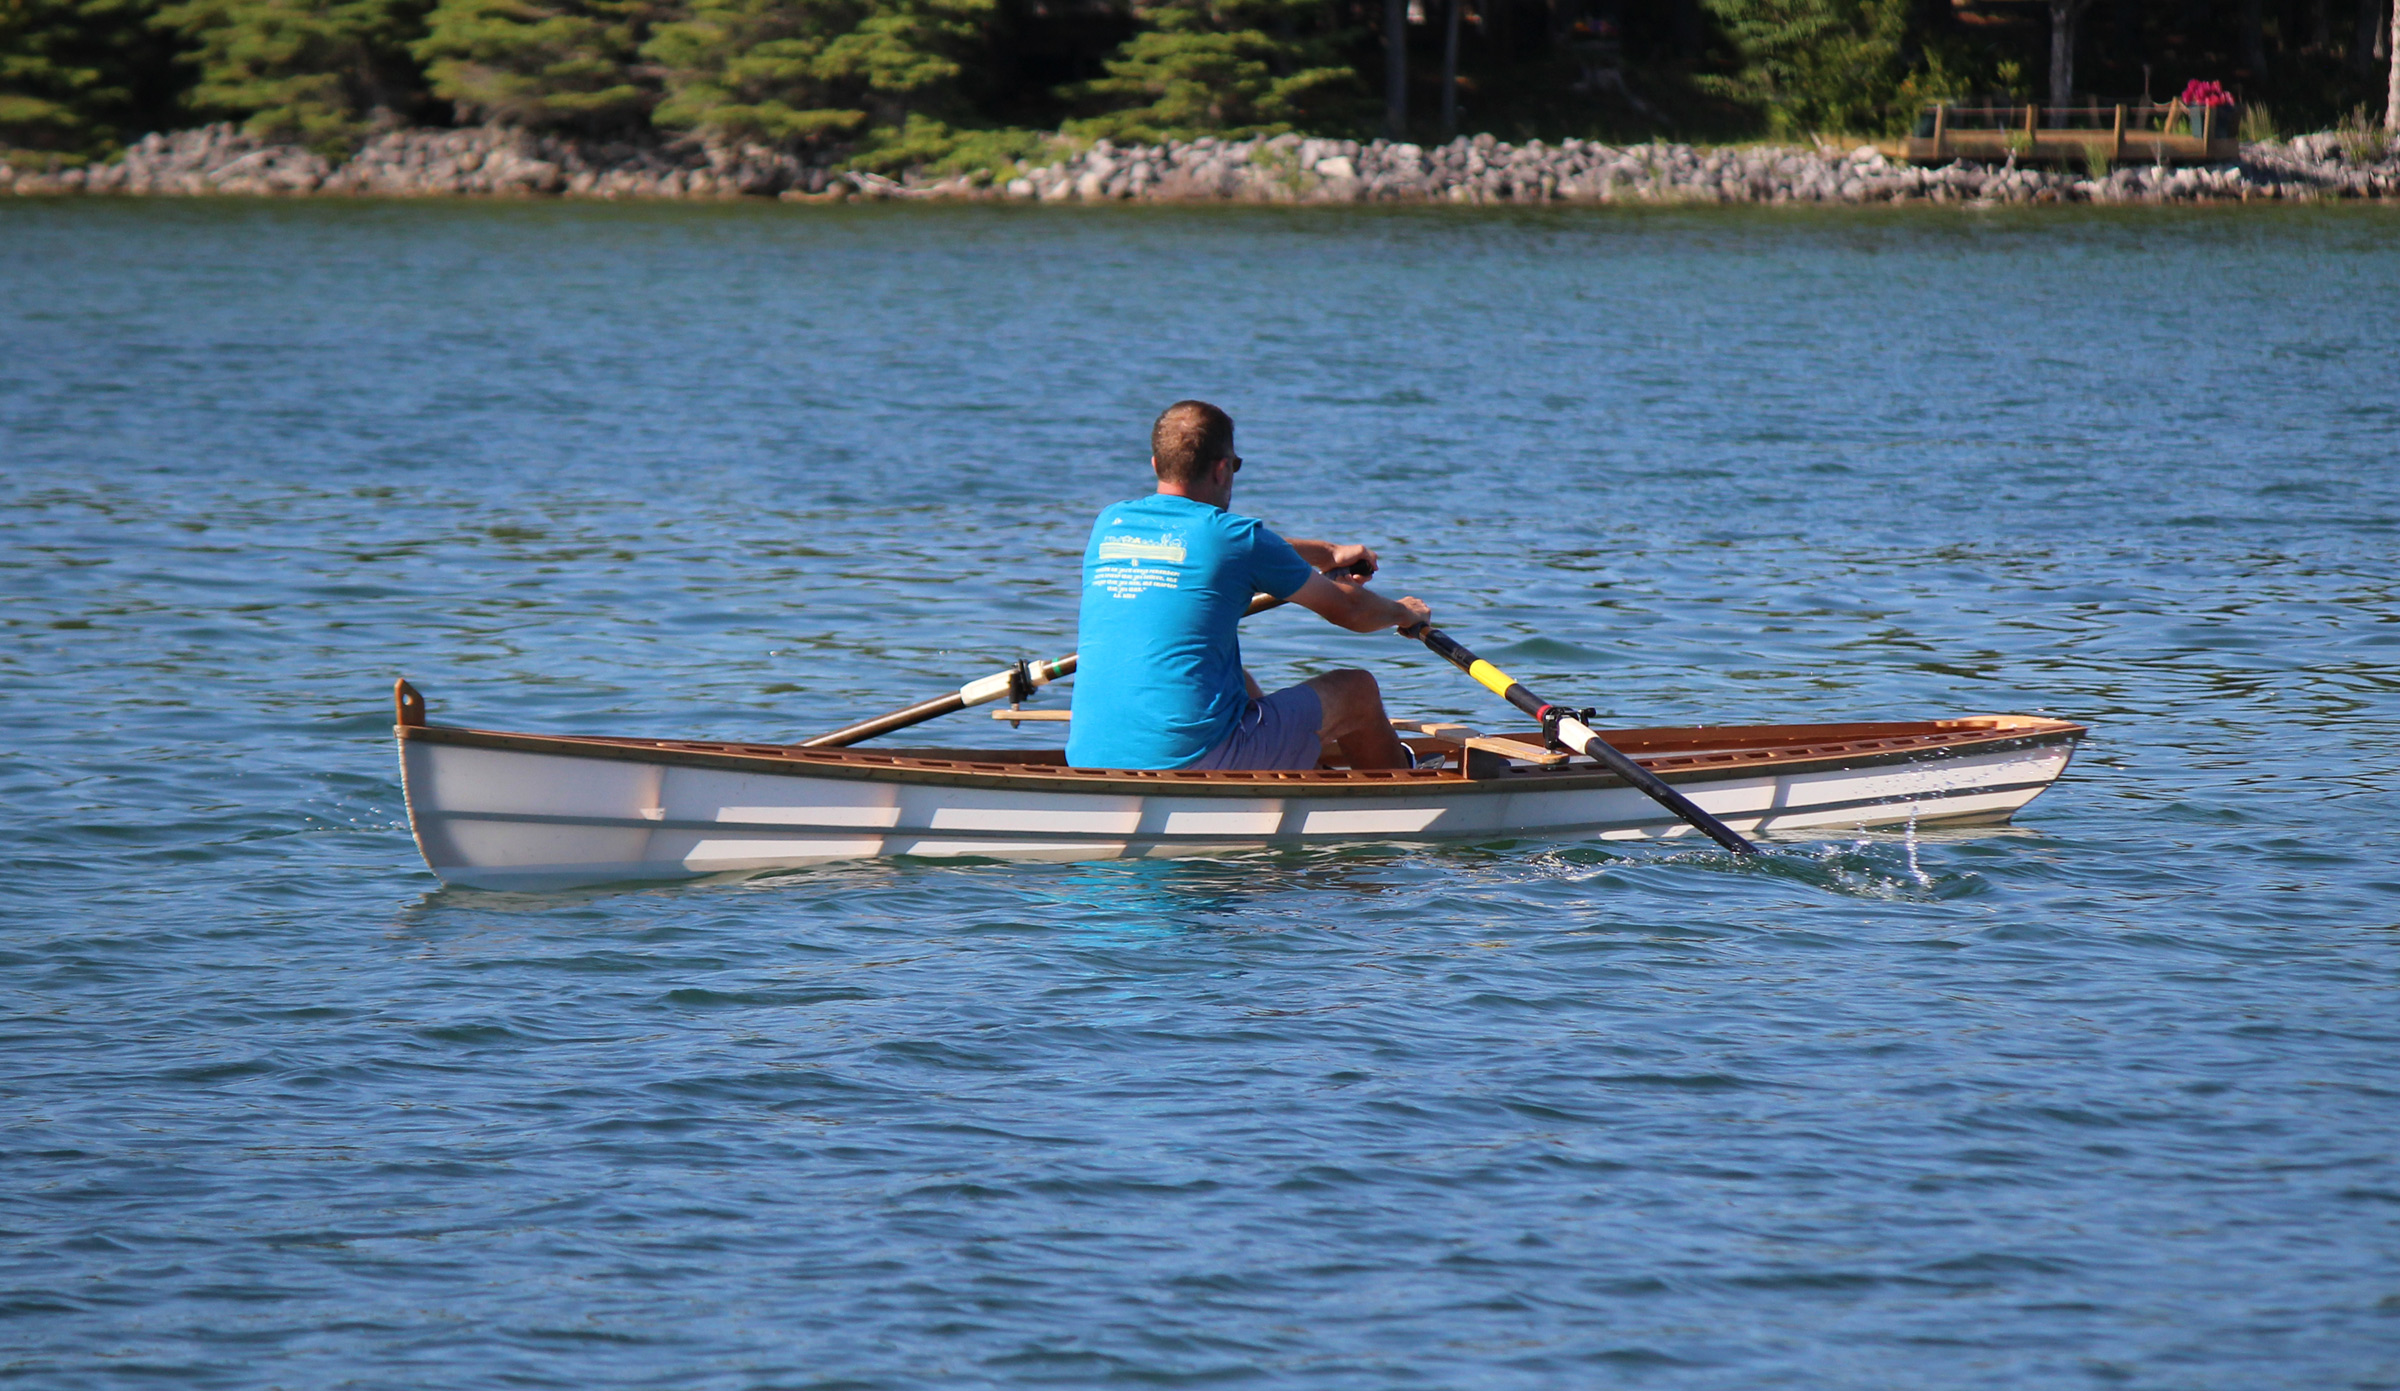
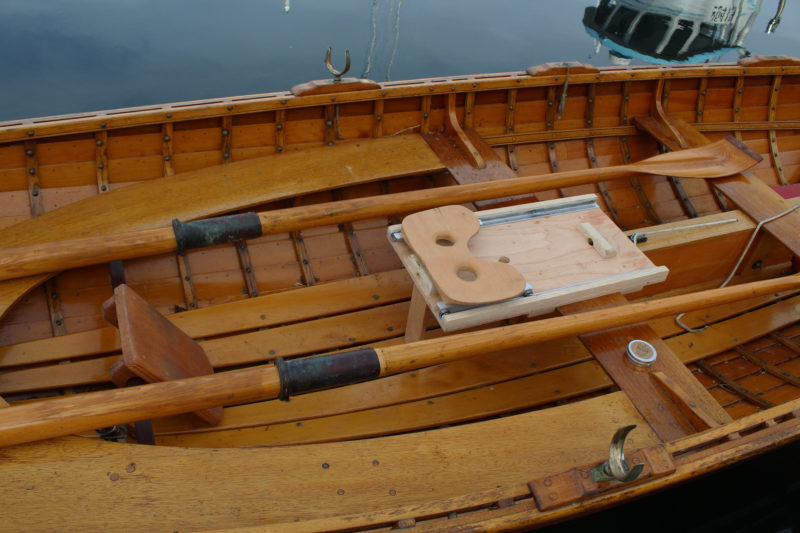
I had ordered Angus’s plans for hollow-loom oars, but the contractor’s tablesaw I borrowed from a friend didn’t seem capable of safely cutting the narrow strips I needed to cut, so I ordered up a pair of Concept2 carbon-fiber oars. When the oars arrived, Suzanne and I loaded the boat on the car and headed for Lacamas Lake in Washington State. The water was smooth, the late-September weather gorgeous, and with the rowing rig set in the forward position and Suzanne sitting in folding camp chair just aft of the outrigger and facing forward—a good arrangement for conversation—I managed to row the lake without crabbing an oar.

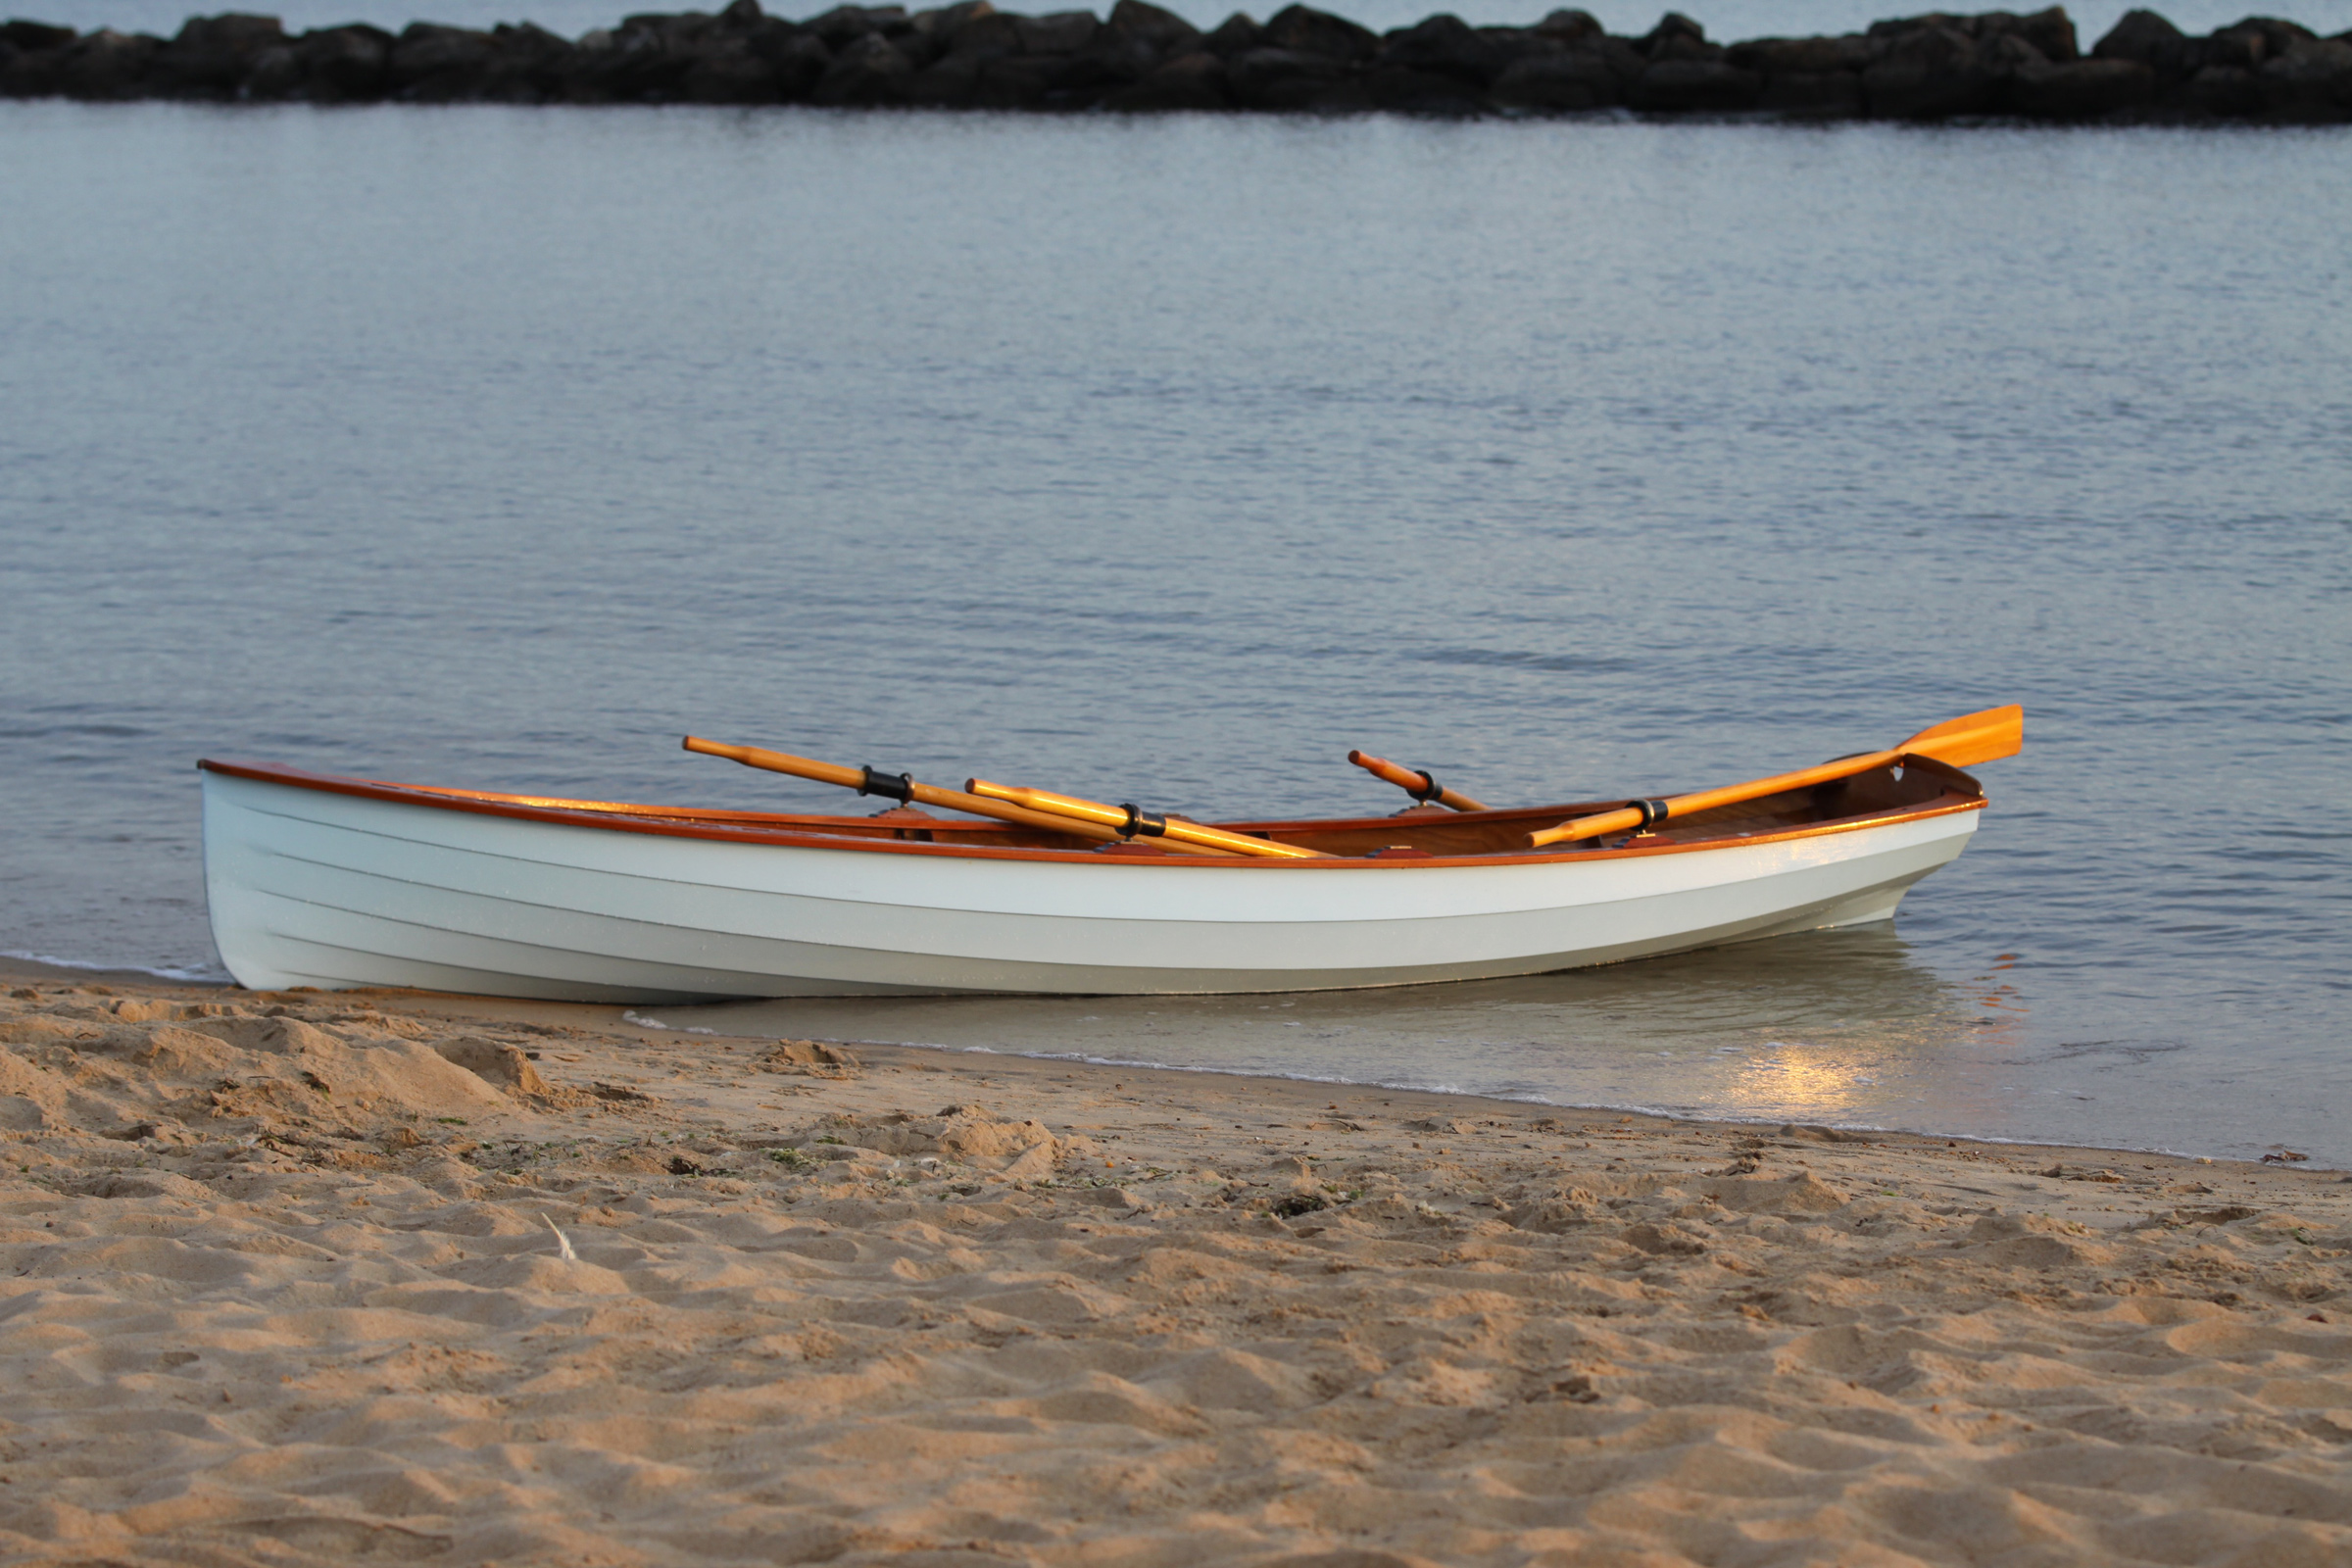
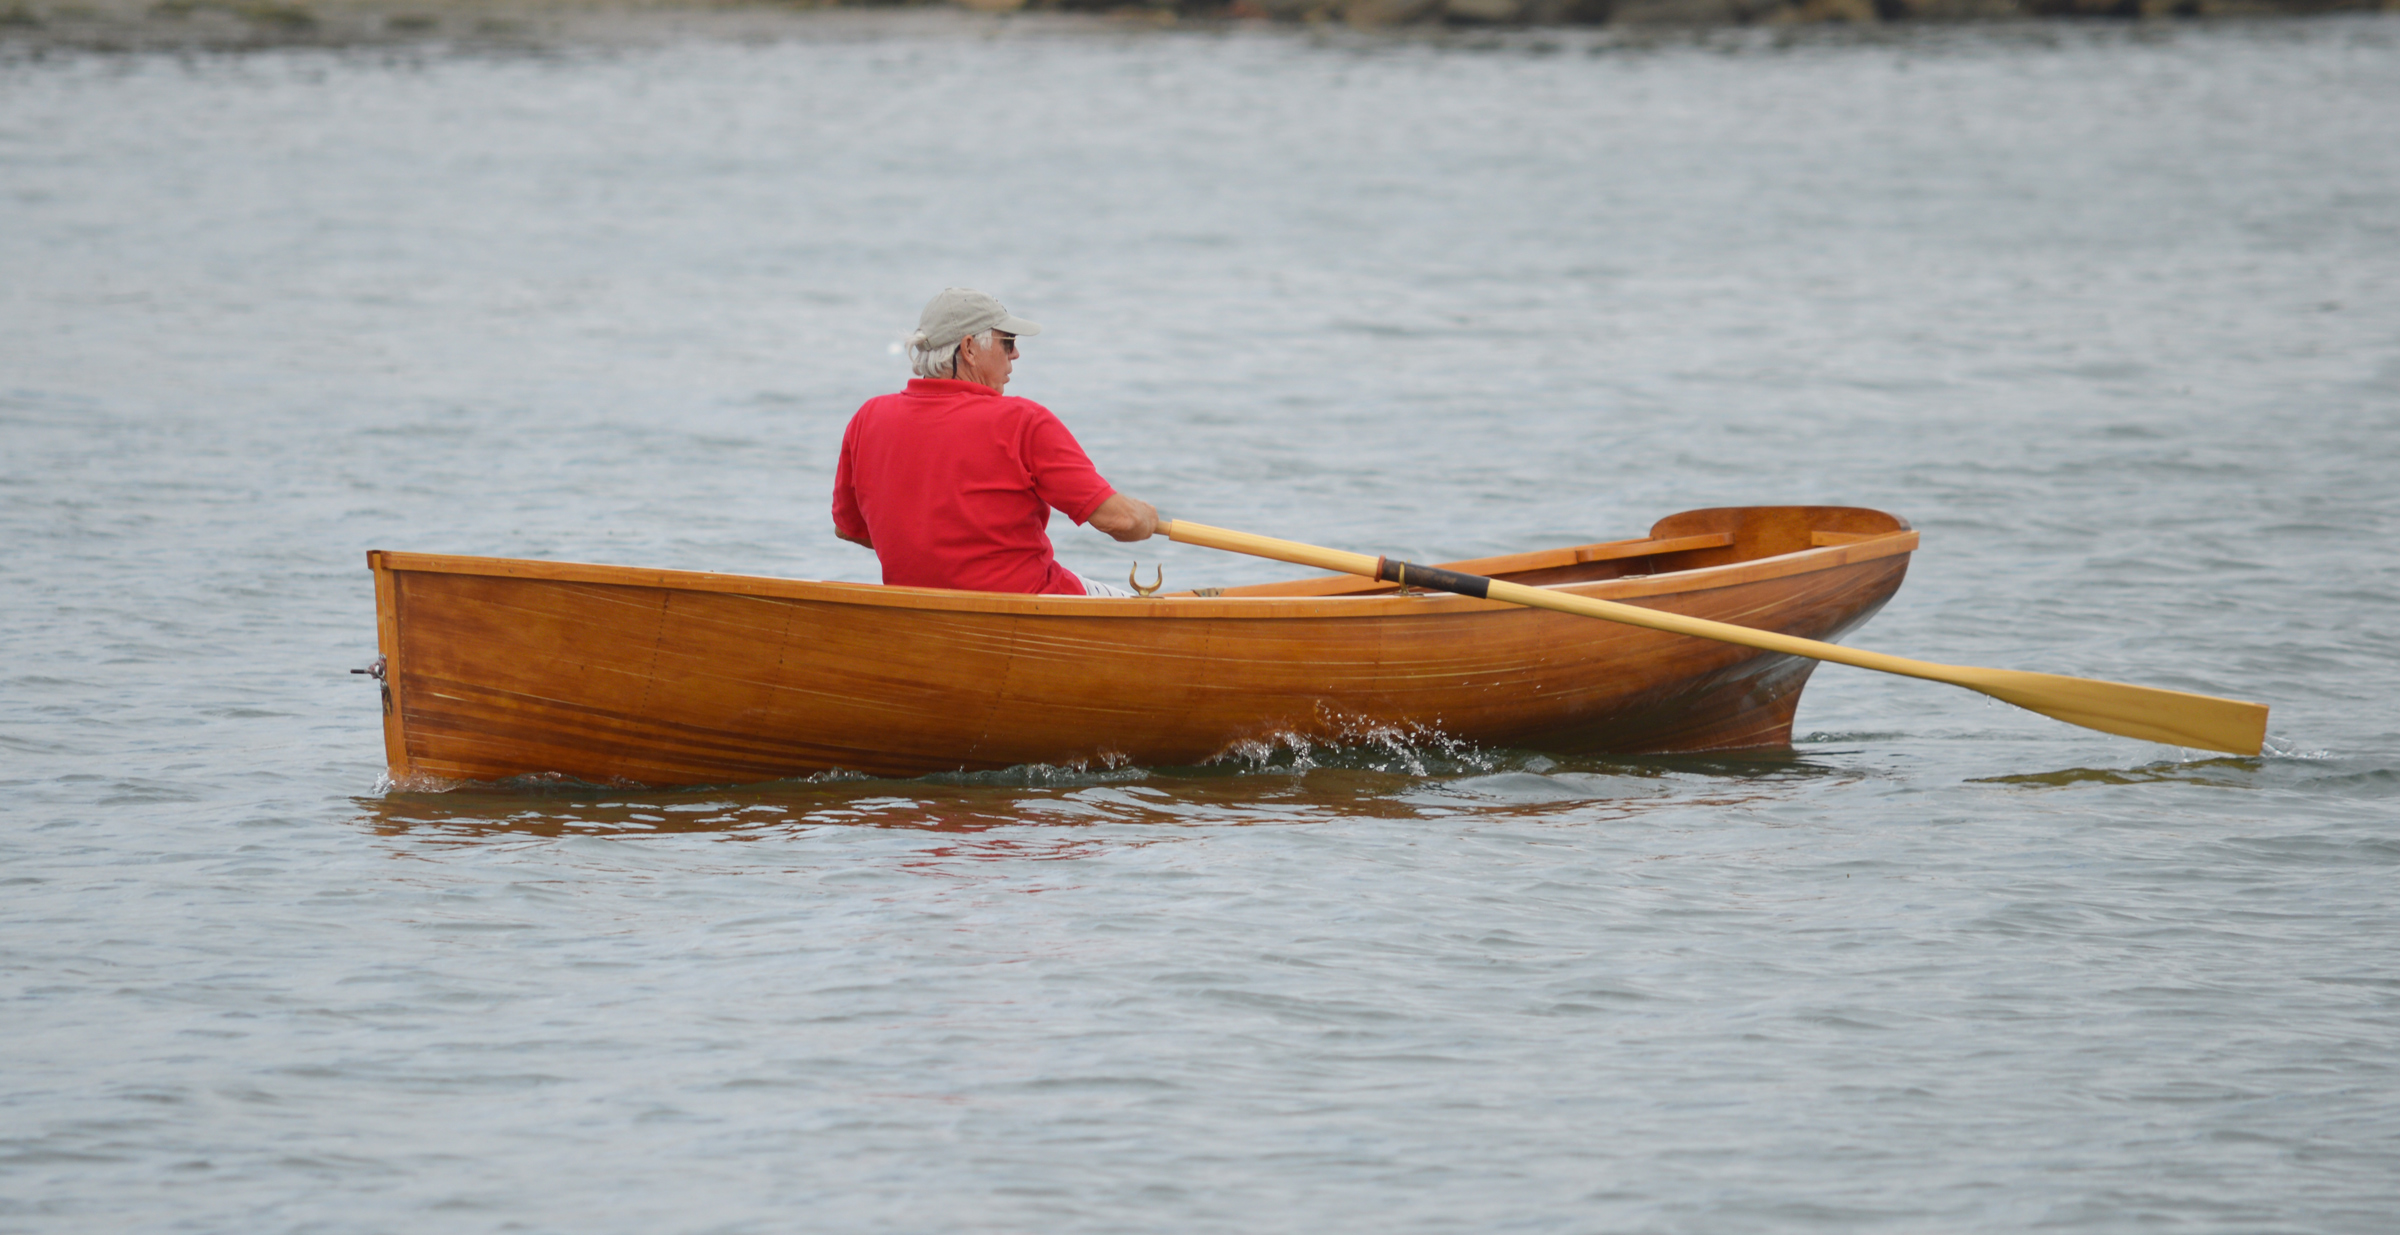
The designer sets the Oxford Wherry’s cruising speed at 3 to 4 knots and the top speed at 6-1/2 knots.

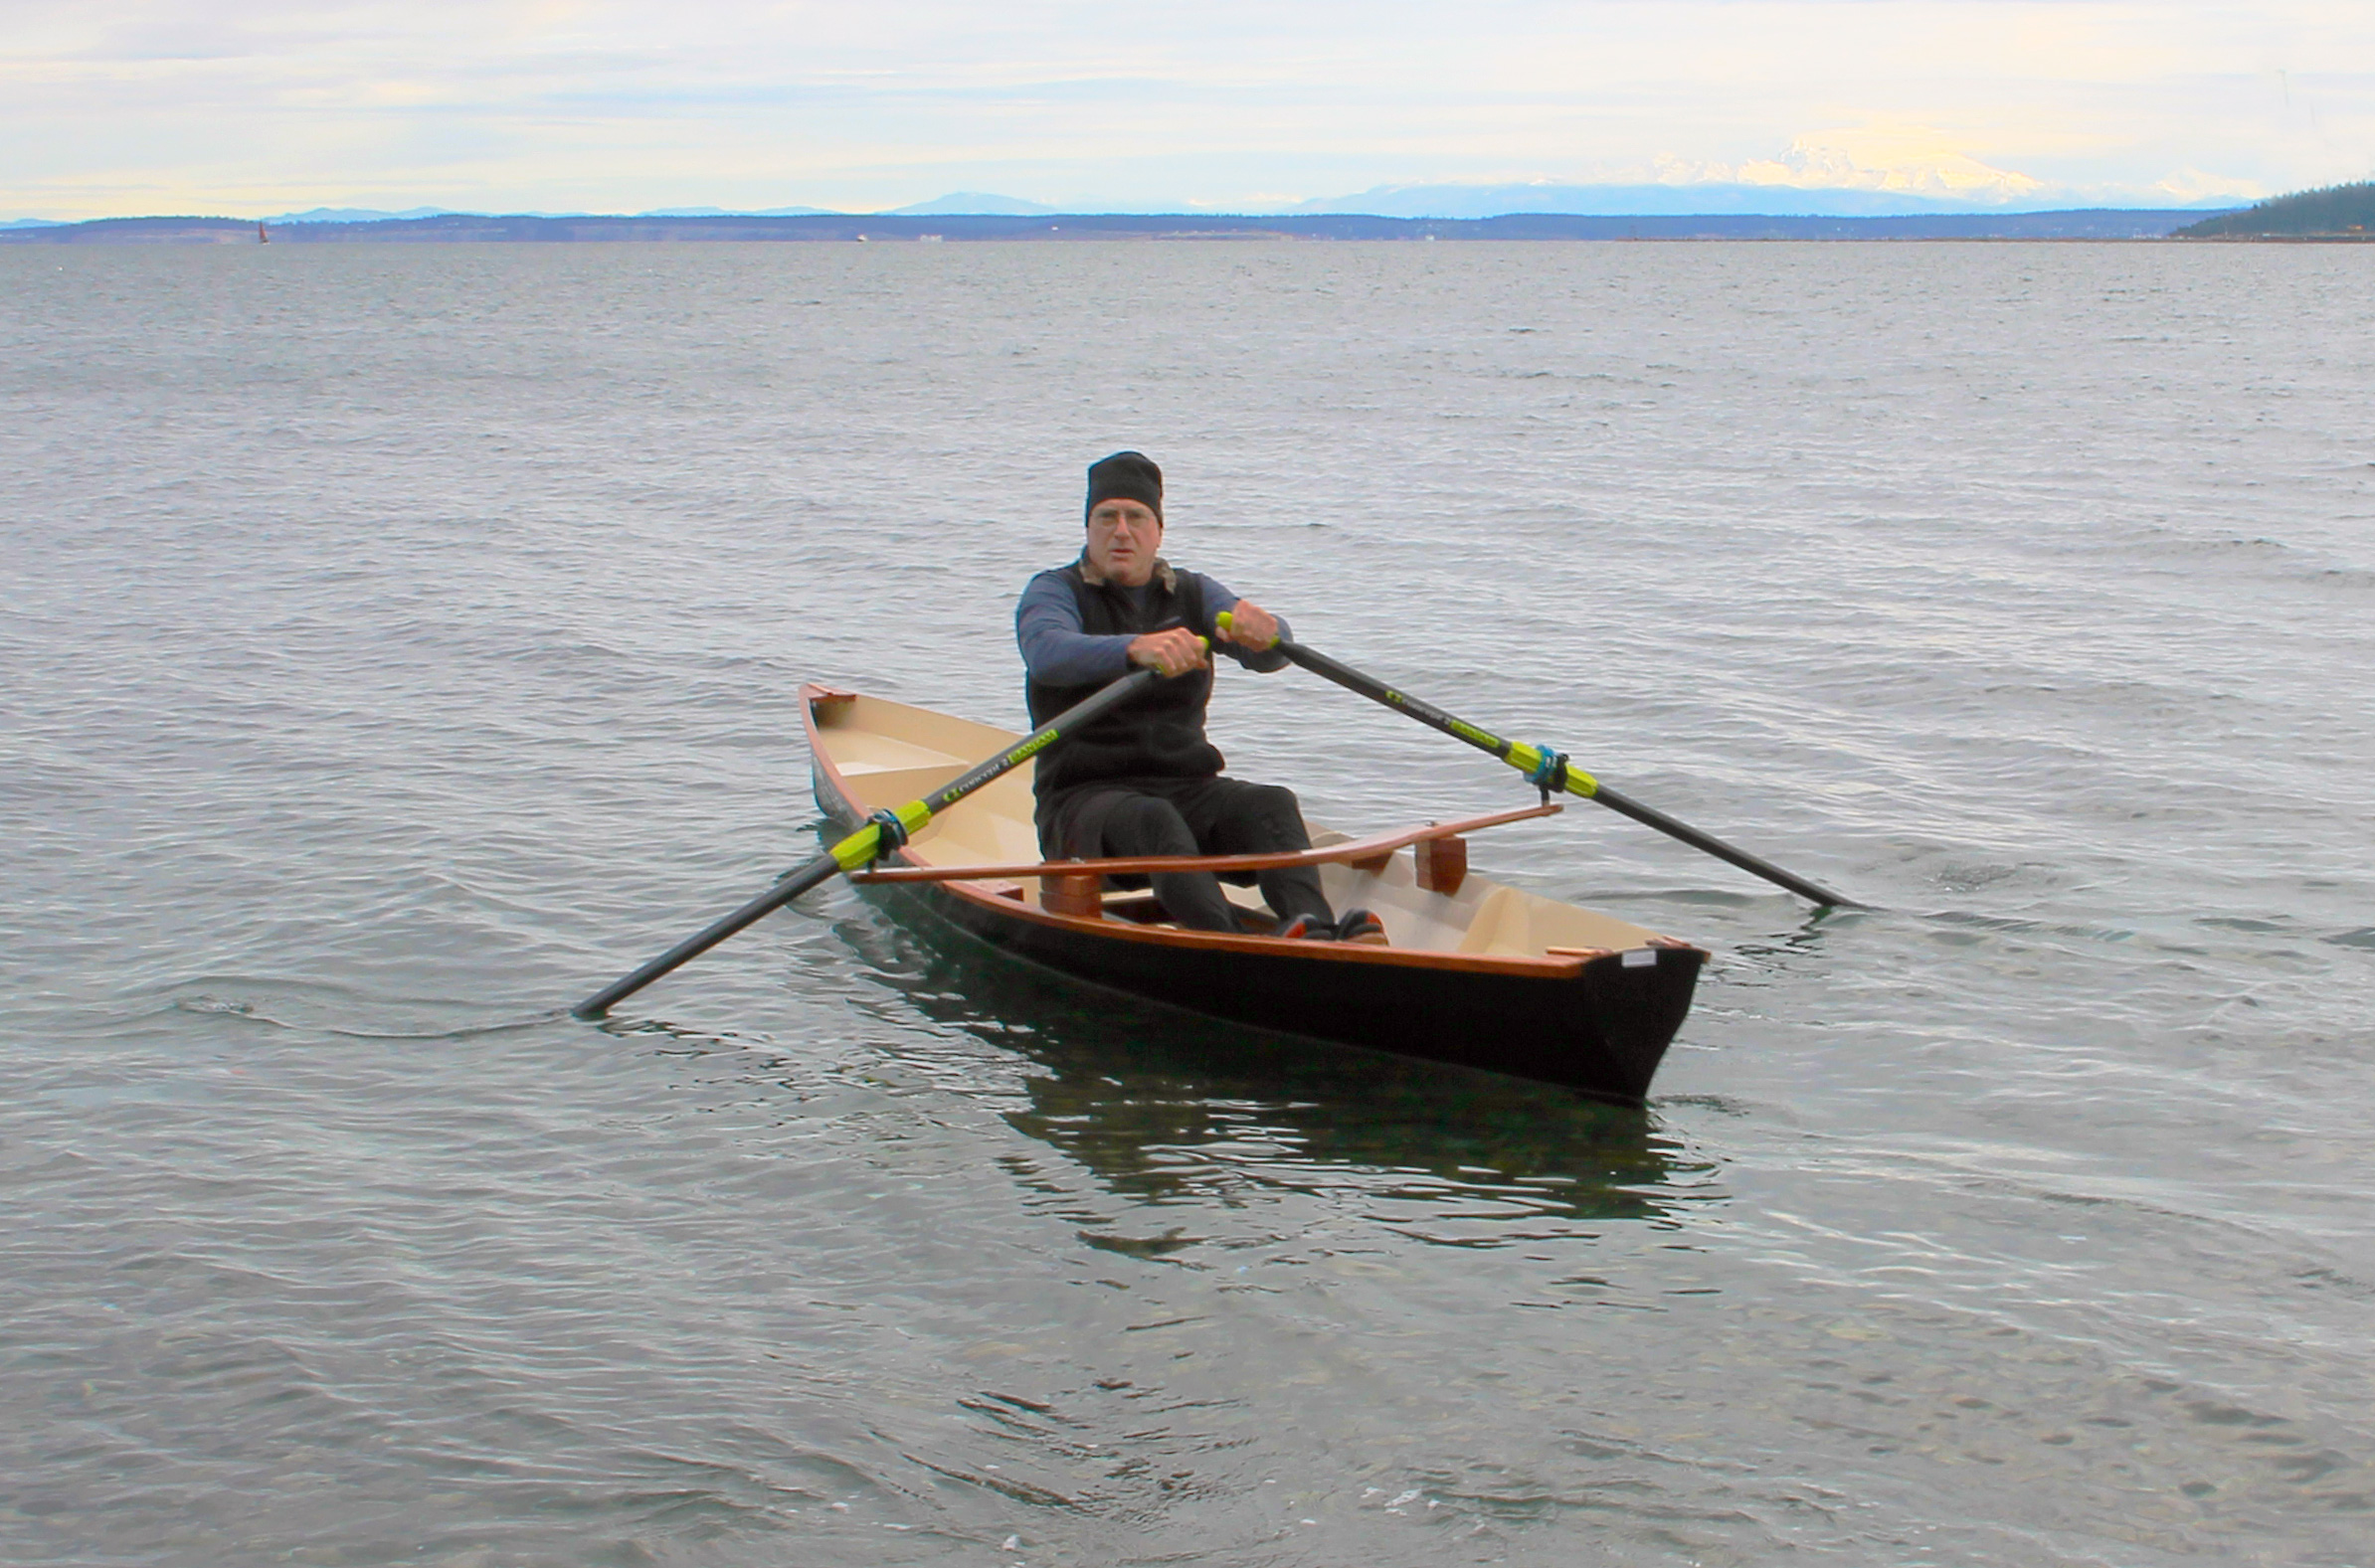
Our next outing was on Vancouver Lake, a venue for rowing competitions. We rowed across the lake and then tested our navigation abilities rowing the 16′ span between the blades down the narrow, serpentine Lake River. Once accustomed to rowing, we found the boat tracked beautifully. Course corrections are as easy as pressing harder with one foot, which translates into about a 5-degree change of direction with each stroke.

The stability added by the long sculls made it easy to get in and out of the wherry. I generally row early in the day on smooth water, and in calm conditions, the boat tracks well and glides quickly. At 235 lbs, I’m a large person, and rowing solo I have enough freeboard. Rowing with a passenger is very smooth and comfortable with minimal loss of speed and maneuverability. When I venture out alone on windy days I feel safe and rarely have water splashing aboard. With Suzanne and some gear along, the load is likely over 400 lbs and I pay more attention to chop and wakes. A bit of water may splash over the gunwale and make some bailing necessary. As with any rowing boat, it is more work to control the boat in chop, especially if taking the chop or wind on the side or the port or starboard bow. When taking waves head-on or running with a following sea, the boat handles well.

The designer compares the seaworthiness of the Oxford Wherry to that of a canoe. Equipping it with outriggers and sculls provides another measure of stability.

When I retired, I decided to do the things that I regretted not doing when I was younger. I’d been drawn to crew in college, but had been unable to participate while working full time and going to classes. It wasn’t until I was pushing 60 that I finally signed up for rowing lessons. Building the Oxford Wherry had a few of the frustrations common to a budding boatbuilder, but it was a grand adventure and rowing it has been a joyful experience.

Bob Eggleston graduated from college with a degree in psychology and a passionate belief that the only meaningful job would be helping people. He found employment in secure psychiatric facilities working with pre-teens, teens, adults, and finally the elderly, but the sadness of the work took its toll. Bob moved to  a more technical career with a large Oregon power company and worked his way into grid operations, partnering with brainy engineers and former Navy nuclear submariners. After a decade there, he took an early retirement to live a more interesting life and do the things he wished he had dreamed about. He moved to Port Townsend,Washington, and enrolled in the nearby Northwest School of Wooden Boatbuilding, to answer this question: “Can a 58-year-old former cube dweller become a productive craftsman?” Bob contently works on answering this question every day.

Oxford Wherry Particulars

[table]

Length overall/15′ 10″

Waterline length/15′ 7″

Beam/38″

Weight/53 lbs

Depth/11″

Freeboard at 250 lbs displacement/7.5″

Freeboard at 600 lbs displacement/5 ″

Cruise speed/3-4 knots

Sprint speed/6.5 knots

Maximum recommended touring load/500 lbs

Maximum recommended short-distance load/600 lbs

[/table]

Angus Rowboats offers the Oxford Wherry as digital plans with CNC router files for $129 and a complete kit for $1,399.

Is there a boat you’d like to know more about? Have you built one that you think other Small Boats Magazine readers would enjoy? Please email us!

Chester Yawl

I work as a naval architect designing high-speed naval craft in an office where the engineers and the most senior naval architect all have the same credo: Never own a boat you can’t carry. Given my career, I felt it was my duty to build a boat with my son and daughter. I considered designing the boat—I certainly have the technical skills—but thinking I could get the design spot-on on the first try seemed hubristic, so it just made sense to go with a proven design. The Chester Yawl fulfilled many prerequisites and needs.

My home in Norfolk, Virginia, is just 250 yards from the shore of the Chesapeake Bay, so I usually hand-launch my boats from the beach. I also have two teenagers, so I need boats big enough to include them on my outings; my rule is to own only boats that I can launch with a dolly, so we needed a boat in the 150-lb range.

Length would be limited to 15′—my garage is 19′ x 19′, and we’d need room to walk around the boat while building it—and a rowing boat would be the best addition to the fleet. I already have two small sailboats and didn’t need a third; and I didn’t want a canoe because its paddlers are facing the same direction, not ideal for conversation. With a rowboat, I could take to the oars and chat with a passenger sitting in the stern. The boat had to be able to handle some waves—the southern end of Chesapeake Bay can quickly turn into a mess of 1′ to 2′ waves when the wind picks up. I wanted an aesthetically pleasing boat with some built-in flotation and the ability to self-rescue if needed. I also wanted an interesting project, not, for example, a single-chine hull we could throw together in a single weekend. And finally, it had to have an aesthetically pleasing, classic shape—I wanted an heirloom, not a workboat.

The plank pieces are joined with precise finger joints for proper alignment.Robert Bice

The plank pieces are joined with precise finger joints for proper alignment.

My search led me to Chesapeake Light Craft’s (CLC) Chester Yawl, a 15′ Whitehall-type rowboat. It has beautiful lines, and the complexity of the project seemed just right: enough to feel like an accomplishment without being daunting. The Complete Rowing Kit I ordered from CLC included CNC-cut parts of marine okoume plywood, epoxy, fiberglass, oarlocks, and a 68-page manual. I also ordered the optional second seat. To create full-length pieces, the rubrails have precut scarf joints and the plank pieces have tight puzzle joints that assure that the mating pieces are properly aligned and the curves of the planks will be fair.

I ordered the kit in June 2015 and scheduled a week off from work for the build. I told my wife and kids we would be halfway done by the end of that week and finished by August. I got the month correct but not the year. We launched the boat in August 2016.

Robert Bice

While the kit outfits the Chester Yawl for fixed-seat rowing, the open cockpit and the easily driven hull are also well suited for a sliding-seat rig. CLC offers instructions for installing a Piantedosi rowing rig.

The Chester Yawl build uses CLC’s LapStitch construction, with precut rabbets in the planks’ lower edges to make the laps of adjoining planks self-aligning and create the appearance of traditional lapstrake construction. The gains that taper the laps and bring the forward ends of the planks have to be cut using a guide and a small rabbet plane. The hull consists of 12 strakes. For strength and abrasion resistance fiberglass cloth and epoxy were applied below the waterline and along the stem.

Building the yawl was just challenging enough without getting frustrating, and the assembly turned out to be easier than the sanding and finishing. We used the tricks outlined on the CLC website for smoothing the fillets with denatured alcohol. After the epoxy has cured enough to stiffen, you can put on a glove, dip a finger in denatured alcohol, and quickly smooth the fillet without the hard work and dust of doing the job with sandpaper after the epoxy has fully cured.

After we had started construction of our Chester Yawl, CLC came up with an option for a spacered inwale, which would provide additional stiffness in the gunwales, add easy attachment points for fenders and lines, and create a look that was too tempting to pass up. To accommodate the addition of the new inwales, I had to cut the breasthook and quarter knees out, and notch the frames and bulkheads.

Buying a kit was the best decision I made, as it is unlikely that I would have been able to cut the planks correctly. The most thoughtful part of the kit was that the holes for the stitching wires were predrilled. That made the construction much easier and made for a neater-looking finished product—it’s not easy to eyeball and space hundreds of wire holes. All of our labor—mine and the kids’—was a bit over 400 hours, and it was wonderful family experience.

The slots in the center and aft floorboards are for the foot braces, not for the seats, which are held in place by the weight of the rower. The frames are flush with the floorboards in the middle of the boat, providing a place to stretch out.SBM

The slots in the center and aft floorboards are for the foot braces, not for the seats, which are held in place by the weight of the rower. The frames are flush with the floorboards in the middle of the boat, providing a place to stretch out. (This is a very early version of the Chester Yawl and some of its details aren’t representative of CLC’s current version.)

The boat has three removable plywood floorboards that fit between the frames. The center and aft floorboards each have rows of notches to anchor footboards. The five notches in each row are 2” long—to fit the tabs on the bottom of the footboard frames—and spaced on 4″ centers, so the footboards offer a 16″ range of adjustment in 4” increments.

The support for the foot braces has tabs to fit in the slots in the floorboards.SBM

The support frames for the foot braces have tabs to fit in the floorboards slots.

The foot braces are solidly anchored, and the footboards are set at a comfortable angle. At 5′ 10″ tall and 180 lbs, I have no issues with the width of the floorboards. They appear to me to be wide enough for someone larger as well. I often row barefooted and enjoy the feel of the varnished wood under my feet.

The seats don’t have tabs to fit in the floorboard slots and are held in place by the weight of the rower. Surprisingly, they don’t move while rowing, and I can only adjust the seat by taking most of my weight off it. There is a trick to get the seat in just the right position, because inevitably the seat moves a wee bit as I sit down. After a few tries I was able figure out how to place the seat so that it is perfectly positioned when I do sit down. I like the flexibility of adjustable seats compared to a fixed thwart. The curve of the plywood top takes a bit of pressure off the tailbone at the finish of the stroke.

There are flotation compartments at the bow and stern. The stern compartment is enclosed and has a 1″ drain plug; the forward compartment has a 6″ deck plate in its bulkhead for access and ventilation.

The Chester Yawl's ancestor—the Whitehall—is made clearly evident by the wineglass transom. The partially closed notch captures a sculling oar and keeps it from lifting away.Robert Bice

The Chester Yawl’s Whitehall ancestry is made clearly evident by the wineglass transom. The partially closed notch captures a sculling oar and keeps it from lifting away.

The sculling notch in the transom is partially closed to help keep the oar in place. I don’t yet have an oar well suited for sculling the yawl, so I have sculled just once with one of the oars we use for rowing. I was barefoot on a wet and slippery floorboard, but even then, the boat was stable and it was somewhat like a stand-up paddle board. I am looking forward to installing some nonskid on the floorboards this spring.

Propelled by two rowers, the yawl can easily reach 5 knots.Robert Bice

Propelled by two rowers, the yawl can easily reach 5 knots.


We have been using our Chester Yawl for two full years now, and it rows wonderfully. When I’m alone on the boat with just a small ice chest aboard, I can row all day at 3 to 4 mph. It rows well with two people at the oars and easily reaches a top speed of around 5 knots without much effort. My favorite way to row is to use the forward rowing station while having a conversation with someone sitting on the aft seat. My kids like the boat for fishing and messing about.

While it’s a pleasure to row the Chester Yawl, one of the things I really like about it is that the floorboards cover up its shallow frames, and with the seats and foot braces moved out of the way, it creates an open space perfectly suited for an afternoon nap.

If you’re looking for an attractive lightweight rowboat, I don’t know that you could find a better design. I couldn’t ask for more—the build experience was fantastic, and we love the boat.

Robert Bice, P.E., grew up in southeastern Texas and spent his childhood exploring and camping on the banks of Village Creek, a tributary to the lower Neches River. He graduated from Texas A&M in 1995 and has been a practicing naval architect for 24 years, primarily focusing on hull structure and stability. He lives in Norfolk, Virginia, with his two teenaged kids. In his free time he likes to explore the endless backwaters of the Chesapeake Bay or use Google Earth to plan his next adventure.

Chester Yawl Particulars

[table]

Length/ 15′

Beam/42″

Capacity/450 lbs

Dry weight/100 lbs

[/table]

The Chester Yawl is available as a kit from Chesapeake Light Craft. The kit with wood parts alone costs $1,135; the complete kit, which includes epoxy, fiberglass, oarlocks and sockets, costs $1,650. The kit for the spacered-inwale option is an additional $349, and the second rowing station parts are available for $69. CLC provides free instructions for the installation of a Piantedosi sliding seat with outriggers.

Is there a boat you’d like to know more about? Have you built one that you think other Small Boats Monthly readers would enjoy? Please email us!

Whitehall 17

In 2011, in anticipation of retiring after a career as a research engineer, I decided I’d build wooden rowing skiff. I wanted a boat with traditional lines—particularly one with a vertical stem and a wineglass transom—and an easily driven hull, so the waterline would have to be longer than 12′. The 17′ Whitehall I found in the catalog of designs from Glen-L was just what I wanted.

I ordered the plans, and the package I received included full-sized patterns for the molds, transom, stem, breasthook, and knees for the transom and thwarts. A table of offsets is provided, but the full-sized patterns make the offsets and lofting unnecessary. The 1/8-scale drawings show the plan and overall profile, keel profile, construction details, and lines.

For transferring the drawings to the wooden stock, I ordered carbon transfer paper from Glen L. I recommend asking Glen-L for rolled drawings, otherwise you’ll receive folded drawings. The creases in the patterns made it difficult for me to obtain precise sectional shapes. The carbon paper came with a good tip: Coat the inside of the station forms with white paint before transferring the section drawings. This way the builder always knows what controls the complex curves of the Whitehall design.

Glen-L advises against lengthening the Whitehall from it's designed 16' 11", but approves shortening it by 10 percent to 15' 3" by reducing the frame spacing.Joe Titlow

Glen-L advises against lengthening the Whitehall from its designed 16′ 11″, but approves shortening it 10 percent to 15′ 3″ by reducing the mold spacing.

The Whitehall is composed of 120 planking strips bent cold over molds. The instructions suggest the hull can be stripped with hardwoods (Honduras or Philippine mahogany) or softwoods (western red cedar or Sitka spruce). The plans estimate a mahogany Whitehall will weigh about 350 lbs. My boat, STELLA, has a cedar hull with spruce trim and weighs slightly over 200 lbs. A light skiff has many advantages. It can accelerate more quickly, go faster, and be more responsive—all of that adds to the fun. At launch sites it is easy getting the Whitehall on and off the trailer, and two can easily carry it.

The instructions note that the builder can choose to use traditional glues, such as resorcinol or marine epoxy. This is just an indication of the bygone era when the instructions were written. Marine epoxies are today’s obvious choice.

I cut my planking stock from 24′-long 2×14 cedar boards. The strip construction for the Whitehall differs from the method widely used for canoes and kayaks. The strips are thicker and glued together with epoxy rather than carpenter’s glue, giving the hull greater strength, resistance to water, and durability. I put a resaw blade on my bandsaw and made 1/2″ x 3/4″ strips. The Glen-L instructions briefly discuss the option of milling bead-and-cove planking strips. Based on my experience, this is an essential step. Unlike flat-edged strips, the mated beads and coves almost snap into place, aligning themselves and closing the gaps. While you can buy bead-and-cove strips ready-made, the cost of the size of strips required for the Whitehall was prohibitive. I used a shaper to mill 5/16″-radius bead and cove profiles.

The Whitehall was designed for fixed-thwart rowing, but it's long waterline and easily driven hull make a sliding seat a fitting addition.SBM

The Whitehall was designed for fixed-thwart rowing, but its long waterline and easily driven hull make a sliding seat a fitting addition.

The instructions mention the option of covering the completed planked hull with fiberglass cloth; I found additional advice in The Gougeon Brothers on Boat Construction. I applied 4-oz cloth with five coats of epoxy inside and out, resulting in a composite structure with a bending strength that is many times that of the cedar alone and abrasion resistance for trailering and landing on gravel beaches. The Glen-L plans recommend painting the hull, and while marine enamels will do the job, the beauty of the wood is lost. I finished my Whitehall bright, protecting the epoxy with a high-grade marine varnish.

During construction I did some things differently than called for in the plans, but I do not see these changes as fixes for shortcomings in design. I believe the aim was to keep things simple to encourage amateur boatbuilders to take on the project. Here are the refinements I made, none of them essential, and all mean more work.

The Whitehall's long straight keel is about 3" deep and assures straight tracking.Joe Titlow

Even when lightly loaded, the Whitehall gives up very little waterline length.

I chose to do the strip-planking according to what the Gougeon company calls the “Master Plank Method.” It starts with the first strip laid on the midpoint between the sheer and the centerline of most of the molds (running fair across those nearest the bow) and results in a hull with the run and grain of the planks emphasizing the sheerline, which is only important with a bright-finished hull. It looks great, particularly in the bow and stern areas.

The planking strips near the keel have to run straight, so I did a “Gougeon Double Run,” which meant switching to strips applied parallel to the keel and making the transition between the two areas along a fair curve. [Editor’s note: The strips closest to the keel take quite a twist from ’midships out to each end. While the author worked all of the strips cold, steaming the ends, or wrapping them with rags and pouring boiling water over them, would help the ends come home with less strain.]

The Whitehall's long straight keel is about 3" deep and assures straight tracking. At speed here, teh Whitehall is showing very little wake at the bow, an indication of the boat's fine entry.Ray Putt

The Whitehall’s long straight keel is about 3″ deep and assures straight tracking. At speed here, very little wake is showing at the bow, an indication of the boat’s fine entry.

The Glen-L design shows eight laminated thwart knees 3/4″ thick. I made several knees to this design and while they were strong enough, they looked undersized on a 17′ skiff. I ultimately made the thwart knees, transom knees, and breasthook all 1″ thick, a small refinement, perhaps, but one that looks right aboard the Whitehall.

The instructions mention foot stretchers; while they’re important to a powerful stroke, I had in mind from the beginning adding a sliding seat. To support the tracks, I installed two parallel beams, secured under the three rowing-station thwarts and notched to sit flush with their tops. The beams also support the tracks for the racing-shell stretchers. This enhancement with the foot stretchers is essential for getting the maximum performance with the sliding seat.

As with most rowing boats with wineglass transoms, the stern is depressed with a passenger in the stern sheets and the rower amidships and coming up to the catch. Even so, the bow remains low and the hull is not badly out of trim.Ray Putt

As with most rowing boats with wineglass transoms, the stern is depressed with a passenger in the stern sheets and the rower amidships and coming up to the catch. Even so, the bow remains low and the hull is not badly out of trim.


I launched STELLA in August 2015. Between receipt of the Glen-L plans and first launch, I spent 1,500 hours on the project, more than half of that fairing, ’glassing, sanding, and varnishing. I spent $10,448 on the materials to build the boat.

When I pulled on the oars the first time, I was amazed and delighted with the performance of the Glen-L design. The Whitehall is easily driven, runs straight, and is stable, although initially tender. A solo rower (or sculler, more properly) can easily sustain 4 knots. The Whitehall has a beam of 4′ 6″, appropriate for oars 8′ to 9′ long. Mine are 8′ 6″. For tandem fixed-thwart rowing the stretchers are removed and then two rowers can sit on the thwarts between the tracks. It’s lots of fun with two pulling, and there’s plenty of distance between the fore and aft rowing stations to avoid a clash of blades. I have seen pictures of other 17′ Whitehalls rowed with three at the oars, so it’s possible, though we haven’t tried it. It comes down to a question of elbows and knees.

Glen-L notes that the Whitehall can carry six; we’ve only had four adults aboard in reasonable comfort and safety, but there is room for two more.

Now that we have the Whitehall, members of my family would rather row than walk on the beach, a sure sign of a good design. The boat is not too big to use as a dinghy for a larger vessel, or too small to provide a workable platform for scuba diving and snorkeling.

The light weight of my Whitehall makes it easy to move off and on the trailer. The stock trailer I bought and modified for the boat weighs about 300 lbs, so the load is an easy tow with my Mini Cooper Sport. The month following the launch of the Whitehall, christened STELLA, my wife and I trailered the boat 1,300 miles from southern California to the Wooden Boat Festival in Port Townsend, Washington. We were delighted with the positive reception the boat received by attendees and by rowing aficionados in particular. We’ve made the trip three more times since then. The Glen-L Whitehall is a great boat and a real crowd pleaser.

Joe Titlow is a retired research engineer, working primarily in the aerospace industry. Besides building small boats, he constructs small buildings and furniture for his wife, two daughters, and grandchildren. Joe has owned and raced a 27′ Soling sailboat for many years, and he has been a member of the San Francisco Yacht Club for 40 years. Throughout his career he has maintained a professional interest in the dynamics of sailing vessels.

Whitehall Particulars

[table]

Length/16′ 11″

Beam/4′ 6″

Hull depth forward/2′ 6″

Hull depth amidships/1′ 10″

Hull depth aft/2′ 2″

Weight/ about 350 lbs

Displacement at 9″ waterline, four aboard with average weight of 150 lbs/945 lbs

Oars/8′ to 9′ long, 1 to 3 rowers

Passengers/2 to 6

[/table]

Plans and patterns for the Whitehall 17 are available from Glen-L.

Is there a boat you’d like to know more about? Have you built one that you think other Small Boats Monthly readers would enjoy? Please email us!

Ruth Wherry

It is hard to capture the feeling of a good pulling boat, but perhaps the best way to sum it up is to say that some boats just glide and will cover great distances on the water with seemingly no effort at all. A few pulls are all that are needed to reveal a well-designed wherry. With the skin-on-frame Ruth, Dave Gentry has created an interesting adaptation of a classic rowing wherry that captures that elusive quality of glide.

The Ruth, with its fabric skin, and well-thought-out, easily built wooden frame, keeps the weight down to around 45 lbs, light enough for this 18-footer to be singlehandedly cartopped with ease. Gentry’s plans are a complete, well-illustrated, easy-to-follow, and include paper templates for the plywood frames.

The structure for the Ruth is a combination of plywood and lightweight western red cedar stringers. The 1/2″ marine-plywood stem, frames, and transom are notched for the full-length strips that bend from bow to stern and give shape to the wherry. Joining frames to stringers takes only a bit of thickened epoxy and stainless-steel screws. Even the most inexperienced builder with basic tools can have a frame built in just a few hours. The plywood breasthook and various supporting knees are laid out in the paper templates as well. They are essential strengthening elements and relatively simple to add with a bit of beveling and finesse.

The fabric skin goes on with a combination of stainless-steel staples and only a bit of handiwork with needle and thread. The plans recommend 8-oz polyester. Nylon durability is well regarded among the skin-on-frame kayak builders; Gentry mentions it as an acceptable alternative with a precaution that it does not heat-shrink as well as polyester.

A good pneumatic or electric stapler makes short work of the hundreds of staples that a fix the skin along the entire gunwale, but a hand stapler would also adequately do the job, albeit with a bit of fatigue at the end of the day. An extra set of hands for the skinning step is helpful. You can do the job solo, keeping the skin in proper alignment with push-pins straight along the keelson. The addition of the gunwale later on hides the staples, but care should be taken to set them consistently at a depth that holds and doesn’t cut or pull the cloth askew at each staple.

The author's Ruth is rigged with a homebuilt rowing rig for solo rowing and is without floorboards and a seat for a passenger. A False transom covers the edges of the fabric skin for a tidier appearance.Jim Dumser

The author’s Ruth is rigged with a home-built rowing rig for solo rowing and is without floorboards and a seat for a passenger. A false transom covers the edges of the fabric skin for a tidier appearance.

The skin wraps around the transom and particular care should be taken to do a neat job with the folds and the copper nails; they will be visible when the boat is completed. On my build, I first used upholstery tacks as a decorative touch, but they didn’t hold well, and the folded fabric edge wasn’t as tidy as I’d hoped. I decided to hide the fabric and the staples with a false transom of 1/8″ plywood. It added very little weight and looks tidy.

The only stitching required for the skin is at the bow. Even for the uninitiated, this short section can be accomplished rather easily. In addition to the supplied directions, helpful video tutorials are available online. Since polyester can easily unravel once cut, the edges need to be heat-sealed. If you don’t have a hot knife specifically made for the task, a flat cutting tip on a soldering gun works like a charm.

After the skin is attached to the frame, the gentle use of an iron will remove wrinkles and pull the skin taut. The polyester fabric needs to be sealed to become fully waterproof and the instructions call for oil-based paint or varnish.  Inexpensive latex porch/floor paint, a favorite of many skin-on-frame builders, seems to hold up well, and can always be touched up or recoated. Marine topside paints, aside from being more expensive, are hard when fully cured and don’t seem to fare well applied to a flexible fabric surface.

There's enough length and enough fullness in the ends to keep the Ruth in trim as the rower's weight shifts back and forth on a sliding seat.Kyla Dumser

The length and enough fullness in the ends keep the Ruth in trim as the rower’s weight shifts back and forth on a sliding seat.

Once the skin is on, the rubrail and skeg round out a finished hull. Although the skeg is attached with screws through the skin, no leaks have developed and reinforcement by way of a short piece of brass fixed along the trailing edge of the skeg and the transom has proven ample support.

The plans detail an interior layout that consists of a rowing station and passenger seats. Designer Dave Gentry opted to rig his own Ruth with a fixed seat with simple outriggers as laid out in the original plans, a good option if you’re building on a limited budget. Fixed-seat rowing will require a pair of locks and simple plywood outriggers attached to the gunwales. A pair of 7′ to 7′ 6″ oars are a good fit.

The plans also include guidance on installing sliding-seat rowing units. I equipped my Ruth with a custom-built sliding seat rig that was designed around plans and a hardware kit ($299) from Colin Angus. Ready-made drop-in rigs like the Piantedosi ($595) have been successfully employed by many Ruth builders.

The author has been able to bring the Ruth up to 6 knots in a short sprint and can hold 4 to 5 knots at a sustainable effort.Kyla Dumser

The author has been able to bring the Ruth up to 6 knots in a short sprint and can hold 4 to 5 knots at a sustainable effort.

My Ruth weighs 55 lbs with the addition of the built-in rowing rig. The boat is very comfortable on flat water and can take on a bit of chop. I can easily sustain a cruising speed of 4 to 5 knots using a 9’6” pair of carbon-fiber hatchet-blade sculls. Top speed for me is a little better than 6 knots, but the extra effort to sustain the sprint seems hard to justify when rowing for pleasure.


Getting aboard is not difficult, but care does need to be taken about foot placement to protect the skin. The plans detail lightly constructed floor boards for a fixed seat; I omitted them because they would have interfered with the placement of the sliding-seat rig.

I usually launch in shallow water and get aboard by sitting on the seat first and then swinging my legs into the boat. Under way, the stability is very good and the Ruth provides a dry ride even when things become a little rough. The craft’s light weight lets me come up to speed very quickly in just a few strokes and the sharp bow ensures that I can maintain speed even in modest chop. The skeg assures that hull will track well underway and yet allows for reasonable maneuvering in tight quarters.

While this Ruth isn't equipped with a seat for a passenger, the reserve buoyancy created by the transom will support the additional weight without putting the hull well out of trim.Kyla Dumser

While this Ruth isn’t equipped with a seat for a passenger, the reserve buoyancy created by the transom will support the additional weight without putting the hull well out of trim.

The greater freeboard of the wherry design, compared to a traditional scull, does lend itself to a little fight in a crosswind, but weathercocking is not excessive and easily corrected. At 18′, the Ruth does an admirable job avoiding the tendency of shorter craft to hobby horse as a rower’s weight shifts fore and aft with the sliding seat. I built my Ruth for solo outings and didn’t install the passenger seat.

The 8-oz polyester skin specified in the plans might make one wonder about its long-term durability. There isn’t much between the rower and the water, but after three years the skin is still in good shape and has no tears or punctures. In the plans, Gentry mentions the option of adding a skim coat of a polyurethane adhesive along areas where abrasion is likely. The challenge is to keep it thin enough not to bubble up while curing, but, when successful, it provides an additional measure of security.

Dave Gentry’s capable Ruth is a winner. Few homebuilt boats will get you on the water as quickly and as inexpensively. The simple construction method, plainly written guide, and complete plans ensure that even a first-time builder will succeed.

Jim Dumser is a husband, father, teacher, and boatbuilder who is lucky to have had the opportunity to share the art and love of boats with his daughters and his students for the past decade. Building boats is the natural extension of his time spent starting and teaching the Wood Arts program at North Carolina’s Community School of Davidson where students have built a number of boats from canoes to a St. Ayles Skiff. 

Ruth Particulars

[table]

Length/18’

Beam/33”

Weight/45 lbs

Maximum capacity/375 lbs

[/table]

Plans ($65 for paper, $55 for digital) and kits ($500) for the Ruth are available from Gentry Custom Boats

Update: The Gentry website seems to be down. Duckworks has plans for the Ruth. 7/14/22

Is there a boat you’d like to know more about? Have you built one that you think other Small Boats Monthly readers would enjoy? Please email us!

Poseidon Sliding Seats

I have been competing in open-water rowing with a traditional boat and a fixed seat for over 20 years, and several years ago I had the opportunity to row and compete in boats with sliding seats. I really enjoyed the increased speed and total body workout, so when I learned about the Poseidon sliding-seat system from Puuvenepiste in Finland, I was eager to have it installed in my 18′ Merrimack Screamer, LE BARON ROUGE. The boat was built by Doug Scott, a New Hampshire boatbuilder, using traditional construction techniques. It has a narrow flat bottom and four wide strakes on alternating sawn and steam-bent frames. I use the boat for open-water rowing races and was drawn to the Poseidon rig as a way to improve the boat’s performance without significantly altering its character.

The author's Merrimack Screamer has a double Poseidon rig installed. Each rail spans both stations so the stretchers can be moved to set the boat up for a single rowing station amidships.Craig Robinson

The author’s 18′ rowing boat has a double Poseidon rig installed. Each of the rig’s rails spans both stations so the stretchers and seats can be rearranged to set the boat up with a solo rowing station amidships.

The rig is dramatically different from other drop-in sliding seat systems, which usually include outriggers that have a wide span between the oarlocks (around 62”) designed to accommodate standard 9’ racing sculls. There are no outriggers included with the Poseidon. Instead, it is meant to be used with existing gunwale-mounted oarlocks. On a boat with a typical 4′ beam you can use ordinary oars 8′ to 8-1/2′ long.

I brought my boat to Rodger Swanson, a distributor for Puuvenepiste, and he installed the system with only a few minor modifications. The installation of the two 7/8”-diameter stainless-steel rails requires some custom-built supports. This particular installation would need three wooden supports for the rails: one secured to the boat’s risers, one spanning a frame, and one set on the floorboard. The adjustable aluminum foot stretchers were then positioned in the appropriate locations relative to the oarlocks. My stretchers require a wrench to adjust their position.

The current version of the stretcher has cam locks for a quick, no-tool adjustment.Ruud van Veelen

Cam locks offer a quick, no-tool adjustment of the stretcher.

The current units include a cam system, making footrest location changes much quicker, and easy to make while on the water. The sliding seat has grooved wheels that align themselves on the rails. The top is plywood and will require a pad or a contoured seat added by the user.

The seats are supplied without pads. Those are left to the rower to select to suit individual preferences.Craig Robinson

The seats are supplied without pads. Those are left to the rower to select to suit individual preferences.

The Merrimack Screamer was built with three oarlock positions for fixed-thwart rowing either as a single or a double, but most of the time it has been rowed as a double. With the Poseidon rig installed, a short test row made it apparent that some adjustments were needed to optimize both the trim and the spacing between the two rowing stations. The position of the foot stretchers can easily be adjusted to accommodate the different leg lengths and to convert from a double to a single rower, but we noticed that the bow was going too deep at the finish of the stroke when our weight was well forward at the release. Moving one set of oarlocks and repositioning the rails farther aft improved trim. Those were rather minor changes, and the system has not required any maintenance or adjustments since.

If you decide to convert your boat from fixed seat to sliding seat, there are a few factors to consider. Setting the Poseidon rig on top of a boat’s thwarts will put the rower too high, so they’ll need to be removed. If the thwarts serve as part of the structure of the boat, then you may need to add cross braces below the rails to reinforce the frames and maintain the shape of the hull. The Merrimack Screamer’s thwarts were resting on the risers, and so weren’t bracing the frames. In fact, the supports secured to the risers and across a frame made the boat stronger than it had been with the removable thwarts.

A Finnish racing churchboat is outfitted with a series of rowing stations with the alternate stretchers.Ruud van Veelen

This Finnish racing churchboat is outfitted with 14 Neptune rowing stations, a version of the Poseidon system with floorboard-mounted stretchers.

A sliding-seat system takes up more room than a thwart. The Merrimack Screamer’s 18′ length was a comfortable fit for two fixed-thwart rowing stations, but had just barely enough room for two sliding-seat stations. The shifting of body weight on a sliding seat is more likely to cause a boat to porpoise with each stroke, so the hull needs to have enough length to stay close to level through the rowing cycle.

The Poseidon system has worked out well for LE BARON ROUGE. The sliding seats allow us to use our legs to both lengthen strokes and increase power. For the same level of effort we’d put in using fixed thwarts, the sliding seats make the boat about a knot faster. Several years ago, I entered the Minot’s Light Roundabout, a 4.5-mile, open-water rowing race, rowing the Merrimack Screamer as a sliding-seat single. There were high winds and waves, and had it not been for the sliding seat advantage, I might have turned back. Instead, I finished in third place and came in ahead of two ocean-rowing shells.

It’s no surprise that long ago, competitive rowing adopted the sliding seat to enable use of the leg muscles; 60 percent of human muscle mass is located below the waist. The Poseidon rig takes advantage of that power and maintains the look and feel of a traditional boat. If you’re ready to make the switch to a sliding seat, it’s well worth considering.

Craig Robinson lives in Hingham, Massachusetts, and began rowing at a young age in an 8′ pram. He now enjoys rowing year round with the Hull Lifesaving Museum Maritime Program. In recent years, he and his rowing partner, John Struzziery, have placed well with the regional open-water races.

The Poseidon sliding seat is manufactured by Puuvenepiste in Finland and distributed in the US by the Swanson Boat Company (the Swanson web site is being updated and will be fully operational in mid-April) and Duckworks. The Poseidon single is $695.00 USD and the double $1,095.00, plus shipping.

Is there a product that might be useful for boatbuilding, cruising or shore-side camping that you’d like us to review? Please email your suggestions.

Sliding-Seat Conversion

Many years ago, I built a sliding seat for my Delaware Ducker using salvaged tracks and a carriage from a canoe’s rowing rig. The Ducker is a pretty quick rowboat, and can be kept over 4 knots; while I couldn’t go faster, with the sliding seat I could go fast longer. Equipping a traditional rowing boat with a sliding seat—without outriggers or longer oars—is an idea that has been around for a while. Mystic Seaport’s elegant Bailey Whitehall, built in 1879, has one and in the early years of the rowing revival, Dick Shew of South Bristol, Maine, was rigging his 16’ Whitehalls to switch between fixed and sliding seats, rowed with the same oars and with the locks set on the gunwales.

I’d been thinking about building a sliding seat for my dory, so I clamped the Ducker slide into it for a test. I knew there would be clearance for the oar handles over my thighs, because I could sit on a throw cushion and still have room. I rowed 15 or so miles in 4 hours, much farther than I anticipated. I liked it, and decided to make one for the dory.

The sliding seat rig, spanning a thwart in the author's dory, has shorter tracks than those used in racing shells, but is well suited to using the same oars and locks that are used for fixed-seat rowing. Note the foot brace secured to the floorboards under the aft thwart.Ben Fuller

The sliding seat rig, spanning a thwart in the author’s dory, has tracks shorter than those used in racing shells, but appropriate for using the same oars and locks that he uses for fixed-seat rowing. Note the foot brace secured to the floorboards under the aft thwart.

I dug around my shop and came up with a couple of tracks and a seat. The tracks didn’t need to extend very far forward of the fixed thwart—as with most fixed seats, my legs are fairly straight when I am on the thwart. I found I could move 7″ or so aft of the thwart before my shins hit the after thwart. The standard length for tracks is 32″ to 34″, longer than required for the length of the stroke in my dory; I trimmed mine to 20″, a couple of inches longer than I needed. The tracks each had a stop in one end, and I split some dowels for the other. Another option for stops is to secure blocks of wood across the ends of the tracks.

The distance between the seat’s wheels determines the span between the tracks and the length of the boards they’re mounted to. Some careful layout is required to make sure that the tracks are parallel. When everything was square, I drilled holes for the bolts to hold the tracks.

The extruded aluminum tracks are very strong and don’t require any additional support where they cross the thwart. If I had a nice varnished thwart, I’d glue a bit of carpet or neoprene to the track undersides. The wood boards joining the tracks also serve to locate them on the thwart; turn-buttons made of 1/8″ aluminum bar hold the rig in place. I put a hinged strut under the edge to help support my weight when I’ve moved aft for the catch.

The tracks rest directly on the thwart, keeping the seat as low as possible. A hinged support takes the weight at the catch.Ben Fuller

On the bottom of the sliding seat there are two aluminum toggles to hold the rig in place on the thwart. The support for the overhanging aft end of the rig folds flat for storage and transport.

With a GPS logging my speed, I found that switching from the fixed thwart to the sliding seat consistently added half of a knot. The 16’ dory isn’t fast, and I have to work hard to maintain 3.5 knots rowing from the thwart; with the sliding seat it is easy to maintain that speed. Rowing 24 strokes per minute, I could have kept going for hours. Pushing off with the balls of my feet helps power the drive; to get the full advantage of the sliding seat you should have a stretcher at the appropriate height. With the sliding seat I can reach farther aft at the catch, so the oar blades reach farther forward , and with the longer stroke I can get the blades buried and have more time to apply more power through the middle of the stroke where it does the most good.

One of the biggest issues with dory is its windage. The additional power of legs makes a significant difference on those days where I only gain half a boat length on a stroke. I took the dory out on an unpleasant rowing day; when I stopped rowing, a nasty chop with wind and tide pushed me downwind at 1.5 knots. With the rig in place I was able to make 2.5 knots to windward, barely 2 without it. I did switch to my shorter oars, shortened the stroke, and sped up the stoke rate, and if it had been rough enough to roll the seat off the tracks, or I had a problem getting the blades out of the water, I could have easily removed the seat and rowed from the thwart.

At only about 20″ long, the sliding-seat rig is compact enough to stow easily. Not having the outriggers and long oars typical of drop-in sliding-seat rigs keeps the versatility of a fixed-seat boat. Perhaps the most interesting possibility is the ability to use this compact slide with a sail-and-oar boat.

This design, with the tracks right on the fixed thwart, keeps the sliding seat as low as possible, so if you can sit on a boat cushion and row, you’ll have enough clearance. You could make higher rowlock socket pads if needed. The length of the rails depends on the rower, but they won’t extend much further forward than where you ordinarily sit. To check how far aft of your fixed thwart the tracks can go, take some scrap and make a temporary seat.

Seats and tracks can be bought from Latanzo or Pocock. They’ll run about $150 to $200. If you are near a rowing club, you may be able to find an old wooden seat, as most racing shells have converted to carbon-fiber seats.

Ben Fuller, curator of the Penobscot Marine Museum in Searsport, Maine, has been messing about in small boats for a very long time. He is owned by a dozen or more boats ranging from an International Canoe to a faering.


Editor’s notes:

I liked Ben’s idea and decided to put a sliding seat in my New York Whitehall. (If you’re wondering why they’re called sliding seats when they actually roll rather than slide, the earliest sliding seats, circa 1870, were wooden seats that had grooves on the bottoms that fit over brass tracks fixed to a thwart. They required lard for lubrication and would slide 10″ to 12″. The “sliding” part of the term stuck even after the transition to wheels.) All during my childhood, my father repaired racing shells and our garage was full of seats, wheels, and tracks. They were just common objects then and it didn’t occur to me then that one day I’d wish I’d kept a few for myself. To make my sliding seat I had to improvise with readily available materials. 


If a carved seat (center) isn't an appealing project, a carriage with flat plywood base can support a manufactured seat (left) or a homemade closed-cell foam pad.Christopher Cunningham

If a carved seat (center) isn’t an appealing project, a carriage with flat plywood base can support a manufactured seat (left) or a homemade closed-cell foam pad.

I had kept a lot of worn-out inline-skate wheels, and the bearings would serve as wheels. I carved the seat from a piece of 1-1/4″ vertical-grain Douglas fir from a salvaged gymnasium bleacher. Modeled after the molded seat shown above, it is 12-3/4″ wide, 7-1/4″, front to back; the centers of the 1-7/8″ holes are 4-1/2″ apart and 3-1/4″ forward of the aft edge; and the notch is 2-3/4″ deep. The carved contours are only about 1/2″ deep. If that project is a bit more work than you’d like to take on, a piece of dense foam cut to the outline of a rowing seat will serve well. The the large notch and the holes take the pressure off your tailbone and sit bones.

The inline-skate bearings fit 5/16" bolts. The hole in the aluminum angle is threaded and the nut opposite the bearing locks the bolt in place. I filed the bolt head smooth and polished it to minimize drag when it contacts the track's upright surface. Grease on both of each track's surfaces makes this arrangement run smoothly.Christopher Cunningham

The inline-skate bearings fit 5/16″ bolts. The hole in the aluminum angle is threaded and the nut opposite the bearing locks the bolt in place. I filed the bolt head smooth and polished it to minimize drag when it contacts the track’s upright surface. Grease on the tracks’ horizontal and vertical surfaces makes this arrangement run smoothly (see Update below).

The skate bearings fit nicely on 5/16″ bolts. Two pieces of 3/4″ aluminum angle serve to hold the bearings; they’re drilled and tapped and nuts lock the bolts. The same aluminum angle stock serves as the tracks. The bottom part needs to be kept smooth, so I added 3/4″ square ash pieces to the plywood base and drilled holes and countersinks in the vertical sides of the angles to fasten them to the ash. I screwed a block to the underside of the seat and two blocks to the plywood base as stops to keep the seat from running off the tracks.

I spent about $10 for the aluminum and the rest of the pieces were shop scraps. The bearings and the bolts can drag on the aluminum tracks, but an application of grease makes for smooth rolling (see Update below). I’ll be rowing my Whitehall a lot more now. My thanks to Ben for a great idea.

The support on the aft end of the base is a shouldered tenon that fit into a mortice that extends through the plywood into the hardwood stop block.Christopher Cunningham

The support on the aft end of the base is a shouldered tenon that fits into a mortice that extends through the plywood into the hardwood stop block.


The aft thwart is my preferred rowing position. I have a full foot board solidly attached to the floorboards and no obstructions for the sliding-seat stroke.Christopher Cunningham

The aft thwart is my preferred rowing position. I have a full foot board solidly attached to the floorboards and no obstructions for the sliding-seat stroke.


With a few modifications to get the centerboard pendants out from under the base, the sliding seat will fit over the the center thwart. The footbrace is slung from straps around the aft thwart. While that works for fixed-thwart rowing, I'd prefer a fixed footboard that braces the entire foot for sliding-seat rowing. My reach into the stern for the catch was slightly limited by the contact of my shins against the aft thwart.Christopher Cunningham

With a few modifications to get the centerboard pendants out from under the base, the sliding seat fits over the the center thwart. The footbrace is slung from straps around the aft thwart. While that works for fixed-thwart rowing, I’d prefer a fixed footboard that braces the entire foot for sliding-seat rowing. My reach into the stern for the catch is slightly limited by the contact of my shins against the aft thwart.


UPDATE

While taking a long row with the sliding seat in my Whitehall, I discovered that the lubrication on the bearings, bolt heads, and tracks would get pushed away and the bolt heads would then create some drag on the sides of the tracks. This was especially noticeable when I turned to look over my shoulder. That would twist the seat in the tracks, and when there wasn’t enough lubrication for the bearings to slip back into alignment with the tracks, I’d feel the bolts grating on the aluminum. I added strips of UHMW plastic in between the bearings. The surface of the plastic is just proud of the bolt heads and still fits in the tracks; it keeps the seat aligned and provides a low-friction contact against the aluminum. A dense hardwood, well greased, might be an adequate substitute. 

Strips of dense, slippery plastic now keep the bolt heads from grating against the sides of the aluminum tracks.

Strips of dense, slippery plastic now keep the bolt heads from grating against the sides of the aluminum tracks.

You can share your tricks of the trade with other Small Boats Monthly readers by sending us an email.