Many years ago, I built a sliding seat for my Delaware Ducker using salvaged tracks and a carriage from a canoe’s rowing rig. The Ducker is a pretty quick rowboat, and can be kept over 4 knots; while I couldn’t go faster, with the sliding seat I could go fast longer. Equipping a traditional rowing boat with a sliding seat—without outriggers or longer oars—is an idea that has been around for a while. Mystic Seaport’s elegant Bailey Whitehall, built in 1879, has one and in the early years of the rowing revival, Dick Shew of South Bristol, Maine, was rigging his 16’ Whitehalls to switch between fixed and sliding seats, rowed with the same oars and with the locks set on the gunwales.
I’d been thinking about building a sliding seat for my dory, so I clamped the Ducker slide into it for a test. I knew there would be clearance for the oar handles over my thighs, because I could sit on a throw cushion and still have room. I rowed 15 or so miles in 4 hours, much farther than I anticipated. I liked it, and decided to make one for the dory.
 Ben Fuller
The sliding seat rig, spanning a thwart in the author’s dory, has tracks shorter than those used in racing shells, but appropriate for using the same oars and locks that he uses for fixed-seat rowing. Note the foot brace secured to the floorboards under the aft thwart.
I dug around my shop and came up with a couple of tracks and a seat. The tracks didn’t need to extend very far forward of the fixed thwart—as with most fixed seats, my legs are fairly straight when I am on the thwart. I found I could move 7″ or so aft of the thwart before my shins hit the after thwart. The standard length for tracks is 32″ to 34″, longer than required for the length of the stroke in my dory; I trimmed mine to 20″, a couple of inches longer than I needed. The tracks each had a stop in one end, and I split some dowels for the other. Another option for stops is to secure blocks of wood across the ends of the tracks.
The distance between the seat’s wheels determines the span between the tracks and the length of the boards they’re mounted to. Some careful layout is required to make sure that the tracks are parallel. When everything was square, I drilled holes for the bolts to hold the tracks.
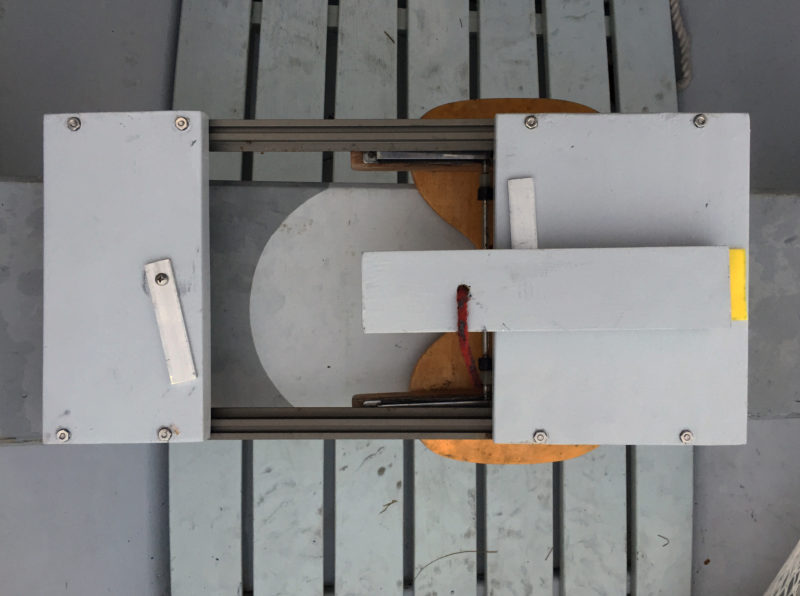
The extruded aluminum tracks are very strong and don’t require any additional support where they cross the thwart. If I had a nice varnished thwart, I’d glue a bit of carpet or neoprene to the track undersides. The wood boards joining the tracks also serve to locate them on the thwart; turn-buttons made of 1/8″ aluminum bar hold the rig in place. I put a hinged strut under the edge to help support my weight when I’ve moved aft for the catch.
 Ben Fuller
On the bottom of the sliding seat there are two aluminum toggles to hold the rig in place on the thwart. The support for the overhanging aft end of the rig folds flat for storage and transport.
With a GPS logging my speed, I found that switching from the fixed thwart to the sliding seat consistently added half of a knot. The 16’ dory isn’t fast, and I have to work hard to maintain 3.5 knots rowing from the thwart; with the sliding seat it is easy to maintain that speed. Rowing 24 strokes per minute, I could have kept going for hours. Pushing off with the balls of my feet helps power the drive; to get the full advantage of the sliding seat you should have a stretcher at the appropriate height. With the sliding seat I can reach farther aft at the catch, so the oar blades reach farther forward , and with the longer stroke I can get the blades buried and have more time to apply more power through the middle of the stroke where it does the most good.
One of the biggest issues with dory is its windage. The additional power of legs makes a significant difference on those days where I only gain half a boat length on a stroke. I took the dory out on an unpleasant rowing day; when I stopped rowing, a nasty chop with wind and tide pushed me downwind at 1.5 knots. With the rig in place I was able to make 2.5 knots to windward, barely 2 without it. I did switch to my shorter oars, shortened the stroke, and sped up the stoke rate, and if it had been rough enough to roll the seat off the tracks, or I had a problem getting the blades out of the water, I could have easily removed the seat and rowed from the thwart.
At only about 20″ long, the sliding-seat rig is compact enough to stow easily. Not having the outriggers and long oars typical of drop-in sliding-seat rigs keeps the versatility of a fixed-seat boat. Perhaps the most interesting possibility is the ability to use this compact slide with a sail-and-oar boat.
This design, with the tracks right on the fixed thwart, keeps the sliding seat as low as possible, so if you can sit on a boat cushion and row, you’ll have enough clearance. You could make higher rowlock socket pads if needed. The length of the rails depends on the rower, but they won’t extend much further forward than where you ordinarily sit. To check how far aft of your fixed thwart the tracks can go, take some scrap and make a temporary seat.
Seats and tracks can be bought from Latanzo or Pocock. They’ll run about $150 to $200. If you are near a rowing club, you may be able to find an old wooden seat, as most racing shells have converted to carbon-fiber seats.![]()
Ben Fuller, curator of the Penobscot Marine Museum in Searsport, Maine, has been messing about in small boats for a very long time. He is owned by a dozen or more boats ranging from an International Canoe to a faering.
Editor’s notes:
I liked Ben’s idea and decided to put a sliding seat in my New York Whitehall. (If you’re wondering why they’re called sliding seats when they actually roll rather than slide, the earliest sliding seats, circa 1870, were wooden seats that had grooves on the bottoms that fit over brass tracks fixed to a thwart. They required lard for lubrication and would slide 10″ to 12″. The “sliding” part of the term stuck even after the transition to wheels.) All during my childhood, my father repaired racing shells and our garage was full of seats, wheels, and tracks. They were just common objects then and it didn’t occur to me then that one day I’d wish I’d kept a few for myself. To make my sliding seat I had to improvise with readily available materials.
 Christopher Cunningham
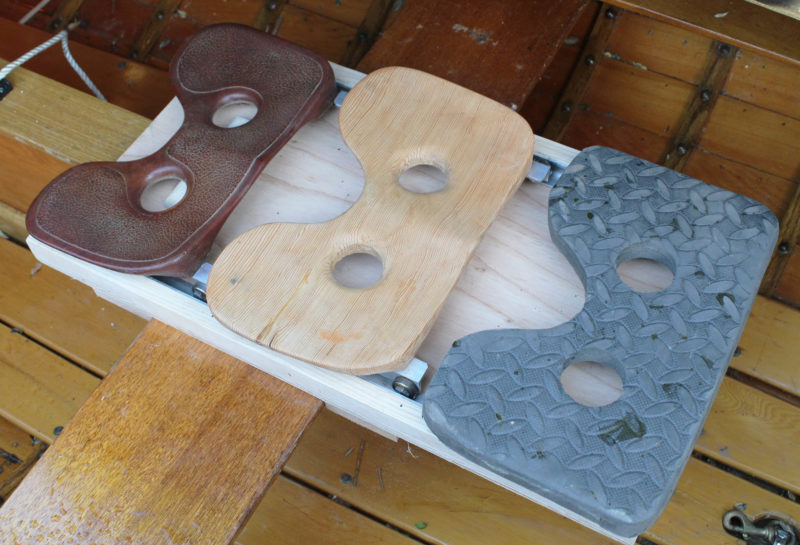
If a carved seat (center) isn’t an appealing project, a carriage with flat plywood base can support a manufactured seat (left) or a homemade closed-cell foam pad.
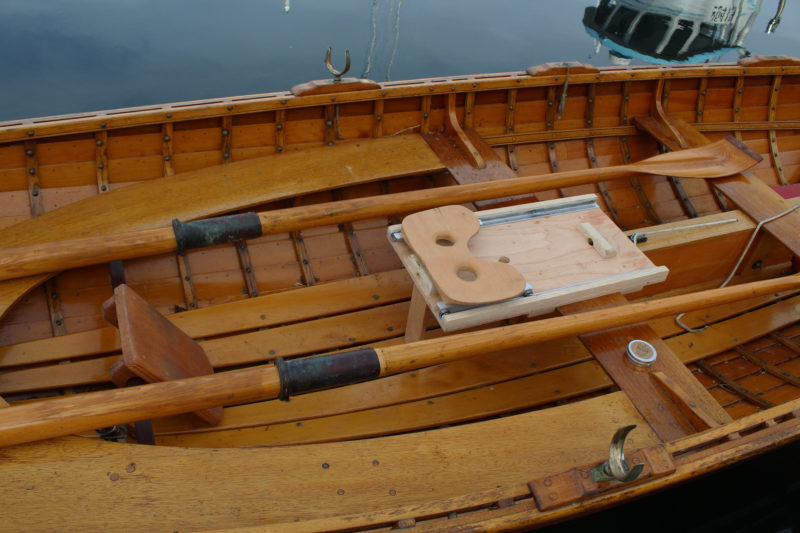
I had kept a lot of worn-out inline-skate wheels, and the bearings would serve as wheels. I carved the seat from a piece of 1-1/4″ vertical-grain Douglas fir from a salvaged gymnasium bleacher. Modeled after the molded seat shown above, it is 12-3/4″ wide, 7-1/4″, front to back; the centers of the 1-7/8″ holes are 4-1/2″ apart and 3-1/4″ forward of the aft edge; and the notch is 2-3/4″ deep. The carved contours are only about 1/2″ deep. If that project is a bit more work than you’d like to take on, a piece of dense foam cut to the outline of a rowing seat will serve well. The the large notch and the holes take the pressure off your tailbone and sit bones.
 Christopher Cunningham
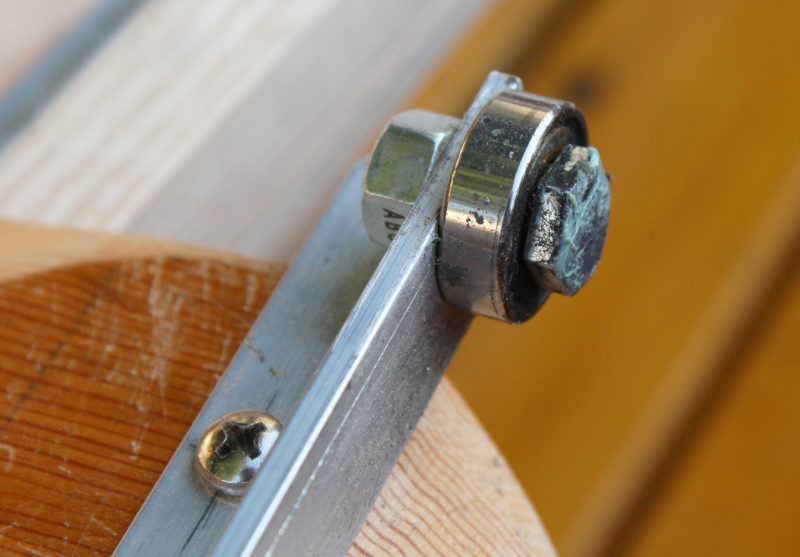
The inline-skate bearings fit 5/16″ bolts. The hole in the aluminum angle is threaded and the nut opposite the bearing locks the bolt in place. I filed the bolt head smooth and polished it to minimize drag when it contacts the track’s upright surface. Grease on the tracks’ horizontal and vertical surfaces makes this arrangement run smoothly (see Update below).
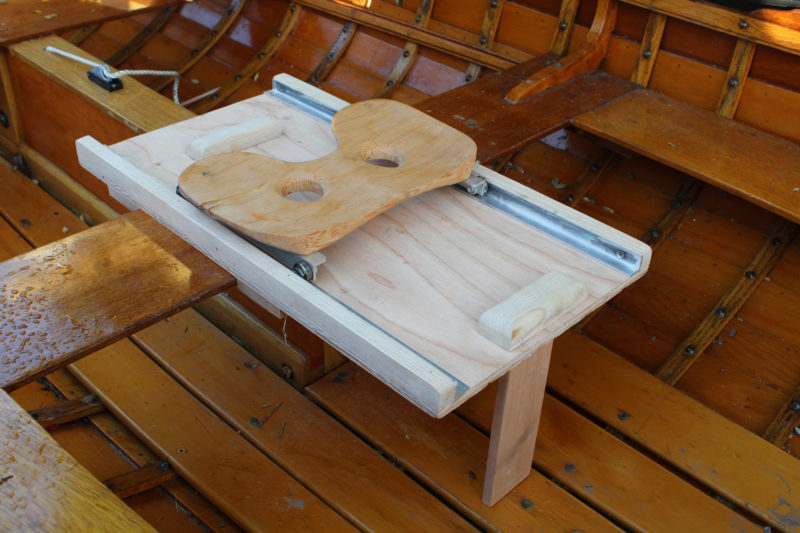
The skate bearings fit nicely on 5/16″ bolts. Two pieces of 3/4″ aluminum angle serve to hold the bearings; they’re drilled and tapped and nuts lock the bolts. The same aluminum angle stock serves as the tracks. The bottom part needs to be kept smooth, so I added 3/4″ square ash pieces to the plywood base and drilled holes and countersinks in the vertical sides of the angles to fasten them to the ash. I screwed a block to the underside of the seat and two blocks to the plywood base as stops to keep the seat from running off the tracks.
I spent about $10 for the aluminum and the rest of the pieces were shop scraps. The bearings and the bolts can drag on the aluminum tracks, but an application of grease makes for smooth rolling (see Update below). I’ll be rowing my Whitehall a lot more now. My thanks to Ben for a great idea.
 Christopher Cunningham
The support on the aft end of the base is a shouldered tenon that fits into a mortice that extends through the plywood into the hardwood stop block.
 Christopher Cunningham
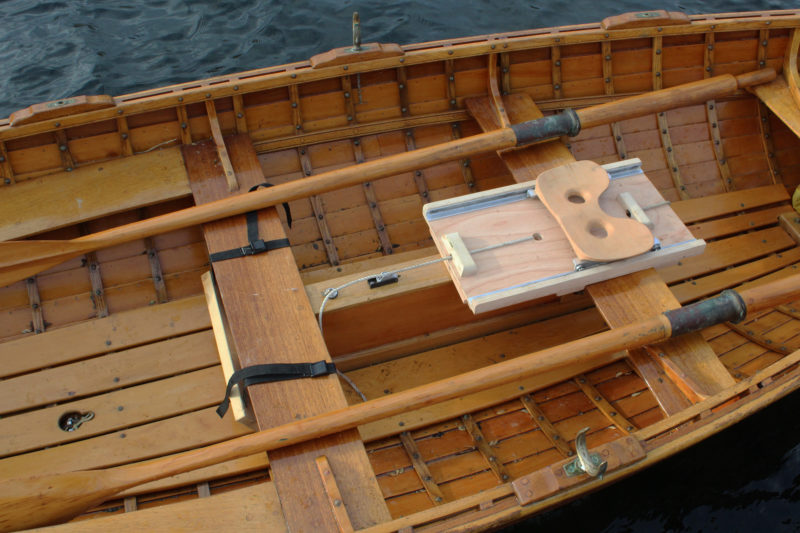
The aft thwart is my preferred rowing position. I have a full foot board solidly attached to the floorboards and no obstructions for the sliding-seat stroke.
 Christopher Cunningham
With a few modifications to get the centerboard pendants out from under the base, the sliding seat fits over the the center thwart. The footbrace is slung from straps around the aft thwart. While that works for fixed-thwart rowing, I’d prefer a fixed footboard that braces the entire foot for sliding-seat rowing. My reach into the stern for the catch is slightly limited by the contact of my shins against the aft thwart.
UPDATE
While taking a long row with the sliding seat in my Whitehall, I discovered that the lubrication on the bearings, bolt heads, and tracks would get pushed away and the bolt heads would then create some drag on the sides of the tracks. This was especially noticeable when I turned to look over my shoulder. That would twist the seat in the tracks, and when there wasn’t enough lubrication for the bearings to slip back into alignment with the tracks, I’d feel the bolts grating on the aluminum. I added strips of UHMW plastic in between the bearings. The surface of the plastic is just proud of the bolt heads and still fits in the tracks; it keeps the seat aligned and provides a low-friction contact against the aluminum. A dense hardwood, well greased, might be an adequate substitute.
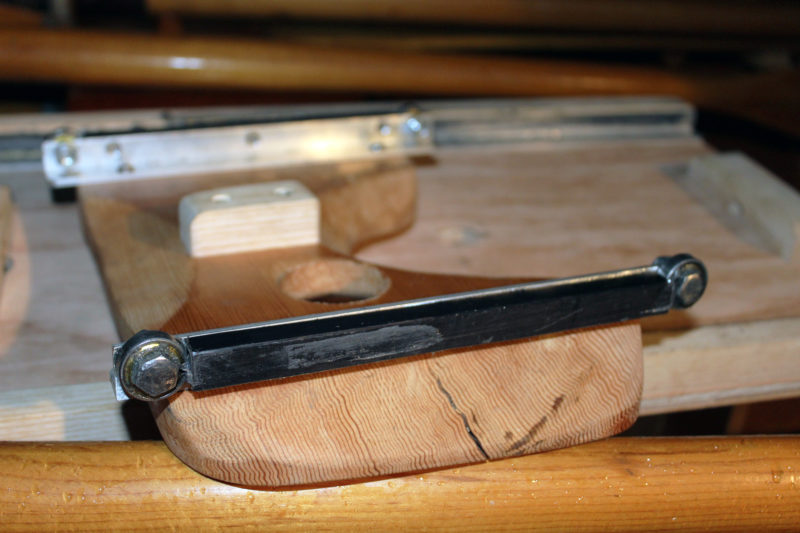
Strips of dense, slippery plastic now keep the bolt heads from grating against the sides of the aluminum tracks.
You can share your tricks of the trade with other Small Boats Monthly readers by sending us an email.
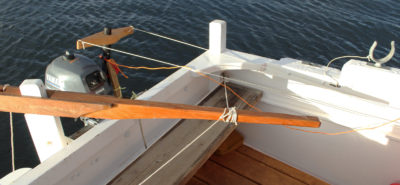





Nice ideas. Very similar to the Finnish sliding seats on the Savo racing boats—sliding seat plus on-gunwale oars. The oars are on a pin, no feathering. This system is one of the easiest sliding seat rigs to use, as the pinned oars don’t feather, and they don’t slide in and out, so all you do is pull on the oars and slide the seat.
Nice job, but your seat is backwards. You’ll notice a difference when you turn it around.
I checked all of the seats in the article and in the comments and they are all correctly installed. I occasionally see seats set backward by rowers thinking the two extensions are meant to support the legs. In fact, the notch between the extensions is to keep the tailbone from making contact with the seat, ,just as the two holes are to eliminate the direct pressure of the ischial tuberosities on the seat.
I grew up the son of a national champion oarsman who coached rowing and repaired racing shells. The garage was always full of racing shells.
Christopher Cunningham
editor of Small Boats Magazine
Nice. As a sliding seat rower, I just shake my head in amazement at fixed seat rowers who don’t even brace their feet—they are just abandoning the largest muscle group of the human body. A couple comments on rowing geometry: 1) you want to be able to get your legs dead straight at the finish, this will likely require being able to adjust the distance of your foot stretcher to the oarlocks; 2) at the finish it is nice to able to press one’s legs down unto the bench (this is where the seat rails attach), it adds a surprising amount power to your stroke and helps stabilize the boat though this is likely more noticeable in a racing shell than a Whitehall. Last a cautionary note about seat comfort: the choice of a rowing seat is very personal — I have been thru six or seven seats before finally finding one I can stand to sit on for an hour or more, so if at first you don’t succeed, try, try again until hit the mark. Many rowers use seatpads, especially those who spend hours (or days or weeks) rowing.
I had a chuckle reading about Ben Fuller’s sliding seat and the adaptation of one for a Whitehall. I’ve been using a sliding seat for rowing our peapod for about 30 years, but it’s not nearly as creative as Ben’s. We also have an Alden ocean shell double, so all I do is remove the Oarmaster, unscrew the riggers and drop the unit onto a mat on the floor of the peapod. I use the aftermost oarlocks and it works just dandy and keeps my weight much lower than if I were seated on the thwart.
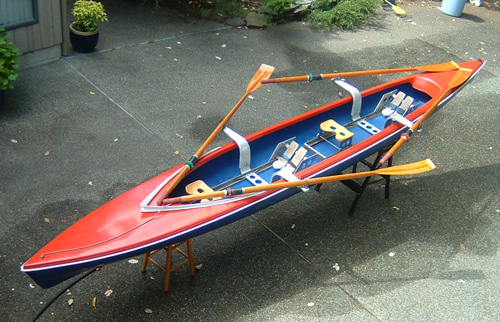
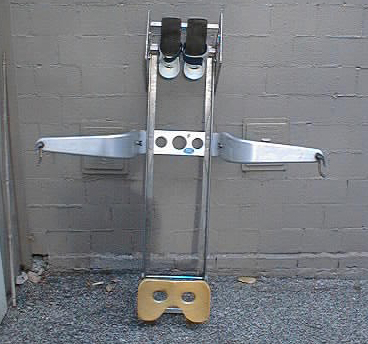

Our ‘pod is a glass reproduction of the LUOMA LOON, a British Columbia handliner. We have no floorboards for it, just a rubber mat to keep things dry and avoid sliding around when pulling on the oars. We use excellent Shaw and Tenney spoon oars 90″ and 96″ long depending on whether my wife is rowing as a double and I’m in the aft rowing position. When using the sliding seat, I use the 96” oars.
Bravo! Didn’t realise it could be so simple.
Installing a sliding seat in my 16′ Swampscott Dory has been on my list of things to add for, oh, I don’t know, 30 years. I can see that having that extra horse power would be useful, but it also adds another layer of complication to a small vessel already filled with spars/ground tackle/camping stuff/etc. Still…. 🙂
Glad that people are finding the article useful.
Pulled the dory, TIPSY, today in anticipation of the first snow of the winter. A nice few miles up the river, no wind, and when out of the tide hitting 3.8, dropping the half knot when not pulling. The sliding-seat rig is really easy to carry, only about 20″ long, fits easy on top of the rowing bag. The old-style double slide seat I have is hard to keep lubricated to keep quiet. I think the modern ones are better. And I definitely use a pad on the seat. TIPSY should be over again for Christmas and New Year’s rowing, but may be a trailer boat for the winter with a easy-to-remove snow-sheltering tarp.
Ben,
Your sliding seat looks like the answer to my prayers.
Am converting 8′ fixed-seat wooden dinghy and need to fit a sliding seat.
Would prefer to fit a sliding seat to the top of the existing seat as per your photos.
In addition to the information contained in your article are you able to provide any updates or additional guidance?
Would be most grateful.
We were hoping to get in a New Year’s row where I could show the rig to some fellow members of the Down East Chapter of the TSCA. Single-digit temperatures, 10 knots of breeze, and a Camden Harbor that is starting to ice has kind of put the kibosh on it. We’ll wait until one of those nice 20-degree days.
This is the first sliding seat I would like to build. Until now I was afraid it would clutter up the boat for sailing. And I like the idea of using skate wheel bearings.
I just made myself a sliding seat rig for FIRE-DRAKE. I only had to acquire some aluminum angle and the inline skate wheel bearings to assemble what’s pretty much a carbon copy of what Chris built. I was worried that the 1/2″ plywood I used for the base might be a little light and too flexible, but it turned out to be OK. On the underside I have a piece of plastic where it sits on the thwart, in the hope that it won’t destroy the varnish. I wanted to keep the finished seat as low as I could to keep from screwing up the ergonomics of the relative positions of butt, feet, and oars, so I appreciated that the bearings-as-wheels solution would do that. I didn’t have a solid block of wood to carve the seat from so I laminated up some pieces of Douglas fir I had. The hole centers are aligned with my ischial tuberosities, so it’s a custom fit. I’ll add a smidgeon of padding—a scrap of wetsuit material from my local dive shop—and I’ll get out on the water to see how well the rig works.
Update: I finally got out on the water to try out the new rig. With the GPS, I rowed back and forth in basically calm conditions first without the rig and then with it. Near as I can tell it adds about 1/4 to 1/3 of a knot to the speed, for the same amount of effort. That is, I can row the empty boat about 3.2 to 3.3 knots with the rig compared to 3.0 knots without it. I’m a little uncertain about the numbers as there was some current flowing through the bay where I did the testing so the speeds were somewhat variable. The other possibility with the rig is to keep the same speed as without it, but simply to expend less effort. On a long trip, where you may be rowing all day, day after day, this might make sense.
Yes, I can definitely see the advantage of putting in less effort per stroke, so as to be able to maintain the same speed as one used to without the rig, and therefore, be able to row for longer periods of time, and therefore, gain additional range, with less fatigue/exhaustion overall.
Thank you for this idea. I will try this out in our peapod.
Hopefully this thread isn’t dead. I have a Fatty Knees 9 dinghy which I use as a tender for my 44ft sailboat. I have been getting into sculling with my local rowing club while I spend the winter in the marina. I am interested in making some type of shorter than usual removable sliding seat. I would like to be able to use my current dinghy as a fitness rower or remove the sliding seat and use it as a tender for people gear etc. What is the smallest boat people have had success putting a sliding seat into?