 Photographs by the author
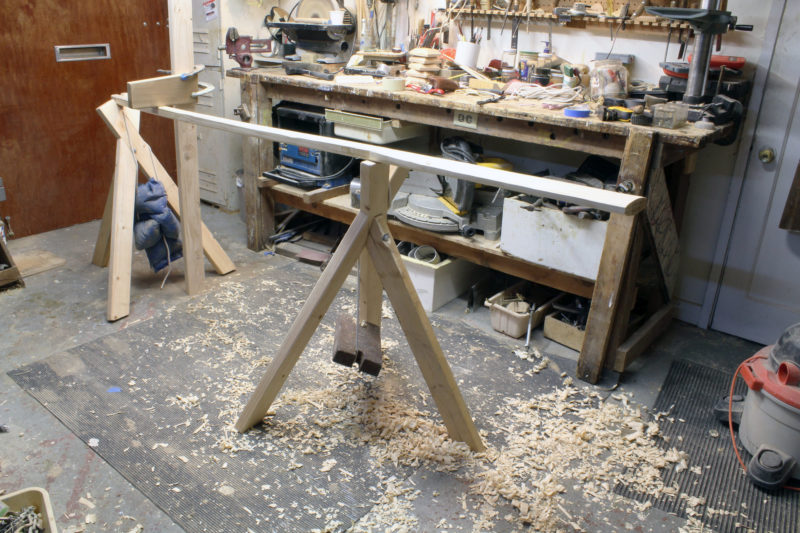
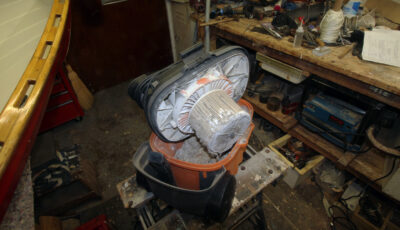
The original stands would have been nailed down, but with my shop’s concrete floor I resorted to weights to keep the stands steady.
Last year I was watching old newsreels on British Pathé’s website and found one filmed in 1950 at the Eton College Boathouse on the River Thames. It was an interesting glimpse of craftsmen working on racing shells and oars, but at first I missed a hidden gem. A few months ago, I watched the film more closely when a friend who’d also seen the newsreel asked me about the work stand the oarmaker was using.
A three-legged stand that supported the blade-end of the oar was clearly visible, but there were no clear shots of what was at the other end. Watching the oarmaker, identified as Len Ferne, I was puzzled by the way he kept moving the oar off the top of the stand, lowering it a few inches to one side, occasionally rotating it, and putting back on top. It could have been interpreted as a nervous tic, but I was pretty sure there had to be a good reason for it.
One shot offered a glimpse of what appears to be the leg of a second stand. I guessed that was supporting the oar handle. The oar blade was cantilevered beyond the support, but it stayed put even with Len planing as vigorously, so something had to be holding the loom down. In another shot, Len did his “nervous tic” twice and both times the loom of the oar come to an abrupt stop in the same place, confirming that there was something fixed over the loom. Len had to give a noticeable tug to get the throat back on the stand, so putting a slight bend in the oar was what held it in position. Brilliant.
I’ve made a fair number of oars for myself and other rowers, and after watching Len work, it was clear that I’d been wasting a lot of time clamping oars to my workbench. Before I made another pair, I had to duplicate the Eton system.
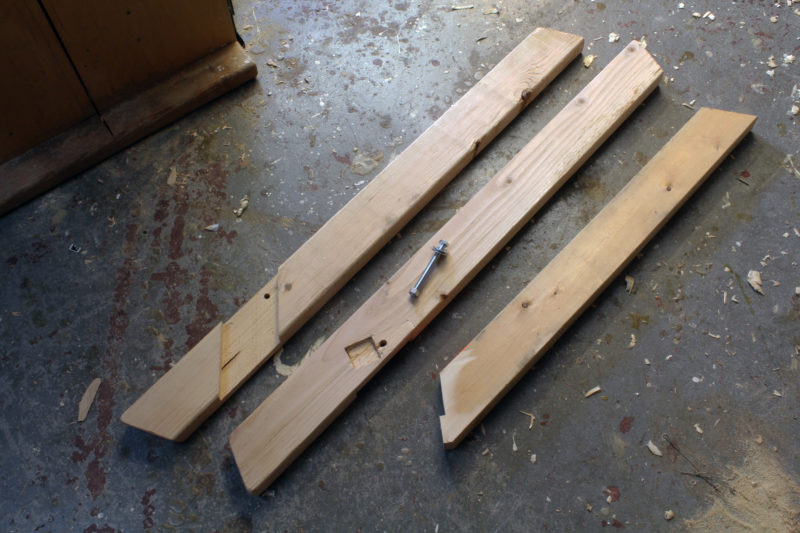
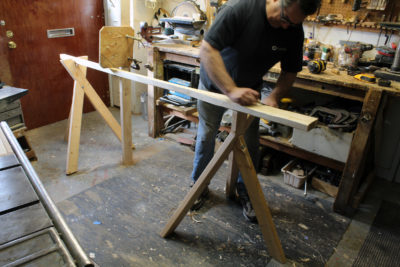
The two longest legs have a half-lap joint cut at 50 degrees. The working leg (center) has a shallow mortice for a tenon on the third leg (right); it’s half lap is on the other side. A single bolt holds everything together.
The project required four 8′ 2x4s, three for the stands and one for a post that would anchor a block to press down on the loom. I cut the legs 42″ long with 65-degree angles at both ends. (I would make the working leg about 45″ long if I were to make another stand.) On the tablesaw I made half-laps centered 32″ from the bottom end at 50 degrees. The third legs have a 50-degree bevel at the top, a 65-degree bevel at the bottom. Before drilling the hole for a single bolt to hold all three legs together, I cut a shallow mortise and tenon to ensure that the third leg doesn’t rotate out of position.
I cut the vertical post just a fraction of an inch longer than the floor-to-ceiling space and tapped it in with a mallet until it jammed in tight (that part of the ceiling, being under my front porch, is concrete).
I’m certain the stands in the Eton boathouse were fastened to the floor. My concrete shop floor didn’t allow that, and I couldn’t afford to dedicate so much space to a single purpose, so I used loops of line to suspend some heavy weights on the stands.
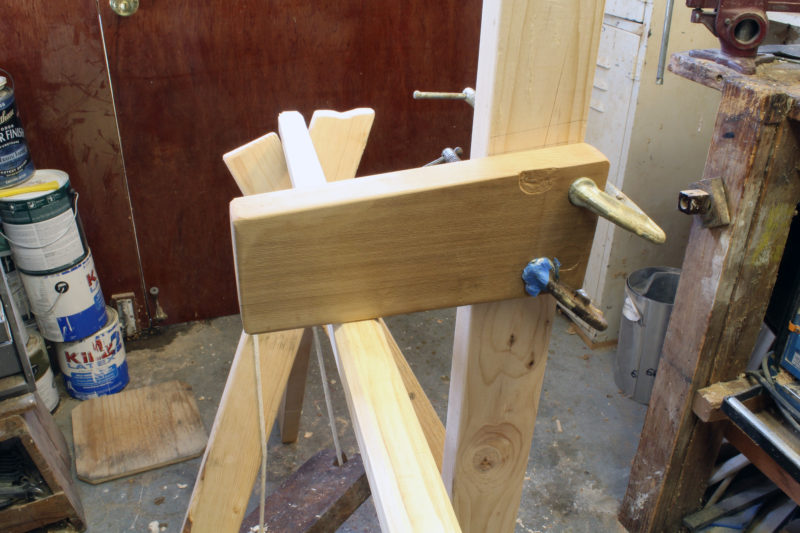
A block of soft red cedar, clamped to a vertical post, provides the downward pressure on the loom. The penciled line on the post indicates the block’s position when it was resting on the unbent oar.
To work the oar blade, its handle end goes in the V of the stand that is set on the back side of the post. That stand should be set so the part of the loom where the leathers will be is even with the post. The throat of the oar then rests for a moment on the top of a leg on the other stand. For the block that gets clamped to the post I used a piece of 1-1/2″ red cedar. It is a soft wood that is less apt to damage the oar. I set the cedar block on top of the oar and marked the post along the top of the block. With the throat of the oar then lowered into the V, I clamped the block about 1/2″ below the mark. When I lifted the throat out of the V, there was the enough pressure to keep the oar firmly in place while being worked, and yet it’s not difficult to lift it to switch its position.
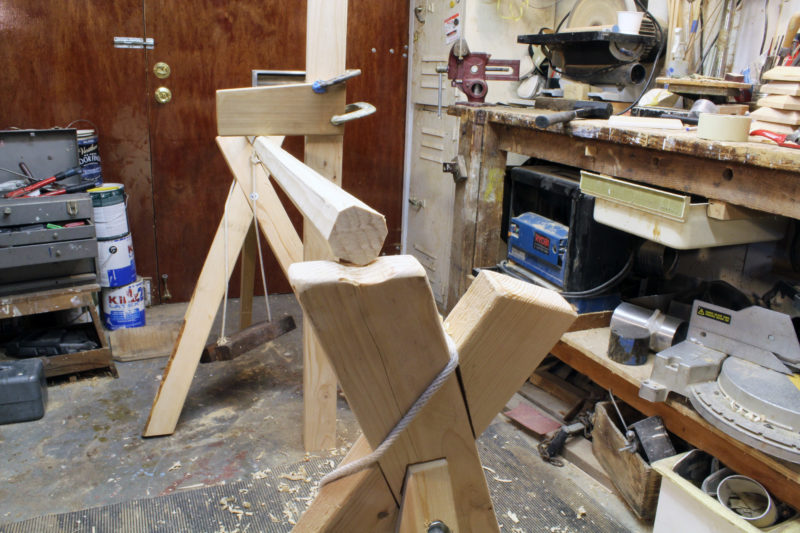
The top of the working leg has a groove to keep the oar from slipping off. If I’d made this leg a few inches longer, I would have more clearance over the top of the other leg when I use a drawknife.
I quickly discovered three things that weren’t working well when I was shaping a glued-up blank for an oar. First, I had cut the top ends of the legs square, and the resulting edge of the leg, as it sits at an angle to the floor, creased the wood at the throat of the blade. I checked the film and saw that the tops were cut parallel to the floor to avoid that damage, so I used a carbide cup on my grinder to flatten the tops. Second, I had made both legs the same length, but discovered the one not supporting the throat interfered with using the drawknife. Another look at the film showed the idle leg was cut shorter; I did the same to my stands, leaving enough length for the V between the legs cradle the oar handle. And third, the oar throat occasionally slipped off the stand. I had noticed in the film that the top of the working leg had a hollow, and I had attributed that to wear, but the groove is intentional and resists lateral pressure on the oar.
Once I got the details right, the stands were a pleasure to use and made the work go ever so much faster than it had with clamps. I could work on both sides of the oar, and shifting it required only one hand—I didn’t even have to put a tool down. Flipping the oar end for end allows work on the whole oar. The system would work for small spars, too.
Having a good pair of oars can make a world of difference in your experience of rowing, and the Eton oar stands can make just such a difference in your experience of making those oars. I’ll be mining newsreels for more gems.![]()
Christopher Cunningham is the editor of Small Boats Monthly. He made his first pair of oars in 1978 and has made oars for all of his boats and for a few other rowers.
You can share your tricks of the trade with other Small Boats Monthly readers by sending us an email.


Chris, I have often thought myself fortunate to have a couple of purpose-built spar and oar-making benches in my workshop, but your Eton Oar Stands show me just what I have been missing. Experience and leather-clad V-blocks have allowed me to perfect my clamping system, but those stands look to be miles better. Thanks very much indeed for the insight. A set will be gracing my shop very soon.
I like this system and I think it is very effective. I’ve always had the problem of wasting time fixing the oars to be processed. I currently use a wall-mounted clamp on a turntable. I will still study the system presented in the article and maybe I will make useful suggestions. Thank you.
What a great find, Chris! I have only a few more set of oars and spars left in me, but this is so simple to make I have to have one. Thanks for your generosity in publishing your version of this very practical addition to a workshop. There will be many others out there who will not believe their luck when they clap eyes on this little gem.
How does the 2×4 and clamped wood piece stand up when you take out the oar to reposition it? It seems like it should fall down.
The 2×4 is jammed between the concrete floor and a concrete ceiling. I measured the distance between them and cut the 2×4 not quite 1/4″longer and tapped it in with a dead-blow mallet. It’s jammed in good and tight and doesn’t budge while I’m working on the oar, but a few taps of the mallet at the bottom of the 2×4 frees it when I want to clear the shop space.
This is pretty slick and would likely work well for Inuit paddle making.
I stumbled on something using the cantilever principal when trying to work out a simple way of managing my leathered oars in need of revarnishing. I use two sawhorses tucking the handle under one and resting the leather on the other. A pair of spring clamps on the leather horse keeps it from rolling off. Then varnish. When one is done, put another alongside it positioning it with springs clamps again. The horses I use are wide enough for two pairs of oars. The hard prep work happens with sandpaper on a bench or on the two horses spread apart.
How did the Etonians hold the oars for varnishing?
The stands could work for making traditional kayak paddles. I’d set the back stand to cradle the loom to make it easy to rotate the paddle. The British Pathé film of the Eton oar makers shows Eric Holttum doing some varnishing but we only see him holding the throat of an oar while he varnishes the blade and then leaning the oar against a wall with only the unvarnished grip and the copper tip making contact.
In the link below you can see pictures and movies of the oars and the system I use for rotating them.
https://www.flickr.com/photos/arturissimo/41767289812/in/album-72157690520705860/