runabout Archives - Small Boats Magazine

MEGOLA

Ernest Pattillo was born into a corn-milling family in Tallassee, Alabama, about 30 or so miles from Montgomery, the state capital. The mill and the creek running by it offered everything a boy could want: scrap lumber, nails, hammers, and saws; turtles, catfish, and swimming.

In the mid-1950s, when Ernest was 10 years old, he and his cousin Alton, mindful of summer’s passing, wanted to do something exciting before school started. The creek suggested a boat, and the cast-offs littering the mill suggested building one. They started with a bent and rusted sheet of corrugated metal roofing and a 2×4 bristling with old nails. The boys pulled nails and sawed off two lengths of 2×4 for stems. After they folded the ends of the roofing around the stems and nailed them home, they applied tar to seal the gaps there and the buckshot holes everywhere else. The canoe was only 5′ long and could only hold one of them, so they built a second.

When the cousins got their canoes to the creek, they quickly realized they would have to scale back their dreams for the first expedition. The canoes were unstable and had barely an inch of freeboard. They only had their hands for paddling and had to reach carefully over the sharp edges of the roofing to keep from cutting their armpits. Ernest and Alton used the canoes until their youthful enthusiasm took them in other directions.

Roughly 37 years went by before Ernest seriously considered building another boat. An article by Mac McCarthy in the May/June 1991 issue of WoodenBoat was an illustrated guide to the construction of a strip-built version of Henry Rushton’s Wee Lassie double-paddle canoe. The article included Rushton’s lines for a 10′ 5-3/4″ by 27″ canoe. The drawings on the magazine page were small and without offsets but they were enough to inspire Ernest to take measurements from the picture and stretch the canoe to build a 12′ version.

Ernest stripped his Wee Lassie with fir, gave it a sturdy sheathing of fiberglass, and wound up with a canoe that looked good but was “heavy as lead.” When he launched it for the first time, he got aboard gingerly and was surprised and alarmed when his wife-to-be, Megan, “plopped herself in right behind me. That scared me, as I had no idea if it would even float, much less carry two. But it did, and we paddled upriver and down on the Coosa River, right here in central Alabama.”

Ernest never grew to feel at ease in the canoe, even though it was a significant improvement on his first canoe with its nonexistent freeboard and sharp, rusty gunwale. He put it up for sale and it went quickly.

Ernest and Megan eventually married, settled down, and before long the urge to build another boat struck again. Ernest thought his son from his first marriage might enjoy having a boat for fishing. He read up on marine design, “understood some of it,” and drew up a 12′ flat-bottomed plywood skiff. It looked good, kept the water out, and made good speed with an electric trolling motor. His son was pleased to have it but had no place to store it out of the weather. The boat moldered away. “Sometimes,” Ernest sighed, “all the work in the world seems to be for naught.”

His fourth boat fared better, though it might not truly qualify as a boat because it never got wet. A wealthy stockbroker had heard that Ernest had built a canoe and commissioned him to build one to keep at his lakeside cabin. Ernest studied Mac McCarthy’s book to expand his strip-building knowledge and put his best work into the canoe. When the customer picked it up, he was delighted with the beautiful colors of the western red cedar strips, the mahogany sheer, and the woven cane seat. A few weeks later, he sent a picture to Ernest, showing the canoe, forever high and dry, hanging upside down from the 30′-high living room ceiling of his “cabin” mansion.

Ernest’s fifth boat was another flat-bottomed fishing boat of his own design. It was a 15-footer for a 25-hp outboard. He built the boat to last: 1/2″ plywood on oak frames, fiberglassed inside and out, and painted with baby-blue epoxy paint. It looked great and would last for decades, even if left out in the weather. After launching it, Ernest went fishing a few times and decided to build casting decks for it. Before he finished the decks and had a chance to install them, a storm rushed through and blew a neighbor’s towering pine tree down. It fell across the fence and smashed across the boat from gunwale to gunwale. “It was ruined. I gave it away. I guess it could be made to still float, but I was practically in tears when they hauled it away. And it really killed me when the guy just dragged it on the concrete driveway as he was loading it.”

Photographs by and courtesy of Ernest Pattillo

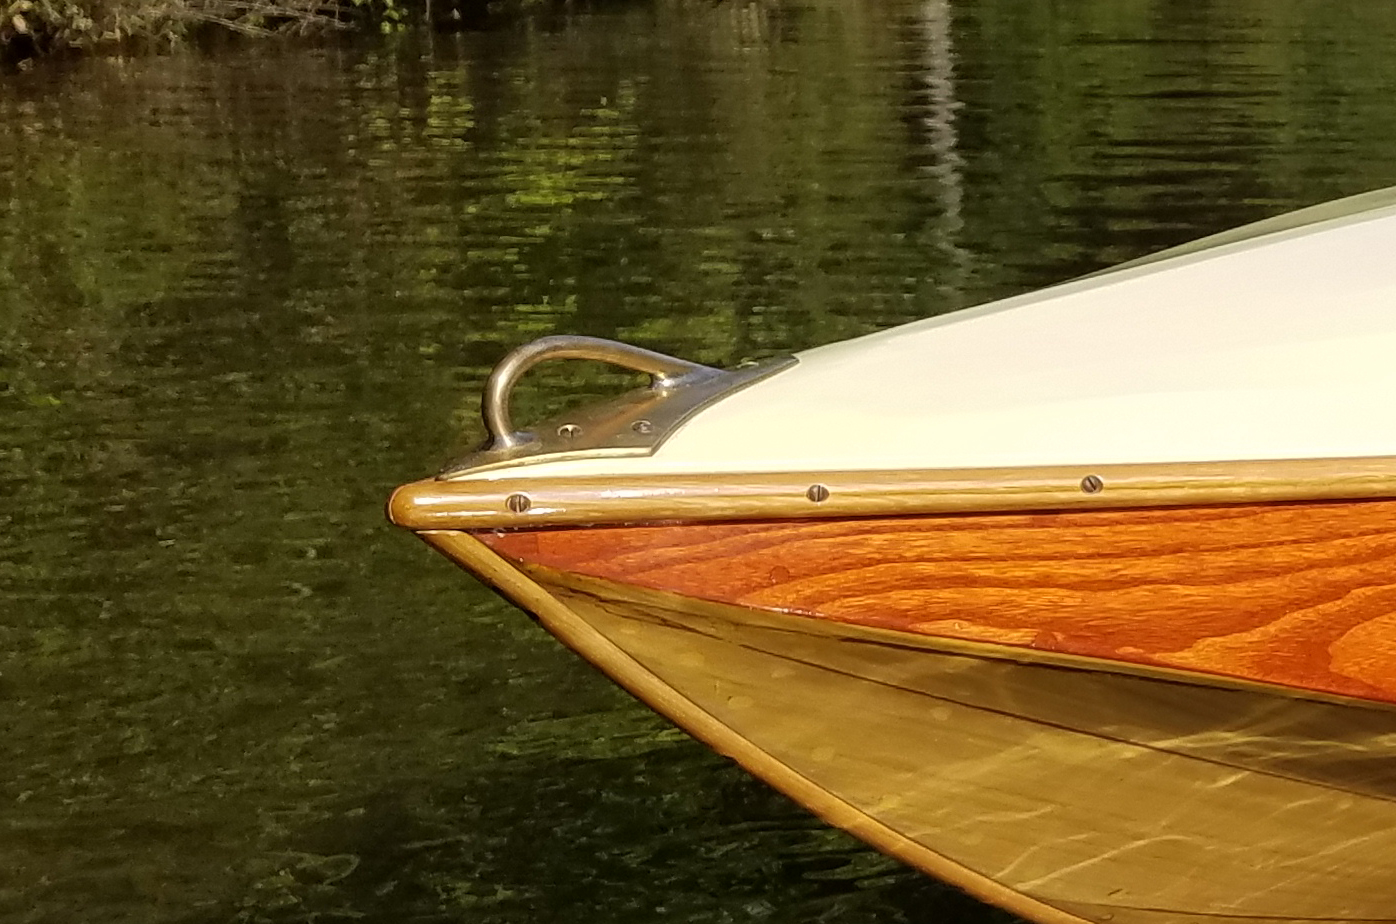
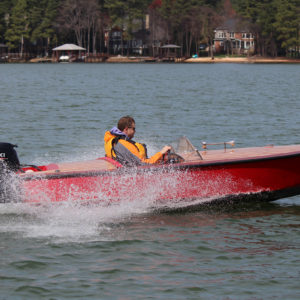
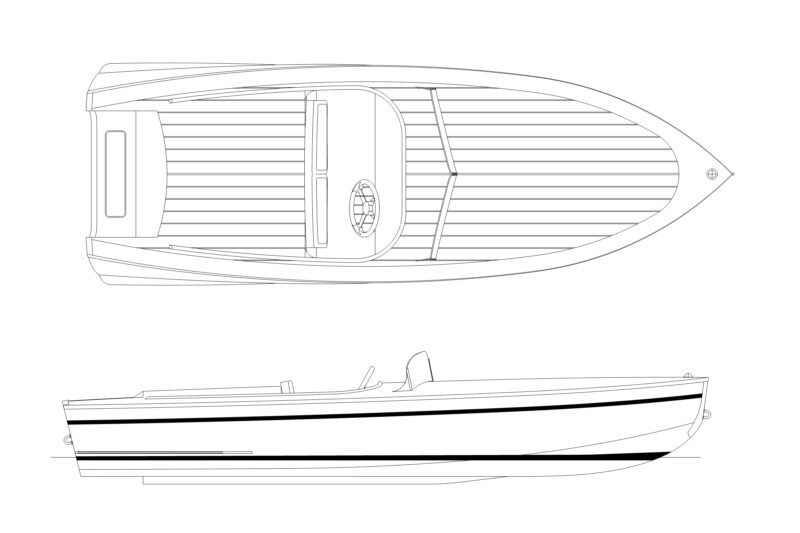
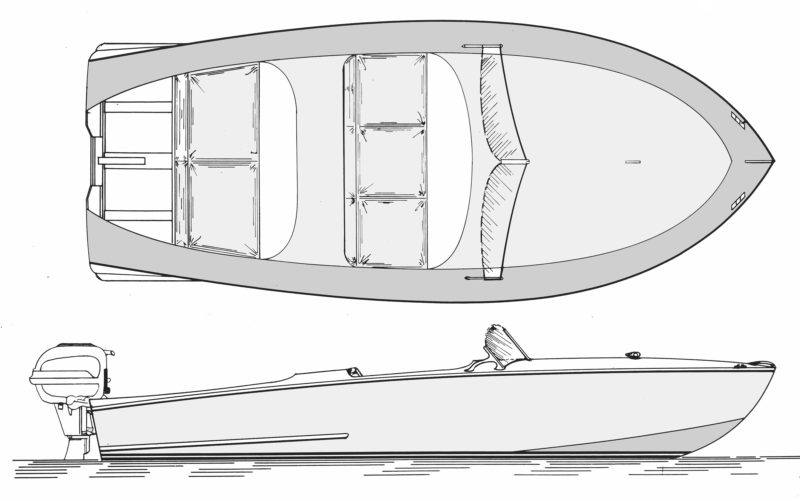
Ernest drew his runabout as a scale drawing and took careful measurements to scale up to the 14′ boat. A bit of tumblehome at the stern would provide a distinctive touch.

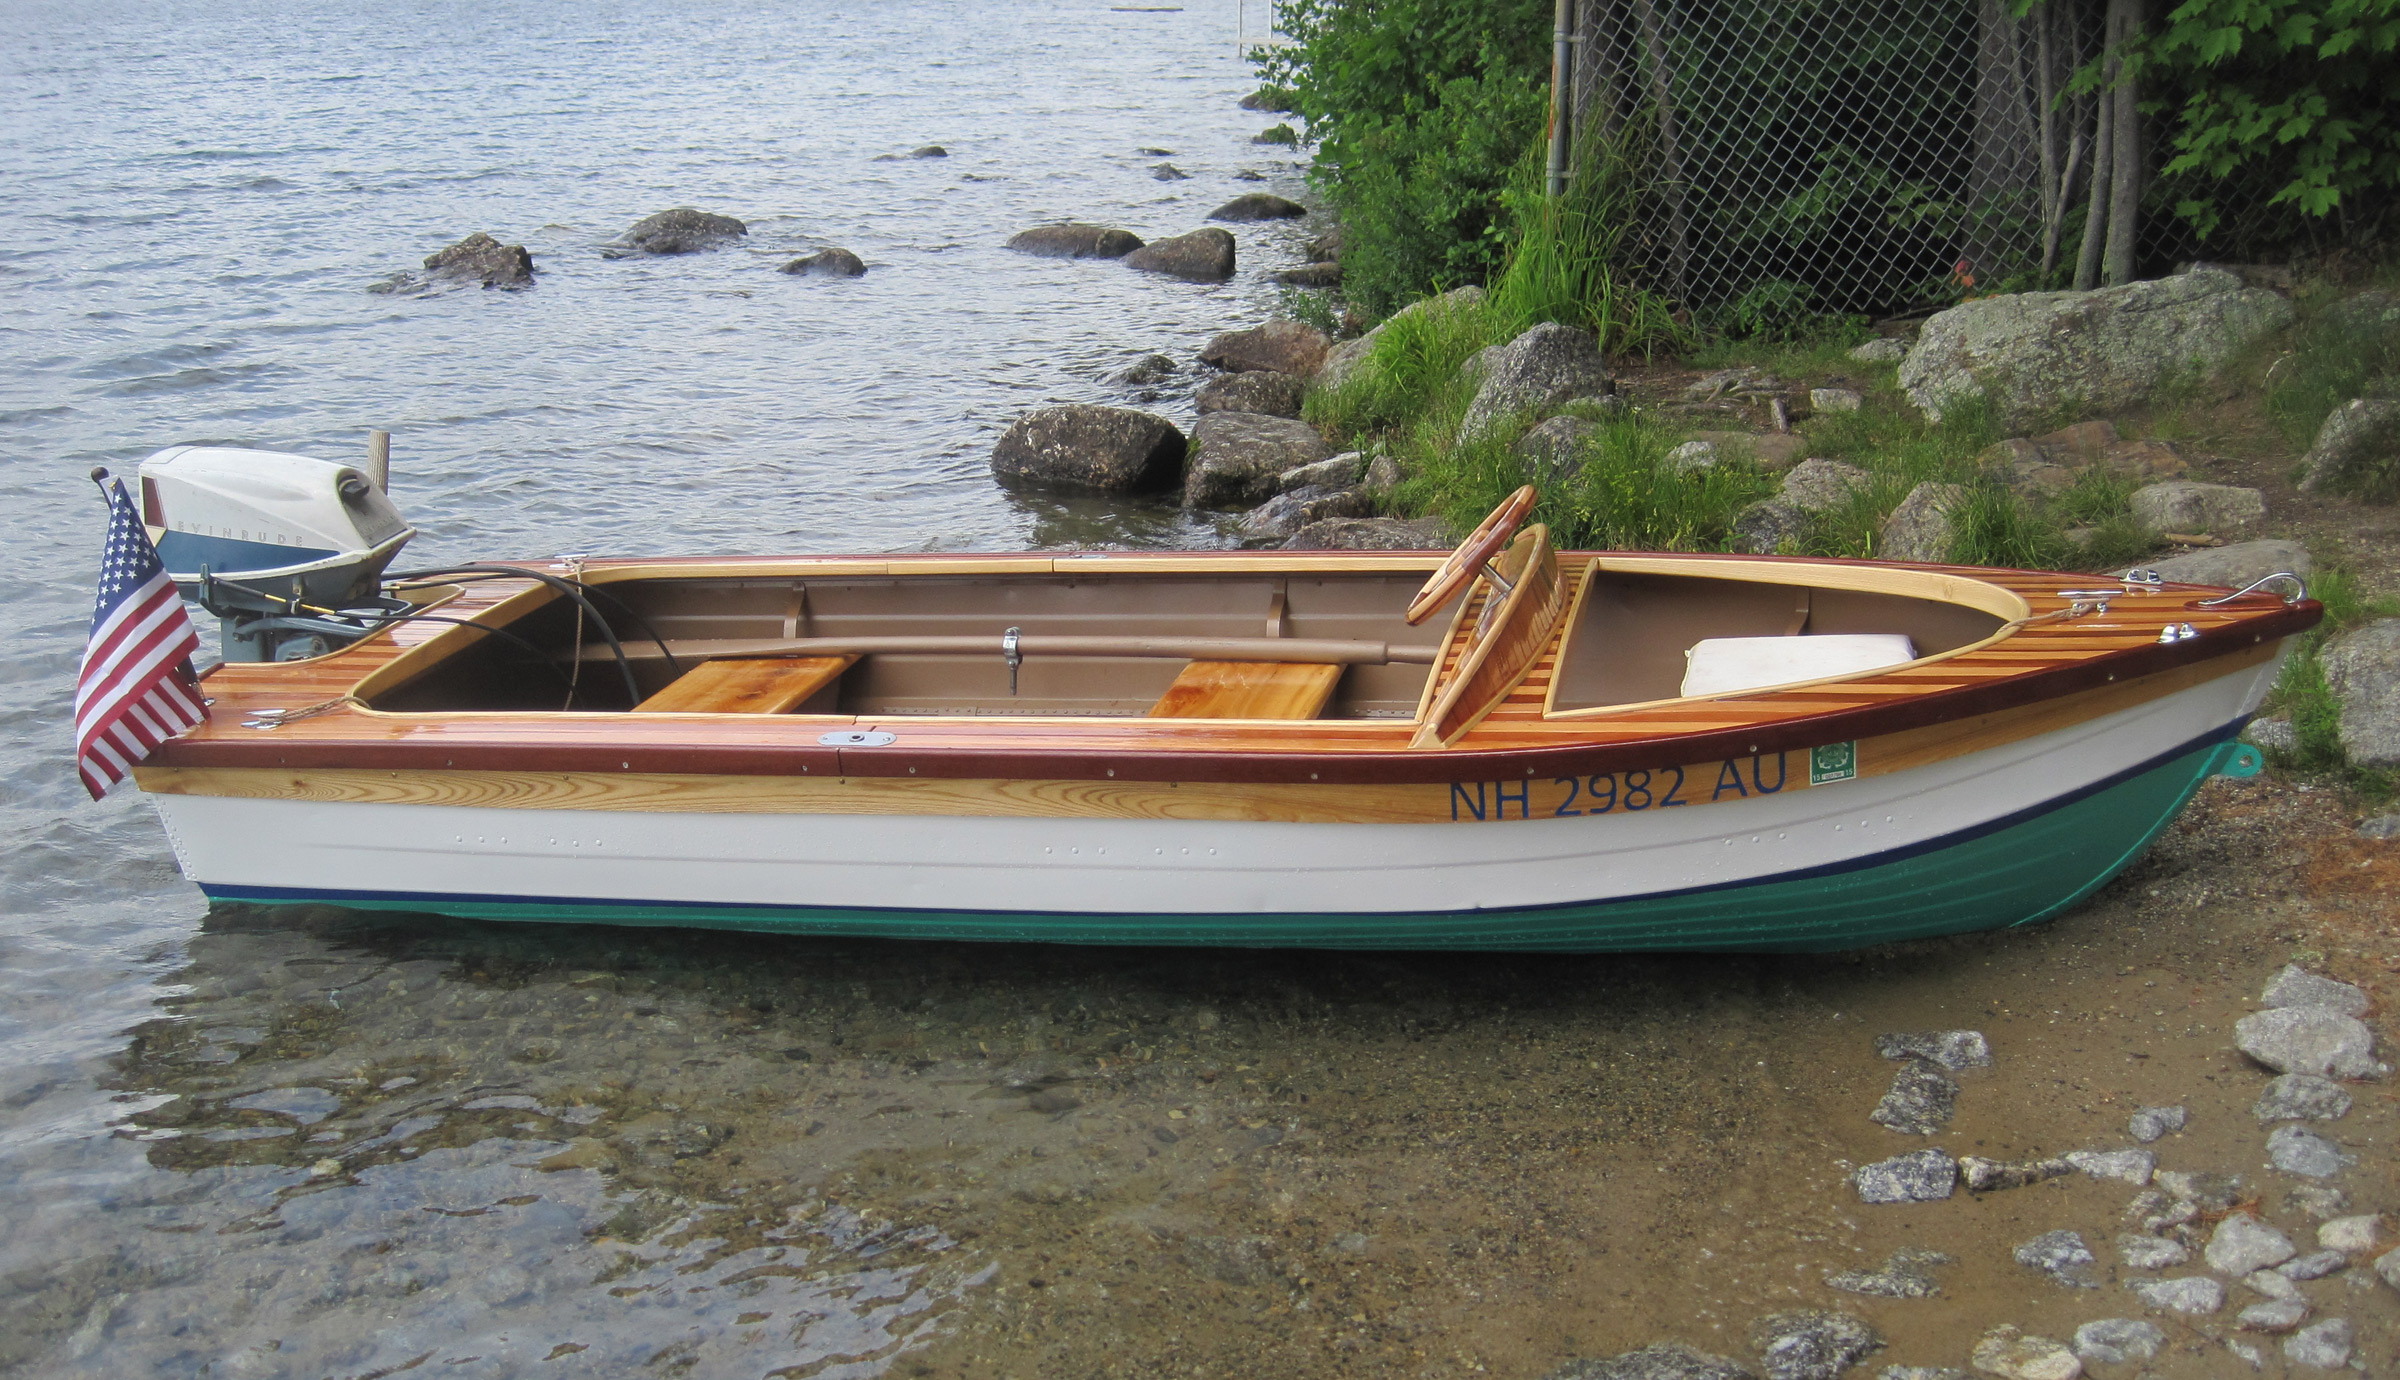
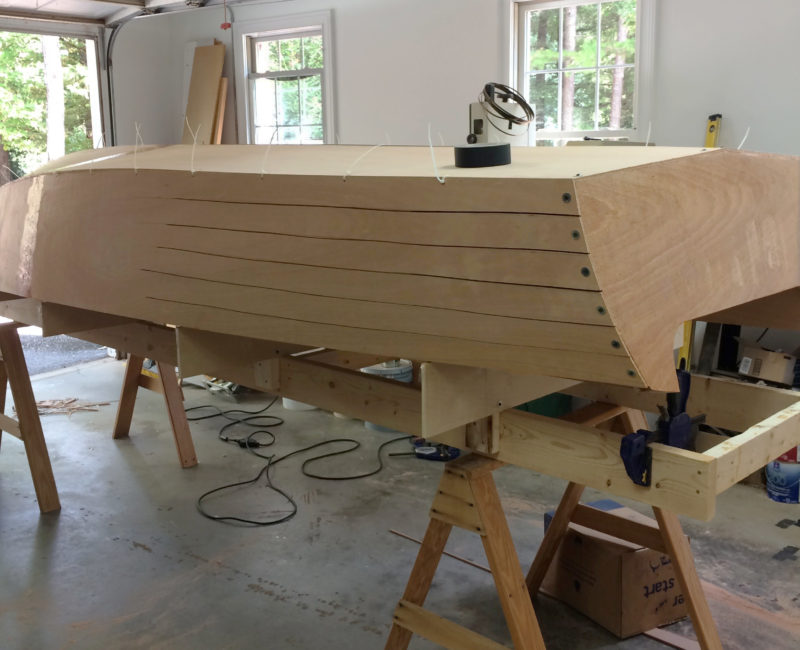
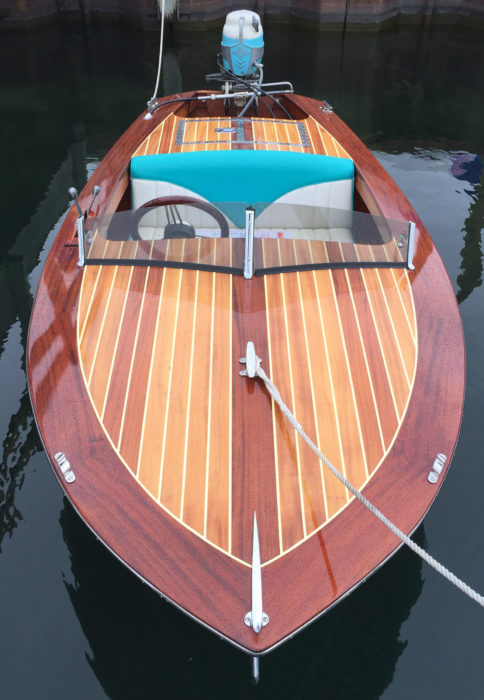
Ernest says that his sixth boat, a 14′ inboard electric cruiser, was his last. He drew a rough plan for a flat-bottomed boat with flat, nearly plumb sides, and tightly radiused chines. He set up closely spaced 3/4″×1″ white-oak frames, half-lapped at the chines, and prepared for strip planking.

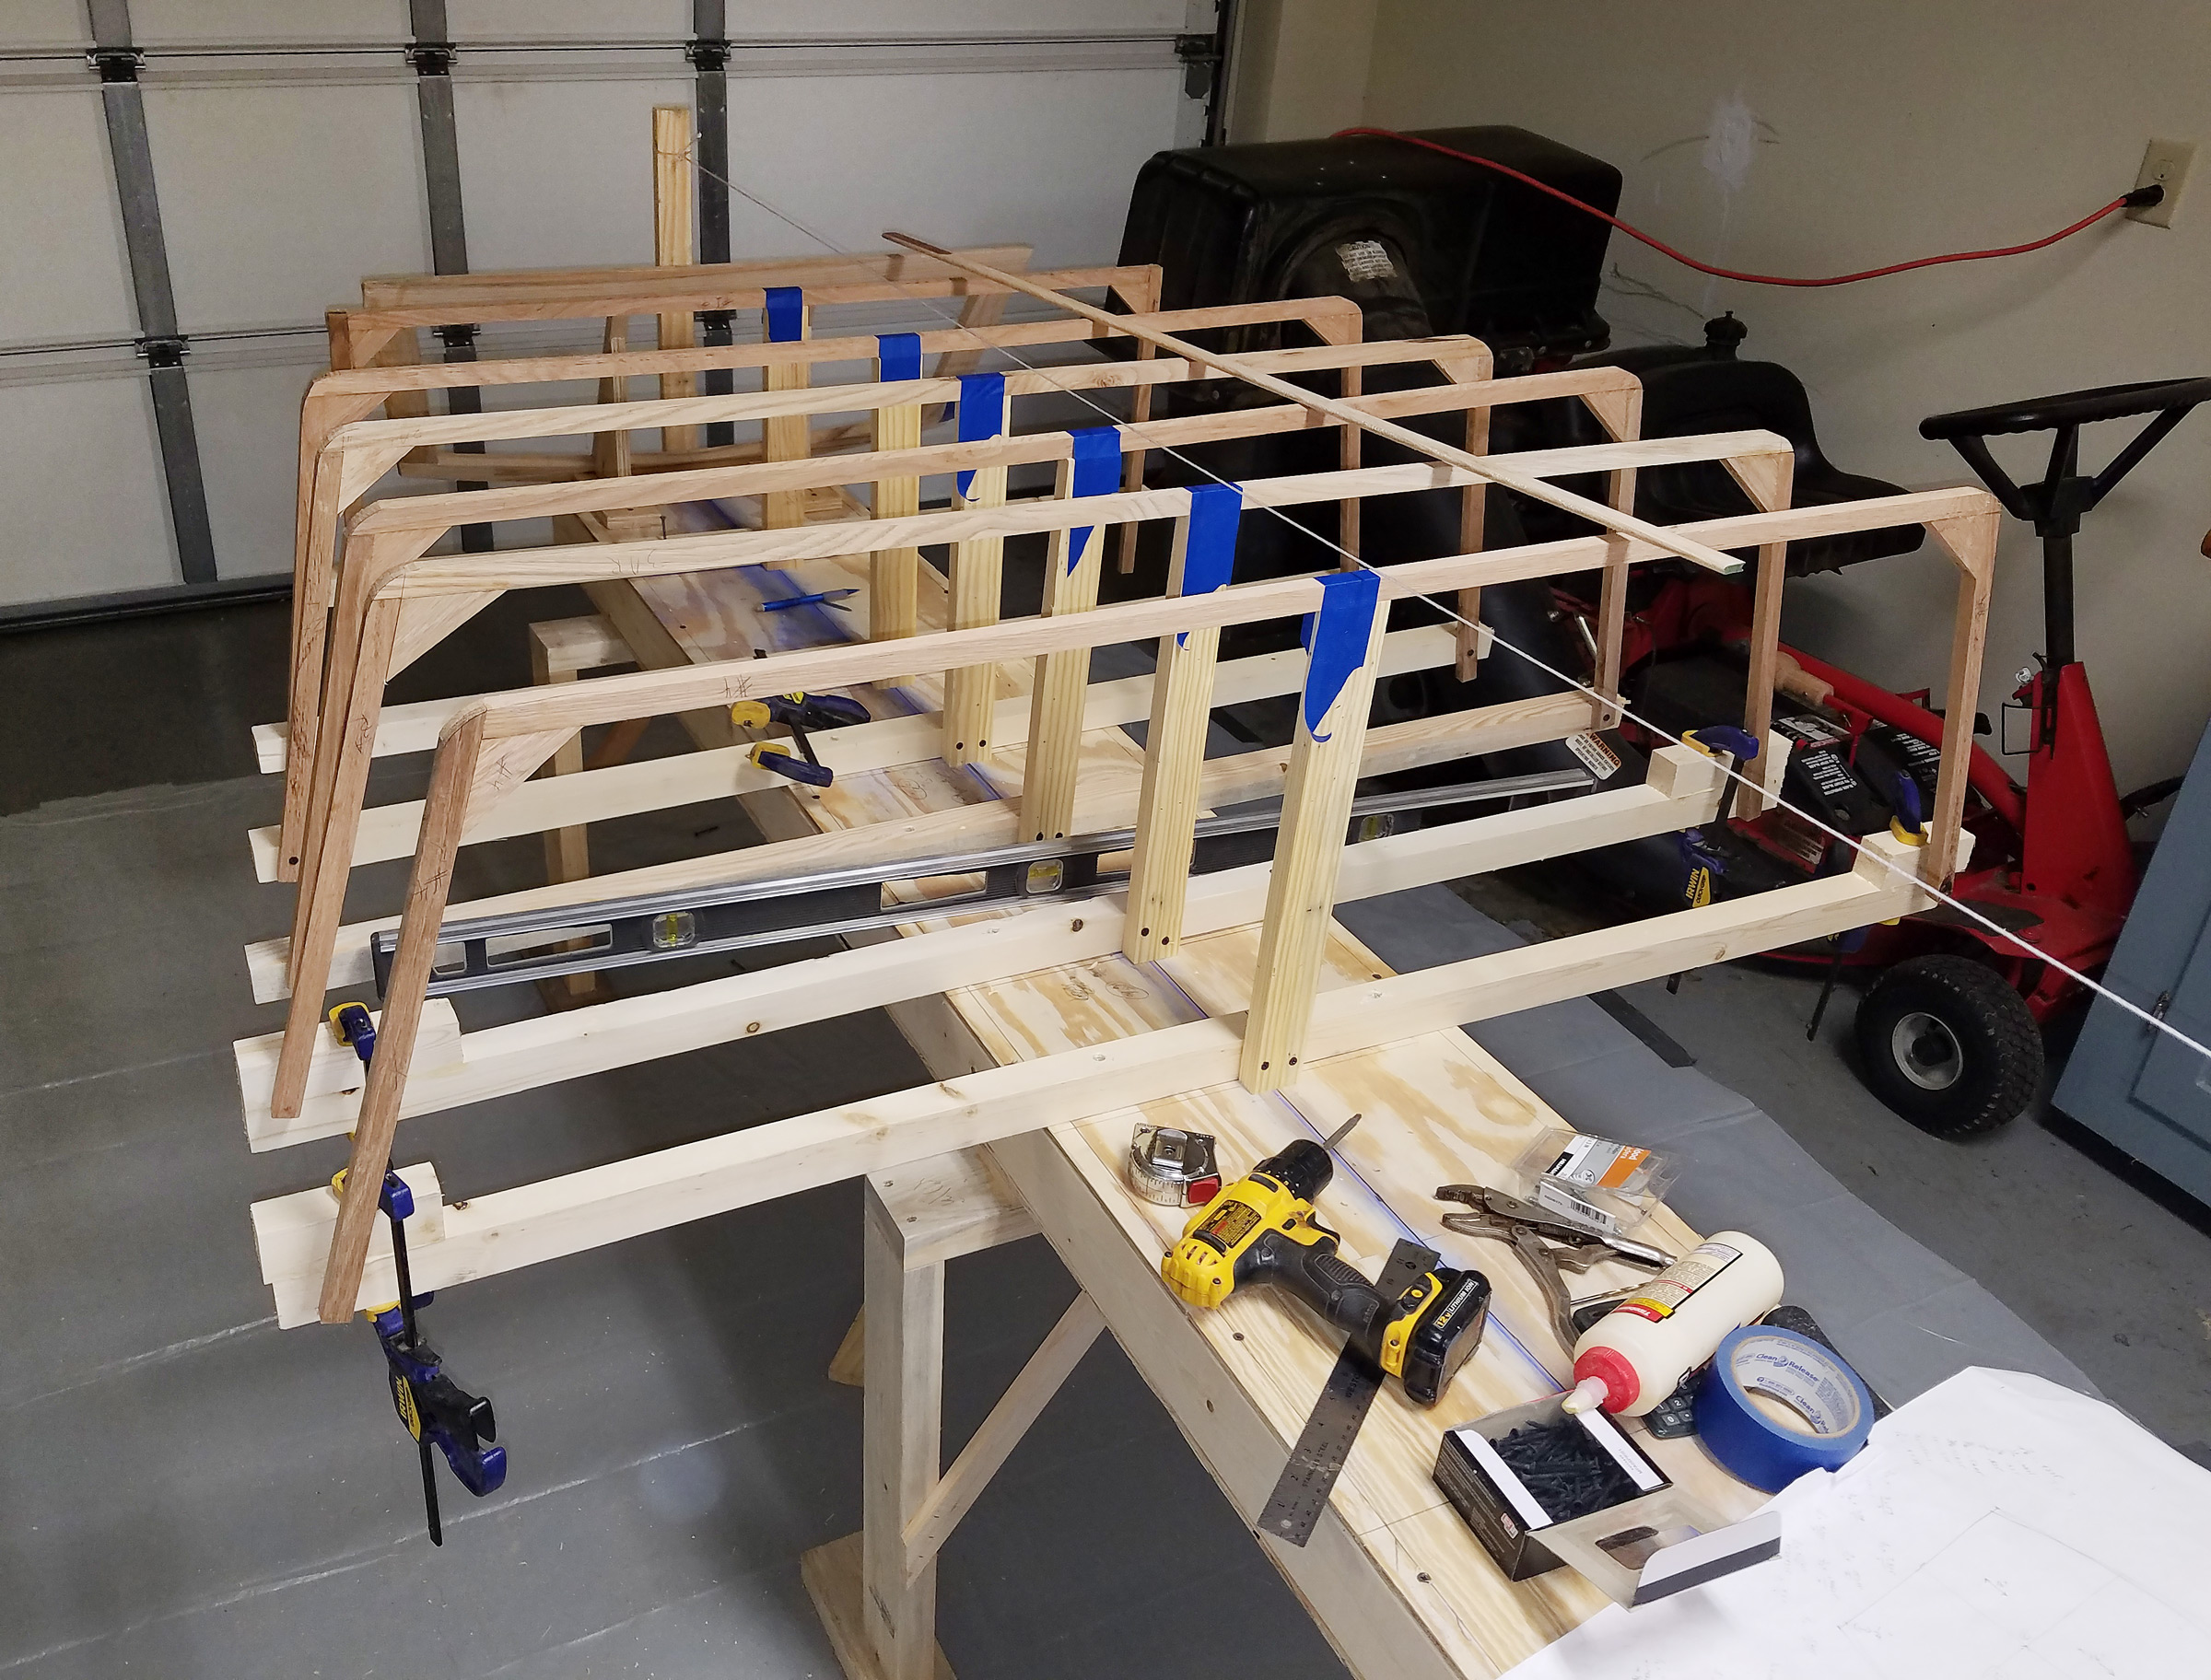
The white-oak frames were supported by 2×2s screwed to the strongback.

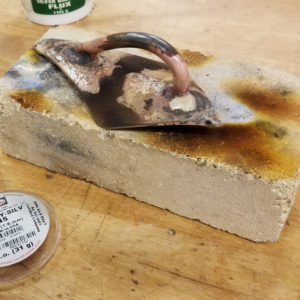
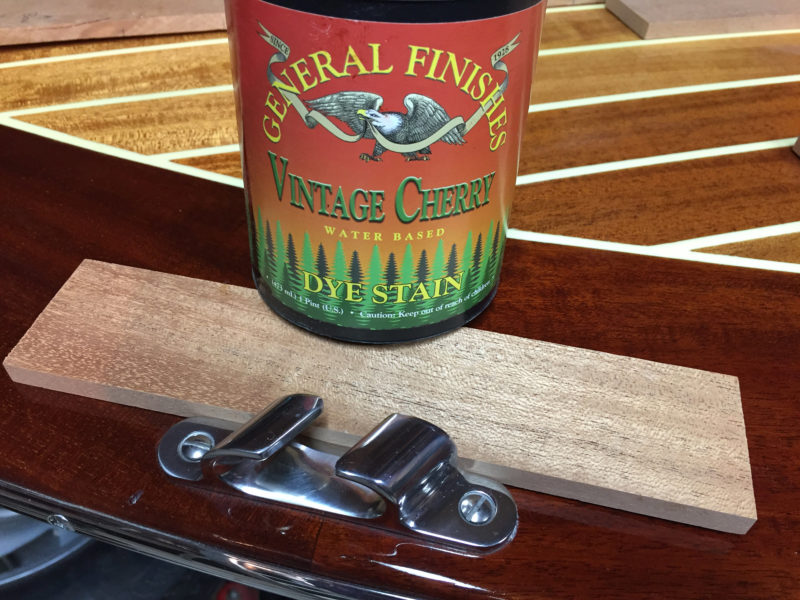
He could get cypress for the 1/4″-thick strips from a bandsaw mill not far from his home. He did the bead-and-cove milling on the strips himself and set up a low-angle sanding jig on his standing belt sander to cut the scarfs. After ’glassing and painting the finished hull’s exterior, Ernest flipped the boat right-side up and outfitted the boat with bow and stern decks, bass-boat seats, and a trolling motor.

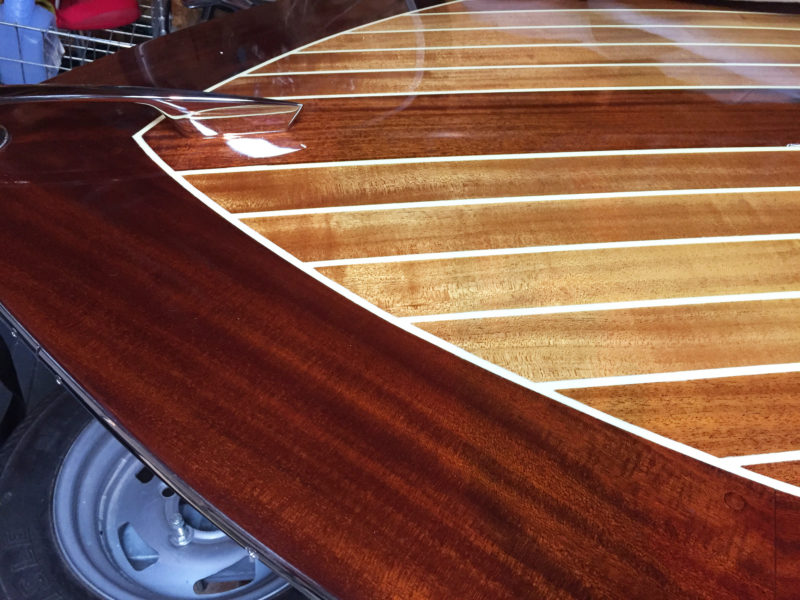
The cypress strips were light and easily worked. The flat sides and bottom might have been more quickly worked with plywood—yet boatbuilding is not always a means to an end, but often so pleasing a way to spend time that there’s no need to take the shortest path to finishing.


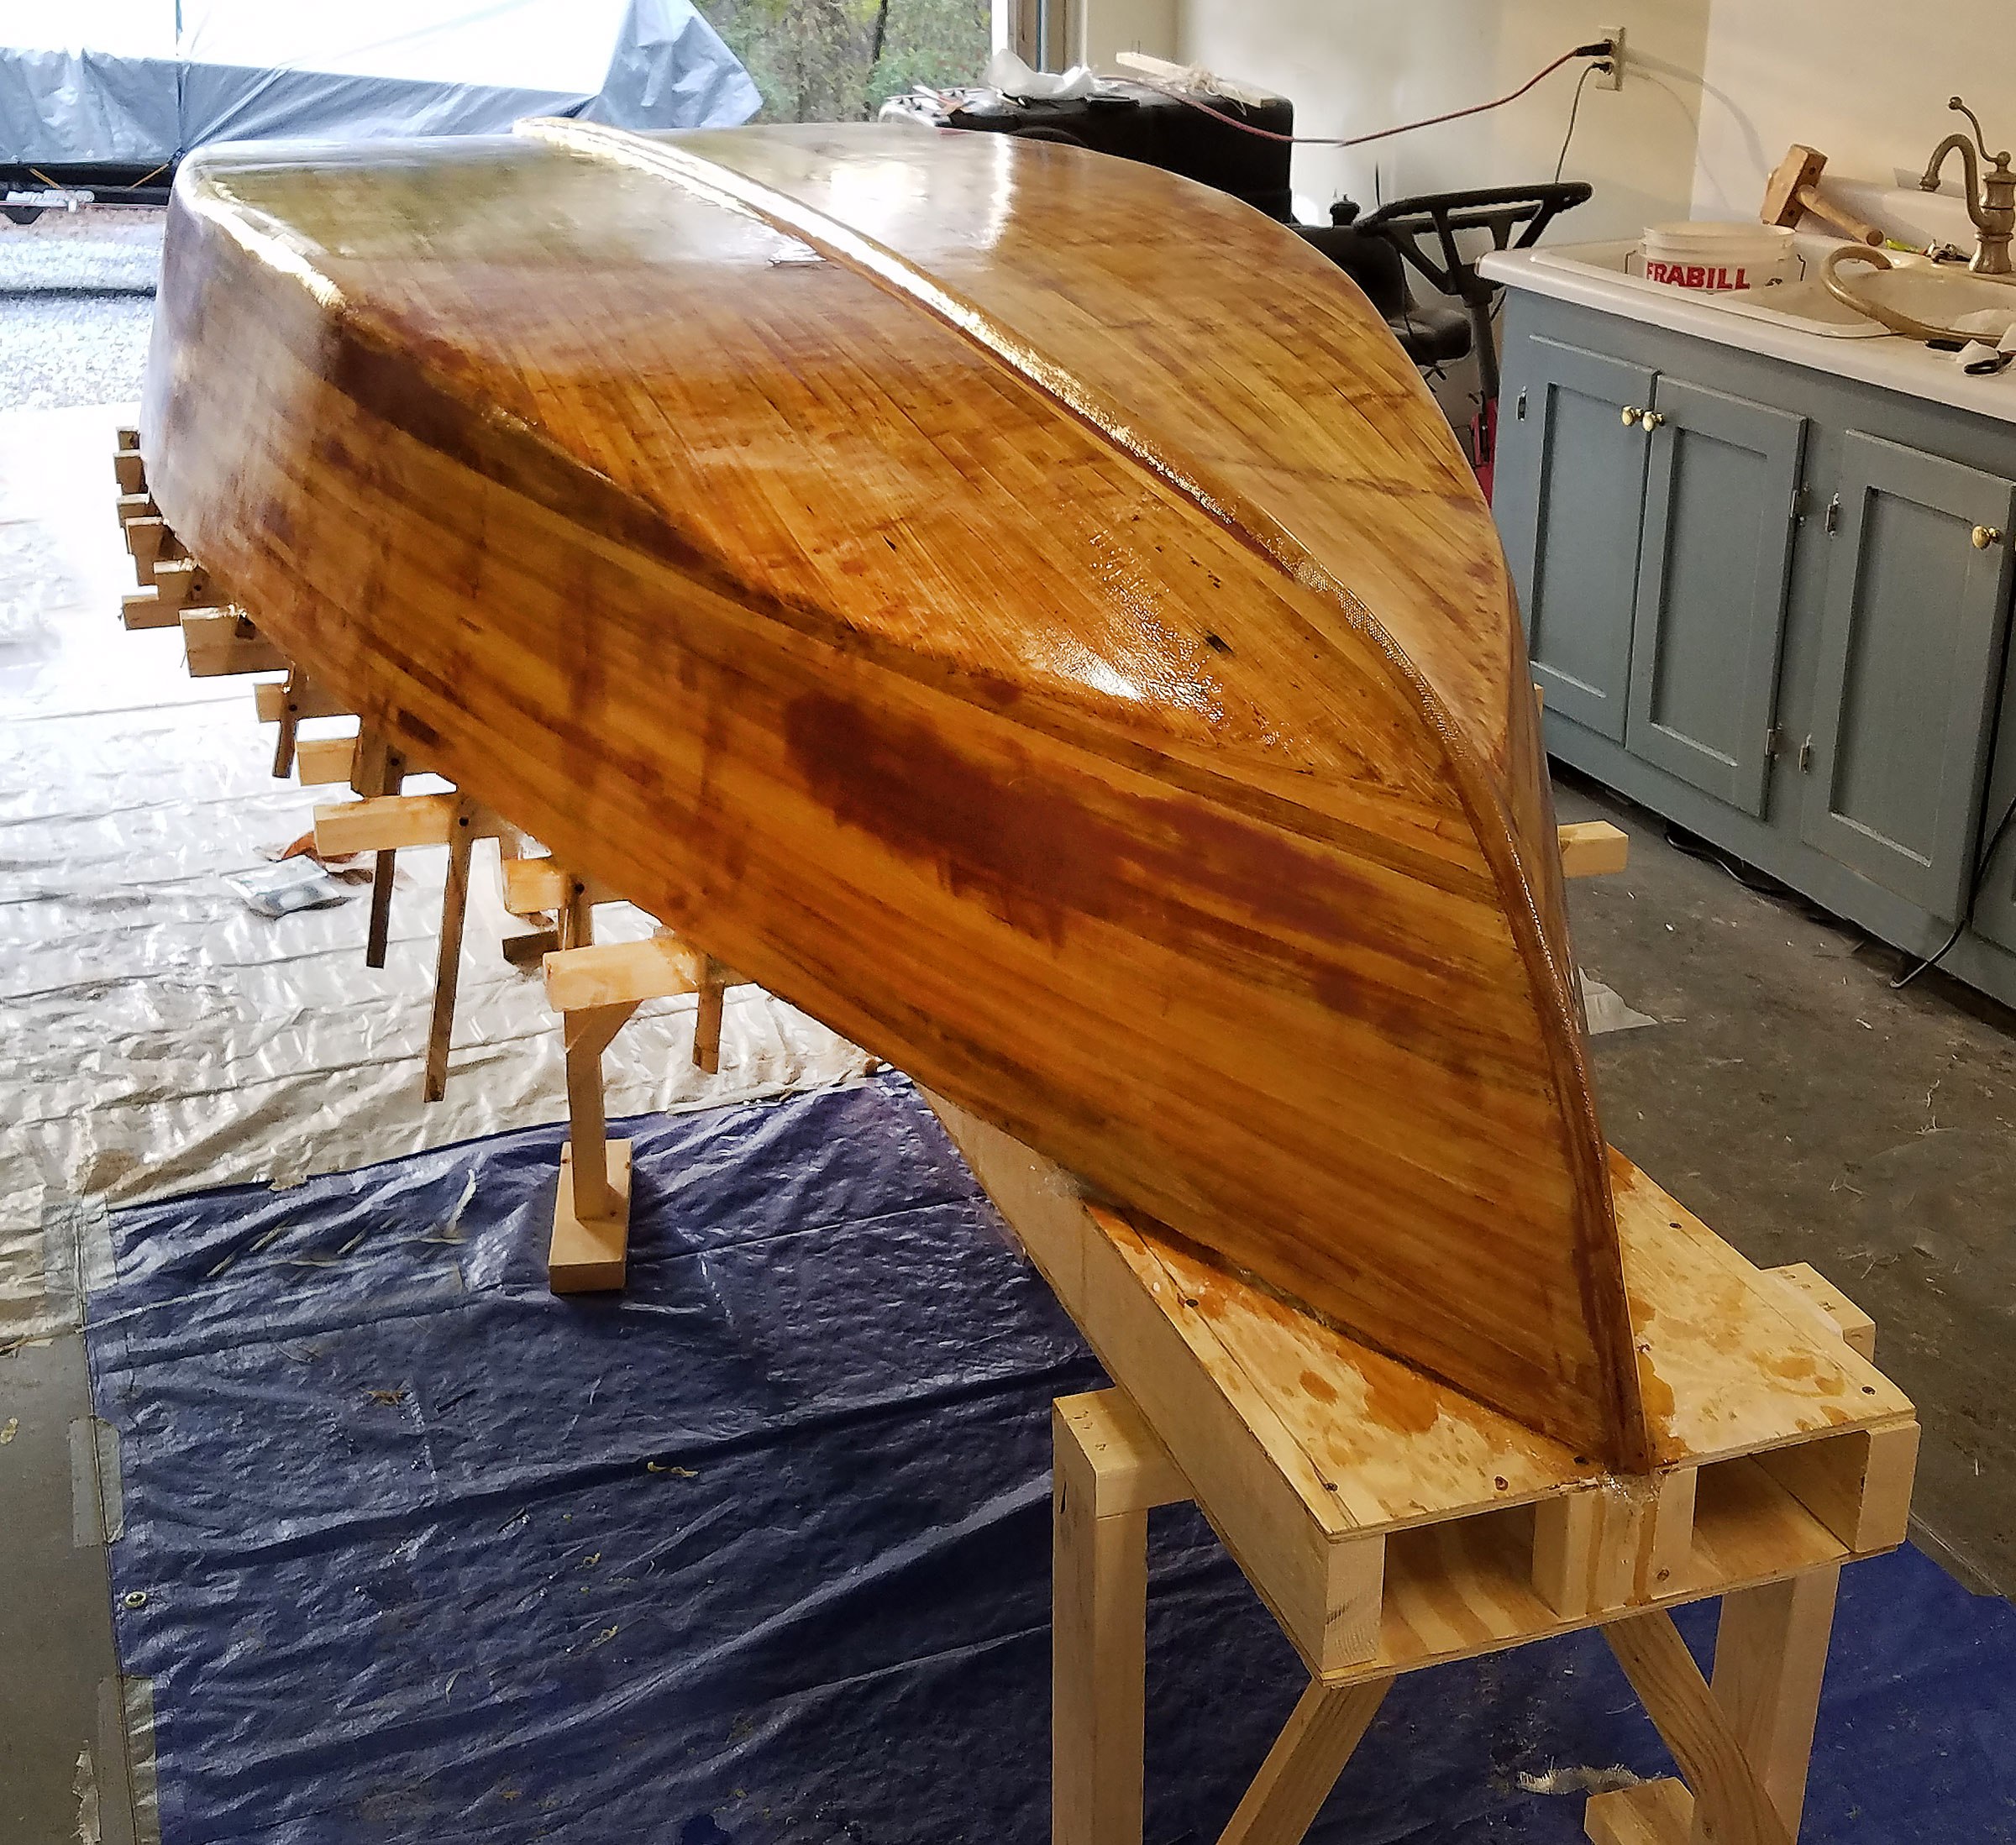
With the strip-planking finished, Ernest applied some fairing compound, a keel, and fiberglass sheathing.


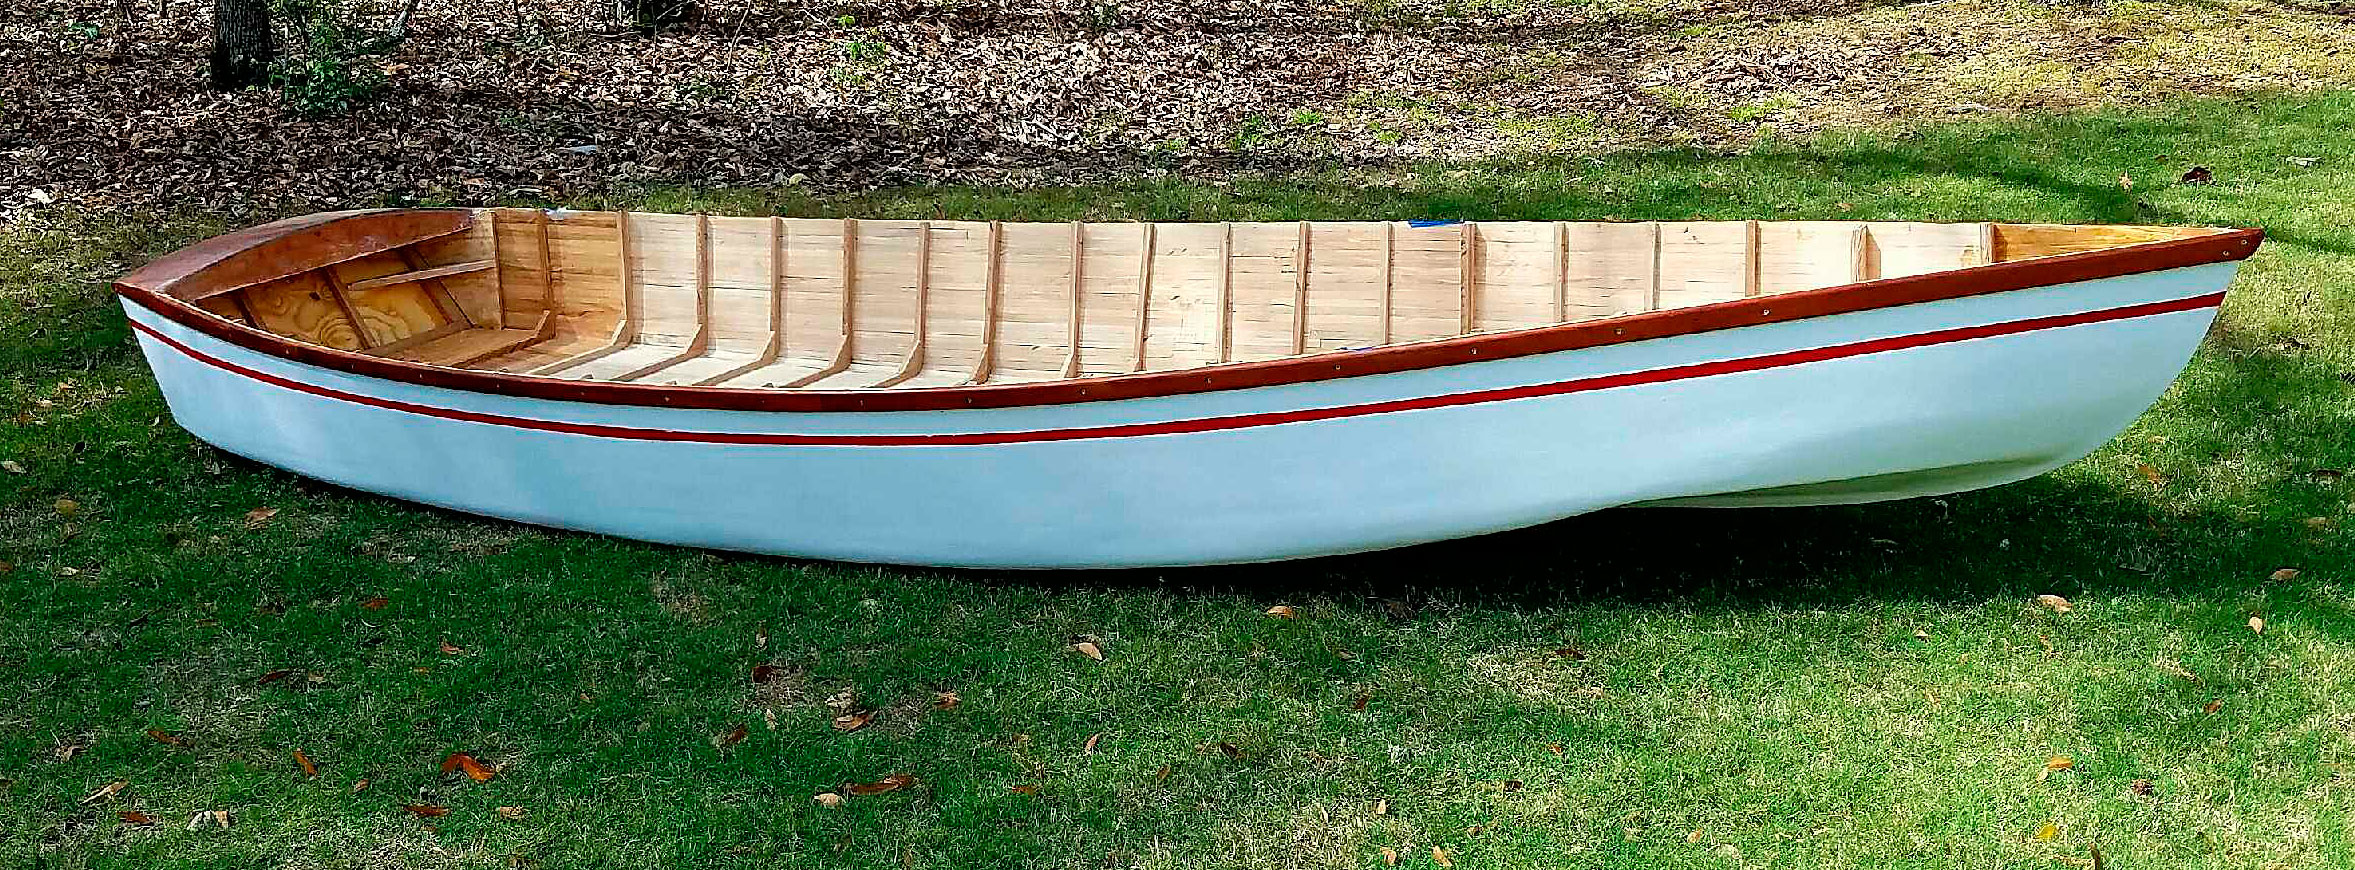
With the exterior painted, the hull could be righted and set outside for a good view before work on the interior began.

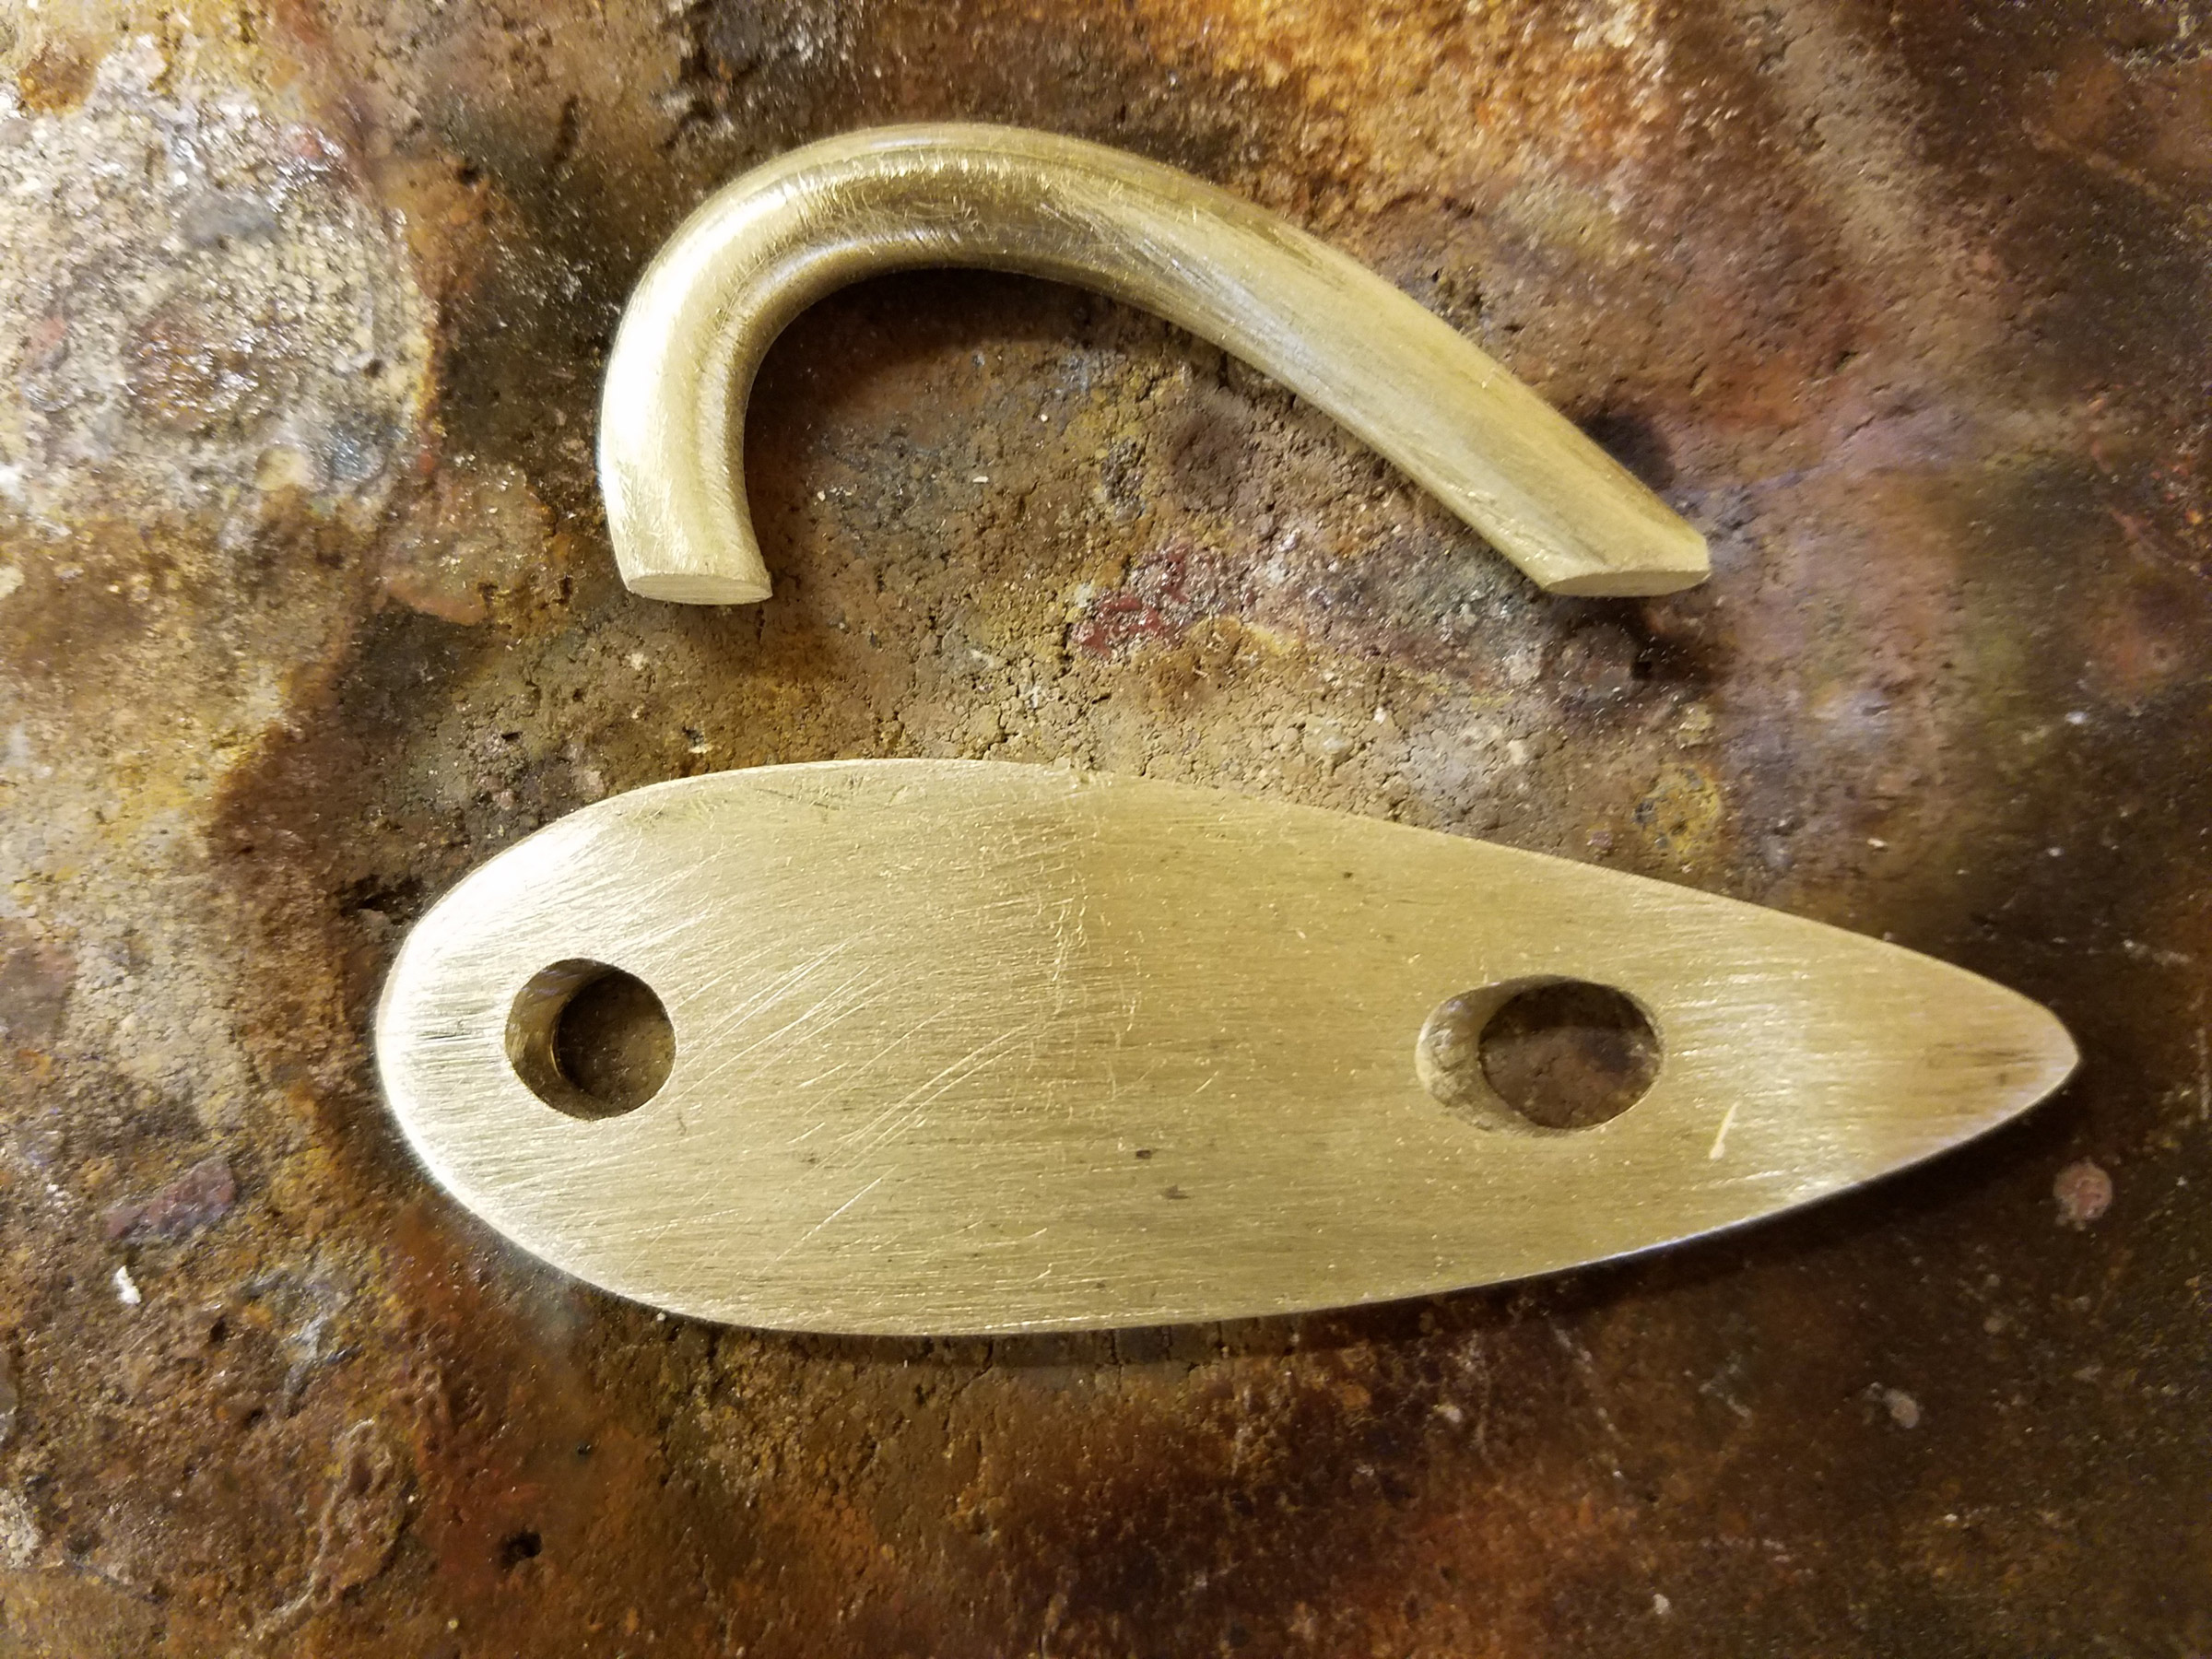
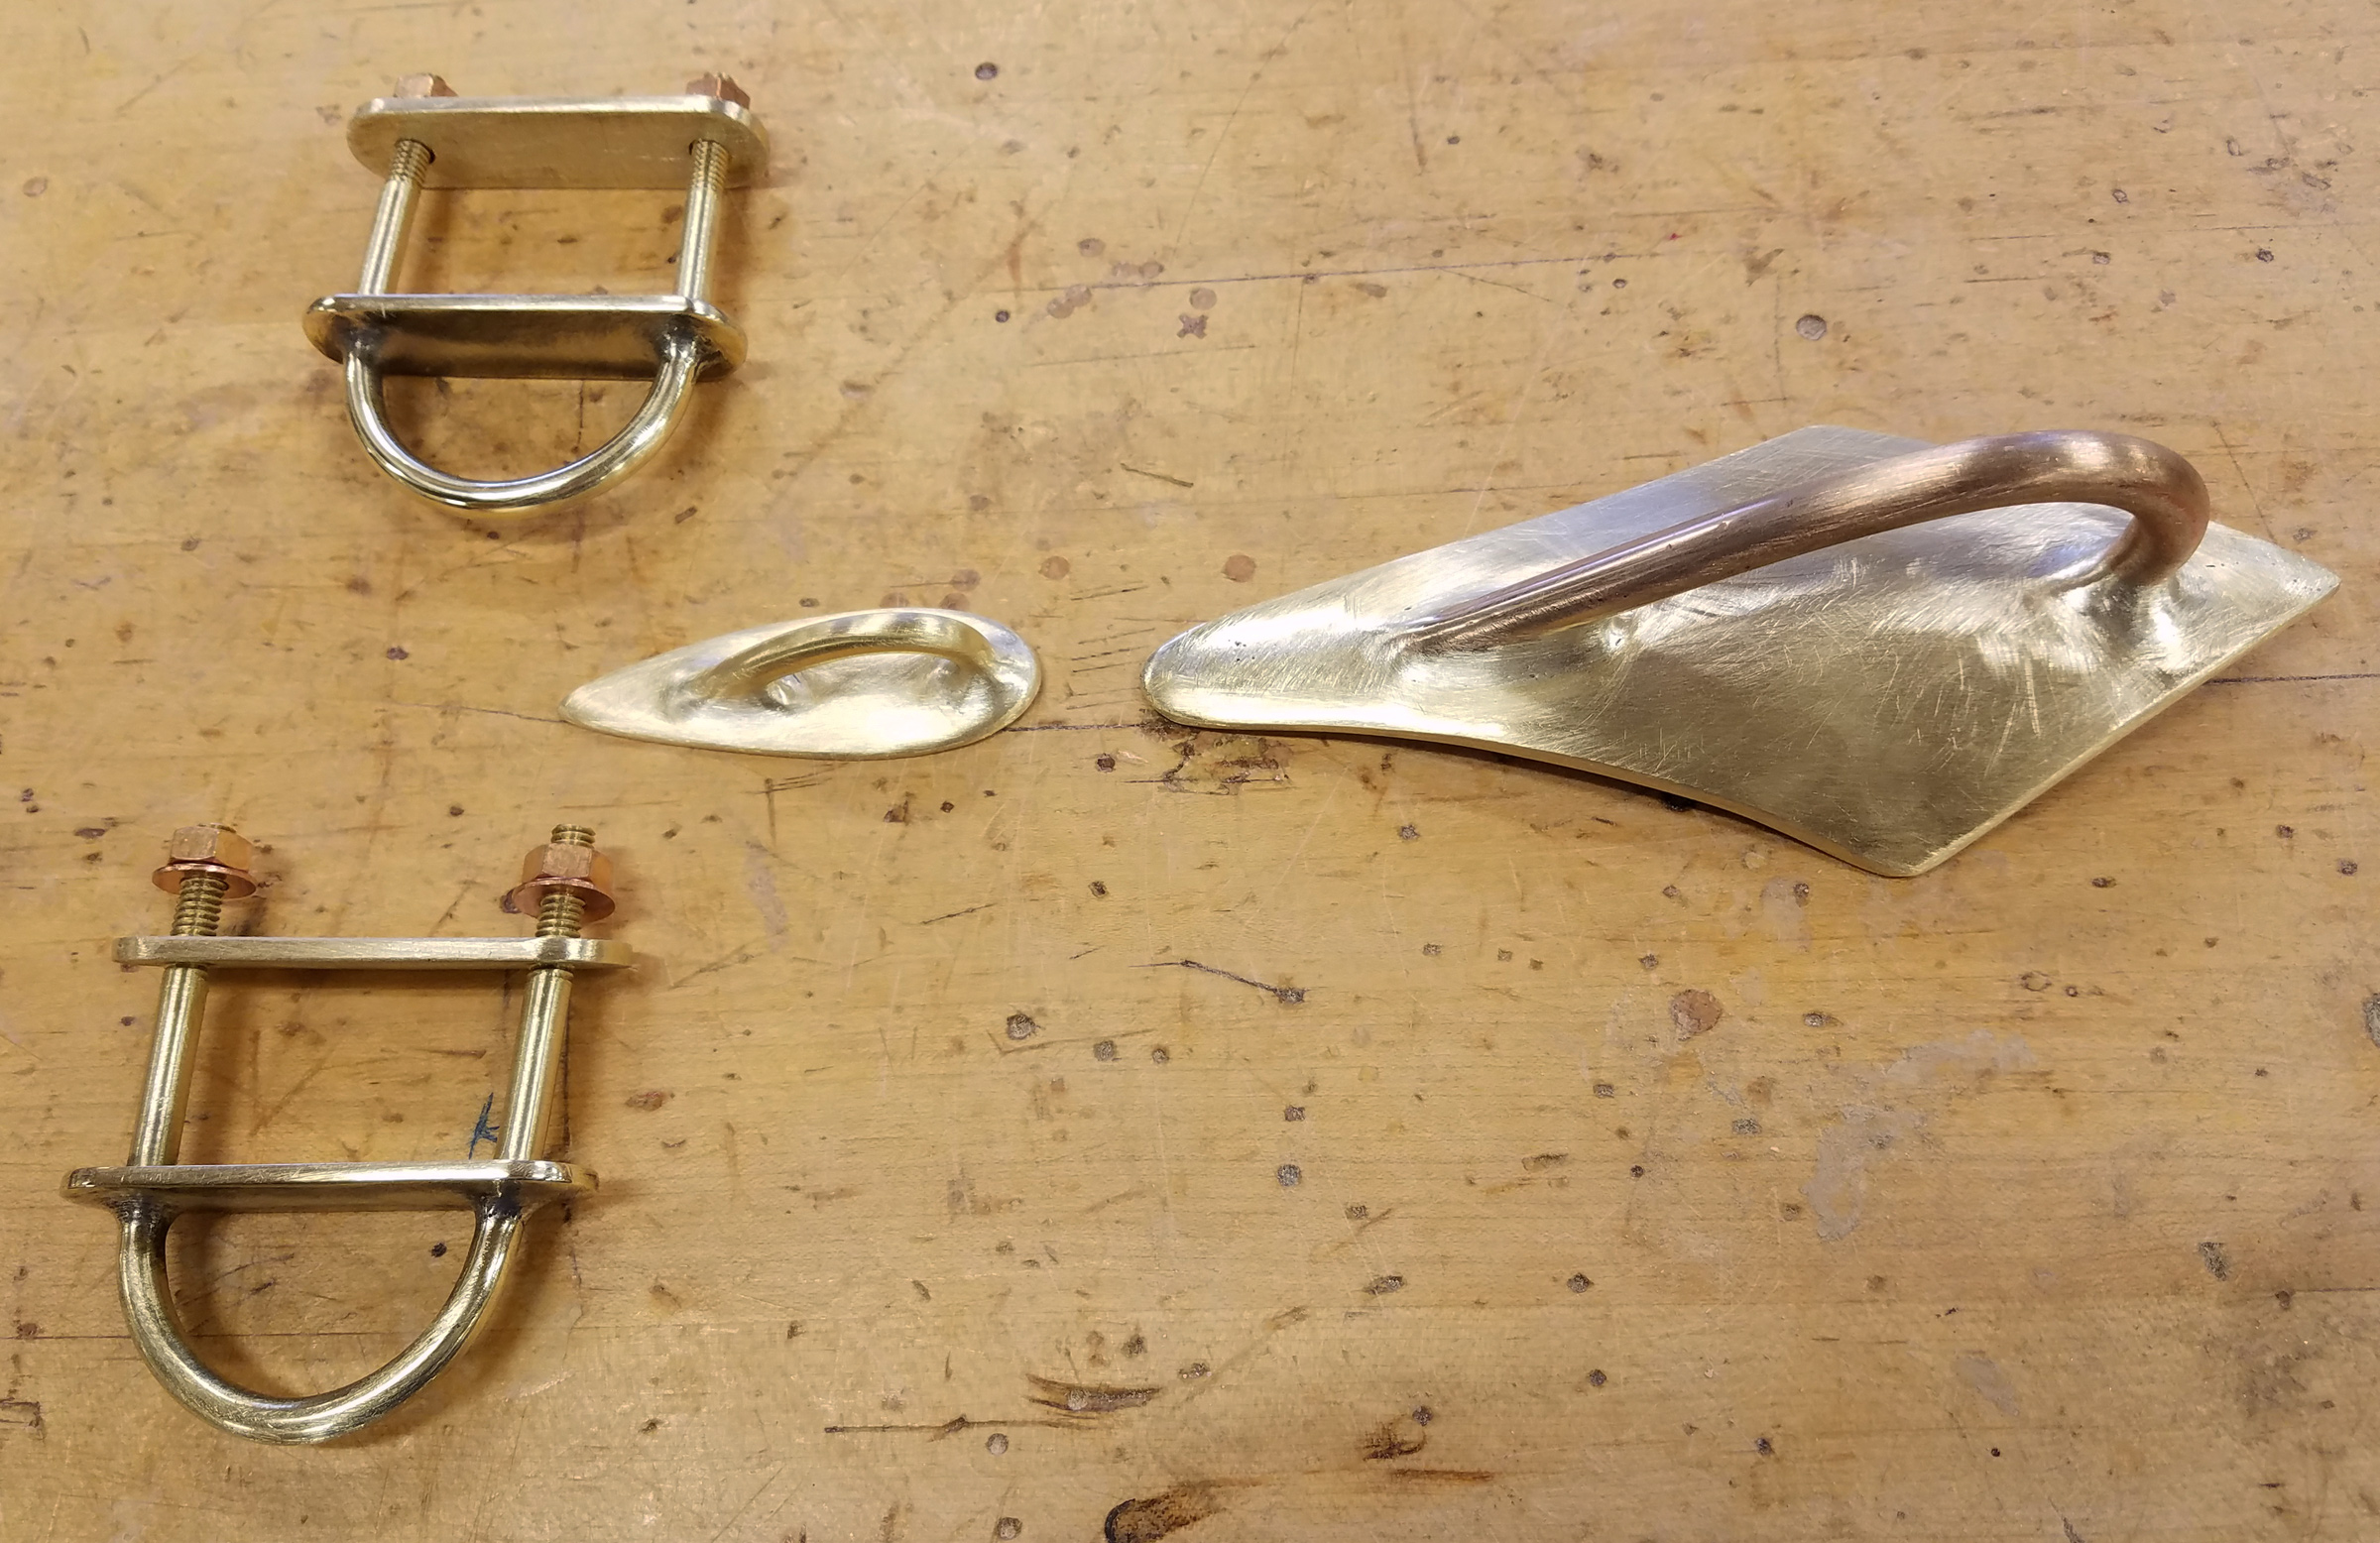
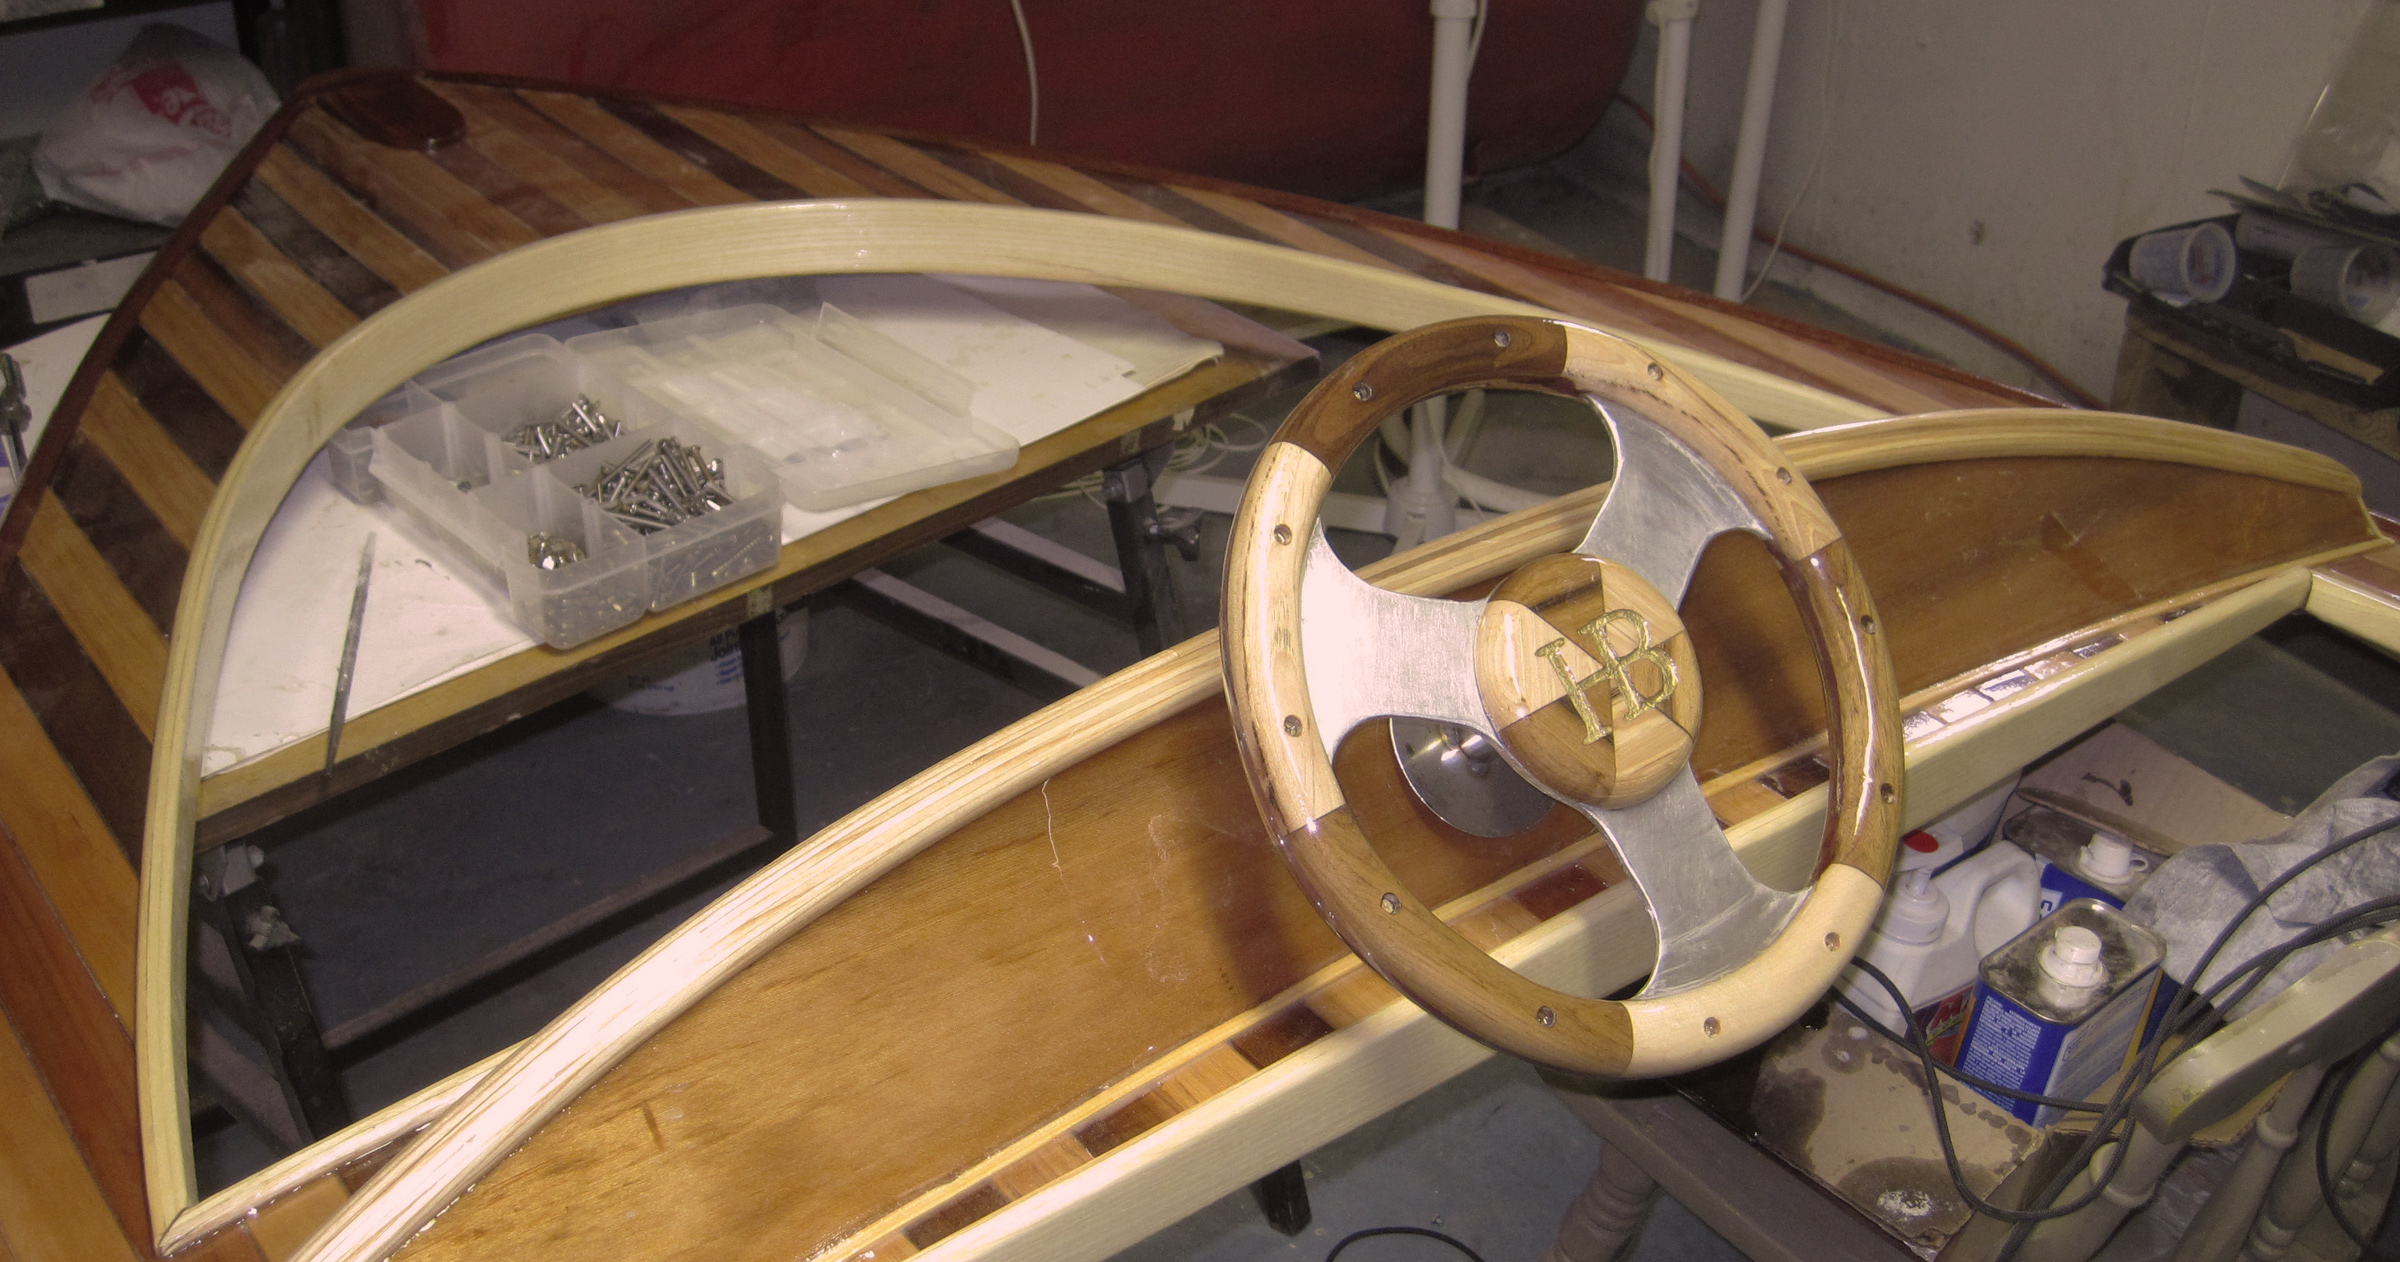
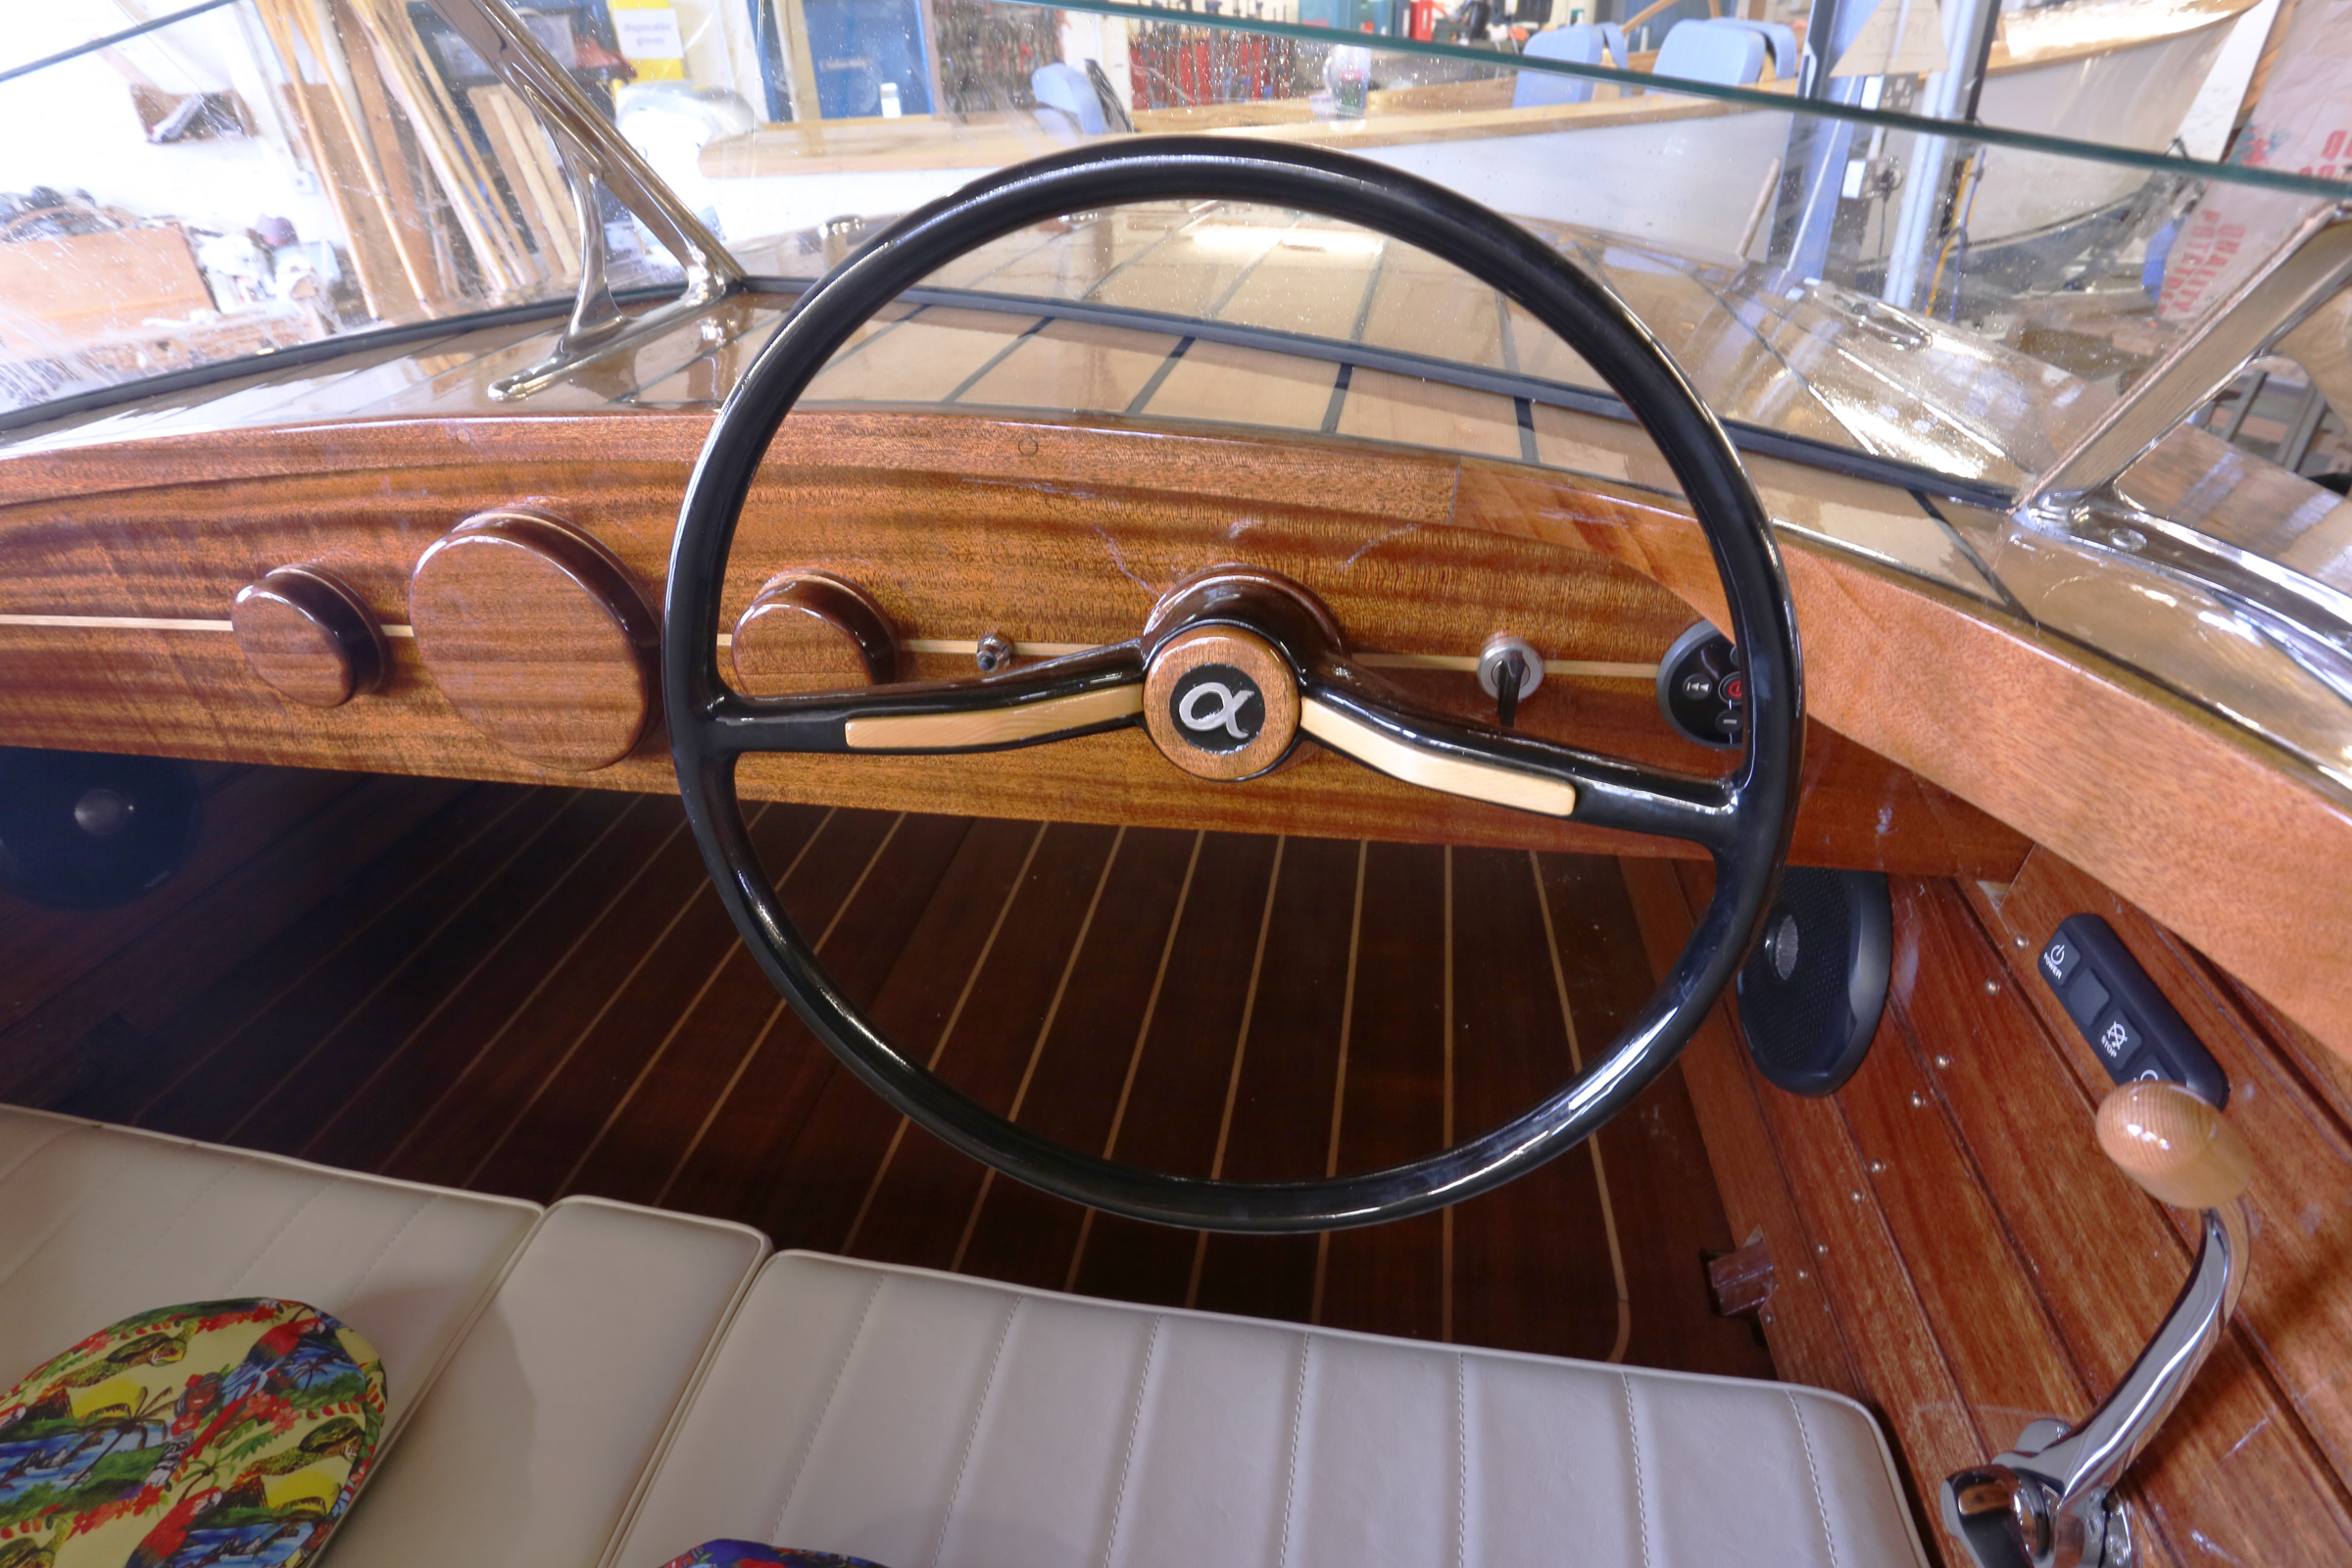
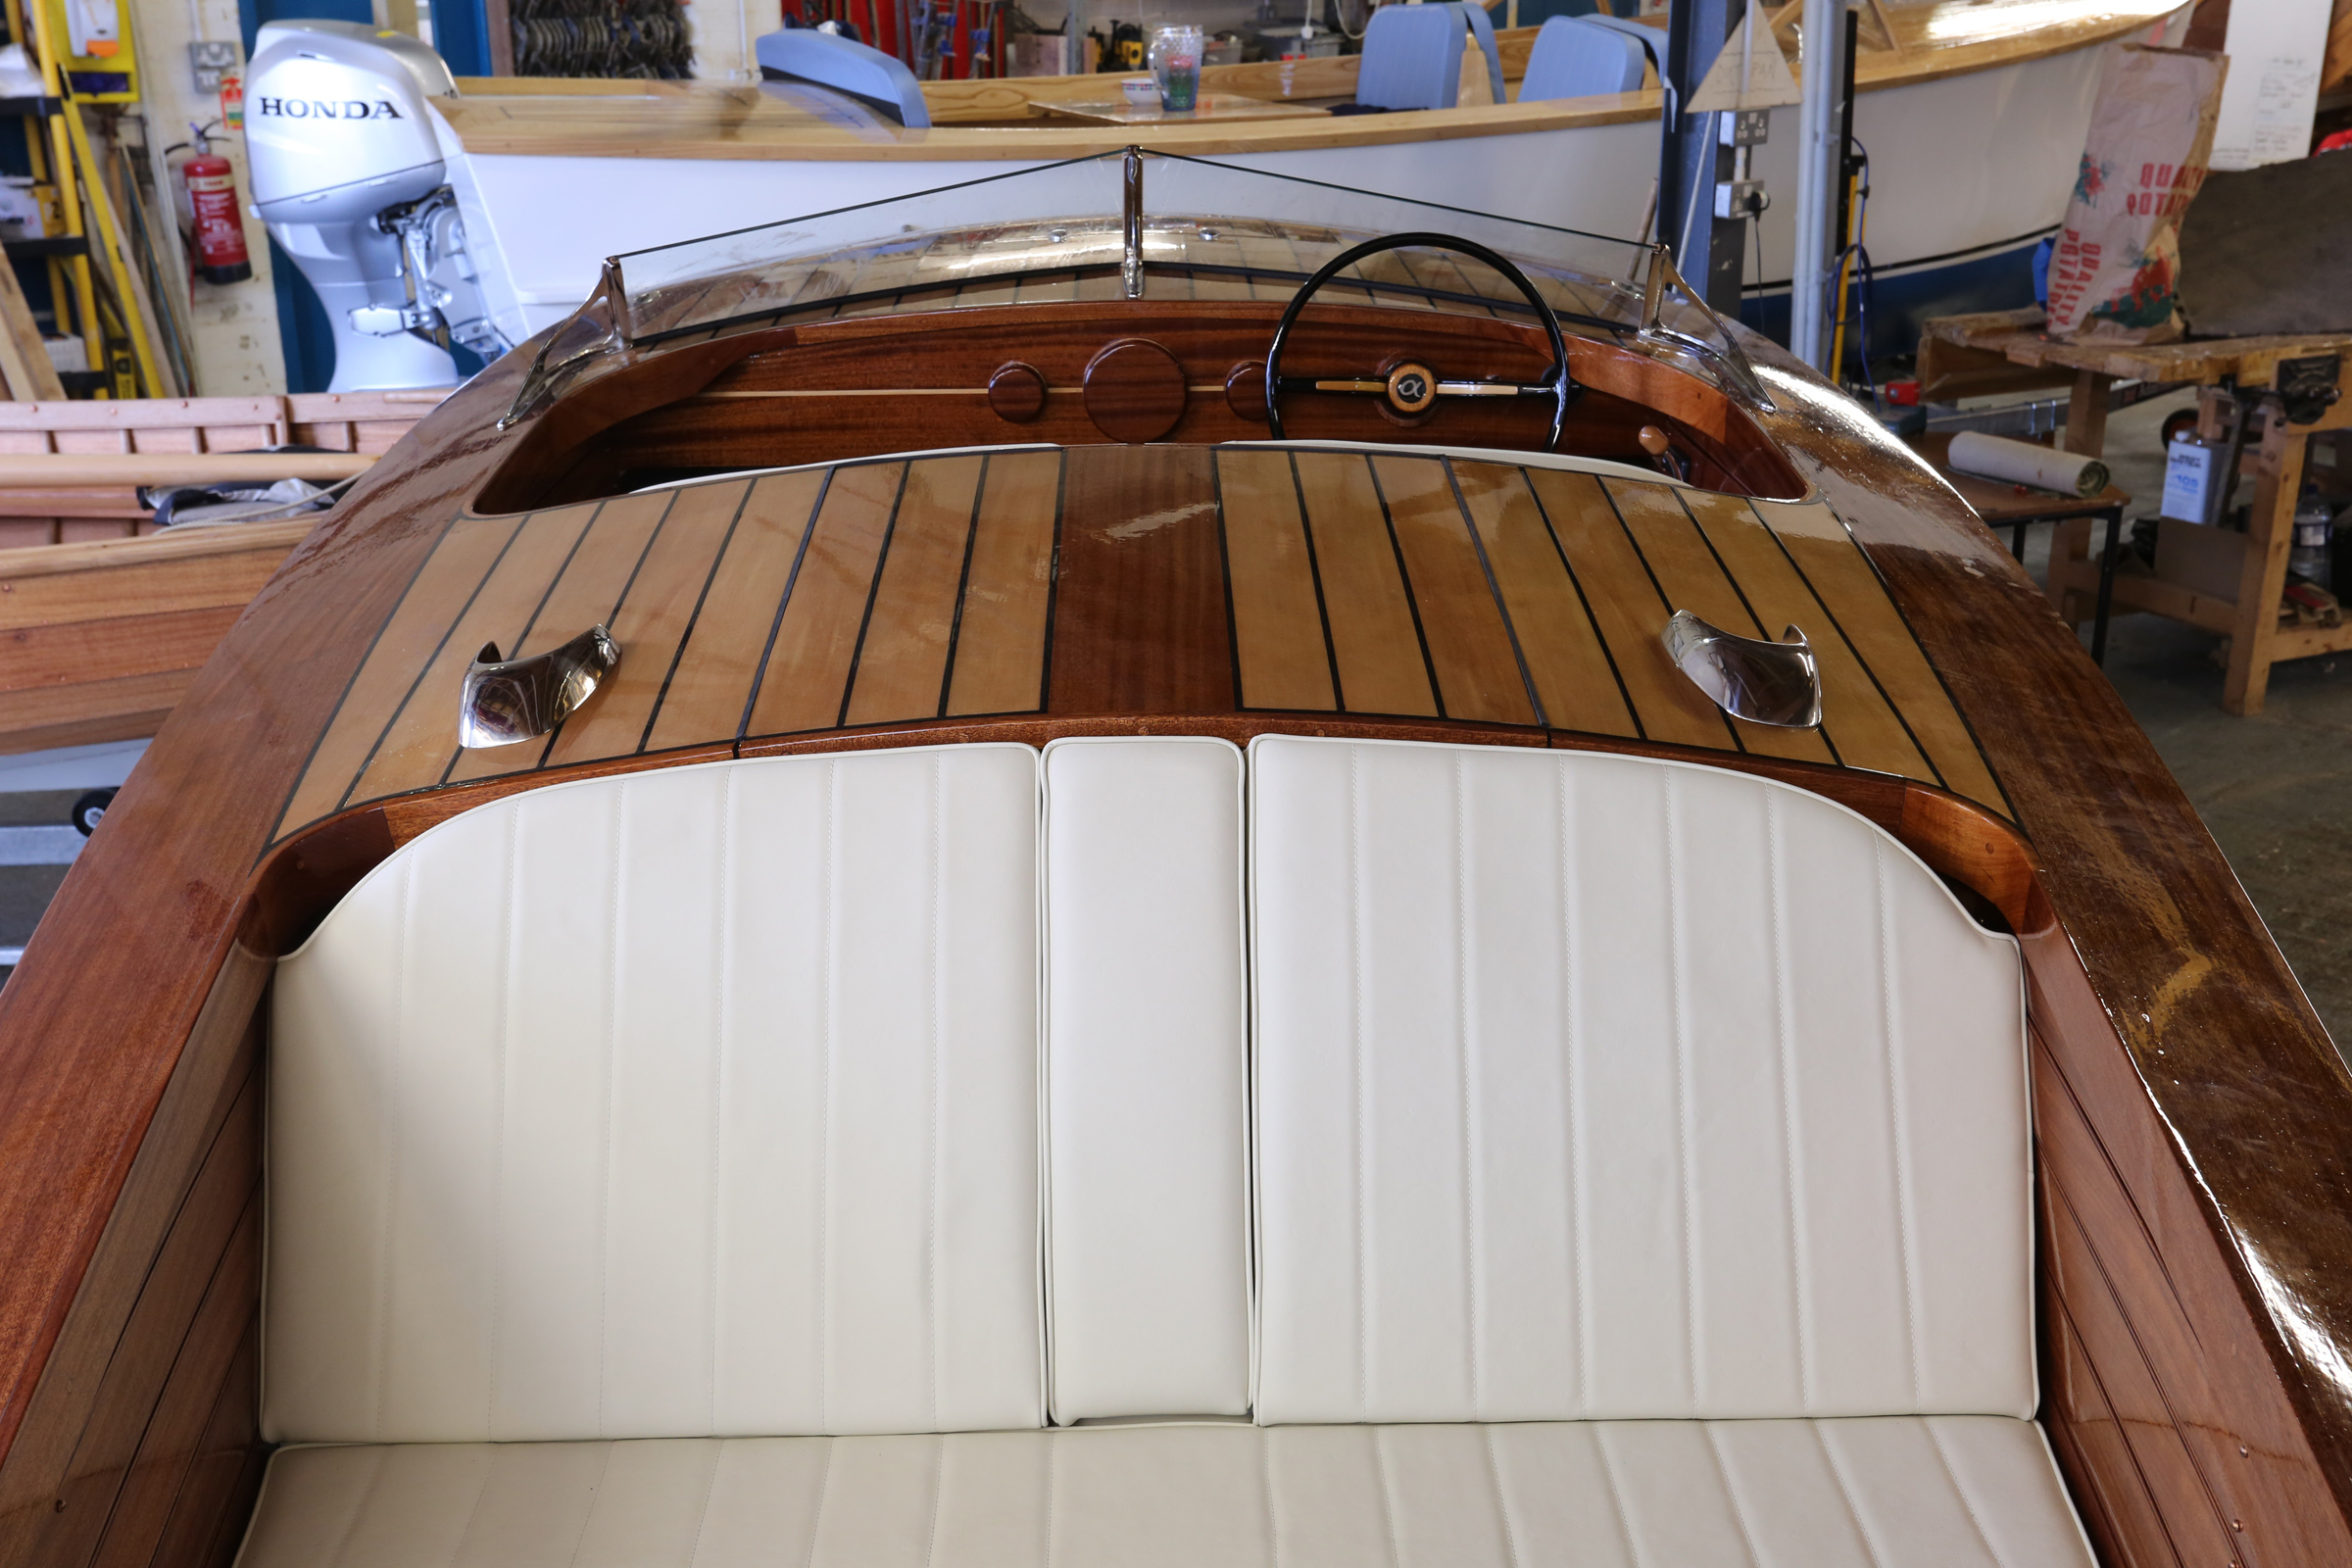
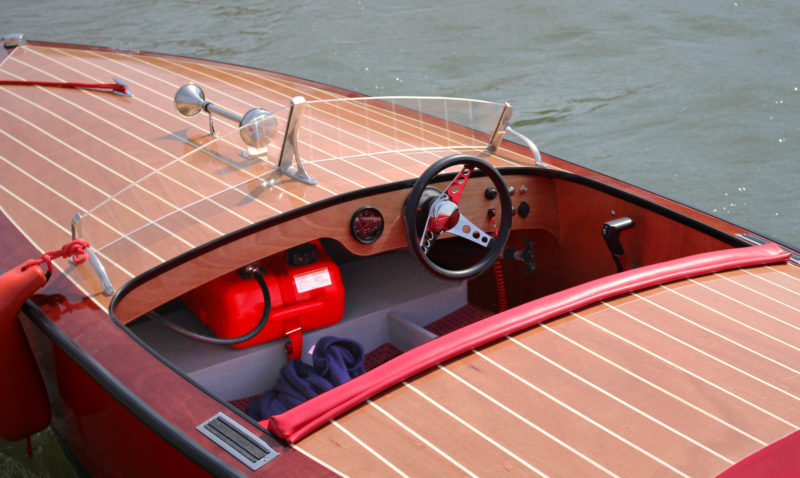
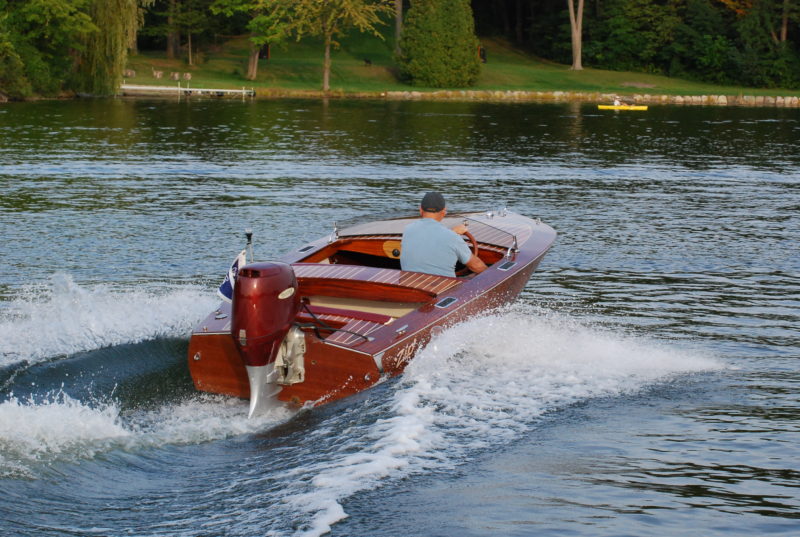
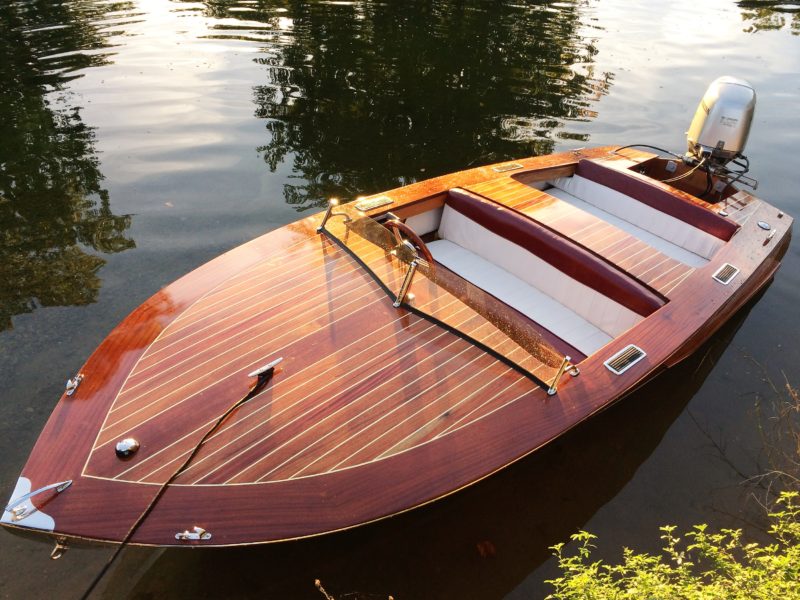
Rather than clamp the motor on the transom, he removed the telescoping motor control from the shaft and installed the motor beneath the hull. The twist-grip throttle went forward and to the right of the starboard seat. A mahogany wheel is connected by cables to a tiller on the motor shaft.

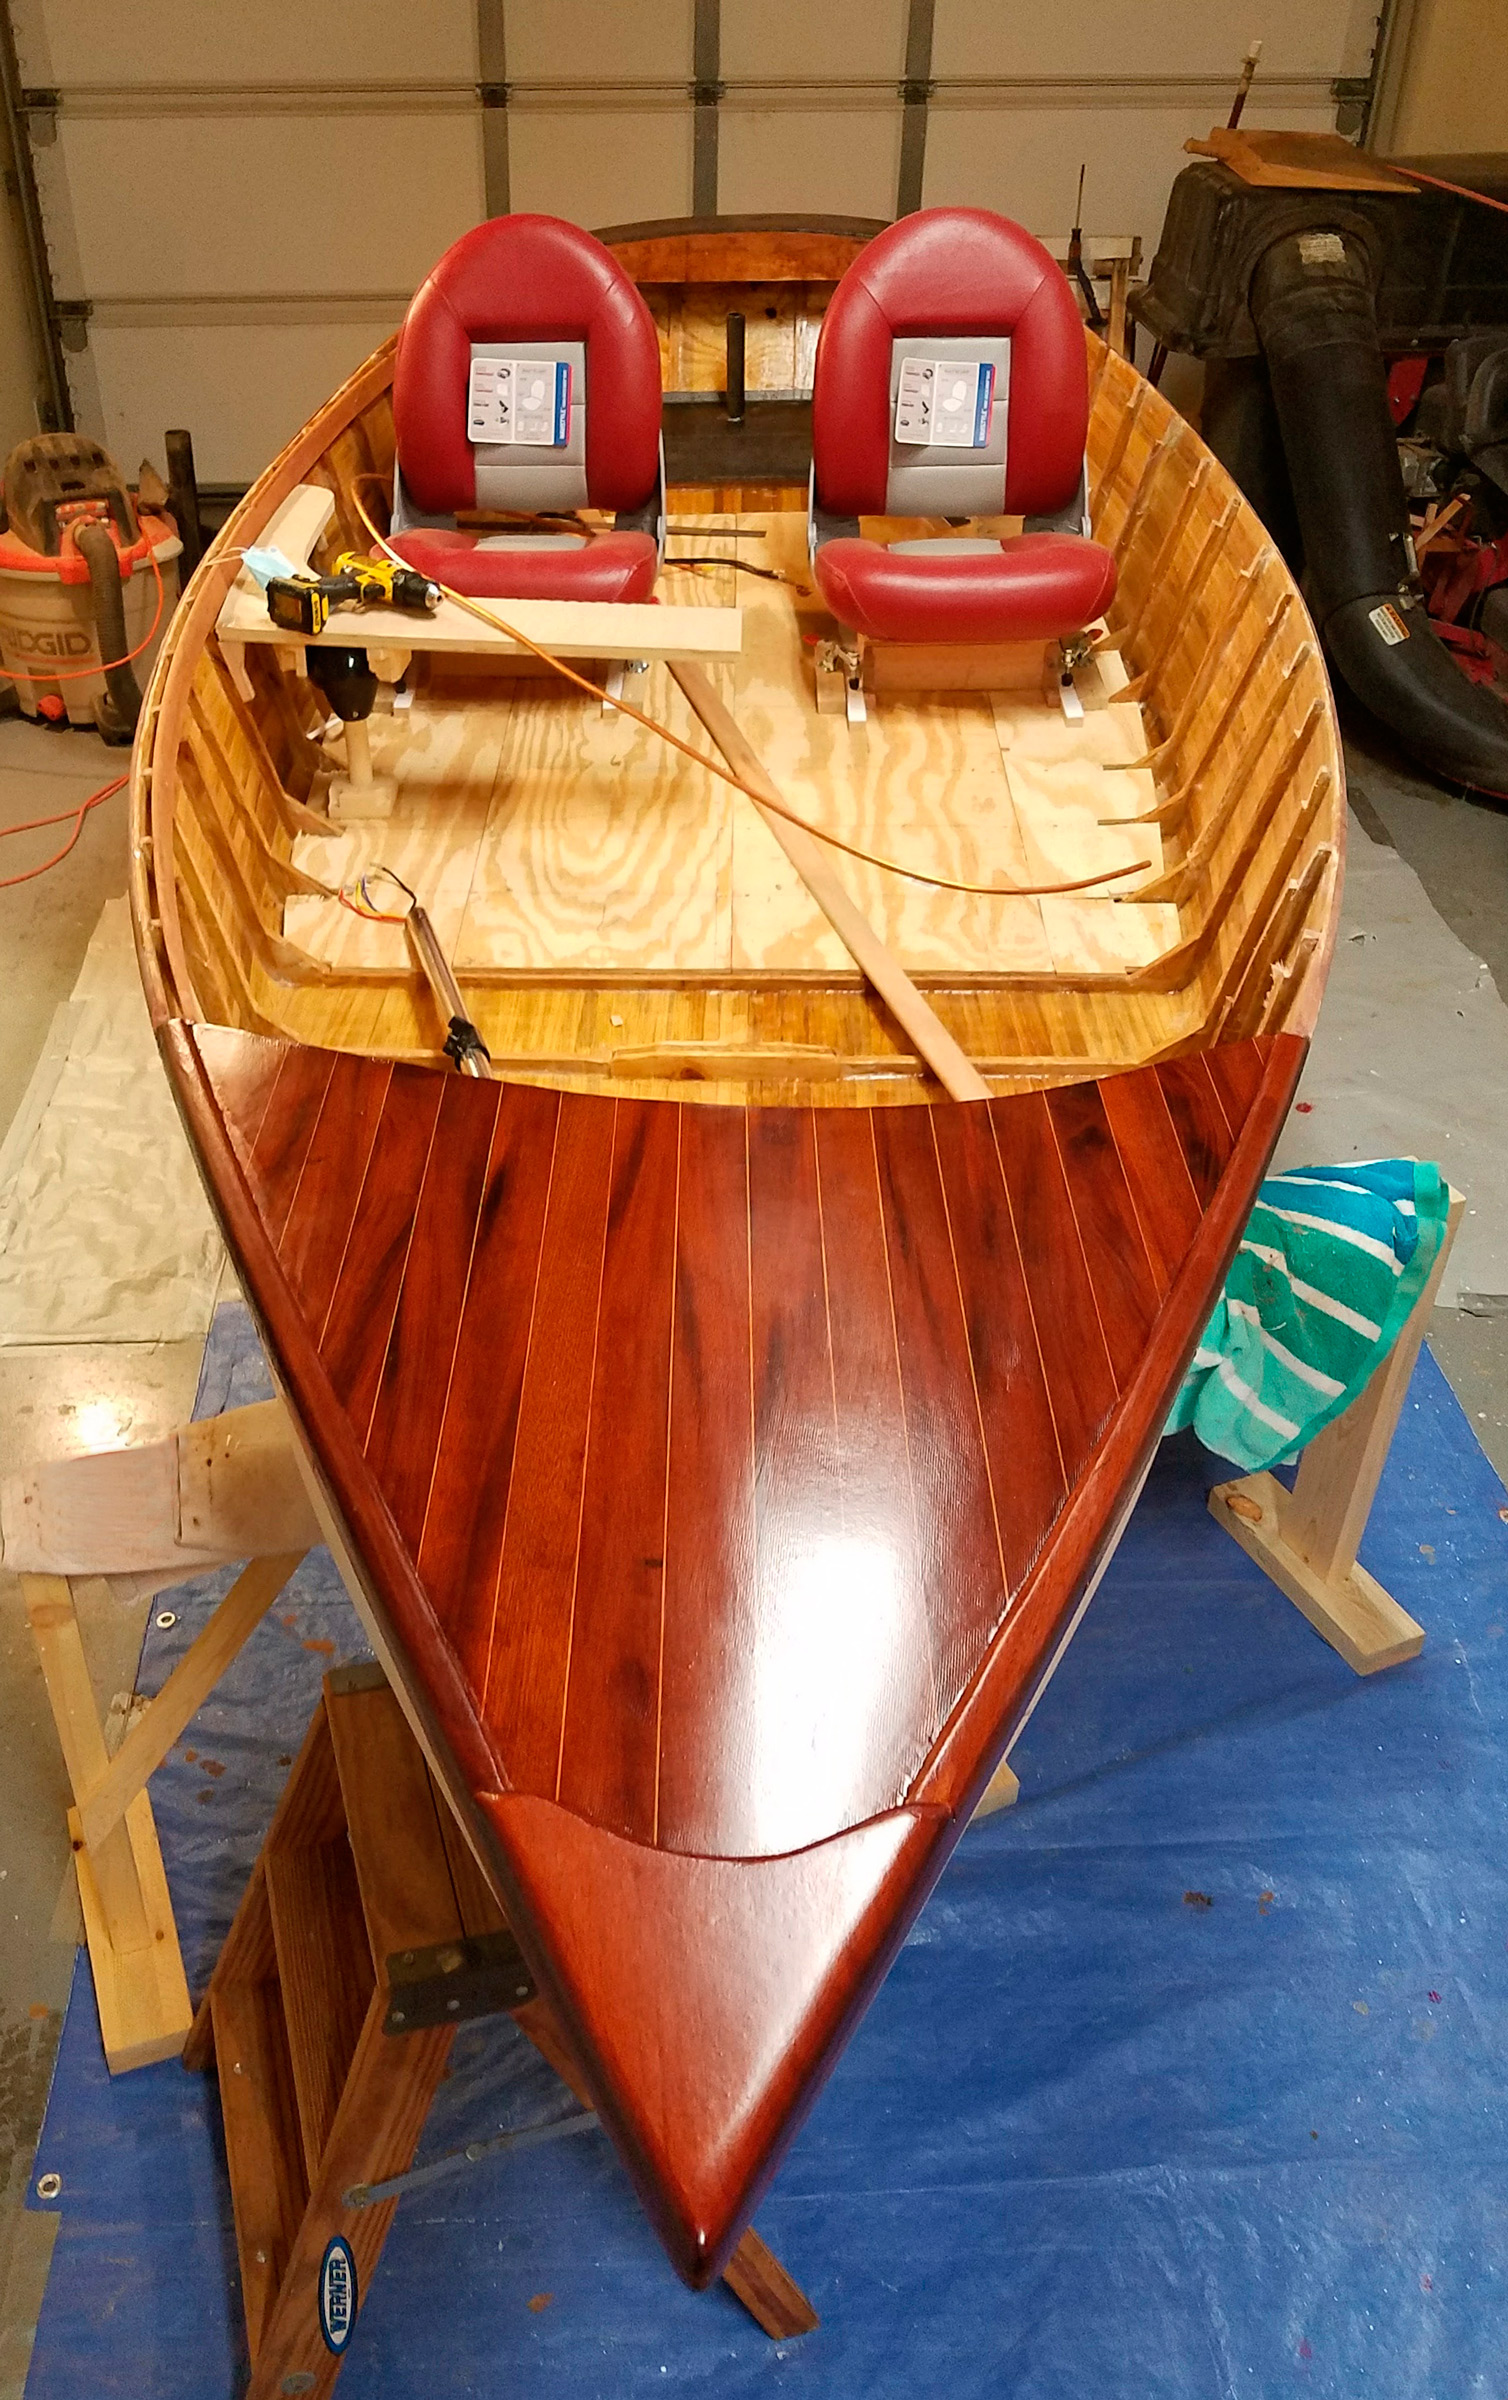
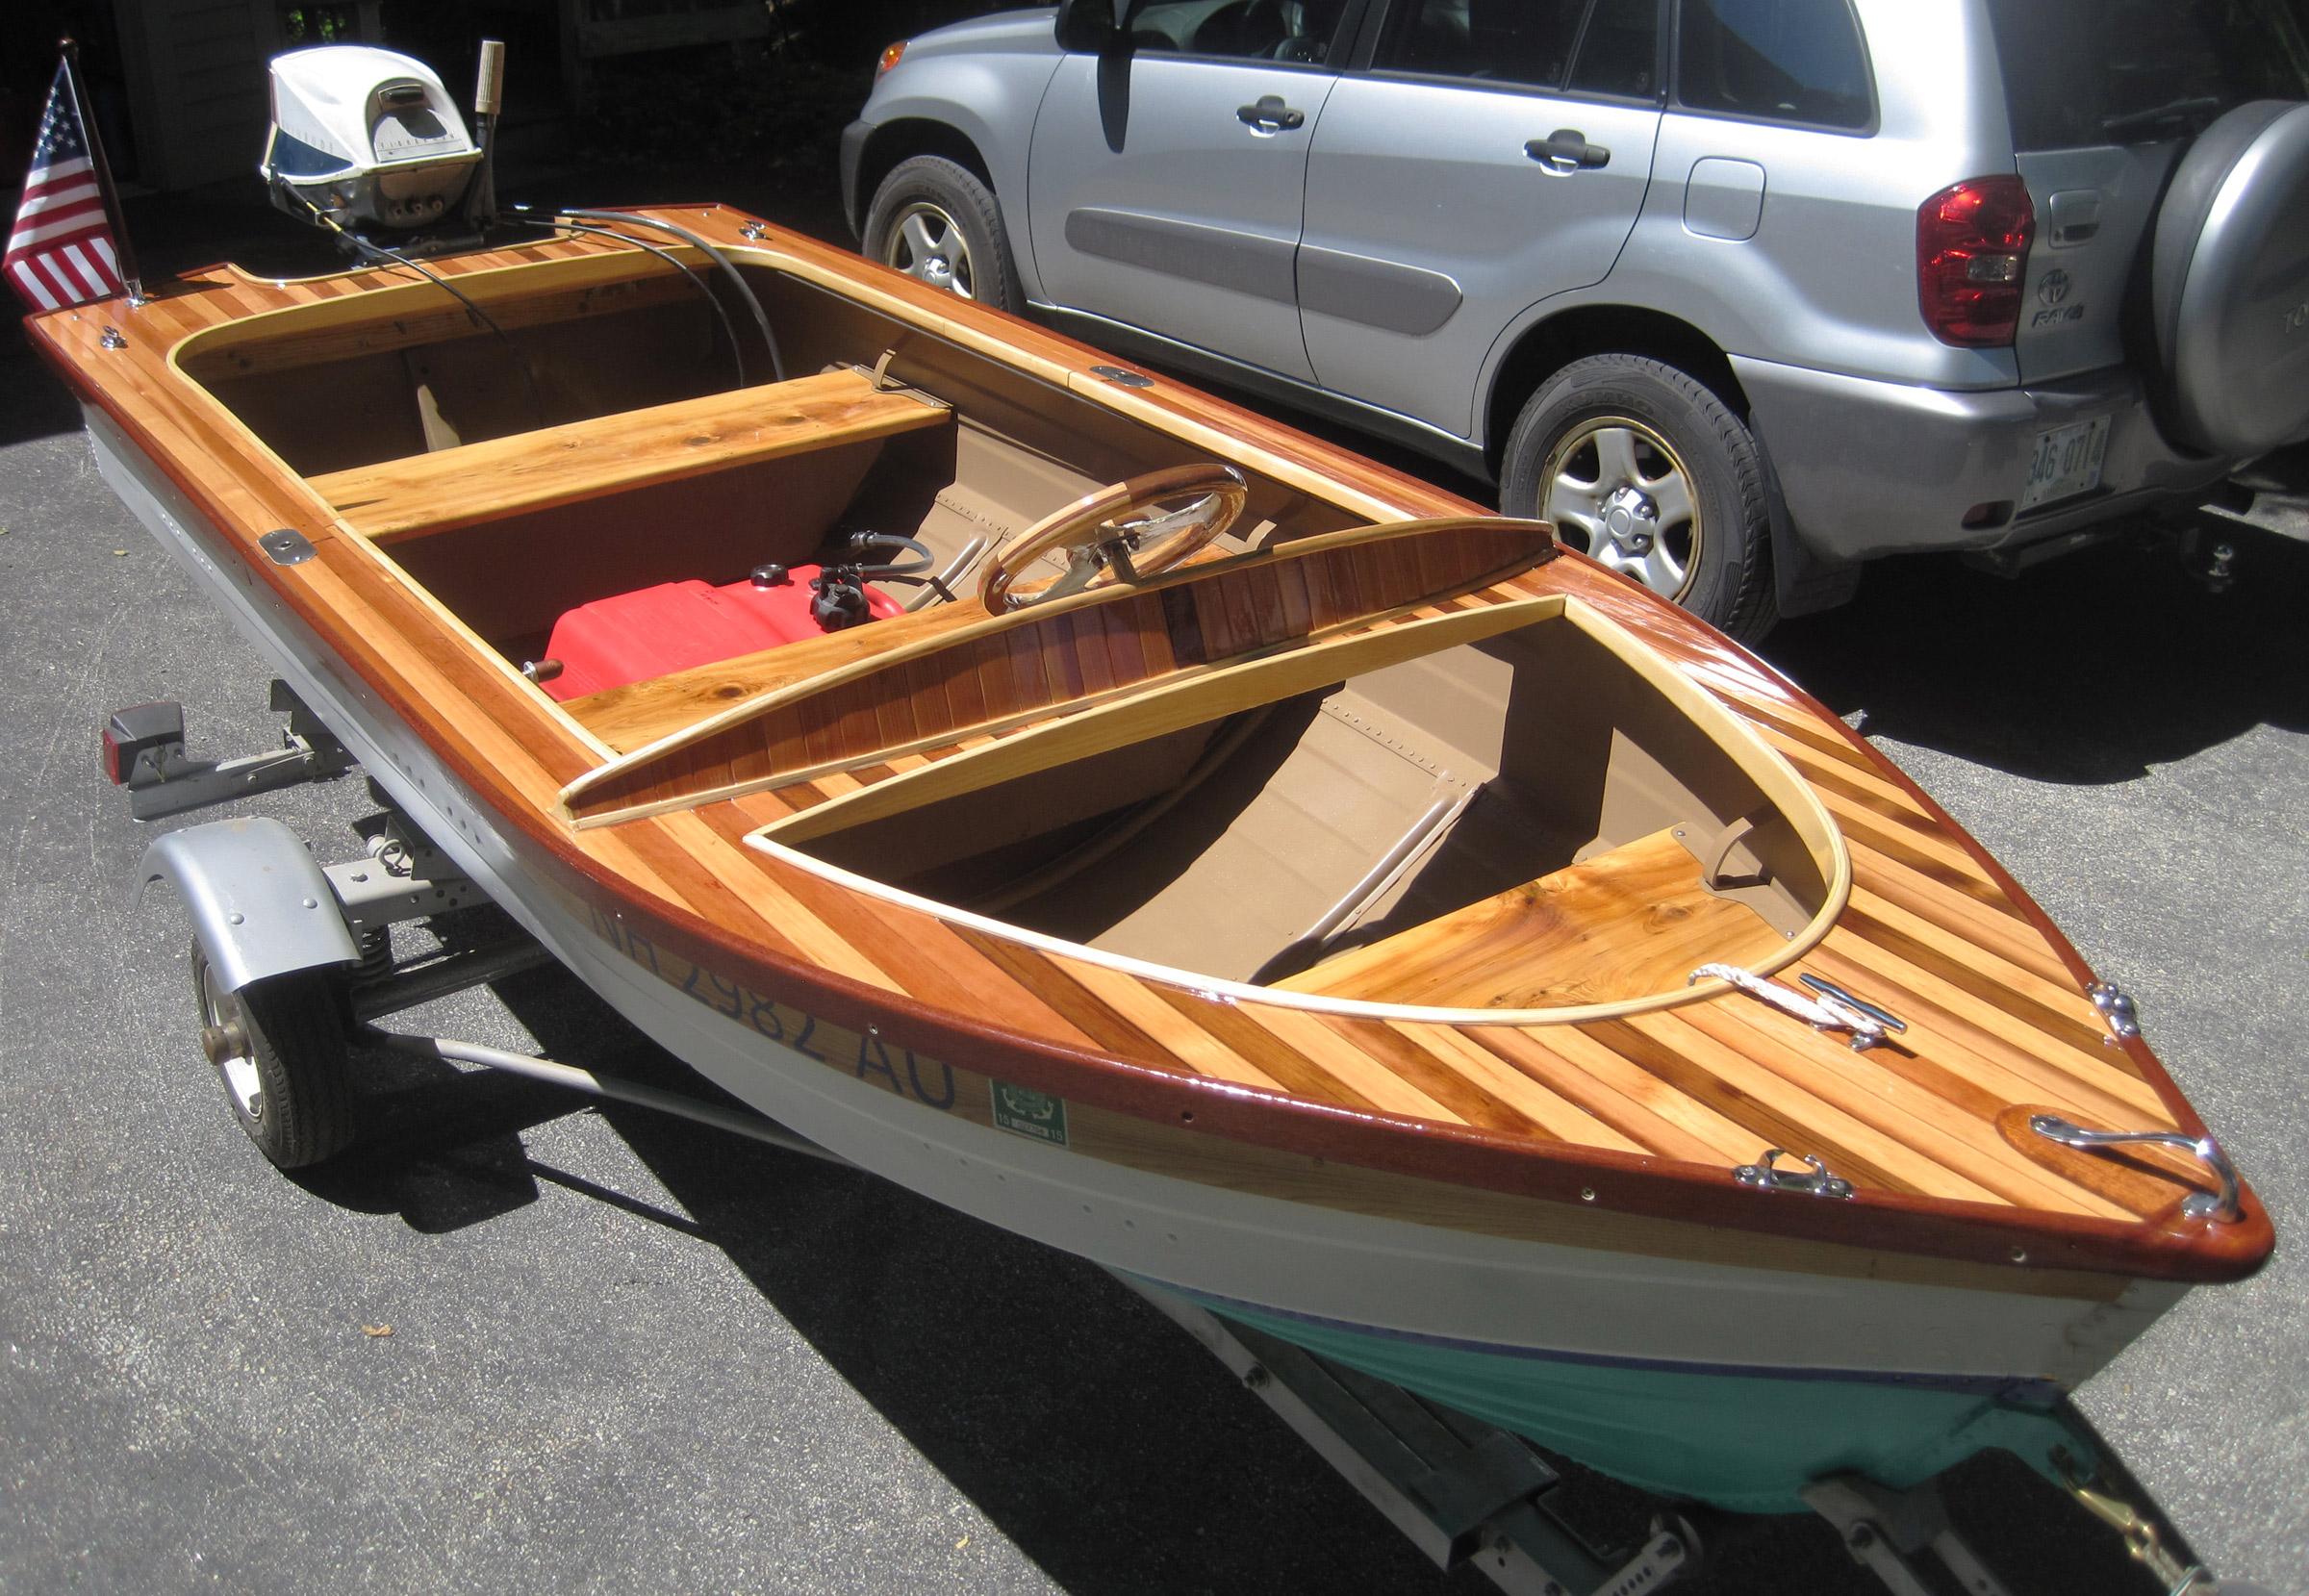
Ernest used mahogany for the decks and the inwales. The port inwale lies in the boat ready to be set in the notches at the tops of the frames. He was “really pleased not only with their appearance but the strength the inwales added.” In the stern, visible between the seat backs as a black upright, is a tube sized to fit the trolling motor shaft. It’s welded to a steel plate that’s bolted to several frames. Several O-rings keep the water out, and the top of the tube is well above the waterline.

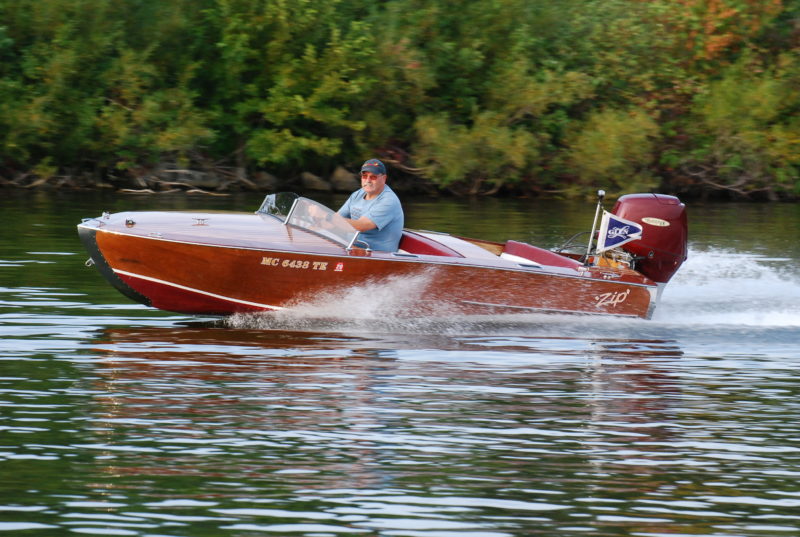
With the interior only partially complete, Ernest and his friend Jon took the boat out for an early sea trial. There would be an insulated box between the seats for cold drinks, and the trolling motor’s shaft has not yet been cut to its finished length.


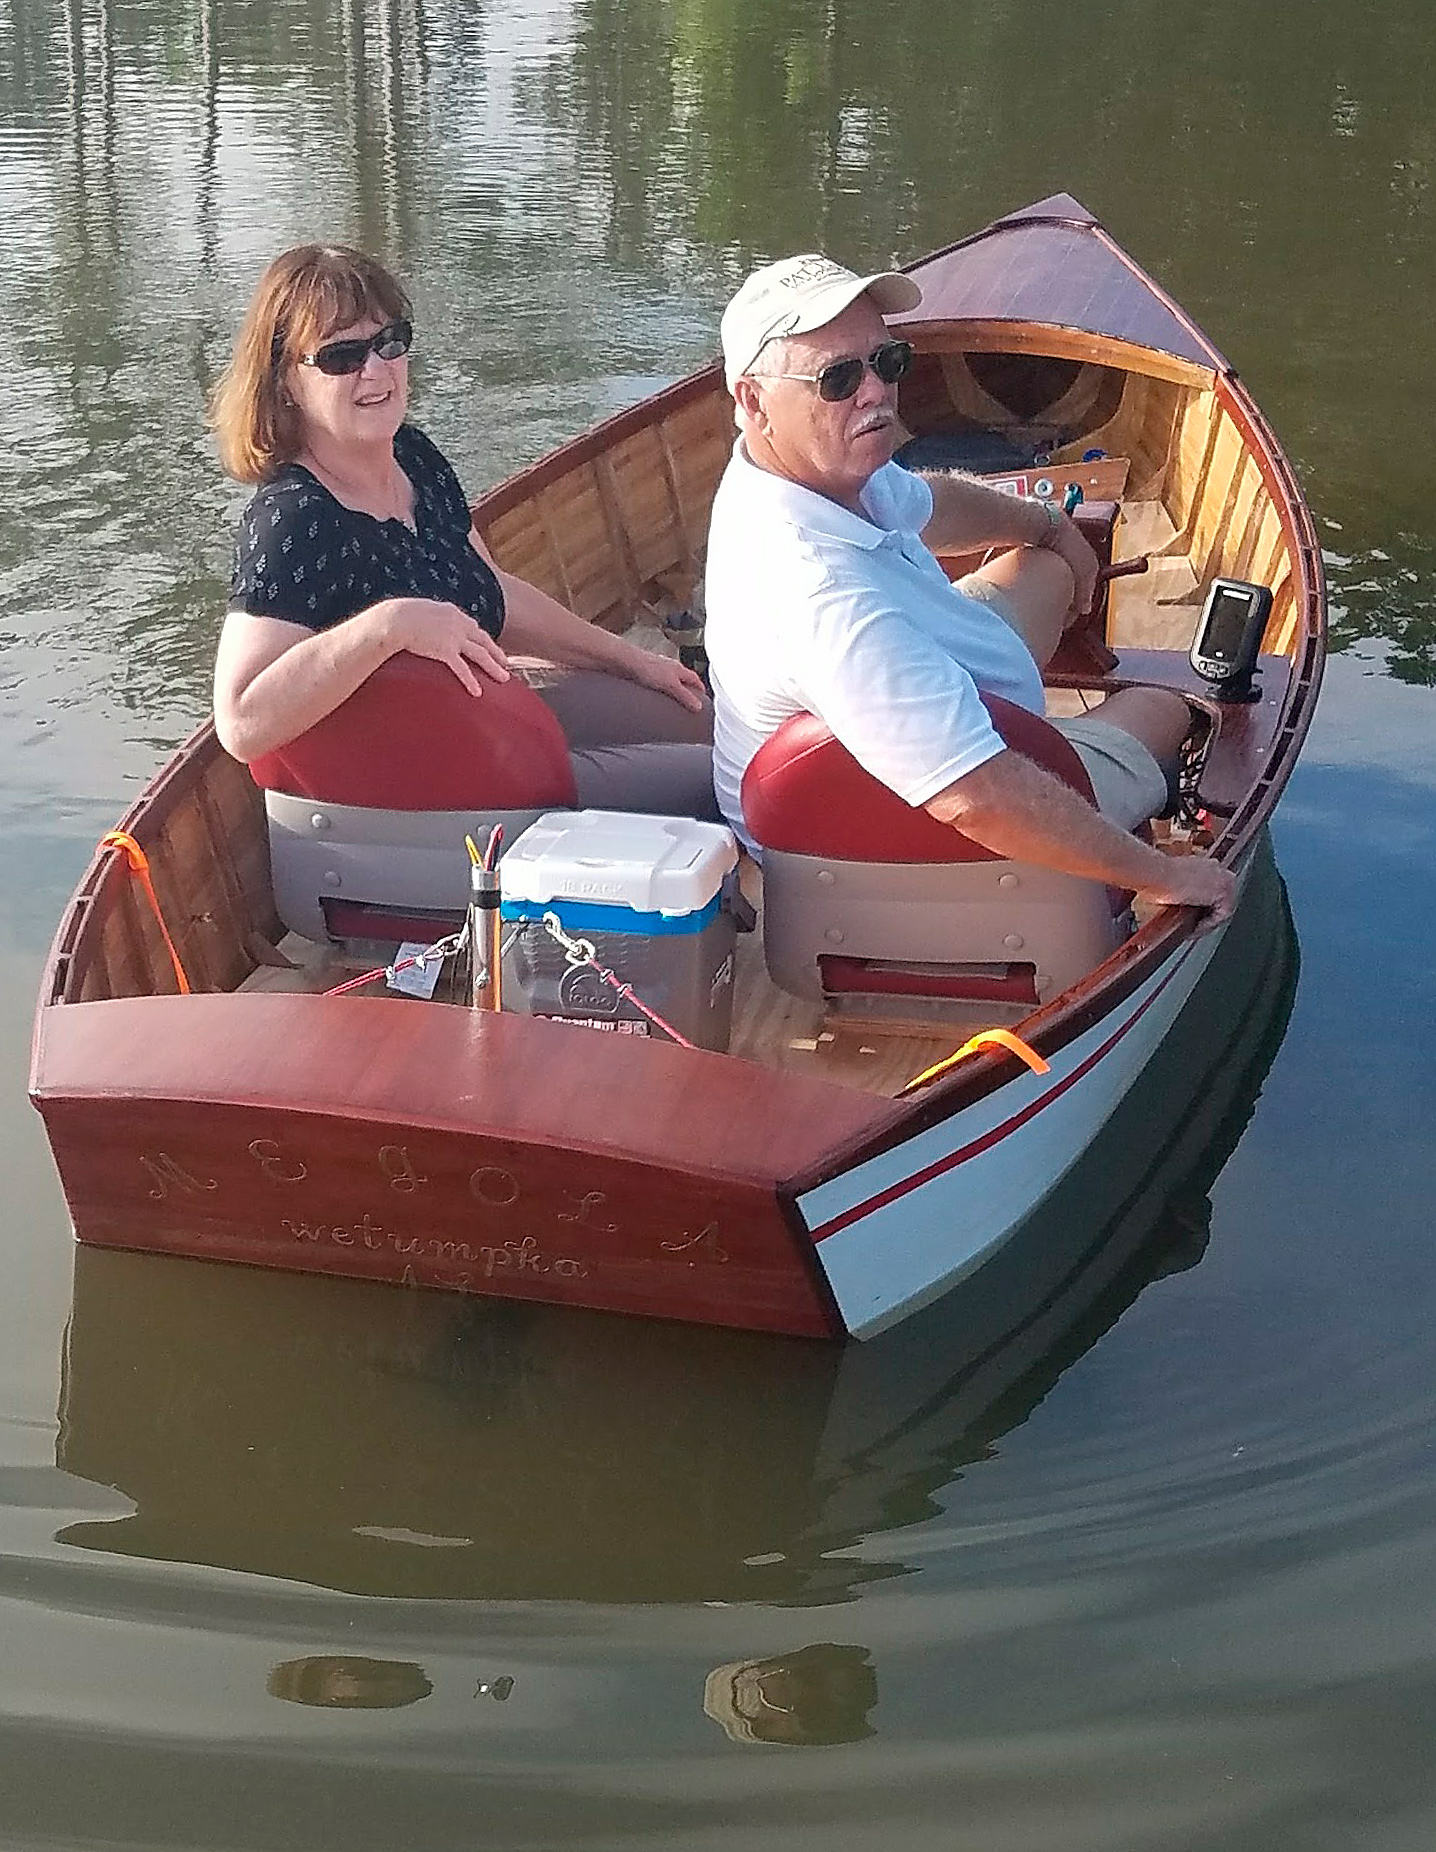
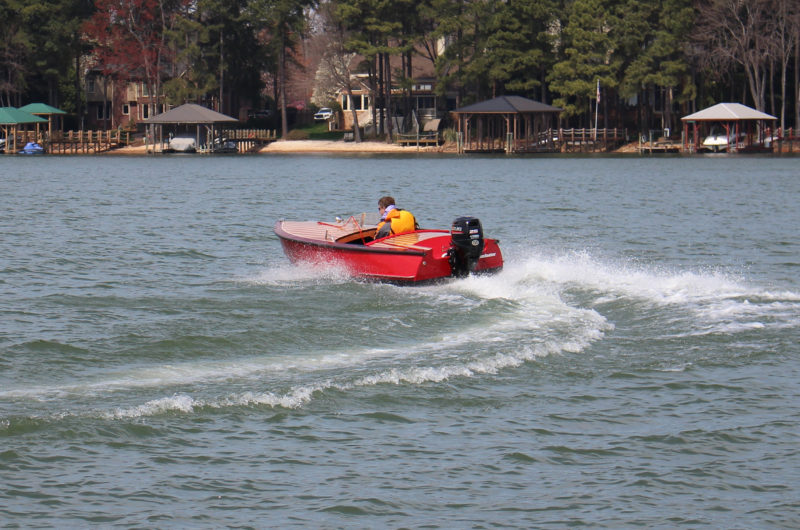
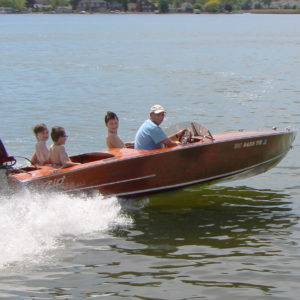
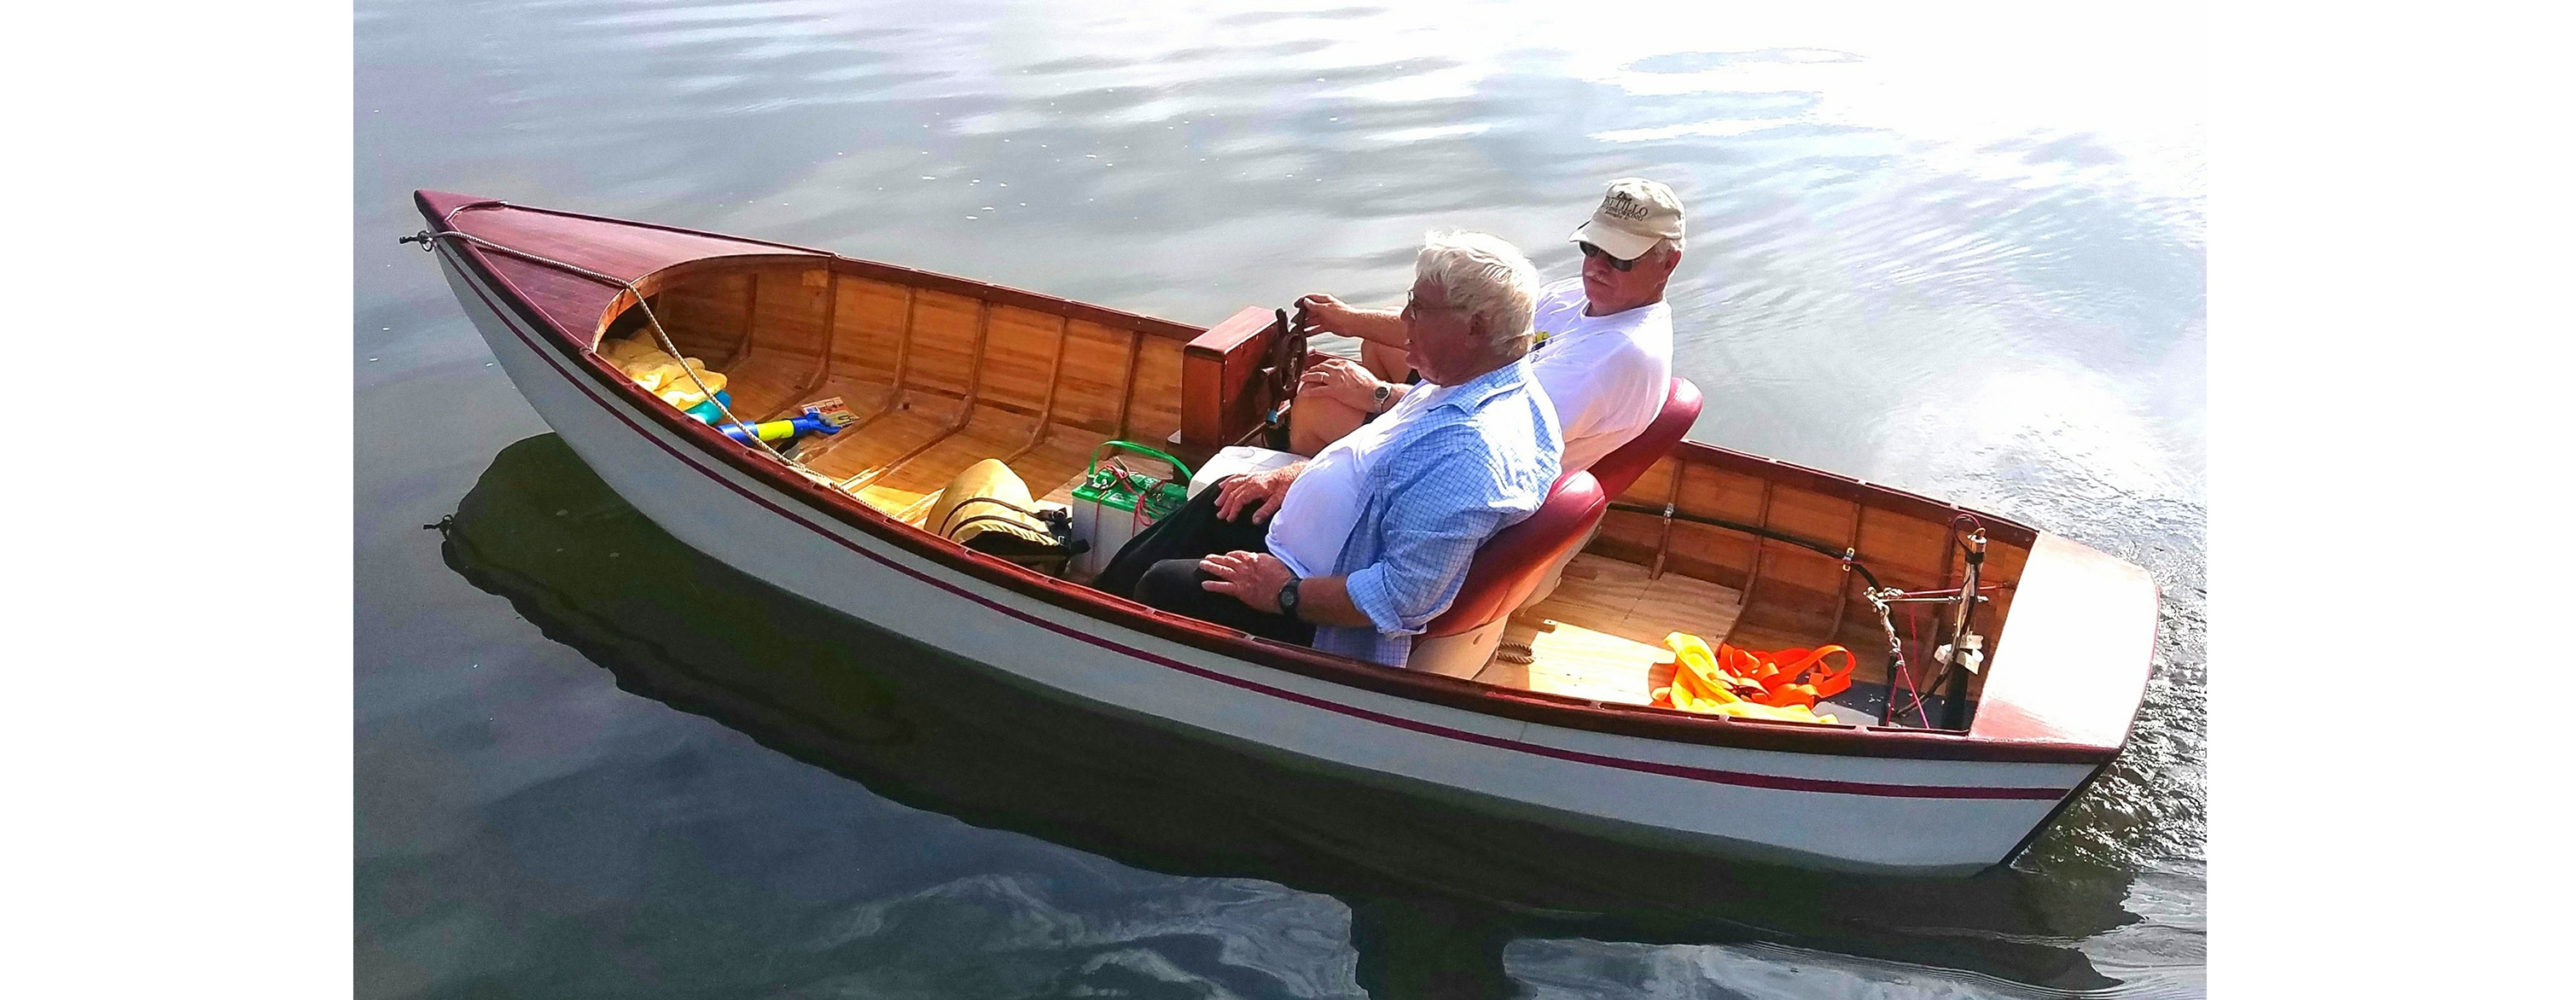
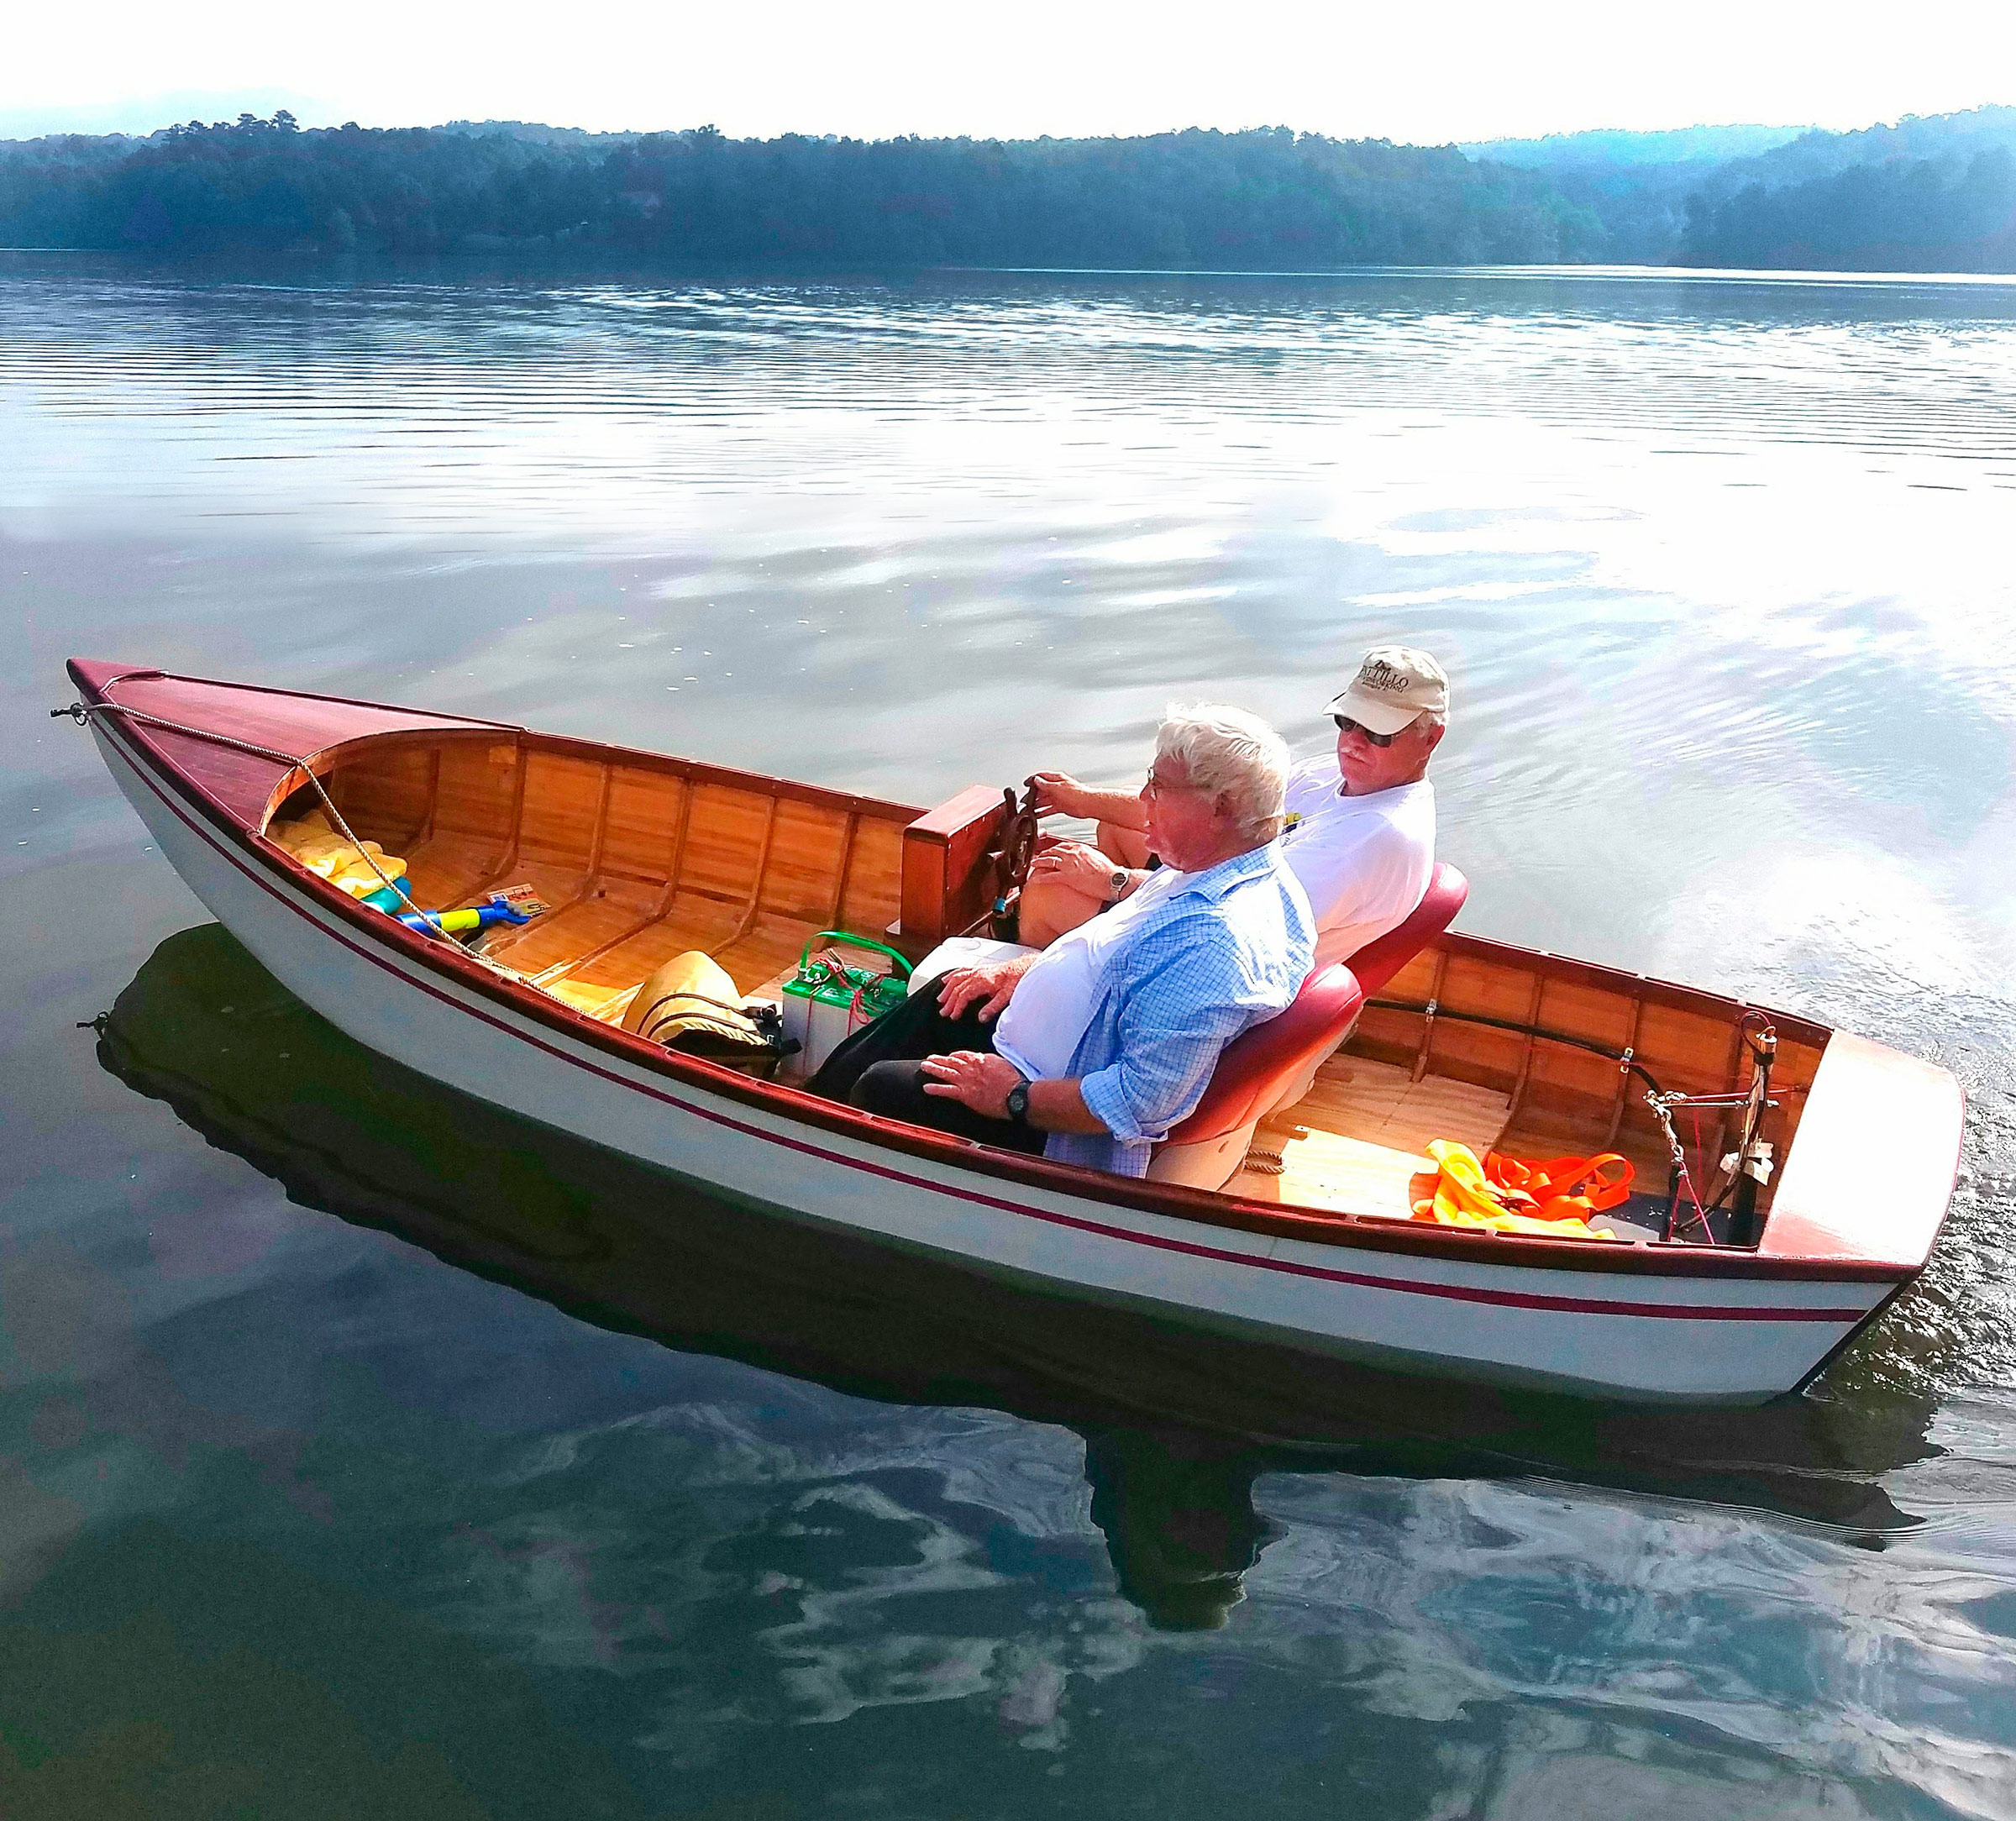
Ernest and Megan enjoyed a brief outing on the boat’s first time afloat. The transom is adorned with MEGOLA, a pet name he has for Megan.


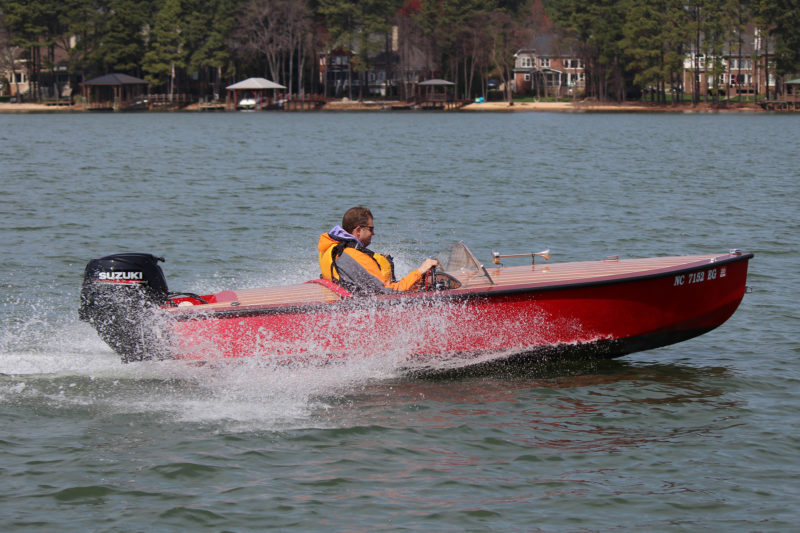
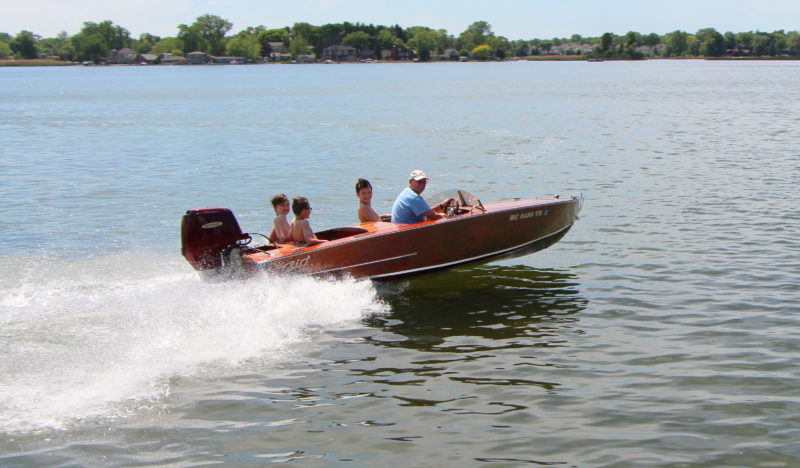
With MEGOLA finally finished, Ernest took his grandkids out for a ride.

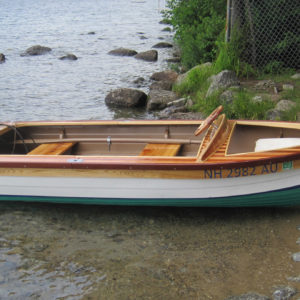
The boat was christened MEGOLA, one of Ernest’s pet names for Megan. The two of them have enjoyed the boat, and it has been popular with their friends and grandchildren. But now, at 78, Ernest says, “I’m getting a little old to get in and out of it.” When MEGOLA goes to someone else, Ernest will be without a boat. But all of his work will not be for naught. Every boat he ever built will always be his wherever it is and, with the memories he created along with them, Ernest will never be boatless.

Do you have a boat with an interesting story? Please email us. We’d like to hear about it and share it with other Small Boats Magazine readers.

Fillet Brazing for Custom Boat Hardware

The transom eyes, wheel, and foredeck fittings were part of the vintage look of the 10' runabout.photographs by Mark Kaufman

The transom U-bolts, wheel, and foredeck fittings added to the vintage look of the 10′ runabout.

While building a Crandall Midget Flyer 10’ runabout, from plans published in the January 1938 issue of Motor Boating, I wanted a bow handle, a foredeck fitting, and transom tie-down U-bolts that were appropriate to the period. I wasn’t able to find anything on the market, so I decided to make my own, and instead of shaping wood patterns and having a foundry sand-cast them, I would fabricate them myself with brazed brass and bronze. Another hobby of mine has been building fillet-brazed, lightweight steel bicycle frames, so I’d use some of the same techniques.

Important safety equipment includes a respirator to scrub vapors and fumes and goggles or glasses with Shade 3 lenses for protection from infra-red radiation.

Important safety equipment includes a respirator to scrub vapors and fumes and goggles or glasses with Shade 3 lenses for protection from infra-red radiation.

By using a brazing alloy that would build up in fillets at the intersections, the resulting radiused transitions would have the appearance of custom-cast fittings.  After some experimentation with different alloys, I found that Harris Safety-Silv 45% Silver Brazing alloy, purchased in a coil of 1/16” wire, produced a nice fillet with a golden color that is a good match for brass, though not quite so dark as bronze.

The parts of the small padeye are cleaned up, ready for assembly and brazing.

The brass parts of the small padeye are cleaned up, ready for assembly and brazing.

I started by making the bow handle from brass plate 1/8″ x 2″ x 24″ acquired from Hamilton Marine. The 3-1/2″ x 6″ base had to be shaped to fit the camber of the white oak breasthook under the fabric deck, so I hammer-formed the two halves of the plate over a curved section of heavy steel.  To silver-braze the two halves together, I set them on a firebrick and coated all areas where the brazing was to occur with GFM Type U Silver Brazing Flux. I use a small Meco Midget oxy-acetylene torch, with the acetylene’s regulator set at 4 psi and the oxygen’s at 10–12 psi. These settings have worked well with other torches; the pressures are set with the valves opened slightly. After lighting the torch, starting with the acetylene, I bring up the oxygen and adjust it to get a gentle, quiet, neutral flame, just off-feather of the outer cone. It is important that the area for brazing is heated slowly so that the flux is not burnt or blackened. The flux will first turn to a chalky white and then, as it reaches the proper brazing temperature, it will become clear.

The bow handle, fully assembled and given generous fillets of Safety-Silv 45 brazing alloy, is ready for to be cleaned, shaped and polished. At right is the mini oxy-acetylene torch.

The bow handle, fully assembled and given generous fillets of Safety-Silv 45 brazing alloy, is ready to be cleaned, shaped, and polished. At right is the mini oxy-acetylene torch.

I hold the torch at a 45-degree angle pointed in the direction the work will progress and position the brazing alloy at an opposing 45-degree angle. A puddle is created when the brazing alloy comes in contact with the adequately heated metal; after creating the initial puddle, you dip the brazing alloy into the molten material–either the heated metal or the puddle of molten brazing material–as you travel along. Don’t try to melt the brazing alloy with the flame.  Heat control is critical—apply only enough heat to melt the brazing alloy and not the brass. The part should also be positioned and repositioned so that there is always a valley for the molten material to flow into and create a radiused transition.

Cleaned up, the parts show the smooth transitions created by the fillets of brazing alloy.

Cleaned up, the parts show the smooth transitions created by the fillets of brazing alloy.

When the brazing is finished, the residual flux will be a very hard, glassy coating that needs to be removed. Let the part cool to room temperature, then place it under a faucet of hot running water and scrub off the flux with a brass-wire brush. When the brazing was done I did some additional contouring and shaping to the base plate before fitting the curved handle.

The wheel began with spokes being brazed to a hub.

The wheel began with spokes being brazed to a hub. The drawing shows the structure of the wooden rim.

I used 3/8” bronze rod for the curved handle.  It was too rigid for my handheld tubing bender, a General #153, so I heated the rod with the torch to a dull red and bent it while it was still hot. The next step was to drill the holes in the base plate for the handle to fit into. Sheet brass really catches the flutes of the drill bit as it exits the back side, so use extra caution when drilling it.

The bow handle's base plate is curved to fit the breasthook beneath the stretched and painted canvas deck.

The bow handle’s base plate is curved to fit the breasthook that lies beneath the stretched and painted canvas deck.

After inserting the handle into the holes in the base, I used the torch and flowed fillets in around the joints. The final profiling of the fillets can be accomplished by using a small round file, followed by 80- and 150-grit emery cloth and working through the various grits of sandpaper to 600-grit. Parts can be polished with a buffing wheel and buffing compound.

I also made a small deck fitting and transom tie-down U-bolts with 1/8″ brass plate and some 1/4” brass rod.  The bolt ends were threaded to accept 1/4-20 bronze nuts.

Using a brazing allow to build fillets provides a way to create flowing transitions between joined pieces; the result, with practice, is elegant metalwork that can pass for cast without the investment of the equipment required for melting and pouring metal into molds.

Mark Kaufman is a technology and engineering education teacher at Garden Spot High School in New Holland, Pennsylvania. He has been fascinated with boats and boatbuilding since his childhood days of boating with his family on Pennsylvania’s Allegheny River. As a teenager he built his first boats, a wood-and-canvas Trailcraft canoe and a Minimost hydroplane. Over the years, many of his high-school students have built skin-on-frame Greenland- and Aleutian-style kayaks. Mark has also taught classes on building these types of kayaks at WoodenBoat School since 2010.

Editor’s note: For a simple method of fabricating parts with brazing alloy and silver solder, see the review of the Bernzomatic TS 8000 in this issue.

You can share your tips and tricks of the trade with other Small Boats Monthly readers by sending us an email.

BUTTERFLY

Patrick MacQueen of Hancock, New Hampshire, got a great package deal on an aged 12′ aluminum skiff, Evinrude outboard, and trailer. He counted his $500 as well spent: “Aluminum boats are rugged and have great utility,” he wrote, “but they sure can be ugly.” The interior was painted gray with black and white flecks, and the exterior was chalky with oxidation. Decals, cracked and peeling, identified the outboard skiff as a MirroCraft.

The old aluminum boat wasn't much to look at but still had plenty of life left in it.Patrick MacQueen photographs

The old aluminum boat wasn’t much to look at but still had plenty of life left in it.

The Mirro Aluminum Company got its start in Manitowoc, Wisconsin, making kitchen cookware—aluminum pots and pans—and in 1956, confident that their experience making stove-top vessels that could keep water in, decided to manufacture boats that could keep water out.

The first steps in the transformation of the MirroCraft were a paint job and the addition of a faux sheer strake in ash.

The first steps in the transformation of the MirroCraft were a paint job and the addition of a faux sheer strake in ash.

Patrick, approaching retirement and seeing boatbuilding would fill the leisure hours he’d have ahead of him, thought the skiff would be a good winter project and decided to do much more than put a new finish on the still serviceable hull. He pulled out the factory-installed aluminum seats. They were covered in mahogany-brown vinyl, and as unpleasant to sit on as they were to look at. They’d be replaced with warm, bright-finished cedar thwarts. After giving the boat a three-tone paint job, Patrick add faux sheerstrakes of varnished ash. The skiff’s flat sheerline made it possible to get the nearly straight planks out in one piece from long ash boards.

The core of the wheel is aluminum salvage from the original seats after they were removed.

The core of the wheel is aluminum salvaged from the original seats after they were removed.

Earlier in the boat’s life, it’s likely that the skipper sat in the stern, steering the with outboard’s tiller, and with all that weight aft, the bow would have been well out of the water. Patrick decided to improve the trim by moving the helm forward so he could pilot the boat from the center thwart. He decked the boat, creating two cockpits separated by the dashboard. The deck’s 3/16″ plywood substrate was gussied up with strips of cedar, an ash coaming, and a mahogany rail.

Cedar decks, trimmed in ash and mahogany, completed the transformation.

Cedar decks, trimmed in ash and mahogany, completed the transformation.

The original thwarts that Patrick removed didn’t go to waste. He used the aluminum for the wheel and trimmed it with maple and walnut. More bits of the aluminum were pressed into service as the thwart-mounted throttle and shifter.

BUTTERFLY, all dressed up, now gets admiring looks, which had never come her way in her previous life.

BUTTERFLY, all dressed up, now gets admiring looks, which had never come her way in her previous life.

The name BUTTERFLY graces the transom, appropriately, and the transformed skiff has been on just about every lake within a 30-mile radius of Patrick’s home. That’s a lot of lakes, and a lot of people have seen and admired the boat, never guessing that its ancestors were pots and pans.

Have you recently launched a boat? Please email us. We’d like to hear about it and share your story with other Small Boats Monthly readers.

Ski King

The Ski King was designed by company founder Glen L. Witt—a keen water-skier and a boat designer—in 1953, the year he went into business selling plans and kits to home boatbuilders. Although he enjoyed boating in his own 15′ Ski King for many years, at some point sales of the plans diminished and they were removed from the Glen-L catalog. But in 1976, Dwain Colton of Portland, Oregon, was keen to purchase a set of Ski King plans which, luckily, were still stored within the company’s archives. As it turned out, Dwain didn’t complete his Ski King until 2003, but the plans are now in Glen-L’s online catalog and “even made it back into our print catalog, which is something that I don’t remember ever happening before,” said Gayle Brantuk, Witt’s daughter who now runs the company.

In August 2017, Jonathon Clark, a former manager in the construction industry, started a 40-week course at the Boat Building Academy in Lyme-Regis. He decided that he would build a Ski King and ordered a set of plans and instructions from Glen L. He could have gone started making the frames—the comprehensive plans include detailed frame dimensions—but because lofting is required part of the Academy’s curriculum, Jonathon began work by drawing the lines full size.

As the lofting process progressed, Jonathon investigated what engine he would install. The plans recommend engines between 45 and 90 hp, noting “the only limitation on the motor is size.” In the higher horsepower range, only car engines would fit; they would have to be marinized, and Jonathon didn’t want to take on the additional challenge. He looked for as big a marine diesel as he could find, and this led him to a 57-hp, four-in-line, water-cooled Yanmar. He soon discovered that this engine wouldn’t fit in the Ski King as drawn, and so he would have to stretch the hull. The plans say that it’s acceptable to increase the 15′ length by up to 10 percent, to 16′ 6″, by spacing the frames farther apart. Jonathon had more or less completed the lofting at this point, so to stretch the hull to 16′ 6″ he simply extended the stern and added an additional frame.

The 54-hp marine diesel installed in AGAPE has enough power to get on plane with a full complement on board.

The 57-hp marine diesel installed in AGAPE has enough power to get on plane with a full complement on board.

The hull is constructed upside down, with the motor stringers serving as twin strongbacks supported on temporary uprights and cross cleats. Jonathon and his fellow students would then set the transom and frames in notches cut into the stringers. The plans call for five frames: three of them ring frames, one just a floor, and the forwardmost a ring frame fitted with a plywood bulkhead.

Jonathon ended up fitting seven. He added one frame aft, and another near the bow, which would make it easier to fit the hull planking. The frames were made of 3/4″ thick sapele with 3/8″ plywood laminated to their floor timbers. Jonathon made the transom, originally drawn for 1″ framing and 1/4″ plywood, with 3/4″ ply faced on the outside with 3/32″-thick khaya veneers. The two motor stringers, which are fitted 1′ to either side of the centerline and run from the transom to the bulkhead at station No. 5, are 1″-thick sapele with 3/8″ ply laminated to their outboard faces to keep them from splitting, and they are interlocked into the frames. The stem is made up of two layers of 3/4″ plywood interlocked with the bulkhead at station No. 5 where it is joined to the keelson, which is made up of a laminate of 1-1/8″-thick sapele and 3/8″ ply, again to prevent the splitting that plywood-on-frame construction occasionally suffers. Other longitudinal components—all sapele—include 1″ x 2″ bottom battens, chines laminated in place from two pieces of 5/8″ x 2”, and sheer clamps from two 1/2″ x 2″ pieces, also laminated in place.

Once this framework was completed, the keelson, motor stringers, chines, and sheer clamps were faired to receive the plywood planking.

The plans call for 16’ sheets of plywood, 1/2″ on the bottom and 1/4″ on the sides. That may well have been available in the USA in the 1950s, but Jonathon could only obtain plywood in 8′ lengths. The plans include instructions for using butt blocks to join 8′ sheets to get the full length needed, but Jonathon opted to scarf two sheets to get the length for the bottom. Then, rather than use 1/4″ plywood for the side planking as specified in the plans, he decided that the simplest solution was to cold-mold the curved sides with three diagonal layers of 1/8″ ply.

The wheel was originally manufactured for a Volkswagen. The dash is not yet finished, with gauges yet to be installed in the three wooden disks.

The wheel was originally manufactured for a Volkswagen. The wooden discs are magnetically attached instrument covers that are removed when the boat is in use.

The plans suggest that, as an option, the outside of the hull could be ’glassed for increased durability. In the ’50s that would have meant using polyester resin, but Jonathon used epoxy and one layer of 450-gsm (13.2-oz) biaxial cloth. And while the plans call for Weldwood resorcinol glue, another pre-epoxy standard, epoxy was used throughout the construction, and during assembly everything was held together with a minimum number of bronze screws (far fewer than the plans specified).

Khaya sprayrails were then fitted along the chines, and in the aft part of the boat—where the tumblehome is pronounced—khaya rubbing strakes were fitted along the point of maximum beam. Once the hull was turned over, all the structural components were epoxy-filleted to each other on the inside.

The propeller shaft needed to be angled at 15 degrees, but if the engine was set at that angle, its forward end would be too high. So, it was fitted at an angle of 8 degrees on fabricated stainless-steel engine beds which were bolted to the motor stringers. A 1.47:1 gearbox made up the difference with a down-angle of 7 degrees.

The 14″-diameter, three-bladed bronze propeller came from Michigan Marine. It was supplied with a 12″ pitch, but BT Marine, a company near Lyme-Regis Academy, after examining all the available data, and tweaked the prop to produce a 13.5″ pitch with cupping to give a virtual pitch of 14″. A custom 304 stainless-steel fuel tank with a capacity of 53 liters (14 gallons), which Jonathon hopes will give him a full day’s use without refueling, was installed under the aft deck.

While the plans illustrate a motor enclosure that extends into the aft cockpit, the layout is meant to be determined by the builder and the motor chosen. In AGAPE, the motor is hidden under the deck between cockpits.Photographs by the author

While the plans illustrate a motor enclosure that extends into the aft cockpit, ultimately the layout is determined by the builder and the motor chosen. In AGAPE, the motor is hidden under the deck between cockpits.

Although Glen-L’s plans suggested a narrow bridge deck with an engine box extending aft from it, and a forward-facing seating in the aft cockpit, the details are left to the builder to accommodate the engine chosen. Jonathon felt that a wider bridge deck to completely enclose the engine with aft-facing seating behind it would better suit the 1950s aesthetic and the designer’s intended function for the boat: towing a water-skier.

The top portion of the ring frames serve as deckbeams, and the remainder of the deck structure is sapele. The deck itself is made up of a 1/4″ plywood sub-deck with 1/4″ khaya covering boards and kingplanks, and spruce laid planks. While there is a hatch in the foredeck for access to a stowage locker, Jonathon was keen to avoid obvious hardware such as piano hinges, and the engine hatch will only need to be opened for major servicing or removal, so he has fitted it semi-permanently. Removing the upholstered backrests forward and aft of the engine provides everyday access. Both sets of backrest cushions are in three sections, partly to make them easier to remove and replace, but Jonathon’s attention to detail is well reflected in the fact that the middle sections line up exactly with the kingplank, and the stitching in the outer sections line up with the other deck seams.

Jonathon found it difficult to source suitable chrome and stainless-steel deck hardware in the U.K., but he was able to find much of it in the USA. The windscreen framework came from a 1950s Chris-Craft, and the steering wheel was salvaged from a 1960s Volkswagen Beetle.

The seats in the aft cockpit face the stern, appropriate for the design's original purpose of towing water skiers.

The seats in the aft cockpit face the stern, appropriate for the design’s original purpose of towing water skiers.

The Academy’s launch day, with an enthusiastic crowd looking on, can be a nerve-wracking affair, especially with a high-performance boat such as the Ski King, now christened AGAPE. Initially Jonathon took co-builders Rory Pullman, Arthur Scott, and Sam Stephens, each of whom, along with fellow student Andrew Petter, gave him invaluable support throughout the project. After the inaugural spin around the bay, he returned and invited me to join him.

There was not a breath of wind, and in a very slight swell at close to the full 3,000 rpm, AGAPE got up to 22 knots. Jonathon was delighted: he had expected something like 20 knots with just one person on board. He was reluctant to try turning hard at full speed, but at 17 knots the turning circle was around 20 boat-lengths. Maneuvering at slow speeds was tricky, partly because the engine was set to idle at 800 rpm, a little high, and gave us a minimum speed of just over 4 knots. At that speed the turning circle was about five boat-lengths.

With 54-hp propelling the AGAPE, it is on the low end of the recommended power range. The upper range of 90- to 100-hp would provide a very lively ride.

Jonathon later contacted his engine supplier, Purbeck Marine, and learned this was computer controlled and would settle to about 600 rpm once the engine broke itself in. In reverse, AGAPE is very difficult to steer, but Jonathon accepts that these are typical characteristics of such a boat and hopes that some tweaks will lead to minor improvements.

Sitting in the stern seating area was very comfortable, with less motion than in the driving seat. Even at full speed I was able to write legible notes, and it was possible to have a conversation with my companions above the engine noise. It will be a perfect spot from which to safely keep an eye on a water-skier being towed astern. It was easy to see why Glen L. Witt, who passed away in 2017 at the age of 98, chose to build this one for himself.


Nigel Sharp is a lifelong sailor and a freelance marine writer and photographer. He spent 35 years in managerial roles in the boat building and repair industry and has logged thousands of miles in boats big and small, from dinghies to schooners.

Ski King Particulars

[table]

Length/15′

Waterline length/13′9″

Beam/6′

Hull weight/700 lbs

Average passengers/2 to 4

[/table]


Plans for the Ski King are available from Glen-L for $96.

Is there a boat you’d like to know more about? Have you built one that you think other Small Boats Monthly readers would enjoy? Please email us!

Runabout 14

There is something magical about the classic styling of decked runabouts that ushers us back to an earlier, more elegant era. Obtaining a genuine classic isn’t going to be in the cards for everyone, but there is an alternative that blends their style with modern affordable construction and just the right amount of whimsy. The Runabout 14 (RB14) designed by Jacques Mertens-Goossens of Bateau.com is one such craft.

Jacques has been building and designing boats for most of his life. Schooled in Belgium in yacht design, he has created a considerable stable of boat designs. He was an early adopter of CAD, and Bateau.com quickly made the transition to CNC-cut kits so Jacques could spend more time designing boats while the team at the shop manages the business of cutting kits, supplying materials, and supporting backyard builders.

Kerfs in the aft half of the side panels make the compound curve at the stern possible.Jim Dumser

Kerfs in the aft ends of the side panels make the compound curves at the stern possible.

The RB14 would look right at home in a 1950s DIY magazine, and in fact that is exactly where Jacques found some of the inspiration for the design. At only 14′ long, the RB14 will never be mistaken for a restoration of a grand runabout that regularly wins awards at wooden boat shows, but it is no slouch in the looks department. The tumblehome stern, faux planked decks, and broad covering boards will turn heads at the ramp and get a thumbs-up from motorists on the highway.

My 13-year-old daughter Kyla and I built an RB14 boat for her since “boatbuilding with dad” has become a recent tradition in our family. She had some hands-on experience helping her older sister, Hannah, build a Jericho Bay Skiff, but when we needed a bit of help we found ample guidance in Bateau’s tutorials, active forum of knowledgeable builders, and the designer himself.

The battery and fuel tank (visible here ahead of the foot well) are carried forward to help maintain good trim.Jim Dumser

The battery and fuel tank (visible here ahead of the foot well) are carried forward to help maintain good trim.

Plans are available, but we opted to order the hull kit. It includes temporary MDF molds and all of the permanent parts in BS 1088 okoume plywood. Each piece is CNC-cut with tabs to hold it in place on the plywood sheet; a little work with a thin, flexible pull saw frees them. Frames have tabs holding their centers which are left in place to give the frame rigidity during the early phase of construction. Long pieces for the side and bottom have puzzle-piece joints for quick and accurate alignment.

Construction is of stitch-and-glue plywood, assembled with the hull upside down. Permanent plywood stringers are incorporated into the molds, providing a rigid structure that exhibits little flex when the plywood panels that form the hull are bent around it.

The sides take on compound curves as they approach the transom—very difficult to achieve using 9mm-thick plywood—so the directions call for cutting parallel kerfs of varying lengths, in effect turning the aft half of the panel into six strakes. They get fastened to the curved edges of the transom and the kerfs are later filled; the facets created by the planks will be transformed into smooth curves in the course of sanding and applying ’glass and fairing compound. The sweet lines of the RB14 are proof that plywood can achieve the look that more traditional techniques provide. Builders working from plans are provided with the option of cutting the transom straight-sided and forgoing the kerfs in the hull sides.

The RB14 carves through turns without skidding. It's very shallow V hull is meant for smooth water.Kyla Dumser

The RB14 carves through turns without skidding. It’s very shallow-V hull is meant for smooth water.


The plans include options for a single or twin cockpit. The twin arrangement is asking a lot of so short a boat, and some might find it a bit restrictive. Builders of larger stature may want to opt for the single cockpit design as it offers more generous legroom.

The decks and cockpit offer the chance to show off woodworking skills and a bit of creativity since more of the decision making is left up to the builder. The kit includes all the parts necessary for the hull, and extra plywood is included for the decks; anticipating that builders will have different requirements for a comfortable fit in the cockpit and the layout of the deck, the plywood for the deck isn’t cut to shape. The plans offer renderings and suggested dimensions and then leave it to the builder to create a custom fit. Although a kit, this boat might be, as the RB14 web page notes, a bit of a reach for the first-time builder.

Decking can be planked traditionally over frames and caulked, or built with a variety of modern techniques. Some Bateau.com builders have vacuum-bagged strips of veneer over plywood on runabout decks. Others have cut plywood strips, then assembled them with colored epoxy filling the seams in lieu of caulk. Kyla chose to rout shallow parallel grooves in the 9mm mahogany plywood decking and fill them to achieve the look of classic runabouts. Regardless of the method, bright-finished wood decking, from either a traditional or a modern approach, is a fitting homage to the designs of a bygone era. It’s a lot more work than painting, but well worth the effort.

With a 25-hp outboard providing power, the RB 14 can reach a speed of 30 mph.Kyla Dumser

With a 25-hp outboard providing power, the RB14 can reach a speed of 30 mph.

Safety is built into the boat with a fully draining motorwell. The standard transom, with a cut for an outboard with a 15″ shaft, keeps the weight down low and doesn’t compromise stability. The literature that comes with the kit includes instructions for adding the proper amount of foam to keep the boat afloat if it is swamped. The hull isn’t deep enough to have room for an elevated self-bailing sole like those found in most larger, modern designs these days, but a good bilge pump will keep her plenty dry at the dock, and her fully ’glassed hull is able to live on a trailer trouble-free while out of the water.

The distribution of weight in a small craft is always an issue to maximize performance, and the RB14 is no exception. The hull is largely left open below decks, so it is possible to fine-tune the trim after finishing and launching the boat. If you opt for an outboard on the larger side of the 10- to 35-hp spectrum, you might want to shift some weight forward to help bring the bow down. Placing the battery and fuel tank ahead of the cockpit helped ensure our First Mate sits on its correct waterline at rest and pops out of the hole quickly when climbing on plane. The dual cockpit design makes achieving proper trim more of a challenge, because passenger weight will play a considerably larger role.

We power the RB14 with a four-stroke 25-hp Suzuki outboard and with its light plywood construction, the boat gets on plane without sending the bow to the sky at the start and with nearly flat sections aft, it will plane easily while this modest-sized outboard sips fuel.  With the motor at about 4,200 rpm the RB14 skims across the water very smoothly; cruising speed with two aboard is right at 20 mph. As the rpms climb, so too does the thrill with such a small boat. At 5,800 rpm, with two aboard, the speed is right up at 30 mph, and although not a white-knuckle ride, no one is left disappointed. The windscreen is appreciated and does improve the social aspect of an outing, allowing conversation without having to shout.

An external keel strip ensures that tracking is more than sufficient to put the pilot at ease; carving turns at speed is comfortable. Even at maximum rpms, the RB14 carves a smooth turn and hardly skids. On a plane, the boat is nice and dry with just a hint of spray when larger wakes are encountered. There is a nicely balanced feel to the handling, even at low speeds, making docking a pleasure. Bateau.com notes: “It’s an old-fashioned V hull that ends up with almost no deadrise: fast, but not designed for anything other than good weather.” We can confirm that the ride is a little bumpy at speed in a chop. No surprises here.

The Runabout 14 is a lightweight, trailer-friendly design that even a small car can pull. It offers strong performance in a small package, coupled with an aesthetic that warms the heart and harkens back to an earlier era when families made the time to go for sunset cruises and perhaps stopped off for a visit at a neighbor’s dock along the way. The RB14 appeals especially to those who enjoy the option to go fast, but are willing to slow down and enjoy life at a more genteel pace.

A word of warning: Don’t take the boat to a crowded launch ramp unless you have the time to answer a myriad of questions and receive a few pats on the back. Boats like the RB14 have a way of attracting attention of the best kind, usually from like-minded people, who just might want to be your new best friends.

Jim Dumser is a husband, father, teacher, and boatbuilder who is lucky to have had the opportunity to share the art and love of boats with his daughters and his students for the past decade. Building boats is the natural extension of his time spent starting and teaching the Wood Arts program at North Carolina’s Community School of Davidson where students have built a number of craft from canoes to a St. Ayles Skiff. 

Runabout 14 Particulars

[table]

Length/14′

Beam/4′9″

Hull weight/160 to 200 lbs

Displacement/730 lbs

Draft/5″

Power/10- to 35-hp outboard

Shaft length/15″ or 20″

[/table]

Runabout 14 plans and kits are available from Bateau.com for $75 and $2130 respectively.

Is there a boat you’d like to know more about? Have you built one that you think other Small Boats Monthly readers would enjoy? Please email us!

Glen-L Zip

I am frequently asked why I built a boat, and particularly, why I built a Glen-L Zip. The first part of the question is easy to answer: I love to build things and I can’t afford to go out and buy a new boat, so a set of plans was my preferred starting point. And why the Zip? I was initially drawn to it because it has style and character, more than I’d ever be able to find in any boat on the market, whether or not I could afford it. But I didn’t have much boatbuilding experience, other than a stitch-and-glue plywood kayak I had finished, so I was unsure if a Zip would be within my abilities. As I searched the Web and corresponded with other novices who had successfully built one, it quickly became clear that it was the obvious choice.

I am a Fire Chief in a small community in Michigan, and our Village Manager is my good friend Art Atkinson. One day Art walked into my office and said he was considering building a boat for himself. He had just returned from northern Michigan where old wooden boats are almost everywhere along the shores of Lake Michigan and Lake Huron. I told him I’d been considering building a boat for myself, too. He liked the idea, and we decided we would both build wooden boats while helping each other along the way. I ordered plans for the Zip, and Art settled on an equally classic-looking runabout, the Glen-L Squirt.  Both Art and I would be building our boats in our basements and so had limitations on the size of the boats we could build. The 14′ 4″ Zip was the largest boat I could build and still get it out of my walkout basement. The 10’ Squirt was small enough to be carried up the stairs from Art’s basement, and through the kitchen to get it outside.

 The 5' 9" beam provide the Zip with good stability and the flared sides help keep the occupants dry.photographs courtesy of the author

The 5’9″ beam provides the Zip with good stability and the flared sides help keep the occupants dry.

The plans for the Zip came from Glen-L with a step-by-step instruction manual and full-sized patterns for the transom, frames, gussets, stem, breasthook, and knees. Builders can shorten the boat by 10 percent if they reduce the frame spacing, but Glen-L recommends against lengthening the Zip. There is also an option to either set the boat up as a utility skiff with an open cockpit or as a runabout with decking surrounding two cockpits. I built my boat to the designed length as a runabout.

I bought rough-cut African mahogany from a local sawmill, brought it home, and milled it for the frames. The frame pieces are joined by plywood gussets at the corners. The stem is made of two layers of 3/4″ plywood, and the transom is a single thickness of 3/4″ plywood, framed and reinforced with mahogany. Mounted on a dual-beam strongback, the three completed frames, the transom, and the stem define the shape of the hull—there are no temporary forms. The keel, chines, and inwales then connect the transom, frames, and stem. The chines were the most difficult longitudinals to install. Each is a two-piece laminate, and each of those pieces required steaming to coax it into the needed bend and twist. Later it took a lot of clamps to tightly close the glue joints between the chine halvess.

The materials list specifies 1/4″ Douglas-fir exterior plywood for the hull, and while it’s an economical choice, I had a bright-finished boat in mind and so opted to use mahogany marine plywood. For the side panels, I cut two 4×8 sheets of plywood in half and joined the pieces to make a pair of 2×16 sheets, with the seams butted and ’glassed.

With a 45-hp outboard on the transom, the Zip gets on plane quickly.

With a 45-hp outboard on the transom, the Zip gets on plane quickly.

The side panels came under a bit of strain when I started to wrap them around the framework, so I applied towels and hot water to soften them up a bit. They then bent easily and held their new shape when dried, ready for epoxy and screws. The bottom went on in three pieces—one full-width piece aft and two half-width pieces forward. None required steaming to be applied to the framework. The hull, while still upside down, got a layer of 6-oz fiberglass, a skeg, and bottom paint.

Work on the interior started after the boat was flipped upright. Floorboards were not included in the plans, but I opted to add them to provide both a more finished look and a stable platform for my passengers to stand on when entering and exiting the boat. I was also worried about feet and gear getting wet, but water never seems to accumulate in the Zip. I used ash for the floorboards because of its strength and for the contrast of color.

The plans call for a deck of mahogany or fir plywood, and while that would be sufficient for a utilitarian boat, many builders of Glen-L runabouts opt to dress the plywood up with covering boards and deck planking. It makes a striking difference. I used mahogany for all of my decking. I bookmatched the broad covering boards to create a symmetrical pattern in the wood grain, then dyed them to create contrast with the deck planks. I added some decking beyond what was detailed in the plans to reduce the open area of the motorwell and provide a tidier appearance. Rather than use white caulk to accent the deck seams, I filled them with epoxy mixed with white pigment. When covered with varnish, the bright white took on a nice, aged golden color.

The plans for the Zip call for a plywood deck, but builders of Glen-L runabouts often lay deck planking over the plywood for a more classic and elegant look.

The plans for the Zip call for a plywood deck, but builders of Glen-L runabouts often lay deck planking over the plywood for a classic look.

Glen-L recommends powering the Zip with a short-shaft outboard of up to 40 hp, and I initially used a 1962 two-stroke 40-hp outboard on mine, but I didn’t care for the noise or the smell. I later equipped my Zip with a 1999, 45-hp four-stroke outboard. With the larger and heavier motor the Zip sits just a little lower at the stern, but when I’m riding alone or with one passenger and give full throttle to the Zip, it jumps out right on plane. With four adults aboard the boat does get up on plane quickly—it just does so a few moments after giving it the gas. I have had five people in my Zip many times, and I feel very safe in this boat with it fully loaded. I have no hesitation to go at full speed; I am just more aware of my weight and balance by always putting the heaviest passengers in the front. The only issue when it is fully loaded is that the bow will pitch up a little higher and the boat takes a few more seconds to get up on plane. The speed and handling characteristics do not seem to be affected by a full load.

Using a handheld GPS or the GPS app on my cell phone I have recorded a consistent top speed between 32 and 33 mph when I’m driving solo. The boat does well in light chop and begins to porpoise in moderate chop unless I apply full throttle and get up on plane. Once the waves get above 2′, I really need to cut the power back to quarter speed and just plow through the waves rather than subject the boat, and myself, to a lot of heavy pounding.

The boat handles like a dream, and I credit this part of the performance to the skeg; in calm water, I can race along at full throttle and make a sharp turn with little skidding. The Zip has bumper rails to protect the hull below the tumblehome at the stern; they also serve to deflect water away from the aft cockpit, but if there are passengers in the rear seats, I need to warn them they may get some spray in a sharp turn.

Builder Ted Gauthier has three young passengers aboard here, but has carried five in comfort. people.

Builder Ted Gauthier has three young passengers aboard here, but has carried four with him in comfort.

It took me 22 months of working on and off to build the Zip, and I could not be happier with its performance. I gladly recommend the design to others. It is a great first boat to build and an exciting boat to use. It is easy to trailer, and everyone who sees it gives it a thumbs-up. The design, drawn up in 1954, prompts many people to ask how old my boat is, and they’re surprised to hear that it hasn’t been around for decades. It is a great pleasure to own a boat you can proudly say you built yourself that has both classic design and modern features. If you’re thinking of getting an outboard boat that will last for years, that will handle well, that carries up to five people, takes up little space in the garage, and won’t break the bank to build or operate, you may want to consider a Glen-L Zip.

Ted Gauthier is the Deputy Fire Chief of Bloomfield Village, Michigan. His passion outside of his dream job as a fireman has always been boating and flying. Ted has built himself many things including an airplane, a hot-air balloon, a kayak, and a CNC machine. He grew up with his five brothers by a lake in lower Michigan where he learned to swim, water-ski, and handle boats. He spent almost all his free time as a child saving for gas so he could go out in small boats to enjoy the summer days. He always remembers his first ride in an old wooden boat and has promised himself that one day he will have his own.

Ted documented his progress on the Zip in his blog. He would be happy to help or answer any questions readers may have about building a Glen-L Zip. Emails to Small Boats Monthly will be forwarded to him. His review of a rivet spacing fan appears in this issue. 

Zip Particulars

[table]

Length/14′ 4″

Beam/5′ 9″

Depth/27″

Weigh/approx. 375 lbs

[table/]

Plans and patterns for the Zip are available from Glen-L for $108.

Water-based Wood Dye


All of the wood on the deck of the author's is African mahogany. The kingplank and covering boards were cut from boards that were the lightest in color, dye made them the darkest pieces. Photographs by the author

All of the wood on the deck of the author’s boat is African mahogany. The kingplank and covering boards were cut from stock that was the lightest in color, and dye made them the darkest pieces.


My outboard runabout, WORK OF ART, often stops people in their tracks when they see the deck with its beautiful, natural-looking wood color with sparkling grain highlights. No one has guessed that much of the wood under the varnish has been dyed.

The deck planking is African mahogany, and I was hoping to find some dark pieces for the perimeter covering boards and kingplank, and lighter boards for the rest. While I did find a couple of boards wide enough and long enough to do the perimeter covering boards, they were especially light in color, the opposite of what I wanted.

I was reluctant to use stain, as it tends to muddy variations in color and mute the wood grain. After doing a bit of research, I decided to get the darker color using dye; it would provide the contrast I wanted for the perimeter and kingplank while creating a clearer grain appearance. Water-based dyes, once dry, are compatible with epoxy and varnish.

With the dye plan in mind, I resawed the mahogany to book-match the planks, and after cutting them to shape, I epoxied them to the deck’s plywood substrate, taking care with the epoxy so as not to contaminate areas to be dyed.

The Vintage Cherry dye transformed the very light mahogany—a cut-off is shown here— into a rich dark color that enhances the grain.

The Vintage Cherry dye transformed the very light mahogany—a cut-off is shown here— into a rich, dark color that enhances the grain.

I used some cutoffs to test a few water-based dyes. There are several brands available; I chose to use dyes from General Finishes. Their Medium Brown was too dark and subdued, but the dye in Vintage Cherry was just dark enough to provide the contrast I was looking for and had a pleasing ruby-red hue. I epoxied the sample to get some gloss to approach the final appearance, and I really liked it.

After a penultimate sanding of the deck, I wiped it down with a wet rag to raise the grain and then sanded the bare wood for the last time with 220-grit. I masked the areas that were to be left undyed with plastic sheeting and blue painter’s tape. Wearing latex gloves, I applied the dye with a cloth rag to the perimeter boards and the kingplank, 3′ to 4′ at a time. The instructions are to apply a “liberal amount of stain” to saturate the wood surface on manageable sections, then wipe off the excess before moving to the next area. The dye is very watery, so as with any shop chemical, use appropriate protective equipment for yourself or surrounding areas that might get splashed.

After the dye dried, I had one area that was a bit blotchy, likely caused by epoxy squeezed through a long crack in the board near its end. With some sanding and reapplication of dye, I was able to get consistent color in the area. The instructions recommend letting the dye dry 3 to 4 hours or up to 10 in cool, humid conditions. I let it dry overnight, and the following day I applied the first coat of epoxy to seal the wood, smooth the surface, and bring up the shine.

The next step for the deck involved masking the plank edges, then filling the faux caulking seams between planks with thickened, white-pigmented epoxy. Then I applied about five coats of clear epoxy over the entire deck to build the surface and smooth it over. Five coats of varnish completed the deck finishing process.

The contrast between the undyed decking and the dyed covering boards and kingplank brings out the color of both.

The contrast between the decking, covering boards, and kingplank brings out the color of both undyed and dyed wood.

A water-based dye makes for a remarkable finish while enhancing the clarity of the grain. The outcome was beautiful beyond my expectations, and in hindsight, I believe the effect of using dye significantly contributed to creating a boat that is a standout in the boat shows that I have entered.

Art Atkinson retired from Ford Motor Company after 31 years as an engineering supervisor at Body Engineering. He is currently the manager for Bloomfield Village Association in Michigan. Woodworking has been his hobby since high school and prior to building boats he made musical instruments, furniture, and kitchen cabinets. His review of the Glen-L Squirt pictured here appeared in our June 2016 issue.

Thanks to Small Boats Monthly reader Bosco Plana for suggesting this article.

You can share your tricks of the trade with other Small Boats Monthly readers by sending us an email.