"From an early age,” writes Paul Sesto of Aurora, Ontario, “my father filled my head with dreams of sailing,” and those dreams have stayed with him. Growing up by Lake Erie in Port Colborne, Ontario, Paul learned to sail at 12. At the age of 14 he learned coastal navigation and two years later, celestial navigation. While in high school, he wanted to be a naval architect and design sailboats, but there were no such programs offered in Canada, so his university studies were in science. The doodles in the margins of his class notes—sailboat profiles—made it clear that his thoughts tended to drift in the direction of his dreams. After graduating, he managed an adult sailing school, and at 31, returned to school to study mechanical engineering and did his fourth-year thesis with a prominent sailmaker in Toronto.
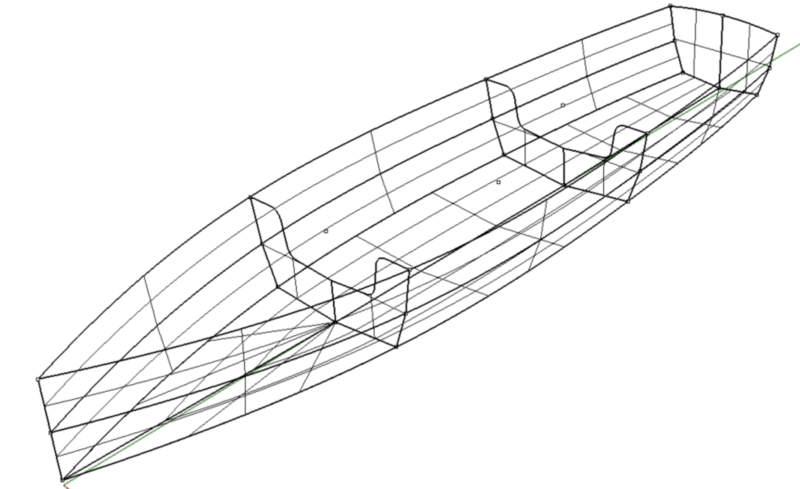
Paul designed his boat with a CAD program, which provided patterns for all of the plywood pieces.
Despite his decades of sailing, Paul had never had a boat of his own, not even a canoe, let alone a sailboat, but he found temporary satisfaction in designing and building model sailboats. Some were meant to be sailed, but since they were models he could only take the helm by radio control.
 Photographs by and courtesy of Paul Sesto
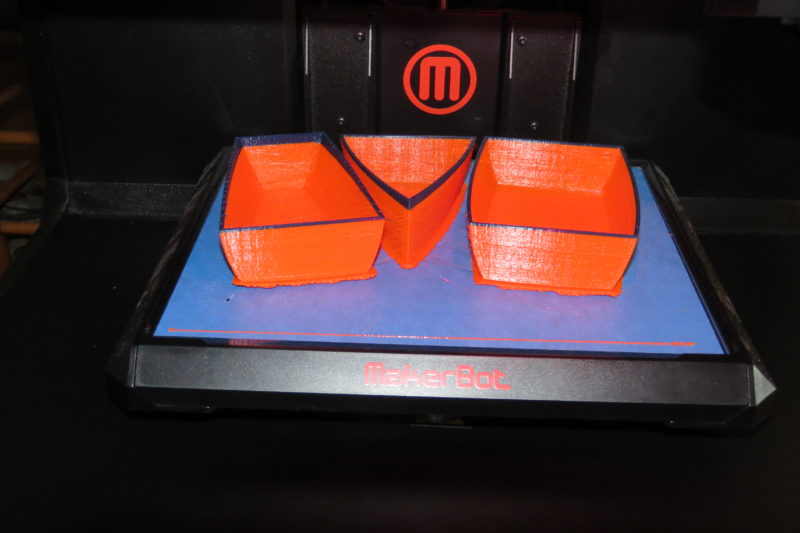
Paul had access to 3D printers through his job and used one to print a model of his design.
The Flight of the Phoenix, a 1965 film featuring Jimmy Stewart, encouraged Paul to build a real boat. Stewart played the role of Frank Towns, pilot of a twin-engine cargo plane forced by a sandstorm to a crash landing in the middle of the Arabian desert. Everyone on board survived, but there was no chance they’d be rescued. One of the passengers, Heinrich Dorfmann, an aeronautical engineer, proposed making a flyable aircraft from what remained of the cargo plane. Only when the group had finished the project did Towns learn that Dorfmann’s work had been only with model airplanes. Dorfmann defended the cobbled-together aircraft, saying “the principles are the same.” That stayed with Paul and got him thinking that if he could make model boats, he could design and build a boat he could sail.
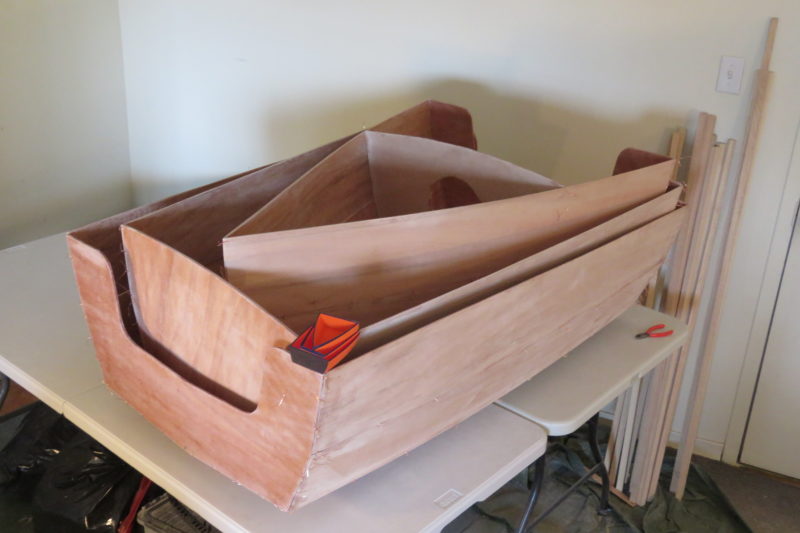
After the three sections had been assembled, Paul nested them for the first time. They fit together just as they did with the printed model.
The size of his boat would be limited by the space he had available for building it, which was the living room of his one-bedroom third story apartment. And the only place he would have to store the finished boat was the 4′-long, 3′-wide back end of his Toyota hatchback. The boat would have to be sectional.
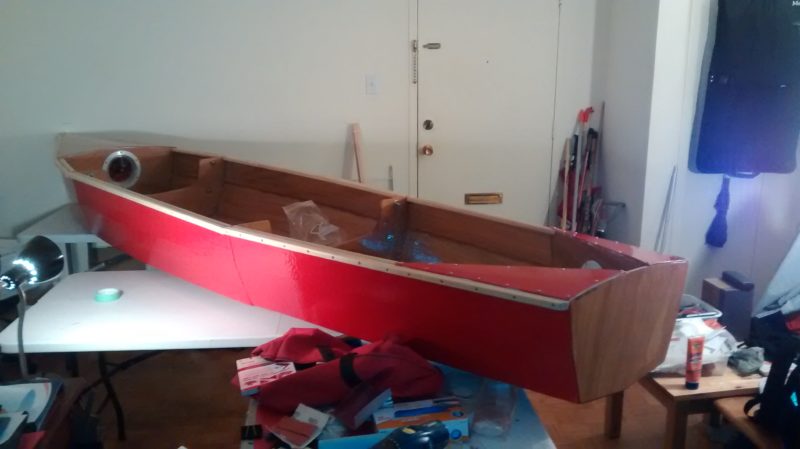
While TRIO could be assembled in Paul’s living room, there wasn’t much room left for anything else.
He started the project early in 2017 with scale models, working out the sizes and shapes of three pieces that would nest in one another. He further developed the shapes with a CAD program, and to test the nested design he made scale models both in wood and on a 3D printer. His older brother Michael, a 3D graphic designer, offered support for the project with his refined sense of aesthetics and his own knowledge of sailing and design. Michael also bought a 12′ origami-folding kayak so he could join Paul on outings when his boat was finished. Satisfied with the design, Paul used the CAD program to develop the panels and print full-sized patterns.
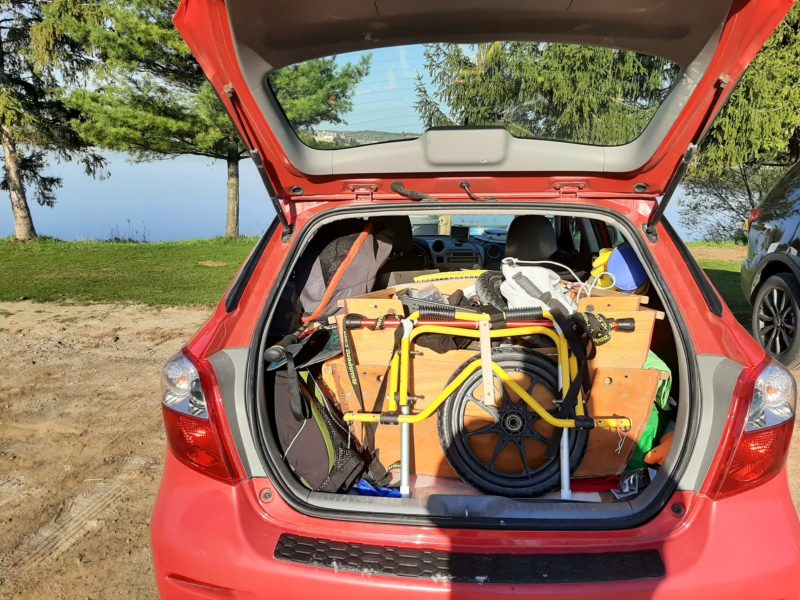
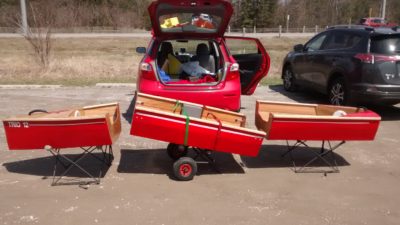
Nested, TRIO fits in the back of his Toyota Matrix Hatchback, along with a folding cart to roll it to the water.
A sectional boat is usually built in one piece with double bulkheads (where it will be cut into separate pieces), but Paul didn’t have enough unused space in his living room to be occupied by the 12′ boat for weeks, so he built it in three separate pieces. This also avoided having to scarf 8′ sheets of marine plywood to make 12′ panels. He worked on a pair of folding tables and cut sheets of 4mm and 6mm plywood to shape with a Japanese pull saw, then drilled the holes for stitch-and-glue construction with a cordless drill.
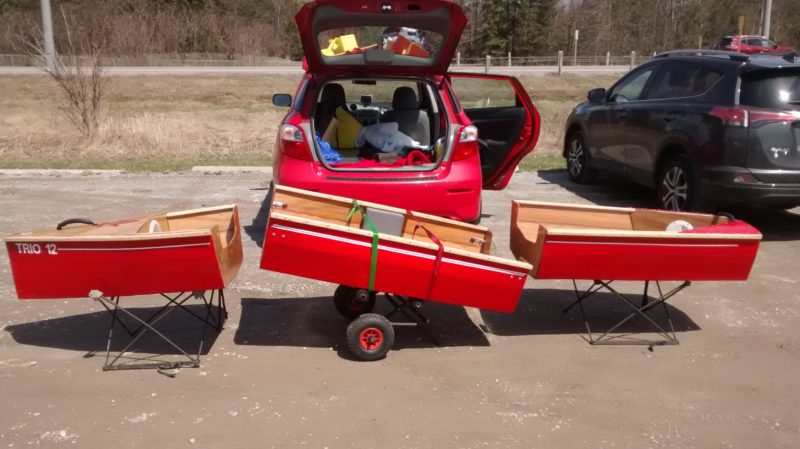
The cart and a pair of stands hold the sections at a convenient working height for assembly. The bolts that hold the bulkheads together are all above the waterline.
After the three box-like pieces were finished and tested for fit—both assembled and nested—Paul moved the project to his parents’ garage, two-and-a-half hours away in his hometown, for the remaining woodwork, paint, and varnish.
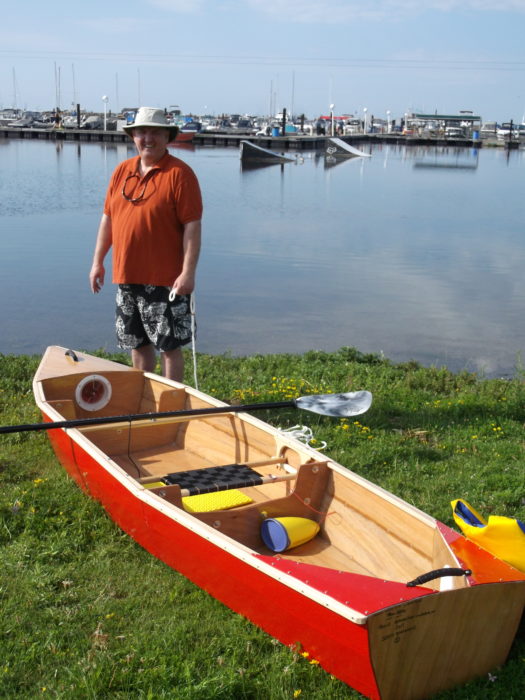
TRIO was launched as a paddle vessel while awaiting her sailing rig, which Paul (pictured here), would make during the winter following her first season afloat. The inscription on the corner of the transom includes the signatures of Paul, his father Adam, and his brother Michael.
Paul’s 86-year-old father, Adam, had taught both sons to work with tools when they were young, but as they grew up he was occasionally less than enthusiastic about the projects they took on: “Don’t you have anything better to do?” But when he saw Paul’s sectional boat taking shape in his garage, Adam was happy to pitch in. He took on the job of painting and varnishing, which is one of features people admire most about the boat. Paul is quick to mention that it’s his father’s handiwork.
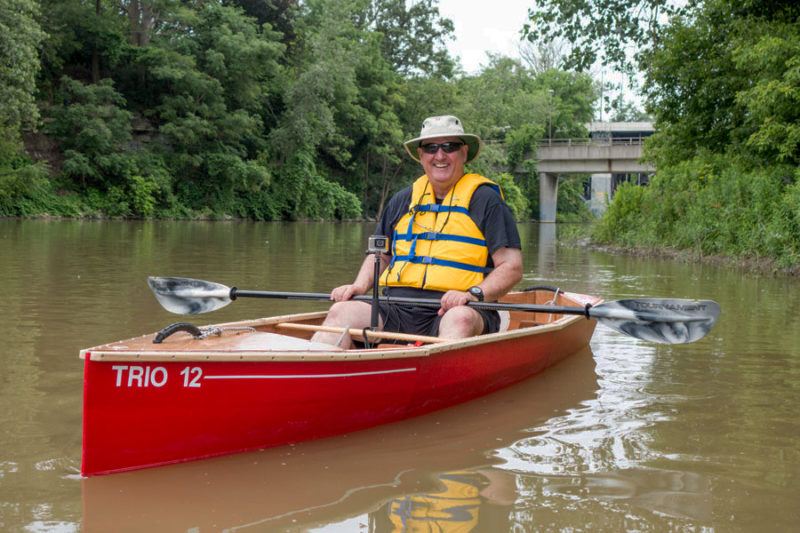
Ontario’s Humber River, only about 20 miles from Paul’s home, winds though many parks on its way to Lake Ontario at Toronto.
In July 2017, TRIO 12, as the boat was christened, was launched. The three sections, from bow to stern, measure 44″, 52″, and 48″ each and came together to make a 12′ hull with a beam of 33″ and a depth of 13″; it weighs 70 lbs. TRIO 12, of course, refers to the three pieces, but also to Paul, Adam, and Michael, the three who invested their time, energy, and pride in her building.
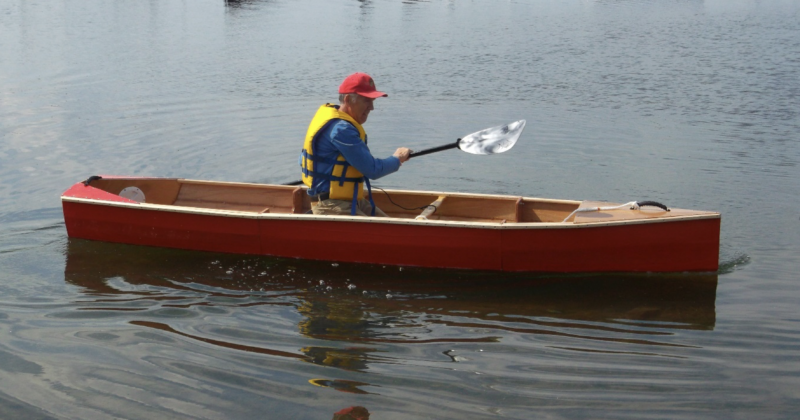
Paul’s 74-year-old uncle, Paul Misner, is a canoeist and offered to take TRIO out so Paul could see how his boat looked while in use.
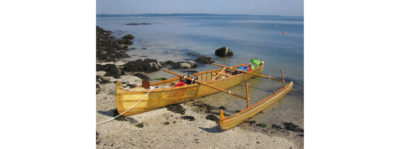
Paul spent much of that summer taking TRIO 12 out with a double-bladed paddle. He often went with Michael and his kayak, spending time together just as they did in their teens and 20s. During the winter that followed, he put together the sailing rig: mast, leeboard, and kick-up rudder with a push-pull tiller. He bought an Optimist pram sail, rigged it as a lugsail rather than a spritsail, and for additional stability he bought an outrigger kit with inflatable amas.
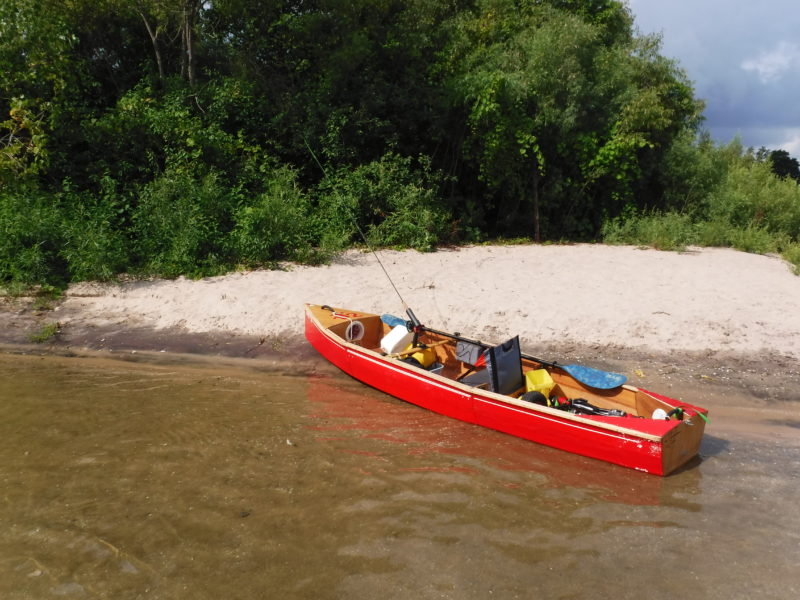
While Paul had sailing in mind as he designed TRIO, he took a keen interest in fly fishing.
Every year since then, from early May to mid-October, TRIO 12 and her sailing rig and cart have stayed in the back of Paul’s car, ready to go on a moment’s notice. “At 55, I proved to myself I could design and build my own sailboat,” he writes, “The boat has transformed my life, and just like when I was a kid, I can’t wait for the ice to melt and to get out on the water again.”![]()
Do you have a boat with an interesting story? Please email us. We’d like to hear about it and share it with other Small Boats Magazine readers.


Magnificent job of engineering. Would love to see pictures of the sailing rig. Is that possible?
Hi Thomas,
Paul Sesto here. I don’t have any true pics of the rig sailing since when I’ve gone out I’ve been on my own. But perhaps this will help that a few summers ago I did a time lapse of putting the canoe & the sailing rig together. The canoe takes about 25 minutes and with the rig maybe an extra 10 to 15. Here are some notes that I also included but couldn’t make it in the story because of length and being more human interest bent. But perhaps this will help:
All sail control lines are rigged as continuous lines leading aft and stationed on the leeboard thwart with a line bag to keep it all tidy. I purchased an Optimist sail and built the spars based on the Optimist dimensions but chose to do it as a balanced lug rig instead of the traditional Opti sprit rig. Being only 35 sq ft. and as a balanced lug it only takes a direct mainsheet to the boom rigged on a spreader line. I also rigged it with a continuous halyard, sprit downhaul and boom downhaul do that I could raise & lower the sail without leaving my prone sailing position. The leeboard & rudder kick up for a shore launch and beach while in the prone position in the centre of the boat. A Hobie fishing inflatable ama kit was purchased and installed across the leeboard thwart for safety buoyancy as outriggers.
And additionally all of the sail-kit wood is mostly 12mm marine ply with 6mm also for the cheeks of the kick up rudder. I used an anodized aluminum adjustable camping tent pole for the push-pull part of the tiller. I checked out the specs for the Opti sale rig and instead of purchasing it I made it myself going to a Toronto spar & rigging shop and getting the right tubing. The mast is 2 piece so it also fits in my Matrix. With the original design I wanted it to be strong stable & safe – that’s why I had the bow deck & stern decks for both strength and lots of positive flotation. It may be “overbuilt” and could be a bit lighter but I was going for strength on my first build. I learned from the first sail being that I needed a window so I then sewed that into the foot of the sail. When I was in high school I built a sail kit from plans for our family 16′ canvas-covered freighter canoe, which had a square transom. I use to literally hike out sitting on the gunwales and putting my feet under a thwart and seat. The rig wasn’t balanced right so it was difficult to tack. Lots of things I learned more than 35-40 years ago I put in to TRIO to make it better. ie. calcuating the centre of effort and placement of the leeboard thwart etc. for the centre of lateral resistance. And I’ve learned with a balanced lug you can alter the CE by boom position and halyard lift. The inflatable amas are adjustable and only hit the water once you start to heel a bit, instead of always being submerged. It’s a light air boat and just a simple joy to move along in the water. When I return to shore, I drop the sail with the downhaul on the sprit, kick up the leeboard & rudder and paddle a couple of strokes to hit the beach. I’ve had refinements over the few years, like removing the traditional canoe seat and using a floor seat that is about 2-3″ off the floor, lowering my centre of gravity and just feeling more stable when I fly fish. Everything I did I tested out first, i.e. building a small stitch & glue box before doing fillets on the real boat and even building a model sail rig on a wooden model of TRIO. Sorry for going on. Just happy to share with anyone looking to do the same.
Looks great… and great fun. Thanks for the article and this addendum. Love the video!
Thank you for posting your trip article. I have been thinking of the Explorer Dinghy, also three sections. Your pictures show a lovely build, congratulations.
BW Peter
I think this is a great idea!!
I immediately started thinking about something a bit larger, that could fit in the bed of a pick-up truck. Maybe 15′ to 17′ or so, with a wider beam (still within the 48″ space between tire wells) that could accept a small electric or gas motor. It would be big enough for a couple of adults, and a couple of smallish children, and it would have more range to get to more “favorite fishing holes” with room for the fuel tank/batteries and a cooler for the caught fish, as well as room for food and drinks for the passengers.
And keeping with the 5:4:3 ratio (rear/middle/front) you could loft the dimensions to work with a 15′ boat up to around 18′, keeping in mind the weight of each section because of the increased materials. Maybe a 15′ boat of 6′, 5′, and 4′ sections)
But a lot of variations come quickly to mind, just as you did mods for sailing.
Your dimensional line drawing is perfect for scaling or lofting, keeping weight in mind, and the limits of length and width in the transporting vehicle.
This could also ride on top of a pop-up camping trailer or even have different mid-sections for sailing—with built-in reinforcements for the mast and rigging—or fishing, or just touring and relaxing on the water.
Just a LOT of spin-off ideas, maybe even pick up one of those small folding trailers that are about 5′ of bed-space, and fold flat against your garage wall, so you can tow the boat-assembly behind even a very small vehicle, or a regular coupe or sedan.
Hi Paul,
Paul Vitelli here. We met at Island lake on Saturday 6 August where I spotted your craft as you were coming out from the lake. I built a stitch and glue SUP and a D5 sailing dinghy and really enjoyed talking to you abound your boat and excited that others in the area have the same interests as I do when it comes to diy boats. Do you sail/paddle at Island lake regularly? Maybe I will see you again there soon. PM me if you would like to share any other stories about your build. Thanks
Paul Vitelli