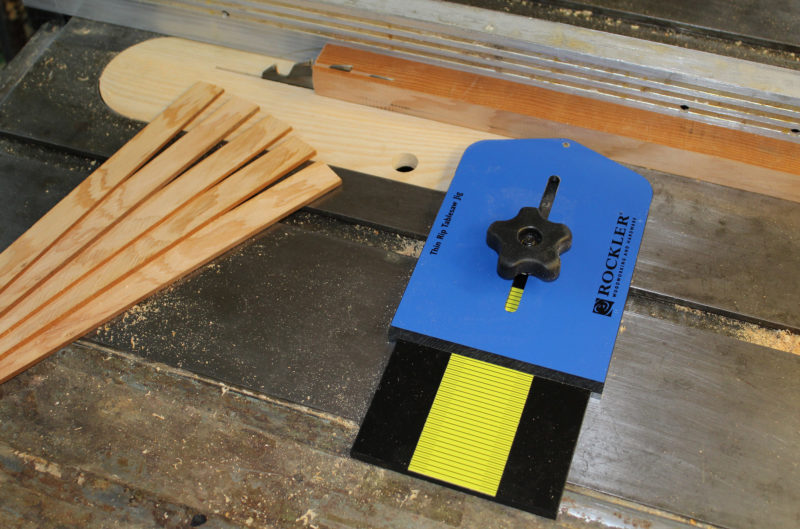
 photographs by the author
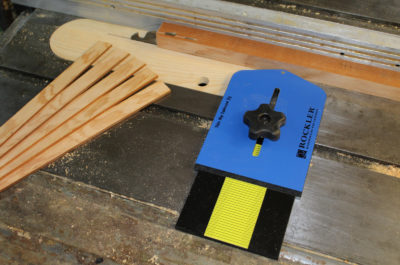
The ball-bearing equipped jig, along with a shop-made, zero-clearance, table saw insert, makes ripping strips for laminations safer than sawing thin stock the on the fence side of the blade.
If I had my druthers, I’d make knees, breasthooks, and stems—all those angle-reinforcing structural parts of boats—out of grown crooks, but they’re hard to come by and take time to season. Laminating these parts is a good way to get the wood grain in them to turn around corners, and they’re fairly easy to make. The part of the process that I like least is cutting the required thin strips of wood on my table saw.
For decades I’ve set the rip fence up close to the saw blade and run the stock through with push-sticks. At the end of each cut it was always a struggle to get the new strip pulled past cleanly the blade. If I walked around to the back of the saw to pull the strip through, I’d interrupt the steady feed of wood through the blade, and the strips could easily bend or twist into the blade, resulting in some gouges or burns. There was also the risk of having the saw shoot the strip across the shop.
I recently came across a better way: thin-rip jigs. There are a few different versions available from woodworking supply stores, and a number of do-it-yourself versions described on the web. I bought Rockler’s Thin Rip Table Saw Jig. It has a metal device on the bottom that locks into the table’s miter track. The top of the jig slides side-to-side, and a knob locks it at a chosen setting. A ball bearing acts as a gauge and a guide for the wood being sawn.
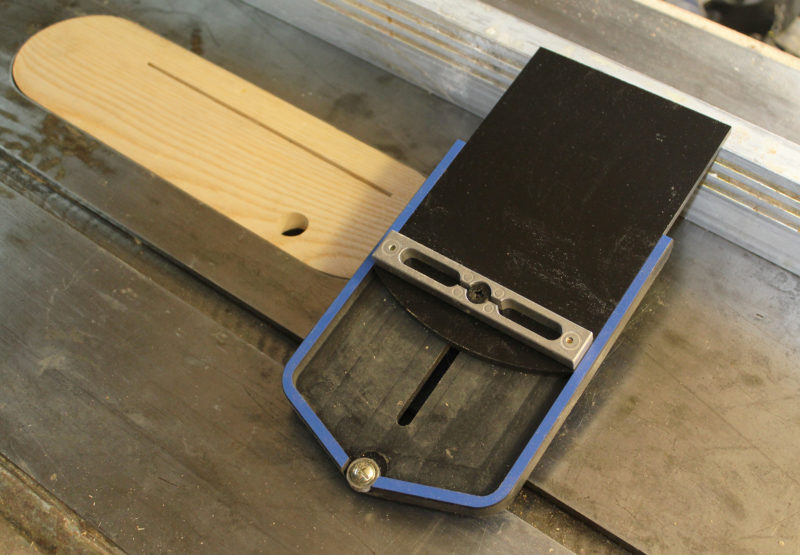
The bottom of the jig has a metal bar that fits and locks in the table saw’s miter track. The ball bearing reduces friction as the wood being sawn is pushed by the jig. The zero-clearance jig shown here is made of ash and is splined at the ends to prevent splitting.
When working with any thin stock on the table saw, a zero-clearance insert is better for the wood and safer for the operator. If the gap in the saw’s standard insert is wider than the strip, the strip won’t be supported and can get pulled down by the saw blade.
I ran the stock through the saw blade (taking off just a bit of wood to assure that the stock had parallel sides), set the jig in the tracks, and placed it so its ball bearing could be set against a saw tooth that would be cutting the kerf on that side. The jig’s scale is marked in 1/16″ increments, making it easy to slide the bearing away from the blade to set the thickness of the strips. Partially tightening the knob locks that setting and leaves the jig to slide back along the track away from the blade; further tightening the knob locks everything in place.
With the rip fence pressing the stock lightly against the bearing, sawing can begin. At the end of the cut, a strip falls safely to the side of the blade with no binding, burning, or gouging. For every subsequent strips, the fence gets unlocked and moved to put the stock again against the bearing.
The last bit of each board may be thick enough to provide another strip, but the jig won’t be able to work with it because the fence would come in contact with the blade. The remnants could be run through a planer or carefully fed through the table saw in the conventional manner, between the blade and the fence.
The Rockler Thin Rip Jig is economical—it would cost me more in time and materials to make a jig that would work as well—and makes reducing a board to a pile of uniform, ready-to-laminate strips a whole lot faster and safer.![]()
Christopher Cunningham is the editor of Small Boats Monthly.
The Thin Rip Table Saw Jig is available from Rockler for $26.99.
Is there a product that might be useful for boatbuilding, cruising or shore-side camping that you’d like us to review? Please email your suggestions.






Awesome! Way better than going between the fence and the blade.
How about a bandsaw splitting a lamination? I mean how much trouble could it be.
As a rule, bandsaw blades drift, so you have to set a fence at a slight angle to get the stock to feed through without binding or deflecting the blade. My 14″ Delta bandsaw didn’t come with a fence so I bolted hardwood blocks to the front and the back of the table to make it easier to clamp a fence in place, but even then I found it fussy to set up a fence and get the saw to cut true. I usually have a 5/8″ blade on my bandsaw and that’s the blade I’d use for ripping laminates, but if I had to change blades, it would take time to swap blades and reset the guides and bearings. I don’t get as smooth a cut with the bandsaw as I do with the table saw—the sides of the carbide teeth on a table-saw blade plane the kerf smooth where the set teeth of a bandsaw blade score it. The table of the bandsaw is also much smaller and doesn’t support the stock as well.
The bandsaw does have one significant advantage: It cuts a narrower kerf and you get more strips and lose less stock to sawdust. If the stock is scarce or expensive, I’ll consider using the bandsaw to rip laminates.
You can always buy a 1/16″ table saw blade. Most of the 10″ ones are really expensive, I bought a 7 or 8″ one from Duckworks for around ~$25 which works great. For ripping you don’t normally need the full depth cutting capability and the smaller blade works fine.
Why does one need a jig at all? Simply set the saw by its rip fence guide or mark a line on the table surface and line up the board’s edge with it. There will be a very slight variance in thickness but not enough to matter. In fact, some strips will be a bit small and others a bit large, thereby evening things out.
Or have I missed something that this jig is providing?
Uniformity is one of the chief benefits of the jig. It’s true that you could just make a mark on the table and the variation in the thickness of the strips would be acceptable, but using the jig would likely be faster than eyeballing the resetting of the rip fence each time. The jig also serves as a featherboard, keeping the stock tight against the fence. That’s especially helpful with longer stock. You could, of course use a mark on the table and a featherboard, but the jig would again likely be faster and produce more uniform results.
I’m with Michael. A quality sharp resaw bandsaw blade such as Highland Hardware’s Wood Slicer can produce veneers uniform enough for furniture making. Yes, you need to joint one side of your workpiece(s) if you need it to show, and I always go through a complete tuneup-setup, including setting the fence for drift, but this is routine, for me at least when changing blades. Also, I think the bandsaw here is inherently safer. I’ve cut plenty of thin stuff on the tablesaw, but I’ve seen a guy impaled with a broken off shard hurled by that blade.
I do a ton of thin strips/staves to birds-mouth stuff for various things like hollow oars and hiking staffs—I just did the staves of a couple hiking staffs yesterday. I was gonna jump all over this jig, but then I realized I rip all the staves off of the same board, and I’d have to reset the jig and the fence after each stave due to the changing width of the stock to use this as shown. I will likely still continue to cut the strip between the fence and the blade. I do use a spacer piece for the first half the blade, so that if the cut wants wants to open up after the blade it can, if you go with just the fence and a cut really wants to open up but can’t, it could cause binding issues or more likely uneven cuts as Chris mentioned. But on second thought, the knob on that jig looks pretty easy and convenient to adjust to me, and like Chris says, even if i just use it as a feather board with my current set up, it’s is going to be much safer, especially when my stock starts getting narrow but there are still another 3 to 5 staves left in it.
If the strips and staves are going to be sawn to the same dimension, the jig stays at one setting. You do have to move the fence for each cut and I thought that would be an extra time-consuming step, but I soon got used to it. The jig was a good excuse to clean up the fence’s rack-and-pinion mechanism to get it to work smoothly. (Several stray drips of epoxy had flowed down into the rack teeth.)
Using this jig on an old Craftsman table saw, fitted with a zero-clearance insert, thin kerf blade, and 16′ infeed and outfeed tables, I was able to rip 1,300 linear feet of 18′ western red cedar strips (3/4 x 1/4) for my Adirondack Guide Boat with few errors. Had to clean up some with 80-grit paper and sanding block. Highly recommended.
Never knew such a beast existed. Thanks for bringing it to our attention.
Your description of what you used to do sounds exactly like what I have been doing.
Next project, I’ll invest in one of these.
No matter how accurate the jig settings, the final accuracy and repeatability of the cut will depend on how accurately the fence is reset each time. That is a major negative aspect of the device. Much easier and more accurate as well as much faster to use the fence and a feather board. For strips that are 1-1/2″ or less in width, they can be cut down to near 1/16″ thickness with a 1/16″ kerf blade with a surface that needs no further work.
Yes, the 1/16″ thickness is a stretch but it is doable with a push piece that fits over the fence. I did it today, but it is a bit finicky, while 3/32″ is fairly easy. That was making veneer for Shaker boxes. It you are careful with the setup, veneers up to 3″ wide can be done with the same blade by flipping the work piece over each time. I confess to using this same method often for resawing up to at least 5″ width by finishing the cut on the bandsaw. This saves set up time for resawing on the bandsaw when only a couple of cuts are needed. Obviously such a thin-kerf blade saves a lot of wood when that is important. The only 1/16″ kerf blade I know of is by Matsushita and it is not available in 10″ diameter as that one is thicker. Great blades though.
Lots of jigs have an initial wow factor but they cost money and you have to remember where they are to be found under all the other seldom-used specialty fixtures in the corner or under the bench.
I haven’t had any trouble with repeatability and accuracy of the the jig when using it to cut strips for laminating. I just cut a new batch of strips and set a caliper to the thickness of one of them. I found that there was some variation in the others: some a tight fit in the caliper jaws, others a bit looser. Adding two layers of paper to the thinnest brought it up to the same fit as the thickest. That’s a variation of about 0.008″, good enough for my work. Resetting the fence between cuts takes about 3 seconds: unlock, rotate the adjustment knob until the stock makes contact with the bearing on the jig, and lock. After cutting a few strips I get the feel for how much pressure to apply—not much—against the bearing. My table saw is a 24-year-old 10″ Delta contractor’s saw with the original fence. It’s nothing fancy, but it does the job. As for by other table-saw fixtures, I have a lot of them, mostly homemade, and they’re either on the shelf I installed under the saw or hanging on the wall next to it. The blue thin-rip jig stands out among them.
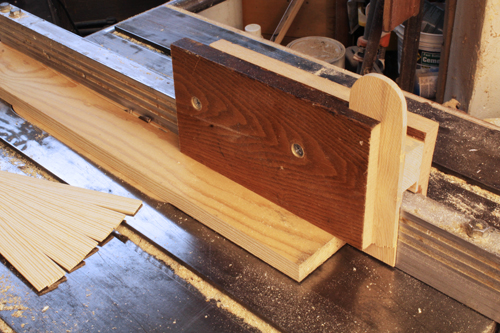
Acting on Tom’s recommendation, I just knocked together this push piece that straddles my table saw’s rip fence. I found it worked well and was quick to use. When sawing short stock, I could cock the back end of the pusher up and slip the stock under it. When sawing long pieces the fence has to be set aside to start the cut and put in place when the tail end of the stock gets to the fence. Putting the push piece in place takes a couple of seconds. The strips turned out about as uniform as those I cut with the thin-rip jig—within thousandths. I made this push piece to work 3/4″ stock; I’d have to make it adjustable to fit other thicknesses so it will push the stock down as well as forward. The vertical piece that pushes the strip is screwed in to make it replaceable and adjustable. This kind of jig also pushes the strip clear of the blade and makes the process accurate and safe. I’ll keep it.
Chris,
My saw is a Delta Unisaw the same age as yours with a Unifence. I like the versatility of the Unifence more than an earlier Biesemeyer but it does not have a micro adjust feature and must be bumped into whatever measure is required. Perhaps that is the reason I found the jig you showed a bit time consuming. There have been several variations of the sliding fence pusher over the years and yours looks nice enough to copy. I was cutting veneers of 1 1/2″, 2″, 2 1/2″ and 3″ width today and did not use the hold down feature you have. To prove it feasible, I cut quite a few in cherry to about .075 max thickness and did not do any jointing between cuts. A few passes through the sander brought them to .066 to .069 and ready for final sanding. The “sander/thicknesser” is a Makita 4X24 belt sander on its side in a jig with an adjustable press piece parallel to the sanding belt.
Like your shop, there are a lot of home made jigs hanging up or on the shelf that are sometimes used often and sometimes only once. Some are copies of those found from others work and some unique to my projects.