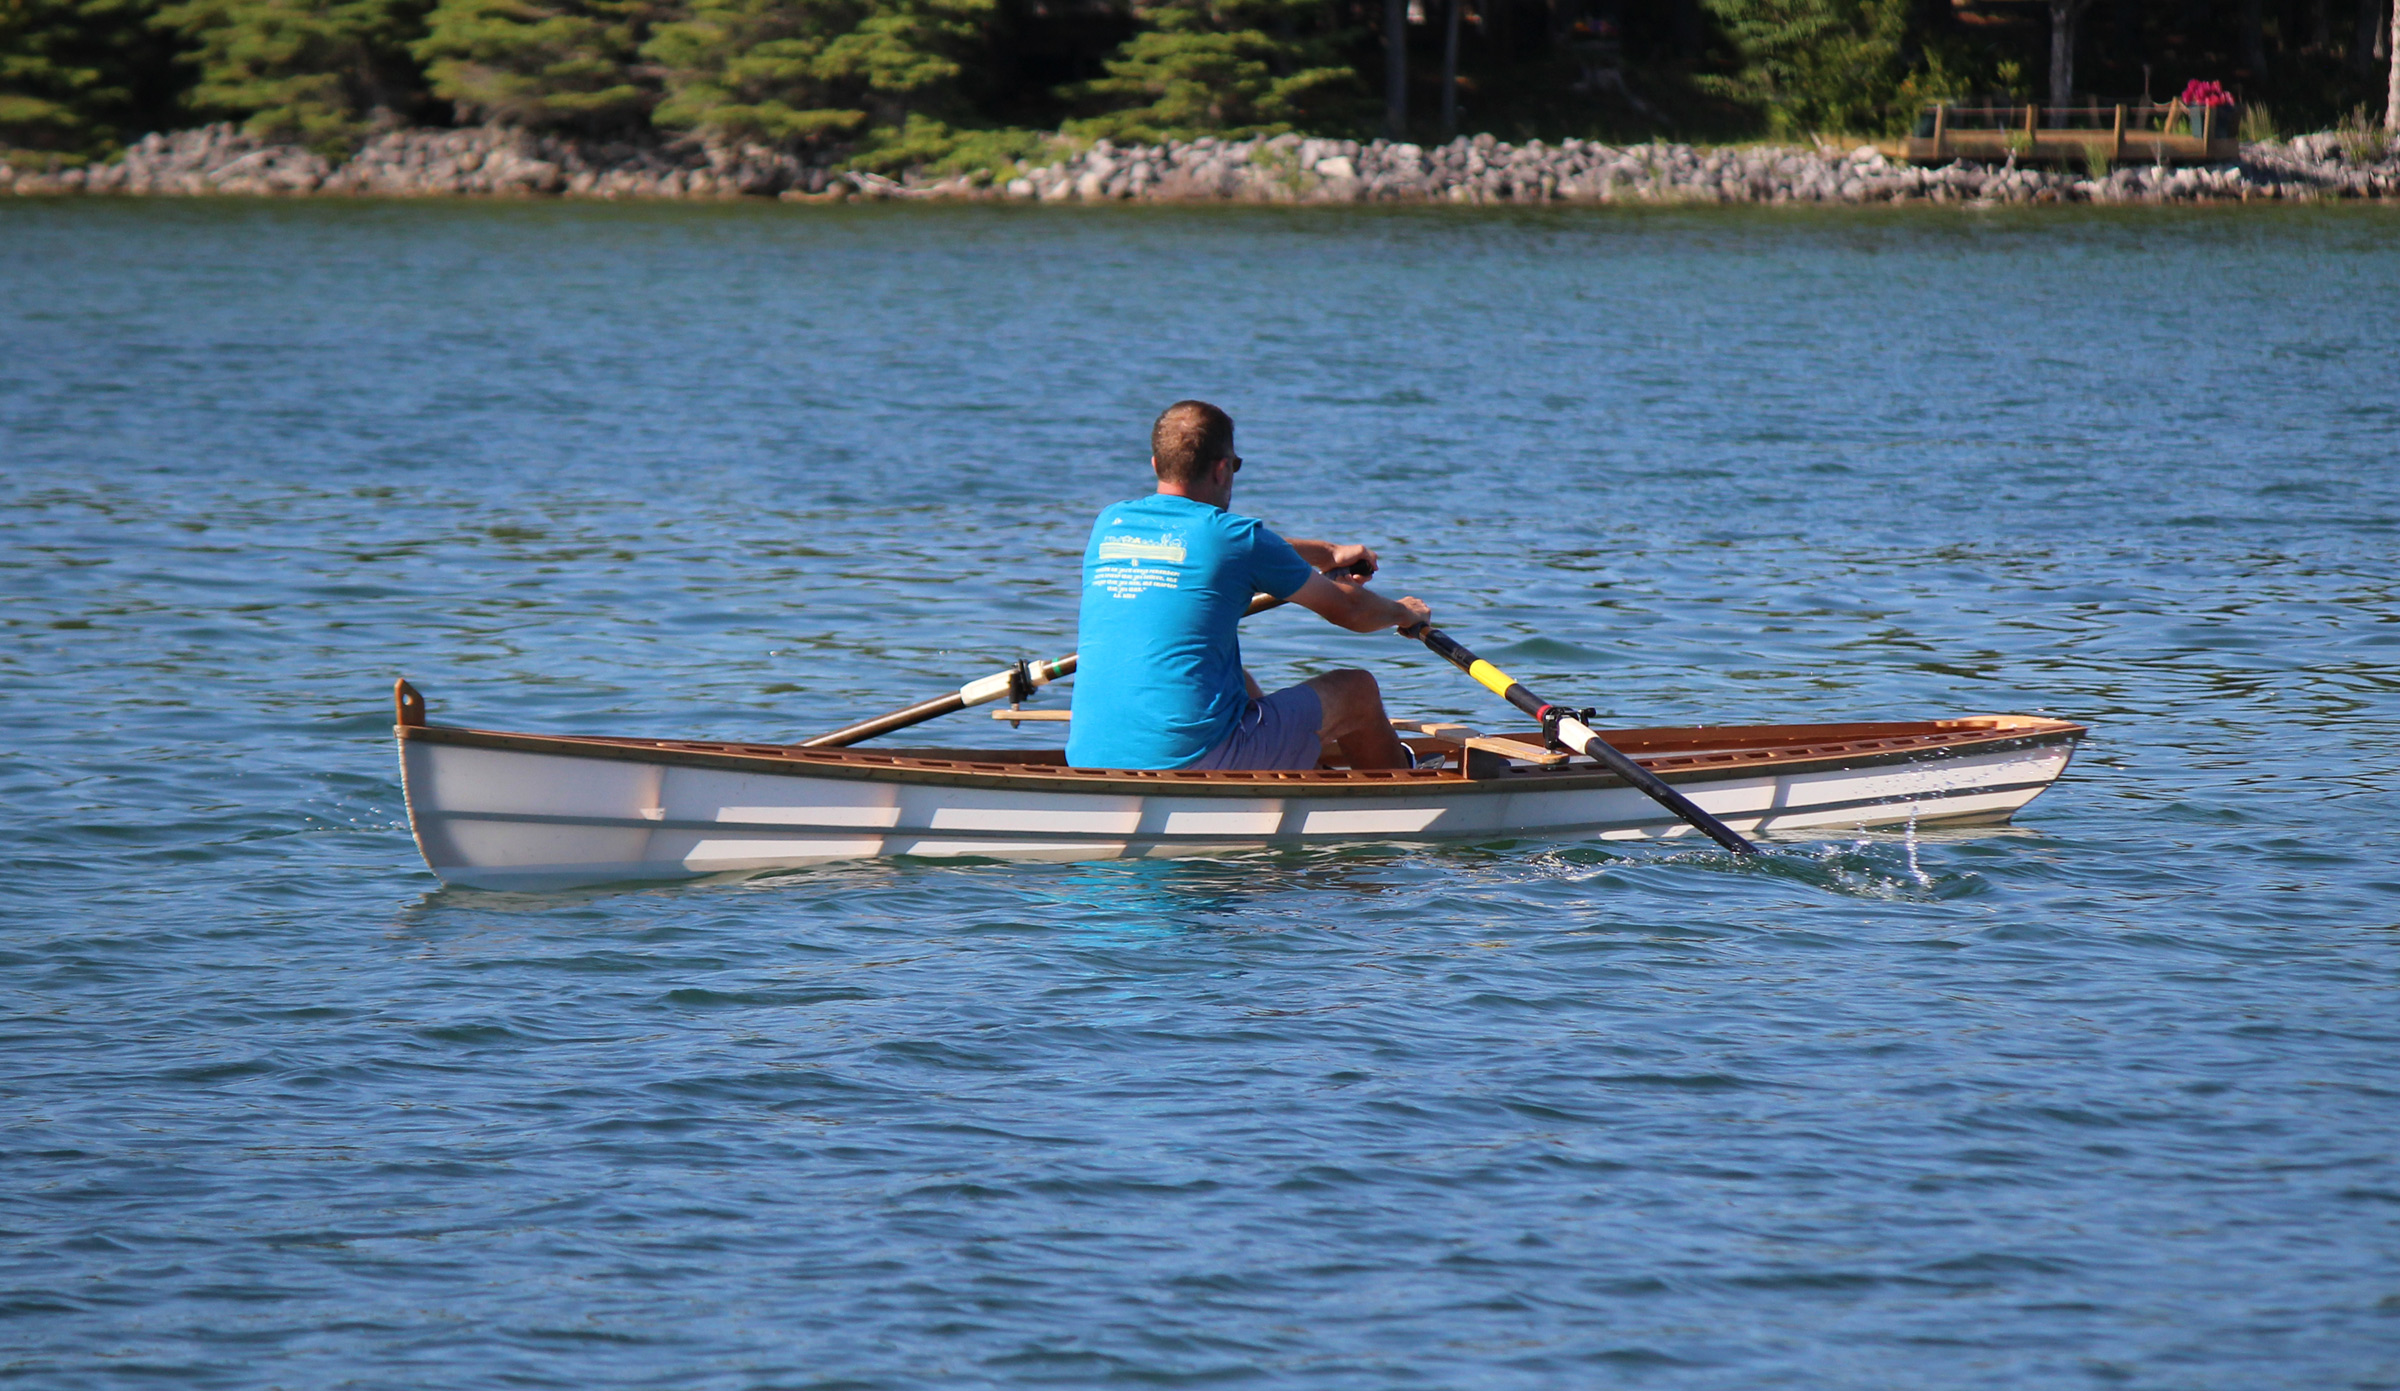
The Wee Lassie canoe dates back to the early 1880s when canoeist and outdoor writer George Washington Sears, known as Nessmuk, asked John Henry Rushton, a boatbuilder in Canton, New York, to design and build a small lightweight canoe. The result was the WEE LASSIE, an open cedar lapstrake canoe 10′6″ long and 27″ wide. While Sears, a diminutive man at 5′3″ and 103 lbs, also asked Rushton to build an even smaller canoe, SAIRY GAMP, most of us would need something larger. Mac MacCarthy, a century after Rushton, stretched the Wee Lassie to 13′ 6″ by 29″ and called the new design Wee Lassie II.
Photographs by Phil Boyer
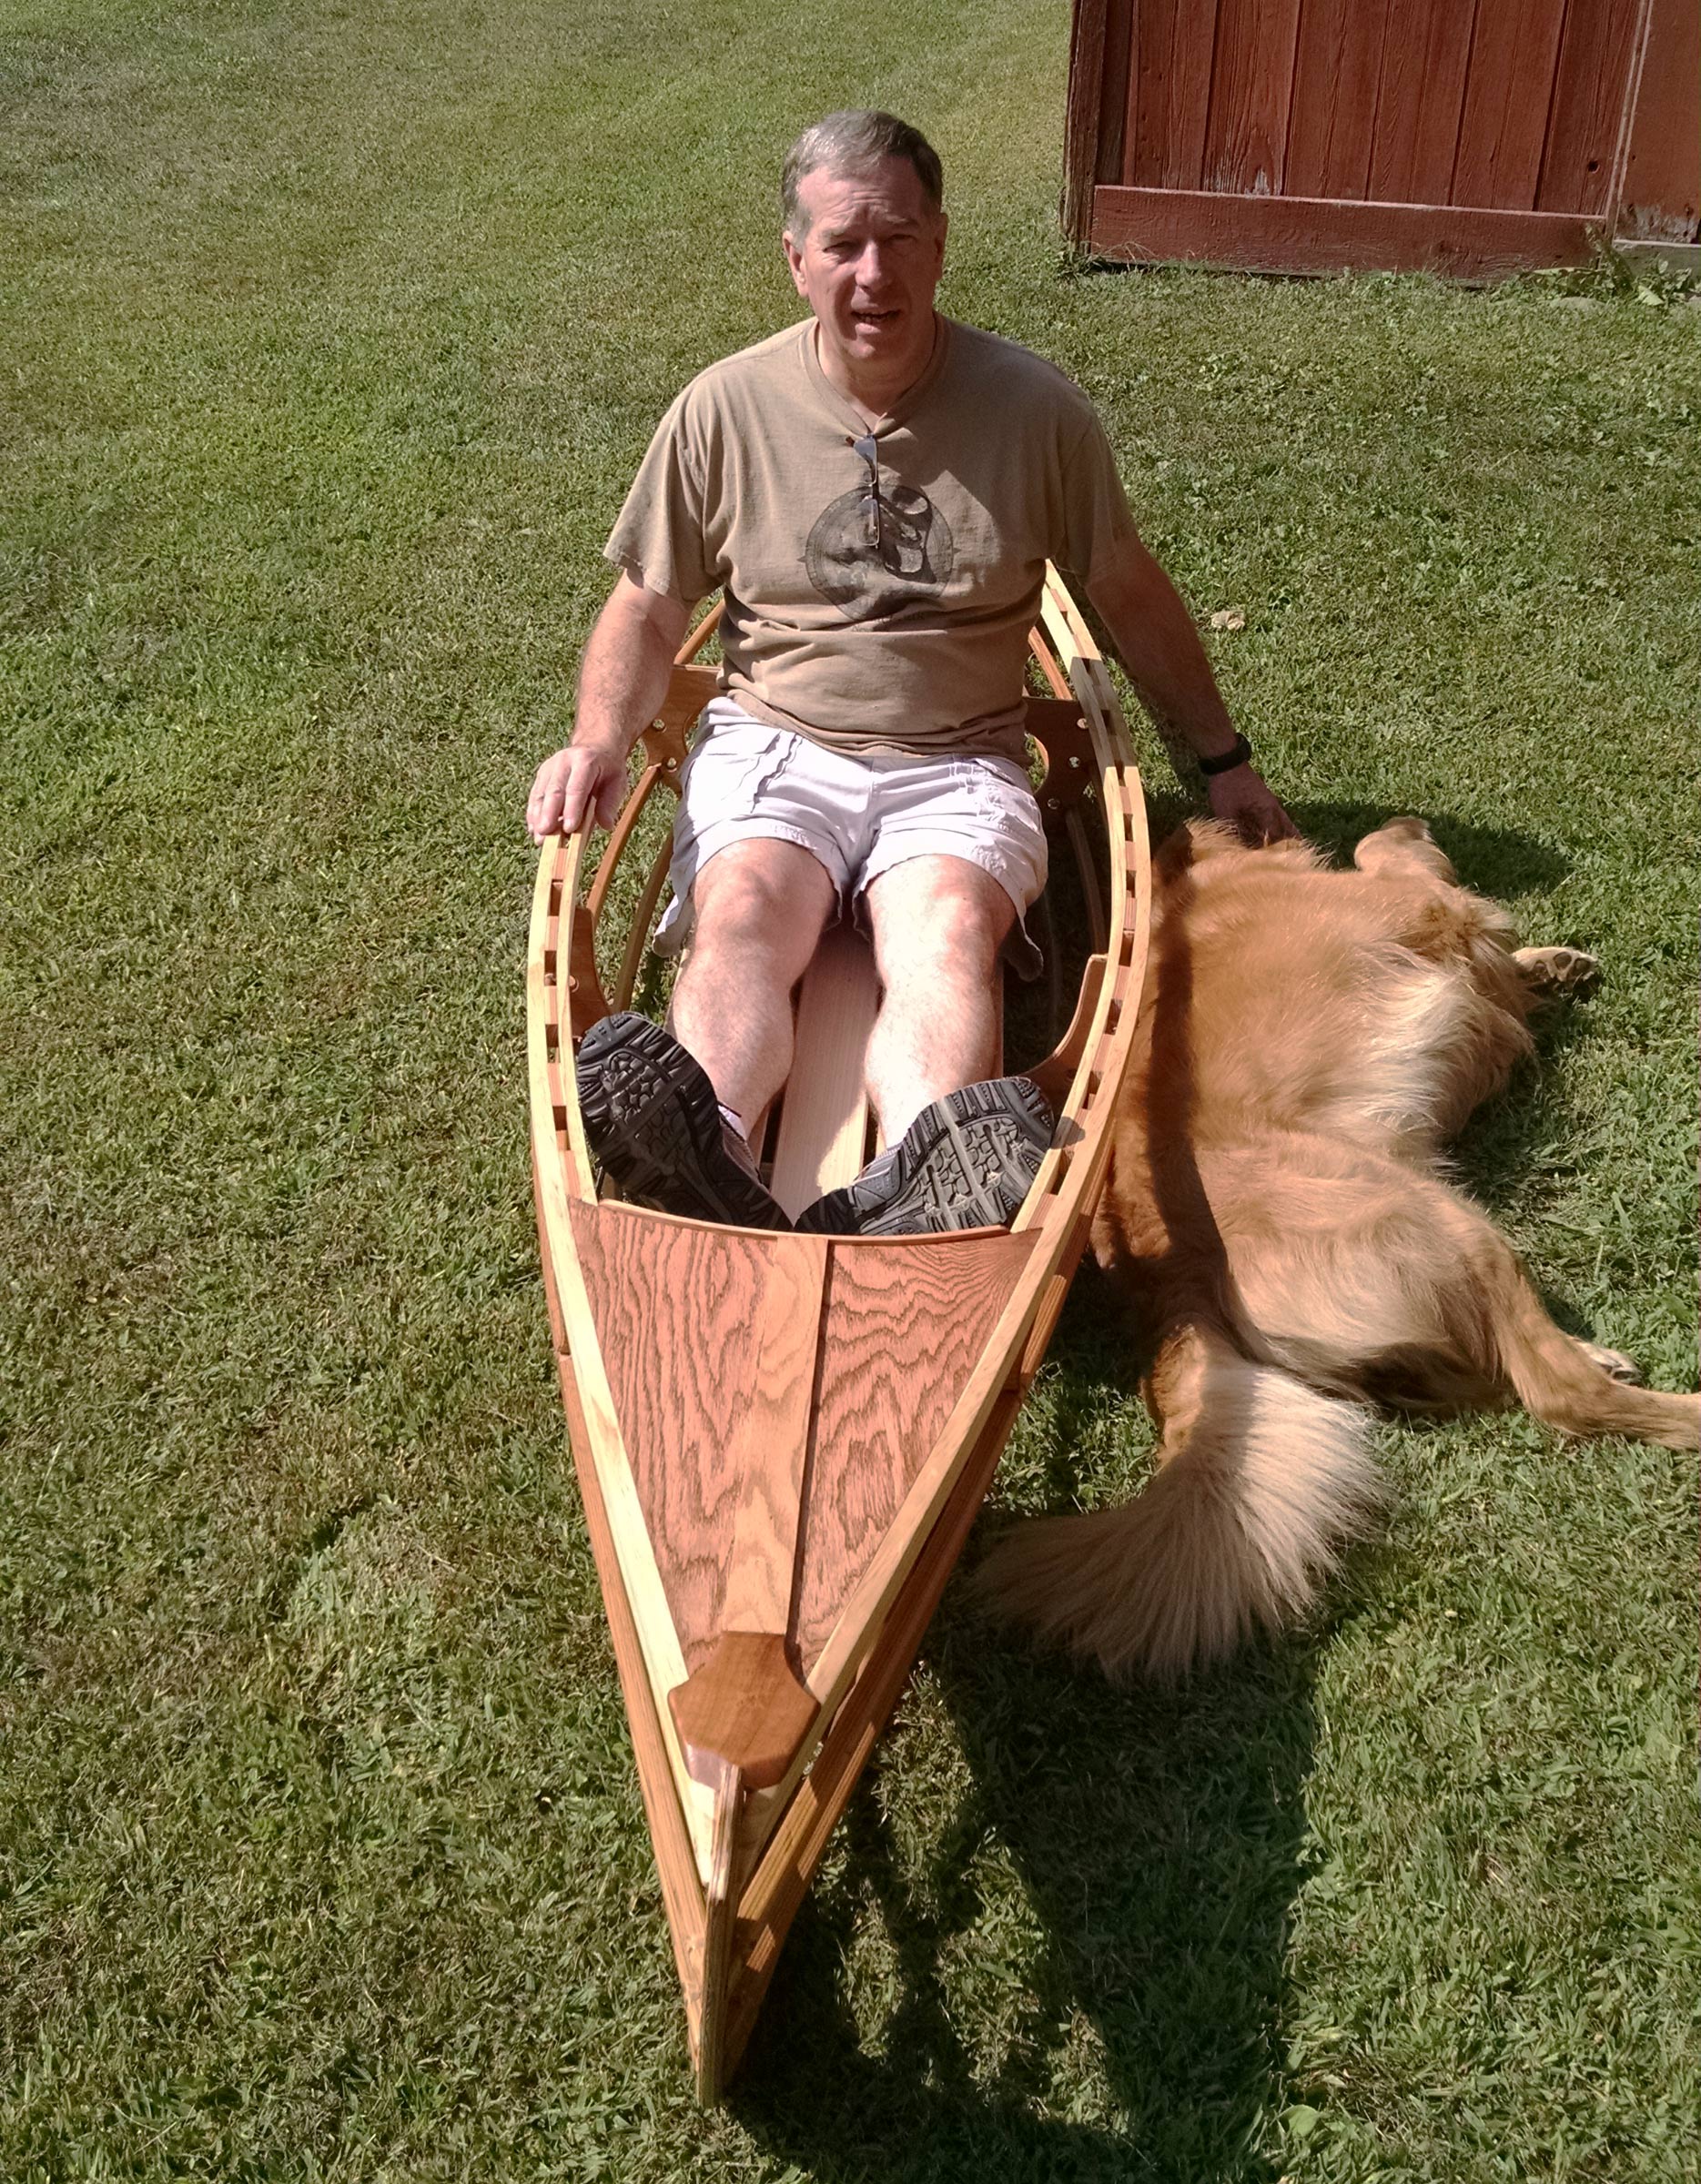
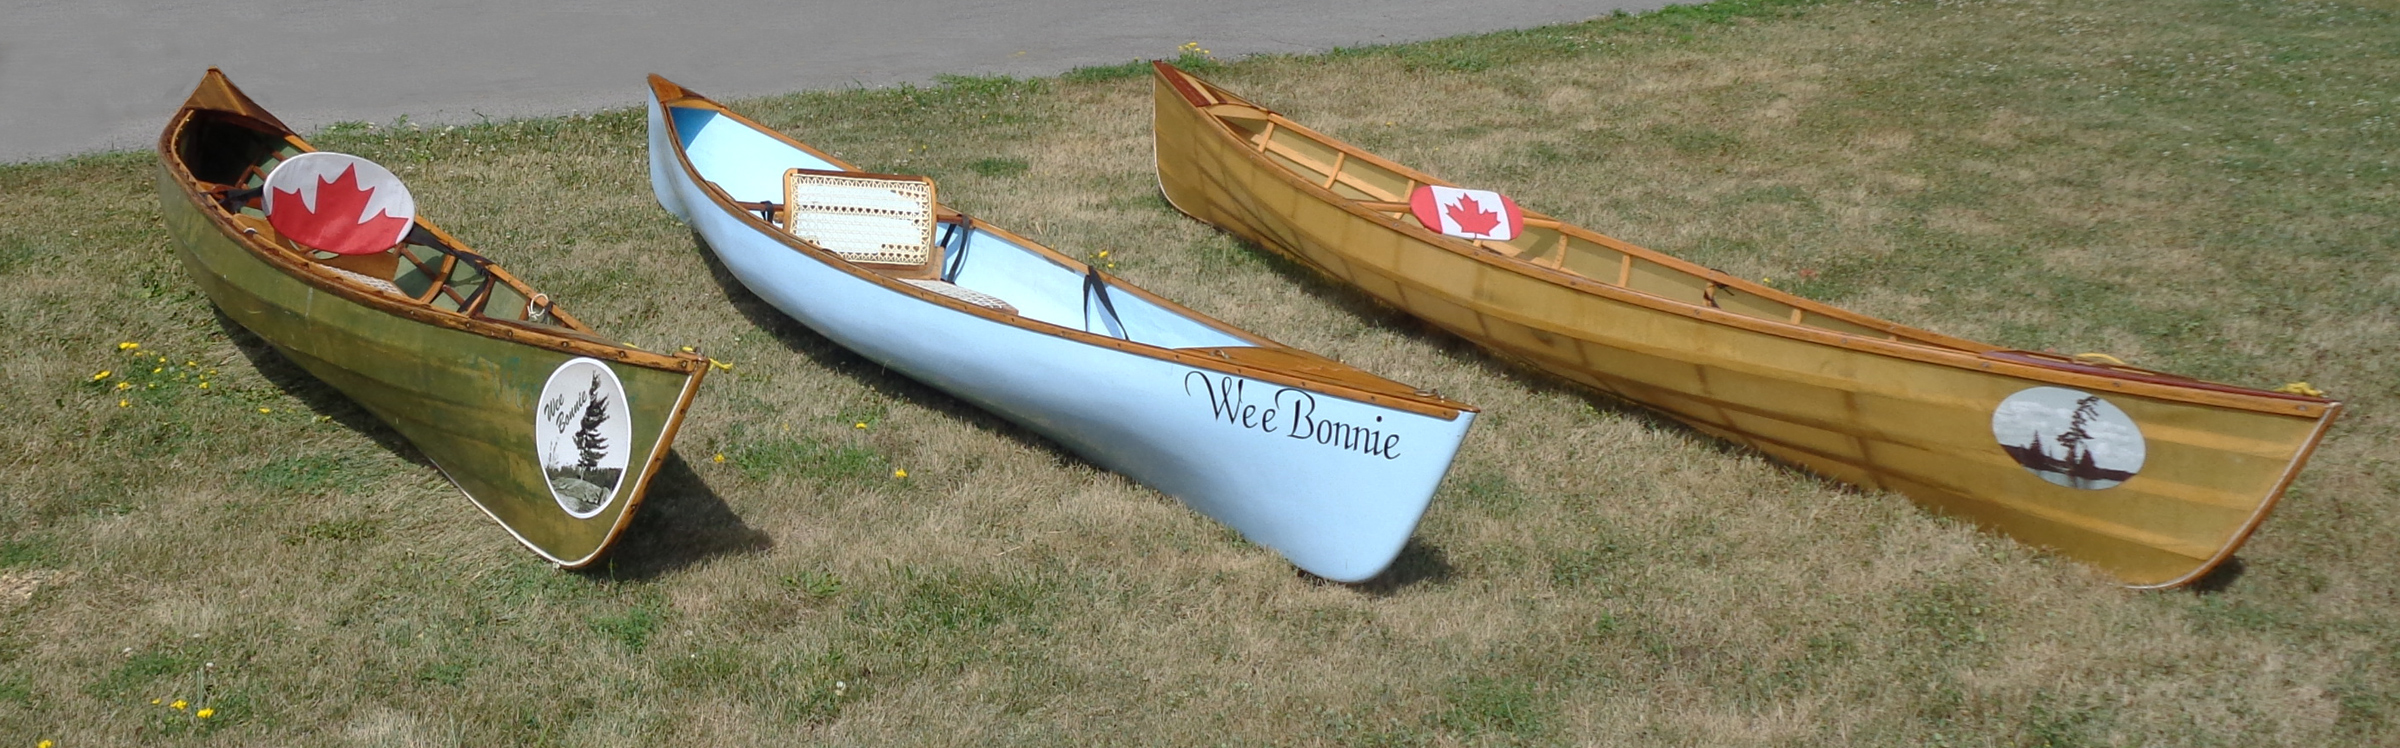
Phil completed this skin-on-frame WEE BONNIE, the first of his canoes, in 2006. The maple leaf, emblem of his Canadian homeland, appears on Phil’s boats, often more than once.
Phil Boyer of Napanee, Ontario, started work on a cedar-strip Wee Lassie II in 2005 but only got as far as setting up the molds when he discovered that canoes could be built quite quickly as skin-on-frame boats. He decided to switch techniques while using the same molds. Western red cedar, salvaged from a deck he had demolished, supplied much of the wood he needed. He skinned the frame with ballistic nylon, dyed it green, and waterproofed it with two-part urethane.
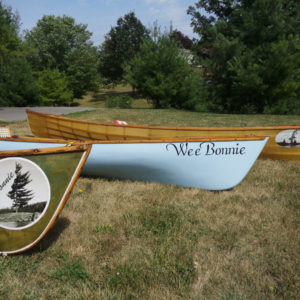
In the spring of 2006, Phil’s sister died of cancer, and when he launched the canoe, he christened it in her honor. Her given name was Carol, but Phil had always called her Bonnie. She was born while her father was overseas during World War II and away during the first 1-1/2 years of her life. A Scottish nurse helped with the childrearing during his absence, and whenever she brought the infant Carol to her mother, she’d say, “Here is your wee bonnie.” The name Bonnie stuck and WEE BONNIE is what Phil called all of the modified Wee Lassie II canoes that he built.
This cedar-strip WEE BONNIE, launched in 2007, is the first canoe that Phil started on but the second that he finished. It had to wait while he used its molds for his skin-on-frame adaptation.
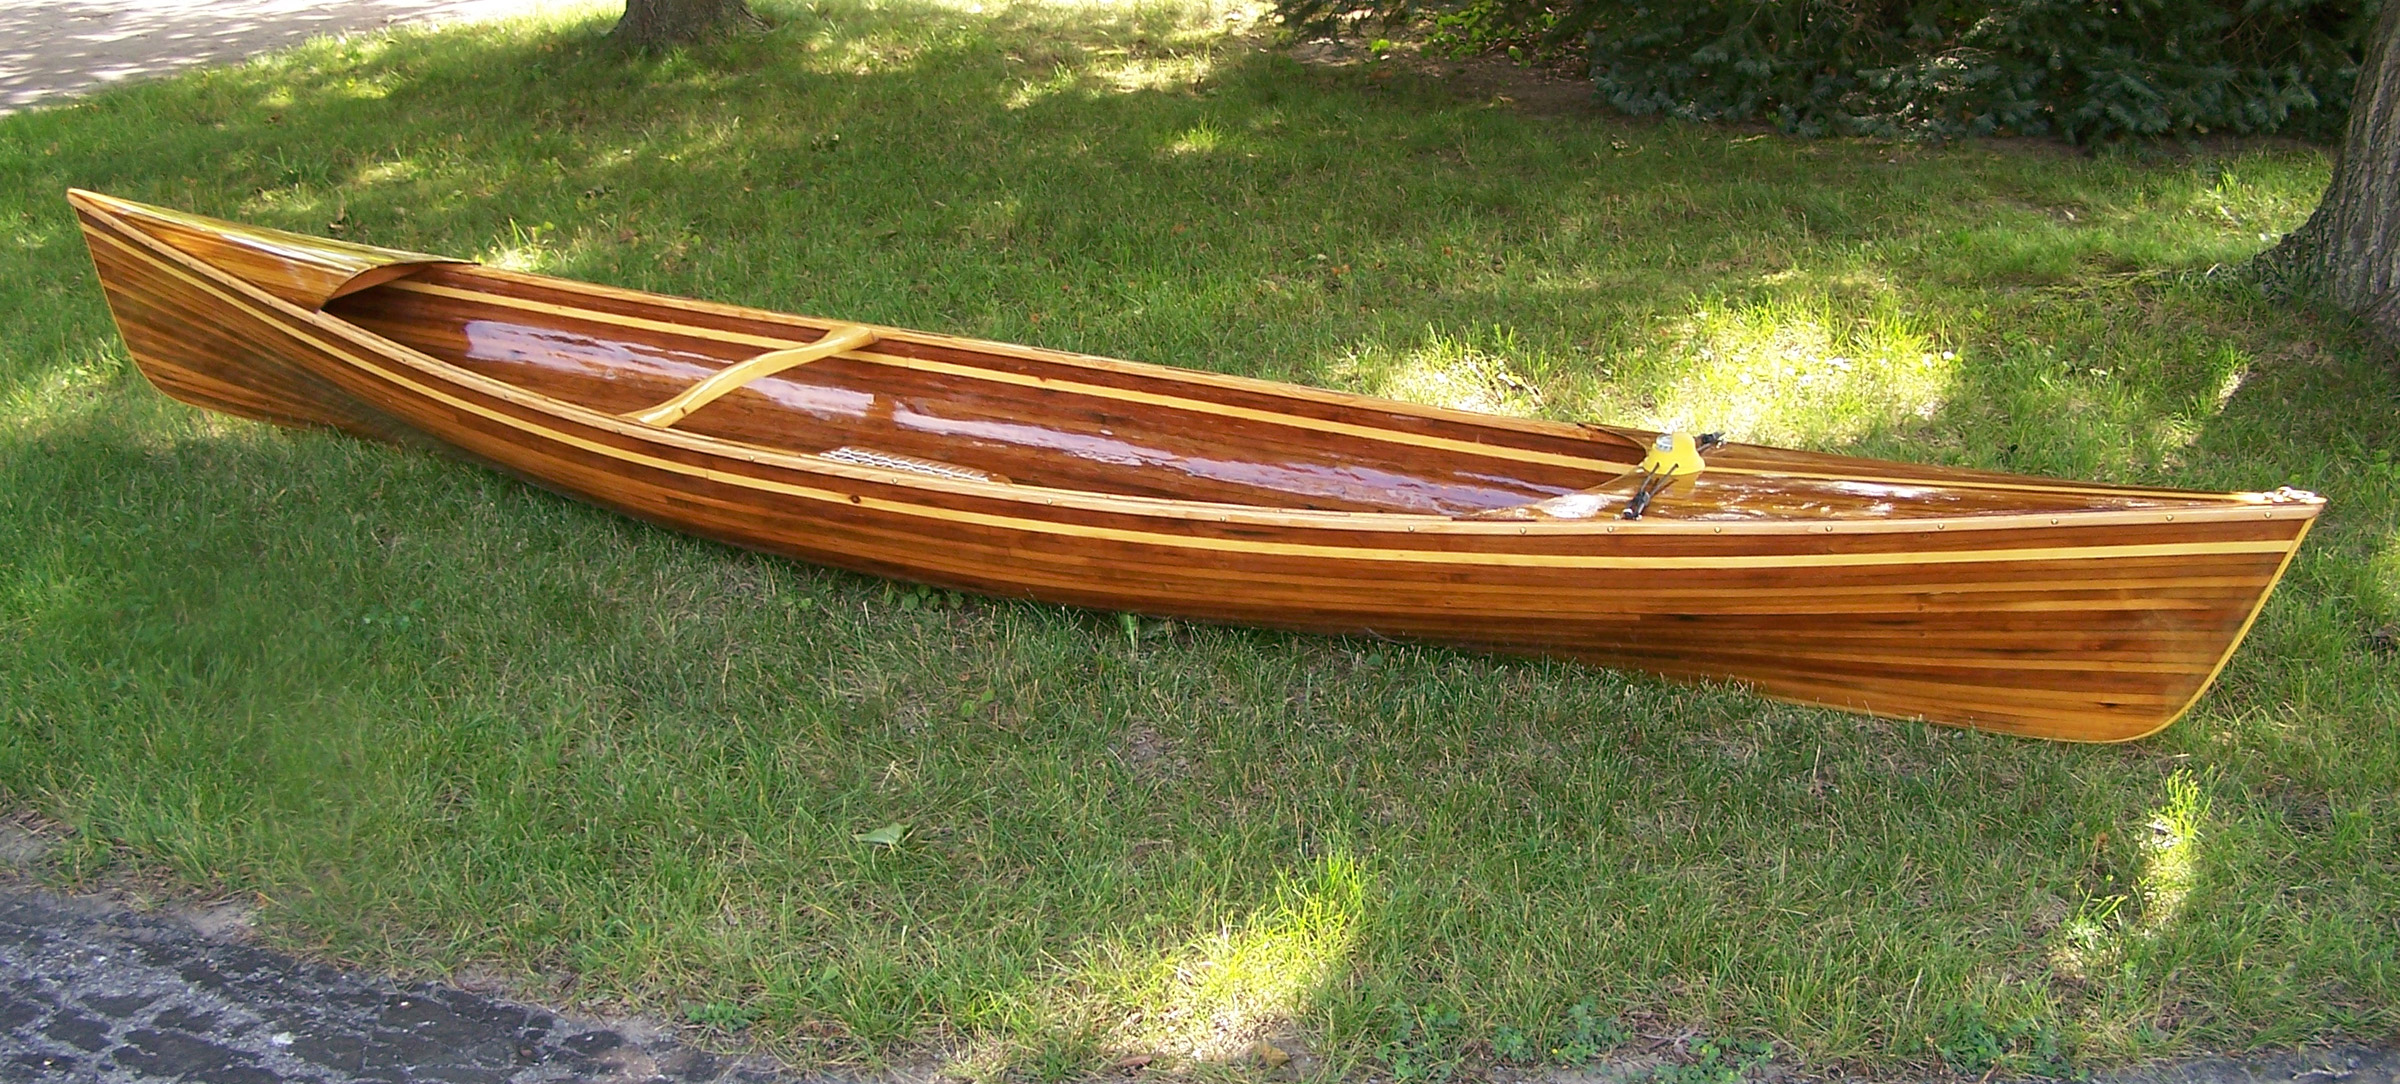
In the year following the launch of the first canoe, Phil went back to his original strip-built project. He was pleased with the canoe when he got it afloat, though at 42 lbs, it was heavier than the nylon-skinned version, and he thought he could do better.
Phil’s insulating-foam version of the canoe, built in 2009, weighed 32 lbs. The hull was finished “bright,” letting the light blue color of the foam come through.
In 2009, he decided to build another stripper and make it as light as possible. He substituted 1/2″ slices of foam insulation for the wood strips. The foam was much more delicate than wood and required care to get them to take fair curves between the molds. Even when glued edge to edge, the strips were very flexible and took a light touch to fair. Carbon-Kevlar fabric would have kept the canoe’s finished weight quite low, but Phil spared himself the extra expense and covered the hull inside and out with 6-oz fiberglass and epoxy. This third WEE BONNIE came in at 32 lbs, and Phil was pleased with how well the experimental construction performed.
The 2015 WEE BONNIE, the second of the three skin-on-frame canoes, was skinned with ballistic nylon.
In 2015 Phil built another skin-on-frame canoe, using lighter nylon to save some weight and equipping it with an innovative seat. A few years earlier, while canoe camping with two of his friends on Opalescence Lake in Algonquin Park, his friend Phil was using one of the three WEE BONNIEs and had commented that the portage yoke was a nuisance when not in use and suggested incorporating a yoke in the seat. Phil liked the idea and came up with a seat that pivoted to become a yoke. The new canoe got the latest version of the arrangement; switching it from paddling mode to portage takes just 30 seconds.
Even before the last of his four WEE BONNIE canoes was finished, Phil was thinking about the next boat he’d build, a strip-built solar-powered launch. We’ll hear more from him in the future.
Do you have a boat with an interesting story? Please email us. We’d like to hear about it and share it with other Small Boats Magazine readers.
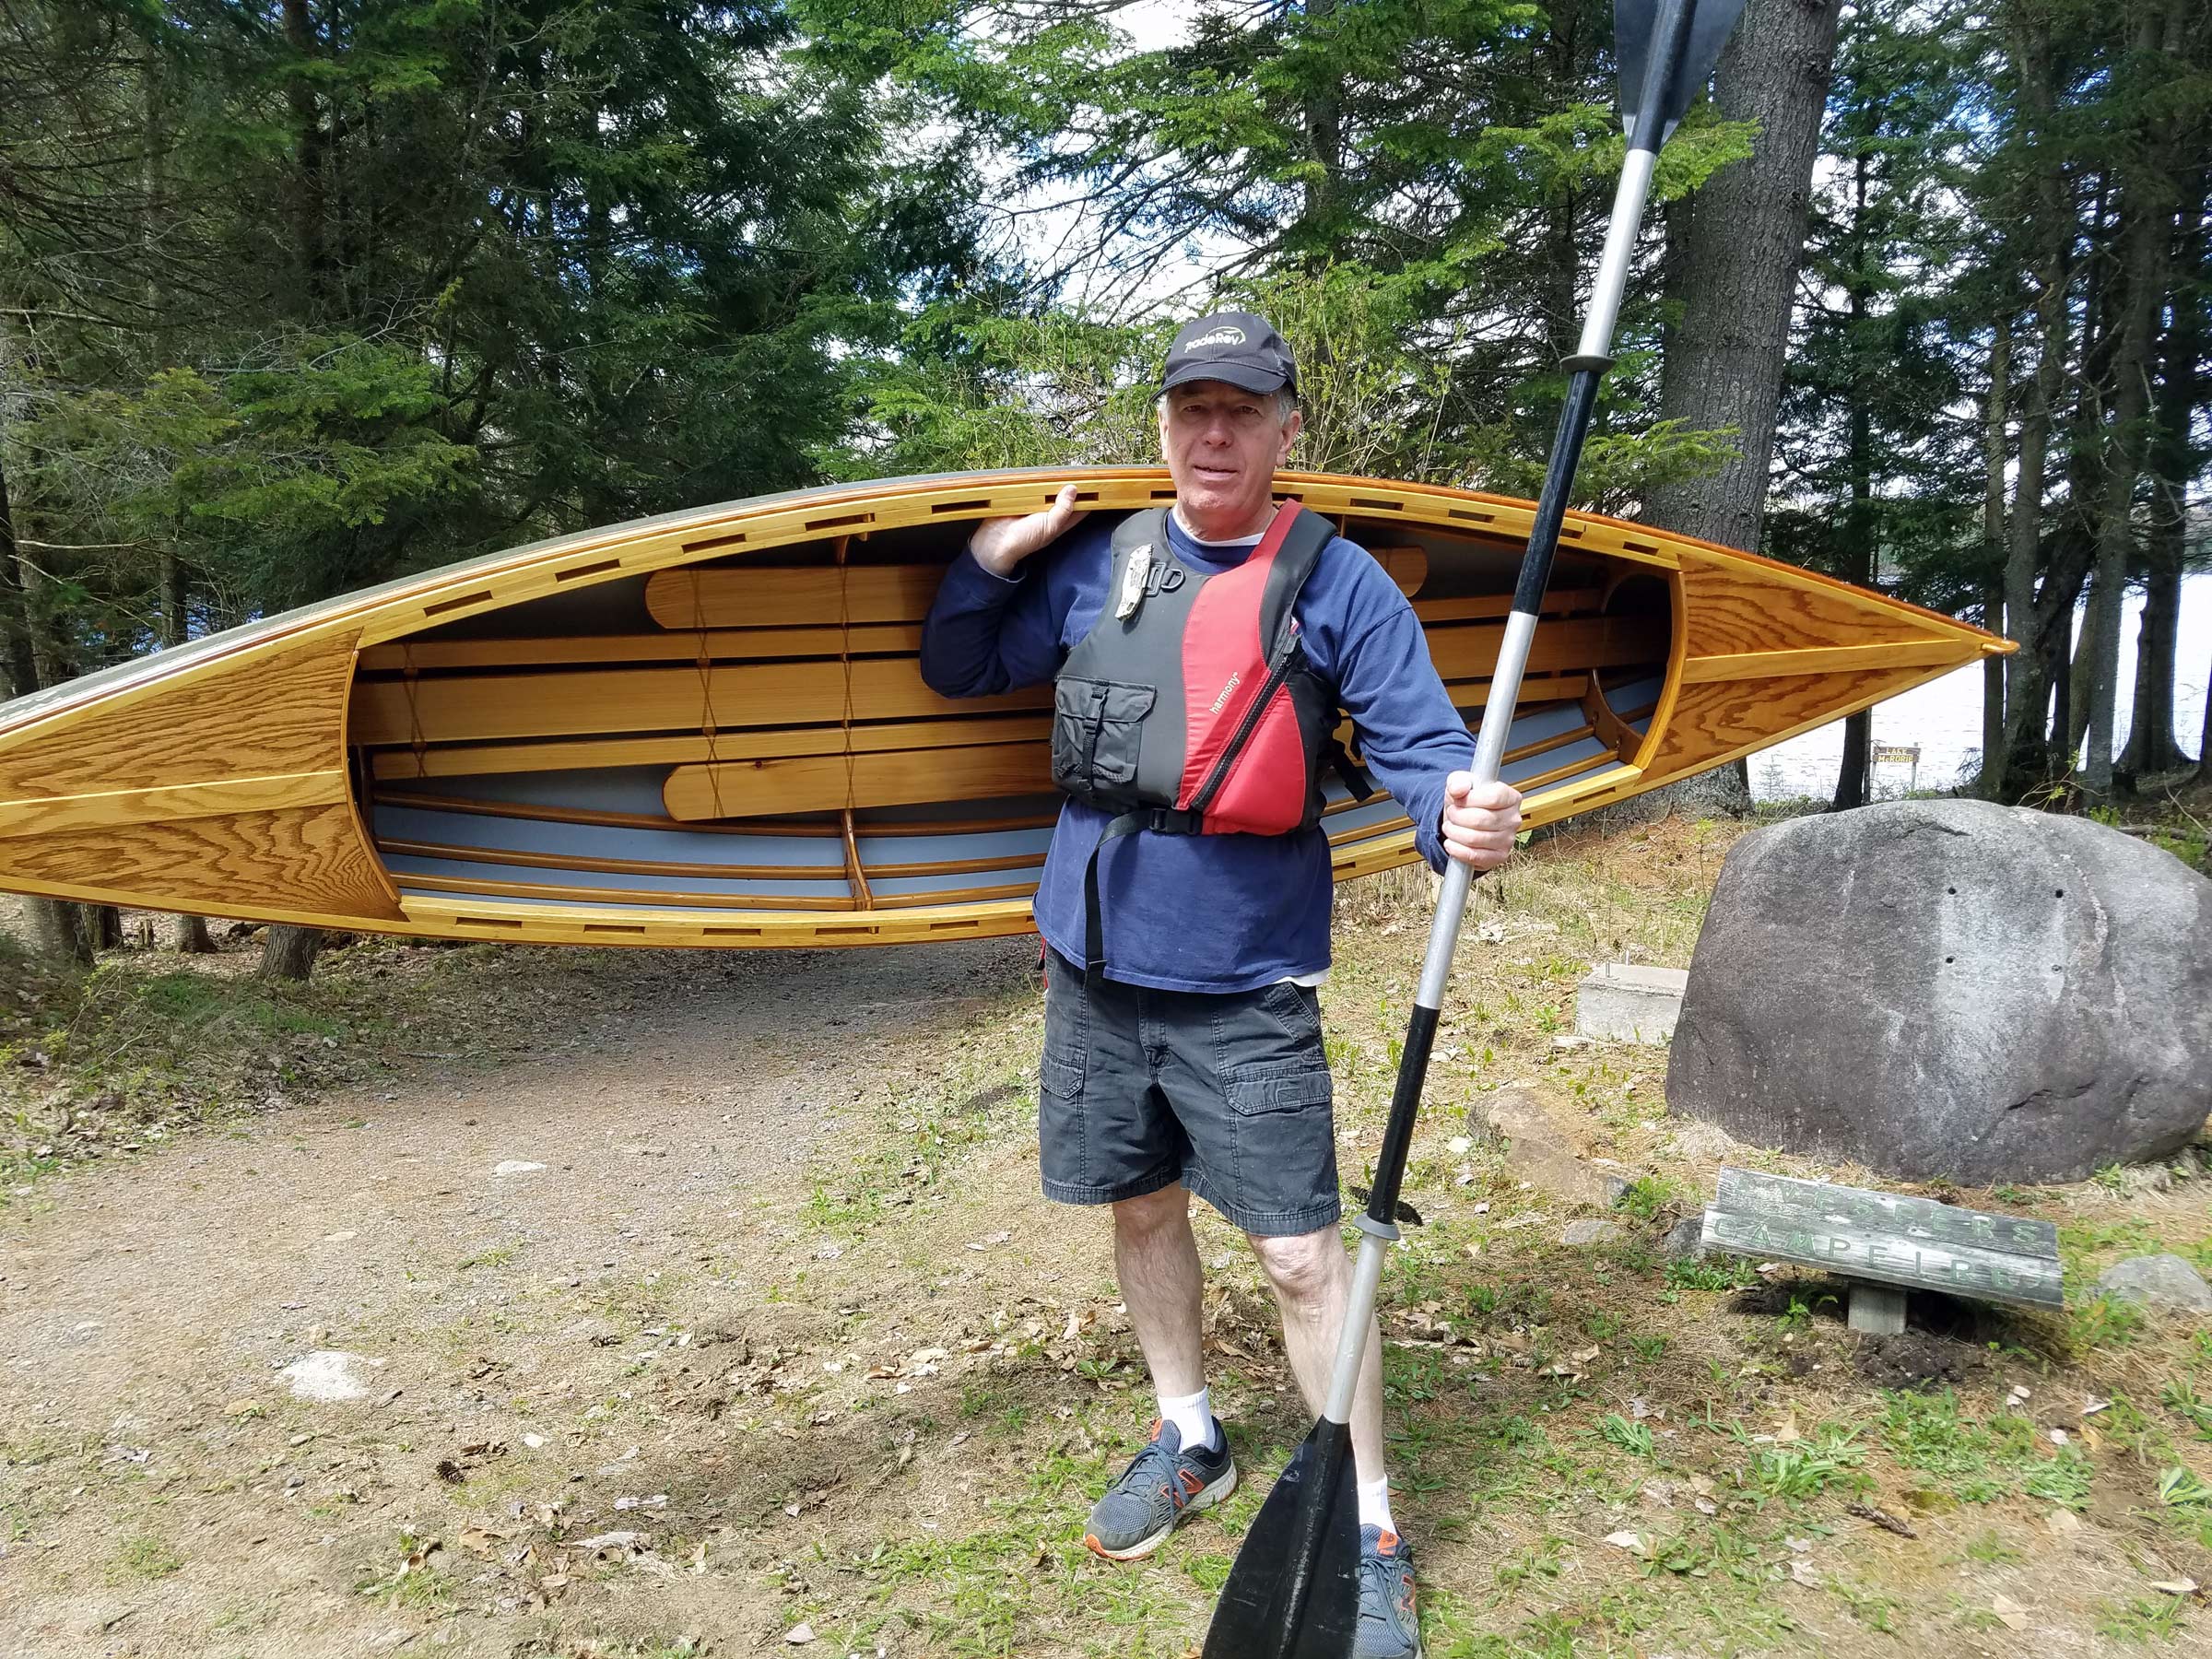
James made his Wee Lassie frame from oak, cedar, spruce, cherry, and marine plywood. The hull is a vinyl-backed polyester covered with marine varnish.
James Shamis grew up in the Adirondacks, where traveling among the lakes and ponds required boats that were lightly built and easily portaged. In his late teen years, he spent his summers working for Milo Williams restoring antique Adirondack guideboats. While working in Milo’s shop on the north shore of Little Moose Lake, he grew to appreciate the beauty of the guideboats and the pleasure of working with wood.
Among all of the boats Milo had under his care was a Wee Lassie, an undecked canoe designed by Henry Rushton. “I had never seen such a small boat before,” James said. “I thought it was a child’s boat the first time I saw it, and, after many days of prodding on my part, Milo finally let me bring it down and take it for a paddle. I was in love!” James had enjoyed rowing the guideboats, but the Wee Lassie, powered by a double-bladed paddle, was light and quick. And he was on his own. “No room for a guest, just me and the water.”
James made up his mind that he’d someday have a Wee Lassie, but the years slipped by and he never found one he could buy and restore. Still, his fondness for the canoe endured for decades.
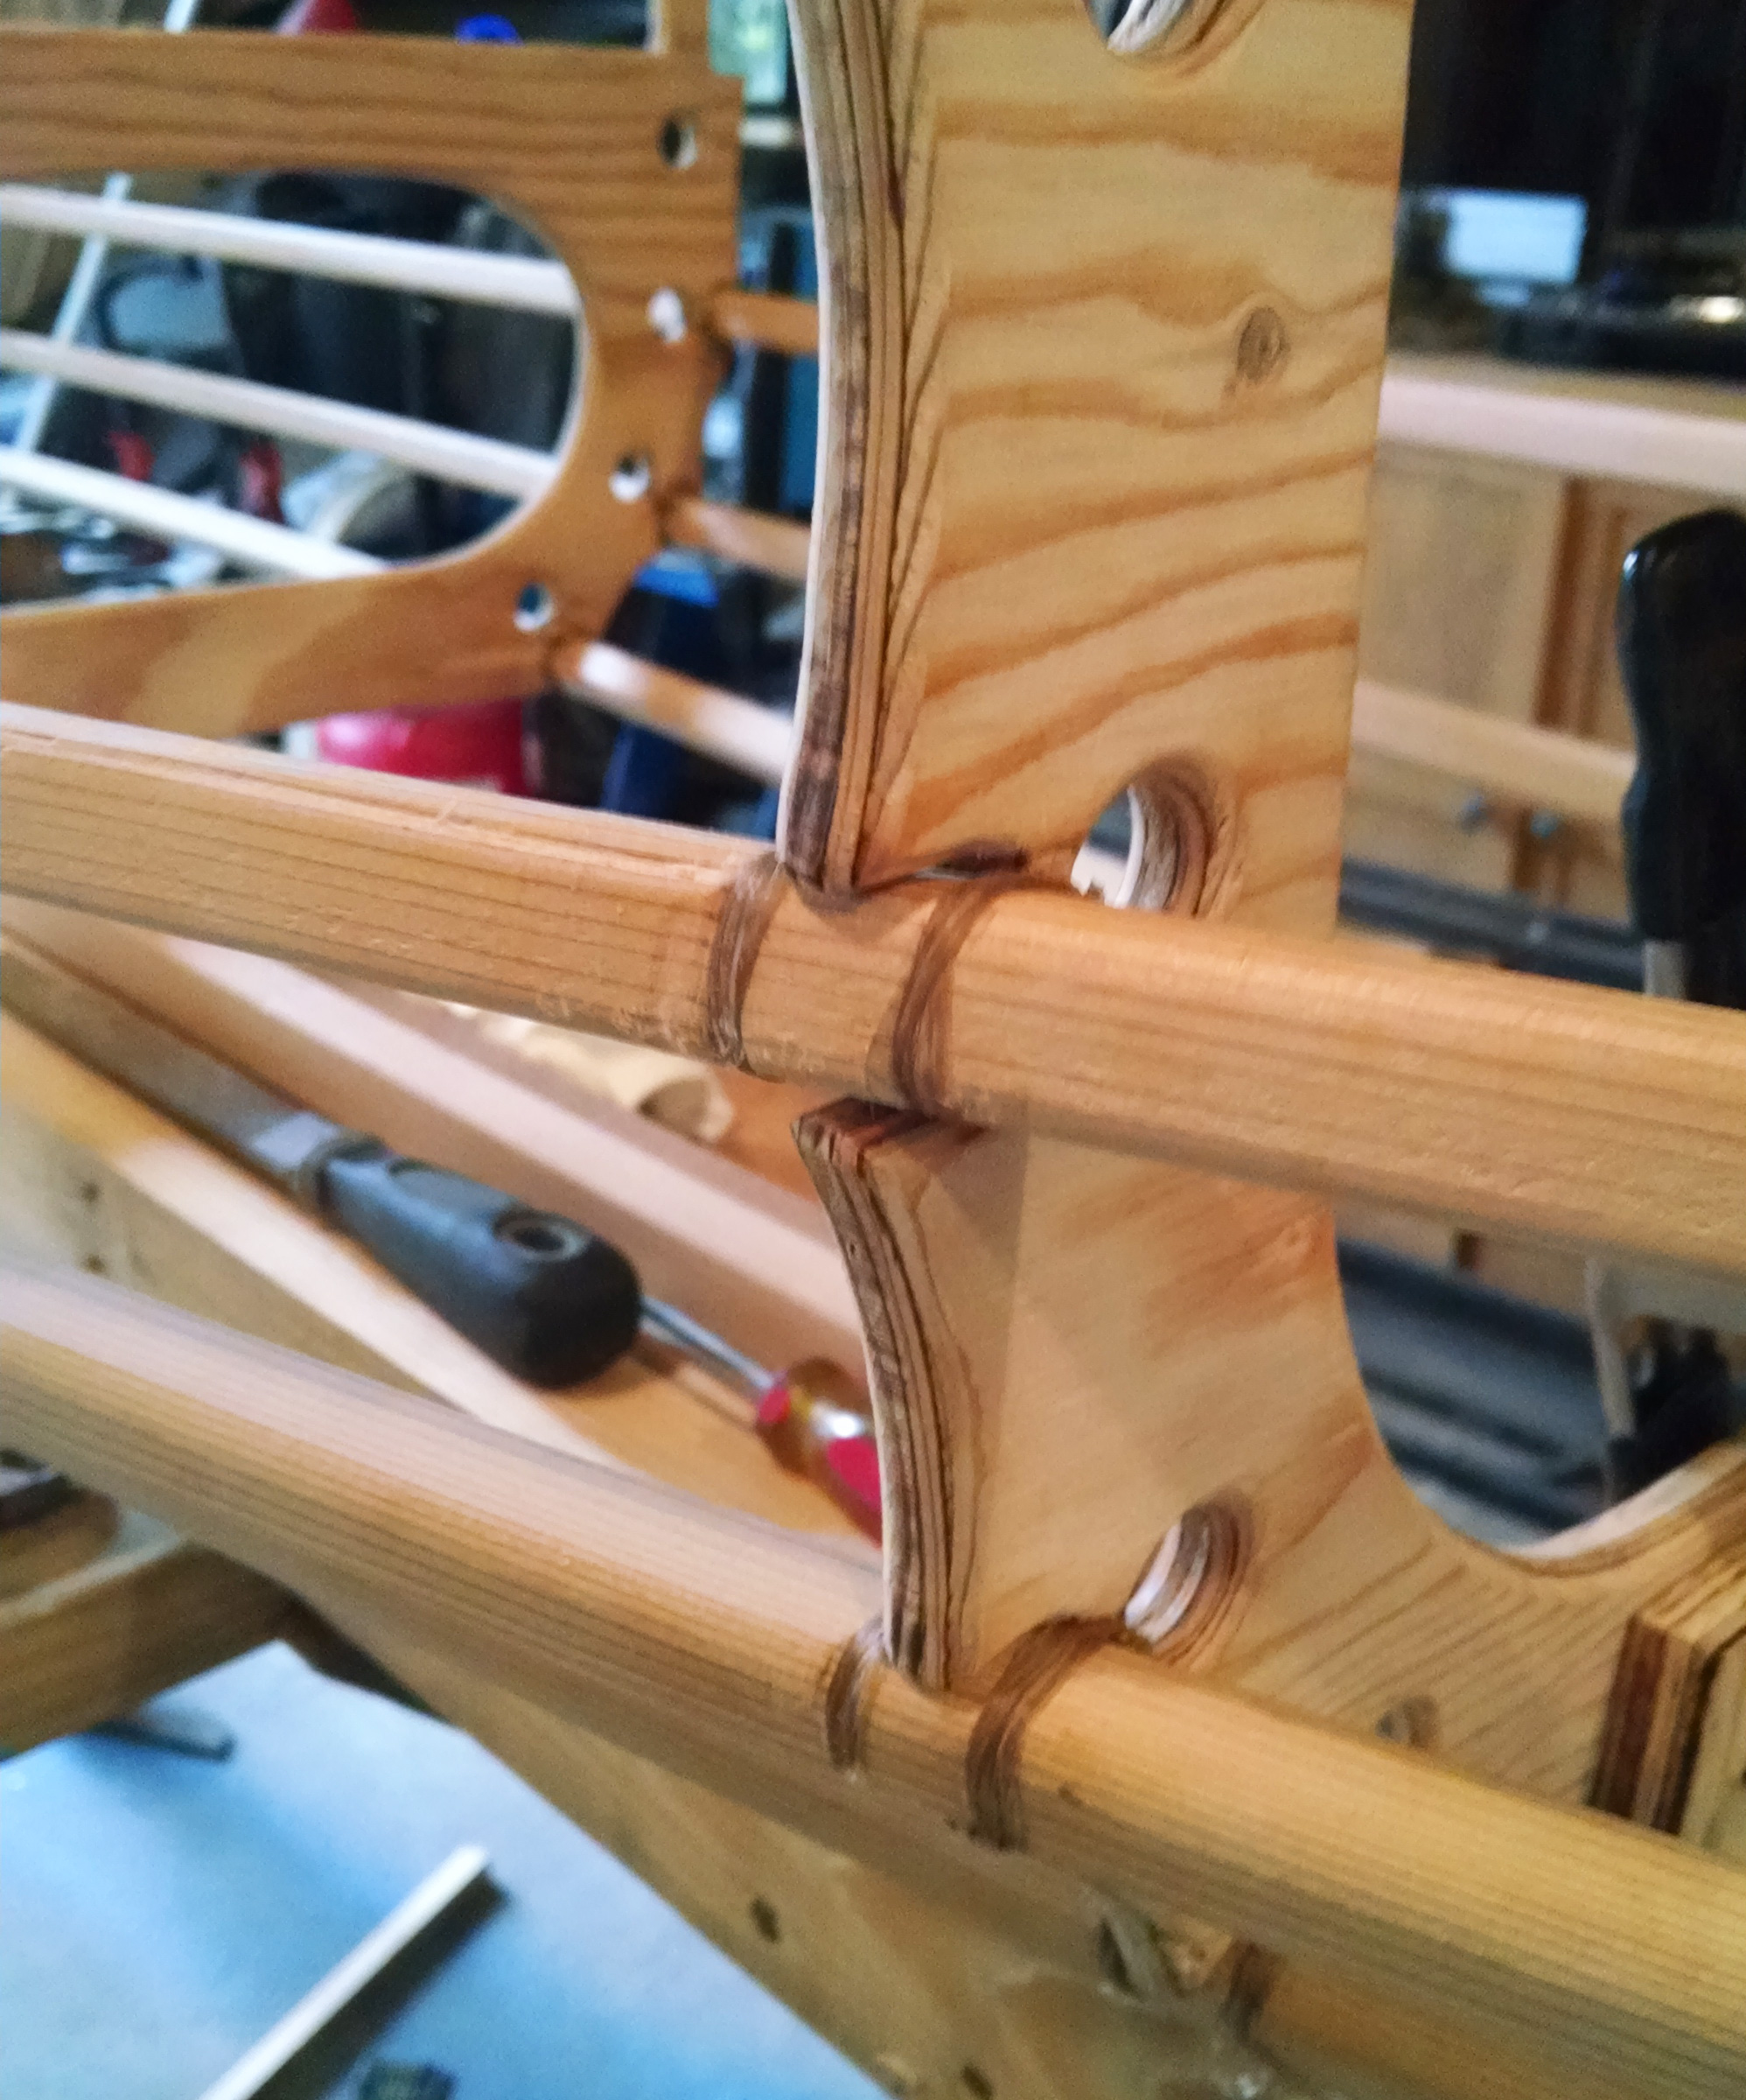
James preferred lashing the frame together over the messier work of using screws and epoxy.
In 2015, doctors discovered James had a vocal-cord cancer. Glottic cancers respond well to radiation treatment and are almost always curable, but the health scare was a wake-up call for James. During his radiation treatments, his thoughts were drawn to his teenage years and the time he spent paddling the Wee Lassie on Little Moose Lake. The memories were his refuge during a difficult time, and after a few rounds of radiation he decided to bring a Wee Lassie back into his life—he’d build his own.
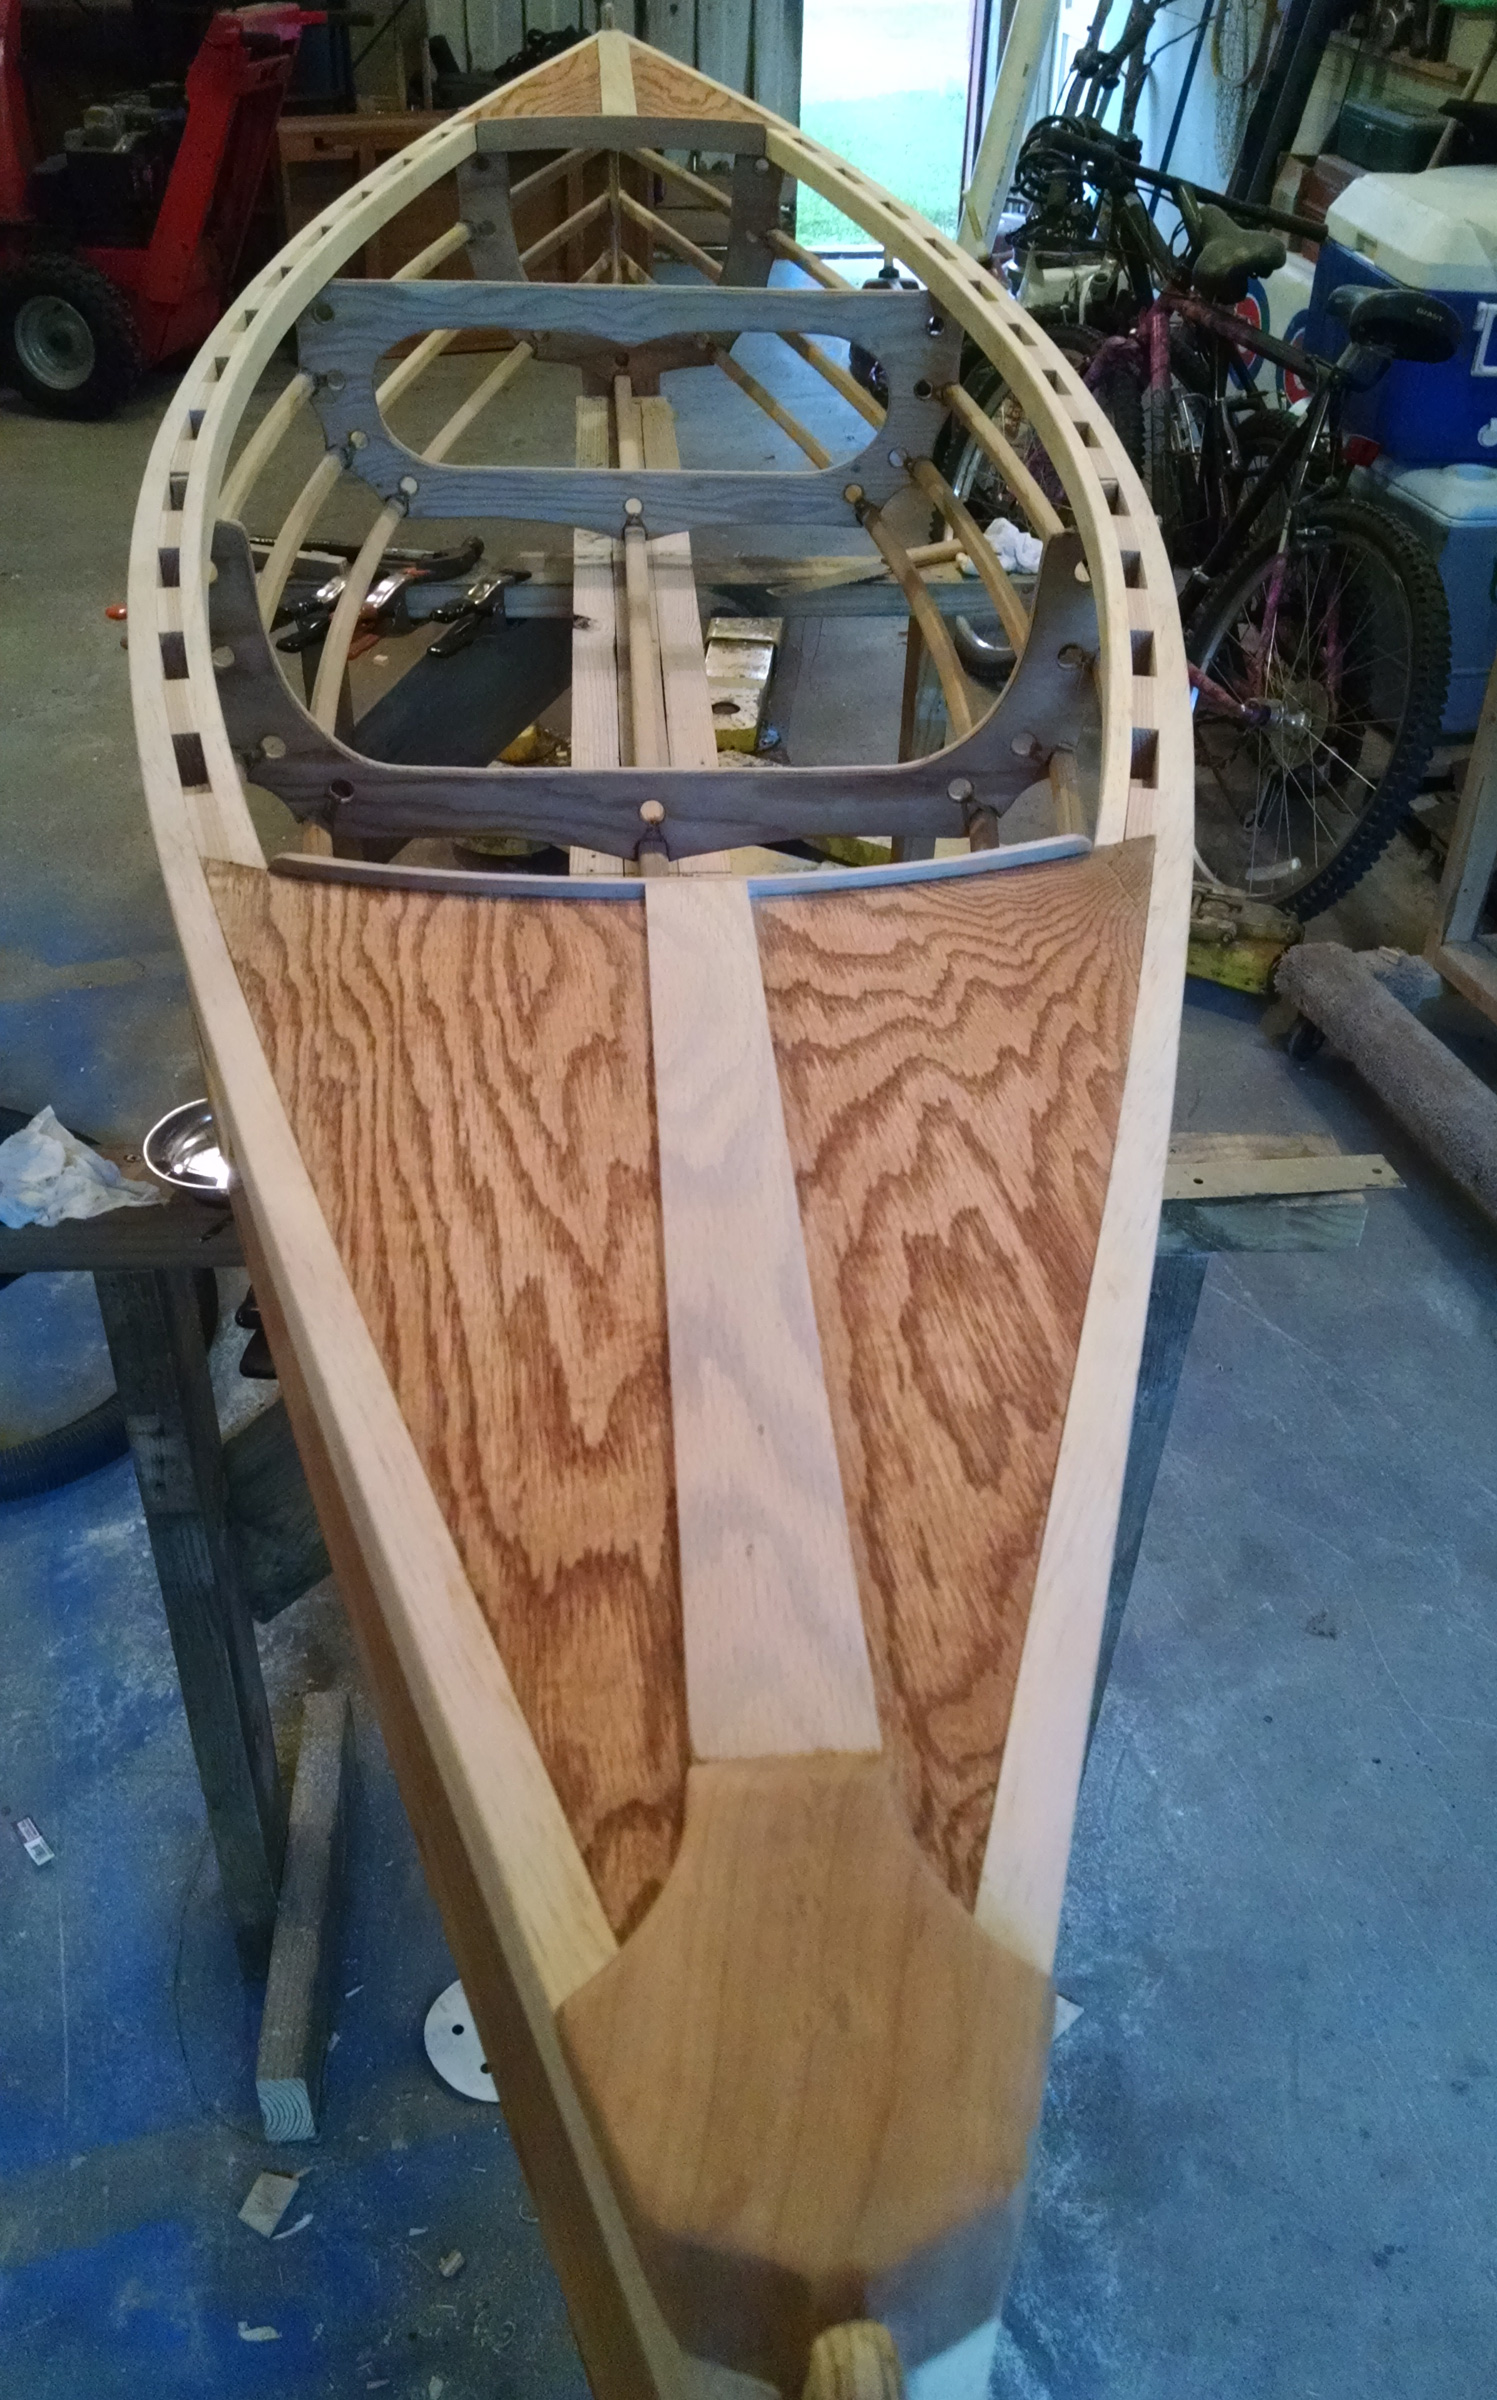
James added decks as reminders of the Adirondack guide boats he used to work on as a teenager.
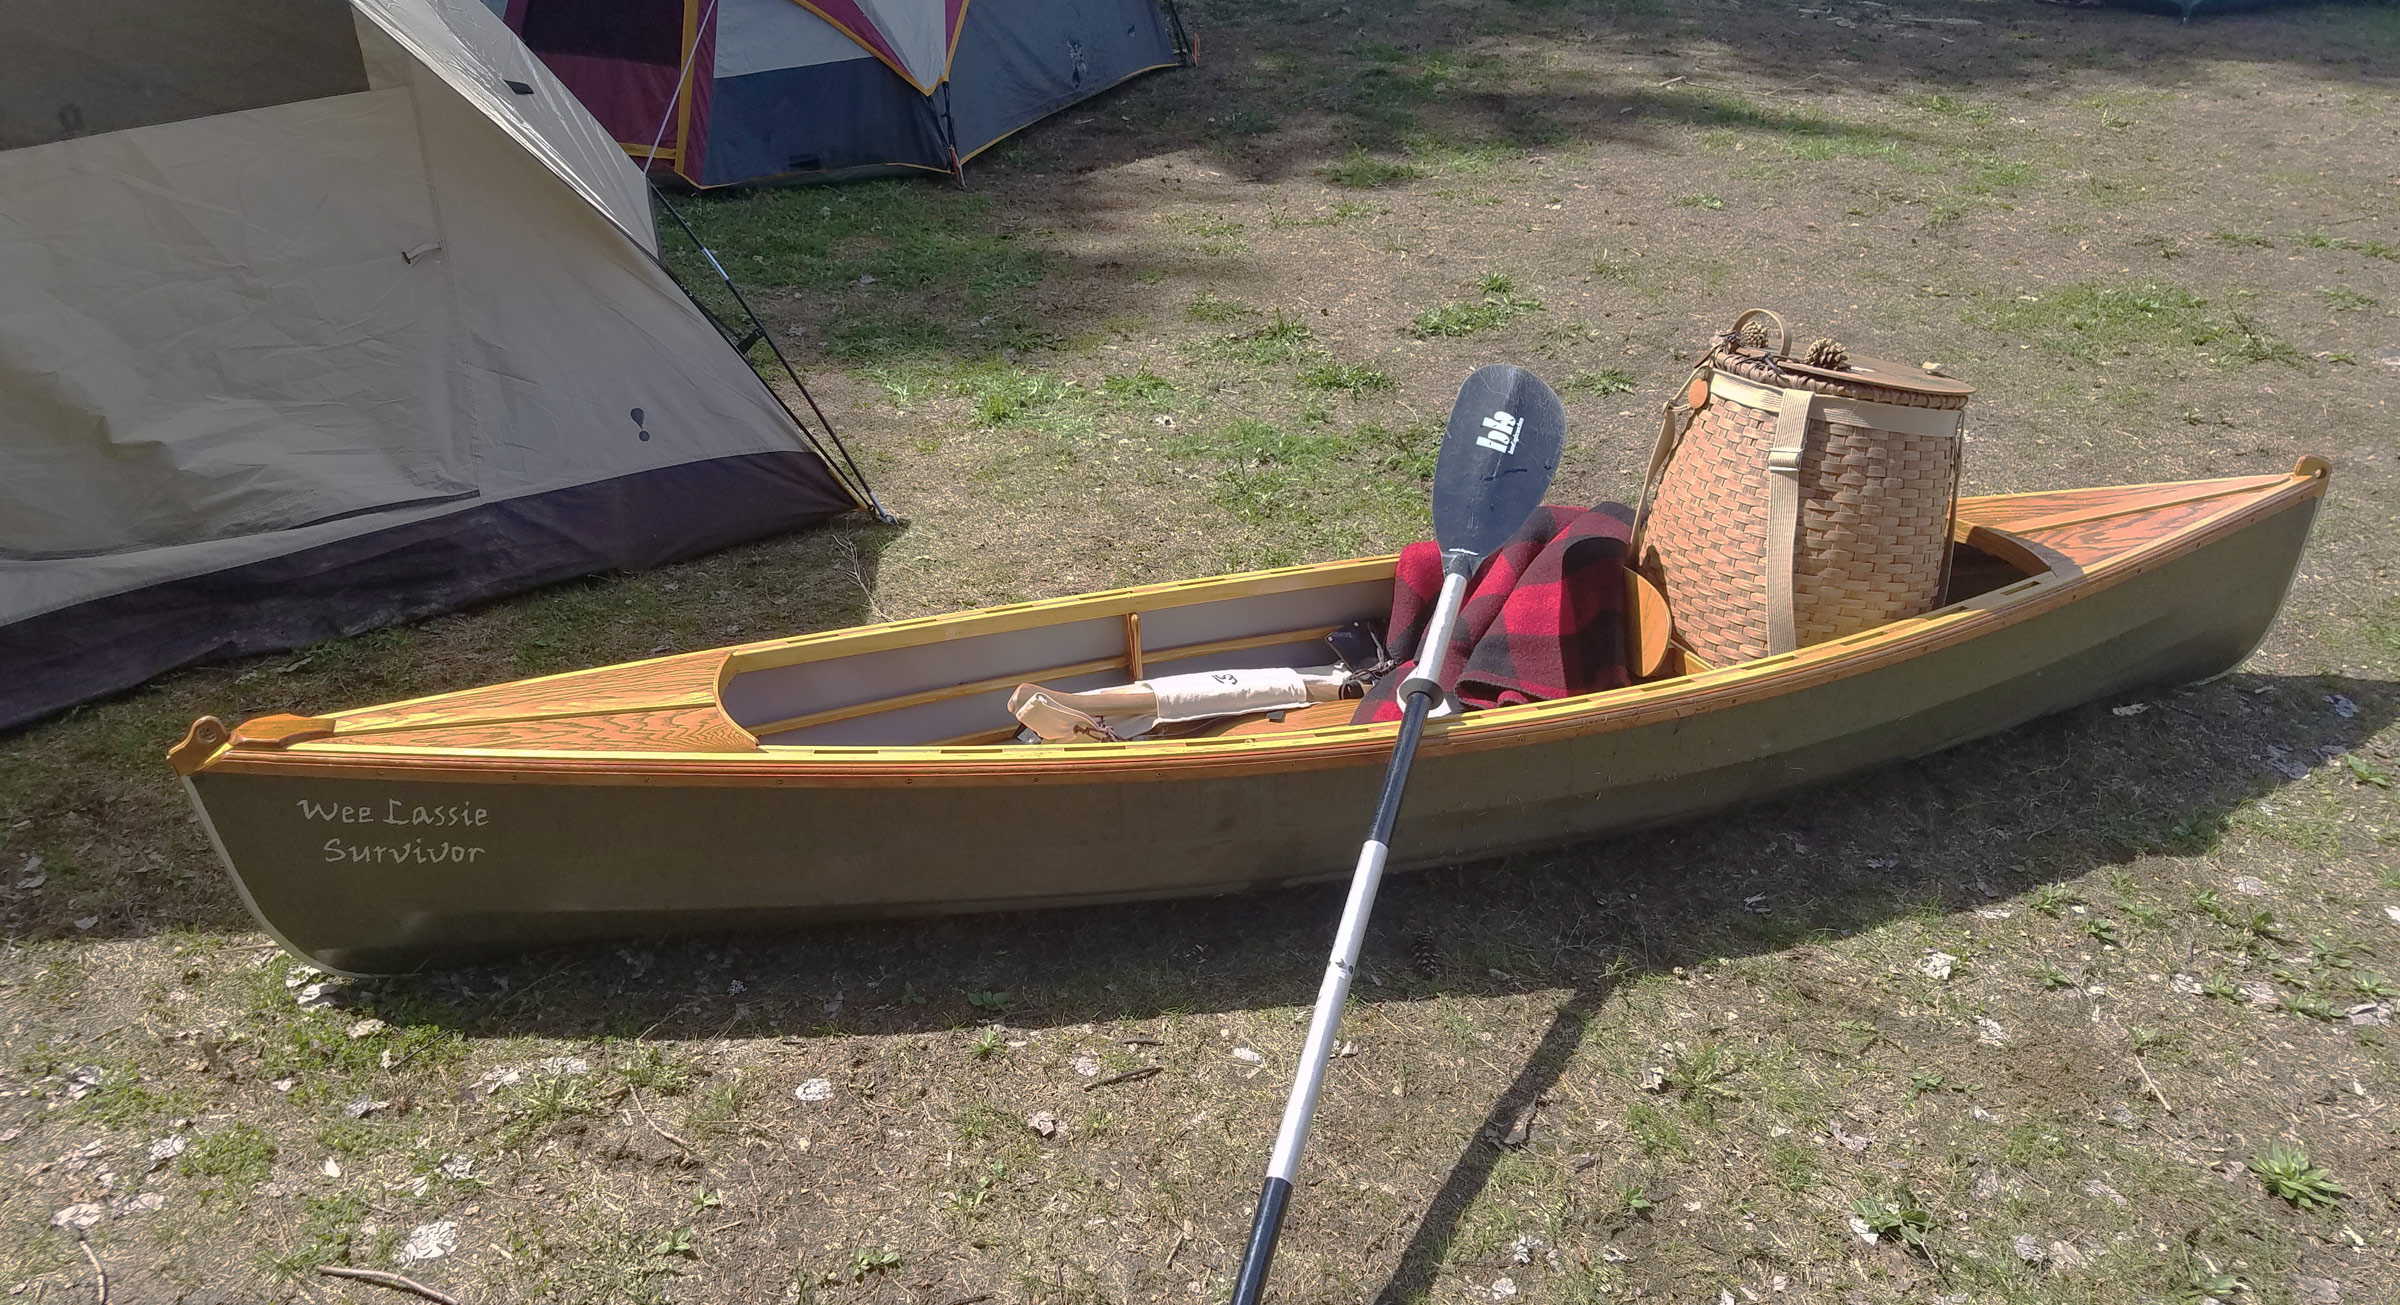
Rushton’s original Wee Lassie, built in 1893, was 10′6″ long, weighed just 20 lbs, and was a delicate lapstrake construction of cedar planks, just 3/16″ thick, on closely spaced steam-bent oak frames. Building a replica true to the original would require the skills of an experienced craftsman. For a first boatbuilding project, James was drawn to Dave Gentry’s version of the Wee Lassie, an adaptation for skin-on-frame construction that would be quick to build, require nominal skills, and yet be as light as the original.
James tries the frame on for size before skinning the canoe. Cody imagines swimming alongside.
In July 2015, James had his last radiation treatment and rested for just two days before beginning building his Wee Lassie. Working in his barn, he got off to a slow start as he gradually regained his strength. When he would return to the house after working for a spell on the canoe, his wife would ask, “What are you doing out there in the barn?” “Building a boat,” he’d reply. She would laugh and say, “Oh, okay….” Weeks went by before she came out to the barn and, to her surprise, there was indeed a boat taking shape there.
James made a woven Adirondack pack basket as a fitting accompaniment to his canoe.
In the Gentry plans, there are two options for fastening the longitudinals to the plywood frames: lashings or screws and epoxy. James opted for lashings. The nylon artificial sinew gave the connections flexibility in addition to great strength. He departed from the plans to add decks fore and aft to give his Wee Lassie a touch of Adirondack-guideboat class. This decorative touch brought the weight to 25 lbs, a bit over the 19 lbs specified in the plans, but still an easy carry.
James’s version of the Gentry Wee Lassie came in at 24 lbs, an easy carry in the backcountry.
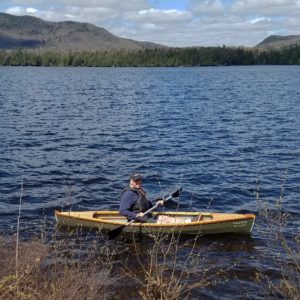
James finished the canoe in three months, christened it WEE LASSIE SURVIVOR, and took his first outing on the waters of Lake Delta, not far from his home in Rome, New York. The moment she was afloat transported him back to his summers paddling Milo’s Wee Lassie on Little Moose Lake.
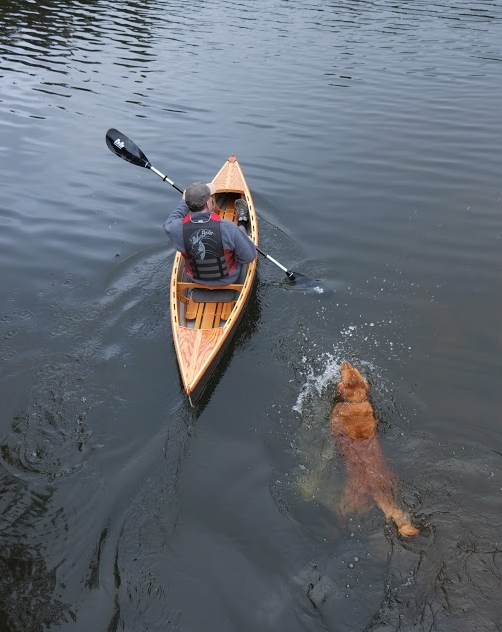
Cody heels dutifully by land and by lake.
Winter descended not long after that first October outing and WEE LASSIE SURVIVOR went back into the barn. The following spring, James joined a Boy Scout canoe-camping trip. He had brought his dog, a golden retriever named Cody, but expected him stay ashore. James was well on his way when he discovered Cody was swimming in SURVIVOR’s wake. The two of them have since enjoyed many small ponds together, one paddling and the other dog-paddling.
Have you recently launched a boat? Please email us. We’d like to hear about it and share your story with other Small Boats Monthly readers.
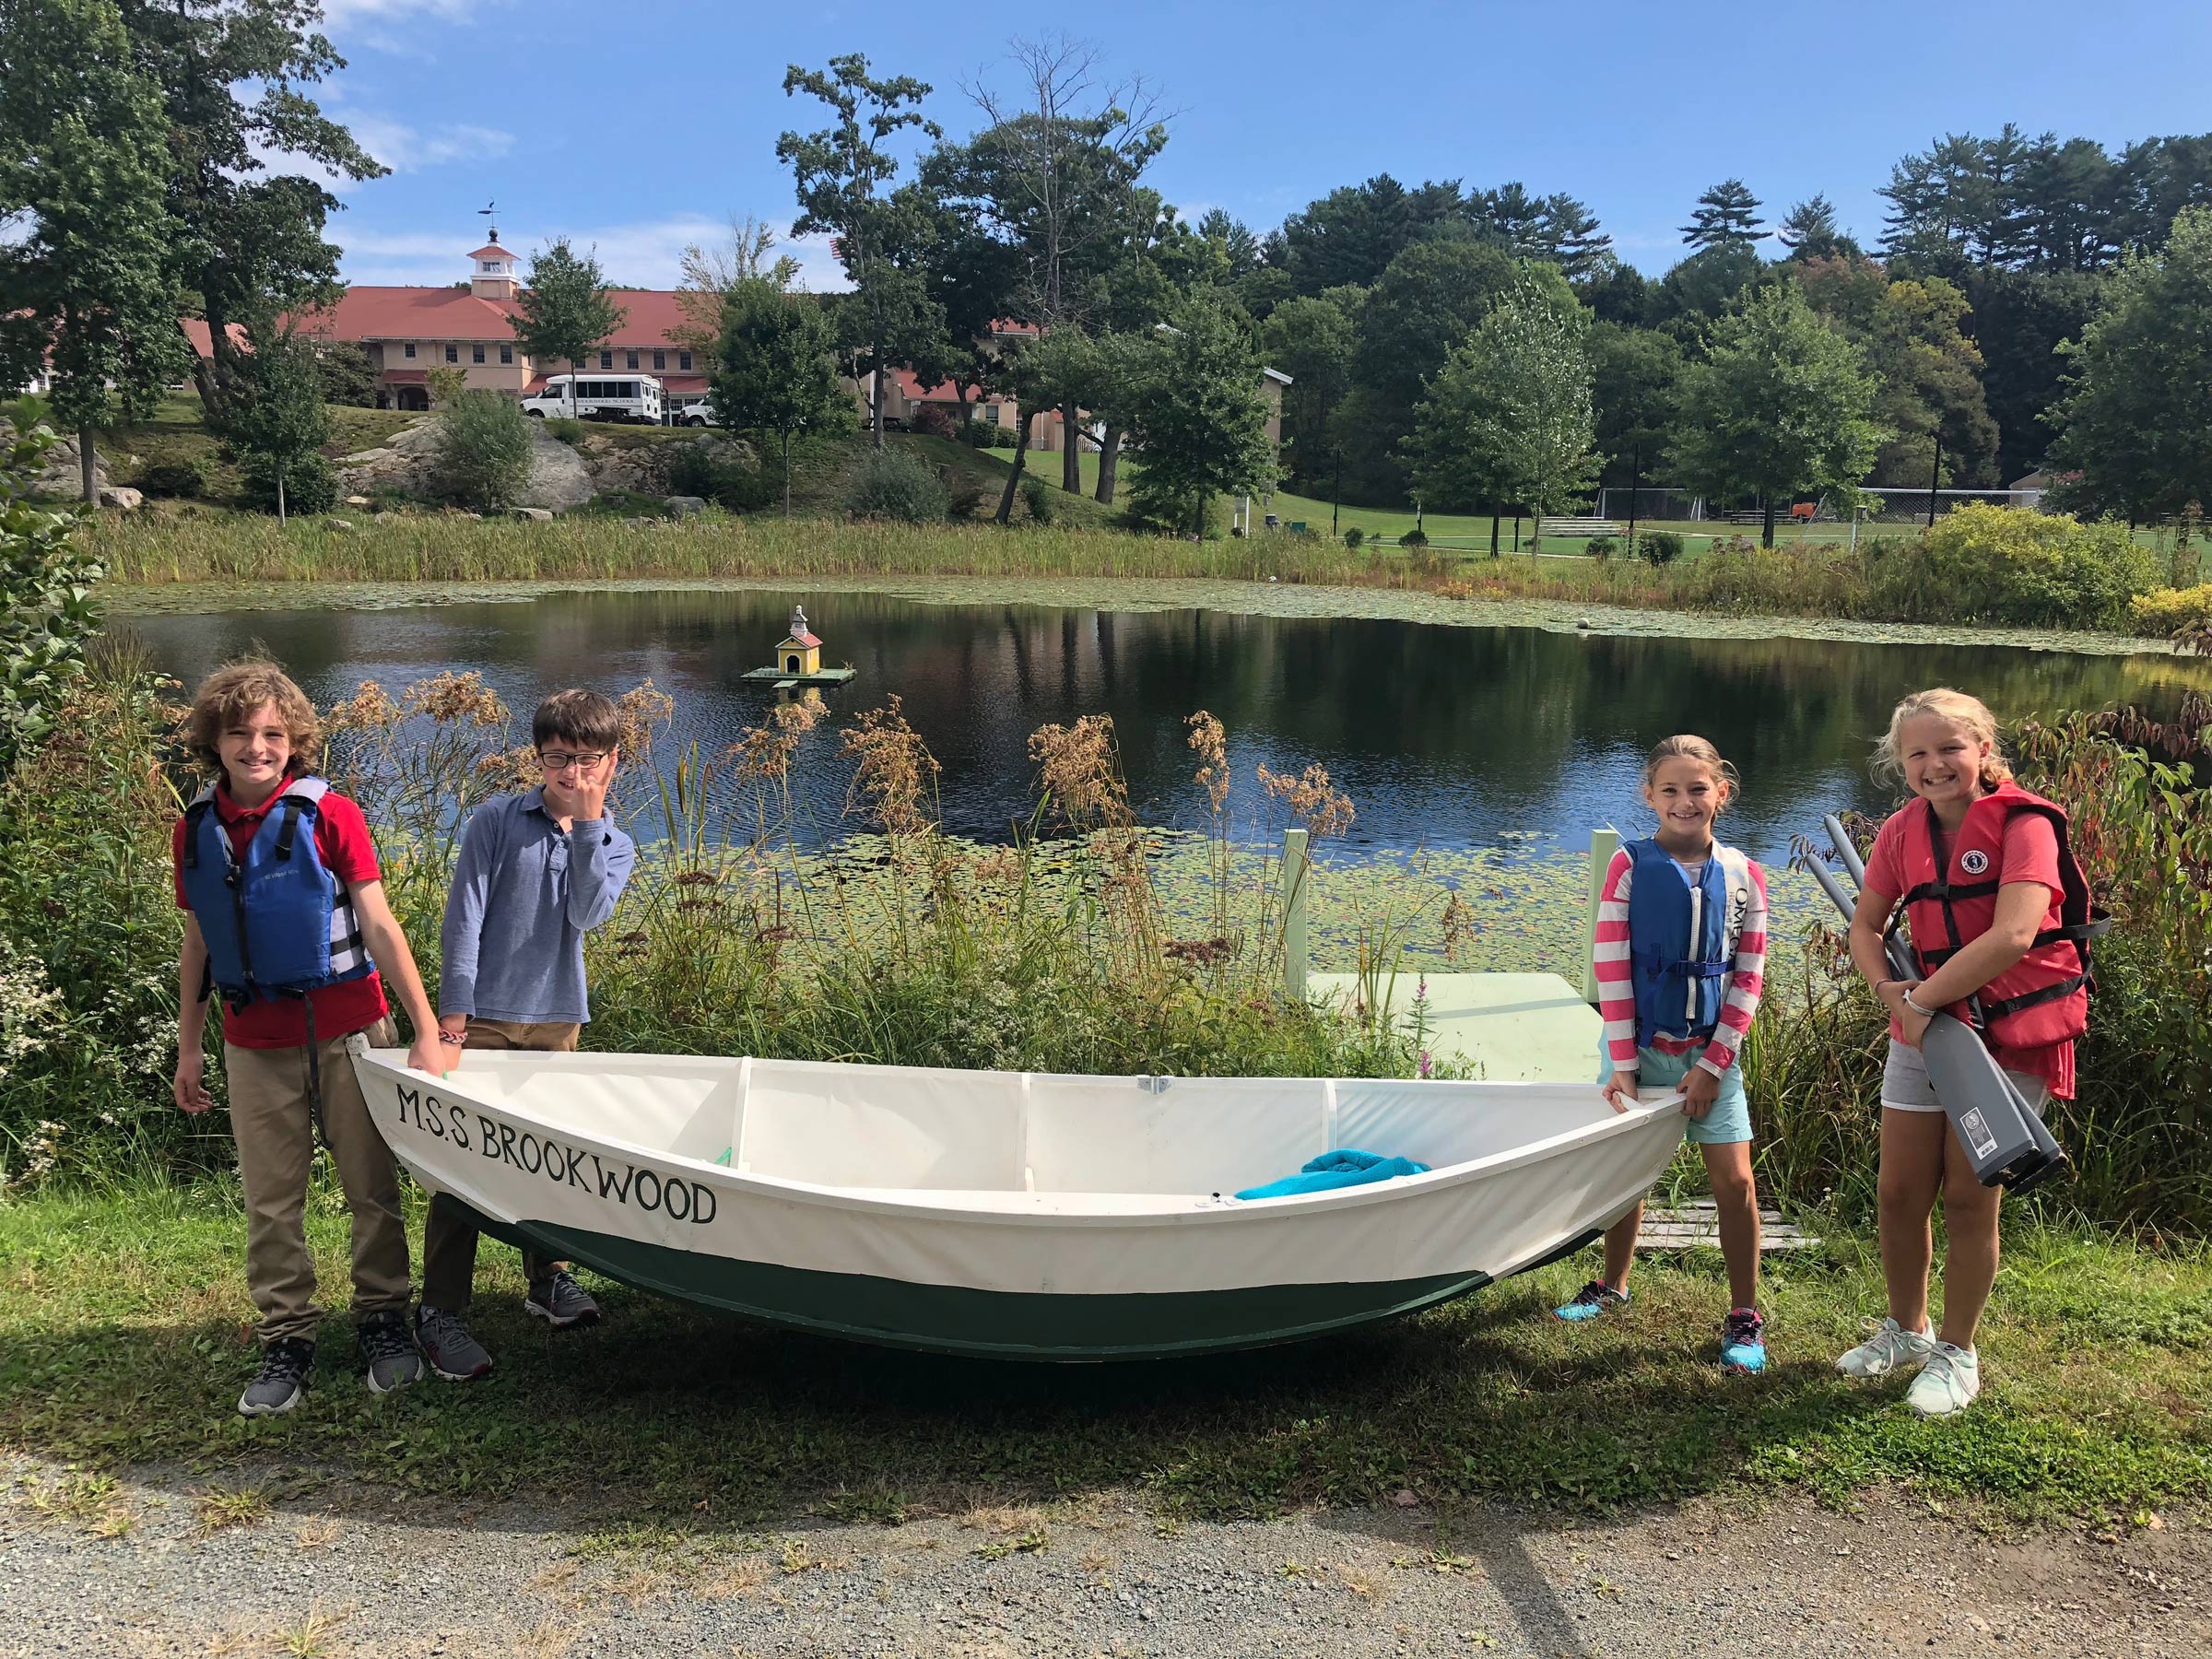
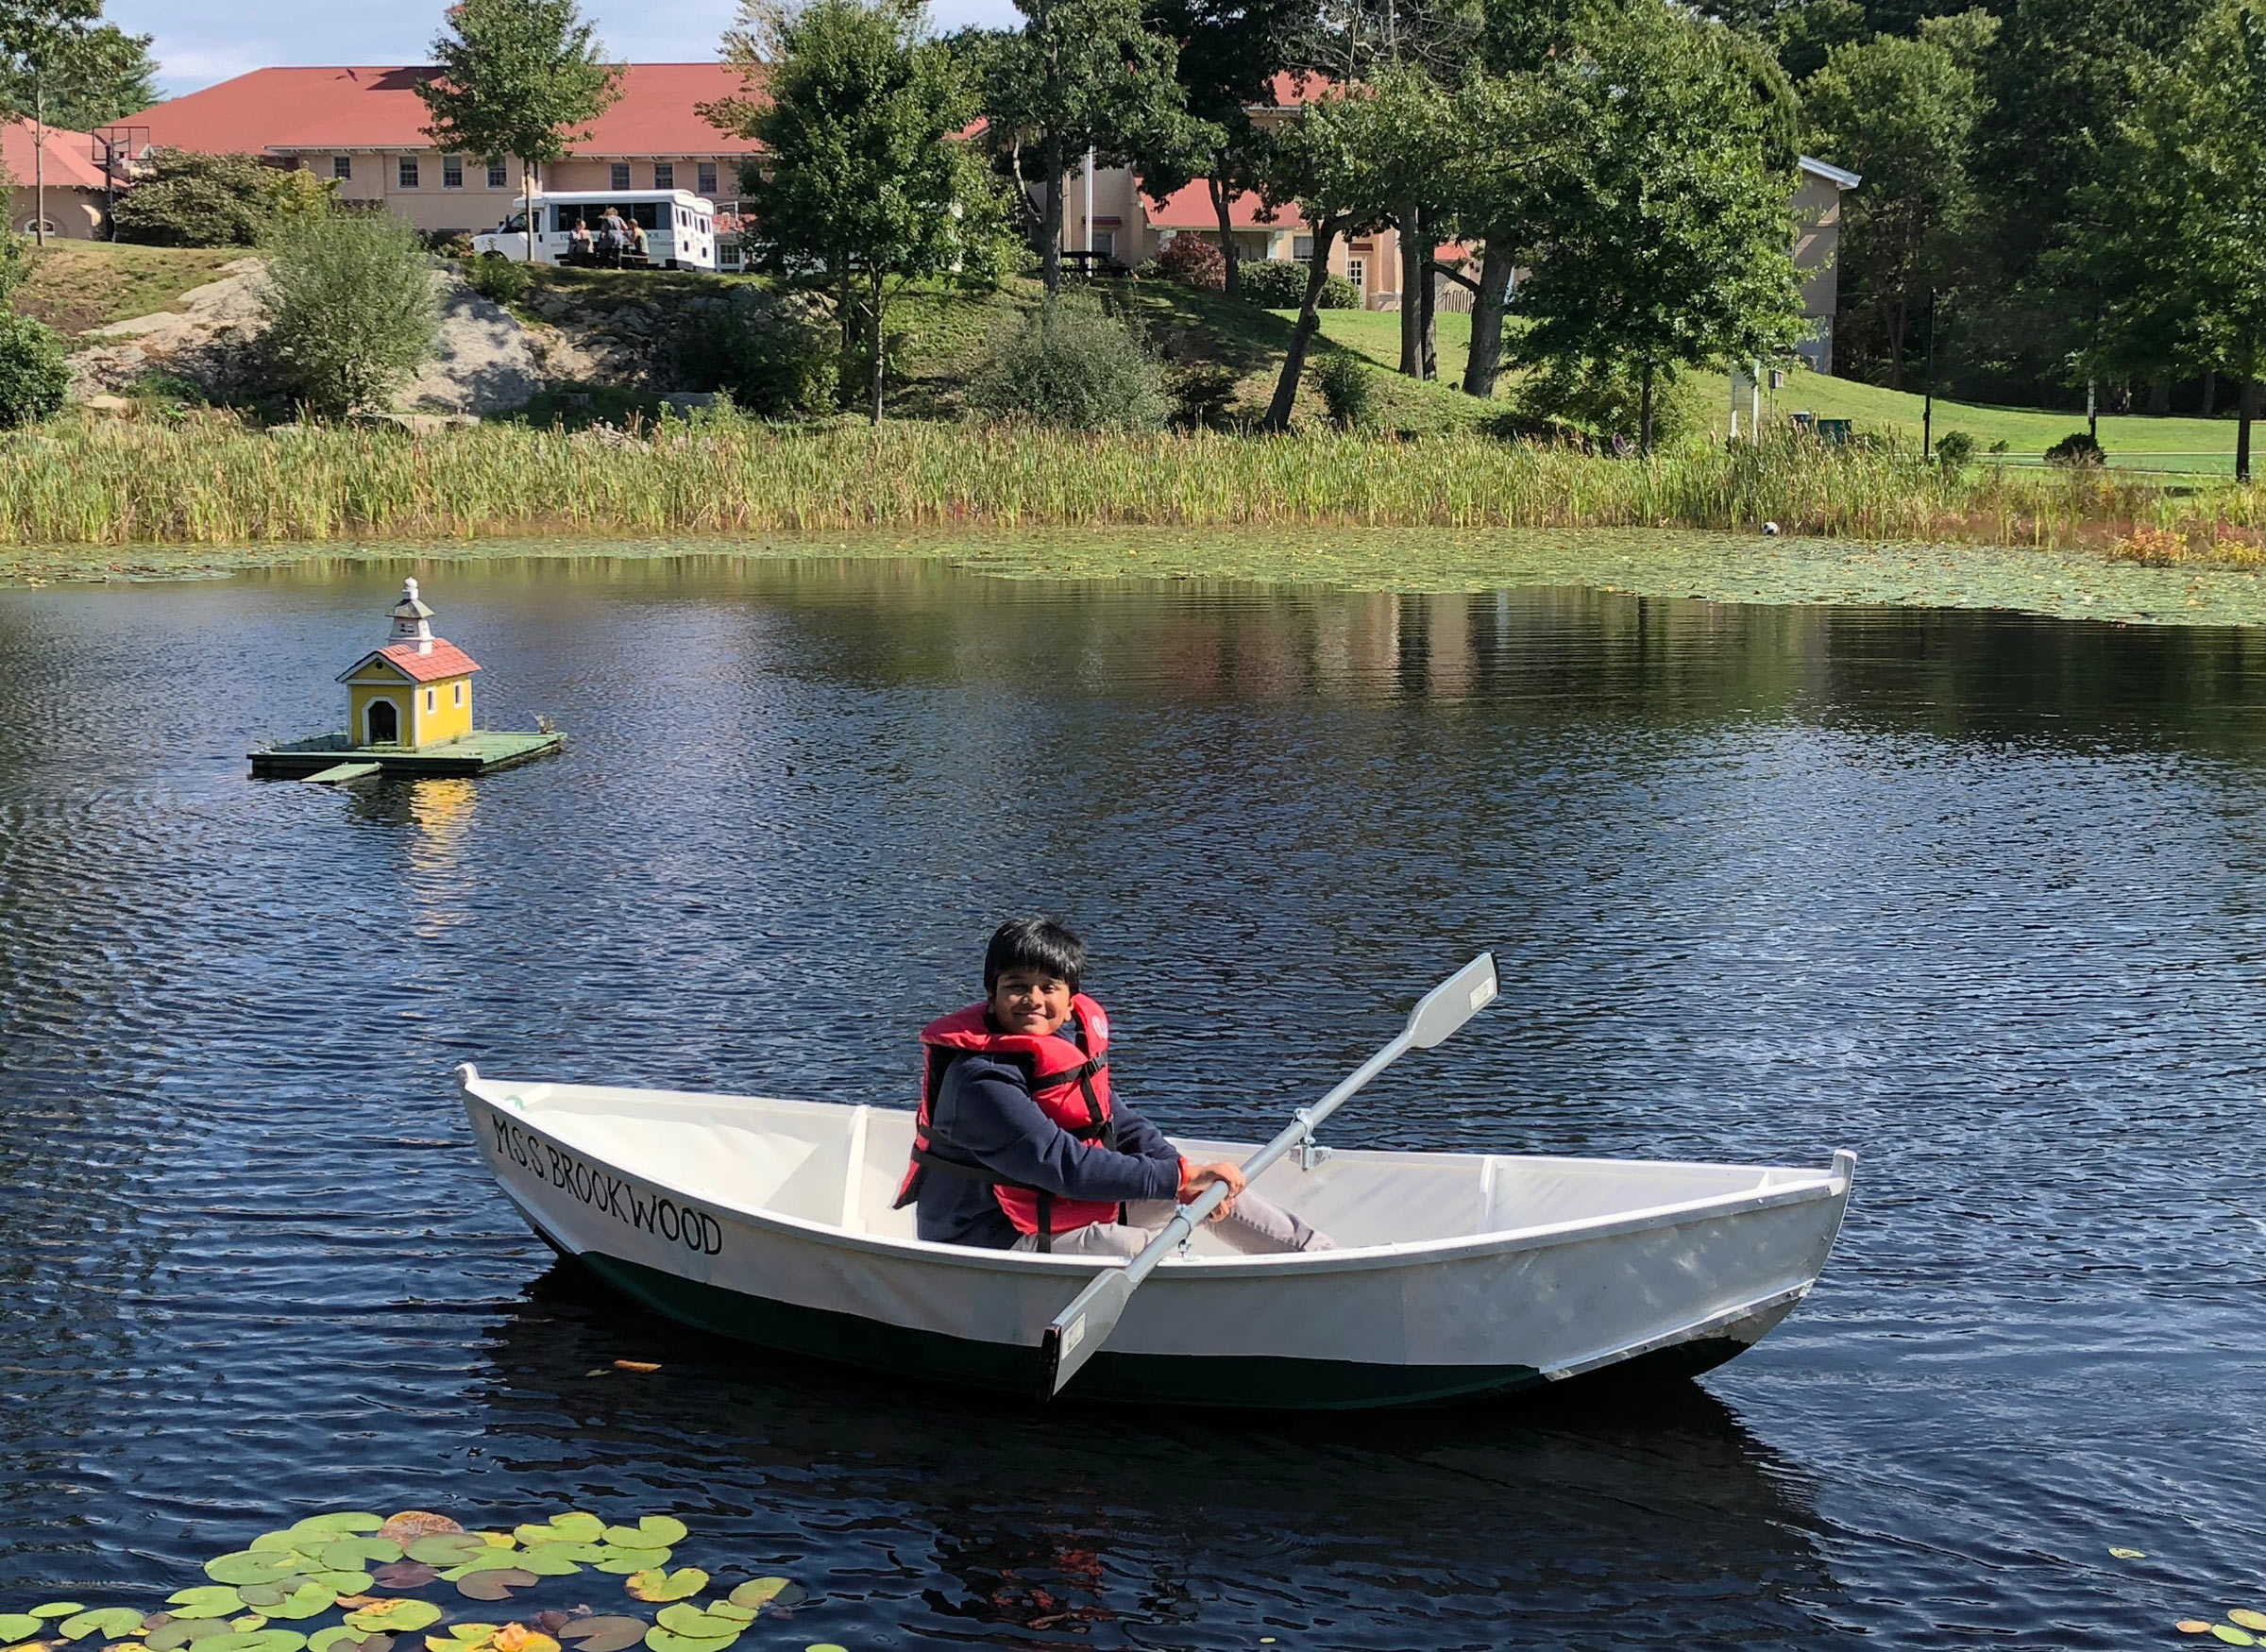
Middle schoolers have the privilege of taking MSS BROOKWOOD out rowing on Cutler Pond on the edge of the school grounds.
Halfway between Swampscott and Gloucester on the Massachusetts North Shore is Brookwood, a private school serving students from pre-kindergarten to the eighth grade. Located in an area with a rich maritime history, it was, perhaps, inevitable that boatbuilding would work its way into the school’s curriculum. The idea had been floating around the school’s faculty for a few years and when one of the school’s classrooms was scheduled to be vacant during the 2015/2016 school year, the space was available for a workshop.
Sven Holch and his fellow fourth- and fifth-grade teachers took the opportunity to introduce 90 students to “design thinking and project-based learning” under the guise of hands-on boatbuilding. The students were divided into nine “watches” with maritime names like Stellwagen, after the Stellwagen Bank fishing grounds. Every week, each watch would gather in the Boatyard, as the classroom had been named, ready to do some boatbuilding.
The design chosen for the build was the 9′ canvas-on-frame double-ended tender designed and built by Ned MacIntosh back in the 1940s when he and his wife were living aboard their Atkin cutter STAR CREST in Panamanian waters. The boat caught on among other cruisers, especially after Ned added a sailing rig. Soon there was a fleet of about 20 of them. When STAR CREST returned home to New Hampshire Ned made more of these lightweight tenders. Maynard Bray, an author of many books on boatbuilding and a frequent contributor to WoodenBoat, saw the tender, took a liking to it, and measured one of them to create drawings to work from to build one for himself. His plans were the starting point for the Brookwood project.
Boatbuilding was new territory not only for the students but also for some of the teachers who participated in the project. “We’re all starting from ground zero,” said Sven. “Building a boat together is the perfect place to practice not knowing anything. We’re using the boatbuilding project as a way to teach about learning styles—metacognition. The kids can think about their thinking at this age.”
From the very beginning, the students kept journals documenting their progress:
“Today I learned about a stern. At first I thought that it was the front of the boat but I learned that it was the back of a boat.”
“Today I also built replicas of the boat. They were nine inches. We had to scarf the stringers. We had to cover it with paper. And use popsicle sticks to make seats.”
The hands-on project gave student real-world connections to academic studies. “The math, science and classic STEM curricula tie to the project in numerous ways,” Sven noted, “including but not limited to displacement, angles, scale, joinery, characteristics of water, measurement and more.”
The canvas boat has held up well for the three years it has been used by students to practice rowing on the school’s pond.
The boat was launched on Cutler Pond, situated between the school and its soccer fields, and christened MSS BROOKWOOD in a ceremony led by Head of School Laura Caron, made Admiral of the fleet for the occasion. The MSS stands for Middle School Ship. Students took turns rowing around a duck-sized schoolhouse—complete with a Brookwood-style cupola—that floats in the middle of the pond. Rowing became the next learning opportunity after the boatbuilding.
The boat’s bow bears the heron from the school’s logo. The pond is a good habitat for herons, so the school chose it as its symbol when the school was founded in 1956. This version is now “old school,” as the logo was updated this summer.
Since its launching, MSS BROOKWOOD continues to rule the pond unchallenged and hasn’t leaked a drop.
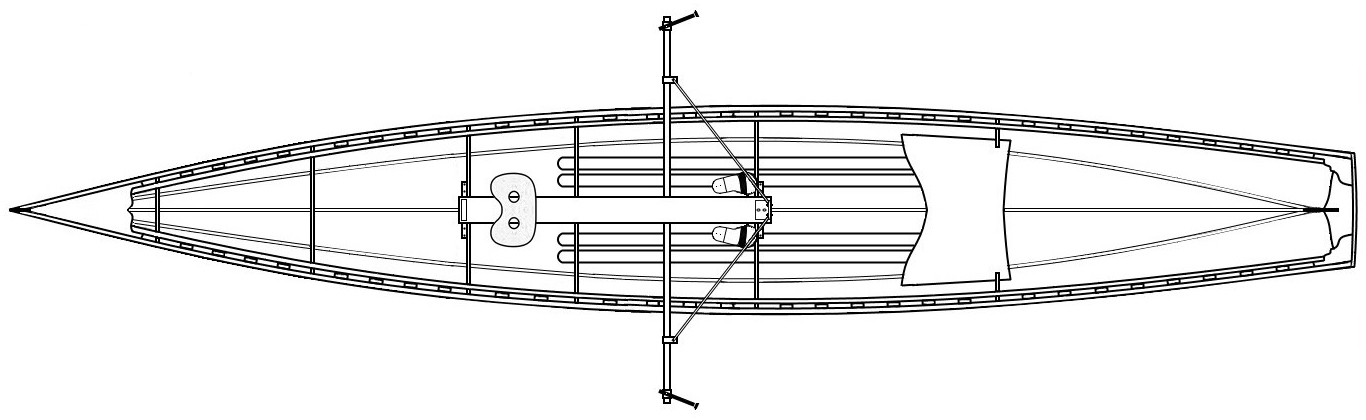
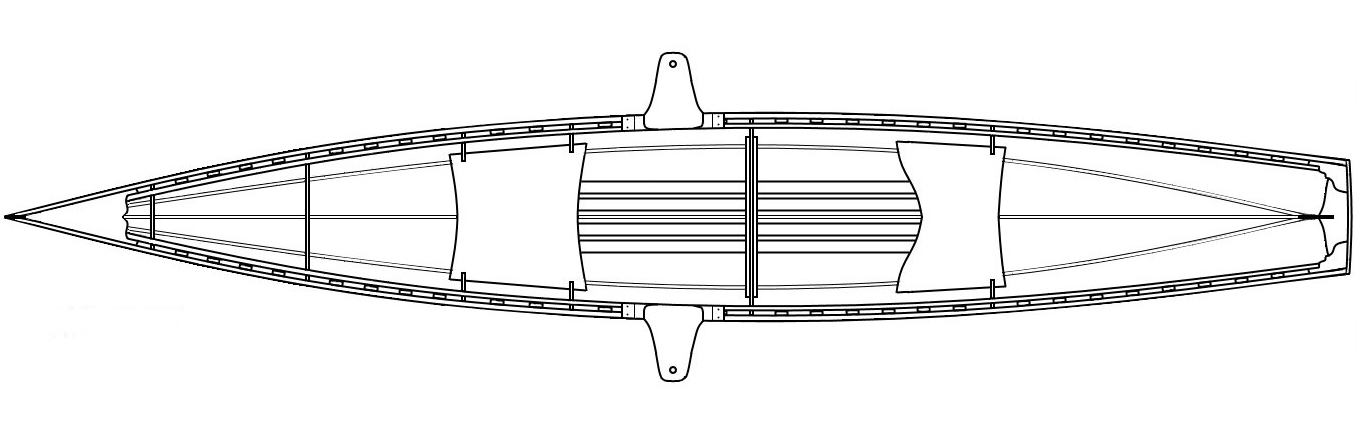
It is hard to capture the feeling of a good pulling boat, but perhaps the best way to sum it up is to say that some boats just glide and will cover great distances on the water with seemingly no effort at all. A few pulls are all that are needed to reveal a well-designed wherry. With the skin-on-frame Ruth, Dave Gentry has created an interesting adaptation of a classic rowing wherry that captures that elusive quality of glide.
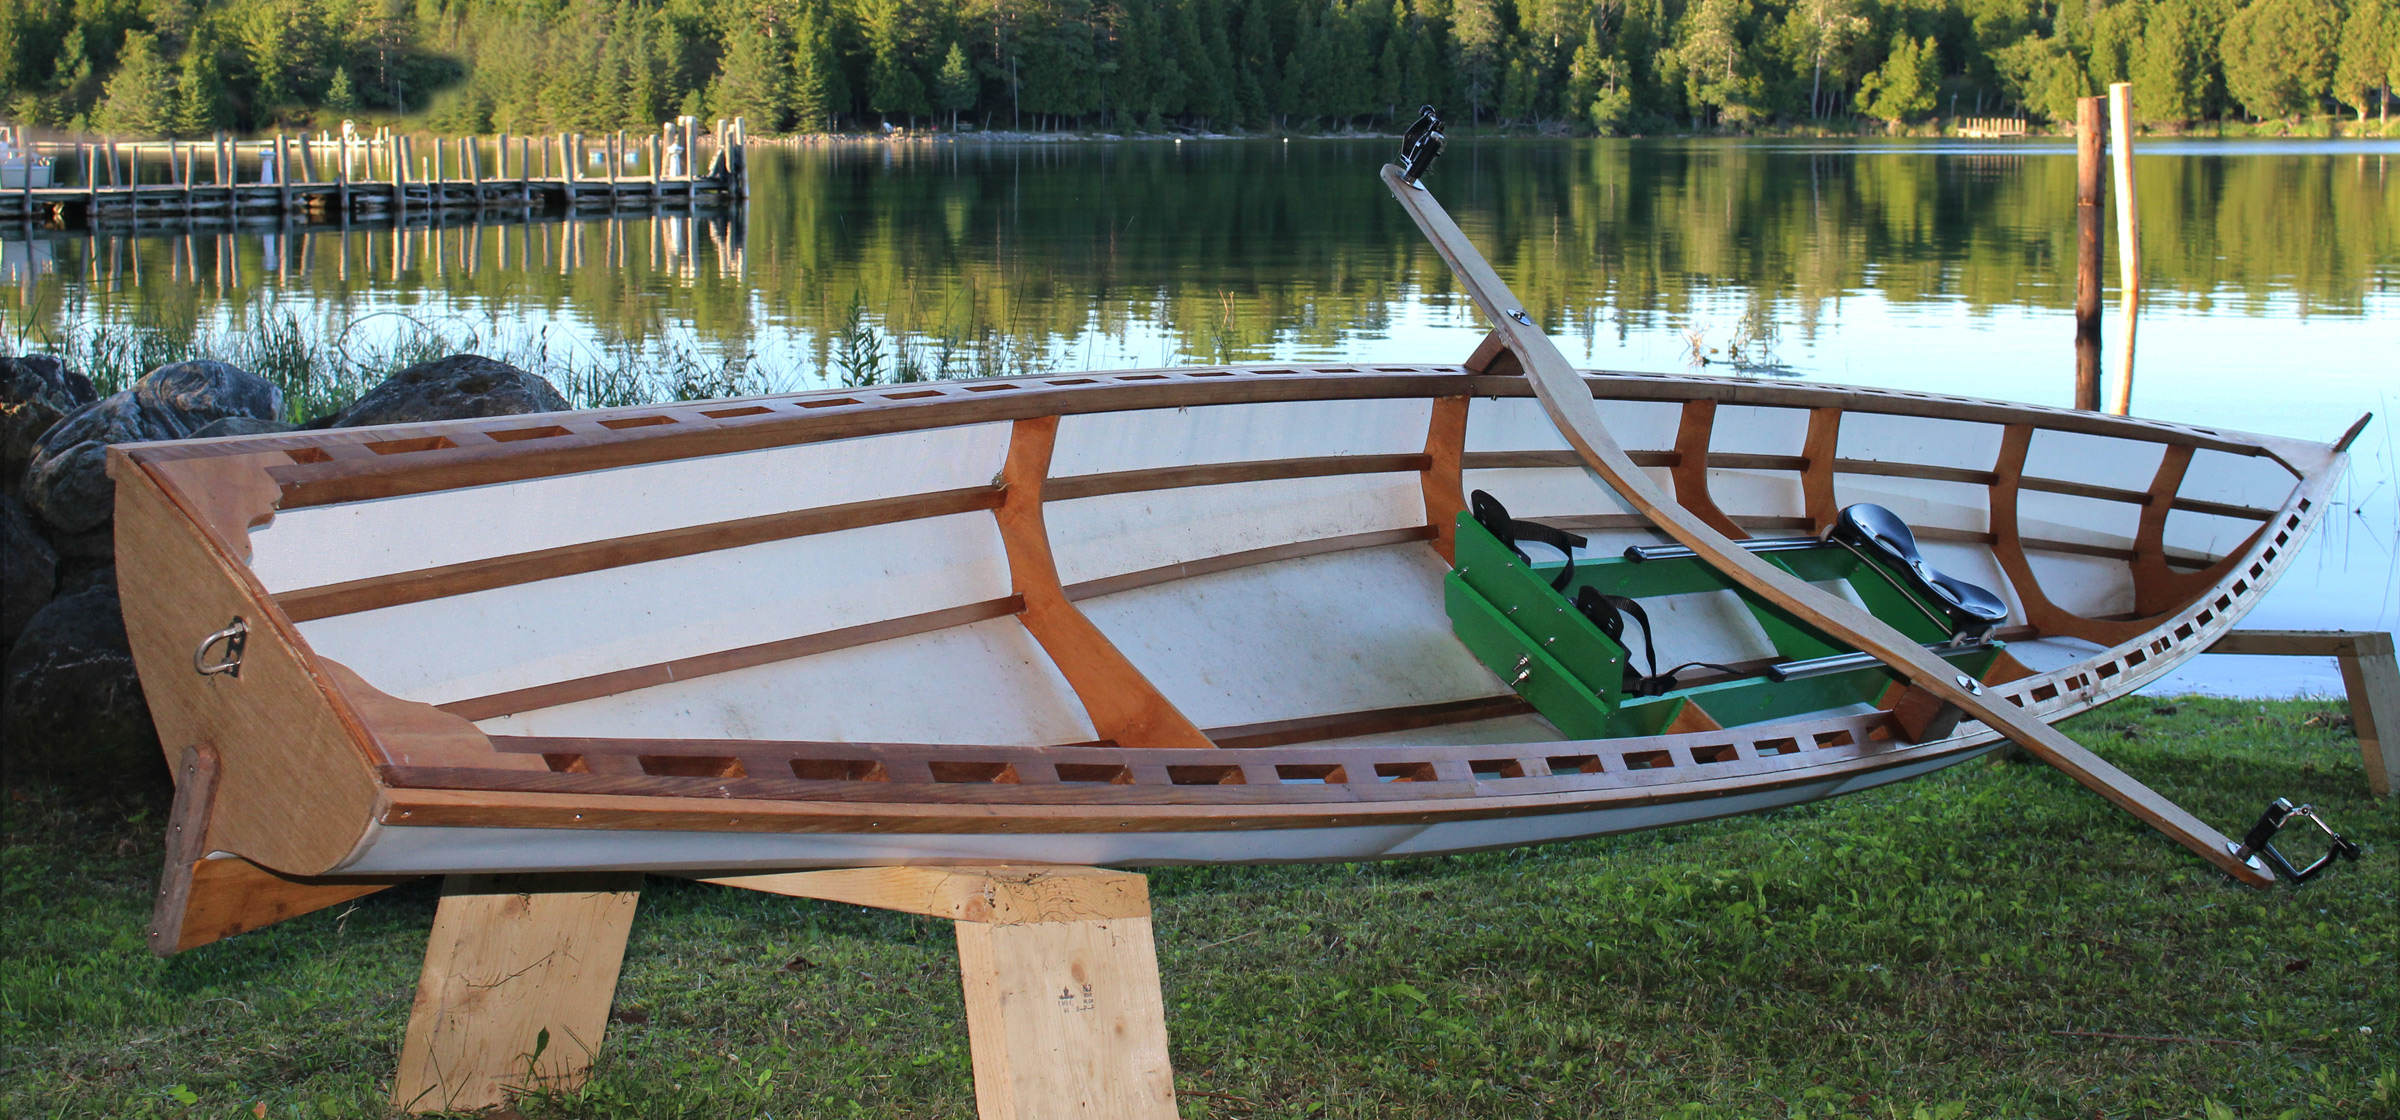
The Ruth, with its fabric skin, and well-thought-out, easily built wooden frame, keeps the weight down to around 45 lbs, light enough for this 18-footer to be singlehandedly cartopped with ease. Gentry’s plans are a complete, well-illustrated, easy-to-follow, and include paper templates for the plywood frames.
The structure for the Ruth is a combination of plywood and lightweight western red cedar stringers. The 1/2″ marine-plywood stem, frames, and transom are notched for the full-length strips that bend from bow to stern and give shape to the wherry. Joining frames to stringers takes only a bit of thickened epoxy and stainless-steel screws. Even the most inexperienced builder with basic tools can have a frame built in just a few hours. The plywood breasthook and various supporting knees are laid out in the paper templates as well. They are essential strengthening elements and relatively simple to add with a bit of beveling and finesse.
The fabric skin goes on with a combination of stainless-steel staples and only a bit of handiwork with needle and thread. The plans recommend 8-oz polyester. Nylon durability is well regarded among the skin-on-frame kayak builders; Gentry mentions it as an acceptable alternative with a precaution that it does not heat-shrink as well as polyester.
A good pneumatic or electric stapler makes short work of the hundreds of staples that a fix the skin along the entire gunwale, but a hand stapler would also adequately do the job, albeit with a bit of fatigue at the end of the day. An extra set of hands for the skinning step is helpful. You can do the job solo, keeping the skin in proper alignment with push-pins straight along the keelson. The addition of the gunwale later on hides the staples, but care should be taken to set them consistently at a depth that holds and doesn’t cut or pull the cloth askew at each staple.
Jim Dumser
The author’s Ruth is rigged with a home-built rowing rig for solo rowing and is without floorboards and a seat for a passenger. A false transom covers the edges of the fabric skin for a tidier appearance.
The skin wraps around the transom and particular care should be taken to do a neat job with the folds and the copper nails; they will be visible when the boat is completed. On my build, I first used upholstery tacks as a decorative touch, but they didn’t hold well, and the folded fabric edge wasn’t as tidy as I’d hoped. I decided to hide the fabric and the staples with a false transom of 1/8″ plywood. It added very little weight and looks tidy.
The only stitching required for the skin is at the bow. Even for the uninitiated, this short section can be accomplished rather easily. In addition to the supplied directions, helpful video tutorials are available online. Since polyester can easily unravel once cut, the edges need to be heat-sealed. If you don’t have a hot knife specifically made for the task, a flat cutting tip on a soldering gun works like a charm.
After the skin is attached to the frame, the gentle use of an iron will remove wrinkles and pull the skin taut. The polyester fabric needs to be sealed to become fully waterproof and the instructions call for oil-based paint or varnish. Inexpensive latex porch/floor paint, a favorite of many skin-on-frame builders, seems to hold up well, and can always be touched up or recoated. Marine topside paints, aside from being more expensive, are hard when fully cured and don’t seem to fare well applied to a flexible fabric surface.
Kyla Dumser
The length and enough fullness in the ends keep the Ruth in trim as the rower’s weight shifts back and forth on a sliding seat.
Once the skin is on, the rubrail and skeg round out a finished hull. Although the skeg is attached with screws through the skin, no leaks have developed and reinforcement by way of a short piece of brass fixed along the trailing edge of the skeg and the transom has proven ample support.
The plans detail an interior layout that consists of a rowing station and passenger seats. Designer Dave Gentry opted to rig his own Ruth with a fixed seat with simple outriggers as laid out in the original plans, a good option if you’re building on a limited budget. Fixed-seat rowing will require a pair of locks and simple plywood outriggers attached to the gunwales. A pair of 7′ to 7′ 6″ oars are a good fit.
The plans also include guidance on installing sliding-seat rowing units. I equipped my Ruth with a custom-built sliding seat rig that was designed around plans and a hardware kit ($299) from Colin Angus. Ready-made drop-in rigs like the Piantedosi ($595) have been successfully employed by many Ruth builders.
Kyla Dumser
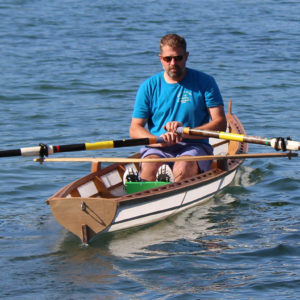
The author has been able to bring the Ruth up to 6 knots in a short sprint and can hold 4 to 5 knots at a sustainable effort.
My Ruth weighs 55 lbs with the addition of the built-in rowing rig. The boat is very comfortable on flat water and can take on a bit of chop. I can easily sustain a cruising speed of 4 to 5 knots using a 9’6” pair of carbon-fiber hatchet-blade sculls. Top speed for me is a little better than 6 knots, but the extra effort to sustain the sprint seems hard to justify when rowing for pleasure.
Getting aboard is not difficult, but care does need to be taken about foot placement to protect the skin. The plans detail lightly constructed floor boards for a fixed seat; I omitted them because they would have interfered with the placement of the sliding-seat rig.
I usually launch in shallow water and get aboard by sitting on the seat first and then swinging my legs into the boat. Under way, the stability is very good and the Ruth provides a dry ride even when things become a little rough. The craft’s light weight lets me come up to speed very quickly in just a few strokes and the sharp bow ensures that I can maintain speed even in modest chop. The skeg assures that hull will track well underway and yet allows for reasonable maneuvering in tight quarters.
Kyla Dumser
While this Ruth isn’t equipped with a seat for a passenger, the reserve buoyancy created by the transom will support the additional weight without putting the hull well out of trim.
The greater freeboard of the wherry design, compared to a traditional scull, does lend itself to a little fight in a crosswind, but weathercocking is not excessive and easily corrected. At 18′, the Ruth does an admirable job avoiding the tendency of shorter craft to hobby horse as a rower’s weight shifts fore and aft with the sliding seat. I built my Ruth for solo outings and didn’t install the passenger seat.
The 8-oz polyester skin specified in the plans might make one wonder about its long-term durability. There isn’t much between the rower and the water, but after three years the skin is still in good shape and has no tears or punctures. In the plans, Gentry mentions the option of adding a skim coat of a polyurethane adhesive along areas where abrasion is likely. The challenge is to keep it thin enough not to bubble up while curing, but, when successful, it provides an additional measure of security.
Dave Gentry’s capable Ruth is a winner. Few homebuilt boats will get you on the water as quickly and as inexpensively. The simple construction method, plainly written guide, and complete plans ensure that even a first-time builder will succeed.
Jim Dumser is a husband, father, teacher, and boatbuilder who is lucky to have had the opportunity to share the art and love of boats with his daughters and his students for the past decade. Building boats is the natural extension of his time spent starting and teaching the Wood Arts program at North Carolina’s Community School of Davidson where students have built a number of boats from canoes to a St. Ayles Skiff.
Ruth Particulars
[table]
Length/18’
Beam/33”
Weight/45 lbs
Maximum capacity/375 lbs
[/table]
Plans ($65 for paper, $55 for digital) and kits ($500) for the Ruth are available from Gentry Custom Boats.
Update: The Gentry website seems to be down. Duckworks has plans for the Ruth. 7/14/22
Is there a boat you’d like to know more about? Have you built one that you think other Small Boats Monthly readers would enjoy? Please email us!
Subscribe For Full Access
Flipbooks are available to paid subscribers only. Subscribe now or log in for access.
 Photographs by Phil Boyer