 SBM photographs and video
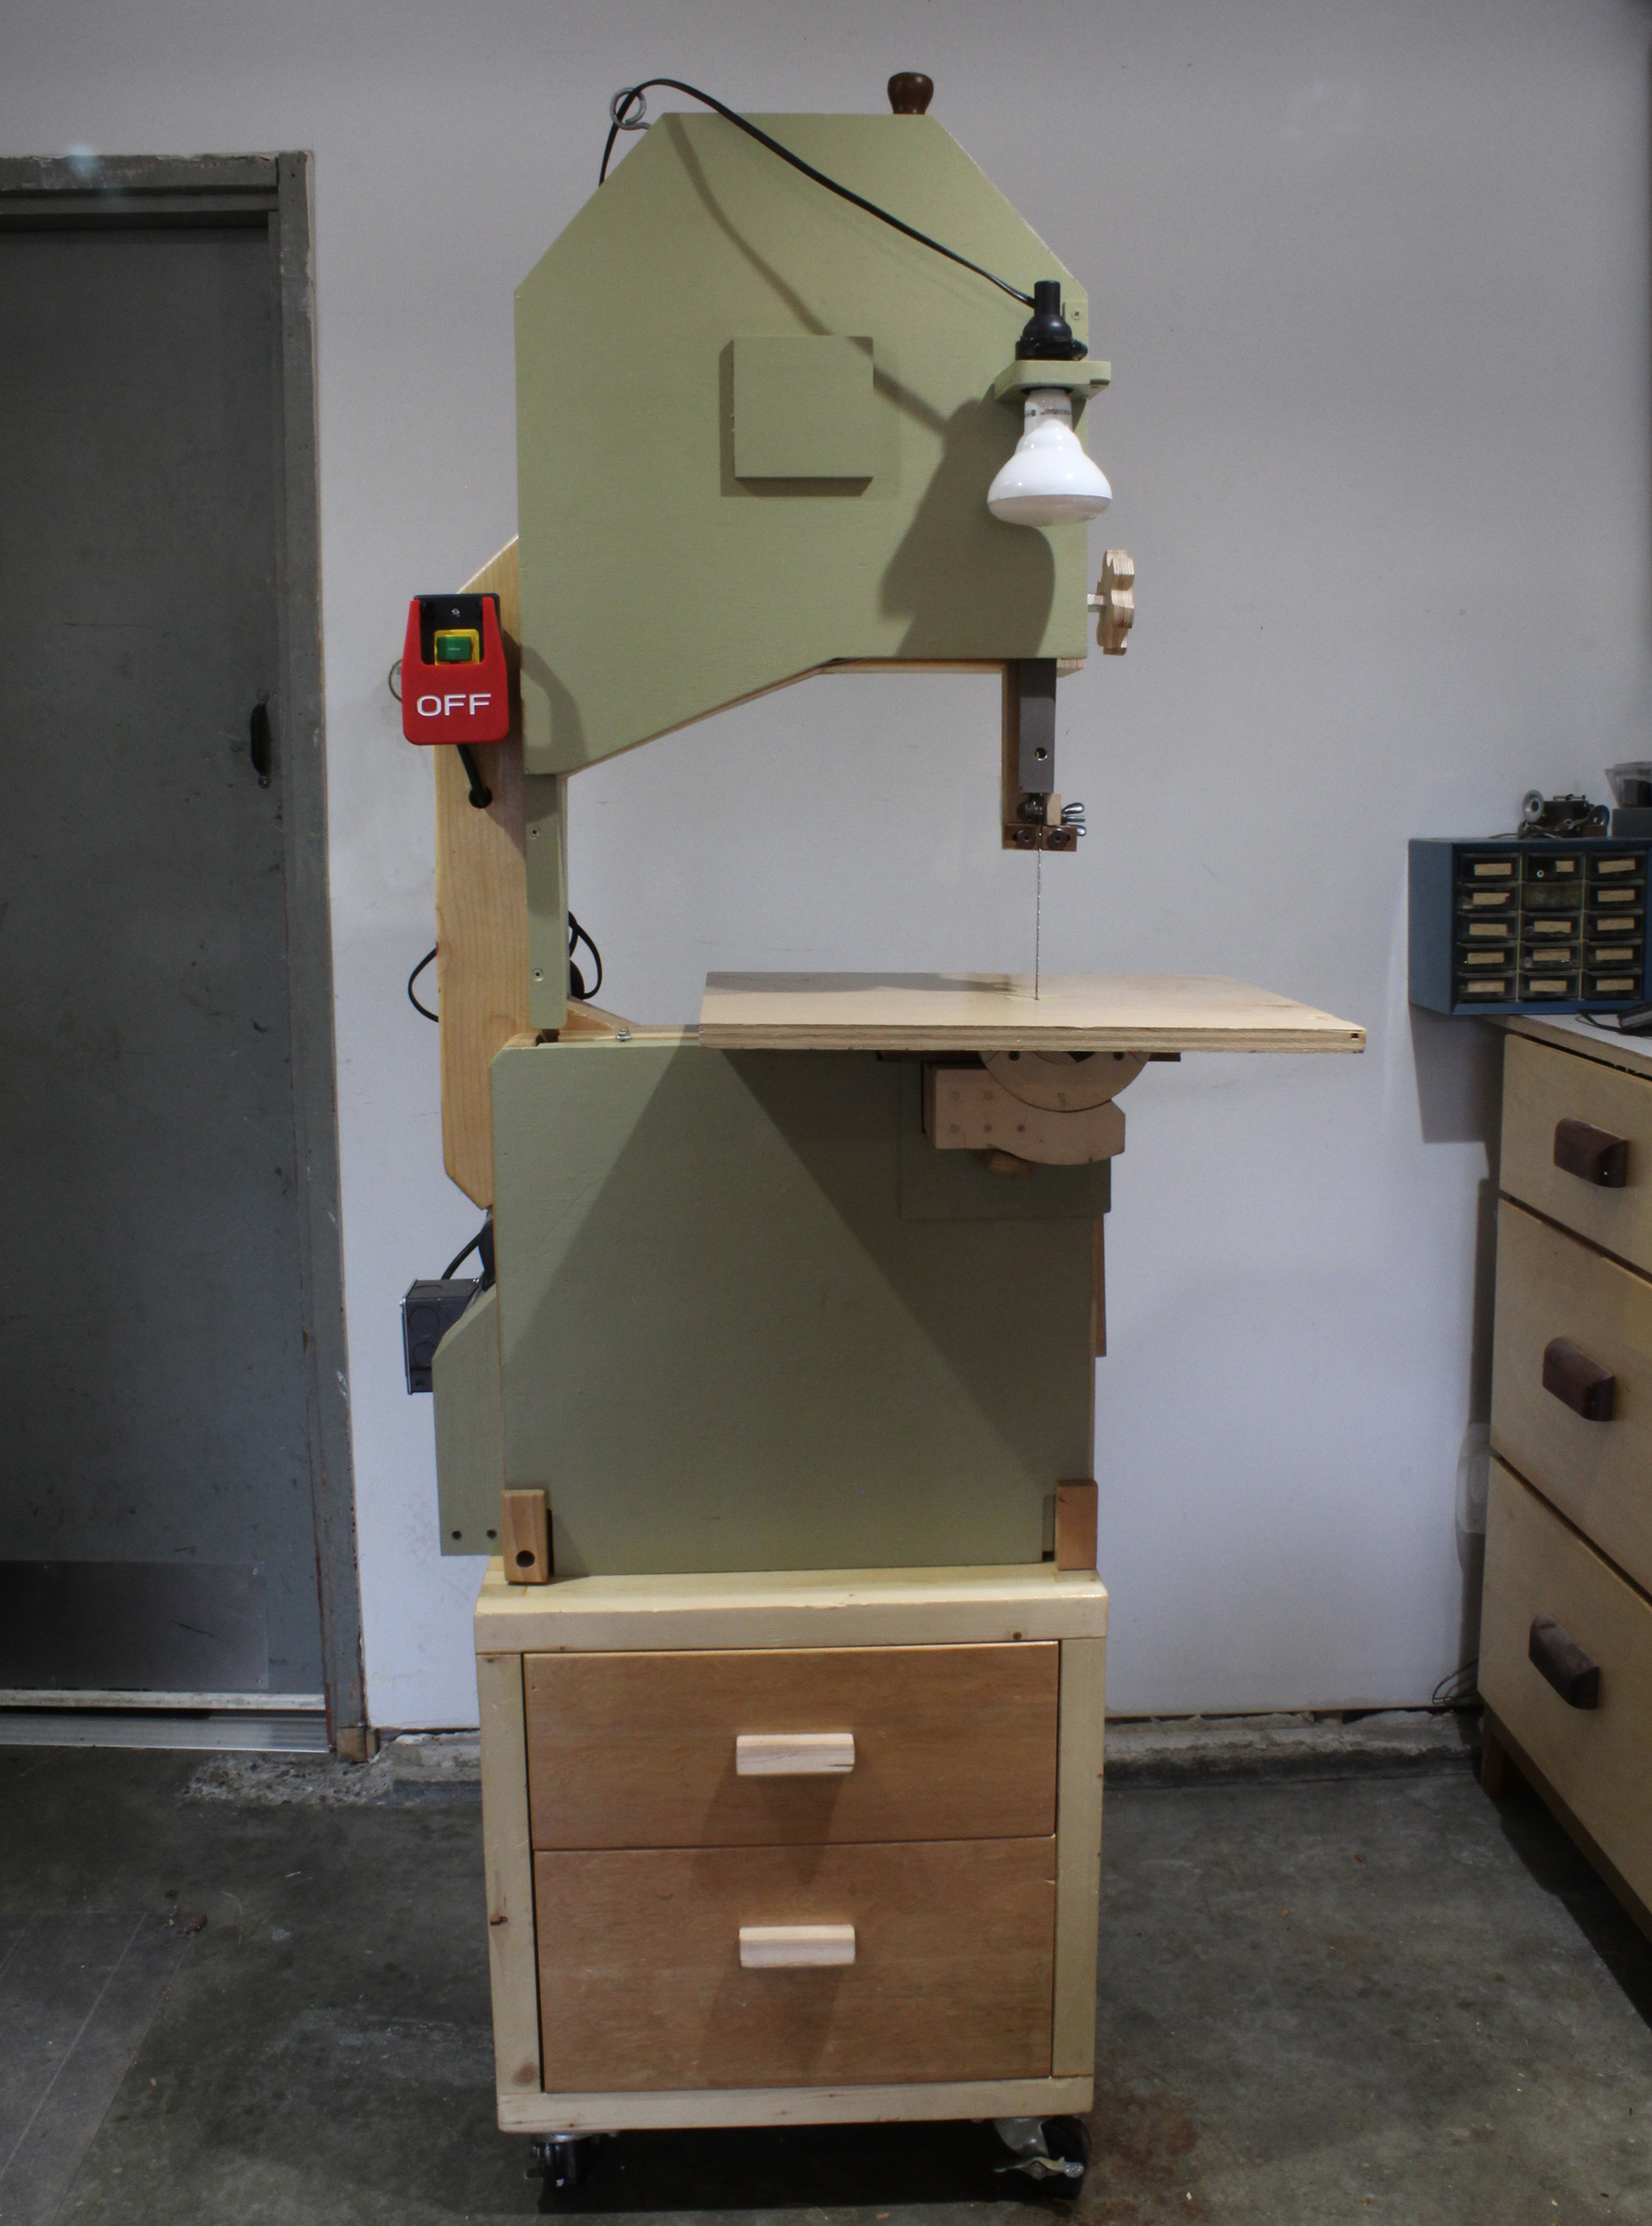
The plans include a dust-collecting cabinet that supports the bandsaw at a working height.
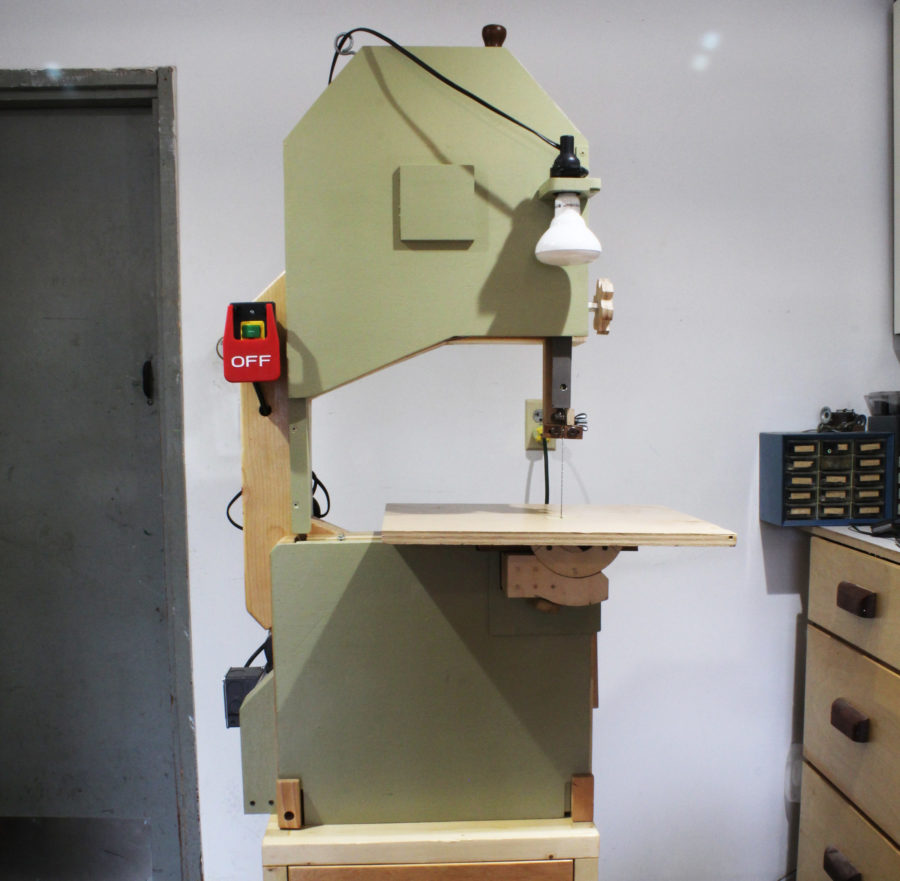
My woodworking began with house repairs with one project leading to another, and one required that I cut box joints. My research on the web led me to a gear-driven box-joint jig created by Matthias Wandel, a Canadian engineer, woodworker, and YouTuber. If you somehow haven’t stumbled onto his videos yet, you’ll want to pack for a long visit. The jig uses three wood gears, which require a bandsaw to cut them; I didn’t have a bandsaw, so I decided to build Wandel’s 16” bandsaw. It’s up and running and someday, I suppose, I’ll get to the box joints.
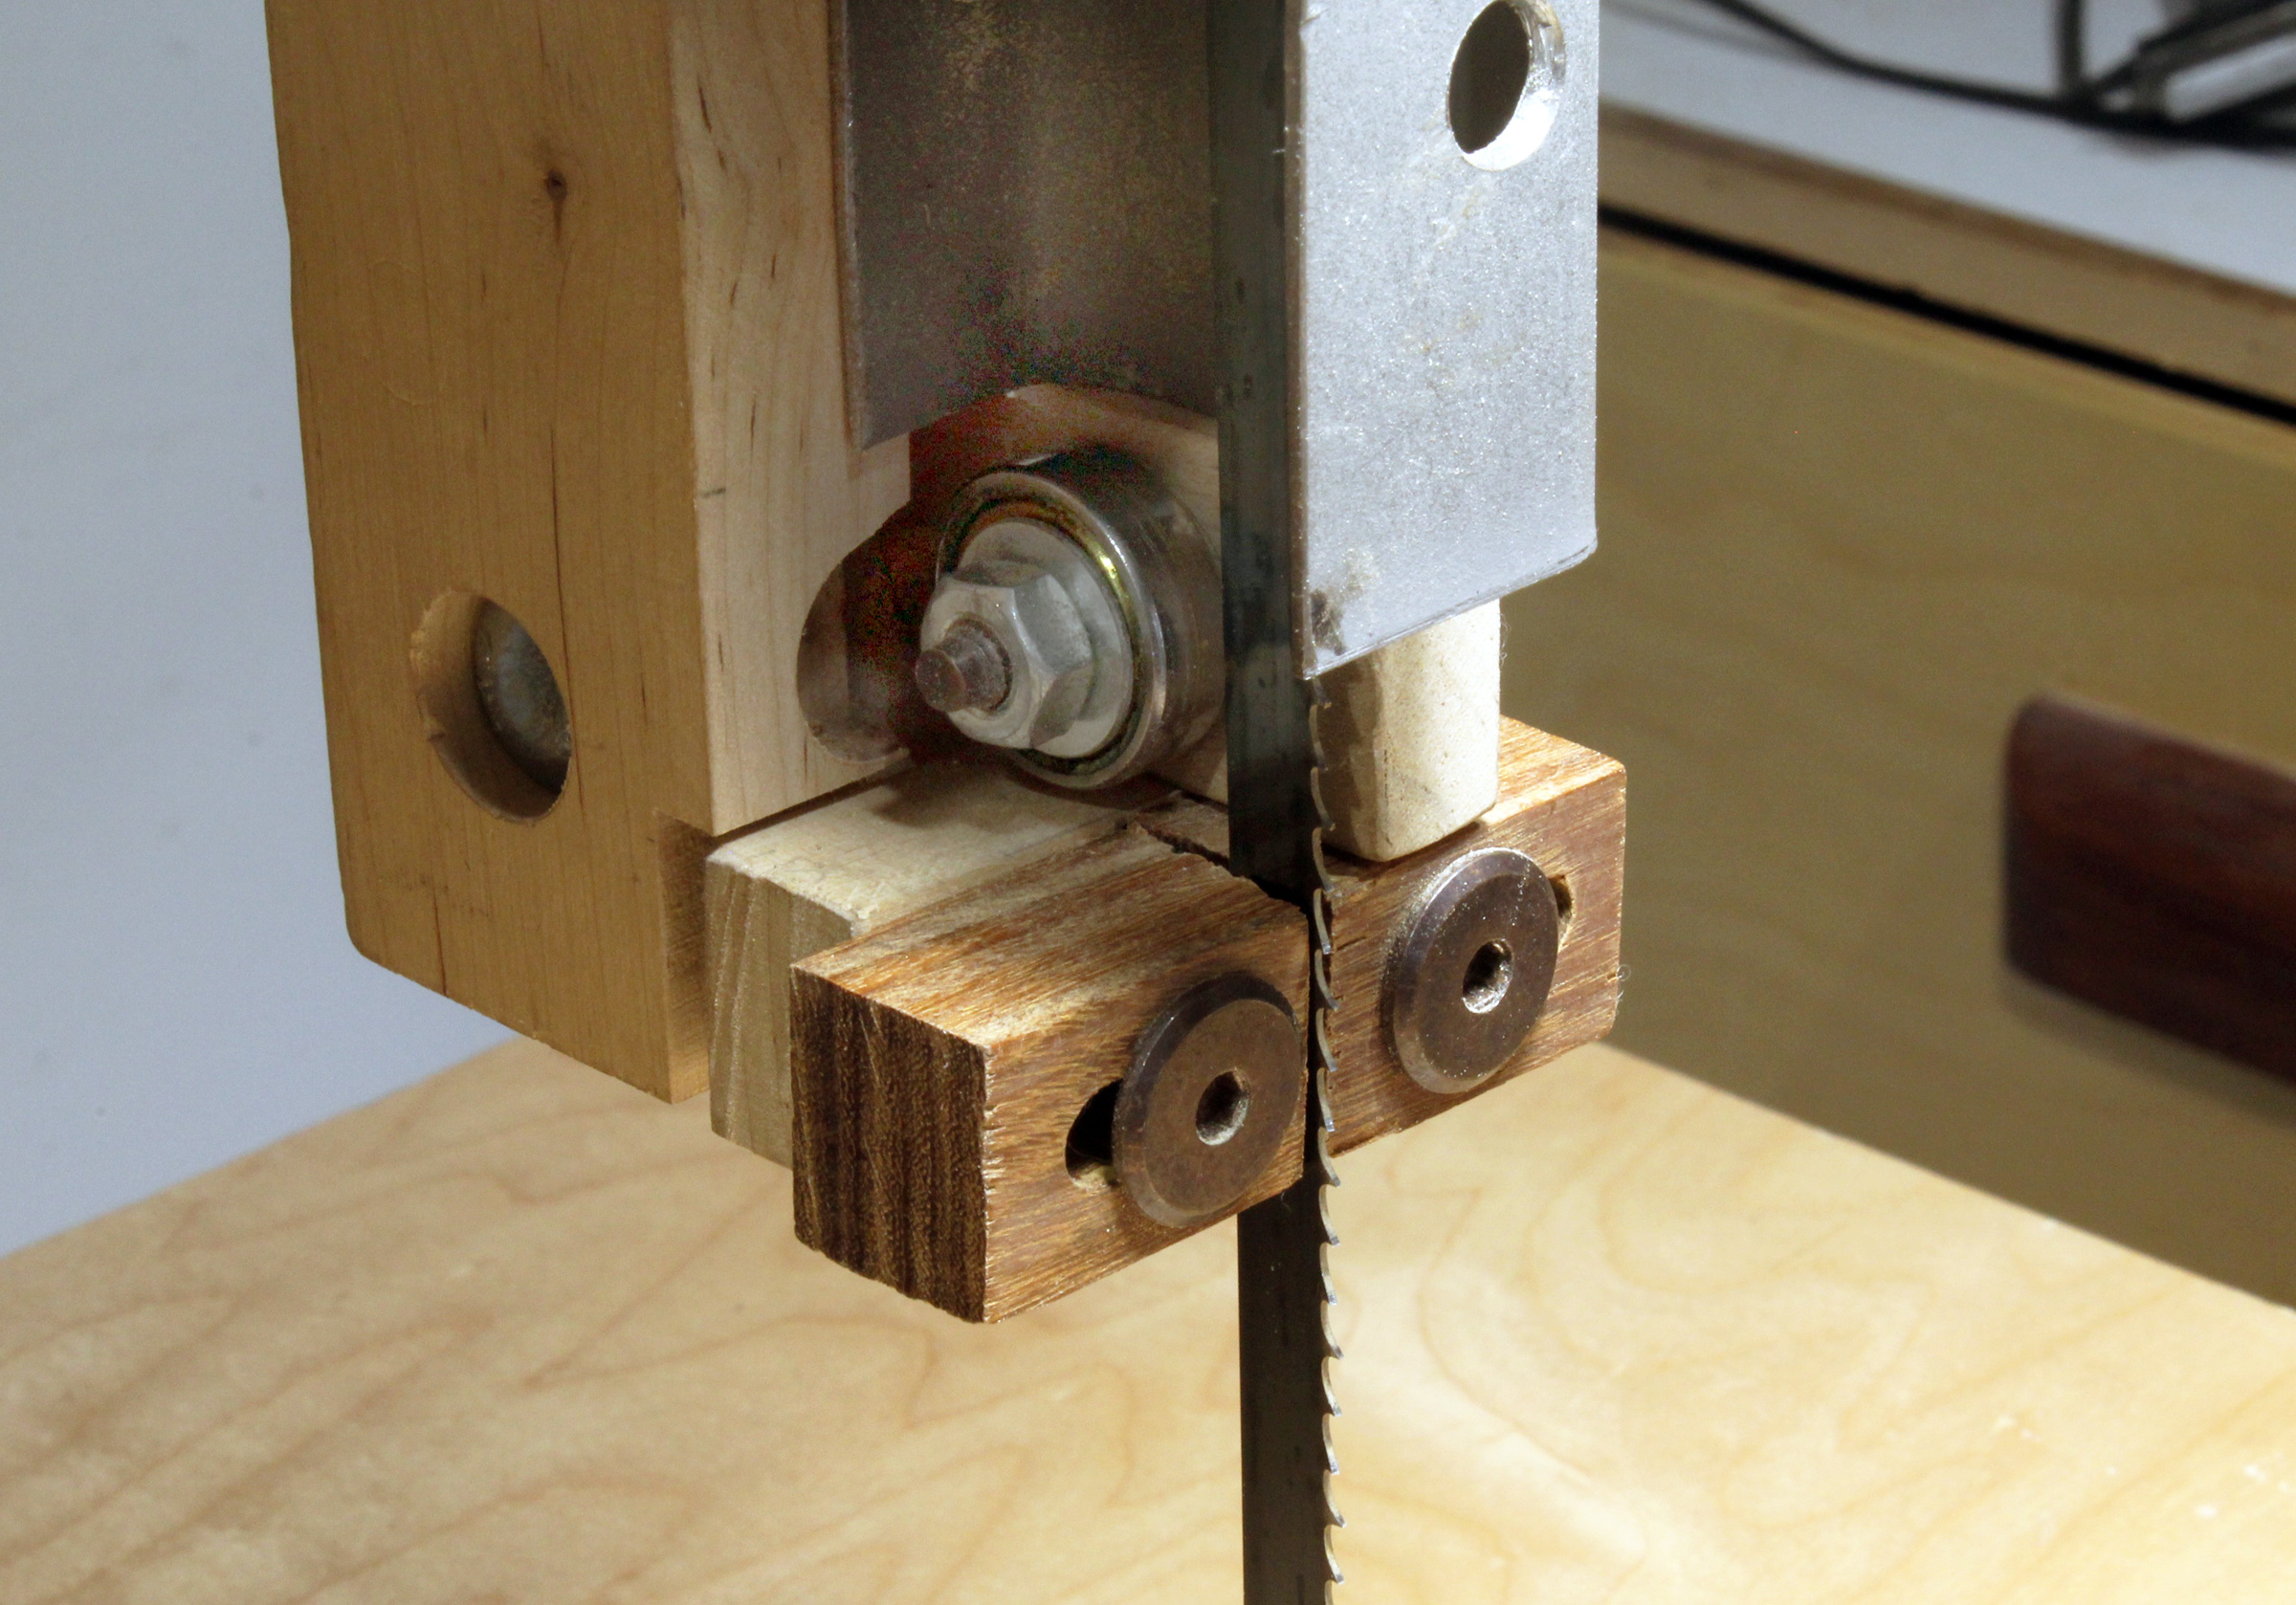
The blade guides are hardwood and have the advantage that they’ll never dull the blade teeth. The thrust bearing meets the blade with it edge, rather than its face, as typical in commercial bandsaws.
The digital plans for the bandsaw include thorough instructions with over 120 photographs, complete materials and cut lists, PDF print-ready full-sized templates of key parts, and Sketchup 3D digital models. Sketchup is a free CAD program that allows you to see the complete bandsaw and every part from any angle. I highly recommended using it. The plans also refer the reader to Wandel’s website with exhaustive articles and photos about this project, and to 19 bandsaw-related videos on his YouTube channel.
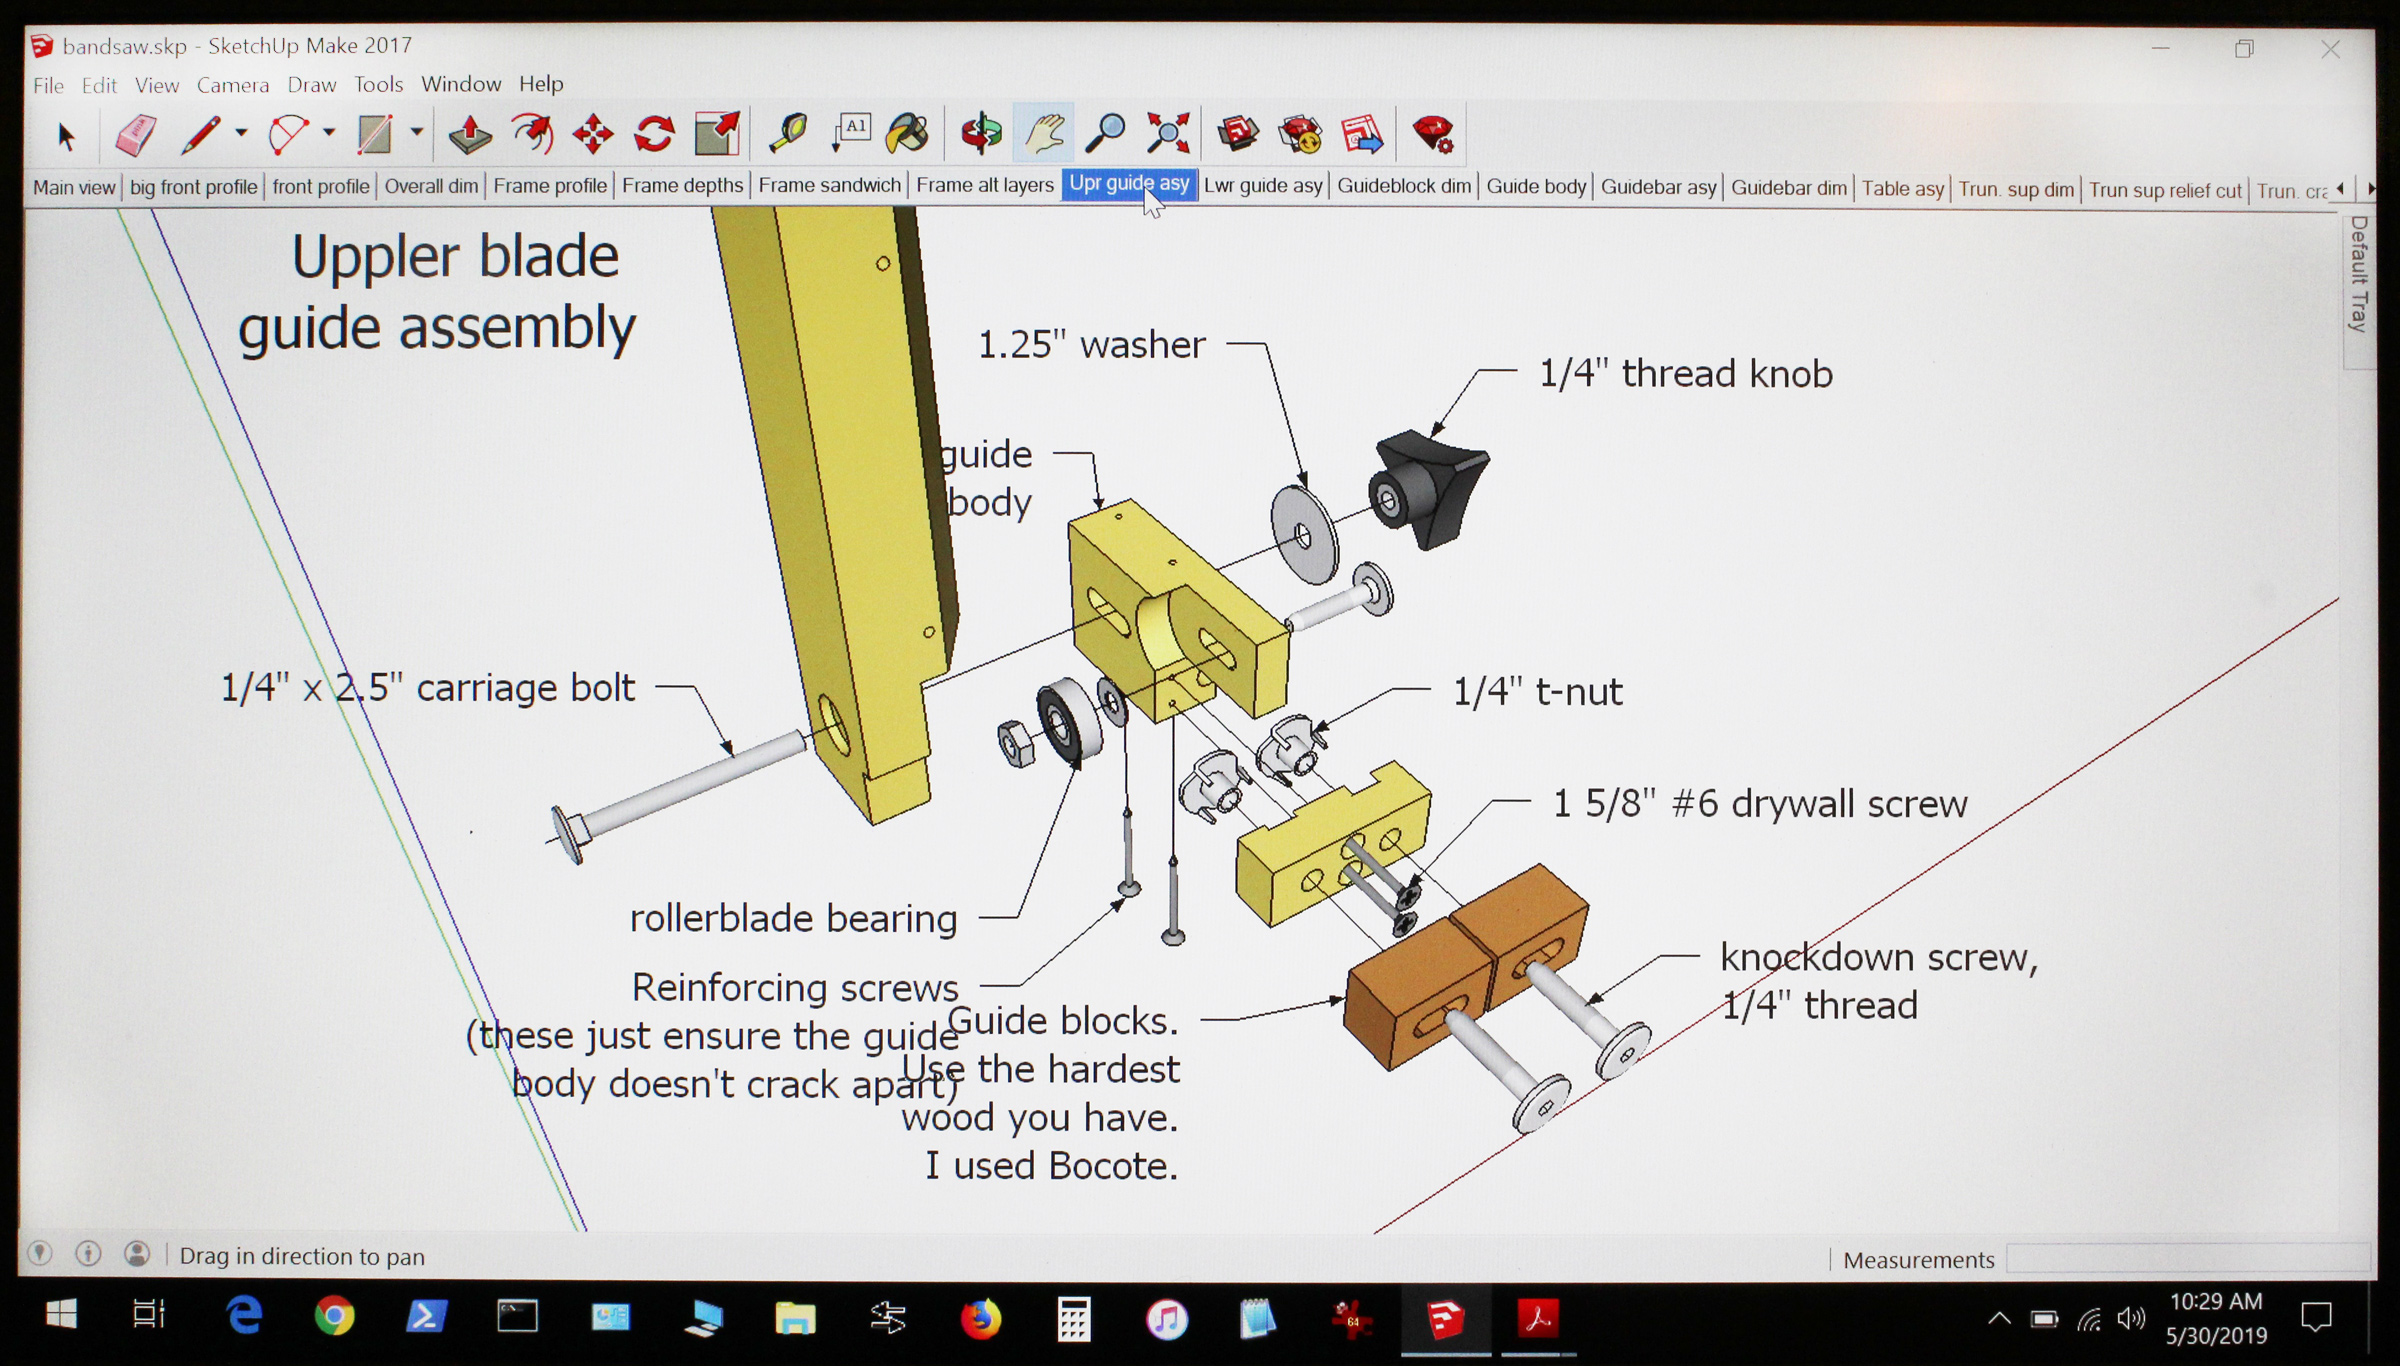
With SketchUp, all of the assemblies can be exploded and each part can be viewed from any angle.
The most elegant aspects of Wandel’s bandsaw design are the frame and wheels. The laminated softwood frame is very stiff, lightweight, easy to build, and cheap—I built mine largely with scrap lumber. Turning, truing, and balancing the plywood wheels and the pulley, with their own bearings on stationary axles, allows for reliable precision with no special tools.
The bulk of the material needed is wood, and Wandel encourages using shop scraps and reclaimed lumber, so builders will probably find the only significant costs to be bearings, shafts, blade, drive belt, bolts/screws, and a motor. The tires are made from bicycle inner tubes! The average cost for everything, including the motor, is between $200 and $500. Wandel, in a video about the cost of his tools, noted that salvaging a motor—his 1/2-hp motor was from a furnace—is what makes the homebuilt bandsaw a good bargain. The 16″ saw uses 105″ blades—the same as used by commercial 14” bandsaws with risers—available at most woodworking outlets.
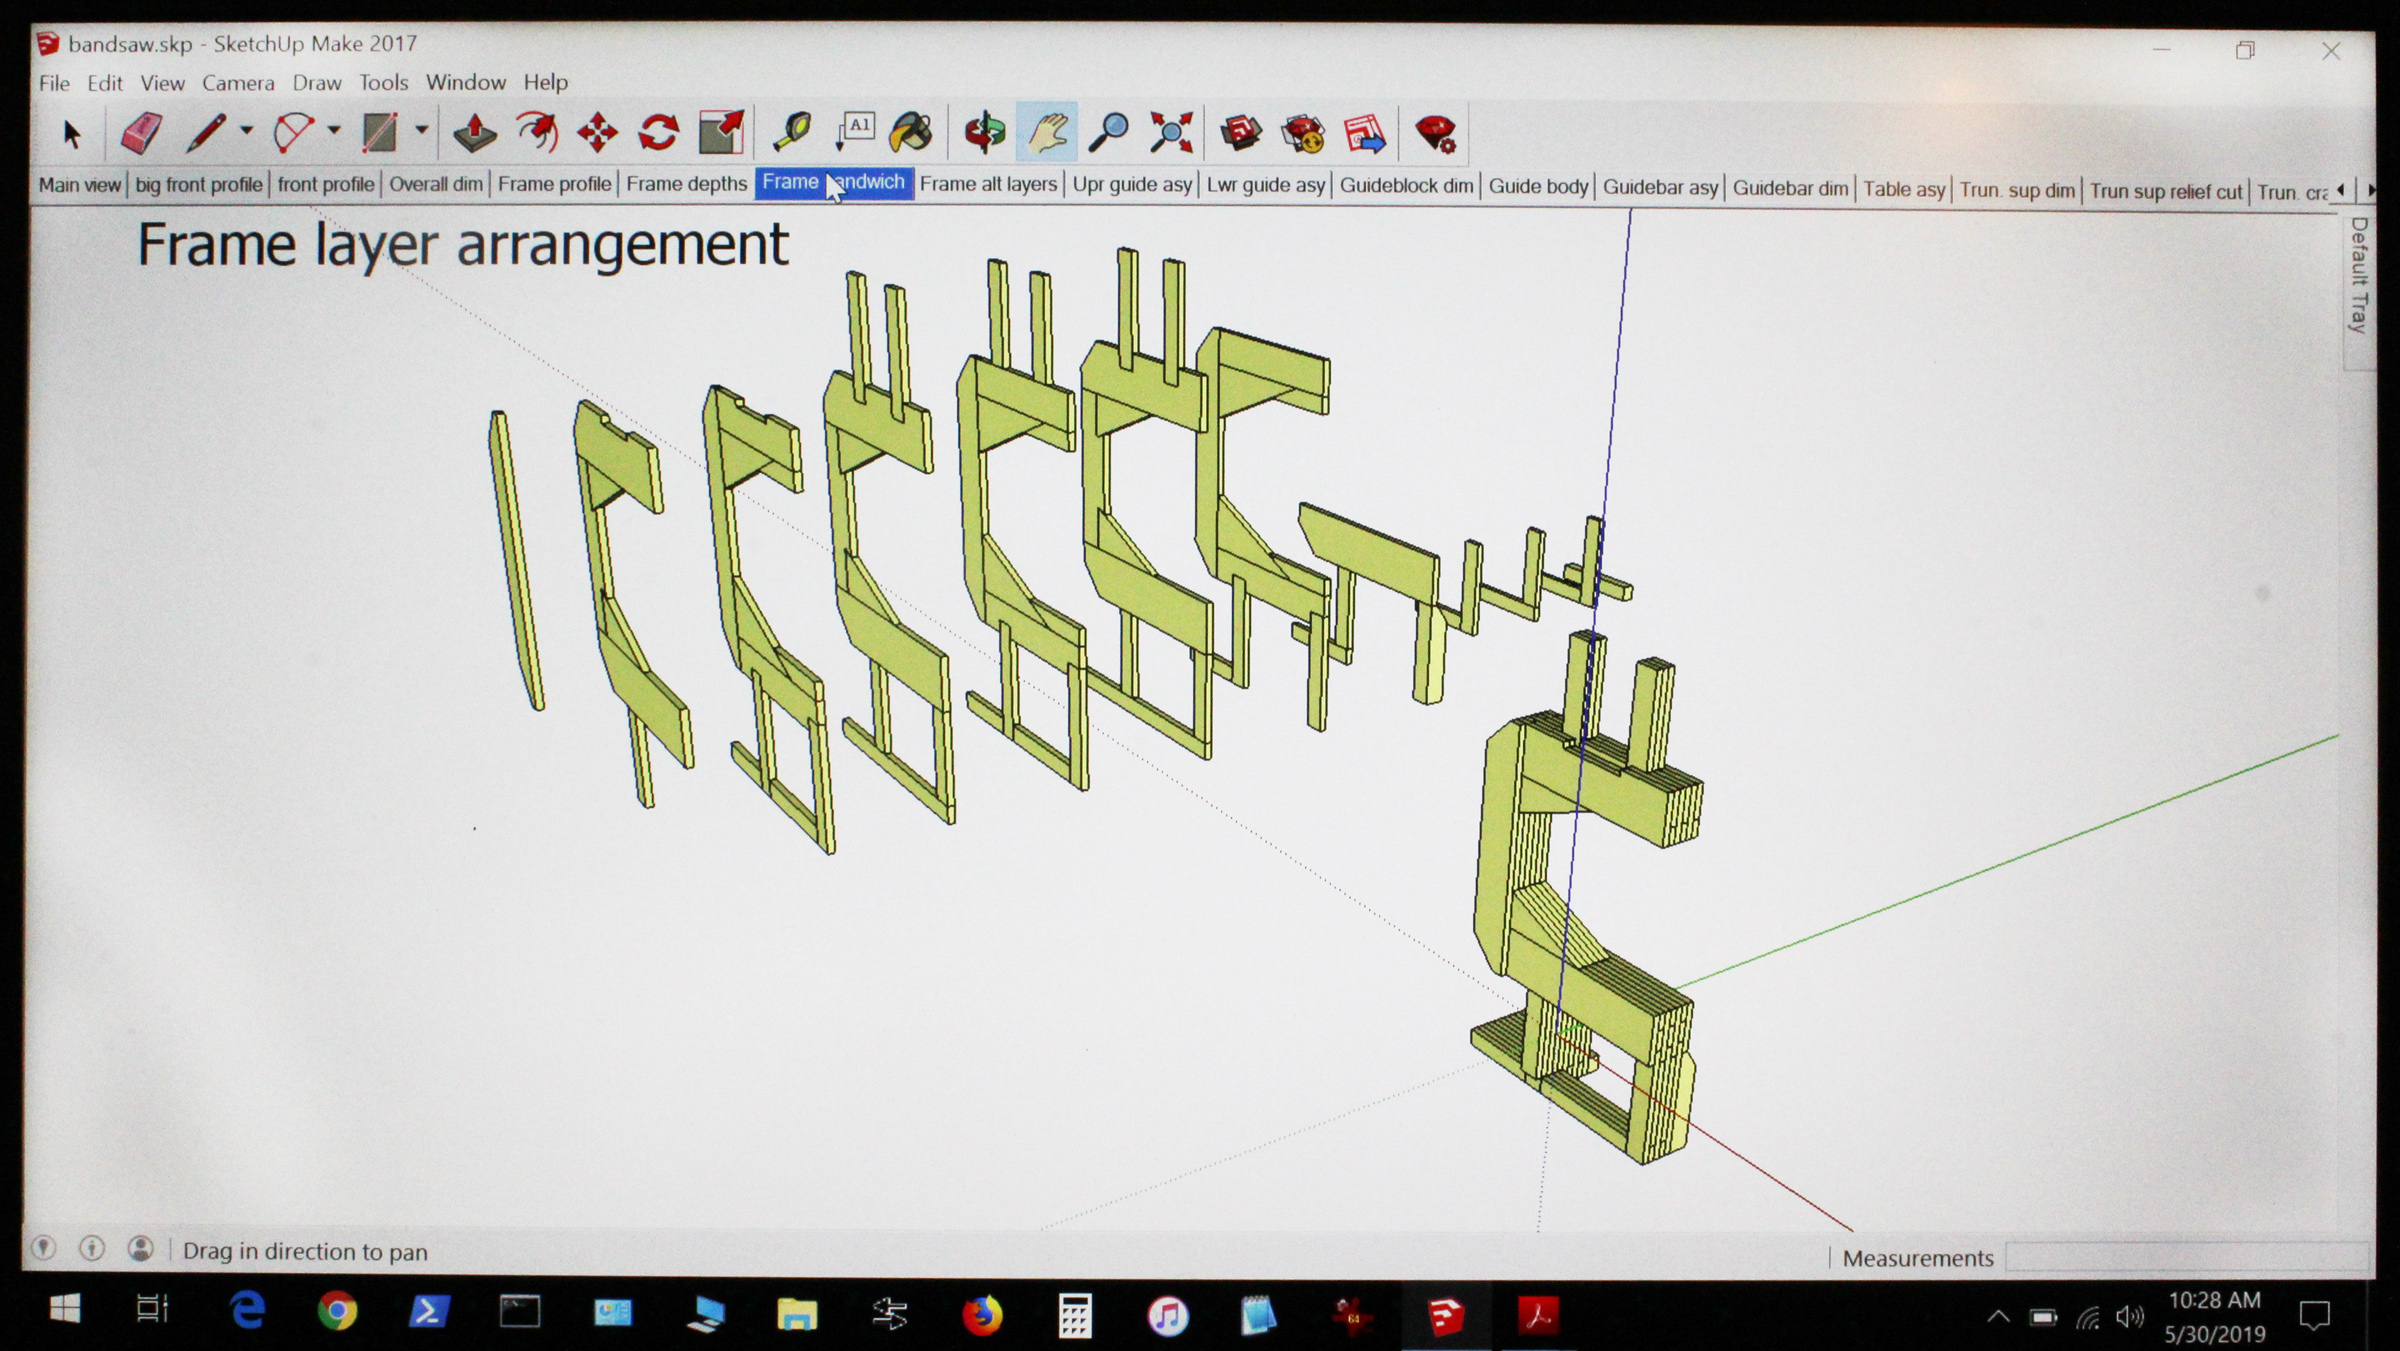
A SketchUp view of the frame shows the laminates that go into it.
The frame is made of eight laminations of interlocking 3/4″ softwood boards. After the first layer is carefully made flat and square, with all parts edge glued on a dead-flat surface, all the subsequent layers easily fall into line on top. The multiple glue-ups will require some creative clamping, weights, and occasional screws, which must be removed to avoid accidentally drilling or cutting into them later.
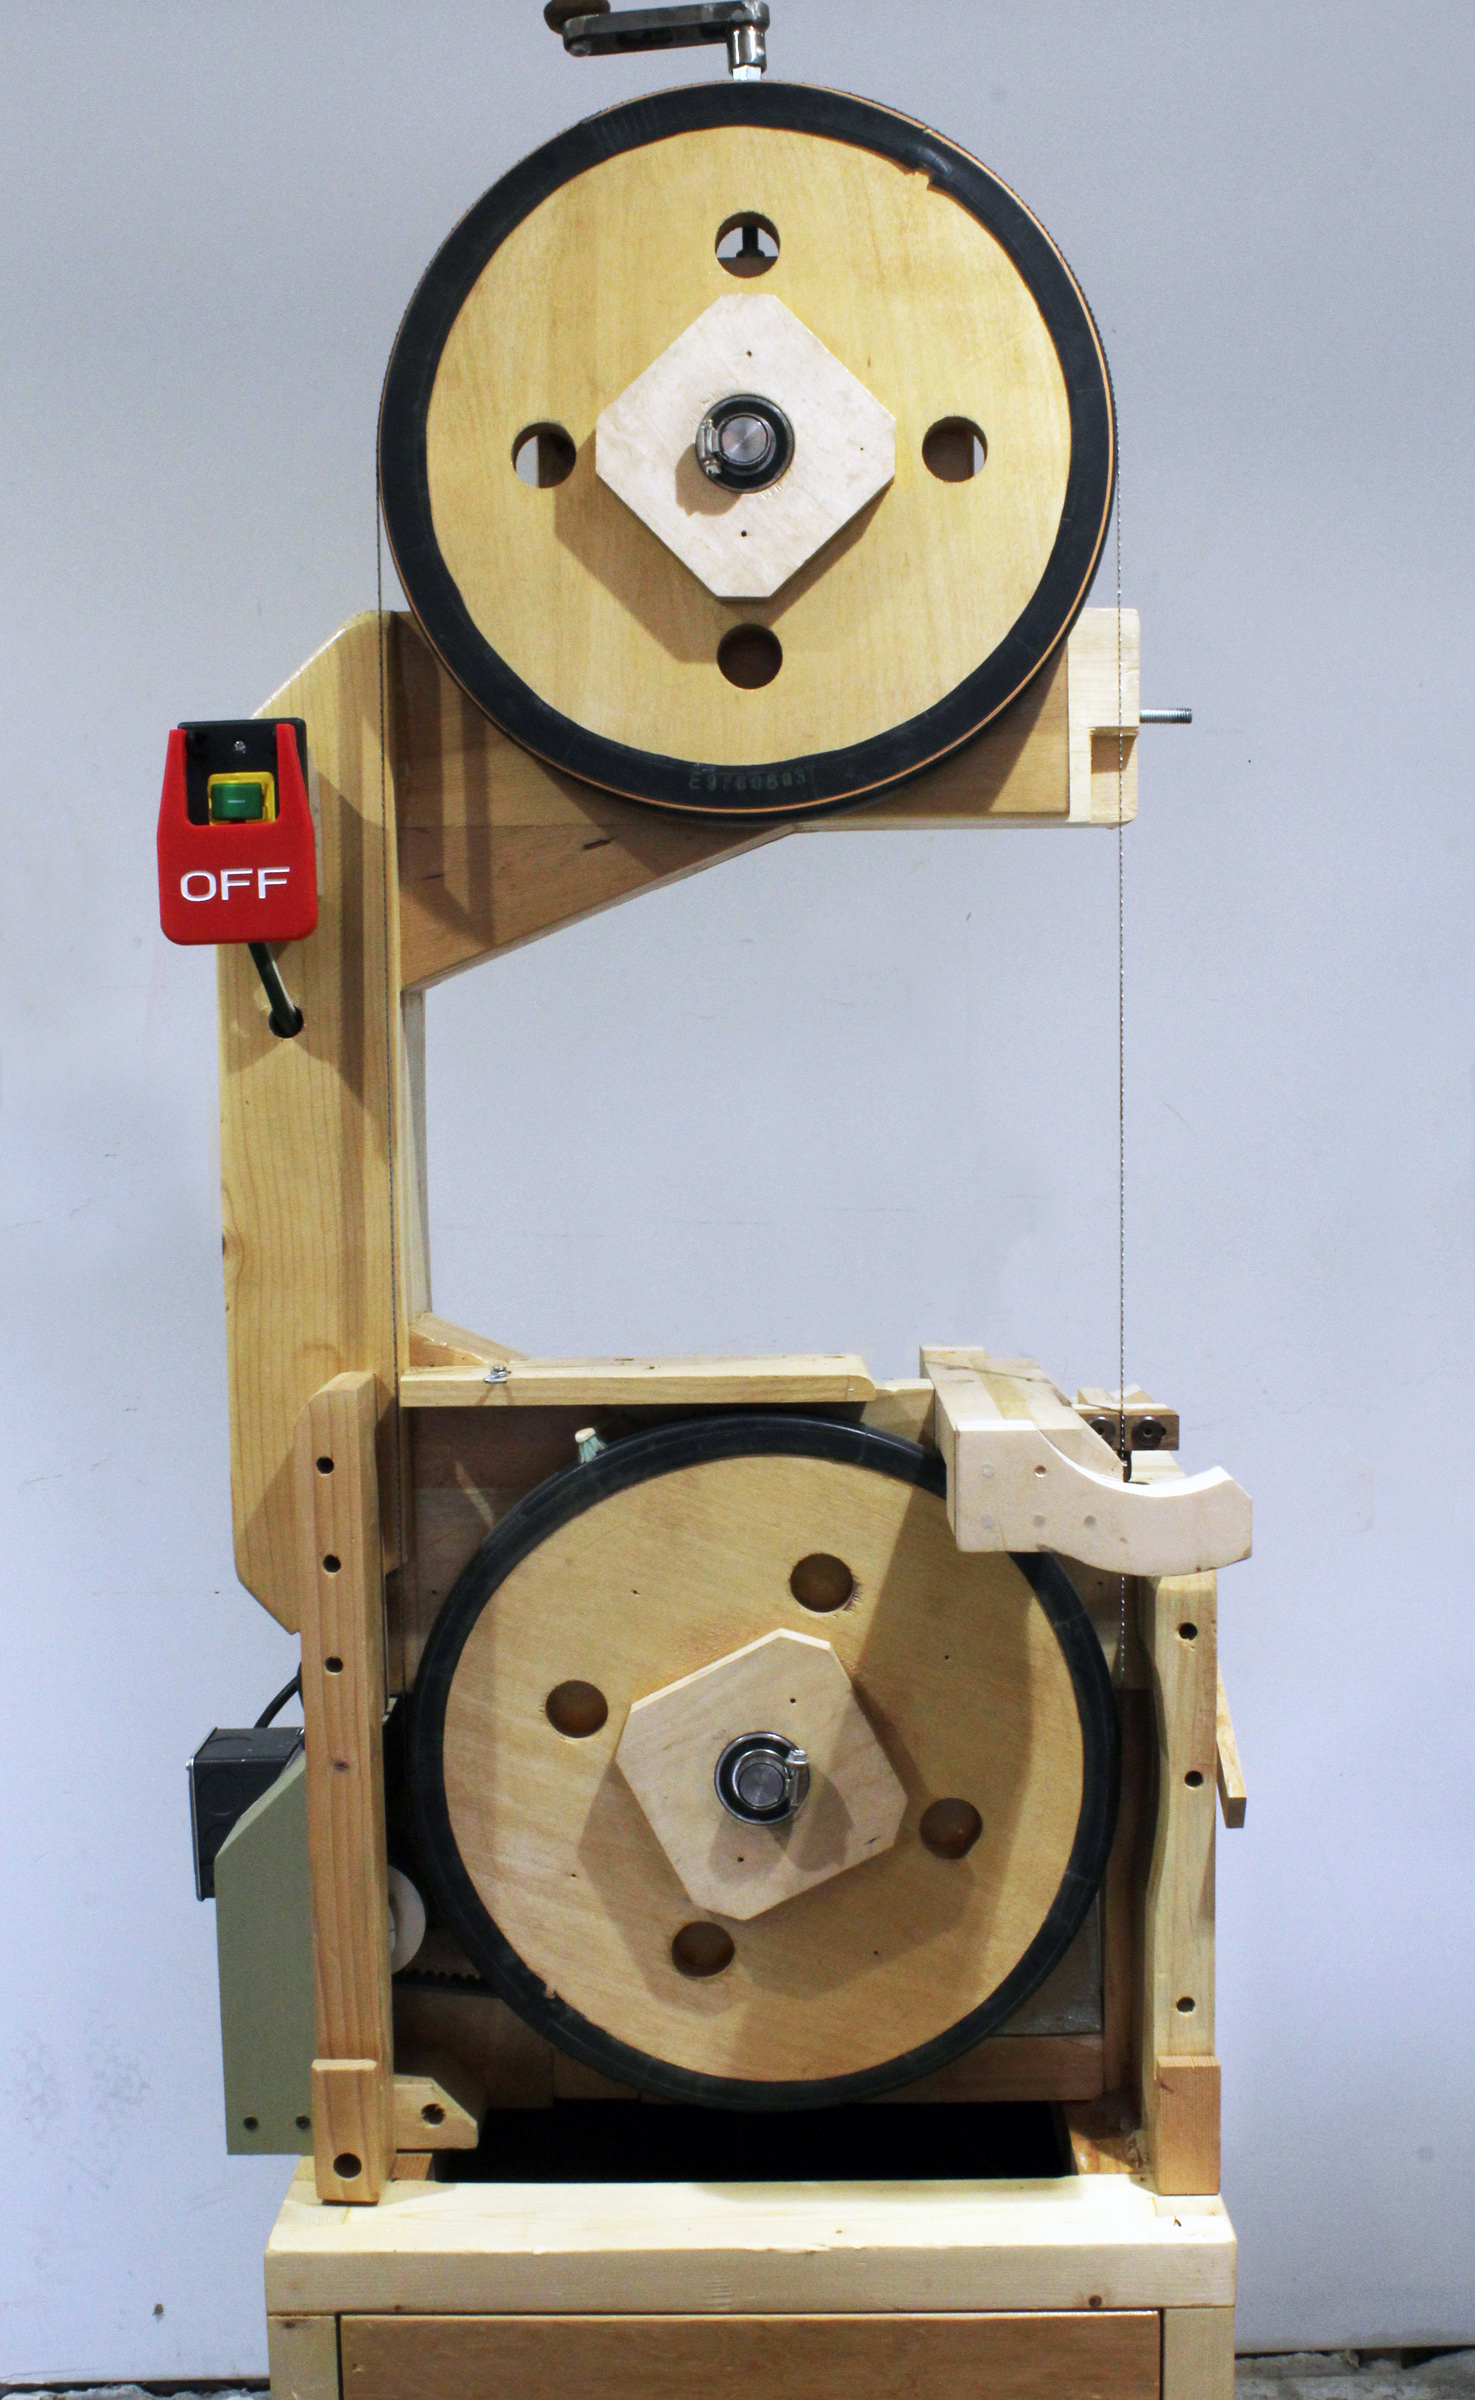
The wheels are made of plywood and have inner-tube tires. The four holes in each wheel are finger holds for turning the wheels when installing a blade.
The wheels are made of two layers of 3/4″ fir plywood. Flanges made of ¾” Baltic-birch plywood glued on either side of the wheels capture the bearings. The higher quality plywood is required to provide a tight and long-lasting connection to the bearings. The holes for the bearings are drilled slightly undersized, and big C-clamps and sacrificial blocks, along with a bench vise, press the bearings into the very tight holes. The instructions suggest using a mallet to drive the bearings in place; on one of Wandel’s videos he uses a vise as a press. With each wheel slipped in turn over a stationary axle, a temporary pulley from junk plywood is used to spin it for shaping and truing. The lower wheel includes a drive pulley made of 3/4” birch plywood. It is trued and gets its V-belt groove cut while the temporary pulley turns the wheel.
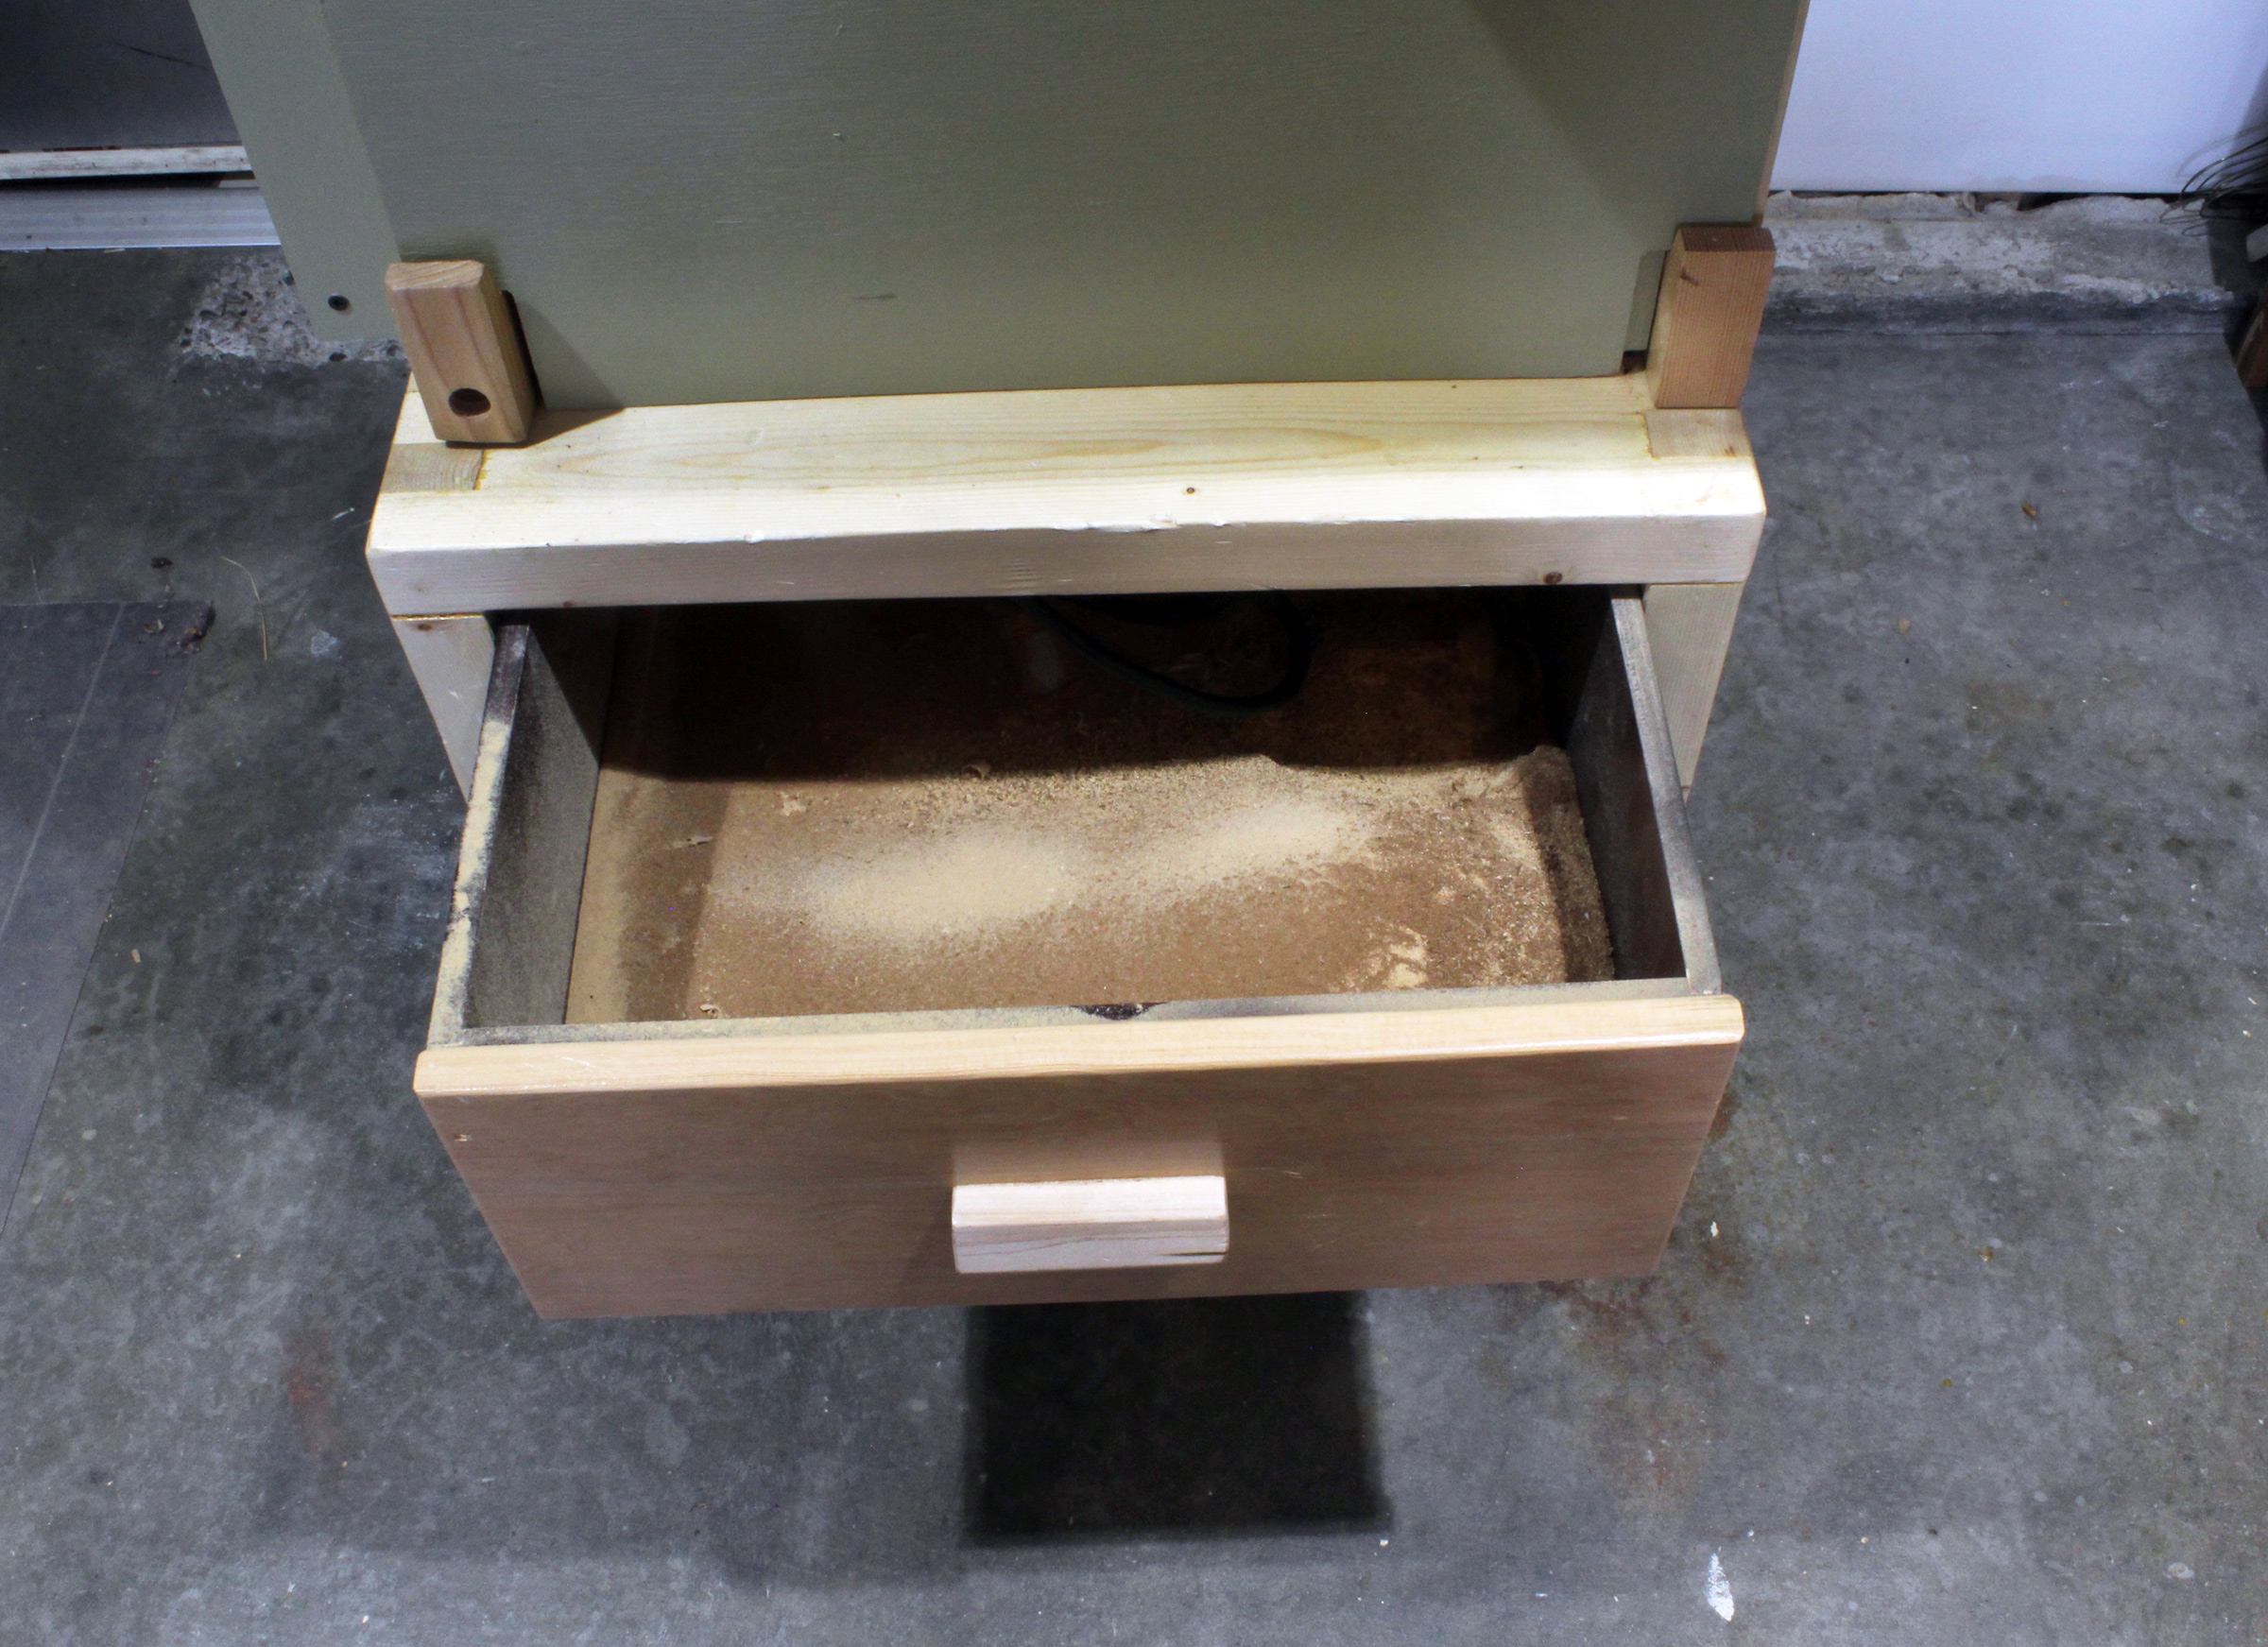
The top drawer built into the base catches sawdust.
After the motor is installed and the wheels on the frame are running true with a blade in place, now comes perhaps the most satisfying part of the whole project: turning the saw on and using it to cut the curved parts for the saw’s own tilting table’s trunnions. A delightful experience.
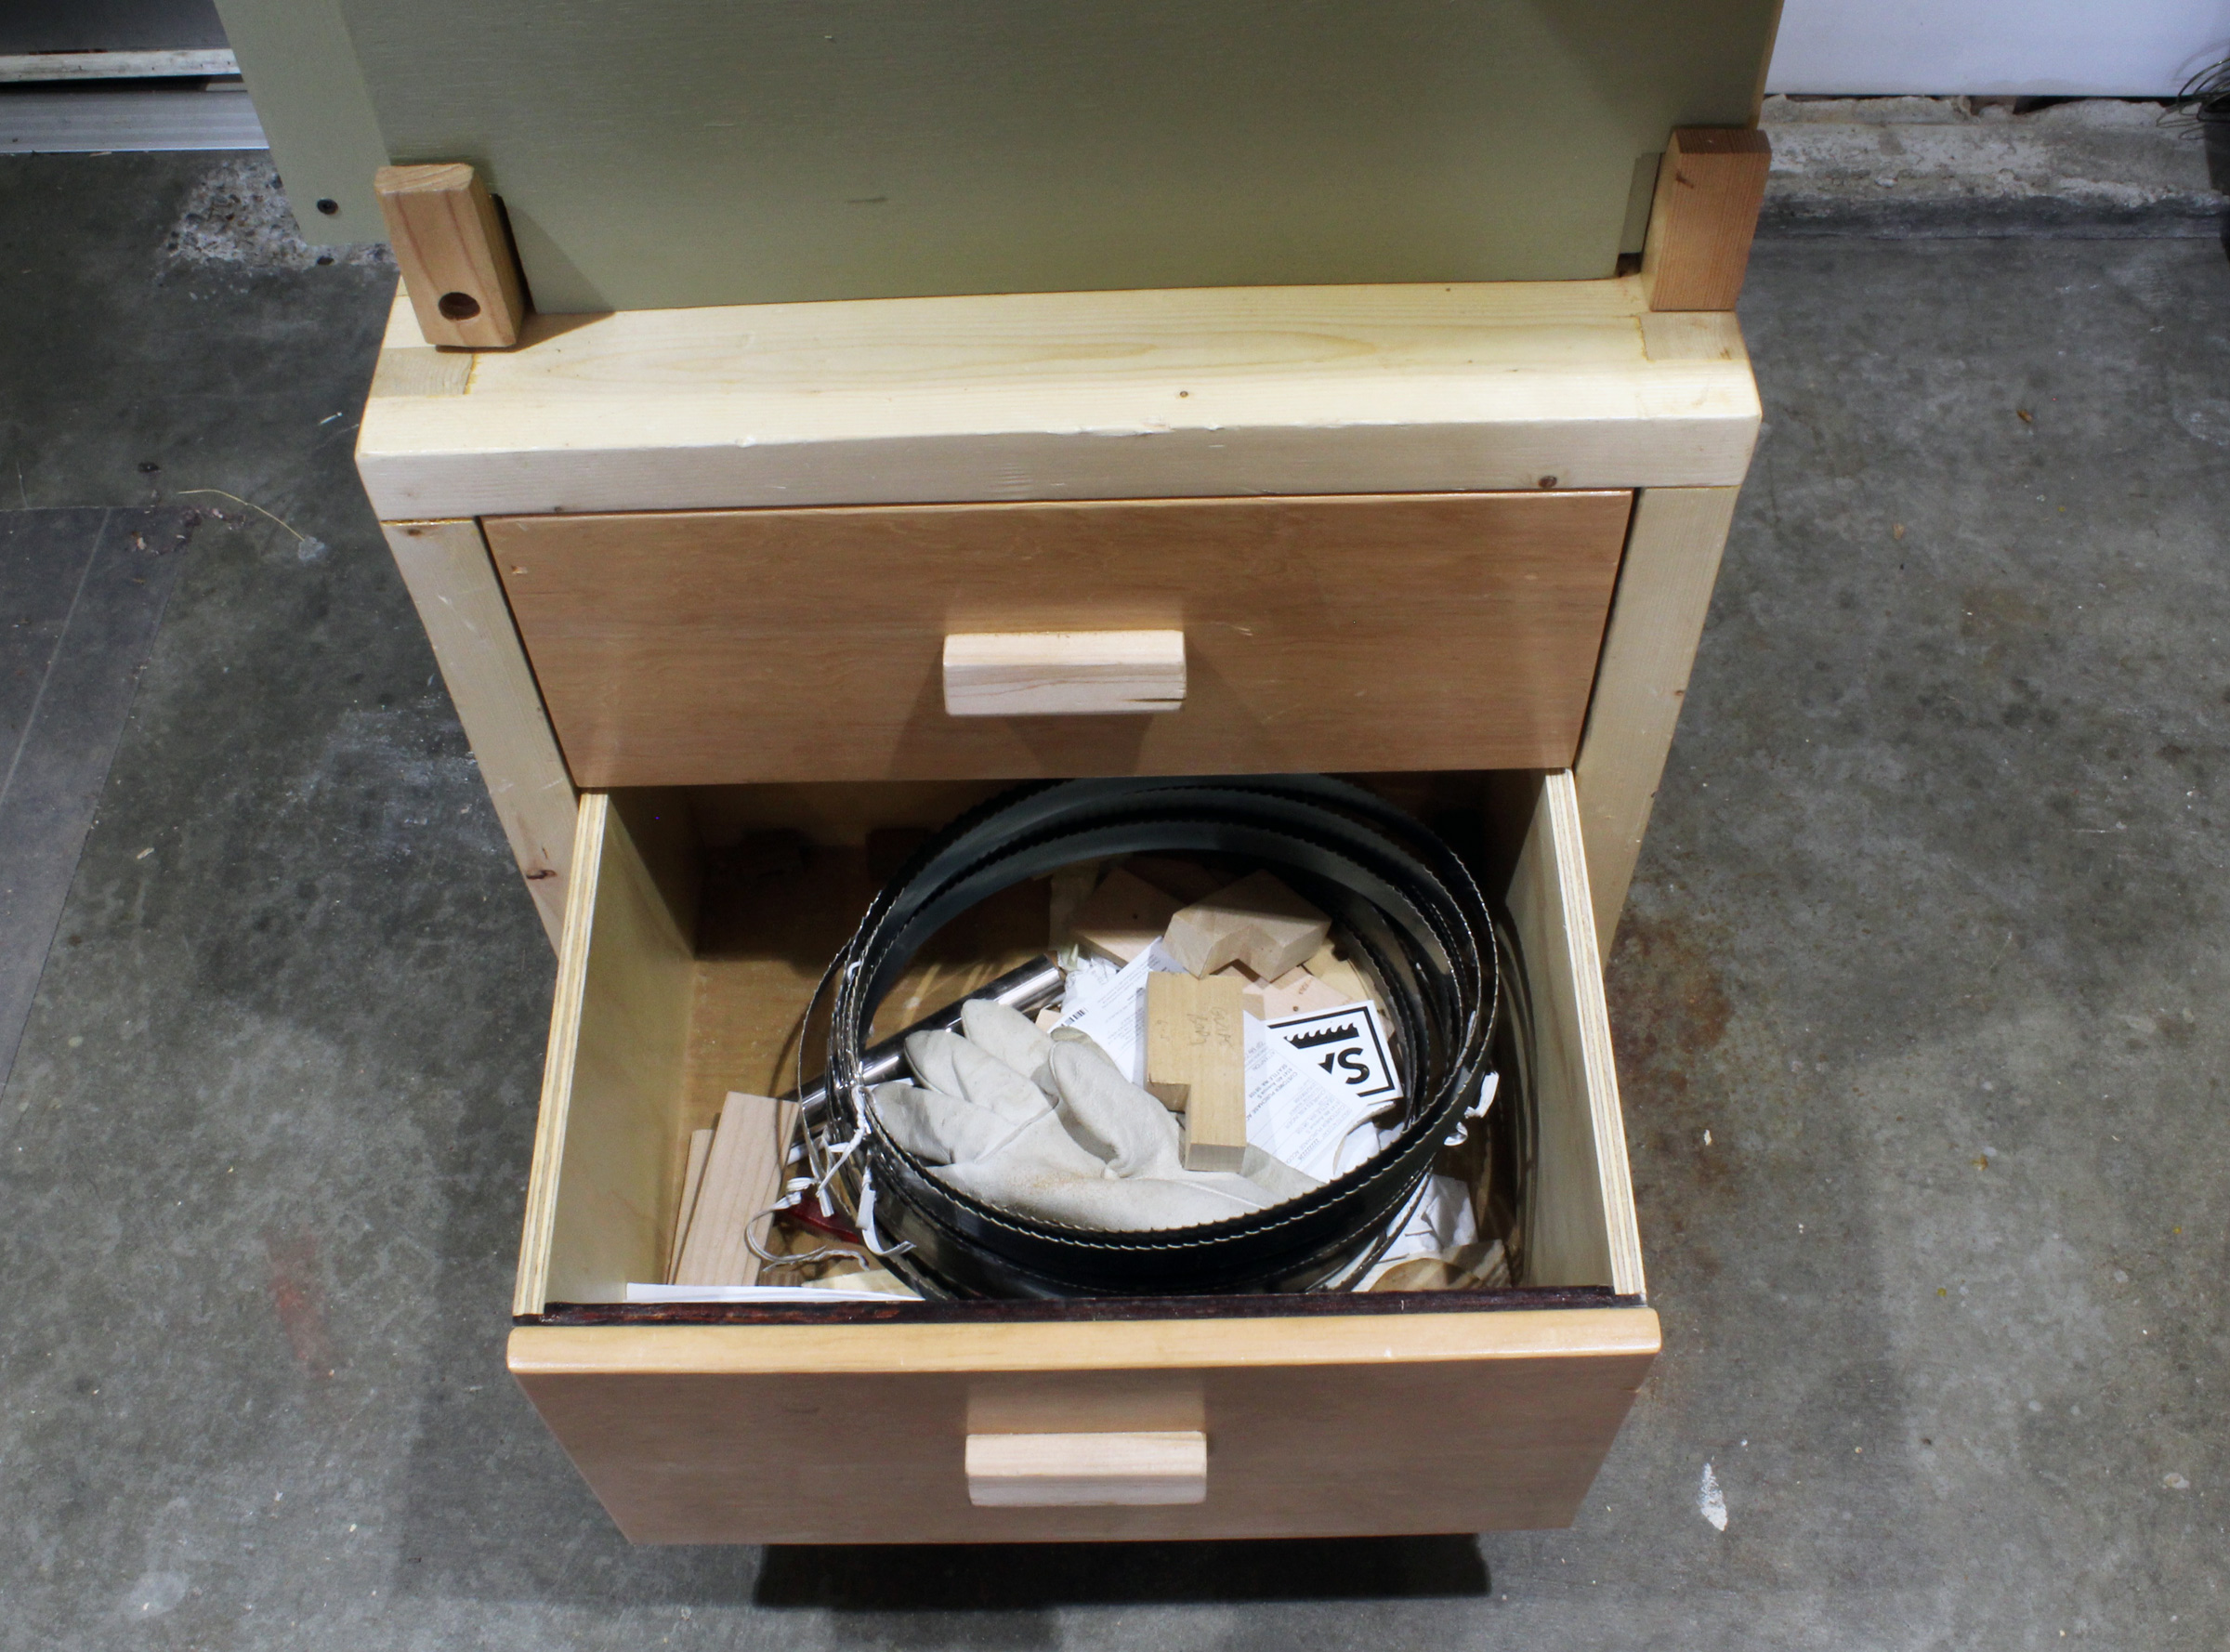
The bottom drawer holds blades and accessories.
I initially installed a salvaged ¼ hp motor, less power than the 1/3-hp to 2-hp range Wandel recommends, and it stalled sometimes, so I shopped around online and found a 1-1/2-hp motor on sale. It was a tight squeeze getting the slightly larger motor on the mount. You might consider making the motor tray area a little long to more easily accommodate whatever motor you install.
With the more powerful motor, my finished bandsaw made quick work of 4″ thick, well dried cherry wood, and I’ve made a sled so I can mill up small logs of salvaged wood. The saw has the capacity for cutting wood up to 10-1/2” thick, though I haven’t yet fully tested its limits. The saw runs with only minimal vibration—I’ve been able to balance a coin on edge on the table while the saw is running.
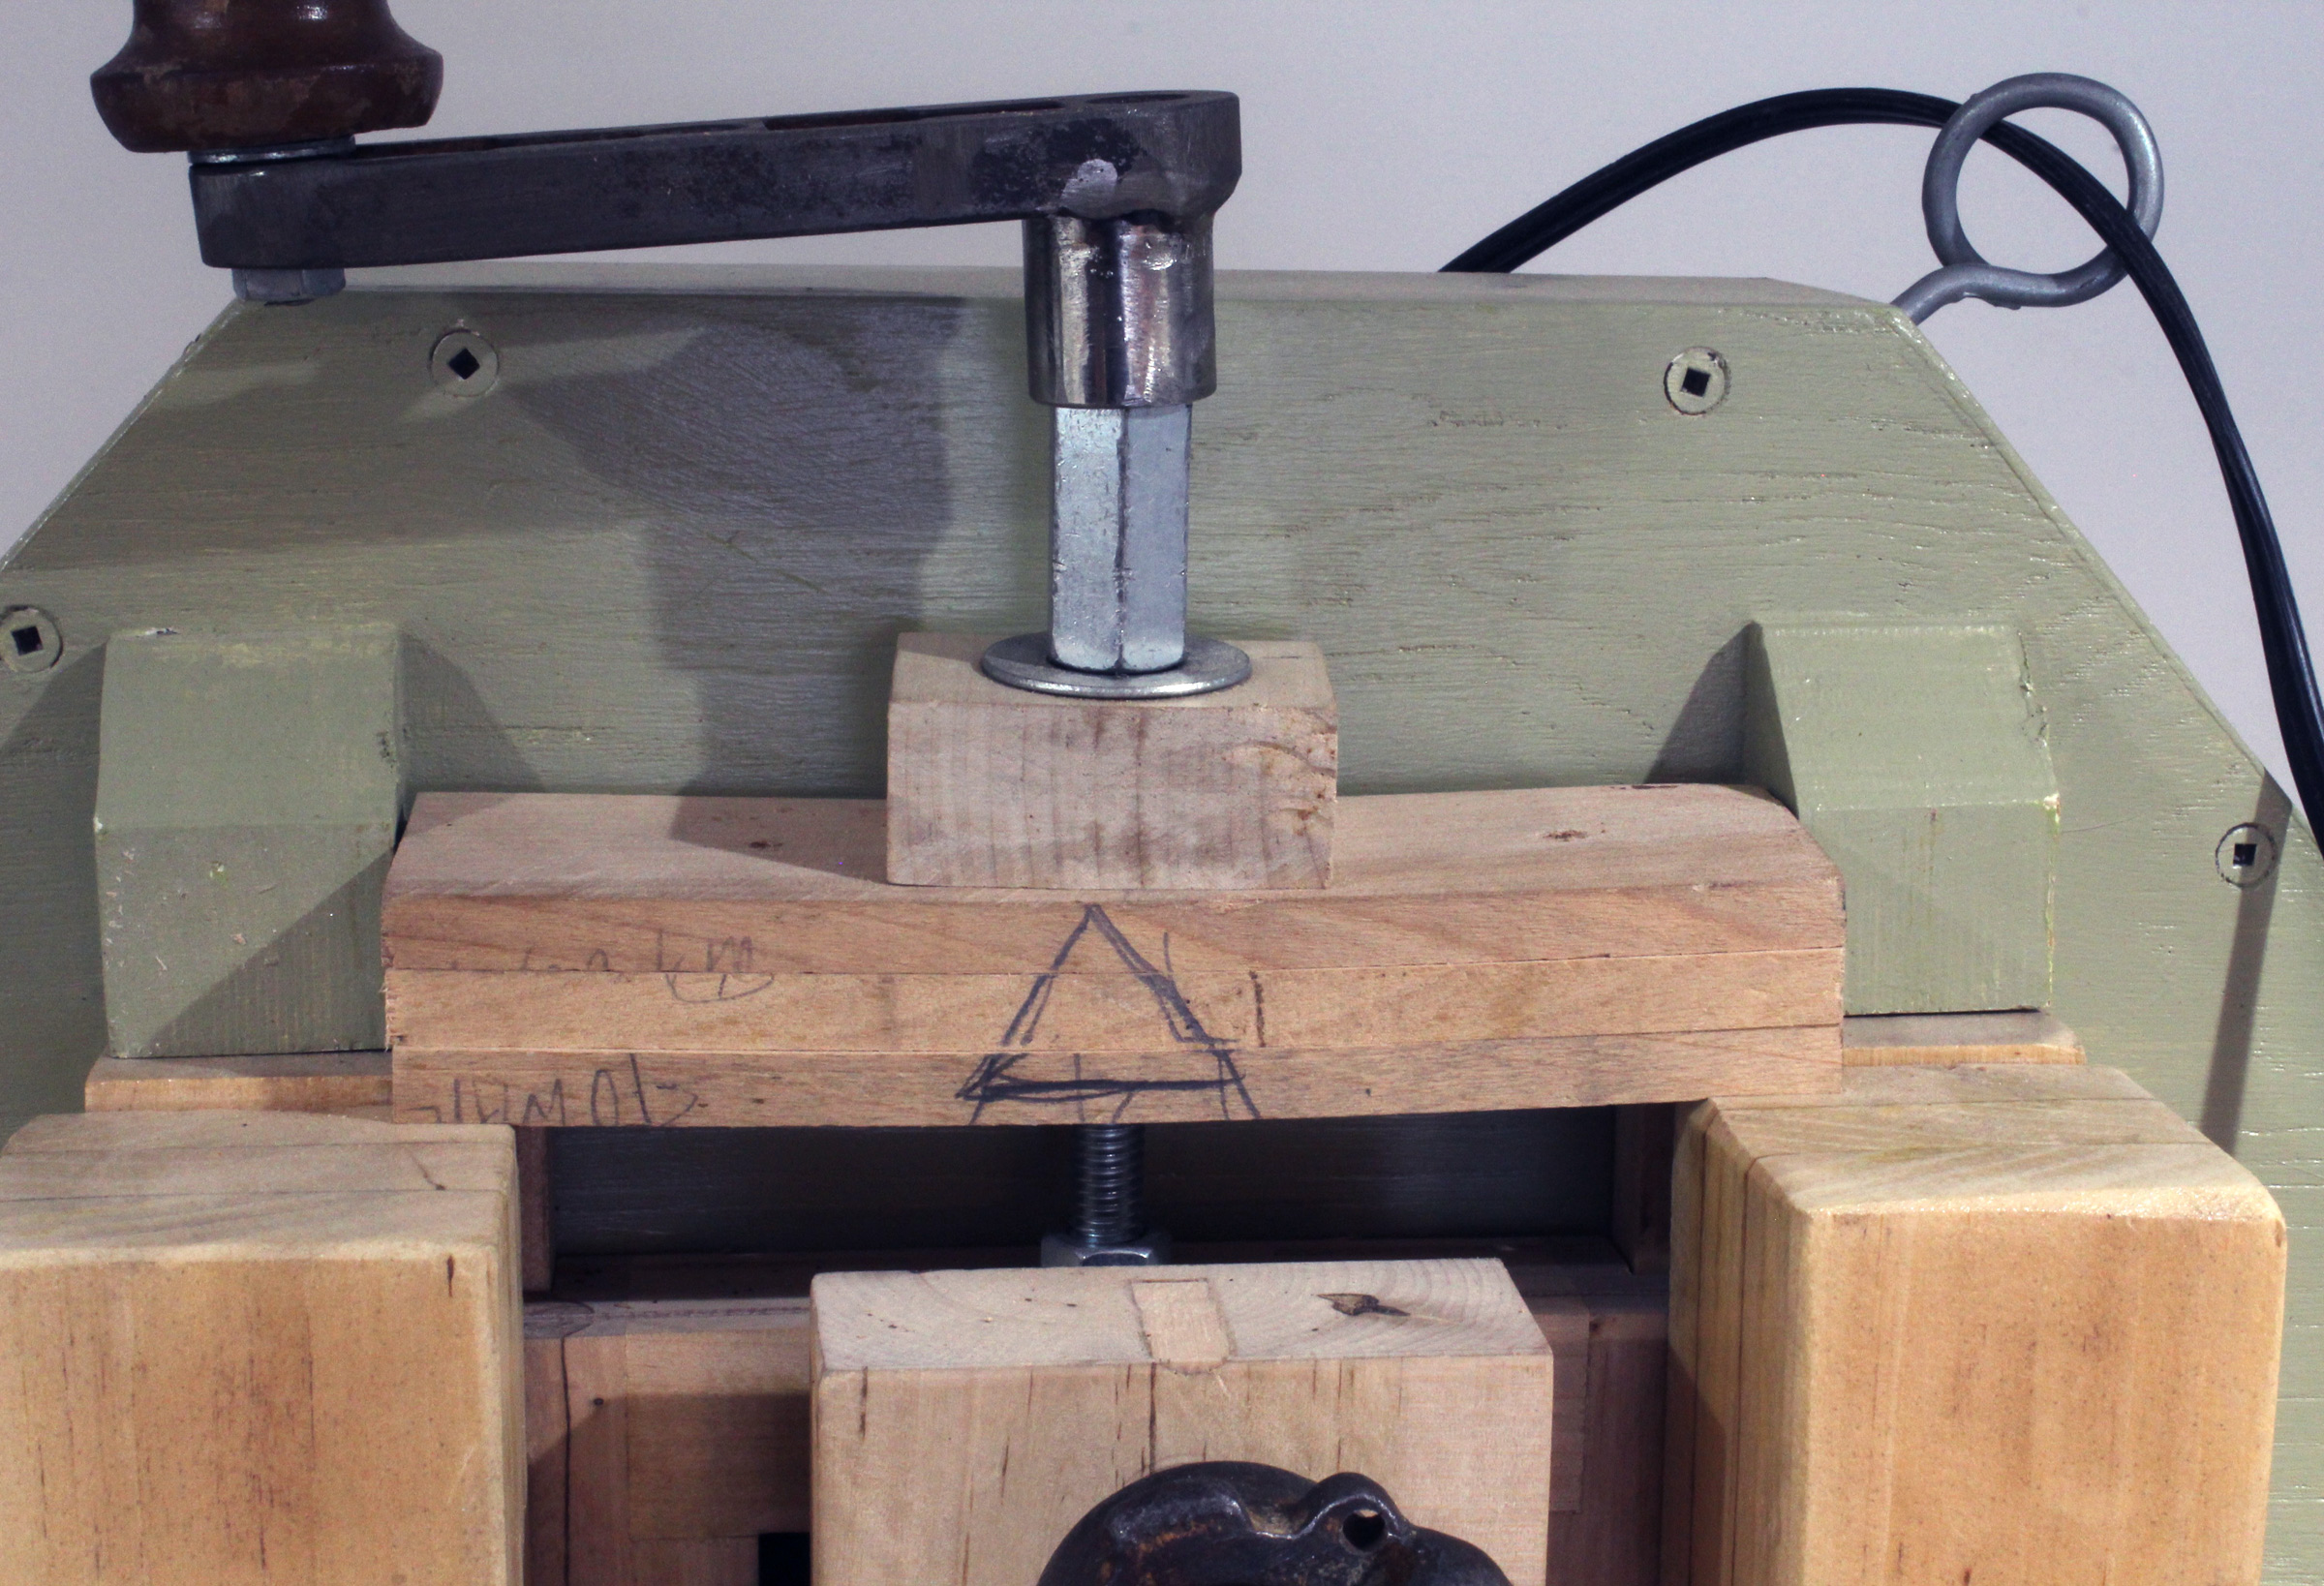
Blade tension is provided by three wooden leaf springs.
Building the bandsaw stretched out over months as I was working in spare time squeezed between family duties and a full-time job—but someone who could devote more time could surely run through the whole project in a week or two.
I added old toothbrushes to scrub the tires and keep them cleaner; Wandel favors letting a layer of sawdust build up on the tires as a way of preventing wear to the rubber and increasing the life of the inner-tubes. I’ve thought that a plexiglass window in the cover to observe blade tracking might be nice. I have also wondered if I could have installed some sort of simple belt-tensioning system other than the slightly elongated motor-mount bolt holes. The saw captures its own sawdust passively in a drawer built into the base. A bit of fine dust leaks out, but one could tweak the enclosures to plug leaks. A dust port for a vacuum would be easy to add.
Wandel’s plans are thorough and easy to follow, and the saw I ended up with is powerful and accurate. I enjoyed the build so much I may not be able to resist giving it away so I can build another one. I’m tempted to build Wandel’s larger 20″ saw next.![]()
Charles Kiblinger is an environmental consultant taking a sabbatical to pursue tinkering, woodworking, and making things in a one-car garage. His boating experiences have mostly been in canoes and kayaks. He lives in Seattle with his wife and son.
Plans for the 16″ bandsaw are available from Matthias Wandel for $21. Some instructions for his similar 20″ bandsaw are useful for assembling the 16” frame. His YouTube videos cover a wide range of interesting devices and useful tools. Searching for “bandsaw” in his channel will provide many useful videos. The current free version of Sketchup is very valuable. The older free versions are still available; Sketchup Make is best.
Is there a product that might be useful for boatbuilding, cruising, or shore-side camping that you’d like us to review? Please email your suggestions.


Very interesting. I have a 14″ bandsaw, but when I downsize, I’d like to get a small one. Ryobi used to make one, about 6″ or 7″ for making models. That would be ideal for me, if I can’t find one second hand. This saw above could possibly be downsized to what I’d like.
Years ago, “Gil Bilt” tools were made from kits produced by Gilliam Co. They used to advertise in “Popular Mechanics” and other magazines. They provided cast aluminum components, such as blade guides, trunnions, arbors, etc, and of course building plans. They offered parts for a tilting arbor table saw, a shaper, and a belt sander. Maybe others, too. I built their 18″ bandsaw, and made the frame stiffer by making the stem a 4 sided box instead of a 3 sided channel. It worked pretty well, but was limited by its somewhat flexible frame to light duty work. It had a height capacity of 12″, I believe. There was a 12″ model also, which my dad built.
Needing to cut some plate bronze, I rigged up a jack shaft and pulley system to reduce blade speed. With a bimetal, variable pitch blade I was able to cut not only the bronze, but mild steel and even stainless. I also cut aluminum, but don’t like using the fine tooth blade on it because it clogs too easily. Spritzing the blade with WD 40 helps keep the blade clean and lubricates the cut. I have since dedicated a 14″ Grizzley bandsaw to metal cutting, and use it very often. With a 1/4″ blade, it will cut intricate shapes. It will cut wood also, but very slowly.
I eventually sold the 18″ Gil Bilt.
I haven’t built any of Wandel’s tools, but he has intriguing designs. If I needed a 12″ jointer, I’d follow his idea of cannibalizing a 12″ or 13″ lunchbox planer for the working parts.
I already have a band saw, so I built the finger-joint jig. Mostly I use it for building my bee-hive boxes which have 3/4″ finger joints. With Matthias’ jig I can run 4 boards at a time, so in two passes I’m done. I can make those 3/4″ fingers in one cut with a dado blade or take longer and stress my saw less with a standard table saw blade. So there’s a lot of flexibility there. I have yet to find a reason to build Matthias’ Pantorouter, but I may some day.