When it came to selecting a tiller for the rudder of my Sooty Tern, UNA, I had to consider the two options designer Iain Oughtred provided for getting around the mizzen mast: a wishbone tiller that divides around the mizzenmast, or a Norwegian tiller, a short tiller set at a right angle to the rudder and operated with a push-pull stick. The former would provide the same feel as a conventional tiller; the latter would clearly take some getting used to.
Common to faerings (double-ended Scandinavian workboats), the Norwegian tiller traces its ancestry to the Vikings, and has been used for ages. It consists of the transverse tiller, an extension that reaches forward, and a flexible or articulated connection between the two. The connection can be simple or complex, anything from a rope with a tensioning cam cleat, two eyebolts interlocked, an oarlock modified with socket, or an off-the-shelf or custom-built tiller universal joint.
Unlike a conventional tiller that may sweep across the boat from rail to rail—and preventing anyone from sitting in the stern—the tiller extension of the Norwegian tiller moves only along its own length, taking up very little space even when the helm is put hard over in either direction. The helmsman can steer easily anywhere within reach of the extension. With an extra-long telescoping extension, it would even be possible to steer from the bow.
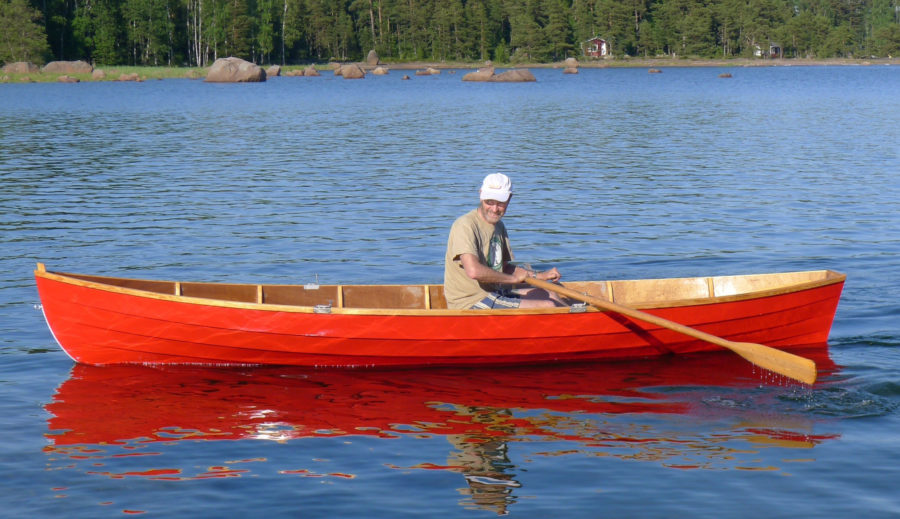
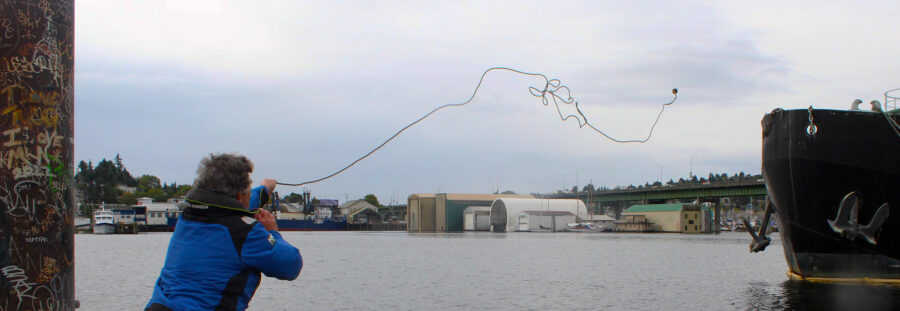
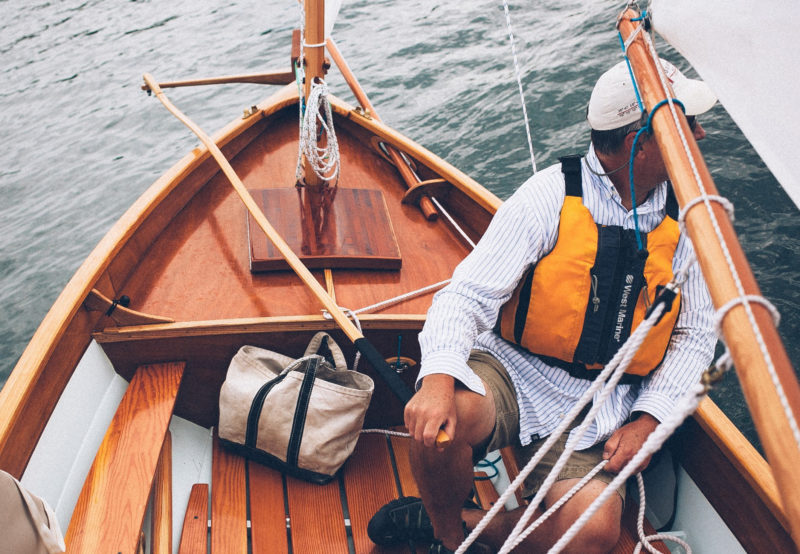 Leney Breeden
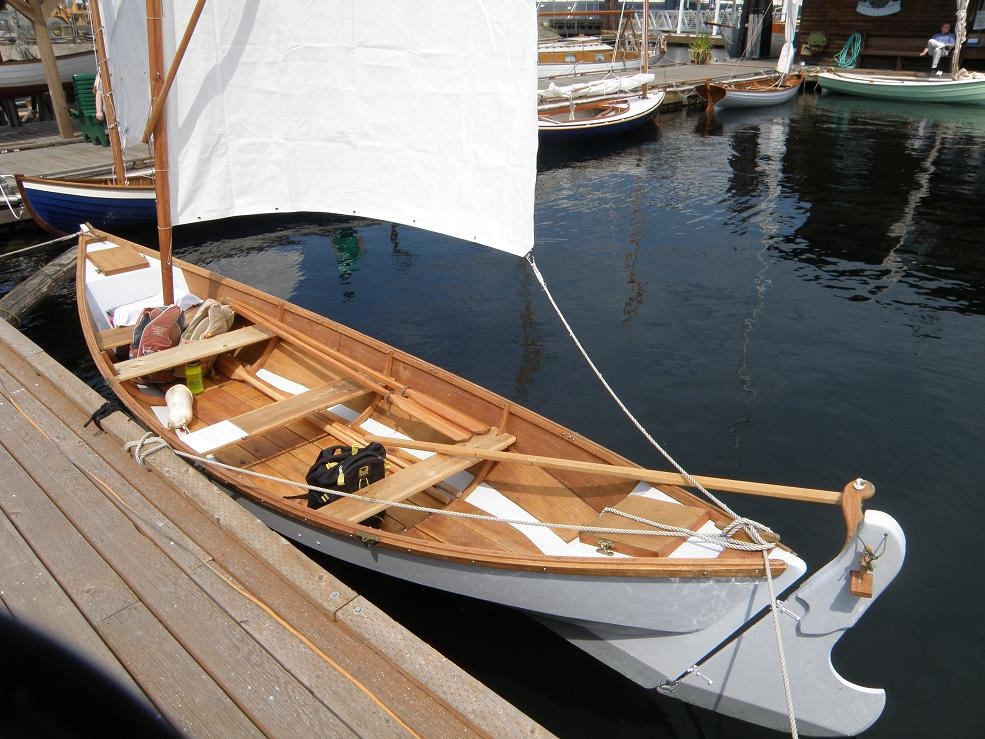
The author at the helm of his Sooty Tern, UNA. The laminated tiller extension arches over the gunwale to keep it from chafing the varnish.
The helmsman can shift his or her weight as the boat heels without the awkwardness that often comes with a conventional tiller. Sit, stand, hike out, or lie down; you’ll always find a comfortable way to hold the extension. If your boat has a neutral helm, you can rest the tiller extension in your lap, over the shoulder, or draped along the rail or held there to self-steer. At anchor it is readily lashed to the gunwale, out of the way.
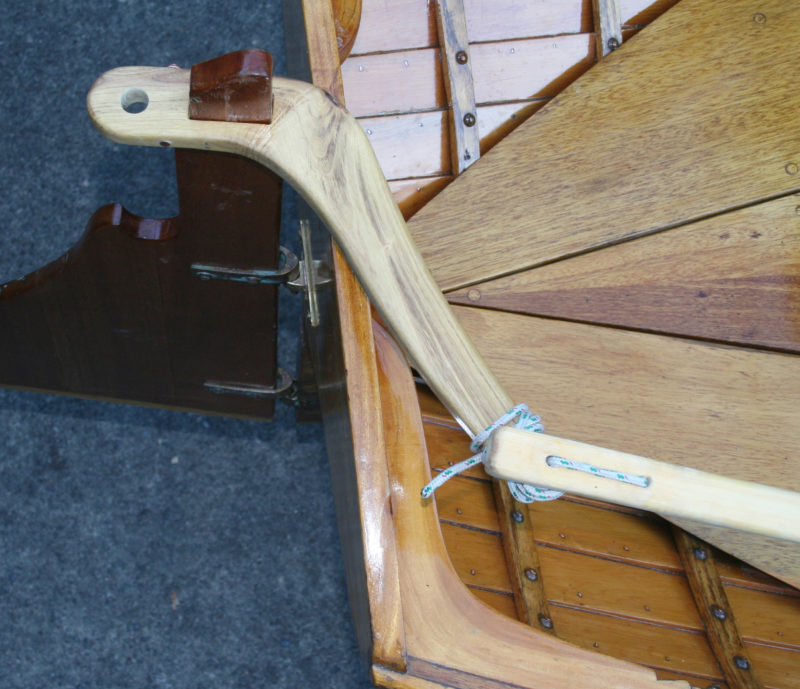
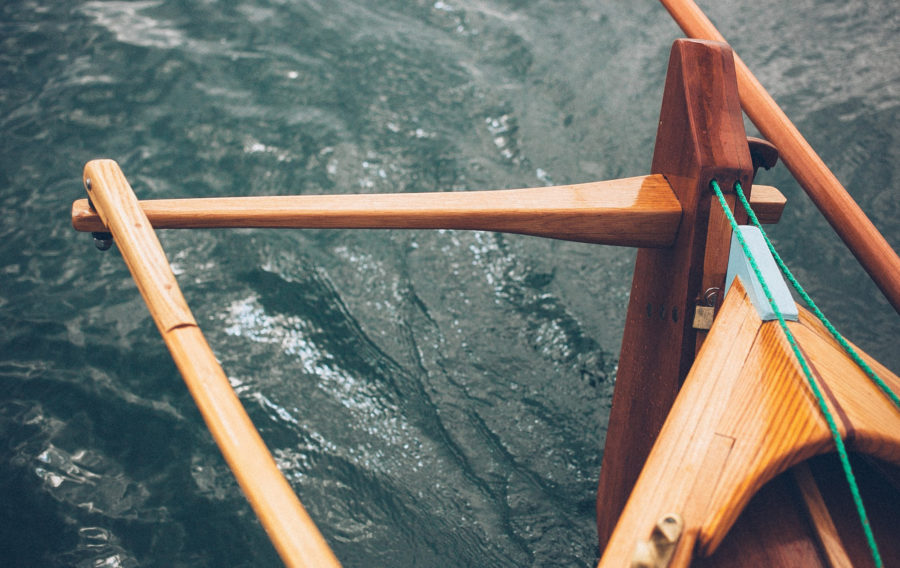
 Leney Breeden
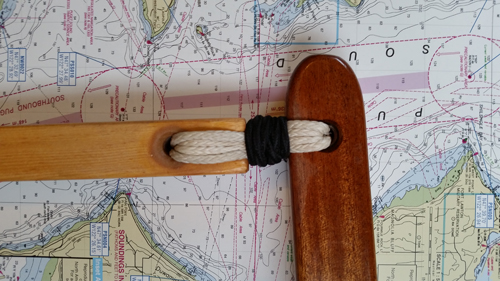
UNA’s tiller uses an eyebolt to create a pivoting connection to the extension. To the port side of the rudder you can see the head of the wedge that locks the tiller to the rudder. The mortise it gets tapped into extends slightly into the rudder head to ensure that the wedge will come home against the rudder for a tight connection.
The transverse tiller can be square and mortised through the rudder head with a wedge to hold it tight, or round and set in an easily drilled hole and allowed to rotate so only a simple hinge at the outboard end of the tiller is required to provide the lateral range of motion. Allow about 1″ of tiller length for every foot of boat. My 20′ boat has a 20″ tiller. Its leverage may be less than that of a standard tiller, but with balanced sail trim for a neutral helm, the short lever arm is quite adequate. The extension can be as long as is practical. UNA’s is 8′ long, short enough to clear the main sheet when tacking, and long enough to let me stretch my legs near amidships when sailing.
Using the tiller requires some mental rewiring, but after an hour it’ll become second nature. I dare say this tiller may be adapted to any well-balanced boat with a rudder. Tested for centuries, it really works. It was the best choice for my boat and has been a joy to use. Give one a try, and see what you’ve been missing.![]()
Eddie Breeden grew up racing Moths and Lasers and has a bit of offshore sailing—Bermuda and Block Island—to his credit. A native Virginian, he’s an architect, married with four children. As an amateur boatbuilder he has built a Sooty Tern, an Eastport Pram, a cedar-strip kayak and a couple of skin-on-frame kayaks, all described on his blog, Lingering Lunacy.
Editor’s notes:
When Eddie first suggested this article I didn’t believe that readers with boats already outfitted with conventional tillers would make the switch to a Norwegian tiller. At the time, I was refinishing a 14′ lapstrake Whitehall that I’d built and sold in 1984 and had come back to me after two owners. Its rudder was equipped with a yoke for steering while rowing and a tiller with a pivoting extension for sailing. When I got the boat back on the water and under sail, the tiller and extension proved awkward to use and prevented having anyone sit astern of me.
 Christoper Cunningham
This tiller, angled forward, made turning to starboard less positive than turning to port. I discarded it.
I made a transverse tiller with a locust crook and while it had a nice trim look, it put the pivot point of the extension forward of the rudder’s pintles and gudgeons, making turns to starboard (the tiller side) less effective. Even so, the Norwegian style was clearly an improvement over the conventional tiller.
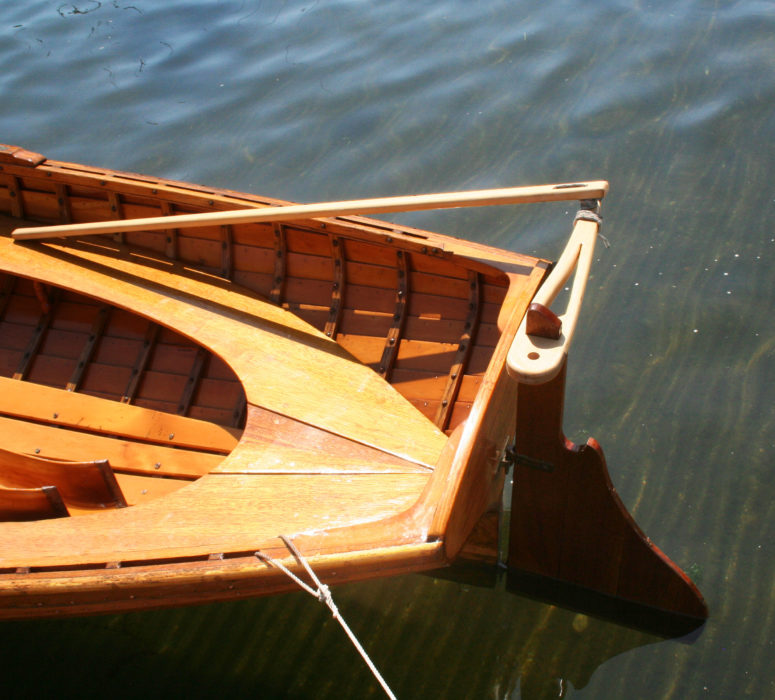 Christopher Cunningham
A straight transverse tiller long enough to extend past the transom opens up the stern sheets for a passenger. The hole in the tiller on the port side of the rudder head is for a flagstaff.
I made a second transverse tiller that was perpendicular to the rudder head and extended just past the transom. With it the steering was positive in both directions and I could sail steer a passenger in the stern.
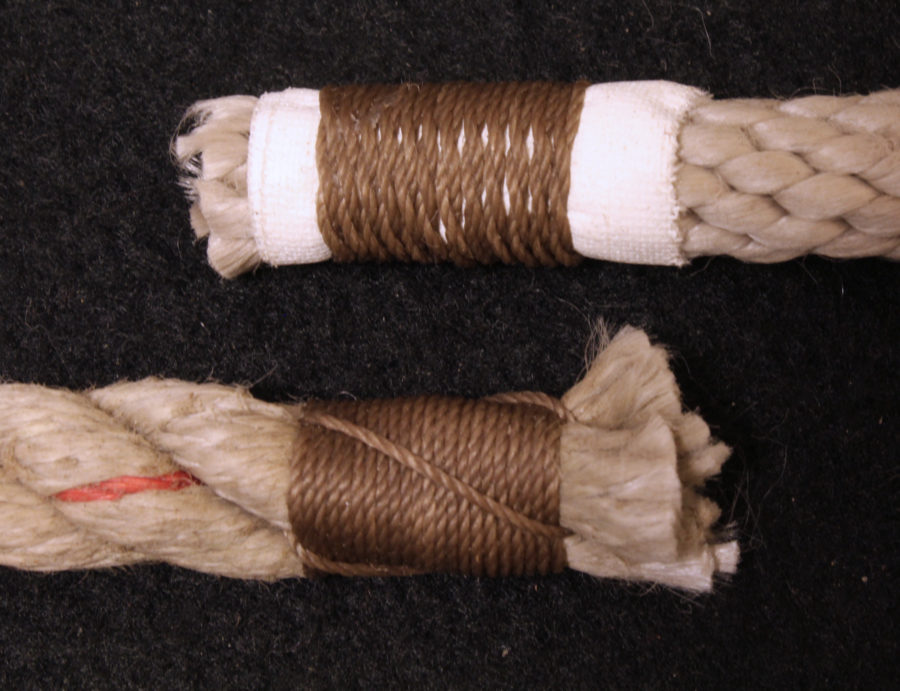
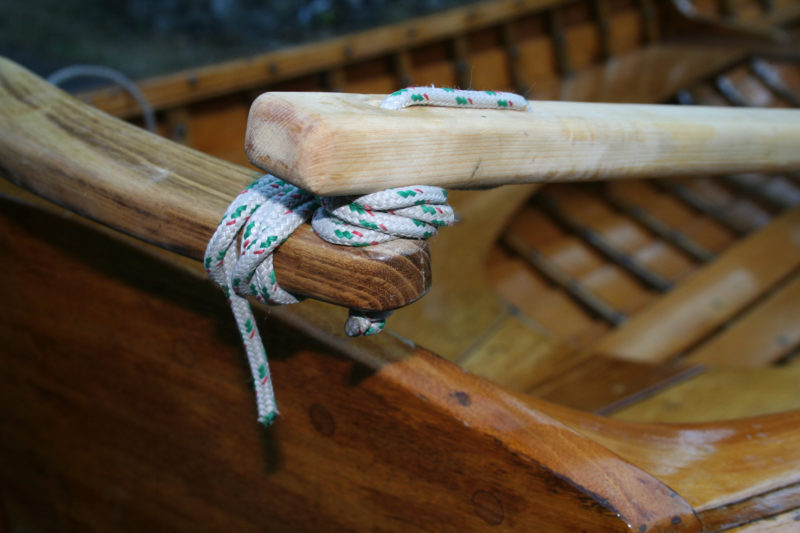 Christopher Cunningham
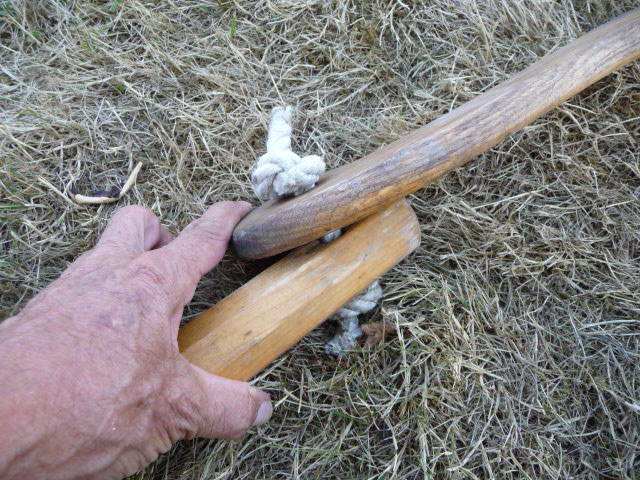
A simple rope connection can be made quite tight to eliminate play.
Some fans of the Norwegian tiller prefer not to use rope to join the extension to the tiller because it gets slack and introduces a disconcerting amount of play in the steering linkage. My solution is to thread a ¼″ braided nylon rope up through holes in the tiller and extension and pull it tight against a figure-8 knot on the end. The other end passes through a second hole in the extension, is drawn tight, and then wrapped around the cord between the tiller and extension. The wraps force those two pieces apart, putting the line between them under great tension. After a half-dozen turns, the tail end of the line gets half-hitched several times around the tiller, holding the tension. The wraps of the cord form a flexible but firm connection that has no detectible play. It’s cheap to make and easy to repair or replace in the field. —CC
You can share your tricks of the trade with other Small Boats Monthly readers by sending us an email.


Nice article.
It didn’t take that long, maybe less that a half-dozen times out on the boat to get used to the Norwegian tiller on my Arctic Tern, OSPREY. I did fiddle with the connection between stick and transverse tiller. A friend suggested the setup pictured below, which has worked out great. It is semi-permanent, in that it doesn’t detach without being cut with a knife. I find this perfectly acceptable as I wasn’t in the habit of removing it anyway. I just remove the whole tiller assembly and stow it in boat for transport—one less thing to assemble before launch.
The joint is AmSteel, a low-stretch line, tied in a alternating horizontal figure-eight between the stick and tiller and wrapped tightly with a short length of bungie. This method yields a strong, flexible connection with no slop. I suppose it is field serviceable in a pinch too.
James, I wish I’d been aware of that. Very elegant, simple, and inexpensive. Does it bind at all at extreme angles? I may use that on my next build! Thanks for sharing.
Bolger has pointed out that if the tiller arm is too short, it makes the steering stiffer, and subtle changes in rudder angle harder to achieve. I assume that it could lead to oversteering, which would yield a zig-zag course.
With a short tiller, steering would be stiffer, but I don’t think it would lead to oversteering and a zig-zag course. Formula-1 race cars have steering wheels that have a range of around 360°—one full turn from lock to lock—while ordinary cars may have 900°—2 ½ full turns—and yet still afford steering with a high degree of finesse. The more likely result of a short tiller and stiffer steering would be fatigue, especially if the boat is not well balanced and carries a heavy weather helm.
A tiller that’s too long may offer a lighter touch but require an awkwardly wide range of motion. In between there is a sweet spot. The tiller on my 19’ 6” Caledonia yawl spans 22 ¾” from rudder head to pivot point and seems to be just right for the boat. I use an adjustable (54” to 96”) aluminum painter’s pole for a tiller extension and often tuck the end in the crook of my knee to steer, leaving my hands free. The 6” I move my knee side to side is plenty of range for holding a steady course.
Christopher Cunningham, Editor, Small Boats Monthly
An additional refinement would be a line running from gunwale to gunwale over the tiller extension, long enough to allow full play for the extension, but short enough to keep it from trailing astern if accidentally dropped overboard. Retrieving a trailing tiller extension is always graceless, and sometimes dangerous.
Stephen, as long as this line is behind the helm, that would work fine. It can’t restrict extension movement while standing, so it needs to be loose. I have a small shock cord with bead on the aft starboard knee to grab and hold the extension when needed (see the first photo in the article). Quick and easy.—EB
Exactly what I was thinking of doing for my sailing kayak. Nice timing.
Great article! It brings back happy memories, as years ago I built a Faeroese four-man boat using a side tiller and tiller extension such as you’ve described. It worked exactly as you say; within an hour I wasn’t thinking about whether to push or pull it when trying to turn. One experience bears mentioning, however. The boat was sloop rigged with a spritsail and jib. I was a pretty green sailor (I still am), sailing by myself in some pretty choppy weather on Alaska’s Kachemak Bay. When I tried to come about, because I hadn’t made the tiller extension long enough (I think it was about 5′ long for the 20′ boat) I couldn’t get far enough forward to get some weight up in the bow, so the bow kept blowing off and not coming far enough into the wind to be able to come about. Eventually I ended up having to jibe, a scary proposition for me as I thought I might capsize. Previously, I’d always had someone forward manning the jib, which kept the bow down so it didn’t blow off when coming about and the boat would come about with no problem. At the time I couldn’t figure out a solution and put it down to my lack of experience in sailing. Later, I saw boats in museums in Norway with long tiller extensions, especially in the smaller faerings, some almost half the length of the boat, and a light went on in my head. Now it makes absolute sense to have an extension long enough to get your weight far enough forward so the boat is well balanced. Thank you for the great article.
John,
Cool story there. I took a friend out in UNA yesterday. It was funny to watch him struggle with pushing or pulling. He was quick to get it though.
As an aside, I was eyeing a 30′ flush deck double-ended wooden cutter last fall and she seemed to be the perfect boat to my liking, but she was not ready to be sold. I thought a Norwegian tiller would be perfect for her. On a boat without a centered mizzen mast you could have both options, Norwegian and conventional.
Eric,
Give one a try. I’m constantly finding new ways to hold or set the tiller for comfort. A big plus for long sails!
I use a short piece of rope with a knot at the top of the tiller and another beneath the extender. I do have to re-tighten it sometimes. I sometimes run the long handle thru a rowlock set in the stern rowing socket.
I have a 16′ outrigger sailing canoe, which has little room for swinging, sweeping things, though an Indonesia-style quarter-rudder (like that on a Viking ship) worked OK. But I shifted to the push-pull pole method. My brain, slower than others’, perhaps, took a couple of afternoon cruises to rewire itself. My first time out I capsized the outrigger when I pushed instead of pulled. I still sometimes have to remind myself after a long absence with a simple mnemonic, “Pull to Port” (my tiller is mounted on the port side of the rudder), but now I would never go back to a straight out tiller. Everything is so much better in a narrow double-ender, as the article tells. Fear not—when I get into a “regular” sail boat, all the tiller habits come right back. One thing I found better for me was a very long tiller. The one inch per foot of boat may be OK, but I put a 20″ tiller on my 16′ boat. This does two things: slows the rate of the tiller input so that you can recover from push-pull mistakes, a good attribute when learning the thing. My capsize was on the short tiller (about 14″) which gave a high rate and the boat was committed to the knockdown before my brain was. The mechanical advantage of a longer lever/tiller is better, and sailing for hours is no strain on the arm.
The only way to steer any sailing canoe and one I used exclusively on the 12-ft Bolger Peero that I sailed a whole lot on the Chesapeake. John Harris built two Peeros many years ago. The tiller also makes sense on longer boats with pointed sterns like the Bolger Birdwatcher. It makes a lot more sense than a conventional tiller.