 SBM
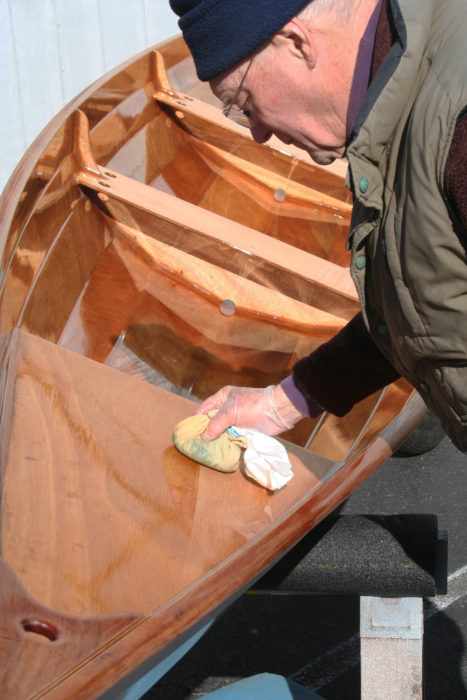
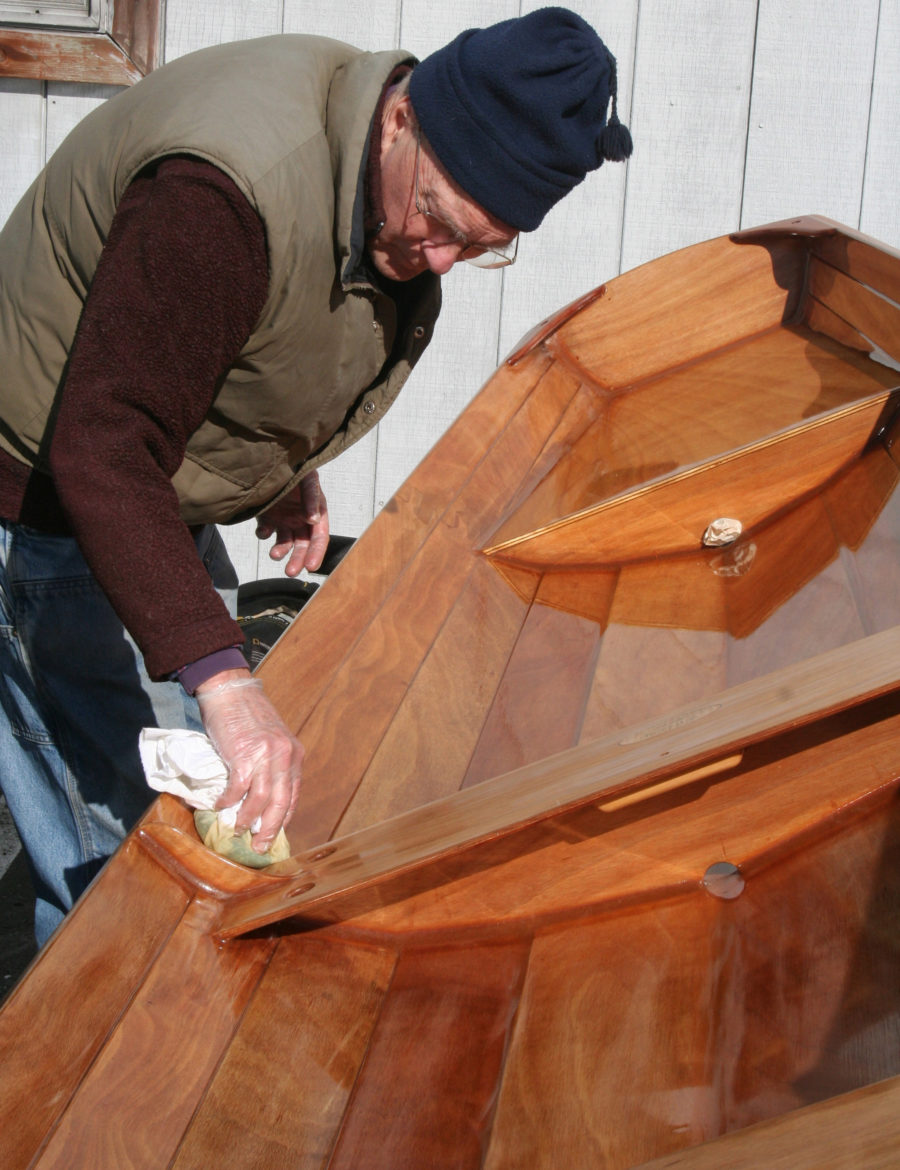
SBMThe varnish is wiped on in “panels.” Here Don is applying varnish to planks bordered by the thwart frame, transom, and stern seat compartment.
I had just finished again sanding out the wiggly, wavy, saggy results of my latest brushed varnish attempt on my wherry interior. I’d bought yet another quart of expensive marine spar varnish and was discouraged that I could expect most of it to wind up in the shop vacuum. In the dusty reaches of my memory I recalled an article by a furniture maker describing his efficient wipe-on varnishing technique. Not having that magazine readily at hand, I used this new-fangled thing called the Internet and found a posting about using a pad-wiping technique with thinned varnish. I did a cursory scan of the instructions, tried my hand at it, and much to my surprise, it worked! It wasn’t perfect but a major improvement over my brushed attempts. I’ve since refined the method to better apply it to the odd shapes of a boat, and present it here for others to experiment with and further refine. This treatise is for building up final smooth coats over epoxy or base coats of varnish. There are faster ways to build base coats that will fill wood grain.
Materials:
Marine spar varnish (I use Interlux Schooner.)
Brushing thinner (Interlux 333 thinner or this close approximation of it: 25% naphtha and 75% kerosene)
Small foam brushes
Paper towels (untextured or blue shop towels from hardware or auto parts stores)
Cotton T-shirt material (don’t use the kind with ribbed texture.)
Paper or plastic bowls (that are compatible with thinner)
Disposable plastic mixing containers with graduation marks
Stirring sticks
Fine 3M Scotch-Brite finishing pads (#7445, white in color)
Tack cloth
Paint filter funnels
Disposable gloves
Sand your base (epoxy or varnish) with at least 220-grit sandpaper—320 is less likely to cut through base coats. Wipe the dust away with a rag wet with thinner. Pour some varnish through a screened funnel into a mixing container, note or mark the volume, and add brushing thinner to double the volume for a 50/50 mix.
 SBM
SBMOn his worktable Don has thinners, disposable gloves, blue paper shop towels, squares of cotton cloth, paper bowls, and varnish.
Crumple a couple of paper towels, and smooth a third over one side of the wad. Place the smooth side of the wad on a roughly 10″ square of T-shirt cotton and gather the edges around the wad to create a handle. Smooth out wrinkles on the working face. Make two of these pads.
Set out three bowls. Pour a bit of thinned varnish into a “do” bowl and straight thinner into an “undo” bowl. A depth of ¼″ to 3/8″ is plenty. Leave the third bowl empty.
Wipe down several square feet of the area to be varnished with the tack cloth. Place one of the T-shirt pads into the “do” bowl and let it soak up a supply of thinned varnish. Press the pad into the empty bowl to squeeze out excess. The face of the pad should have an even, wet look without drips or thick glossy areas. Start at one end of a “panel”—a thwart, plank, whatever that is bordered by edges of some kind—and wipe smoothly in a straight line along the grain, leaving behind a thin but glossy film of varnish. Avoid lifting the pad from the surface by making turns at the ends of short strokes. For long areas, strokes all go the same direction. Overlap the strokes slightly for a consistent wet edge. As the varnish load is depleted, usually within a few strokes, reload and press out the excess as before.
 SBM
SBMWhile applying varnish to the panel over the forward compartment, Don missed a dime-sized patch of sanded varnish. Rather than go back over the area on this pass, he’d get it covered with the next coat.
Holidays? Not to worry, you’ll get them in subsequent coats. DO NOT, under penalty of endless frustration, go back into wet areas to correct them.
Before the varnish in the panel has time to begin flashing off its solvent, use a nearly dry foam brush to tip out the irregularities that occur at the ends of strokes or where you come up against obstructions. Start at the obstruction and very lightly tip back into the smooth area, lifting the brush off the surface as you go. You can also correct still-wet drips or sags with the foam brush. Use a wetter foam brush to get into corners or other areas the pad can’t reach, then blend back into pad-applied areas with the drier brush.
If the foam brush fails to fix errors of excess varnish while things are still wet, grab your undo pad, dip it into the thinner bowl, press it moist, and wipe down the whole panel. Recoat immediately.
Continue with adjacent panels. The goal is to keep a wet edge. The undo pad can refresh a wet edge that is at a panel perimeter such as a plank lap.
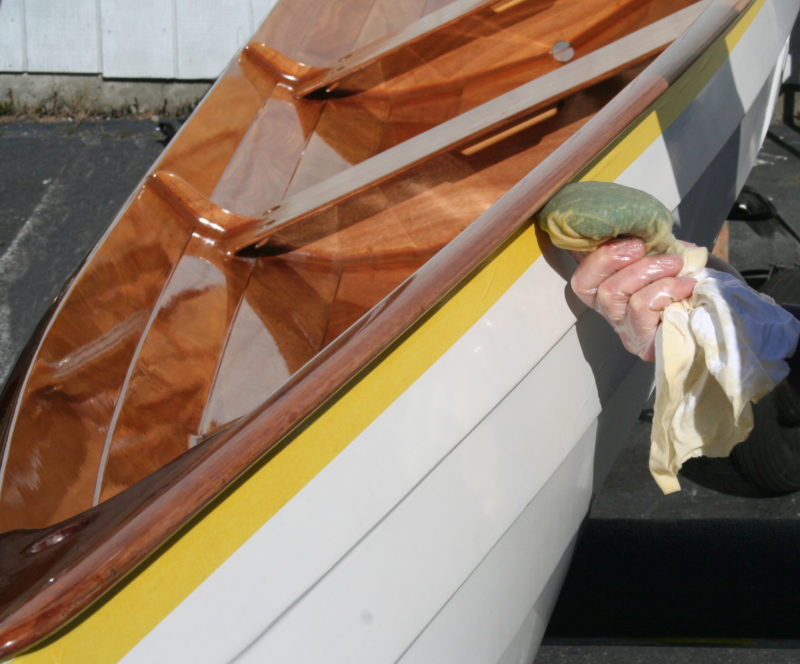
With masking tape protecting the painted hull, Don can move with the speed necessary to wipe on the thinned varnish.
When you’ve finished with the first coat, allow it to dry to the point the surface of the earliest coated area does not feel sticky to touch. That may be only an additional half hour or so depending on how long the whole job has taken. You may notice streaks or areas that are not as glossy. Don’t fret; these tend to decrease with subsequent coats. Some folks have seen a reduction in streaks by increasing the varnish in the thinned ratio.
Use a light touch with a 3M white scrubber to dislodge bugs and lint nits. If the scrubber drags, the varnish isn’t quite dry enough. Wipe with a tack rag in preparation for the next coat.
Make up a new varnish pad and repeat as above. You should be able to get at least three coats on in a day, roughly the same as one coat of brushed varnish. The next day you can continue without sanding unless there are drips, runs, or errors you want to correct. Eight to a dozen coats over two to three days will build up a nice depth of finish. Overall, wiped-on varnish will achieve good results with much less sanding labor. It takes practice and even though I don’t get perfect results, the boat will look pretty nice when I step back from my work. An annual light wet-sanding with 320-grit and three or so coats of wiping varnish should get you through a season depending on local conditions. Wiping-on varnish also works well for scratch repairs.![]()
Don Aupperle apparently inherited his fascination with boats from his father, and has cobbled together many, beginning with an Eastern Idaho canal sailing raft made of borrowed fence posts and advancing through wood-and-canvas kayaks to several plywood sailboats, graduating only recently to current stitch-and-glue technology. A Seattle resident, his day job is product design. Or is really it maintaining his 39′ cruising sailboat?
Editor’s note:
I used Don’s method to apply new varnish to the exterior of a lapstrake Whitehall I built in 1983. The boat had been well cared for, but it was showing signs of age. The existing varnish was in good shape and I chose not to go to bare wood to smooth the surfaces. I used odorless mineral spirits for a solvent—it was what I had on hand—and started out with a 50/50 mix with West Marine Admiral’s varnish. Wiping varnish on was much faster than brushing, and the thinned varnish as it came from the pad was much less likely to sag or drip than straight brushed-on varnish. I had recently refinished a dory with brushed varnish and the fresh coat would often look fine before I left it to dry, but an hour later sags appeared. The wiping varnish goes on much thinner and dries much faster, so sags were an infrequent occurrence. It also greatly reduced the time during which dust and bugs could get caught on the surface. When I did get sags, they’d be dry and sandable the next day. Sags of brushed-on varnish never seemed to cure; they could stay gummy for days if not weeks. I applied three coats of wiping varnish per day for three days. I was getting matte streaks and increased the amount of varnish in the mix. That and better lighting greatly reduced the problem. I was pleased with the results, easily the best varnish job I’ve ever done.
You can share your tricks of the trade with other Small Boats Monthly readers by sending us an email.


That’s the exact way I was introduced to French polishing many years ago by an old furniture craftsman; and I never considered it for finishing varnish on a boat. If you have never seen a French Polish process, look online. Its fascinating to see a mirror finish applied with rubbing cloths. Great article!
Niall, you are right, the pad applicator is a lot like French Polish (FP). It strikes me that wipe-on varnish is a cross (ignoring the leap between chemistries) between FP and brushed varnish. I’ve not tried the centuries-old FP shellac process where subsequent coats of alcohol dissolved shellac are rubbed into and slightly soften the existing finish to build up and smooth to an exquisite mirror finish through many many coats. The operative word appears to be “polish.” In contrast, wiping varnish puts down a film—extremely thin by brushing standards—that does not noticeably soften the underlying coats although it may chemically bond with the surface. Since it is a film, I’ve not been able to go back into wet areas as demonstrated by those doing FP, although I have read of using a “bus-boy” wipe. Well, bus boy didn’t work for me, but did lead to the development of the undo pad! As mentioned in the article the wipe on finish won’t net a flawless surface but it does positively help the balance of the age old dilemma: Sail or varnish?
I was taught a similar technique by a German fine-furniture maker. The “varnish” was airplane dope (the treatment used on cloth wings and fuselages) diluted with lacquer thinner. I applied the dope to gun stocks with fine steel wool and could achieve a perfect finish. I never thought of using this method for boats. I’ve been finishing my boat with the best exterior house paint from Home Depot.
My boat varnishing was over for the season when I found this article, so I decided to put the technique to use on an antique oak dining table I needed to refinish. My first results using Le Tonkinois #1 varnish and generic thinner were not so good—it dried very unevenly and didn’t seem to build nicely. After a couple of these patchy coats I gave it a good sanding and started over (all in the name of practicing for next season’s varnish on the boat). This time I tried the 1:3 ratio of naphtha to kerosene to make the thinner, and the results are great. This mixture went on evenly, dried quickly, recoated smoothly, and has a consistent gloss. My suggestion: Pay attention to your varnish and thinner combination to find one that works.
I used the same mix to varnish the deeply fluted legs, this time using a good brush to get into the bottoms of the flutes. The results are good this way, too. Don’t be afraid to brush the thin solution to get to the desired end. I stood the legs on end and spun them to brush the round bits. I’d like to rig something like that for spars!
I like to plunge in and get the job done and more often than I’d care to admit, I regret trying a new coating or application method without having done a test panel. I had originally used Don’s method with a mix of varnish and mineral spirits and got good results. Recently I used Interlux 333 brushing liquid instead of thinner. I was planning on recoating in an hour or so as I had previously, but the varnish mixture needed to cure overnight for it to set up enough for recoating. A small mix and a test panel would have saved me the long wait and I would have finished the job much sooner. Christopher Cunningham, Editor, Small Boats Monthly